Infrastructure and Deployment
- Understand principles and processes for building and managing code, infrastructure and deployment
- Container-based infrastructure and Docker
- Continuous integration
- Continuous delivery and continuous deployment
- VSCode
- Docker Desktop (version 4.18.0)
Managing code deployment is an important part of a software developer’s job. While this can also be seperated into another profession – a DevOps engineer – it is vital to be able to understand and carry out code deployment, as, depending on the company, this role may fall onto software developers.
Deploying code
The ways we deploy software into live environments are varied. Legacy applications might run on manually configured on-premises servers, and require manual updates, configuration adjustments and software deployments. More modern systems may make use of virtual machines – perhaps hosted in the cloud – but still require an update process. Configuration management tools, introduced in the previous module, can help automate this, but do not completely remove the risks of configuration drift.
In this module we take things a step further, first introducing the concepts of immutable infrastructure and infrastructure as code.
We will take a deep dive into containers, and see how this technology bundles an application, its environment and configuration into a standalone, immutable, system-agnostic package. We’ll gain hands-on experience with Docker, a popular piece of container software.
Immutable Infrastructure
Mutable versus immutable infrastructure
At a high level, the difference can be summarised as follows:
- Mutable: ongoing upgrades, configuration changes and maintenance are applied to running servers. These updates are made in place on the existing servers. Changes are often made manually; for example, by SSH’ing into servers and running scripts. Alternatively, a configuration management tool might be used to automate applying updates.
- Immutable: once a server is set up, it is never changed. Instead, if something needs to be upgraded, fixed or modified in any way, a new server is created with the necessary changes and the old one is then decommissioned
| Mutable Servers | Immutable Servers |
|---|---|
| Long-lived (years) | Can be destroyed within days |
| Updated in place | Not modified once created |
| Created infrequently | Created and destroyed often |
| Slow to provision and configure | Fast to provision (ideally in minutes) |
| Managed by hand | Built via automated processes |
A common analogy that is used to highlight the difference between mutable and immutable infrastructure is that of “pets versus cattle”. Mutable infrastructure is lovingly cared for, like a pet, with ongoing fixes and changes, careful maintenance, and treated as “special”. Immutable infrastructure is treated with indifference – spun up, put into service, and removed once no longer required; each instance is essentially identical and no server is more special than any other.
You’ll probably hear the “snowflakes versus phoenixes” analogy, too. Snowflakes are intricate, unique and very hard to recreate. Whereas phoenixes are easy to destroy and rebuild; recreated from the ashes of previously destroyed instances!
We will be focusing on immutable infrastructure in this module. This is because it has several benefits, including repeatable setup, easier scaling and ease of automation.
Due to the short living qualities of immutable infrastructure, we require a reproducible configuration to create this infrastructure. This includes the three basic steps:
- Document the requirements to create the infrastructure
- Create scripts that will build and assemble the infrastructure
- Automate the process
The configuration scripts and setup documentation should be stored in source control. This process is referred to as Infrastructure as Code or IaC. In this module we will learn about Dockerfiles which is an example of IaC.
Successful immutable infrastructure implementations should have the following properties:
- Rapid provisioning of new infrastructure. New servers can be created and validated quickly
- Full automation of deployment pipeline. Creating new infrastructure by hand is time consuming and error prone
- Stateless application. As immutable infrastructure is short lived and can coexist, they should be stateless. This means that if state is required, a persistent data layer is needed.
Containers
Containers are isolated environments that allow you to separate your application from your infrastructure. They let you wrap up all the necessary configuration for that application in a package (called an image) that can be used to create many duplicate instances. Docker is the most popular platform for developing and running applications in containers, and has played a key role in the growth of immutable infrastructure.
Containers should be:
- Lightweight – with much smaller disk and memory footprints than virtual machines.
- Fast – new containers start up in milliseconds.
- Isolated – each container runs separately, with no dependency on others or the host system.
- Reproducible – creating new containers from the same image, you can guarantee they will all behave the same way.
Together, these features make it much easier to run many duplicate instances of your application and guarantee their consistency. Since they take up significantly fewer resources than virtual machines, you can run many more containers on the same hardware, and start them quickly as needed. Containers are also able to run virtually anywhere, greatly simplifying development and deployment: on Linux, Windows and Mac operating systems; on virtual machines or bare metal; on your laptop or in a data centre or public cloud.
The reproducibility that containers provide — guaranteeing that the same dependencies and environment configuration are available, wherever that container is run — also has significant benefits for local development work. In fact, it’s possible to do most of your local development with the code being built and run entirely using containers, which removes the need to install and maintain different compilers and development tools for multiple projects on your laptop.
This leads to the concept that everything in the software development lifecycle can be containerised: local development tooling, continuous integration and deployment pipelines, testing and production environments. However, that doesn’t mean that everything should be containerised – you should always consider what the project’s goals are and whether it’s appropriate and worthwhile.
Terminology
Container: A self-contained environment for running an application, together with its dependencies, isolated from other processes. Containers offer a lightweight and reproducible way to run many duplicate instances of an application. Similar to virtual machines, containers can be started, stopped and destroyed. Each container instance has its own file system, memory, and network interface.
Image: A sort of blueprint for creating containers. An image is a package with all the dependencies and information needed to create a container. An image includes all the dependencies (such as frameworks) as well as the deployment and execution configuration to be used by a container runtime. Usually, an image is built up from base images that are layers stacked on top of each other to form the container’s file system. An image is immutable once it has been created.
Tag: A label you can apply to images so that different images or versions of the same image can be identified.
Volume: Most programs need to be able to store some sort of data. However, images are read-only and anything written to a container’s filesystem is lost when the container is destroyed. Volumes add a persistent, writable layer on top of the container image. Volumes live on the host system and are managed by Docker, allowing data to be persisted outside the container lifecycle (i.e., survive after a container is destroyed). Volumes also allow for a shared file system between the container and host machine, acting like a shared folder on the container file system.
A lot of this terminology is not specifc to Docker (such as volumes), however depending on the containerisation used, the definition may change.
Docker
Docker is an open source software program designed to make it easier to create, deploy and run applications by using containers.
Docker is configured using Dockerfiles. These contain configuration code that instructs Docker to create images that will be used to provision new containers.
Docker consists of the following key components. We’ll discuss each in detail:
- Docker objects (containers, images and services)
- The Docker engine – software used to run and manage a container
- Docker registries – version control for Docker images (similar to git).
Images
If you’ve ever used virtual machines, you’ll already be familiar with the concept of images. In the context of virtual machines, images would be called something like “snapshots”. They’re a description of a virtual machine’s state at a specific point in time. Docker images differ from virtual machine snapshots in a couple of important ways, but are similar in principle. First, Docker images are read-only and immutable. Once you’ve made one, you can delete it, but you can’t modify it. If you need a new version of the snapshot, you create an entirely new image.
This immutability is a fundamental aspect of Docker images. Once you get your Docker container into a working state and create an image, you know that image will always work, forever. This makes it easy to try out additions to your environment. You might experiment with new software packages, or make changes to system configuration files. When you do this, you can be sure that you won’t break your working instance — because you can’t. You will always be able to stop your Docker container and recreate it using your existing image, and it’ll be like nothing ever changed.
The second key aspect of Docker images is that they are built up in layers. The underlying file system for an image consists of a number of distinct read-only layers, each describing a set of changes to the previous layer (files or directories added, deleted or modified). Think of these a bit like Git commits, where only the changes are recorded. When these layers are stacked together, the combined result of all these changes is what you see in the file system. The main benefit of this approach is that image file sizes can be kept small by describing only the minimum changes required to create the necessary file system, and underlying layers can be shared between images.
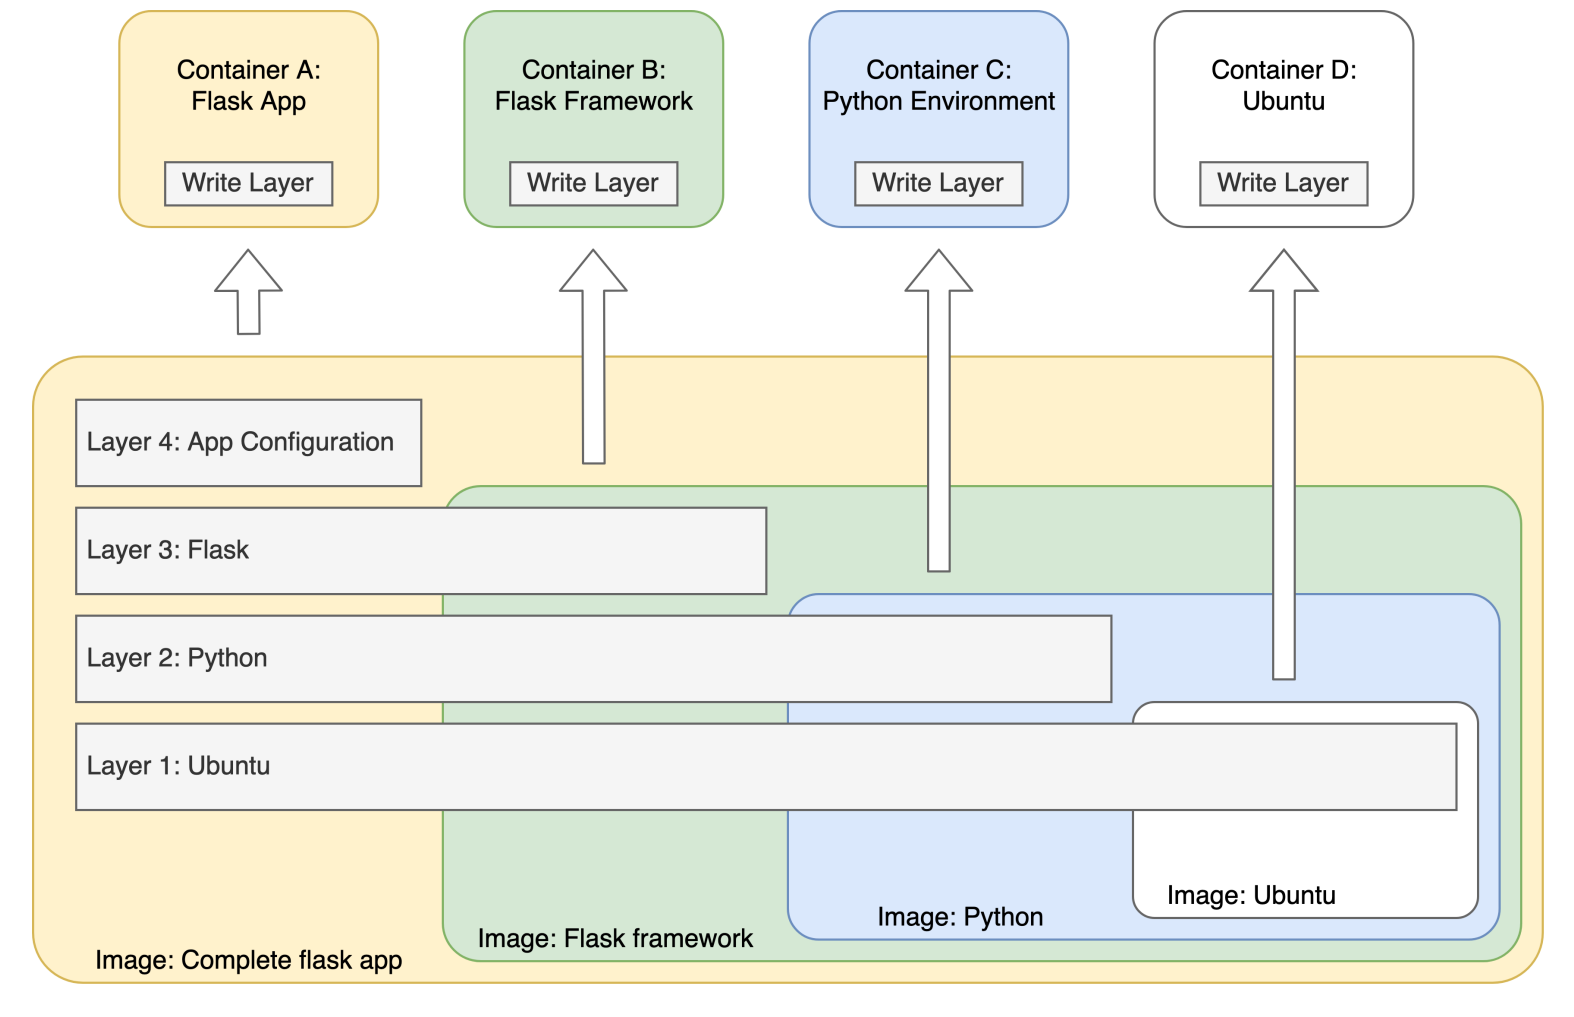
The layered file system also allows programs running in a container to write data to their container’s file system (remember that the file system layers of the image are read-only, since the image is immutable). When you create a new container, Docker adds a new writable layer on top of the underlying layers from the image. This layer is often called the “container layer”. All changes made to the running container, such as writing new files, modifying existing files, and deleting files, are written to this thin writable container layer. This also minimises the disk space required to create many containers from the same image – only the thin writable layer for each container needs to be created, while the bulk of the file system is shared from the read-only image layers.
Because of their immutability, Docker images are uniquely tagged so that you can choose a specific version/variant when creating a container. Image tags will often include a version number that corresponds to the version of the main application they provide. For example, images for Java or Python languages are typically tagged with the version of the language runtime that they provide (python:2.7, python:3.6, openjdk:8, etc.). You can think of an image tag as equivalent to a git branch or tag, marking a particular unique version of an application. If a tag is not specified then the default latest tag is used. This applies when building a new image or when creating a container from an existing image. Multiple tags can also refer to the same image, for example my_app:2.3 and my_app:latest could both refer to the newest build you created for an image of your app. There are a number of curated official images that are publicly available. These images are designed to:
- Provide essential base OS images (e.g. ubuntu, centos) that serve as the starting point for the majority of users.
- Provide drop-in solutions for popular programming language runtimes, data stores, and other services, such as Ruby, Python, MySQL or Elasticsearch.
- Exemplify Dockerfile best practices and provide clear documentation to serve as a reference for other Dockerfile authors.
- Ensure that security updates are applied in a timely manner.
One of the key benefits of Docker images is that they allow custom images to be created with only minimal size increase from existing base images.
Images are created in a layered manner, in which a new image can be created upon an existing image by adding another layer that contains the difference between the two. In contrast, the image files of different VMs are isolated from each other, so each must contain a full copy of all the files required by its operating system.
Containers
We’ve already discussed containers in general, and mentioned them in the context of Docker images. In Docker, a container runs a single application, and a full service would typically consist of many containers talking to each other, and the outside world. A container is made from an image. The image is a template. A container will add a writable layer on top of the image that stores all file modifications made within the container. A single image can be used to create many identical containers, and common layers will be shared between containers to reduce disk usage. You can make a container from the command line:
docker run <image_name>
Just like an application, you can supply containers with runtime parameters. These are different from build-time parameters included in images. Runtime parameters are often used to inject secrets or other environment-specific configuration. The example below uses the --env option create a container and add a DB_USER environment variable. This variable can be used by the application running in the container.
docker run --env DB_USER=<database_user> <image_name>
Docker containers may host long-lived applications that only terminate on an unhandled exception or shutdown command (e.g. a web server), or scripts that exit when complete. When a container stops running – either through an error or successful completion – it can either be restarted or discarded. We could restart the container ourselves using docker restart. We can also get the Docker container to restart itself in case of unhandled exceptions, through docker run --restart=always or docker run --restart=unless-stopped. However, eventually all containers must die.
In this way, you can think of a container itself as ephemeral, even if the application it hosts is long-lived. At some point a container will stop, or be stopped, and another will be created to continue running the same application. For this to work without data loss, containerised applications must be stateless. They should not store persistent data within the container, as the container may be destroyed at any time and replaced by another. Any data on the writable container layer is lost when this happens. The distinction between an ephemeral container, and the persistent service that the container provides, is essential to understanding how containerised services can scale to meet demand. Stateless applications are necessary if we want to treat Docker containers as immutable infrastructure (which we certainly do, for all the scalability and maintainability reasons discussed previously). To achieve this, data storage should happen outside the container – either through a network connection (e.g. a cloud database) or on the local filesystem stored outside the container. This can be achieved through use of volumes or bind mounts.
Volumes and Bind Mounts
Normally, a container only has access to the files copied in as part of the image build process. Volumes and bind mounts allow container to access external, shared file systems that persist beyond the container lifecycle. Because these file systems are external to the container, they are not destroyed when a container is removed. The same volume or bind mount can also be attached to multiple containers, allowing data sharing.
- A bind mount attaches an existing file or directory from the host machine to a container. This is useful for sharing pre-existing data or host configuration files with containers.
- A volume creates a new Docker managed file system, and attaches it to containers. Volumes are more flexible than bind mounts for general purpose data storage, and more portable as they do not rely on host system file permissions.
Volumes are the preferred tool for storing persistent local data on containerised applications. A common use case is a containerised database server, where the database server itself exists within Docker, while the data files are stored on a volume. In another use case, a volume might be used to allow a code development container to access source files stored, and edited, on the host device file system.
You can create a bind mount or volume using the --mount option:
# Mounts the host /shared/data directory to /data within the container.
$ docker run --mount type=bind,src=/shared/data,dst=/data <my_image>
# Attach a volume called 'my-data-volume' to /data within the container.
# If the volume already exists it will be re-used, otherwise Docker will
# create a new volume.
$ docker run --mount type=volume,src=my-data-volume,dst=/data <my_image>
You may also see volumes added using the --volume or -v options. This mounts a host directory to a container in a similar fashion to --mount type=bind. In general, --mount is preferred. You can read more about the differences in the Docker documentation.
Networks and Port Binding
Docker containers usually need to communicate with each other, and also send and receive network requests over the wider network via the host machine. Networking Docker containers is complex, and for all but the most simple use-cases you’ll rely on container orchestration tools to help manage this at a higher level. We will introduce the basic Docker networking principles here, and come back to orchestration tools in a later module.
Docker manages its own virtual network, and assigns each container a network interface and IP address within that network. You can configure how, and even if, Docker creates this network. For further details on Docker’s low-level networking architecture, please refer to the official documentation.
By default, Docker creates a bridge network where all containers have unrestricted outbound network access, can communicate with other containers on the same Docker host via IP address, and do not accept any requests from the external (i.e. host) network and wider internet.
To receive inbound network requests, Docker needs to forward traffic on a host machine port to a virtual port on the container. This port binding is configured using the -p (publish) flag during docker run. The port binding example below specifies that incoming traffic to port 80 on the host machine (http traffic) should be redirected to port 5000 inside the container, where a web server may be listening.
# Map host machine port 80 to port 5000 inside the container.
$ docker run -p 80:5000 <my_image>
# The Docker run command can be used to publish multiple ports, limit port
# bindings to specific protocols and bind port ranges.
Occasionally, a container will expose many ports and it won’t be feasible, or desirable, to manually map them all using the publish option (-p) of docker run. Instead, you would like to automatically map every port documented in the Dockerfile.
You can use the -P flag on docker run to publish all ports documented by EXPOSE directives in the Dockerfile. Docker will randomly bind all documented container ports to high-order host ports. This is of limited use, as the user has no control over the host ports bound. It is generally preferable to specify port bindings explicitly using multiple -p flags. Remember, -p and -P have very different behaviour.
The Docker Engine
The Docker Engine provides most of the platform’s key functionality and consists of several main components that form a client-server application:
- A long-running program called a daemon process that acts as the server (the
dockerdcommand) - A REST API specifying the interface that programs can use to talk to the daemon and instruct it what to do
- A command line interface (CLI) client (the
dockercommand) that allows you to interact with the daemon
The daemon is responsible for creating and managing Docker objects, such as images, containers, networks and volumes, while the CLI client (and other clients) interact with the daemon via the REST API. The server-client separation is important, as it allows the Docker daemon and Docker CLI to run on separate machines if needed.
You can read more about Docker’s underlying architecture here.
Using Docker
While there is a healthy ecosystem of published Docker images you can use to run standard installations of many applications, what happens when you want to run your own application in a container? Fortunately, it’s pretty straightforward to build your own custom images by creating a Dockerfile.
A Dockerfile is a recipe containing instructions on how to build an image by copying files, running commands and adjusting configuration settings. These instructions are applied on top of an existing image (called the base image). An image can then be built from the Dockerfile using the docker build command. The result is a new Docker image that can be run locally or saved to a repository, such as Docker Hub (see below).
When building an image, Docker effectively runs each of the instructions listed in the Dockerfile within a container created from the base image. Each instruction that changes the file system creates a new layer and the final image is the combination of each of these layers.
Typical tasks you might perform in a Dockerfile include:
- Installing or updating software
packages and dependencies (using
apt-get,pipor other package manager) - Copying project code files to the image file system
- Downloading other software or files (using
curlorwget) - Setting file permissions
- Setting build-time environment variables
- Defining an application launch command or script
Dockerfiles are typically stored alongside application code in source control and simply named Dockerfile in the repository root. If you have multiple Dockerfiles, it’s conventional to give them meaningful file extensions (e.g. Dockerfile.development and Dockerfile.production). Here’s a very simple Dockerfile, we’ll cover the instructions in detail in the next section.
Dockerfile FROM alpine ENTRYPOINT ["echo"] CMD ["Hello World"]
Dockerfile instructions
Here are some of the most useful instructions for use in Dockerfiles:
- FROM defines the base image used to start the build process. This is always the first instruction.
- RUN executes a shell command in the container.
- COPY copies the files from a source on the host into the container’s own file system at the specified destination.
- WORKDIR sets the path where subsequent commands are to be executed.
- ENTRYPOINT sets a default application to be started every time a container is created from the image, it can be overridden at runtime.
- CMD can be used to provide default command arguments to run when starting a container, it can be overridden at runtime.
- ENV sets environment variables within the context of the container.
- USER sets the UID (or username) used to run the container.
- VOLUME is used to enable access from the container to a specified directory on the host machine. This is similar to using the
-voption of Docker run. - EXPOSE documents a network port that the application listens on. This can be used, or ignored by, those using the image.
- LABEL allows you to add a custom label to your image (note these are different from tags).
For further details about Dockerfile syntax and other available instructions, it’s worth reading through the full Dockerfile reference.
Just as with your source code, you should take care not to include secrets (API keys, passwords, etc.) in your Docker images, since they will then be easily retrievable for anyone who pulls that image. This means that you should not use the ENV instruction to set environment variables for sensitive properties in your Dockerfile. Instead, these values should be set at runtime when creating the container, e.g., by using the --env or -- env-file options for Docker run.
ENTRYPOINT versus CMD
The ENTRYPOINT and CMD instructions can sometimes seem a bit confusing. Essentially, they are intended to specify the default command or application to run when a container is created from that image, and the default command line arguments to pass to that application, which can then be overridden on a per-container basis.
Specifying command line arguments when running docker run <image_name> will append them to the end of the command declared by ENTRYPOINT, and will override all arguments specified using CMD. This allows arguments to be passed to the entry point, i.e., docker run <image_name> -d will pass the -d argument to the entry point. You can override the ENTRYPOINT instruction using the docker run --entrypoint flag.
Docker build
The docker build command instructs the Docker daemon to build a new image and add it to the local repository. The image can subsequently be used to create containers with docker run, or pushed to a remote repository. To build an image, docker build requires two things:
- A Dockerfile – By default,
docker buildwill look for a file named “Dockerfile” in the current working directory. If the file is located elsewhere, or has a different name, you must specify the file path with the-foption. - A Build Context – Dockerfile
COPYandADDinstructions typically move files from the host filesystem to the container filesystem. However, it’s not actually that simple. Remember, the Docker CLI and Docker daemon are loosely coupled, and may be running on different host machines. The daemon (which executes the build command) has no access to the host filesystem. Instead, the CLI must send a collection of files (the “Build Context”) to the daemon before the build can begin. These files may be sourced locally, or pulled from a URL. All files referenced inCOPYandADDinstructions must be included in this context.
The build context is often a source of confusion to those new to Docker. A minimal docker build command is shown below, and would typically be run from the root of a git repository:
docker build .
The command above requires an appropriately named Dockerfile file in the current directory. The build context is the one and only argument to docker build (.). This means that the whole of the current directory, and any subdirectories, will be sent to the Docker daemon before the build process begins. After this transfer, the rest of the build process is performed as defined in the Dockerfile.
docker build can also be used to tag the built image in the standard name:tag format. This
is done using the --tag or -t option.
If you rely on just using the latest tag, you’ll have no way of knowing which image version is actually running in a given container. Instead, use a tag that uniquely identifies when/what was built. There are many versioning strategies you could consider, but some possible unique identifiers include:
- timestamps
- incrementing build numbers
- Git commit hashes
You can add an unlimited number of the tags to the same image so you can be very flexible with your tagging approach.
Example: A Docker ‘Hello World’
Let’s see how all this works in practice, by creating a simple Docker image for a container that echoes “Hello World!” to the console, and then exits. To run through this, you’ll need Docker installed locally and have the daemon running.
If you haven’t got Docker installed locally, follow the steps in the Docker documentation to install Docker Desktop.
Since all standard Linux images will already have the echo command available, we’ll use one of the most common base images: alpine. This is based on the minimal Alpine Linux distribution and is designed to have a small footprint and to serve as a reasonable starting point for creating many other images.
Start by creating a new Dockerfile file (in whichever directory you prefer) and specifying alpine as the base image:
FROM alpine
Since we haven’t specified a version (only the name of the base image), the latest tagged version will be used.
We need to instruct the container to run a command when it starts. This is called the entry point for the container and is declared in the Dockerfile using the ENTRYPOINT instruction. In our case, we want the container to use the echo command to print “Hello World” to stdout (which Docker will then display in our terminal). Append the following to your Dockerfile and save it:
ENTRYPOINT ["echo", "Hello World"]
Now we’re ready to build an image from our Dockerfile. Start a terminal from the same directory as your Dockerfile and run the build command:
docker build --tag hello-world .
Check that your image is now available by listing all images in your local repository:
docker image ls
Finally, create a container from your image to see if it works:
docker run hello-world
Hopefully, you should see “Hello World” printed to your terminal! If you wanted to make the message printed by the container customisable (such that running docker run hello-world Greetings! would print “Greetings!” instead). How would you modify your Dockerfile to achieve that? (Hint: ENTRYPOINT and CMD can help.)
Docker Hub and other repositories
Docker Hub is a cloud-based repository run and managed by Docker Inc. It’s an online repository where Docker images can be published and downloaded by other users. There are both public and private repositories; you can register as an individual or organisation and have private repositories for use within your own organisation, or choose to make images public so that they can be used by anyone.
Docker Hub is the primary source for the curated official images that are used as base images for the vast majority of other custom images. There are also thousands of images published on Docker Hub for you to use, providing a vast resource of ready-made images for lots of different uses (web servers, database servers, etc.).
Docker comes installed with Docker Hub as its default registry, so when you tell Docker to run a container from an image that isn’t available locally on your machine, it will look for it instead on Docker Hub and download from there if it’s available. However, it’s possible to configure Docker to use other registries to store and retrieve images, and a number of cloud- and privately-hosted image registry platforms exist, such as GitLab Container Registry, JFrog Artifactory and Red Hat Quay.
Regardless of whether you are using Docker Hub or an alternative image registry, the Docker commands to fetch and save images are the same. Downloading an image is referred to as pulling it, and for Docker Hub you do not need an account to be able to pull public images (similarly to GitHub). Uploading an image is known as pushing it. You generally need to authenticate with an account on the registry to be able to push images.
The docker login command is used to configure Docker to be able to authenticate against a registry. When run, it prompts you for the username and password you use to log in to the registry, and stores your login credentials so that Docker can access your account in the future when pulling or pushing images.
Continuous Integration (CI)
During development cycles, we want to reduce the time between new versions of our application being available so that we can iterate rapidly and deliver value to users more quickly. To accomplish this with a team of software developers requires individual efforts to regularly be merged together for release. This process is called integration.
In less agile workflows integration might happen weekly, monthly or even less often. Long periods of isolated development provide lots of opportunities for code to diverge and for integration to be a slow, painful experience. Agile teams want to release their code more regularly: at least once a sprint. In practice this means we want to be integrating our code much more often: twice a week, once a day, or even multiple times a day. Ideally new code should be continuously integrated into our main branch to minimise divergence.
In order to do this we need to make integration and deployment quick and painless; including compiling our application, running our tests, and releasing it to production. We need to automate all these processes to make them quick, repeatable and reliable.
Continuous integration is the practice of merging code regularly and having sufficient automated checks in place to ensure that we catch and correct mistakes as soon as they are introduced. We can then build on continuous integration to further automate the release process. This involves the related concepts of continuous delivery and continuous deployment. Both of these processes involve automating all stages of building, testing and releasing an application, with one exception: continuous delivery requires human intervention to release new code to production; continuous deployment does not.
In this section we introduce the concept of continuous integration (CI) and why we might want to use it. We also highlight some of the challenges of adopting it and look at some of the techniques that we can use to mitigate those challenges.
What is Continuous Integration?
A core principle of development is that code changes should be merged into the main branch of a repository as soon as possible. All code branches should be short lived and their changes merged back into the main branch frequently. It favours small, incremental changes over large, comprehensive updates.
This is enabled by adopting continuous integration – automating the process of validating the state of the code repository. It should handle multiple contributors pushing changes simultaneously and frequently.
CI has many potential benefits, including reducing the risk of developers interfering with each others’ work and reducing the time it takes to get code to production.
How do we do it?
Fortunately, there are several practices that we can use to help mitigate the challenges of merging regularly while still accepting all the advantages.
Above all, communication is key. Coordinating the changes you are making with the rest of your team will reduce the risk of merge conflicts. This is why stand ups are so important in agile teams.
You should also have a comprehensive, automated test suite. Knowing that you have tests covering all your essential functionality will give you confidence that your new feature works and that it hasn’t broken any existing functionality.
Being able to run your tests quickly every time you make a change reduces the risks of merging regularly. Some testing tools will run your test suite automatically on your dev machine in real time as you develop. This is really helpful to provide quick feedback (and helps stop you forgetting to run the tests).
Automatically running tests locally is good; running them on a central, shared server is even better. At a minimum this ensures that the tests aren’t just passing on your machine. At its best, a continuous integration server can provide a wide variety of useful processes and opens the door to automated deployment. More on this later.
Pipelines
Pipelines crop up in many areas of software development, including data processing and machine learning. In this section we will be focusing on build pipelines and release pipelines. We will discuss what these pipelines are, their purpose, and why they might be helpful to us.
What is a pipeline?
A pipeline is a process that runs a series of steps. This is often run automatically on a dedicated server in the codebase repository, and can be set up to run on a variety of events, such as every push, every merge request or every commit to main.
Let us look at a very simple example:
- Checkout the latest version of the code from a repository.
- Install dependencies.
- (Depending on the technology used) Compile or otherwise build the code.
- Run unit or integration tests.
These steps form our pipeline. They are executed in sequence and if any step is unsuccessful then the entire pipeline has failed. This means there is a problem with our code (or our tests).
One might ask why bother with the extra overhead of a pipeline over a simple script? Decomposing your build and release process into the discrete steps of a pipeline increases reusability and clarity.
If you have committed code to the project that results in either the tests failing or, worse, the code being unable to compile you are said to have broken the build. This is bad: the project is now in a broken, useless state. Fixing it quickly should be a matter of priority. More sophisticated build pipelines will prevent build breaking commits from being merged to main. This is definitely highly desirable, if it can be achieved.
What else can a CI/CD pipeline do?
A CI pipeline can also:
- Build the code
- We can also package the code which includes extra steps, such as wrapping it in an installer or bundling it with a runtime.
- Static analysis (such as linting, or scanning for outdated dependencies)
- Notify the committer that their commit is not passing the pipeline
- Validate an expected merge (your branch to
main) will not cause conflicts
CI/CD pipelines can have manually approved steps, such as to deploy to staging environments.
Docker
It is also possible to use Docker to containerise your entire CI/CD pipeline. This may be particularly useful if your production environment uses Docker. It will also allow you to run the same CI/CD pipeline locally, avoiding implicitly depending on some properties of the build agent, a.k.a. “it works for me” problems. Using Docker is an alternative to using a CI tool’s native container, and brings many of the same benefits.
Some tools support Docker natively but do be cautious – you may run into problems with subtle variations between different implementations of Docker.
Common CI/CD Tools
There are a variety of CI tools out there, each with their own IaC language. These include:
The CI/CD solutions mentioned above are just examples, not recommendations. Many tools are available; you should pick the correct tool for your project and your organisation.
Continuous Delivery (CD)
The previous section on continuous integration and earlier modules taught how to test your code using continuous integration pipelines, and how a strong passing test suite, combined with a CI pipeline, gives you confidence that your code is always ready to deploy.
In this section we’ll look at the next step, and discover how we can build pipelines that automate code deployment. We’ll introduce Continuous Delivery and how it enables us to automate code deployments. We’ll introduce Continuous Deployment and cover how it, despite the similar name, requires a fundamentally different culture to continuous delivery. We’ll review the benefits that continuous delivery can bring, but also note some of the challenges you might face implementing it, both internal and regulatory.
What is Continuous Delivery?
Continuous delivery (CD) is about building pipelines that automate software deployment.
Without a CD pipeline, software deployment can be a complex, slow and manual process, usually requiring expert technical knowledge of the production environment to get right. That can be a problem, as the experts with this knowledge are few, and may have better things to do than the tedious, repetitive tasks involved in software deployment.
Slow, risky deployments have a knock-on effect on the rest of the business; developers become used to an extremely slow release cycle, which damages productivity. Product owners become limited in their ability to respond to changing market conditions and the actions of competitors.
Continuous delivery automates deployment. A good CD pipeline is quick, and easy to use. Instead of an Ops expert managing deployments via SSH, CD enables a product owner to deploy software at the click of a button.
Continuous delivery pipelines can be built as standalone tools, but are most often built on top of CI pipelines: if your code passes all the tests, the CI/CD platform builds/compiles/ bundles it, and its dependencies, into an easily deployable build artefact (files produced by a build that contains all that is needed to run the build) which is stored somewhere for easy access during future deployments. At the click of a button, the CD pipeline can deploy the artefact into a target environment.
A CI pipeline tells you if your code is OK. Does it pass all the tests? Does it adhere to your code style rules? It gives you something at the other end: a processed version of your source code that is ready for deployment. But a CI pipeline does not deploy software. Continuous deployment automates putting that build artefact into production.
Why do we want it?
Continuous delivery pipelines automate deploying your code. This approach has many benefits. Releases become:
- Quicker. By cutting out the human operator, deployments can proceed as fast as the underlying infrastructure allows, with no time wasted performing tedious manual operations. Quick deployments typically lead to more frequent deployments, which has a knock-on benefit to developer productivity.
- Easier. Deployment can be done through the click of a button, whereas more manual methods might require a deployer with full source code access, a knowledge of the production environment and appropriate SSH keys. Automated deployments can be kicked-off by non-technical team members, which can be a great help.
- More Efficient. Continuous delivery pipelines free team members to pick up more creative, user-focused tasks where they can deliver greater value.
- Safer. By minimising human involvement, releases become more predictable. It’s harder to make one-off configuration mistakes, and you can guarantee that all releases are performed in the same way.
- Happier. Deploying code manually is repetitive and tedious work. Few people enjoy it, and even fewer can do it again and again without error. Teams that use automated deployments are able to focus on more interesting challenges, leaving the routine work to their automations.
Automated deployments reduce the barrier to releasing code. They let teams test out ideas, run experiments, and respond to changing circumstances in ways that are not possible, or practical, in slower-moving environments. This fosters creativity, positivity and product ownership as teams feel that the system enables, rather than restricts, what they are able to do.
Continuous delivery works well in environments where development teams need control over if and when something gets deployed. It’s best suited to business environments that value quick deployments and a lightweight deployment process over extensive manual testing and sign-off procedures.
What makes it hard?
Implementing continuous delivery can be a challenge in some organisations.
Product owners must rely on automated processes for testing and validation, and not fall back to extensive manual testing cycles and sign-off procedures. Continuous delivery does involve human approval for each release (unlike continuous deployment), but that approval step should be minimal, and typically involves checking the tests results look OK, and making sure the latest feature works as intended.
Continuous delivery requires organisation wide trust that a comprehensive automated validation process is at least as reliable as a human testing & sign-off process. It also requires development teams to invest time in fulfilling this promise, primarily through building strong test suites (see the tests module).
How do we do it?
Some organisations have separate DevOps engineers, whos role is to oversee development operations, such as setting up CI/CD. In other organisations, software developers may take this role. Thoughout this module, “DevOps Engineer” refers to a person assuming this role. It is important to understand the topics covered in this module even if your organisation has a specialist DevOps team.
Continuous delivery increases the importance of high-quality test code and good test coverage, as discussed earlier in the course. You need strong test suites at every level (unit tests, integration tests, end-to-end tests), and should also automate NFR testing (for example, performance tests). You also need to run these tests frequently and often, ideally as part of a CI pipeline.
Even the best testing process, manual or automated, will make mistakes. Continuous delivery encourages rapid iteration, and works best when teams work together to get to the root of any failures/bugs, and improve the process for future iterations.
To undertake CI/CD, we set up automated testing infrastructure. Releases will fail, and not always in immediately-obvious ways. It’s up to these professionals to set up appropriate monitoring, logging and alerting systems so that teams are alerted promptly when something goes wrong, and provided with useful diagnostic information at the outset.
Environments
Software development environments is a broad term meaning “your software, and anything else it requires to run”. That includes infrastructure, databases, configuration values, secrets and access to third-party services.
Most software projects will have at least one environment that is a near-exact clone of the production environment. The only differences are that it won’t typically handle live traffic, nor will it hold real production data. This kind of staging (also known as pre-production or integration) environment is a great place to test your build artefacts before releasing them to your users. If it works there, you can be reasonably sure it will work in production. Staging environments are commonly used for end-to-end automated testing, manual testing (UAT), and testing NFRs such as security and performance.
Production-like environments are sometimes referred to as “lower” environments, as they sit beneath the production environment in importance. Build artefacts are promoted through these lower environments before reaching production, either through build promotion or rebuilds from source code.
Some projects will also include less production-like environments that can be used for testing and development. Such environments are usually easy to create and destroy, and will stub or mock some services to achieve this.
Typical patterns of environment configuration include:
- Integration and Production
- Dev, Staging, and Production
- Dev, UAT and Production
- Branch Environments (where every branch has it’s own environment)
- Blue-Green deployments
Blue-green deployments use two production environments: each takes turn handling live traffic. New releases are first deployed to the inactive environment, and live traffic is gradually re-directed from the second environment. If there are no issues, the redirection continues until the live environments have switched, and the process repeats on the next update.
Data In Environments
Application data can be one of the trickiest, and most time-consuming, aspects of environment setup to get right. Most environments hold data, either in a traditional relational database (e.g. a postgreSQL server), or other storage tool. Applications running in the environment use this data to provide useful services. Some environments don’t store any data – they are stateless – but this is rare.
Production environments hold ‘real’ data, created by the users of your service. Production data is often sensitive, holding both personal contact information (e.g. email addresses) and financial details (e.g. bank account numbers). Handling personally identifiable data and/or financial data is often regulated, and the last thing you want is a data breach, or to send real emails to customers as part of a test suite. For these reasons, production data should remain only in the production environment.
Instead of using production data, lower environments can use manufactured test data. It’s not real data, and can be used safely for development and testing purposes. So, how do we generate data for our other environments? First, work out what data you need on each environment. Frequently, development environments need very little data and a small, fabricated dataset is acceptable. This can be created manually (or automatically), and then automatically injected into a data store whenever the environment is first set up.
Some use-cases, such as performance testing, require more production-like data. Such data need to have the same size and shape as the production dataset. This is usually done through an anonymisation process. Starting with a backup of production data, you can systematically obfuscate any fields that could contain sensitive information. This can be laborious, and needs to be done very carefully. Using pure synthetic data is an alternative, but it can be challenging to reliably replicate the characteristics of a real production dataset.
Dealing With Failure
In every release process, something will go wrong. Mistakes will happen. This doesn’t reflect a fundamentally-broken process; as discussed earlier in the course, all systems have flaws and we work to remove and mitigate those flaws. Nevertheless, it’s important that we build systems that can tolerate mistakes and recover from them. In particular, we need systems that can recover from failure quickly. There are three main approaches for this:
- Rollbacks – Roll back to a previous working commit. This can have issues – for instance if there have been database migrations
- Roll-forwards – Roll forward to a new commit that fixes the issue following the standard release process
- Hotfix – A last resort that bypasses the usual validation and deployment process to provide a short term fix
From Delivery To Deployment
So far, this section has discussed continuous delivery pipelines. Such pipelines automatically test, build and deliver deployable software. Often they will automatically deploy software into development or testing environments, but they don’t automatically deploy new code into production. When practicing continual delivery, production deployments require human approval.
Continuous deployment takes continuous delivery a step further by removing human oversight from the production deployment process. It relies entirely on automated systems to test, deploy and monitor software deployments. This is not a complex transition from a technical point of view, but has wide reaching implications for businesses that choose to put it into practice.
Continuous deployment is often considered the gold standard of DevOps practices. It gives the development team full control over software releases and brings to the table a range of development and operations benefits:
- Faster, more frequent deployments. Removing the human bottleneck from software deployments enables teams to move from one or two deployments a day to hundreds or thousands. Code changes are deployed to production within minutes.
- Development velocity. Development can build, deploy and test new features extremely quickly.
- Faster recovery. If a release fails, you can leverage a continuous delivery pipeline to get a fix into production quickly, without skipping any routine validation steps. Hot fixes are no longer needed.
- Lower overheads. Checking and approving every single release is a drain on team resources, particularly in Agile teams where frequent deployments are the norm. Continuous delivery frees up team resources for other activities.
- Automated code changes. Dependency checkers, and similar tools, can leverage a fully automated pipeline to update and deploy code without human intervention. This is commonly used to automatically apply security fixes and to keep dependencies up-to-date, even in the middle of the night.
Continuous deployment has the same technical requirements as continuous delivery: teams need excellent automated testing, system monitoring and a culture of continual improvement.
Continuous deployment simply removes the human “safety net” from releases, thereby placing greater emphasis on the automated steps.
Continuous deployment can be a huge change for some organisations, and may sound particularly alien in organisations that typically rely on human testing and sign-off to approve large, infrequent releases. In such cases, continuous deployment is best viewed as the end goal of a long DevOps transition that begins with more manageable steps (e.g. agile workflows and automated testing).
Continuous deployment can be challenging. It requires a high level of confidence in your automated systems to prevent bugs and other mistakes getting into your live environment. It’s also not appropriate for all organisations and industries.
Continuous Delivery vs Continuous Deployment
Despite their similar names, continuous delivery and continuous deployment are very different in practice.
We are responsible for designing and implementing software deployment pipelines that meet business and developer needs. It’s important that you understand the various factors that favour, or prohibit, continuous deployment.
Continuous deployment is the gold standard for most DevOps professionals. However, it is not something you can simply implement; for most businesses, continuous deployment is not primarily a technical challenge to overcome – it requires a fundamental shift in business practice and culture. It’s best to think of continuous deployment as the end product of a steady transition to DevOps culture and values from more traditional Waterfall-based methodologies, rather than a one-off pipeline enhancement.
That transition typically starts with building automated tests and a CI pipeline into an existing manual testing and deployment process. Steadily, automated tests reduce the load on the testing team and your organisation begins to develop trust in the process. You might then build a continuous delivery pipeline to automate some steps of the traditional Ops role. Eventually, once the testing suite is hardened and your organisation is comfortable with leveraging automated pipelines, you can introduce continual deployment, perhaps into a blue-green production environment to provide additional recovery guarantees to concerned stakeholders. This account is fictional, but gives an example of how a transition to continuous deployment might play out in reality.
In some circumstances, continuous deployment is not possible and you should focus instead on delivering great continuous integration & delivery pipelines. This usually happens when human sign-off is required by law. We’ll discuss how this sort of regulatory constraint can impact DevOps priorities shortly.
Continuous delivery and continuous deployment are both, unhelpfully, abbreviated to CD. Despite similar names and an identical abbreviation, the two workflows are quite different in practice.
If your team has a CI/CD pipeline, make sure you know which flavour of CD you are talking about.
Autonomous Systems
Automated systems are generally “one-click” operations. A human triggers a process (e.g. runs a shell script), and the automated system handles the tedious detail of executing the task. Automated systems know what to do, but require external prompts to tell them when to do it.
Autonomous systems take automation to the next level. An autonomous system knows what to do, and also when to do it. Autonomous systems require no human interaction, operate much faster and scale better than human-triggered automated systems. Continuous deployment pipelines are autonomous systems.
Continuous deployment pipelines aren’t just used to deploy new features. They are integral to larger autonomous systems that can handle other aspects of the software deployment process.
Automated rollbacks
Organisations using continuous deployment rely on automated monitoring and alerting systems to identify failed releases and take appropriate action. Often, the quickest and simplest solution is to rollback to the previous working version.
Rollbacks can be automated using monitoring and a continuous deployment pipeline. If a monitoring system triggers an alert following a release (e.g. an app exceeds an allowable error rate), the system can trigger a rollback. Because the deployment pipeline is autonomous, the whole process can be done without human intervention. That means rollbacks can be performed quickly, reproducibly, and at all hours. Autonomous monitoring and repair approaches are often only possible in environments using continual deployment. By removing the human bottleneck, rollbacks become quicker and more reliable. This further reduces the risk of deployments. Also, rollbacks are tedious and repetitive to do manually – automating the process is a great help to team morale.
Remember, not every bug can be fixed with a rollback, and all rollbacks create some technical debt as developers still need to fix the underlying issue. Nevertheless, automated rollbacks can make continuous deployments far safer.
Regulatory Constraints
The software you produce, and the ways in which you produce it, may need to meet certain regulatory requirements. Most sectors don’t need to worry about this, but certain industries (e.g. banking) are heavily regulated. If you work in a highly-regulated industry, it’s important to be aware of the regulatory requirements that exist.