Tests 2 – Reading
- Gain familiarity of and follow software testing frameworks and methodologies
- Conduct a range of test types
- Test code and analyse results to correct errors found using Integration and other tests
Integration Testing
In the Tests 1 module, we explored how testing the individual components of your application can give you confidence that your app works correctly.
But unit tests alone are not enough! Every component can be bug-free, but the unit tests can’t tell if those components work together properly.
To save ourselves from this problem, we can write a few integration tests which check our code from end-to-end to catch bugs that only emerge when the components in our application interact. If the unit tests and the integration tests all pass, we’ll have much more confidence when making changes to the app.
Drawing the test boundary
When we write an integration test, we have to decide where the edges of the test – what components will we include in the test, and what will we replace with test-doubles?
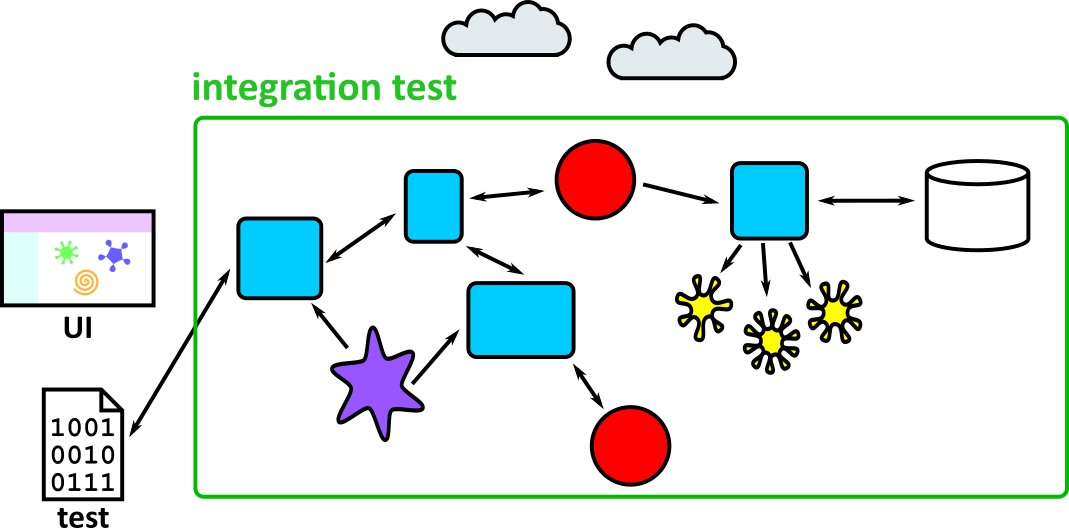
We choose this boundary based on a trade-off:
- The more components we include in the test, the more realistic it is
- The more components we include, the more likely the test is to be:
- flaky: i.e. it will sometimes fail because it’s dependent on an external system
- slow: because HTTP and database calls are usually (slower than our own code)
- inconvenient: because it calls real APIs which might return different data over time, or we don’t want our tests to modify data using the API
For web applications, a common way to do it is this:
- Write the tests so that they call your application through the controller endpoints
- Replace HTTP API calls with test doubles, either stubbed (for GET endpoints that just return data) or mocked (if it’s important to check that your application updates some data).
- Use a realistic database. This might be the same type of database that you’re using in production (e.g. PostgreSQL) or a lightweight substitute (e.g. SQLite)
Writing good integration tests
Lots of the guidelines for writing good unit tests apply to integration tests too:
- Give your tests good names
- Make it clear what they’re testing
- Treat the code like it’s a black box – your tests should only care about what goes in and out, not how it happens
- The tests should be reliable
Unlike unit tests, however, you shouldn’t try to test lots of different edge cases. Integration tests are usually slower and flakier than unit tests, so we use them to check whether the components in the system can work together, not all the tiny details.
This means it’s worth testing some edge cases in the way components interact – for example, testing that the UI doesn’t crash if an API returns a 500 error response – but you should rely on your unit tests to check other edge cases.
Example: Caesar cipher messaging app
Let’s return to the encrypted message app we wrote unit tests for in the Tests 1 module.
To write the integration tests, first we have to decide where to draw the boundary around the app. We’d like to test as many components together as possible, without relying on external systems, but we need to decide the entry point and which components (if any) to replace with test doubles.
Integration test entry point
Real users interact with the UI presented by the application. Ideally, our integration test would use this as well, but that would be tricky because it reads user input and prints to the console, which is hard to check.
A good compromise is for the tests to call the layer just below the UI. All the commands from the UI get sent to the controller, and it’s easier to interact with because we can call the send_command function directly and check the return value.
Test doubles
We want to test as much of the real app as possible, so only use mocks and stubs for external dependencies. For this app, the only external dependency is the web API used for sending and fetching messages.
One possibility is to run your own mock API server while running integration tests – using a library like request_mock which lets you define API responses in your tests and set up expectations to check an endpoint has been called with the correct URL and content, e.g. to check a message was sent.
Writing the test
This is the boundary that our integration tests will interact with:
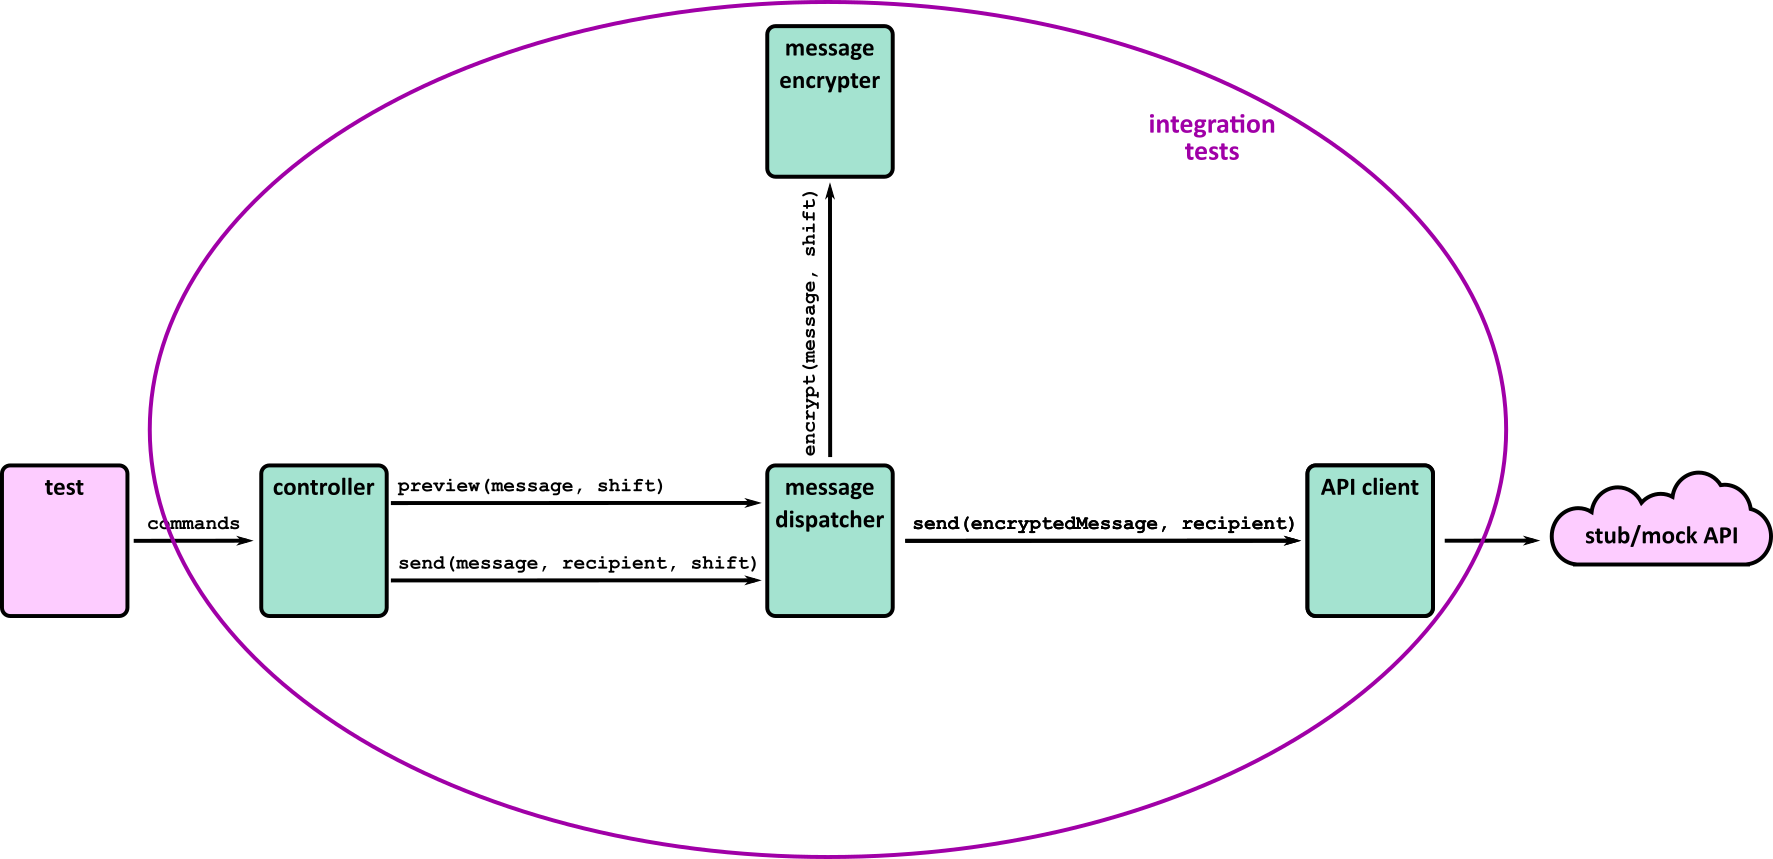
Let’s write a test for sending a message.
import json
import pytest
import requests
import requests_mock

def test_send_encrypted_message():
    api_response = {'id': 56}
    with requests_mock.Mocker() as mock_request:
        mock_request.post('https://jsonplaceholder.typicode.com/posts',json=api_response, status_code=200)
    response = controller.send_command('send message bob 25 A message for Bob')

    assert response == 'message sent'
    assert mock_request.called

    message_request = mock_request.last_request
    assert message_request.json() == {'userId': 'bob', 'body': 'z ldrrzfd enq ana'}
Note that we still have the arrange/act/assert or given/when/then structure that we saw in our unit tests.
Because an integration test tests so many layers of the app at once, it contains a mix of high-level and low-level concepts. In this case, we send a command that is similar to one the user would send (high-level) and check that the JSON in the API request is correct (low-level).
The test also implicitly tests many things at once:
- The command
send message bob 25 A message for Bobis interpreted correctly - The message is sent to the right recipient (bob)
- The message is encrypted to
z ldrrzfd enq ana - The API request is sent as a
POSTrequest to the right URL - The JSON body of the API request has the right format
- The app can handle a valid API response
- The value returned to the user
message sentis correct - All the modules in the app which do these things can talk to each other
All of these checks have edge-cases that we could test. For example, is the message sent correctly if we specify a negative shift value? What happens if the send message command doesn’t have the right arguments? But these edge cases are already covered by the unit tests, so we can keep our integration tests simple. Together they give us confidence that the app does the right thing in most circumstances.
Common problems
Flaky tests
Flaky tests are tests which sometimes pass and sometimes fail. They cause problems because you stop being able to trust your test suite. If you’ve configured your project so that you can’t merge changes until the tests are green, they slow you down while you wait for the tests to re-run. Worse, you start ignoring failing tests (and miss real bugs!) because you’re used to seeing a few red tests.
Integration tests are more likely to be flaky than unit tests because they test more components, some of which may be asynchronous, or use time-dependent or random data. There are lots of possible causes, so you’ll have to do some debugging, but there are two main types of flaky test:
Interacting tests
If a test passes when it’s run on its own but fails when run as part of the full suite (or vice-versa) it probably depends on some test set-up, such as a database or some files on disk, being in a certain state. This is why it’s important to ensure the state of the system is consistent at the start of each test.
Non-deterministic test
This is a test that randomly passes or fails when it’s run on its own. It can be tricky to debug because it doesn’t always fail, but look for places where your app uses random data or time data that will change every time the test is run.
Timeouts are also a source of flaky tests, so check the code or add logs to see whether tests failures happen when some event doesn’t happen as fast as you expect. If using async, you can mark your test method as async as well, allowing you to await the result without using timeouts like time.sleep.
In both cases, make sure you read the failure or error message! It will give you clues to help you debug the failures.
Slow tests
Slow tests are painful – they encourage you to avoid running the test suite, which makes it harder to pinpoint bugs because you’ve made so many changes since you last ran the tests.
Integration tests are inherently slower than unit tests, which is one of the reasons your test suite should have more unit tests than integration tests. One of the reasons for a slower test suite is that you’ve written too many integration tests. Take a step back and see if you can test more of the logic through unit tests, which will let you delete some of your slow tests. (But keep a few to let you check the application still works as a whole!)
Watch out for delays in your code or tests that explicitly wait for timeouts. These will slow down the tests because you’ll always have to wait for that delay, even if the thing it’s waiting on happens very quickly. Consider whether you can reduce the timeouts during testing, or use built in asynchronous programming tools to await the result directly.
Acceptance tests
The types of tests that we have met so far have been mostly of use to developers – unit and integration tests give us confidence that the components of the system do what we expect. But that’s not enough if we want an application to be useful – we need to make sure that the system does what the users need it to.
So we need tests at a higher level, that of the user requirements. These are called acceptance tests, and they usually test the entire system, following a more complete user flow, rather than targeting specific edge cases. They can be manual tests performed by users of the system (or a product owner who understands the user needs) or automated tests, which can be reviewed by users or product owners to make sure they’re testing real requirements.
User acceptance testing
User acceptance testing (UAT) is where someone who understands the domain tests that the application really does help the user do what they need. Since the tester is deciding whether the application or individual features are fit for purpose, UAT is usually done on the whole application (though it may be on a testing environment rather than production):
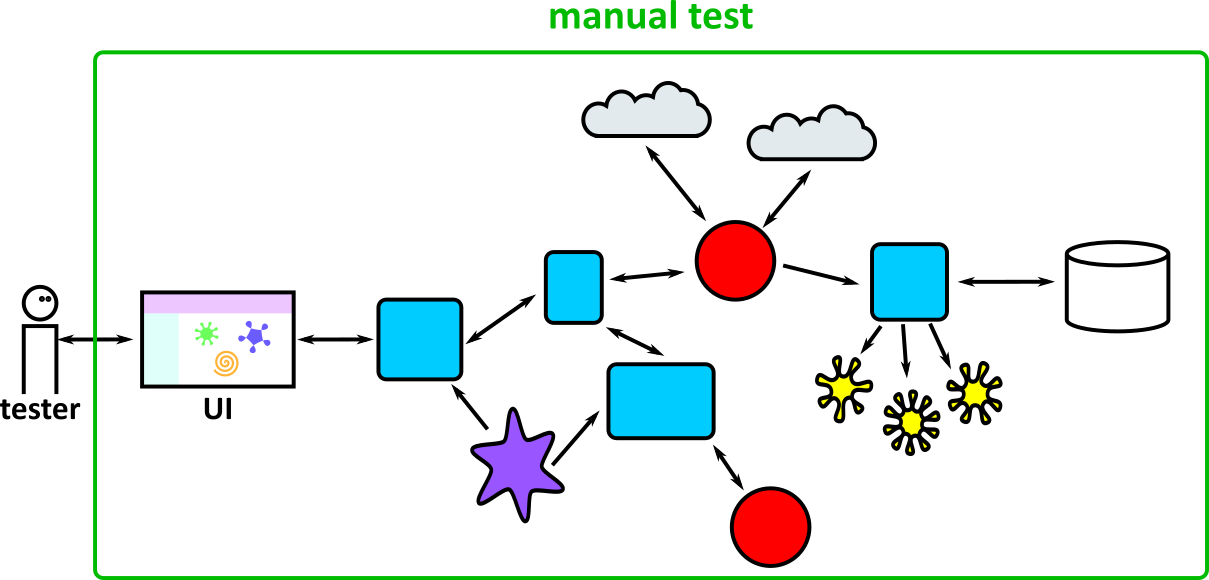
If the application is an internal one which is used by people within the organisation, this testing is done by real users, ideally ones with different roles and user needs. For external applications where the users are the general public, UAT is usually done by a product owner: someone who has a good understanding of what users want from the application and how they interact with it. This can bring to light issues that are missed when planning the feature, or by automated tests.
UAT is usually the final phase of testing after the team has decided that the feature is good enough to release. Signing off the tests might be a formal part of the release process.
There are a few ways that users can approach UAT. They might try out the new features in an ad-hoc way. They might have a list of checks that they like to go through before signing off a new feature. Or they might try using the application like they would in their normal job, to get a feel for the new version.
If a user finds an issue during UAT, consider adding an automated test at the appropriate level, e.g. a unit test if they’ve found a small bug in a component that otherwise works, or an automated acceptance test if there’s a business-critical feature missing. You’ll know that you’ve fixed the bug when the test passes, and it will prevent a regression from happening in future.
Automated acceptance testing
As with most parts of Software development, automation helps speed up the testing process and produce more reliable results.
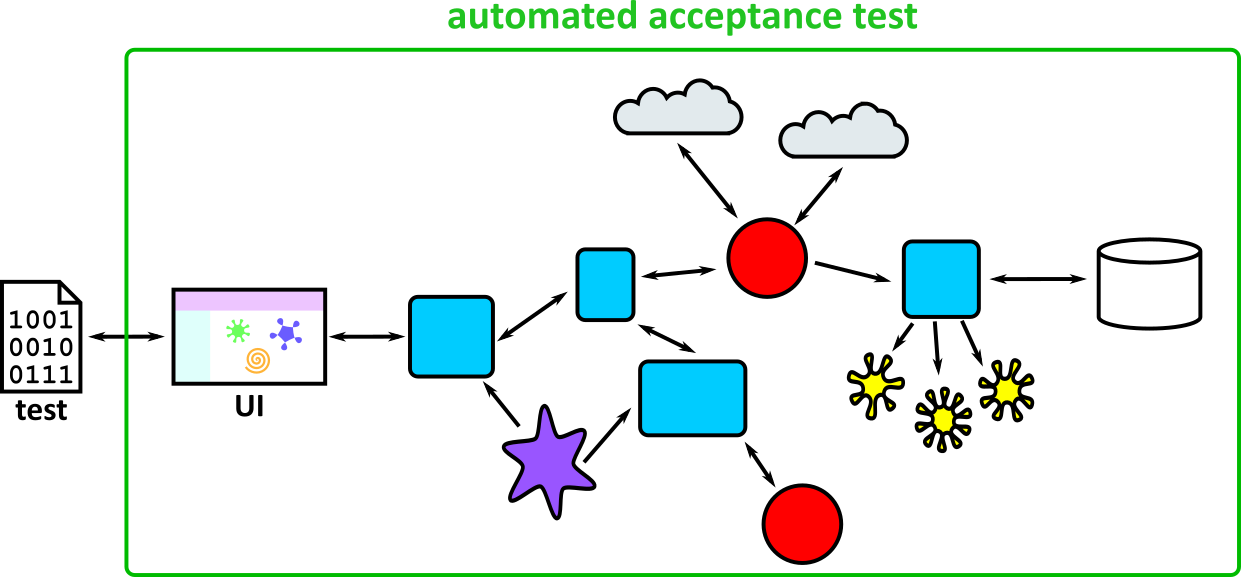
There are many ways of performing automated acceptance tests – it depends enormously on the system (and in particular, the user interface) you are working with. You will need to investigate the best tools for each project individually.
These tools can get pretty sophisticated – for example a mobile app that needs to be thoroughly tested on many different devices might use a room full of different mobile phones (controlled remotely) to test that the app works properly on each different model.

Web testing (Selenium)
Web testing is the process of testing web applications – or those that expose . It typically involves using a tool like Selenium to control a browser and simulate real user behaviour.
The key part of Selenium is the webdriver interface, which can be used to control a browser – there are versions in many languages, and it may target several browsers.
As an example, to control Chrome using Java, go through the Selenium installation process to install the library and browser driver.
Then in a script:
from selenium.webdriver.chrome.service import Service
from selenium import webdriver

## Create the driver
service = Service(executable_path="/path/to/chromedriver")
driver = webdriver.Chrome(service=service)

## Load a website
driver.get("https://www.selenium.dev/selenium/web/web-form.html")

## Always remember to quit the browser once finished
driver.implicitly_wait(0.5)
If you run this, you should see the website pop up for a few seconds!
While you can use this to control a browser for any reason, it is most commonly used to run tests against your website – for example, a simple test that checks that the page loads with the correct title:
from selenium import webdriver
from selenium.webdriver.common.by import By


def test_my_app():
    ## Before tests, prepare the driver
    driver = webdriver.Chrome()

    driver.get("https://www.selenium.dev/selenium/web/web-form.html")

    title = driver.title
    assert title == "Web form"

    ## After tests, quit the driver
    driver.quit()
Note the before and after steps to make sure that the driver is created and quit at the right time. One of the most important things with larger suites of tests is making sure you use (and destroy) resources effectively:
- Creating and destroying resources too often can be extremely slow – starting a browser may add several seconds per test!
- Reusing resources can lead to tests interfering with each other – some state may be left over on the page (e.g. a dialog box).
It is important to maintain a balance between reliability and speed.
When running tests, you will typically use a browser in ‘headless’ mode. This means you won’t actually see anything – it runs in the background. For Chrome you can specify some arguments:
 from selenium import webdriver
 from selenium.webdriver.chrome.options import Options

 options = Options()
 options.headless = True
 driver = webdriver.Chrome(options=options)
This is just a tiny taste of what Selenium can do – its real power is selecting and interacting with HTML elements on the page. For example, finding an input element, entering a value and clicking a submit button – then verifying that the right message appears!
The full documentation for the Python driver can be found here.
There are versions of WebDriver for most common languages and the API for all of them is very similar, allowing you to apply the same principles across them.
Cucumber tests
While you can write acceptance tests in the same way as your unit/integration tests, it is quite common to write them using the Cucumber language* (which has implementations in Java, JavaScript and Ruby). This allows you to write a specification using (what looks like) plain English:
Feature: Send and Receive messages

Scenario: Receiving a message
Given "Alice" has sent me the message "ab ykhf tebvx"
When I check my messages with shift 19
Then I should receive the message "hi from alice"
The steps describe the process using domain terms which are the same ones that a user would use, like “checking messages” and “message shifts”, rather than lower-level ones like typing commands at the command line. This allows for easier collaboration with less technical members of the team, who can review these specifications.
These types of tests are also used when doing Behaviour-Driven Development (BDD) – an extension of Test-Driven Development (TDD), where you write the acceptance tests first and write code to make them pass.
This leads to them sometimes being referred to as ‘BDD-style’ tests – even if they are written after the code!
poetry add behave
We need two pieces in place to run our tests
- Feature files, which contain specifications written in the style above.
- Step files, which contain the details of how to translate the steps in the specification into code.
Assuming you have the feature as above, a corresponding steps file might look a bit like:
from behave import given, when, then

@given('string} has sent me the message {string}')
def setp_impl(context):
   ##  Set up the API to return with the message and sender

@when('I check my messages with shift {int}')
def setp_impl(context, shift):
  context. recieved_message= context.send_command(f'check messages ${shift}')

@then('I should receive the message {string}')
def setp_impl(context, message):
  assert (context.recieved_message == (f`user ${context.sender}: ${message}` )
There are some missing details here – like where the application is created etc., but it works very similar to integration tests.
Try to make your steps as reusable as possible – e.g. by carefully using parameters and state. This makes it really easy to add new scenarios that are similar to existing ones.
Note all of the parameters in the examples above.
*Strictly speaking, the language is called ‘Gherkin’ and ‘Cucumber’ is the software that interprets it – however this distinction is not commonly made.
Non-functional testing
Most pieces of software have a lot of important non-functional requirements (NFRs), and it is just as important to test them as functional requirements. As NFRs can cover an enormous variety of things, the way you test them varies enormously. Here, we cover a few of the more common types of testing you might encounter.
Performance testing
The aim of a performance test is to test how a system performs under different patterns of use, to ensure that the system will work well in production – including when under stress. Certain types of performance test have more specific names.
When planning a performance testing phase, you should specify scenarios under which you want to test the system. For example:
| Test name | Traffic pattern | Notes |
|---|---|---|
| Load test | A web traffic pattern that matches a realistic busy day | Based on analytics data gathered from the production system |
| Stress test | A traffic pattern representing very high load | This may come from NFRs specified at the start of the project, such as “the response time for page X should be less than 800 milliseconds when under load from 500,000 concurrent users” |
| Endurance test | A traffic pattern of sustained high load | This form of test can detect memory leaks or other issues with resource management over time |
| Scalability test | Rapid increases and decreases in traffic | For system architectures that scale up and down automatically (as do many cloud applications), this type of test checks that the application scales up to remain responsive when traffic increases, and scales down to reduce running costs when traffic decreases |
Note that “load testing” is also used as a general term by many people to cover stress and endurance testing. “Capacity testing” is similar, in that it confirms that the system has the ability (capacity) to handle a particular level of traffic; for example, an e-commerce site may undergo capacity testing prior to the beginning of a sale.
Running any of the performance tests above is usually achieved by the following high-level steps:
- Set up a test system that is as ‘live-like’ as possible (see below)
- Use a tool to generate load on the system, by making requests that follow the pattern of the scenario being tested
- Analyse metrics – e.g. response time percentiles, availability percentage
It is critical that the system is set up realistically – otherwise your performance tests will be useless!
- The servers should be a similar spec to the production system (e.g. the same AWS instance sizes)
- Code should be run in production mode (e.g. enabling all production optimisations)
- Data in the system should be realistic in quantity and quality (e.g. the same number of users, with typical variation in data)
- External dependencies should behave realistically (or be stubbed to do so)
A lot can go wrong when load testing – by its nature you are stressing a system to (or past) its limits. You should be prepared for unexpected results and problems with not only the target system but the tooling itself.
Be very careful before running any performance tests. Make sure the target system is prepared to receive the load and won’t incur unexpected costs (e.g. through usage of an external API or compute-based pricing of cloud instances).
Never run against production servers unless you are sure they can handle it.
Performance testing tools
The most common type of load test is for an HTTP server, and there are dozens of tools available for generating HTTP requests and producing performance metrics.
A tool like Apache JMeter will let you configure a test plan with many different options using a GUI.
If this doesn’t appeal, there are more code-focused approaches, such as Gatling, for which the test plans are written as code (in this case, in Scala):
class BasicSimulation extends Simulation {

  // Configure the base HTTP setup
  val httpConf = http.baseURL("http://example.com")

  // Configure the 'scenario' for the simulation
  // 'GET /foo' and pause for 5 seconds
  val scn = scenario("BasicSimulation")
    .exec(http("Foo request").get("/foo"))
    .pause(5)

  // Inject 10 users
  setUp(
    scn.inject(atOnceUsers(10))
  ).protocols(httpConf)
}
The best approach is mostly a matter of personal preference, but you should take time to understand whichever tool you are using.
If you are testing a different protocol, you can look up tools for that domain (e.g. JMeter also supports testing FTP, LDAP, SMTP and others).
Always prefer this over writing your own tool – it may sound easy, but it can be extremely difficult to ensure that you are really testing the performance of your target system, and not the tool itself!
Performance test analysis
The hardest part of running a performance test is analysing the results. It is important to have a goal before you start (as demonstrated in the table above), so you can make sense of the results.
Once you know what load you are targeting, you need to choose which metrics to look at! For example:
- Response Times (percentiles)
- Availability (percent)
- CPU usage (maximum percent)
- Memory usage (maximum MB)
These are direct metrics – that directly impact how your app is running, and may fail your test if they fall outside acceptable limits.
However, you typically want to track many more metrics. If your test reveals that your app cannot perform at the desired load, you will usually need a lot more information to narrow down the problem. Typically there is a bottleneck somewhere, such as CPU, memory, network bandwidth, database connections, database CPU/memory, disk usage etc. If one of these seems unusually high, consider what steps you might take to remedy the situation.
Diagnosing bottlenecks takes some experience, but for example:
- High CPU: Try to identify ‘hot’ paths in your code, for example using a profiler, then optimise them.
- High Memory: Try to identify what objects are taking up memory, and whether you can reduce them. The profiler can help here as well.
- Slow database queries: Can you optimise your queries, for example by using indices?
Security testing
The most common type of security testing is an Information Security (InfoSec) review, which involves going through all the data and endpoints in your system and evaluating their security.
Many systems also undergo Penetration testing, in which a tester attempt to gain unauthorised access to your system using knowledge, experience and tools. This is typically performed by a separate group, and requires a lot of skill – you should not try and do this yourself unless you know what you are doing!
The Web Servers, Auth and Security module will go into detail of common issues that a security testing phase should address.
Accessibility testing
In the Responsive Design and Accessibility module, we will discuss principles and guidelines for developing software that is accessible – that is usable by people who are unable to interact with applications in some way, for example due to a visual or motor impairment. It should be an NFR for all modern software that it meet a reasonable standard of accessibility.
Therefore it is important that all software undergoes accessibility testing. There are a number of of accessibility tools that assist with this testing:
- Screen Readers such as ChromeVox, or the built-in software on an iPhone
- Colour contrast checkers, such as this color contrast checker extension
- Automated compliance tools, such as WAVE
- Manual testing by experienced testers