Further JS: the DOM and bundlers
- VSCode
- Web browser
So far most of the exercises have focused JavaScript as a programming language, and in particular, the core ECMAScript standard. This is appropriate for server-side code or standalone applications, but is not why the language was originally invented!
JavaScript was originally created in 1995 to manipulate HTML in Netscape Navigator.
The server-side language you have been learning about so far is based on the ECMAScript standard (more on that in a moment), but JavaScript that runs in a browser will also include a number of Web APIs.
JavaScript or ECMAScript?
You will have already come across differences in ECMAScript versions, e.g. when using const or arrow functions. However, you might not quite know why we use ECMAScript instead of just plain JavaScript?
ECMAScript refers to a set of precise language specifications, whereas JavaScript is a slightly fuzzier term encompassing the language as a whole.
The history of JavaScript is a long, and slightly silly story – if you don’t like some of the features, consider that most of the language was only written in 10 days!
In particular, any JavaScript implementation may include any number of proprietary extensions. For example, at time of writing:
- Node.js 17 implements ECMAScript 2022, but also includes several Node API extensions
- Node.js 18 implements most of the ECMAScript 2023 features, as well as the Node APIs
- Chrome, Firefox, Safari, Opera and Edge implement ECMAScript 2016, some of them implement features up to ECMAScript 2022, and most Web APIs
- Internet Explorer 11 implements ECMAScript 5 and some Web APIs – however, it was officially retired in 2022
If this all sounds confusing, it is! If you’re in doubt, there are several resources that can help:
- Kangax Compatibility Table shows support across a wide range of JS engines
- caniuse.com allows you to search for a feature and see which browsers support it
- MDN Documentation on a feature will have a compatibility table at the bottom
DOM Elements and Interfaces
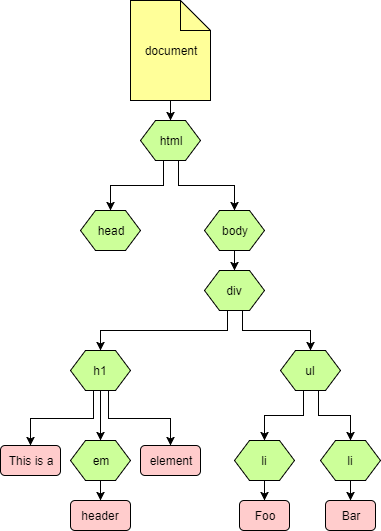
The DOM (Document Object Model) is a tree-like representation of your HTML structure, containing nodes of different types, the most common being:
- Document Node – the top level node containing your entire web page
- Element Node – a node representing an HTML element, e.g. a
<div> - Text Node – a node representing a single piece of text
Each node will implement several interfaces which exposes various properties of the node – e.g. an Element has an id corresponding to the id of the HTML element (if present).
Consider this fairly simple HTML document:
<!DOCTYPE html>
<html>
  <head></head>
  <body>
    <div>
      <h1>This is a <em>header</em> element</h1>
      <ul>
        <li>Foo</li>
        <li>Bar</li>
      </ul>
    </div>
  </body>
</html>
Follow the Manipulating documents guide to learn how to obtain and manipulate DOM elements in JavaScript.
The DOM is not intrinsically tied to JavaScript or HTML: it is a language-agnostic way of describing HTML, XHTML or XML, and there are implementations in almost any language. However, in this document we are only considering the browser implementations in JavaScript.
DOM Events
By manipulating DOM Elements you can use JavaScript to manipulate the page, but what about the other way around?
Manipulating the page can trigger JavaScript using DOM Events.
At a high level these are relatively straightforward: you attach an Event Listener to a DOM element which targets a particular event type (‘click’, ‘focus’ etc.). There are 3 native ways of attaching event listeners:
addEventListener
var myButton = document.getElementById('myButton');
myButton.addEventListener('click', function (event) { alert('Button pressed!'); });
Any object implementing EventTarget has this function, including any Node, document and window.
While it may appear the most verbose, this is the preferred method as it gives full control over the listeners for an element.
To remove a listener, you can use the corresponding removeEventListener function – note that you need to pass it exactly the same function object that you passed to addEventListener.
Named properties
var myButton = document.getElementById('myButton');
myButton.onclick(function (event) { alert('Button pressed!'); });
Many common events have properties to set a single event listener.
HTML attributes
<button id="myButton" onclick="alert('Button pressed!')">My Button</button>
The named properties can also be assigned through a corresponding HTML attribute.
This should generally be avoided as it has the same issues as named properties, and violates the separation of concerns between HTML and JavaScript.
The Event interface
As hinted by the examples above, event listeners are passed an Event object when invoked, containing some properties about the event.
This is often most important for keyboard events, where the event will be a KeyboardEvent and allow you to extract the key(s) being pressed.
Event propagation
<div id="container">
  <button id="myButton">My Button</button>
</div>
Adding a ‘click’ event listener to the button is a fairly simple to understand, but what if you also add a ‘click’ event listener to the parent container?
var container = document.getElementById('container');
container.addEventListener('click', function (event) {
    alert('Container pressed?');
});

var myButton = document.getElementById('myButton');
myButton.addEventListener('click', function (event) {
    alert('Button pressed!');
});
In particular, does a click on the button count as a click on the container as well?
The answer is yes, the container event also triggered!
The precise answer is a little involved. When an event is dispatched it follows a propagation path:
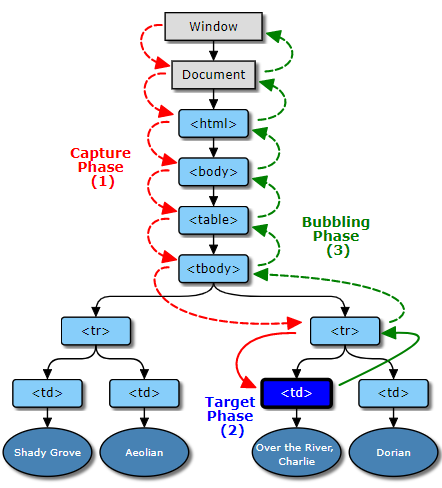
The full documentation can be found here, but as a general rule, events will ‘bubble’ up the DOM, firing any event listeners that match along the way. However there is a way of preventing this behaviour:
event.stopPropagation()

var myButton = document.getElementById('myButton');
myButton.addEventListener('click', function (event) {
    event.stopPropagation(); // This prevents the event 'bubbling' to the container
    alert('Button pressed!');
});
Now if we click the button, it won’t trigger the container listener.
Use stopPropagation sparingly! It can lead to a lot of surprising behaviour and bugs where events seemingly disappear. You can usually produce the desired behaviour by inspecting event.target instead.
From the diagram above, there is another phase – the capture phase, which can be used to trigger event listeners before reaching the target (whereas bubbled events will trigger listeners after reaching the target).
This is used by setting the useCapture argument of addEventListener:
var container = document.getElementById('container');
container.addEventListener('click', function (event) {
    alert('Container pressed?');
}, true); // useCapture = true
Now the container event listener is fired first, even though the button event listener is stopping propagation.
You can also call stopPropagation in the capture phase, to prevent the event reaching the target at all. This is rarely useful unless you genuinely want to disable certain interactions with the page.
Use capturing with caution - it is fairly uncommon so can be surprising to any developers who are not expecting it.
Default behaviour
Many HTML elements and events have some kind of default behaviour implemented by the browser:
- Clicking an
<a>will follow the href - Clicking a
<button type="submit">will submit the form
These can be prevented by using event.preventDefault():
<a id="link" href="http://loadsoflovelyfreestuff.com/">Free Stuff!</a>
var link = document.getElementById('link');
link.addEventListener('click', function (event) {
    event.preventDefault();
    alert('Not for you');
});
If you attempt to click the link, the default behaviour of following the link will be prevented, and instead it will pop up with the alert.
It is important to understand the difference between preventDefault() and stopPropagation() – they perform very different tasks, but are frequently confused:
preventDefault()stops the browser from performing any default behaviourstopPropagation()stops the event from ‘bubbling’ to parent elements
XMLHttpRequest and Fetch
The other very important Web APIs are XMLHttpRequest and the more modern Fetch API.
These are both ways of making HTTP requests from JavaScript, e.g. to load data, perform server-side actions etc.
XMLHttpRequest
// Construct a new request
var xhr = new XMLHttpRequest();

// Add an event listener to track completion
xhr.addEventListener('load', function () {
    console.log(xhr.responseText);
});

// Initialise the request
xhr.open('GET', 'http://www.example.org/example.txt');

// Send the request!
xhr.send();
If this is unfamiliar, have a look at Using XMLHttpRequest.
Fetch
Here is an equivalent request using fetch:
fetch('http://www.example.org/example.txt').then(function (response) {
    console.log(response.text());
});
Much more natural! See Using Fetch if you are not familiar with it.
Unfortunately, like most convenient modern APIs, it is not supported by Internet Explorer. However, a polyfill is available.
Adding JavaScript to a page
You can add internal or external JavaScript, much like CSS:
Internal
Just put it in a <script> tag somewhere in the HTML document:
<script>
alert('Running JavaScript!');
</script>
External
Unlike CSS, which uses a different <link> element, you still use a <script> element, but with a src attribute:
<script src="/script.js"></script>
Load Order
When including JavaScript in a page, it is loaded synchronously with the DOM. This has two main consequences:
- If you have multiple scripts, those higher in the document will execute first.
- Scripts may execute before the DOM has been loaded.
The latter can be especially problematic. To ensure your JavaScript runs after the DOM is loaded, there is a DOMContentLoaded event on the document:
document.addEventListener('DOMContentLoaded', function(event) {
    console.log('DOM fully loaded and parsed');
});
Many libraries have an idiomatic way of doing this, which may have better cross-browser support (the DOMContentLoaded event is not supported in IE <9). e.g. in jQuery:
$(document).ready(function() {
    console.log('DOM fully loaded and parsed!')
});
Bundlers
A JavaScript bundler is a tool that takes multiple JavaScript files and combines them into a single file, that can be served to the browser as a single asset. This can improve performance by reducing the number of HTTP requests required to load a web page. Bundlers can also perform other optimizations, such as minifying the code (removing unnecessary characters to make the file smaller) and tree shaking (removing unused code).
There are several popular JavaScript bundlers available:
These tools typically use a configuration file to specify which files to bundle and how to bundle them.
Further Reading
There are lots of other Web APIs, far too many to cover here. Pick one and read up about it! Some more interesting ones:
- Canvas – 2D and 3D graphics using HTML and JavaScript
- Notifications – display notifications on your desktop or mobile device
- Web Workers – perform tasks in a background thread, even if your web page is not open