Tests 1 – Reading
- Gain familiarity with and follow software testing frameworks and methodologies
- Identify and create test scenarios
- Test code and analyse results to correct errors found using unit testing
Motivations behind testing
Comprehensive testing is important because it helps us discover errors and defects in our code. By having thorough testing we can be confident that our code is of high quality and it meets the specified requirements.
When testing, approach your code with the attitude that something is probably broken. Challenge assumptions that might have been made when implementing a feature, rather than simply covering cases you are confident will work. Finding bugs shouldn’t be something to be afraid of, it should be the goal – after all, if your tests never fail, they aren’t very valuable!
Errors and defects
We want our testing to detect two different kinds of bugs: errors and defects. Errors are mistakes made by humans that result in the code just not working, for example:
String myString = null;
myString.ToUpperCase();
This code has an error because it’s trying to call a method on a variable set to null; it will throw a NullPointerException.
Defects, on the other hand, are problems in the code where the code works but it doesn’t do the right thing. For example:
public void PrintGivenString(String givenString) {
    System.out.println("Some other string");
}
This function works but it doesn’t do what it’s meant to do, i.e. print the given string. Therefore it has a defect.
Validation
We want our testing to validate that our code satisfies the specified requirements. This can be done by dynamic testing: running the code and checking that it does what it should.
Verification
We also want our testing to verify that our code is of good quality without errors. This can be done by static testing: inspecting the code to check that it’s error-free and of good quality.
Regression Testing
A regression is when a defect that has been fixed is reintroduced at a later point.
- Developer A has a problem to solve. They try to solve this in the most obvious way.
- Developer A finds that the most obvious way doesn’t work – it causes a defect. Therefore A solves the problem in a slightly more complicated way.
- Developer B needs to make some changes to the code. They see the solution A has implemented and think “This could be done in a simpler way!”.
- Developer B refactors the code so that it uses the most obvious solution. They do not spot the defect that A noticed, and therefore reintroduce it into the system – a regression!
These can occur quite commonly, so it is good practice to introduce regression tests. When you spot a defect, make sure to include a test that covers it – this will check for the presence of the defect in future versions of the code, making sure it does not resurface.
Levels of testing
There are many different phases to testing and one way of visualising them is using the ‘V’ model below. This describes how the phases of system development tie into testing. For example, business requirements determine the acceptance criteria for User Acceptance Testing (UAT).
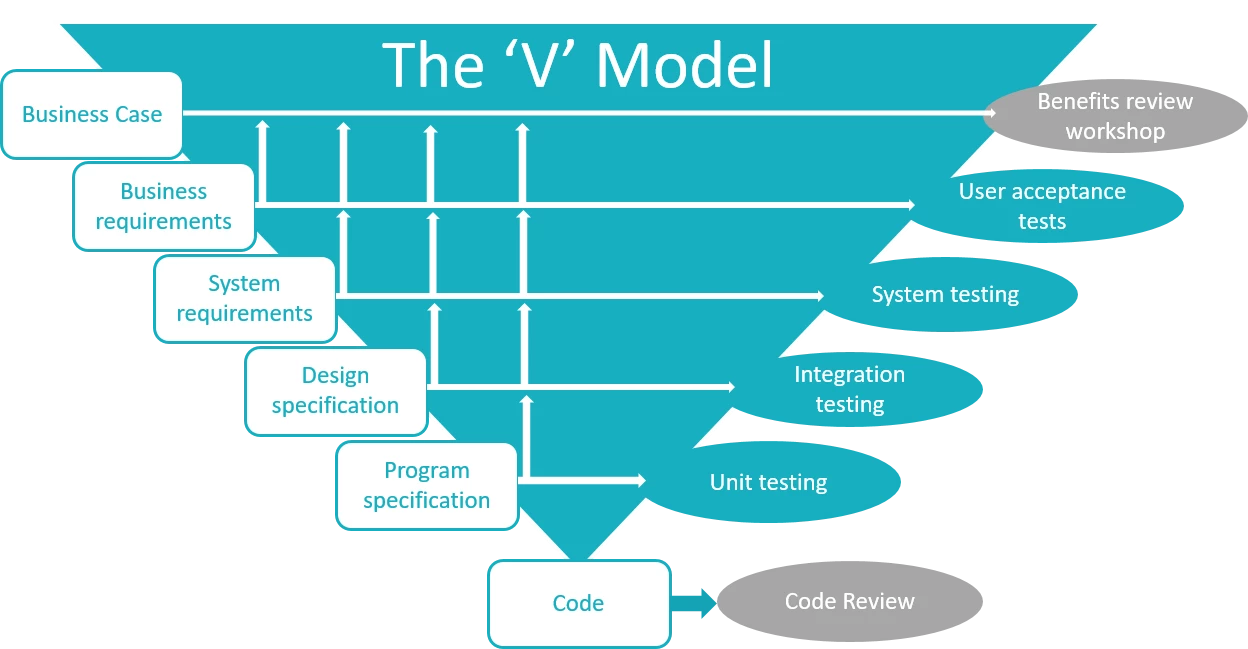
The triangular shape of the diagram indicates something else – the cost of fixing bugs will increase as you go up the levels. If a defect is found in code review, it’s relatively quick to fix: you’re already familiar with the code and in the process of changing it. However, if a bug is found during UAT it could take significantly longer: there might not be a developer available, they might not be familiar with the code, and another large round of testing might have to be repeated after the fix has been applied.
Always do as much testing as early as possible, which will allow fixes to be made with as little overhead as possible.
Each of the levels is covered in more detail later, but here is a short summary:
Code review
Code review is your first line of defence against bugs. It is a form of static testing where other developers will take a look at the code in order to spot errors and suggest other improvements.
Unit testing
Unit tests will be the most common type of test that you write as a developer. They are a form of dynamic testing and usually written as you’re working on the code. Unit tests will test smaller parts of the system, in particular parts that involve complicated logic.
Regression tests are commonly unit tests as well, as they target a very specific area.
Integration testing
Integration testing is also a form of dynamic testing, but instead covers the integration of different components in your system. This might be testing that all the parts of your application work together – e.g. testing your API accepts requests and returns expected responses.
System testing
System testing is another form of dynamic testing where the entire system is tested, in an environment as close to live as possible.
For example:
- Manual testing. Where tests are run manually by a person (could be a developer or a tester) instead of being automated.
- Automated system testing. These tests can be quite similar to integration tests except that they test the entire system (usually a test environment), not just the integration of some parts of it.
- Load testing. These are tests designed to check how much load a system can take. For example, if your system is a website then load tests might check how the number of users accessing it simultaneously affects performance.
User acceptance tests (UAT)
UAT is a form of dynamic testing where actual users of the software try it out to see if it meets their requirements. This may include non-functional requirements, like checking that it is easy and intuitive to use.
Benefits review
A benefits review takes place after the system is live and in use. It’s used to review whether the system has delivered the benefits it was made to deliver and inform future development.
Unit testing
When you write some code, how do you know it does the right thing? For small apps, the answer might be “run the application”, but that gets tedious quite quickly, especially if you want to make sure that your app behaves well in all circumstances, for example when the user enters some invalid text.
It’s even harder to test things by hand on a project with several developers – you might know what your code is supposed to do, but now you need to understand everything in the app or you might accidentally break something built by someone else and not even notice. And if you want to improve your code without making any changes to the behaviour (refactoring), you might be hesitant because you’re scared of breaking things that are currently working.
To save yourself from the tedium of manually retesting the same code and fixing the same bugs over and over, you can write automated tests. Tests are code which automatically run your application code to check the application does what you expect. They can test hundreds or thousands of cases extremely quickly, and they’re repeatable – if you run a test twice you should get the same result.
Types of automated test
Your app is made up of lots of interacting components. This includes your own objects and functions, libraries and frameworks that you depend on, and perhaps a database or external APIs:

When you test the app manually, you put yourself in the place of the user and interact with the app through its user interface (which could be a web page or a mobile screen or just the text on the screen of a command-line app). You might check something like “when I enter my postcode in this textbox and click the Submit button, I see the location of my nearest bus stop and some upcoming bus times”.

To save time, you could write an automated test which does pretty much the same thing. This is some code which interacts with the UI, and checks the response is what you expect:
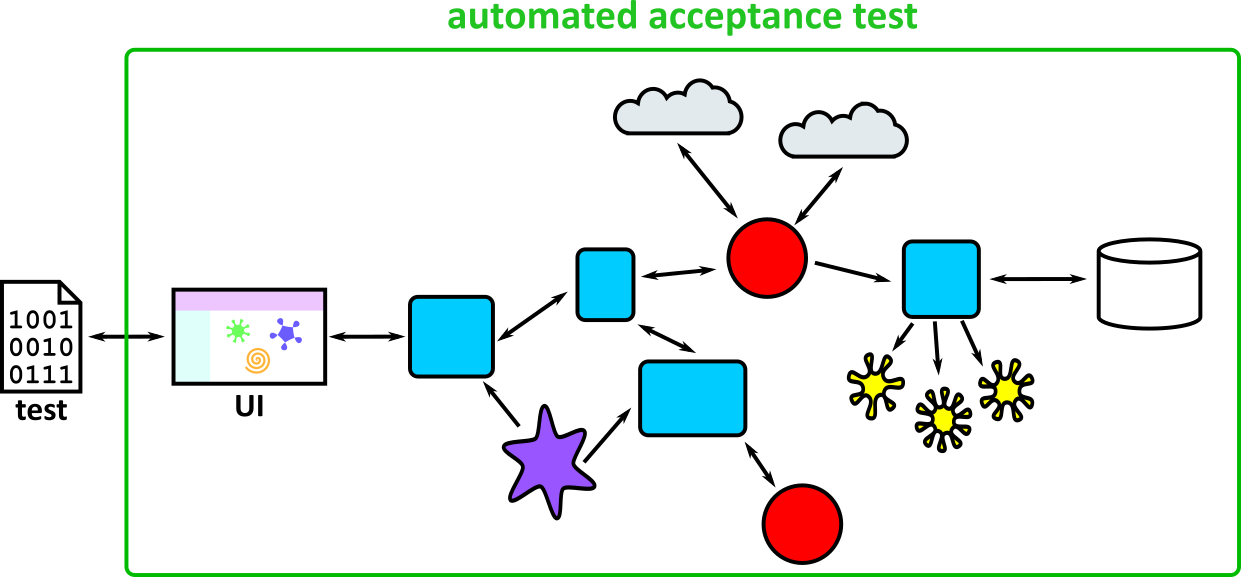
This is called an acceptance test, and it’s a very realistic test because it’s so similar to what a user would do, but it has a few drawbacks:
- Precision: You might not be able to check the text on the page exactly. For example, when we’re testing the bus times app it will show different results at different times of day, and it might not show any buses at all if the test is run at night.
- Speed: The test is quite slow. It’s faster than if a human checked the same thing, but it still takes a second or so to load the page and check the response. That’s fine for a few tests, but it might take minutes or hours to check all the functionality of your app this way.
- Reliability: The test might be “flaky”, which means it sometimes fails even though there’s nothing wrong with your app’s code. Maybe TFL’s bus time API is down, or your internet connection is slow so the page times out.
- Specificity: If the test fails because the app is broken – let’s say it shows buses for the wrong bus stop – it might not be obvious where the bug is. Is it in your postcode parsing? Or in the code which processes the API response? Or in the TFL API itself? You’ll have to do some investigation to find out.
This doesn’t mean that acceptance tests are worthless – it means that you should write just enough of them to give you confidence that the user’s experience of the app will be OK. We’ll come back to them in a later section of the course.
To alleviate some of these problems, we could draw a smaller boundary around the parts of the system to test to avoid the slow, unreliable parts like the UI and external APIs. This is called an integration test:
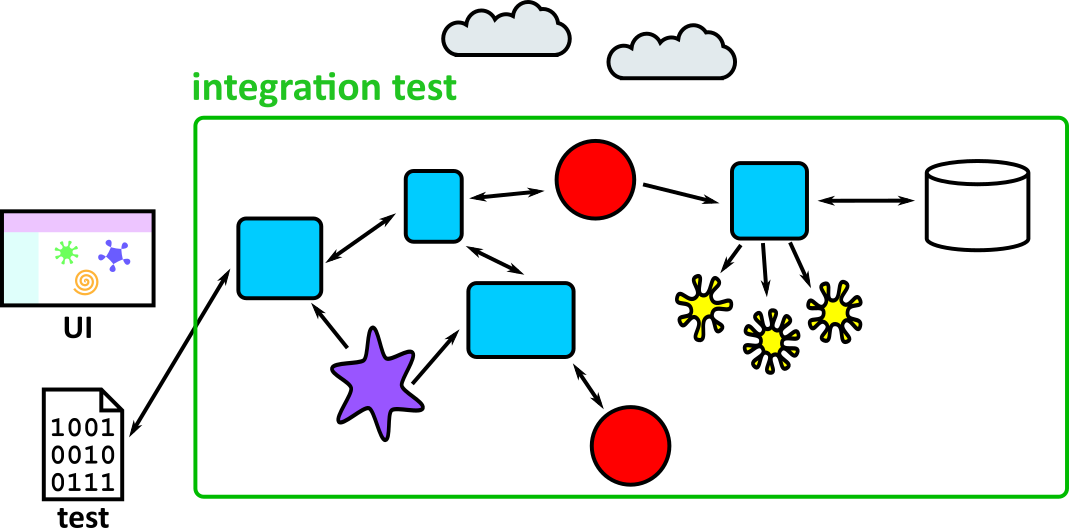
These tests are less realistic than acceptance tests because we’re no longer testing the whole system, but they’re faster and more reliable. They still have the specificity problem, though – you’ll still have to do some digging to work out why a test failed. And it’s often hard to test fiddly corners of the app. Let’s say your bus times app has a function with some fiddly logic to work out which bus stop is closest to your location. Testing different scenarios will be fiddly if you have to test through the whole app each time. It’d be much easier if you could test that function in isolation – this is called a unit test. Your test ignores all the rest of the app, and just makes sure this single part works as expected.

Unit tests are very fast because they don’t rely on slow external dependencies like APIs or databases. They’re also quicker to write because you can concentrate on a small part of the app. And because they test such a small part of the app (maybe a single function or just a couple of objects) they pinpoint the bug when they fail.
The trade-offs between the different types of tests means that it’s useful to write a combination of them for your app:
- Lots of unit tests to check the behaviour of individual components
- Some integration tests to check that the components do the right thing when you hook them together
- A few acceptance tests to make sure the entire system is healthy
Unit tests are the simplest, so we’ll cover them first.
Writing a test
Let’s imagine we’re writing a messaging app which lets you send encrypted messages to your friends. The app has to do a few different things – it has a UI to let users send and receive messages, it sends the messages to other users using an HTTP API connected to a backend server, and it encrypts and decrypts the messages.
You’ve written the code, but you want to add tests to catch bugs – both ones that are lurking in the code now, and regressions that a developer might accidentally introduce in future. The encryption and decryption code seems like a good place to start: it’s isolated from the rest of the code and it’s an important component with some fiddly logic.
It uses a Caesar cipher for encryption, which shifts all the letters by a given amount. It’s pretty insecure, but we’re pretty sure nobody will use this app to send really secret secrets…
The class we’re testing looks like this:
public class CaesarEncrypter
{
    public String encrypt(String message, int shift)
    {
        // Do the encryption...

        return encryptedMessage;
    }

    // ...
}
The encrypt function takes two parameters: a message containing the string we want to encode, and a shift which is an integer from 0 to 25 specifying how many letters to shift the message. A shift of 0 means no change. A shift of 1 means shift each letter by 1, so “hello” would become “ifmmp”, and so on.
We can test this function by passing in a message and a shift, and checking that it returns what we expect:
public class CaesarEncrypterTest
{
    @Test
    public void shouldShiftEachLetterInMessage()
    {
        CaesarEncrypter caesar = new CaesarEncrypter();
        String originalMessage = "abcd";
        int shift = 1;                                          // (1)

        String result = caesar.encrypt(originalMessage, shift); // (2)

        Assert.assertEquals("bcde", result);                    // (3)
    }
}
The code inside the test has three parts:
- The test setup, where we specify the input to the function
- A call to the function we’re testing
- An assertion that the function returned the value we expect
This structure is sometimes called Given/When/Then or Arrange/Act/Assert.
You might decide to move some of the variables inline, which is fine for short tests:
public class CaesarEncrypterTest
{
    @Test
    public void shouldShiftEachLetterInMessage()
    {
        CaesarEncrypter caesar = new CaesarEncrypter();
        String result = caesar.encrypt("abcd", 1);

        Assert.assertEquals("bcde", result);
    }
}
But especially for longer tests, making the separation between setup, action, and assertion makes the tests easier to follow.
The tests above are written using JUnit 4. There exist other testing frameworks; they might have slightly different syntax but the same concepts.
In the above example, the CaesarTests test class contains a single test, shouldShiftEachLetterInMessage, which we have given it a descriptive name. Doing so is important because it will help other developers understand what’s being tested; it’s especially important when the test breaks.
Creating a test project and running the tests
In Java, it’s customary to place the tests in a separate folder; this keeps them separate from the code they test. When creating a new Gradle project, it will usually create a separate test folder for you.
To create the Gradle project, at a command prompt navigate to a new folder in which you want the project to be created and run the following command.
gradle init --type java-application
You will be asked a series of questions, for most of which you can go with the default. However, in response to Select test framework: you should choose the option for JUnit 4.
Now, we can add the test class described in the previous section, assuming that there is an implementation of CaesarEncrypter and where the package is the same as the others in your project:
package training.caesarencryption;

import org.junit.Assert;
import org.junit.Test;

public class CaesarEncrypterTest
{
    @Test
    public void shouldShiftEachLetterInMessage()
    {
        CaesarEncrypter caesar = new CaesarEncrypter();
        String result = caesar.encrypt("abcd", 1);

        Assert.assertEquals("bcde", result);
    }
}
Then, click the Testing icon in the left-side navigation bar and then the “Run Tests” button (which looks like a double-play icon).
Modern IDEs have a lot of useful features to make your life easier. There are other ways to run unit tests as well! Explore and ask your colleagues.
If all goes well, this will show the output:
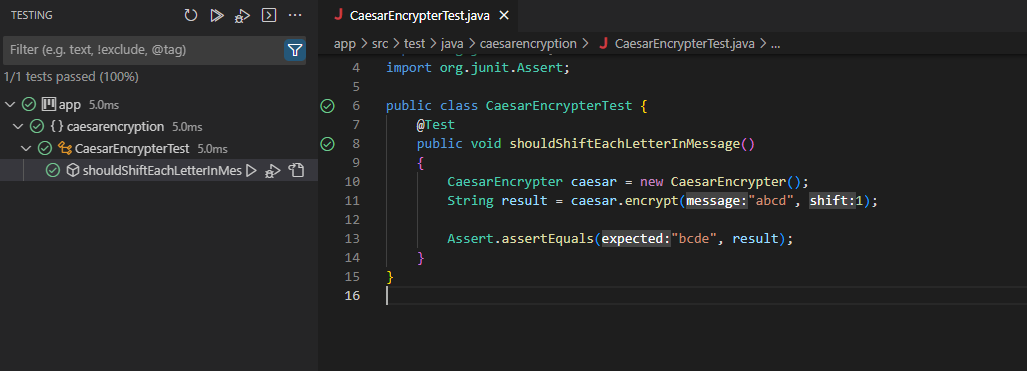
If all doesn’t go well, we might see this instead:
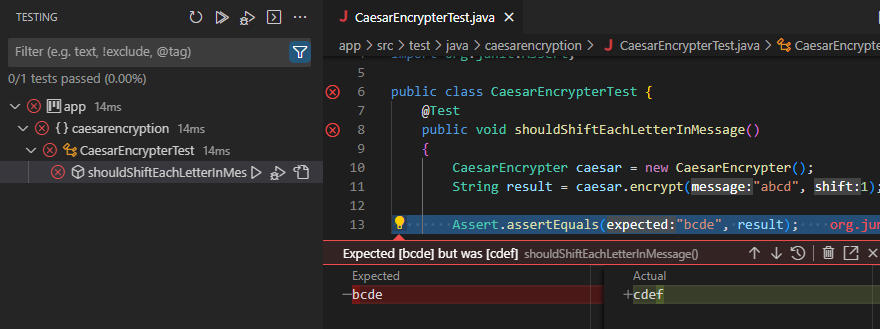
This takes us to the test that failed (shouldShiftEachLetterInMessage, in CaesarEncrypterTest) and shows how: it expected output bcde, and got cdef instead.
This gives us a starting point to work out what went wrong.
Choosing what to test
The main purpose of testing is to help you find bugs, and to catch bugs that get introduced in the future, so use this goal to decide what to write unit tests for. Some principles to follow are:
Test anything that isn’t really simple
If you have a function that’s as logic-free as this:
public String getBook()
{
    return book;
}
then it probably doesn’t need a unit test. But anything larger should be tested.
Test edge cases
Test edge cases as well as the best case scenario.
For example, in our encryption app, the test we wrote covered a simple case of shifting the letters by 1 place. But have a think about what else could happen:
- We need to check that letters are shifted around the alphabet. We’ve checked that ‘a’ can be converted to ‘b’, but not that ‘z’ is converted to ‘a’.
- What should happen if the shift is 0?
- Or negative? Or more than 25?
- Should the code throw an exception, or wrap the alphabet around so (for example) a shift of -1 is the same as 25?
- What should happen to non-alphabetic characters in the message?
You can probably think of other edge cases to check.
Writing good tests
When you’ve written a test, do a quick review to look for improvements. Remember, your test might catch a bug in the future so it’s important that the test (and its failure message) are clear to other developers (or just to future-you who has forgotten what current-you knows about this particular program). Here are some things to look for:
- Is the purpose of the test clear? Is it easy to understand the separate Given/When/Then steps?
- Does it have a good name? This is the first thing you’ll see if the test fails, so it should explain what case it was testing.
- Is it simple and explicit? Your application code might be quite abstract, but your tests should be really obvious. “if” statements and loops in a test are a bad sign – you’re probably duplicating the code that you’re testing (so if there’s a bug in your code there’s a bug in your test!), and it’ll be hard to understand when it fails.
- Does it just test one thing? You might have two or three assertions, but if you’re checking lots of properties then it’s a sign that you’re testing too much. Split it into multiple tests so that it’s obvious which parts pass and which parts fail.
- Does it treat the application as a black box? A test should just know what goes into a function and what comes out – you should be able to change the implementation (refactor) without breaking the tests. For example, in the encryption example above you didn’t need to know how the code worked to understand the test, you just needed to know what it should do.
- Is it short? Integration tests are sometimes quite long because they have to set up several different parts of the app, but a unit test should be testing a very small part. If you find yourself writing long tests, make sure you are testing something small. Think about the quality of your code, too – a messy test might mean messy code.
Test doubles
A test double is like a stunt double for a part of your application. To explain what they do and why you’d use them, let’s write some more tests for our encrypted messaging app.
Example: testing the messaging app
Here’s the structure of the application, with the messages sent between components:

We wrote a test of the encryption function, which is a helper function on the edge of the application:
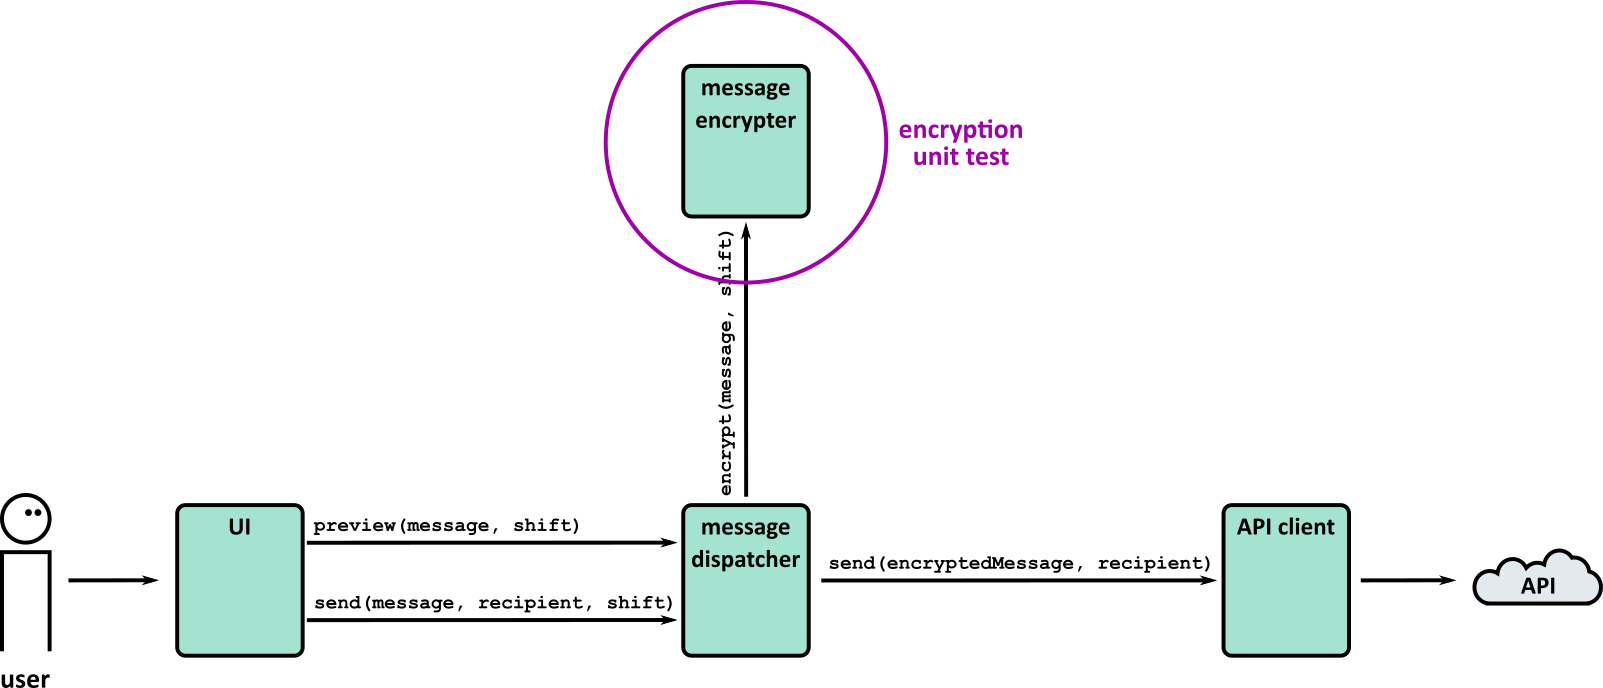
The test we wrote was very short:
@Test
public void shouldShiftEachLetterInMessage()
{
    CaesarEncrypter caesar = new CaesarEncrypter();
    String result = caesar.encrypt("abcd", 1);

    Assert.assertEquals("bcde", result);
}
This is a very simple test because it’s testing a function that has a very simple interaction with the outside world: it takes two simple parameters and returns another value. It doesn’t have any side-effects like saving a value to the crypt object, or calling an external API. The implementation of the encryption might be very complicated, but its interactions (and hence its tests) are simple.
But how do you test an object that has more complex interactions with other parts of the system? Take the message dispatcher, for example:

It has two methods:
preview, which returns a preview of the encrypted messagesend, which sends an encrypted message to the given recipient
The message dispatcher uses two dependencies to do this:
- It calls
encrypter.encryptto encrypt the message - It calls
apiClient.sendto send the encrypted message
Remember that when we write tests, we treat the object under test as a black box – we don’t care how it does something. We just care that what it does is the right thing. But we also want this to be a unit test, which means testing the message dispatcher in isolation, separate from its dependencies.
Let’s take each method in turn, and work out how to write unit tests for them.
Testing the preview method
This is what the preview method looks like:
public String preview(String message, int shift)
{
    return encrypter.encrypt(message, shift);
}
It’s very simple: it passes the message and shift value to the encrypt method and then returns the result.
The obvious way to test it is to pass in a message and test the result:
@Test
public void shouldPreviewTheEncryptedMessage()
{
    MessageDispatcher messageDispatcher = new MessageDispatcher(new CaesarEncrypter(), new ApiClient());
    String preview = messageDispatcher.preview("abcd", 4);

    Assert.assertEquals("efgh", result);
}
This is a reasonable test, in that if there’s something wrong with the MessageDispatcher then the test will fail, which is what we want.
There are, however, a few concerns that we might want to address:
- To write this test, we had to know that encrypting ‘abcd’ with a shift of 4 would return ‘efgh’. We had to think about encryption, even though we’re testing a class which shouldn’t care about the specifics of encryption.
- If someone introduces a bug into the
CaesarEncrypterso it returns the wrong thing, this test will break even though there’s nothing wrong withMessageDispatcher. That’s bad – you want your unit tests to help you focus on the source of the error, not break just because another part of the app has a bug. - If someone deliberately changes how encryption works, this test will also break! Now we have to fix the tests, which is annoying. This test (and the
MessageDispatcheritself) shouldn’t care how encryption is implemented.
Our unit test is not isolated enough. It tests too much – it tests the message dispatcher and the encrypter at the same time:
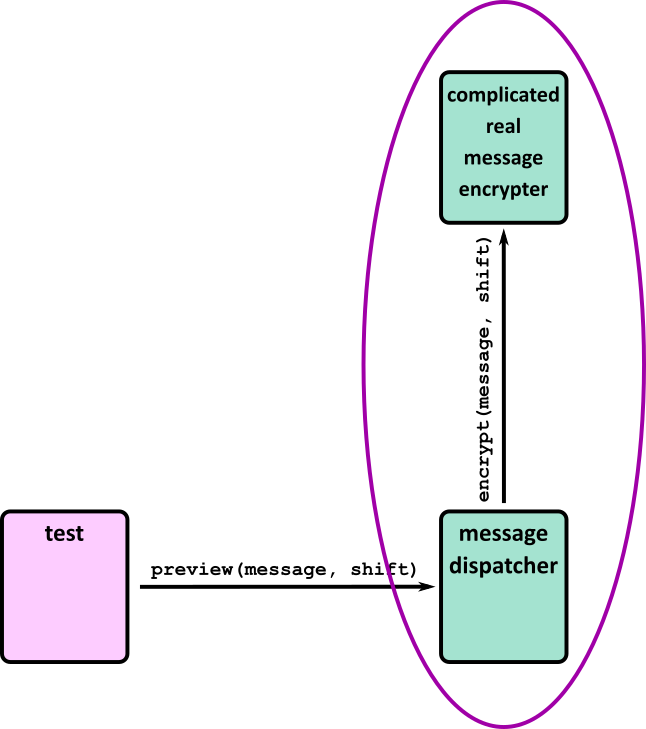
In order to test just the message dispatcher, we’re going to substitute in a different encryption function which returns a canned response that the test can predict in advance. Then it won’t have to rely on the real behaviour of encrypt. This will isolate the function being tested:
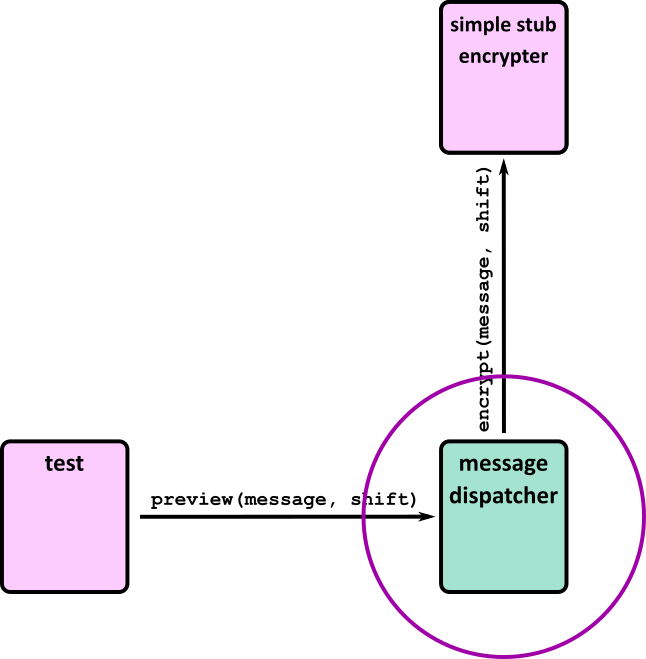
This is called a stub: unlike the real encrypt function, which applies encryption rules to the real message, the stub version returns the same thing every time.
To override the real behaviour with the stubbed behaviour, we can use a test double library. There are a few options – see below – but for now we’ll use Mockito. You can add this into your testing project as usual.
This is what the test looks like with the stub:
@Test
public void shouldPreviewTheEncryptedMessage()
{
    // Set up the encrypter stub
    CaesarEncrypter encrypter = Mockito.mock(CaesarEncrypter.class);
    Mockito.when(encrypter.encrypt("original message", 4)).thenReturn("encrypted message");

    MessageDispatcher messageDispatcher = new MessageDispatcher(encrypter, new ApiClient());
    String preview = messageDispatcher.preview("original message", 4);

    Assert.assertEquals("encrypted message", preview);
}
The test is now just testing MessageDispatcher.preview. It doesn’t depend on the real behaviour of CaesarEncrypter.encrypt.
You might have noticed that the test is longer and a little bit harder to follow than before because we have to configure the stub. Using a stub is a trade-off: it makes the test more complicated, but it also makes it less dependent on unrelated classes.
The stubbed return value “encrypted message” is nothing like the real encrypted message “efgh” we tested in the previous version of our test. This is intentional: it makes it clear that it’s a dummy message rather than a real one, and it makes the failure message easier to understand if the test fails.
Something else to notice is that although we configure the stub to return a particular value, we don’t verify that the stub is called. Whether the stub is called (or how many times it’s called) is an implementation detail which shouldn’t matter to our test.
Testing the send method
The send method encrypts a message and then passes it on to an API client:
public void send(String message, String recipient, int shift) {
    String encryptedMessage = encrypter.encrypt(message, shift);
    apiClient.send(encryptedMessage, recipient);
}
This method does not return anything. Instead, it performs an action (sending a message to the API client). To test it, we will have to check that the API client receives the message. The test will look something like this:
// Given I have a message, a shift value and a message recipient
// When I send the message to the messageDispatcher
// Then the API should receive an encrypted message with the same message recipient
We also need to make sure that the send function does not call the real API client object, because it will call the API and we might accidentally send someone a message every time we run the tests!
Just as we replaced the encrypt function with a stubbed implementation when we tested preview, here we need to replace apiClient.send with a dummy version. But this dummy send method has an extra role to play – we need to check that it was called correctly.
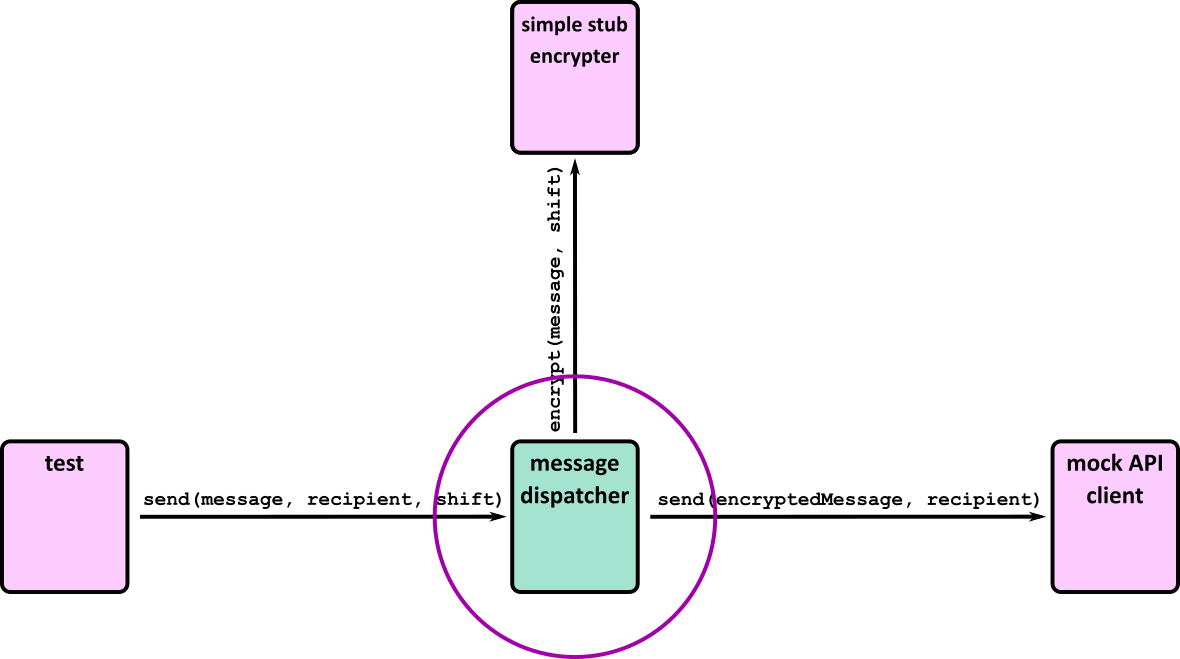
This type of test double is called a mock: we use them to check that the code under test sends the expected commands to its dependencies.
Again, we’ll use the Mockito library to create the mock. Here’s the full test:
@Test
public void shouldSendTheEncryptedMessage()
{
    // Set up the encrypter stub
    CaesarEncrypter encrypter = Mockito.mock(CaesarEncrypter.class);
    Mockito.when(encrypter.encrypt("original message", 4))
            .thenReturn("encrypted message");

    // Create the api client mock
    ApiClient apiClient = Mockito.mock(ApiClient.class);

    MessageDispatcher messageDispatcher = new MessageDispatcher(encrypter, apiClient);
    messageDispatcher.send("original message", "alice", 4);

    // Verify the mock was called as expected
    Mockito.verify(apiClient).send("encrypted message", "alice");
}
The test creates a mock version of the API client and when the fake version of apiClient.send is called it won’t be making a real call to the API.
Instead of an assertion about the result of the function, the last step of the test is to verify that the mock was called correctly, i.e. that the code under test sends an encrypted message.
Types of test double
We introduced stubs and mocks above, but there are a few other types of test double that are worth knowing about.
Don’t get too hung up on these names. People don’t use them consistently, and some people call every type of test double a “mock”. It’s worth being aware that there is a distinction, though, so that you have a range of tools in your testing toolbox.
Stub
A function or object which returns pre-programmed responses. Use this if it’s more convenient than using a real function and to avoid testing too much of the application at once. Common situations where you might use a stub are:
- the real function returns a randomised result
- the real function returns something time-dependent, such as the current date – if you use the real return value, you might end up with a test that only passes at certain times of day!
- it’s tricky to get the real object into the right state to return a particular result, e.g. throwing an exception
Mock
Use this when you need to make sure your code under test calls a function. Maybe it’s to send some data to an API, save something to a database, or anything which affects the state of another part of the system.
Spy
A spy is similar to a mock in that you can check whether it was called correctly. Unlike a mock, however, you don’t set a dummy implementation – the real function gets called. Use this if you need to check that something happens and your test relies on the real event taking place.
Fake
A fake is a simpler implementation of the real object, but more complex than a stub or a mock. For example, your tests might use a lightweight in-memory database like SQLite rather than a production database like PostgreSQL. It doesn’t have all the features of the full thing, but it’s simpler to use in the tests. You’re more likely to use these in an integration test than a unit test.
Test double libraries
The examples above used Mockito to create mocks and stubs. There are plenty of other good libraries with slightly different syntax and naming conventions but the core ideas should be the same.