DuckDuckGoose
- Version control using Git
- Pull requests
- Following designs and specifications
- Continuous integration using GitHub Actions
- VSCode
- Git
- GitHub
- PostgreSQL (version 15)
- pgAdmin 4 (version 7)
- Node (version 18)
- Mocha testing library (version 10.2.0)
DuckDuckGoose is a small in-development social media site with the following requirements:
- Users can view all other users’ posts (or honks) on the Honks page
- Users can view a list of all other users on the Users page
- Users can view all an individual user’s honks on a dedicated individual user’s page
- Users can create their own honks on the honk creation page
- Users can follow other users
The development work for most of these changes has already been completed by your “colleagues” and is sitting on different branches. It’s your job to merge these changes into the main branch – dealing with any merge conflicts on the way.
Git
Version Control Software (VCS)
Version Control Software allows you to keep track of and switch between multiple copies of your work. In a programming setting, version control is used to track and manage all changes to the source code of projects. By doing this, developers can revisit earlier versions of the codebase or have multiple different copies that can be worked on in parallel. Programmers can leverage these tools to make it easier to track down bugs, record this history of a project and work more effectively with other developers.
Git is the industry standard for VCS in software development.
What is Git?
Git is a Distributed Version Control System. So Git does not necessarily rely on a central server to store all the versions of a project’s files. Instead, every user clones a copy of a repository (a collection of files) and has the full history of the project on their own hard drive. This clone has all of the metadata of the original while the original itself is stored on a self-hosted server or a third party hosting service like GitHub.
Git helps you keep track of changes and synchronise code between multiple developers.
Git Workflow
There are four fundamental elements in the Git workflow: working directory, staging area, local repository, remote repository.
If you consider a file in your working directory, it can be in three possible states.
- It can be staged – the files with changes are marked to be committed to the local repository but not yet committed.
- It can be modified – the files with the changes are not yet stored in the local repository.
- It can be committed – the changes made to the file are stored in the local repository.
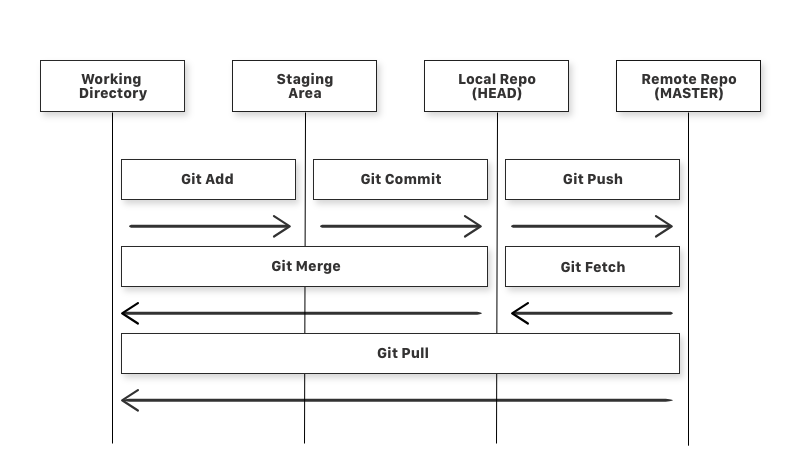
You can move code between these different parts of the workflow with the following commands.
git add– add a file that is in the working directory to the staging area.git commit– add all files in the staging area to the local repository.git push– add all files in the local repository to the remote repository.git fetch– get files from the remote repository to the local repository but not into the working directory.git merge– get files from the local repository into the working directory.git pull– get files from the remote repository directly into the working directory. It is equivalent to agit fetchand agit merge.
Branching
Git stores data as a series of snapshots. When you make a commit, Git stores an object with a pointer to the snapshot of your staged changes – this object also contains a pointer to the commit(s) that came directly before: its parent(s).
A branch is just a movable pointer to a commit. The default branch name in Git is main (although you may seem some older repositories use master), each time you make a commit you move forward the main branch.
You can create a new branch with git branch <name>. This creates a new movable pointer to the commit that you are currently on, allowing you to develop new features or fix bugs without affecting main. Once the feature has been implemented, or the bug fixed, you can merge the branch back into main.
A great way to learn about git branching is with this interactive tutorial.
Continuous Integration (CI)
During development cycles, we want to reduce the time between new versions of our application being available so that we can iterate rapidly and deliver value to users more quickly. To accomplish this with a team of software developers requires individual efforts to be merged together for release. This process is called integration.
Long periods of isolated development provide lots of opportunities for code to diverge and for integration to be a slow, painful experience. Ideally new code should be continuously integrated into our main branch.
Continuous integration is the practice of merging code regularly and having automated checks in place to catch and correct mistakes as soon as they are introduced.
In practice, for this to be viable we need to make integration and deployment quick and painless; including compiling our application, running our tests, and releasing it to production. We need to automate all these processes to make them quick, repeatable and reliable. It should also handle multiple contributors pushing changes simultaneously and frequently.
Why do we want it?
CI has many potential benefits, including reducing the risk of developers interfering with each others’ work and reducing the time it takes to get code to production.
Having multiple authors work in parallel on the same codebase introduces the risk of different changes being made to the same area of code at the same time. Sometimes the two sets of changes are fundamentally inconsistent with each other – this results in a merge conflict which has to be manually resolved. Regular code merges reduce the risk of two developers changing the same code at the same time. This reduces both the number and the severity of merge conflicts.
CI also speeds up development. Merging your code changes into the main branch regularly makes your code changes available to other developers as soon as possible so they can build upon your work. It also ensures that the main branch is as up-to-date as possible.
Automated testing on the main branch is more meaningful; it is testing a release candidate, rather than each feature in isolation.
How do we do it?
Merging code to main regularly isn’t without problems. With a busy team your main branch will be in a constant state of flux. It is very likely that different sets of changes will not work together as expected; or break existing functionality. QA will find some bugs but no manual process will be able to keep up with a team that may be merging new branches multiple times per day.
How do you keep on top of it? How can you be confident that the code still works?
Above all, communication is key. Coordinating the changes you are making with the rest of your team will reduce the risk of merge conflicts. This is why stand ups are so important in agile teams.
You should also have a comprehensive, automated test suite. Knowing that you have tests covering all your essential functionality will give you confidence that your new feature works and that it hasn’t broken any existing functionality.
Being able to run your tests quickly every time you make a change reduces the risks of merging regularly.
Continuous Delivery (CD)
Continuous delivery (CD) is about building pipelines that automate software deployment.
Software deployment can be a complex, slow and manual process, usually requiring expert technical knowledge of the production environment to get right. That can be a problem, as the experts with this knowledge are few, and have better things to do than the tedious, repetitive tasks involved in software deployment.
Slow, risky deployments have a knock-on effect on the rest of the business; developers become used to an extremely slow release cycle, which damages productivity. Product owners become limited in their ability to respond to changing market conditions and the actions of competitors.
Continuous delivery automates deployment. A good CD pipeline is quick, and easy to use; enabling a product owner to deploy software at the click of a button.
Continuous delivery pipelines are often built on top of CI pipelines: if your code passes all the tests, the CI/CD platform builds/compiles/bundles it into an easily deployable build artefact. At the click of a button, the CD pipeline can deploy the artefact into a target environment.
A CI pipeline tells you if your code is OK and gives you a processed version of your source code that is ready for deployment. But a CI pipeline does not deploy software. Continuous deployment automates putting that build artefact into production.
Why do we want it?
Continuous delivery pipelines automate deploying your code. This approach has many benefits. Releases become:
- Quicker. No time is wasted performing tedious manual operations. This lead to more frequent deployments, increasing developer productivity.
- Easier. Deployment can be done through the click of a button, whereas more manual methods might require a deployer with full source code access, a knowledge of the production environment and appropriate SSH keys.
- More Efficient. Continuous delivery pipelines free team members to pick up more creative, user-focused tasks where they can deliver greater value.
- Safer. Releases become more predictable; you can guarantee that all releases are performed in the same way.
- Happier. Deploying code manually is repetitive and tedious work. Few people enjoy it, and even fewer can do it again and again without error.
Automated deployments reduce the barrier to releasing code. They let teams test out ideas and respond to changing circumstances fostering creativity, positivity and product ownership as teams feel that the system enables, rather than restricts, what they are able to do.
Continuous delivery works well in environments where development teams need control over if and when something gets deployed. It’s best suited to business environments that value quick deployments and a lightweight deployment process over extensive manual testing and sign-off procedures.
What makes it hard?
Implementing continuous delivery can be a challenge in some organisations.
Product owners must rely on automated processes for testing and validation, and not fall back to extensive manual testing cycles and sign-off procedures. Continuous delivery does involve human approval for each release (unlike continuous deployment), but that approval step should be minimal, and typically involves checking the tests results look OK, and making sure the latest feature works as intended.
Continuous delivery requires organisation-wide trust that an automated validation process is as reliable as a human testing & sign-off process. It also requires development teams that fulfil this promise, through building strong test suites.
How do we do it?
Teams must be confident in the quality of their testing. You need to trust that every code version that passes your automated tests is a viable and safe release candidate. This requires significant effort.
Continuous delivery increases the importance of high-quality test code and good test coverage. You need strong test suites at every level, and should also automate NFR testing. You also need to run these tests frequently and often, ideally as part of a CI pipeline.
DevOps engineers (or software developers taking this role) are central to this effort. They set up the automated testing infrastructure and CI/CD pipeline, and monitor code after the release. Releases will fail, and not always in obvious ways. It’s up to these professionals to set up appropriate monitoring, logging and alerting systems so that teams are alerted promptly when something goes wrong, and provided with useful diagnostic information at the outset.
Exercise
Running the DuckDuckGoose app and tests
You’ll find the code in this repo. Follow the instructions laid out in the README to get the project up and running.
At this point, not many of the features have been merged into the main branch. But users should be able to register and log in.
Looking at the repo, you’ll notice that the code files end in .ts rather than .js. The project is written in TypeScript, which is a layer on top of JavaScript; it’s quite similar but ask your trainer if you have any trouble.
Setting up Continuous Integration (CI)
Continuous integration acts as a quality control layer for code before it makes it to the main branch. It automatically performs a list of predefined checks each time candidate code is ready to be merged, which removes the need to rely solely on manual processes.
We’ll go into more detail on continuous integration later in this exercise, but for now you should just follow these steps. Our continuous integration will be set up using GitHub Actions.
- Create a folder at the root of the repository called
.github - Within this folder, create another folder called
workflows - Within this folder, create a YAML file with any name you like. For example, you could call it
continuous-integration.yml
We want to configure GitHub Actions to reserve a machine and run our tests on it each time a pull request is raised. This allows us to check that the code is safe to merge (i.e., it doesn’t break any existing tests). Take a look at the documentation for guidance on how to do this. You should end up with a file that looks a bit like the following:
name: continuous-integration
on: ...
jobs:
  test:
    runs-on: ubuntu-latest
    steps:
      - uses: actions/checkout@v3
      - run: ...
Merging new features
Now that we’ve set up our project, we can start to merge in the features.
Honks page
Most importantly for our app, we want users to be able to see others’ honks. Your colleague has completed this functionality and their work currently resides on a branch called DDG1-honks-page. Unfortunately, they’ve just left to go on a group holiday with some of your other colleagues before getting chance to merge their work into the main branch. You need to raise and complete a pull request to get this resolved.
Users page
We also want users to be able to see a list of other users. Another colleague has completed this functionality and their work currently resides on a branch called DDG2-users-page. Unfortunately, they are also on the group holiday at the moment, and they didn’t get chance to merge their work into the main branch either. Once again, you need to raise and complete a pull request to get this resolved, but be sure not to overwrite any of the work from the previous pull request.
Individual user pages
We want users to be able to view honks by a specific user on a dedicated page. Another colleague has been working on this functionality and their work currently resides on a branch called DDG3-user-pages. Unfortunately, they are also on the group holiday at the moment, and they didn’t quite manage to get their work finished and merged into the main branch. There are therefore three things you need to do here:
- Raise a pull request with the work so far
- Complete the final missing feature in this part of the specification and push it
- Complete the pull request once the CI checks pass
The missing feature is described as follows:
When the dedicated page for a non-existent user is visited, a 404 Not Found Error should be raised (rather than a 500 Internal Server Error).
Once again, be sure not to overwrite any of the work from previous pull requests.
Honk creation page (stretch goal)
We want users to be able to create honks of their own. Another colleague has been working on this functionality and their work currently resides on a branch called DDG4-honk-page. Unfortunately, they are also on the group holiday at the moment, and there was a small bug in their work that they didn’t quite manage to fix in order to get their work finished and merged into the main branch. There are therefore three things you need to do here:
- Raise a pull request with the work so far
- Fix the bug
- Complete the pull request once the CI checks pass
The bug is described as follows:
When attempting to add a new honk to the database, this change doesn’t seem to be persisted and the honk doesn’t appear on the honks page.
Once again, be sure not to overwrite any of the work from previous pull requests.
Follow functionality (stretch goal)
We want users to be able to follow other users. This functionality crops up on quite a few of the pages we have worked on so far. Three colleagues who are currently on the group holiday have chipped in to creating this functionality, and their work currently resides on a branch called DDG5-follow-functionality. They decided to copy and paste the work they’d done from each of their original branches across to this new branch and add the follow functionality on top of this. All this work needs to be merged into the main branch, so you need to raise and complete a pull request to get this resolved.
There is the potential for some quite extensive merge conflicts in this case, so once again, be sure not to overwrite any of the work from previous pull requests.