Further HTML and CSS
Every website consists of three pieces working together to produce the page:
- HTML (HyperText Markup Language) defines the content of the page. It defines the text that should appear, and the logical structure of that text. It can be thought of as the skeleton of the web page.
- CSS (Cascading Style Sheets) defines the layout of the page. It’s here that the bare-bones skeleton is turned into something beautiful. For example, while HTML defines that some piece of text is a heading, it’s CSS that says headings should be displayed in bold red.
- JavaScript is a programming language that allows dynamic behaviour on the web page – things that happen in your web browser (for example, menus that pop up when you hover over them, and much more). It’s what brings static websites to life.
These should all be familiar, but this topic will explore them in more detail.
Example
As a demonstration, here is the same small page, built up from the three pieces:
HTML

With just HTML, the basic structure is in place.
HTML + CSS

With HTML and CSS, the content is styled.
HTML + CSS + JavaScript

By adding JavaScript, the content is interactive.
Online resources
The Mozilla Developer Network has a huge number of resources for web development, which are all free and openly editable. This will likely become your first stop for any question about HTML, CSS or JavaScript.
Since these are all very large topics, we won’t cover them in detail, but MDN provide a good series of tutorials.
HTML
As a primer, read Getting Started with HTML.
There are many other HTML topics that are valuable to read, but the following are fundamental:
CSS
It will take time and experience to become proficient with CSS. If you are totally unfamiliar with it, begin by reading the Introduction to CSS.
After that basic grounding, read through the following standard guides:
- Syntax
- Simple Selectors
- Pseudo-classes
- Combinators
- Values and Units
- Cascade and Inheritance
- The Box Model
The above should give an abstract understanding of how CSS works, but they do not include many of the properties required to actually lay out your page.
There are a lot of these properties – about 500 or so, and developers are not expected to memorise them all.
The continuation of the MDN tutorial covers various groups of properties, which should be read as appropriate when tackling the main exercise. Once the syntax and model are understood, the best way to learn is to read about different selectors & properties is as they are needed – over time they will become more familiar, but even experienced developers will need to look up the details from time to time.
Developer tools
When working with HTML/CSS/JS, the browser developer tools are extremely valuable.
Go to a website and open up the Developer Tools. You can do this on most web browsers by right clicking somewhere on the page and selecting ‘Inspect’, or using an appropriate shortcut (usually F12 or Ctrl-Shift-I).
A side bar should pop up showing HTML and CSS in it. The main area shows the HTML structure of the page, (under “Elements” or “Inspector”); it can either be navigated by hand, or the element picker may be used to select an element on the page and bring it into view in the developer tools window.
Once an element is selected, the tools will display all the CSS rules being applied to that element on the right hand side:
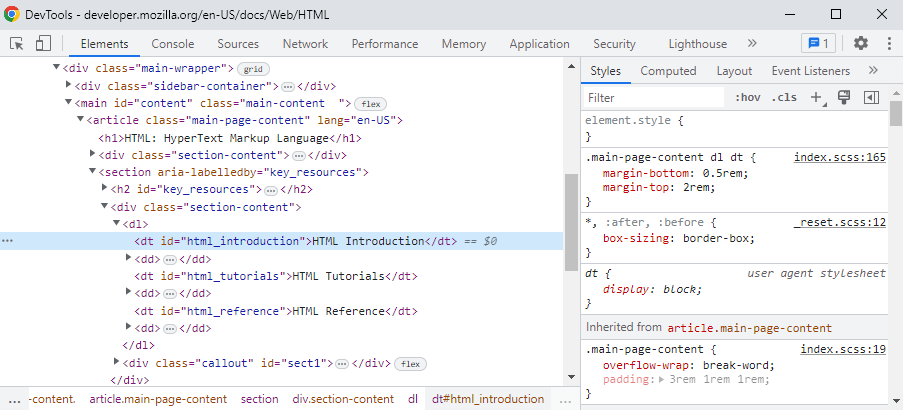
This assists in diagnosing why an element is (or isn’t) displaying in a certain way. Furthermore, both the HTML and CSS can be edited directly using the developer tools; in this way it is possible to rapidly adjust and test the structure and rules of the page before modifying the original.
Other useful features of the developer tools include:
- Console – the JavaScript console will print any log messages or errors
- Sources (Debugger in Firefox) – will show you the scripts running on your page, and permit setting breakpoints and debugging
- Network – shows all the HTTP requests being made by the browser, making it possible to diagnose broken requests
Further reading
Explore MDN
There is a large number of other MDN tutorials and documentation that give deeper and wider understanding of web technologies. Even for those with some experience of web development, there are many advanced topics to cover.
Flexbox
One particularly important set of properties are those involved in Flexbox. This supports arranging elements in a very flexible and powerful way, it is a very powerful way of producing different layouts.
As well as the MDN documentation above, this Flexbox Reference is recommended for its exploration of exactly how the properties work.
Internet Explorer’s implementation of Flexbox still has numerous bugs – be sure to test carefully if that browser needs to be supported.
Other challenges
The Wikiversity CSS challenges is an excellent resource, although the difficulty level increases rapidly. Even for developers who regularly work with CSS will benefit from this site.
CSS Pre-processing
CSS is a very powerful tool for styling, but it can be repetitive and verbose. It is painful to write and difficult to maintain or extend; this is a serious problem for a language that is required for any reasonable web page.
The most common solution to this is developing in an extension to CSS which provides additional features to make this possible. Since browsers only support plain CSS, these languages must be compiled before being used – referred to as “pre-processing”.
The two major CSS pre-processors are SASS and Less, and they are very similar. SASS is used more widely so there may be more helpful articles online, although there are not strong reasons to choose one over the other.
Therefore the focus of this topic is on using SASS, but instructions for Less are included for comparison.
The remainder of this topic recommends using the command line compilers for SASS and Less in order to become familiar with them. Both can be installed using npm (Node Package Manager).
SASS – Syntactically Awesome Style Sheets
The official SASS reference contains very good resources and documentation. The remainder of this topic will explore the major functionality that it provides.
The SASS command line compiler can be installed using the command npm install -g sass
To demonstrate how SASS is compiled into CSS, write the following simple SASS in a new file test.scss:
$widgetcolor: blue;

.widget {
  color: $widgetcolor;

  div {
    font-weight: bold;
    border-color: $widgetcolor;
  }
}
After compiling it by running sass test.scss test.css at the command line, there should be a new file test.css containing the following standard CSS (although the actual output may not be formatted identically):
.widget {
  color: blue;
}
.widget div {
  font-weight: bold;
  border-color: blue;
}
Advanced: SASS or SCSS?
SASS supports two syntaxes: .scss and .sass.
SCSS is an extension of CSS, meaning any valid CSS is also valid SCSS. This allows for seamless transition from writing CSS to SCSS – for both existing codebases and developer knowledge.
SASS is an older indentation-based format that omits semicolons and braces. The example above would look like:
$widgetcolor: blue

.widget
  color: $widgetcolor

  div
    font-weight: bold
    border-color: $widgetcolor
Some consider this cleaner and more concise, but the lack of compatibility with CSS generally makes it a less desirable choice.
Less
See the official Less reference for guidance on how to use Less.
The Less command line compiler can be installed using the command npm install -g less
Write the following simple Less code into new file test.less:
@widgetcolor: blue;

.widget {
  color: @widgetcolor;

  div {
    font-weight: bold;
    border-color: @widgetcolor;
  }
}
Compile it using lessc test.less test.css and you should see a new file test.css containing standard CSS that is equivalent to that which was generated from the earlier SASS file.
Useful CSS pre-processing features
Nesting
Nesting makes it possible to organise CSS rules using a similar hierarchy to the HTML. This can avoid duplication of selectors when a range of rules apply within a subtree of those selectors.
For example, suppose that some styles need to apply only to elements in the subtree of a widget component, with a widget class. By nesting the rules applicable inside the widget selector, then those rules will only apply within a widget:
.widget {
  div {
    margin: 0 10px;
  }

  ul.listicle {
    display: flex;

    li {
      color: red;
    }
  }
}
Predict the CSS that will be generated from the SASS above, then test it.
Excessive nesting can make the resulting selectors over-qualified and tightly coupled to the specific HTML structure. This is considered an anti-pattern, and makes the SCSS difficult to maintain.
Parent selector
When nesting, it can sometimes be useful to access the parent selector (for example, to apply a CSS pseudo-class); this can be done using &:
a {
  color: #020299;

  &:hover {
    color: #3333DD;
    background-color: #AEAEAE;
  }
}
Variables
Variables make it possible to reuse values throughout the CSS. This can make it easy to adjust the look of a site that has been defined with a few key branding variables.
SASS variables are declared with $ symbols, and are simply substituted when compiled:
$primary-color: #ff69b4;
$font-stack: Helvetica, sans-serif;

.gizmo {
  background-color: $primary-color;
  font: 24px $font-stack;
}
It should be clear what CSS this will generate, but it can be compiled to confirm.
Partials and imports
In the same way that application code is structured across multiple files, it is valuable to structure your CSS in a comparable manner. Partials can be used to store logically distinct pieces of CSS in separate files.
Each partial is named with an underscore to signify that it should not generate a separate CSS file:
Consider a partial file called _widget.scss:
.widget {
  background-color: yellow;
}
with main file main.scss:
@use 'widget';

body {
  font-family: Helvetica, sans-serif;
}
The above will generate a single CSS file containing all the styles.
It isn’t necessary to include the extension or the underscore in the import – SASS will deduce it.
Note also that the @use command has replaced the deprecated @import. If you are using a different version of SASS you may need to use @import instead.
Mixins
Consider the requirement to have a set of CSS rules that need be written several times, perhaps with slightly different parameters each time.
Mixins make it possible to define snippets for reuse throughout the CSS:
@mixin fancy-button($color) {
  color: $color;
  border: 1px solid $color;
  border-radius: 3px;
  padding: 2px 5px;
}

.accept-button {
  @include fancy-button(green)
}

.reject-button {
  @include fancy-button(red);
}
Extends
Similar to mixins, it is possible to extend CSS classes to have a form of inheritance. As well as extending existing CSS classes, it is possible to extend a “placeholder” class created using % (which will never be rendered explicitly).
%base-widget {
  padding: 3em;
  display: flex;
}

.important-widget {
  @extend %base-widget;
  font-weight: bold;
}

.disabled-widget {
  @extend %base-widget;
  color: gray;
  cursor: not-allowed;
}
The difference between the above and an (argument-less) mixin is how they are compiled:
- Mixins just inline their content, so are very simple to reason about.
- Extended classes add the selectors to the original definition, so the example above compiles to the following:
.important-widget, .disabled-widget {
  padding: 3em;
  display: flex;
}

.important-widget {
  font-weight: bold;
}

.disabled-widget {
  color: gray;
  cursor: not-allowed;
}
Care should be taken when extending classes – if they are used in other nested styles it is very easy to generate a large number of unintended selectors. In general, mixins should be favoured for repeated styles.
Operators and functions
There are a number of standard operators and functions available at compile tine, and as well as the ability to define custom functions.
@use "sass:math";

// Simple numeric operations
$gutter-width: 40px;
$small-gutter-width: math.div(40px, 2);

// Color operations
$primary-color: #020576;
$primary-highlight: lighten($primary-color, 50%);

// Custom function
@function gutter-offset($width) {
  @return $gutter-width + math.div($width, 2);
}

.widget {
  position: absolute;
  left: gutter-offset(100px);
  color: $primary-highlight;
}
If you are using a different version of SASS from that provided by npm, it may have in-built functions instead of standard modules like sass:math. If so, you can remove the @use statement from the code above and replace the math.div calls by simple division expressions such as $width / 2.
Numerical calculations preserve units, and the SASS compiler will emit an error if an invalid unit would be produced in the final CSS (e.g., height: 4px * 2px).
A full list of the functions provided by standard modules can be found in the SASS Modules Documentation; it is not necessary to be familiar with them for most simple styling.
Advanced: Further SASS features
SASS supports more advanced features (for example, control flow structures), but these are typically not required and will likely just add complexity to your code.
More details can be found in the Sass Reference.
SASS in practice
The pre-processor means that there is an intermediate step before the CSS that’s been written can be used. This slightly complicates the process, but this is more than justified by the benefit of not being restricted to plain CSS.
Production
As with all compiled code, it is best practice to avoid checking-in the compiled CSS; instead the SASS/Less code is checked in and then built before deployment. This is comparable to checking in Java source code rather than the compiled Jar.
The compilation step may involve simply running the command line tool at a sensible point or using an appropriate plugin for the environment (e.g. for NPM, Grunt, Webpack, Maven etc.)
Development
During development it is inefficient to run a command to compile the CSS every time the developer wants to check the results. Getting styling right often requires a lot of tweaking, so the process should be as streamlined as possible.
One solution to this is ‘watching’ the source files, which involves automatically compiling them as they are modified.
SASS has a ‘watch’ mode built-in:
sass --watch test.scss:test.css
The command above will run until killed, recompiling whenever test.scss is modified.
However the simplest solution when using an IDE is to find an appropriate plugin, for example:
- Visual Studio Code: Live Sass Compiler
- IntelliJ: Compiling Sass, Less and SCSS to CSS